change time Seat Altea XL 2010 Owner's Manual
[x] Cancel search | Manufacturer: SEAT, Model Year: 2010, Model line: Altea XL, Model: Seat Altea XL 2010Pages: 312, PDF Size: 8.41 MB
Page 64 of 312
Cockpit
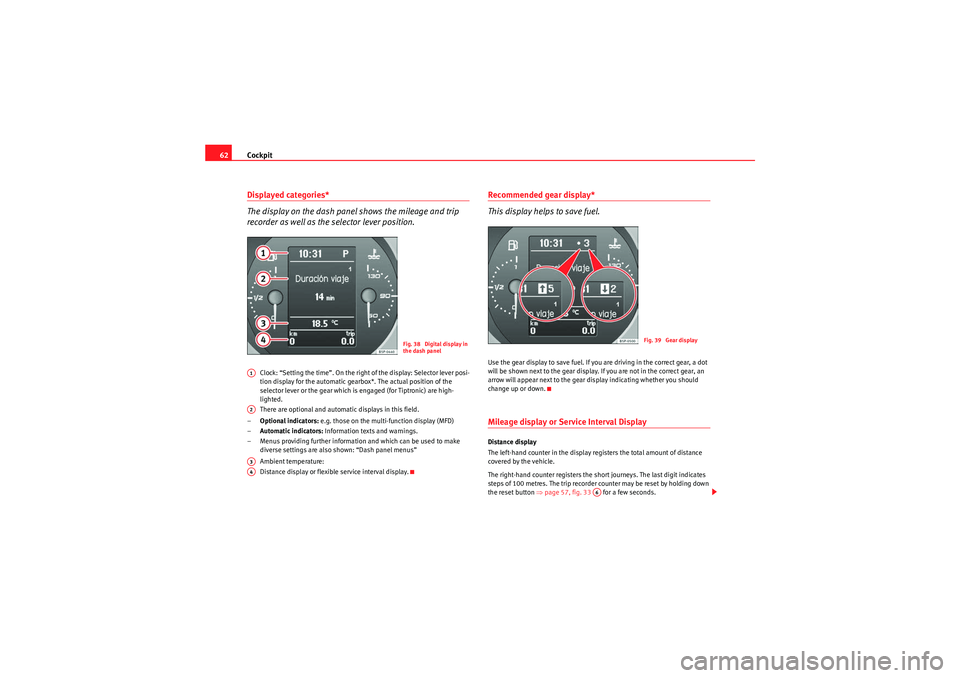
62Displayed categories*
The display on the dash panel shows the mileage and trip
recorder as well as the selector lever position.
Clock: “Setting the time”. On the right of the display: Selector lever posi-
tion display for the automatic gearbox*. The actual position of the
selector lever or the gear which is engaged (for Tiptronic) are high-
lighted.
There are optional and automatic displays in this field.
– Optional indicators: e.g. those on the multi-function display (MFD)
– Automatic indicators: Information texts and warnings.
– Menus providing further information and which can be used to make diverse settings are also shown: “Dash panel menus”
Ambient temperature:
Distance display or flexible service interval display.
Recommended gear display*
This display helps to save fuel.Use the gear display to save fuel. If you are driving in the correct gear, a dot
will be shown next to the gear display. If you are not in the correct gear, an
arrow will appear next to the gear display indicating whether you should
change up or down.Mileage display or Service Interval DisplayDistance display
The left-hand counter in the display registers the total amount of distance
covered by the vehicle.
The right-hand counter registers the short journeys. The last digit indicates
steps of 100 metres. The trip recorder counter may be reset by holding down
the reset button ⇒page 57, fig. 33 for a few seconds.
Fig. 38 Digital display in
the dash panel
A1A2A3A4
Fig. 39 Gear display
A6
AlteaXL_EN.book Seite 62 Dienstag, 1. September 2009 10:37 10
Page 66 of 312
Cockpit
64
The multi-function system uses two automatic memories: 1 - Actual
memory and 2 - Total memory . The selected memory will be shown
in the upper right-hand corner of the display.
Selecting a memory
– When the ignition is on, briefly press button ⇒page 63, fig. 40
on the windscreen wiper lever to change from one memory to
another or press button on the steering wheel controls
⇒ page 63, fig. 40 .
Resetting a memory
– Select the memory that you would like to reset.
– Hold down button on the windscreen wiper lever or button on the steering wheel contro ls for at least 2 seconds.The trip memory 1 collects the travel and consumption rates from the
moment the ignition is switched on until it is switched off. If the journey is
continued within two hours of switching off the ignition, the new values will
be added to the existing trip recorder memory. The memory will automatically
be deleted if the journey is interrupted for more than two hours.
The total memory 2 collects the trip data for any number of individual jour-
neys (even if the ignition is switched off for longer than two hours) up to a
total of 19 hours and 59 minutes travel time or 1999 km distance travelle d.
The memory will automatically be deleted if one of the named values is
reached.
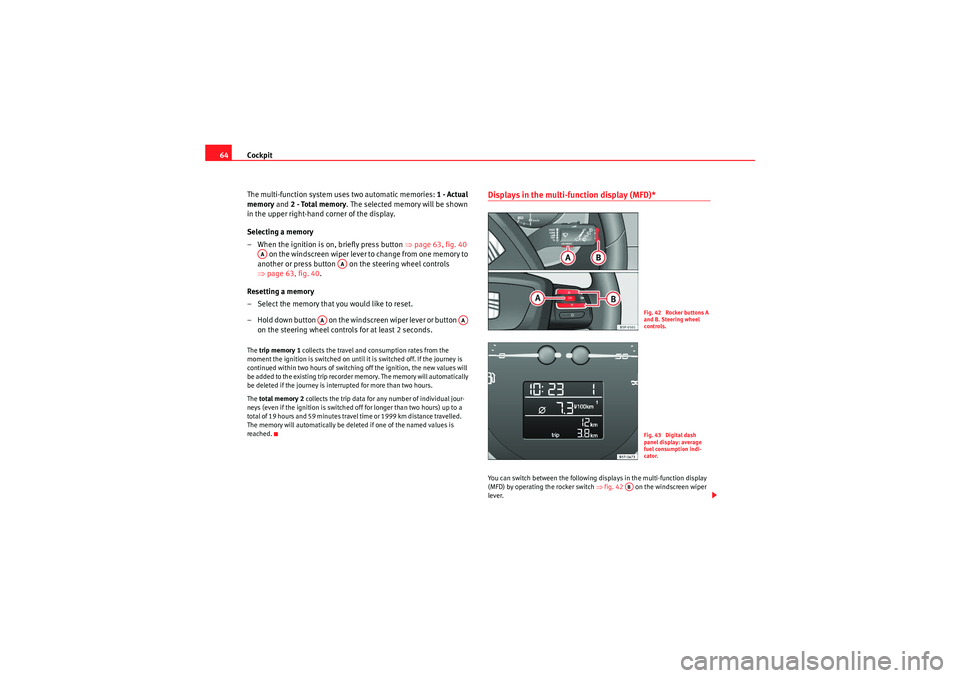
Displays in the multi-function display (MFD)* You can switch between the following displays in the multi-function display
(MFD) by operating the rocker switch ⇒fig. 42 on the windscreen wiper
lever.
AA
AA
AA
AA
Fig. 42 Rocker buttons A
and B. Steering wheel
controls.Fig. 43 Digital dash
panel display: average
fuel consumption indi-
cator.
AB
AlteaXL_EN.book Seite 64 Dienstag, 1. September 2009 10:37 10
Page 73 of 312

Cockpit71
Safety First
Operating instructions
Practical tips
Technical Data
Note
For electronic and vehicle equipment one or more of these menus will be
displayed.
Multi-function display menu (MFD)
The multi-function display (MFD) shows you information on
the journey and fuel consumption.The multifunction display (MFD) has two automatic memories: 1 - Trip
memory and 2 - Total memory . The selected memory is shown on the upper
right hand section of the display ⇒fig. 48 at all times.
Open the multifunction display menu
–Select the Multifunction display menu from the main menu ⇒page 70
and press the button on the windscreen wiper lever or the multifunc-
tion lever*.
Selecting a memory
– To change from one memory to another, briefly press button ⇒page 68, fig. 44 ⇒ page 68 on the windscreen wiper lever or the
button on the multifunction lever ⇒page 68, fig. 45 ⇒page 68 while
the ignition is switched on.
Te l e p h o n e
This menu is only available if the vehicle is fitted with
a telephone mounted by the manufacturer: “Fixed tel-
ephone installation”
Vehicle condition
This menu displays current warning or information
texts: “Vehicle status menu”
This option flashes when one of these texts is dis-
played.
Configuration
This option allows the time, the speed warning when
using winter tyres, units, language, independent
heating, the Light and visibility menu and the Con-
venience menu to be reset.
Fig. 48 Multifunction
display (MFD) dash panel
display.
OK
AA
OK
AlteaXL_EN.book Seite 71 Dienstag, 1. September 2009 10:37 10
Page 76 of 312
Cockpit
74The warning and information texts may be viewed in this menu. If there is no
warning or information message, the option Vehicle status is not displayed.
If there are several messages, each one is shown for a few seconds.
Example of menu use ⇒page 68.
Note
If there are no warning messages, this menu is not available.Configuration menu
This menu is used to make th e settings for the vehicle func-
tions.Open Configuration menu
– Select the option Configuration from the main menu: “Main
menu” and press button ⇒page 68, fig. 44 on the wind-
screen wiper lever. or
– Press button or on the multifunction steering wheel* ⇒page 68, fig. 45 until the Configuration menu is displayed.Example of menu use ⇒page 68.
Note
•For electronic and vehicle equipment one or more of these menus will be
displayed.
Displayed on the screen
Function
Multifunction display
data
This menu is used to establish the data in the
multifunction display menu to be displayed on
the dash panel ⇒ page 71
Convenience
The convenience set-up mode is used to make
the settings for the convenience functions in the
vehicle.
OK
AA
Lights and visibility
From this menu it is it possible to alter the vehi-
cle lighting settings.
Time
The hours and minutes of the clock and the navi-
gation system can be changed. Choose between
12 or 24-hour format and change to summer
time.
Winter tyres
The menu allows the setting of a speed at which
an optical and acoustic warning will be given by
the system. You can use this function, for exam-
ple, if you have fitted winter tyres which are not
suited for the top speed of your vehicle. Please
see the section “Wheels and tyres”.
Settings: Language
The display texts and the navigation system texts
can be seen in different languages.
Units
This option allows you to select the units for dis-
playing temperature, fuel consumption values
and distances.
Aux. speed
The dash panel also displays the speed in
another different unit of measurement (mph or
km/h) to that given on the speedometer.
Inter Service
Consult service messages and reset service inter-
val display here.
Manufacturer's settings
The manufacturer's predefined values for the
functions of this menu are restored.
Back
a)
This returns to the main menu
a)Only of the windscreen wiper lever is used (MFD).
AlteaXL_EN.book Seite 74 Dienstag, 1. September 2009 10:37 10
Page 118 of 312
Lights and visibility
116Activating daytime lights (bi-xenon lamps)
With the ignition switched off, move the indicator and main beam lever
upwards and back (left indicator and headlamp flash).
Switch on the ignition for 3 seconds. The daytime lights are activated and can
be switched on.
Note
Please observe any relevant legal requirements which may apply in your
country.Coming/leaving home function*
The Coming Home function is controlled manually. The
Leaving Home function is controlled with a photo sensor.If the Coming Home or Leaving Home function is connected, the front side
and dipped lights, the tail lights and the registration plate light will light up
to provide assistance.
Coming home function
The Coming Home function is activated by switching off the ignition and
briefly flashing the lights. When the driver's door is opened, the Coming
Home lighting comes on. If the driver's door is already open when the lights
are flashed briefly, the Coming Home lighting comes on immediately.
When the last door of the vehicle or the tailgate is closed, the Coming Home
function starts and the switching off the headlights is delayed.
The Coming Home lighting switches off in the following cases:•On completion of the time period established for the delay in switching off
the lights after all the vehicle doors and the tailgate have been closed.
•If, 30 seconds after being connected, any doors or the tailgate remain
open.•If the light switch is turned to position
.
•If the ignition is switched on.
Leaving home function
The Leaving Home function is activated when the vehicle is unlocked if:•the light control is in position
and
•the photosensor detects “darkness”.
The Leaving Home lighting switches off in the following cases:•If the time period for the delay in switching off the headlamps has ended•If the vehicle is locked again.•If the light switch is turned to position
.
•If the ignition is switched on.Note
The setting for the delay in switching off the headlamps in the Coming Home
and Leaving Home function can be changed or the function can be connected
or disconnected in the menu Lights and visibility ⇒ page 76.•If the ignition key is removed while the lights are on, and the lights are
flashed briefly and the driver's door opened, no acoustic signal is heard, as
when the Coming Home function is on, the lights are automatically switched
off after a period of time (except when the light switch is in position
or
.
AlteaXL_EN.book Seite 116 Dienstag, 1. September 2009 10:37 10
Page 122 of 312
Lights and visibility
120Indicator and main beam headlight lever
The turn signal and main beam lever also operates the
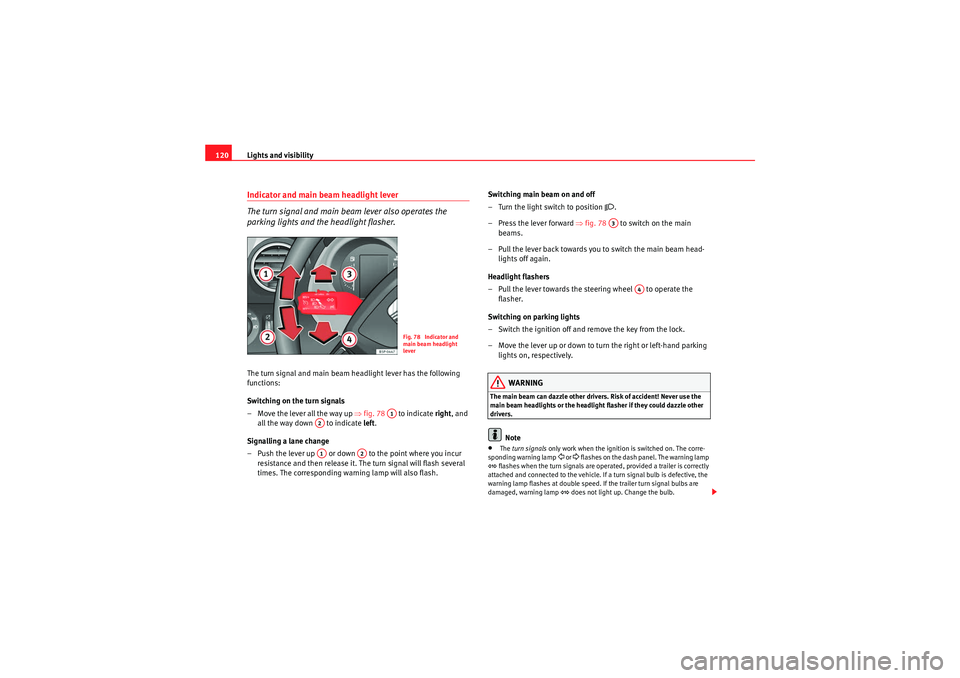
parking lights and the headlight flasher.The turn signal and main beam headlight lever has the following
functions:
Switching on the turn signals
– Move the lever all the way up ⇒fig. 78 to indicate right , and
all the way down to indicate left .
Signalling a lane change
– Push the lever up or down to the point where you incur resistance and then release it. The turn signal will flash several
times. The corresponding warning lamp will also flash. Switching main beam on and off
– Turn the light switch to position
.
–Press the lever forward ⇒fig. 78 to switch on the main
beams.
– Pull the lever back towards you to switch the main beam head- lights off again.
Headlight flashers
– Pull the lever towards the steering wheel to operate the flasher.
Switching on parking lights
– Switch the ignition off and remove the key from the lock.
– Move the lever up or down to turn the right or left-hand parking lights on, respectively.
WARNING
The main beam can dazzle other drivers. Risk of accident! Never use the
main beam headlights or the headlight flasher if they could dazzle other
drivers.
Note
• The turn signals only work when the ignition is switched on. The corre-
sponding warning lamp
or flashes on the dash panel. The warning lamp
flashes when the turn signals are operated, provided a trailer is correctly
attached and connected to the vehicle. If a turn signal bulb is defective, the
warning lamp flashes at double speed. If the trailer turn signal bulbs are
damaged, warning lamp
does not light up. Change the bulb.
Fig. 78 Indicator and
main beam headlight
lever
A1
A2A1
A2
A3
A4
AlteaXL_EN.book Seite 120 Dienstag, 1. September 2009 10:37 10
Page 154 of 312
Seats and stowage
152Luggage compartmentStowing luggage
All luggage must be securely stowed.Please observe the following points to ensure the vehicle handles
well at all times:
– Distribute the load as evenly as possible.
– Place heavy objects as far forward in the luggage compartment
as possible.
– Secure luggage in the luggage compartment with suitable straps on the fastening rings*.
WARNING
•Loose luggage and other loose items in the vehicle can cause serious
injuries.•Loose objects in the luggage compartment can suddenly move and
change the way the vehicle handles.•During sudden manoeuvres or accidents, loose objects in the
passenger compartment can be flung forward, injuring vehicle occupants.•Always store objects in the luggage compartment and secure with suit-
able straps. This is especially important for heavy objects.•When you transport heavy objects, always take in account that a
change in the centre of gravity can also cause changes in vehicle handling.•Please observe information on safe driving ⇒page 7, “Safe driving”.
Caution
Hard objects on the shelf could chafe against the wires of the heating
element in the rear window and cause damage.
Note
The ventilation slots in front of the rear side windows must not be covered as
this would prevent stale air being extracted from the vehicle.
AlteaXL_EN.book Seite 152 Dienstag, 1. September 2009 10:37 10
Page 167 of 312
Heating, Ventilation and Air conditioning165
Safety First
Operating instructions
Practical tips
Technical Data
When the button is off (LED off), the heating, ventilation and air condi-
tioning system is off.
When the button is off, the heating, ventilation and air conditioning
system is switched off to save fuel. The temperature continues to self-regu-
late. The set temperature can then only be reached if it is higher than the
ambient temperature.
Driver and passenger temperature control
The button controls the synchronisation of the 2 Climatronic climate
zones.
When the button is on (LED lit), the climate zone of the Climatronic is
personalised, for example: Driver side temperature 22°C and passenger side
temperature 23°C.
When the button is off (LED off), the climate zone of the Climatronic is
synchronised, for example: Driver side temperature 22°C and passenger side
temperature 22°C.
If the button is off and the passenger side temperature is changed, the
function is automatically activated.
Air recirculation mode
Air recirculation mode prevents fumes or unpleasant smells
from coming from the outside.– Press the button
⇒page 164, fig. 135 to switch air recir-
culation mode on or off. It is switched on if the following symbol
appears in the display
.
Air recirculation mode prevents strong odours in the ambient air from
entering the vehicle interior, for example when passing through a tunnel or in
a traffic jam. With low temperatures outside, the air recirculation increases the effective-
ness of the heating system by heating the air inside the passenger compart-
ment rather than the air from outside.
With high ambient temperatures, the air recirculation increases the effective-
ness of the air conditioning system by cooling the air inside the passenger
compartment rather than the ambient air.
If the windscreen air output is on and the air recirculation mode is pressed,
this remains active. When the recirculation mode is on, if the air distribution
towards the windscreen mode is selected, the recirculation mode is deacti-
vated. For safety reasons, the air recirculation mode should not be
connected.
WARNING
In air recirculation mode, no cold air from the outside enters the vehicle
interior. If the air conditioning system is switched off, the windows can
quickly mist over. Therefore, never leave the air recirculation mode
switched on for a long time (risk of accident).General notesThe impurity filter
The impurity filter (a combined particle filter and active carbon filter) serves
as a barrier against impurities in the ambient air, including dust and pollen.
For the air conditioning system to work with maximum efficiency, the pollen
filter must be replaced at the intervals specified in the Service Schedule.
If the filter loses efficiency prematurely due to use in areas reaching very high
pollution levels, the pollen filter must be changed more frequently than
stated in the Service Schedule.
ACAC
DUAL
DUALDUAL
DUAL
A2
AlteaXL_EN.book Seite 165 Dienstag, 1. September 2009 10:37 10
Page 181 of 312
Driving179
Safety First
Operating instructions
Practical tips
Technical Data
the full power of the engine. This programme is not recommended for use on
the motorway or in the city.
Selecting the manual programme (tiptronic)
This programme allows driving similar to a manual gearbox.
This programme may be accessed using the selector lever or from the
steering wheel controls when this option is fitted
⇒page 181.
Selector lever locking
The selector lever lock prevents gears from being engaged
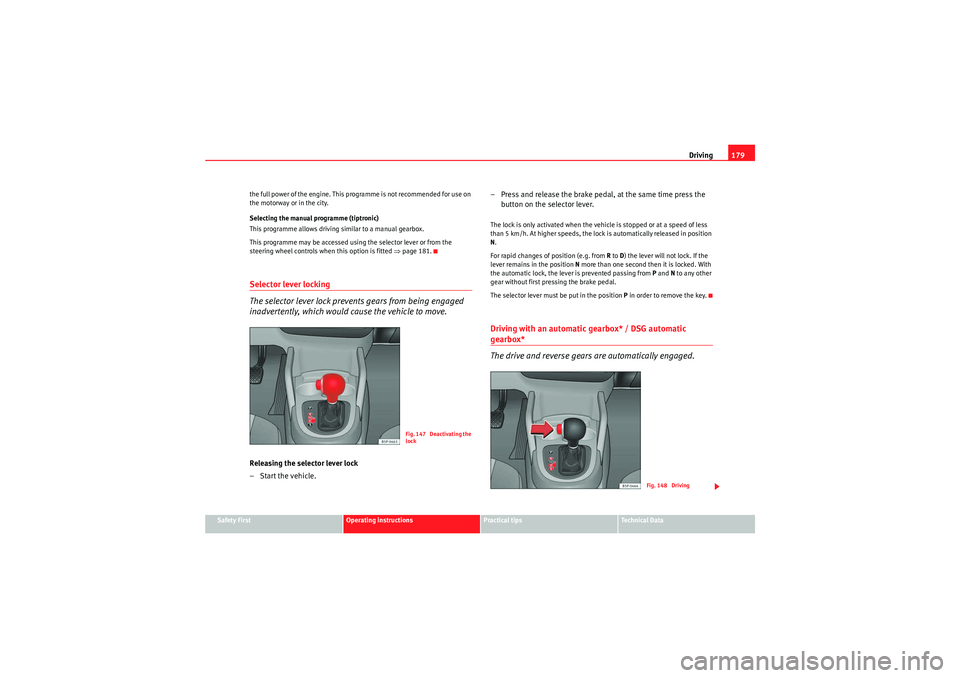
inadvertently, which would cause the vehicle to move.Releasing the selector lever lock
– Start the vehicle. – Press and release the brake pedal, at the same time press the
button on the selector lever.
The lock is only activated when the vehicle is stopped or at a speed of less
than 5 km/h. At higher speeds, the lock is automatically released in position
N.
For rapid changes of position (e.g. from R to D) the lever will not lock. If the
lever remains in the position N more than one second then it is locked. With
the automatic lock, the lever is prevented passing from P and N to any other
gear without first pressing the brake pedal.
The selector lever must be put in the position P in order to remove the key.Driving with an automatic gearbox* / DSG automatic gearbox*
The drive and reverse gears are automatically engaged.
Fig. 147 Deactivating the
lock
Fig. 148 Driving
AlteaXL_EN.book Seite 179 Dienstag, 1. September 2009 10:37 10
Page 184 of 312
Driving
182
General information about driving in Tiptronic mode
Changing gear with the gear stick
– Put the lever in position D and press towards the right to enter
the Tiptronic gate ⇒page 181, fig. 149 .
– Press the gear lever forwards ⇒page 181, fig. 149 to select
a higher gear.
–Press the gear lever back ⇒ page 181, fig. 149 to select a
lower gear.
Changing gear with the steering wheel levers
– Press the right paddle lever ( +OFF) towards the steering
wheel to change up ⇒page 181, fig. 150 .
– Press the left paddle towards the steering wheel to change down ⇒page 181, fig. 150 .Using the levers on the steering wheel, you can access manual driving mode
regardless of the driving mode pre-selected.
General information about driving in Tiptronic mode
When accelerating, the automatic gearbox / direct shift gearbox goes into a
higher gear a little before it reaches the maximum permitted revolutions.
If a lower gear is selected, the automatic gearbox / direct shift gearbox does
not change down until the point is reached where the engine could no longer
overrev.
If the “Tiptronic” is selected whilst the vehicle is in motion and the automatic
gearbox / direct shift gearbox is in 3rd gear in selector lever position D, the
“Tiptronic” will then also be in 3rd gear. Changing gears in the normal or sport programme using the steering wheel
paddle levers
If the paddle levers ⇒
page 181, fig. 150 are used in the normal or sport
programme, the system switches temporarily to “Tiptronic” mode. To exit
“Tiptronic” mode again, press the right paddle lever towards the
steering wheel for approximately one second. You will also leave “Tiptronic”
mode if the paddle levers are not moved for a certain time.
Note
•The gearbox controls on the steering wheel can operate with the gear stick
in any position and with the vehicle in motion.Kickdown feature
The kickdown feature is designed to give maximum accelera-
tion.If you press the accelerator down thoroughly, the gearbox automatically
changes down, depending on speed and engine speed, into a lower gear to
take full advantage of the maximum acceleration of the vehicle.
The gearbox does not change gear until the engine reaches the maximum
determined engine speed for the gear.
WARNING
You could lose control of the vehicle if you accelerate on slippery road
surfaces. Risk of serious injury.•Be particularly careful when using the kickdown features on slippery
road surfaces. With fast acceleration, the vehicle could lose traction and
skid.
A+
A–A+
A–
+ OFF
AlteaXL_EN.book Seite 182 Dienstag, 1. September 2009 10:37 10