key Seat Altea XL 2013 Owner's Guide
[x] Cancel search | Manufacturer: SEAT, Model Year: 2013, Model line: Altea XL, Model: Seat Altea XL 2013Pages: 317, PDF Size: 4.69 MB
Page 124 of 317
122Lights and visibility
Turn signal and main beam headlight lever
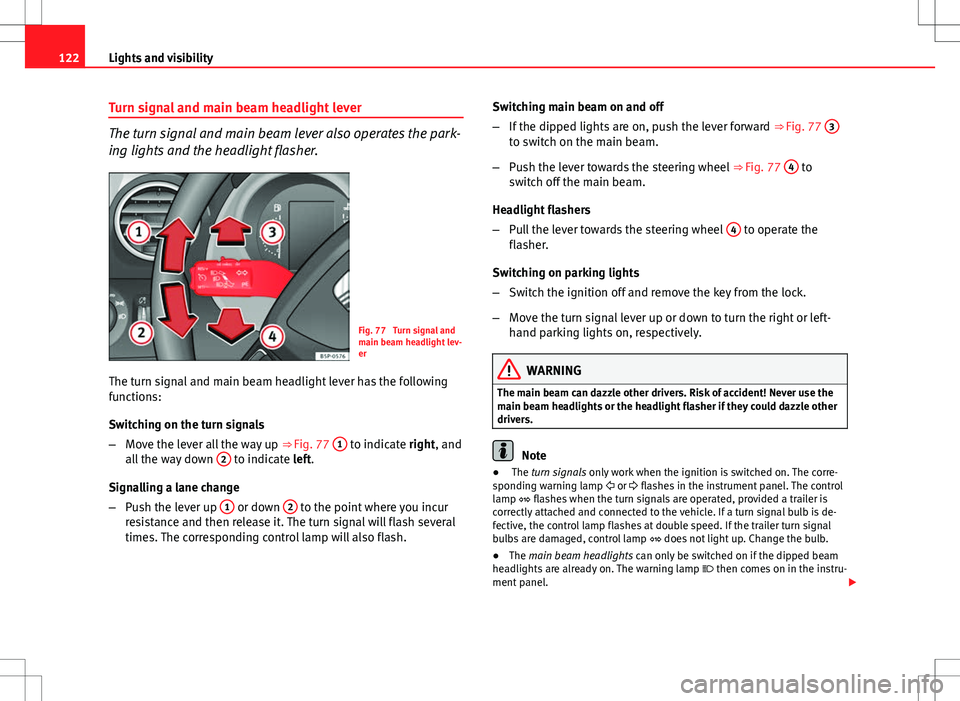
The turn signal and main beam lever also operates the park-
ing lights and the headlight flasher.
Fig. 77 Turn signal and
main beam headlight lev-
er
The turn signal and main beam headlight lever has the following
functions:
Switching on the turn signals
– Move the lever all the way up ⇒ Fig. 77 1
to indicate right, and
all the way down 2 to indicate left.
Signalling a lane change
– Push the lever up 1
or down 2 to the point where you incur
resistance and then release it. The turn signal will flash several
times. The corresponding control lamp will also flash. Switching main beam on and off
–
If the dipped lights are on, push the lever forward ⇒ Fig. 77 3
to switch on the main beam.
– Push the lever towards the steering wheel ⇒ Fig. 77 4
to
switch off the main beam.
Headlight flashers
– Pull the lever towards the steering wheel 4
to operate the
flasher.
Switching on parking lights
– Switch the ignition off and remove the key from the lock.
– Move the turn signal lever up or down to turn the right or left-
hand parking lights on, respectively.
WARNING
The main beam can dazzle other drivers. Risk of accident! Never use the
main beam headlights or the headlight flasher if they could dazzle other
drivers.
Note
● The turn signals only work when the ignition is switched on. The corre-
sponding warning lamp or flashes in the instrument panel. The control
lamp flashes when the turn signals are operated, provided a trailer is
correctly attached and connected to the vehicle. If a turn signal bulb is de-
fective, the control lamp flashes at double speed. If the trailer turn signal
bulbs are damaged, control lamp does not light up. Change the bulb.
● The main beam headlights can only be switched on if the dipped beam
headlights are already on. The warning lamp then comes on in the instru-
ment panel.
Page 125 of 317
123
Lights and visibility
● The headlight flasher comes on for as long as you pull the lever – even if
no other lights are switched on. The warning lamp then comes on in the
instrument panel.
● When the parking lights are switched on, the headlight and the tail light
on the corresponding side of the vehicle light up. The parking lights will on-
ly work if the key is removed from the ignition. If the lights are switched on,
an audible warning will be emitted while the driver door is open.
● If the turn signal lever is left on after the key has been taken out of the
ignition lock, an acoustic signal sounds when the driver door is opened.
This is a reminder to switch off the turn signal, unless of course you wish to
leave the parking light on.
Interior lights
Front interior light type 1
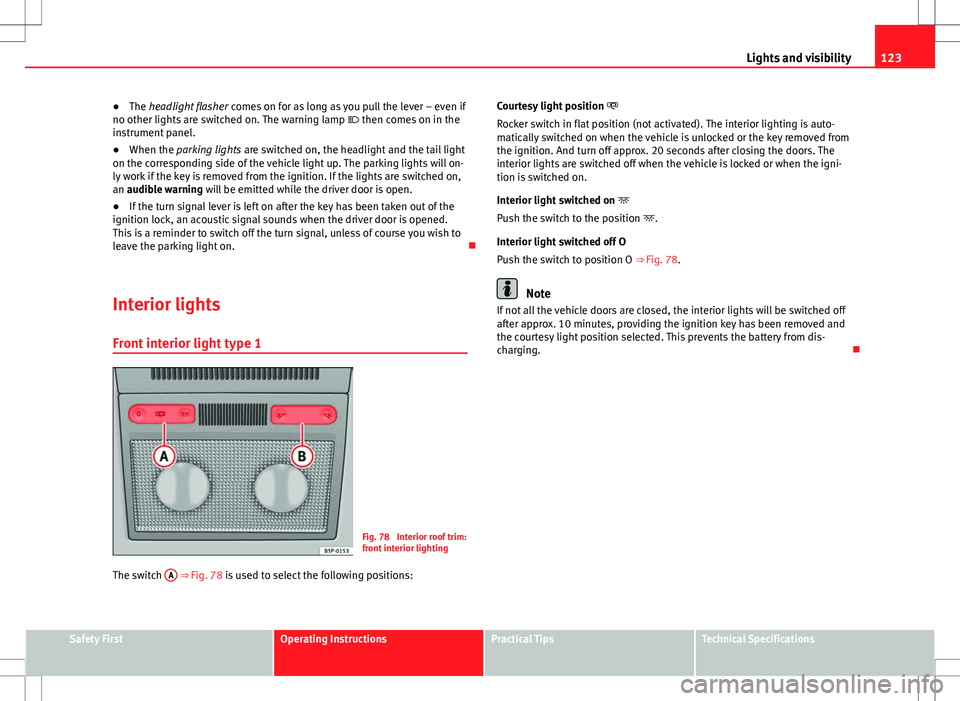
Fig. 78 Interior roof trim:
front interior lighting
The switch A
⇒ Fig. 78 is used to select the following positions: Courtesy light position
Rocker switch in flat position (not activated). The interior lighting is auto-
matically switched on when the vehicle is unlocked or the key removed from
the ignition. And turn off approx. 20 seconds after closing the doors. The
interior lights are switched off when the vehicle is locked or when the igni-
tion is switched on.
Interior light switched on
Push the switch to the position .
Interior light switched off O
Push the switch to position O ⇒ Fig. 78.
Note
If not all the vehicle doors are closed, the interior lights will be switched off
after approx. 10 minutes, providing the ignition key has been removed and
the courtesy light position selected. This prevents the battery from dis-
charging.
Safety FirstOperating InstructionsPractical TipsTechnical Specifications
Page 126 of 317
124Lights and visibility
Front interior light type 2
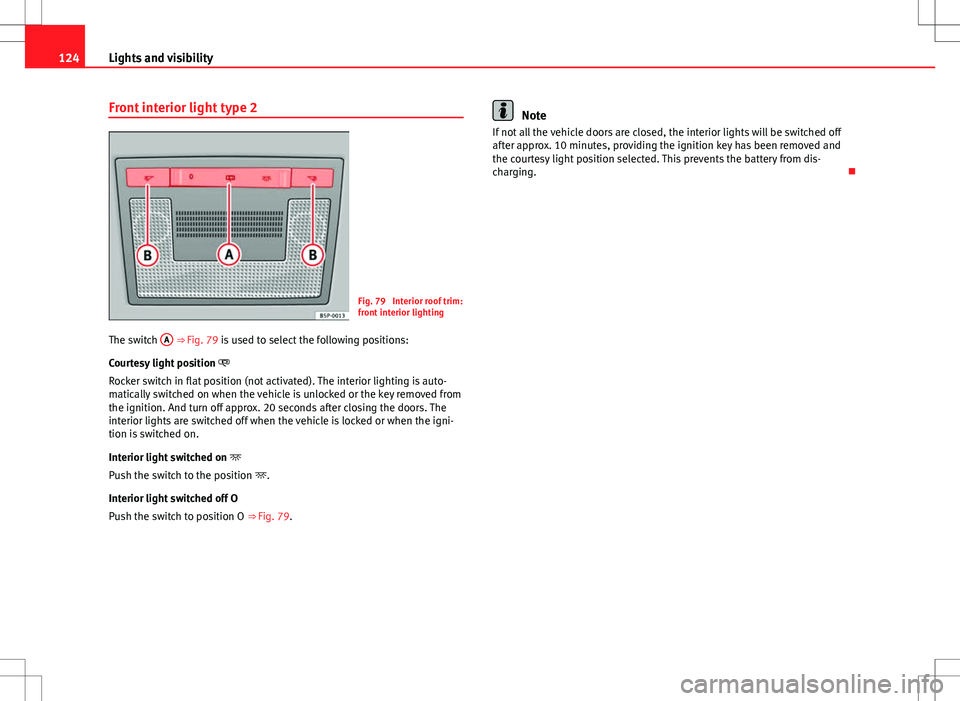
Fig. 79 Interior roof trim:
front interior lighting
The switch A
⇒ Fig. 79 is used to select the following positions:
Courtesy light position
Rocker switch in flat position (not activated). The interior lighting is auto-
matically switched on when the vehicle is unlocked or the key removed from
the ignition. And turn off approx. 20 seconds after closing the doors. The
interior lights are switched off when the vehicle is locked or when the igni-
tion is switched on.
Interior light switched on
Push the switch to the position .
Interior light switched off O
Push the switch to position O ⇒ Fig. 79.
Note
If not all the vehicle doors are closed, the interior lights will be switched off
after approx. 10 minutes, providing the ignition key has been removed and
the courtesy light position selected. This prevents the battery from dis-
charging.
Page 127 of 317
125
Lights and visibility
Front reading lights
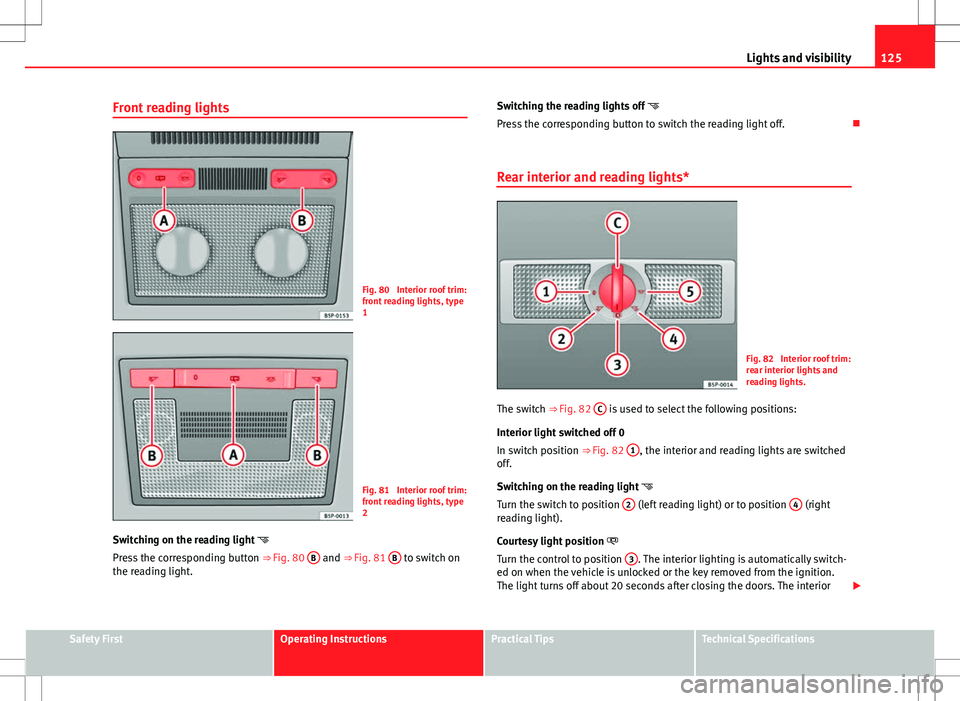
Fig. 80 Interior roof trim:
front reading lights, type
1
Fig. 81 Interior roof trim:
front reading lights, type
2
Switching on the reading light
Press the corresponding button ⇒ Fig. 80 B
and ⇒
Fig. 81 B to switch on
the reading light. Switching the reading lights off
Press the corresponding button to switch the reading light off.
Rear interior and reading lights*
Fig. 82 Interior roof trim:
rear interior lights and
reading lights.
The switch ⇒ Fig. 82 C
is used to select the following positions:
Interior light switched off 0
In switch position ⇒ Fig. 82 1
, the interior and reading lights are switched
off.
Switching on the reading light
Turn the switch to position 2
(left reading light) or to position 4 (right
reading light).
Courtesy light position
Turn the control to position 3
. The interior lighting is automatically switch-
ed on when the vehicle is unlocked or the key removed from the ignition.
The light turns off about 20 seconds after closing the doors. The interior
Safety FirstOperating InstructionsPractical TipsTechnical Specifications
Page 128 of 317
126Lights and visibility
lights are switched off when the vehicle is locked or when the ignition is
switched on.
Interior lights or both reading lights switched on
Turn the control to position 5
.
Note
If not all the vehicle doors are closed, the interior lights will be switched off
after approx. 10 minutes, providing the ignition key has been removed and
the courtesy light position selected. This prevents the battery from dis-
charging.
Visibility Sun visors
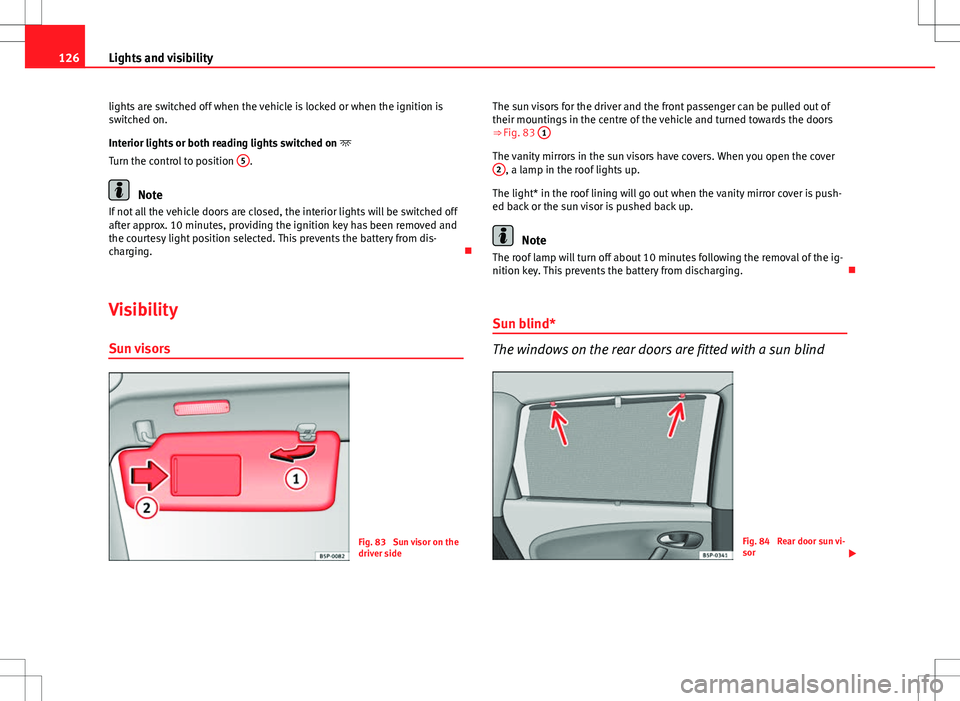
Fig. 83 Sun visor on the
driver side The sun visors for the driver and the front passenger can be pulled out of
their mountings in the centre of the vehicle and turned towards the doors
⇒ Fig. 83
1
The vanity mirrors in the sun visors have covers. When you open the cover
2, a lamp in the roof lights up.
The light* in the roof lining will go out when the vanity mirror cover is push-
ed back or the sun visor is pushed back up.
Note
The roof lamp will turn off about 10 minutes following the removal of the ig-
nition key. This prevents the battery from discharging.
Sun blind*
The windows on the rear doors are fitted with a sun blind
Fig. 84 Rear door sun vi-
sor
Page 129 of 317
127
Lights and visibility
Rear door sun blind*
– Pull out the visor and hook it onto the hooks at the top of the
door frame ⇒ Fig. 84.
Windscreen wipers
Front windscreen wipers
The window wiper lever controls the windscreen wipers and
the automatic wash and wipe.
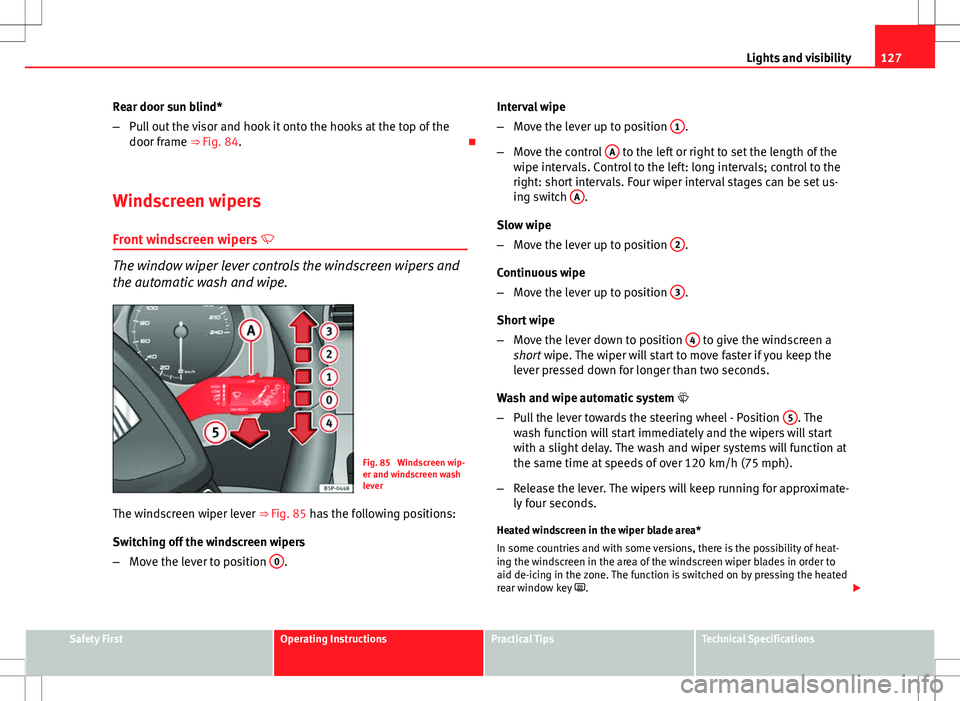
Fig. 85 Windscreen wip-
er and windscreen wash
lever
The windscreen wiper lever ⇒ Fig. 85 has the following positions:
Switching off the windscreen wipers
– Move the lever to position 0
. Interval wipe
–
Move the lever up to position 1
.
– Move the control A
to the left or right to set the length of the
wipe intervals. Control to the left: long intervals; control to the
right: short intervals. Four wiper interval stages can be set us-
ing switch A
.
Slow wipe
– Move the lever up to position 2
.
Continuous wipe
– Move the lever up to position 3
.
Short wipe
– Move the lever down to position 4
to give the windscreen a
short wipe. The wiper will start to move faster if you keep the
lever pressed down for longer than two seconds.
Wash and wipe automatic system
– Pull the lever towards the steering wheel - Position 5
. The
wash function will start immediately and the wipers will start
with a slight delay. The wash and wiper systems will function at
the same time at speeds of over 120 km/h (75 mph).
– Release the lever. The wipers will keep running for approximate-
ly four seconds.
Heated windscreen in the wiper blade area*
In some countries and with some versions, there is the possibility of heat-
ing the windscreen in the area of the windscreen wiper blades in order to
aid de-icing in the zone. The function is switched on by pressing the heated
rear window key .
Safety FirstOperating InstructionsPractical TipsTechnical Specifications
Page 134 of 317
132Lights and visibility
Note
● The automatic anti-dazzle function will only work properly if the sun
blind* for the rear window is retracted and there are no other objects pre-
venting light from reaching the rear vision mirror.
● If you have to stick any type of sticker on the windscreen, do not do so in
front of the sensors. Doing so could prevent the anti-dazzle function from
working well or even from working at all.
Exterior mirrors
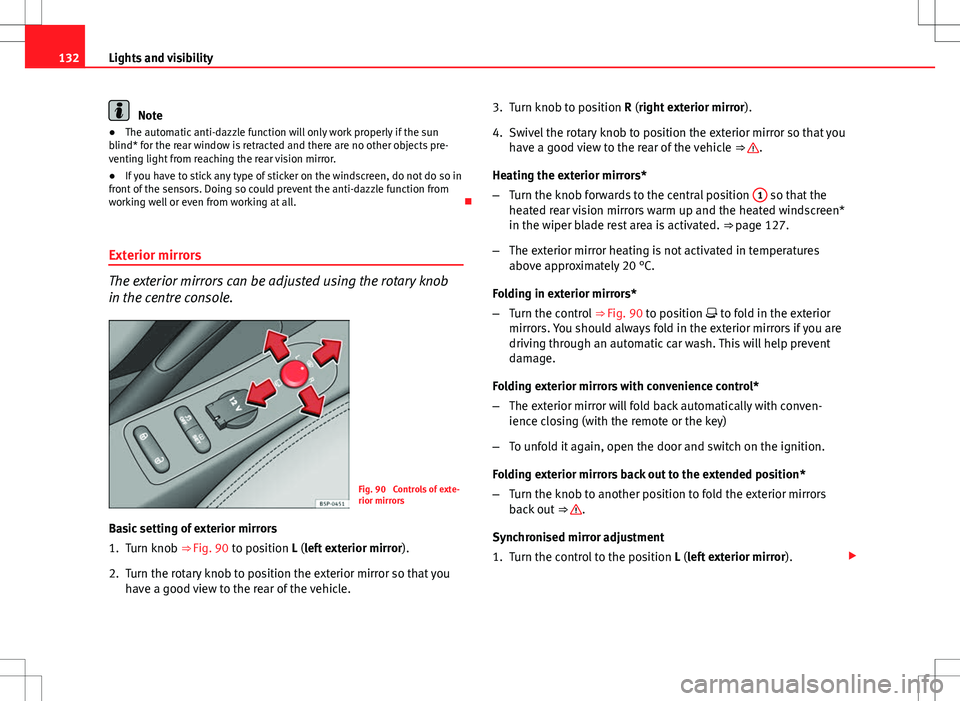
The exterior mirrors can be adjusted using the rotary knob
in the centre console.
Fig. 90 Controls of exte-
rior mirrors
Basic setting of exterior mirrors
1. Turn knob ⇒
Fig. 90 to position L (left exterior mirror ).
2. Turn the rotary knob to position the exterior mirror so that you have a good view to the rear of the vehicle. 3. Turn knob to position R (right exterior mirror
).
4. Swivel the rotary knob to position the exterior mirror so that you have a good view to the rear of the vehicle ⇒
.
Heating the exterior mirrors*
– Turn the knob forwards to the central position 1
so that the
heated rear vision mirrors warm up and the heated windscreen*
in the wiper blade rest area is activated. ⇒ page 127.
– The exterior mirror heating is not activated in temperatures
above approximately 20 °C.
Folding in exterior mirrors*
– Turn the control ⇒ Fig. 90 to position to fold in the exterior
mirrors. You should always fold in the exterior mirrors if you are
driving through an automatic car wash. This will help prevent
damage.
Folding exterior mirrors with convenience control*
– The exterior mirror will fold back automatically with conven-
ience closing (with the remote or the key)
– To unfold it again, open the door and switch on the ignition.
Folding exterior mirrors back out to the extended position*
– Turn the knob to another position to fold the exterior mirrors
back out ⇒
.
Synchronised mirror adjustment
1. Turn the control to the position L (left exterior mirror).
Page 173 of 317
171
Driving
● When driving with snow chains.
● When driving in deep snow or on loose surfaces.
● When the vehicle is stuck, to rock it backwards and forwards.
Press the button to switch the ASR back on when you no longer need wheel
spin.
WARNING
● Do not forget that the Electronic stability control (ESC) cannot defy
the laws of physics. This should be kept in mind, particularly on slippery
and wet roads and when towing a trailer.
● Always adapt your driving style to suit the condition of the roads and
the traffic situation. The greater safety provided by the ESC should not
encourage you to run any risks.
● Please refer to the corresponding warning notes on ESC in
⇒ page 194, Intelligent technology.
Ignition lock
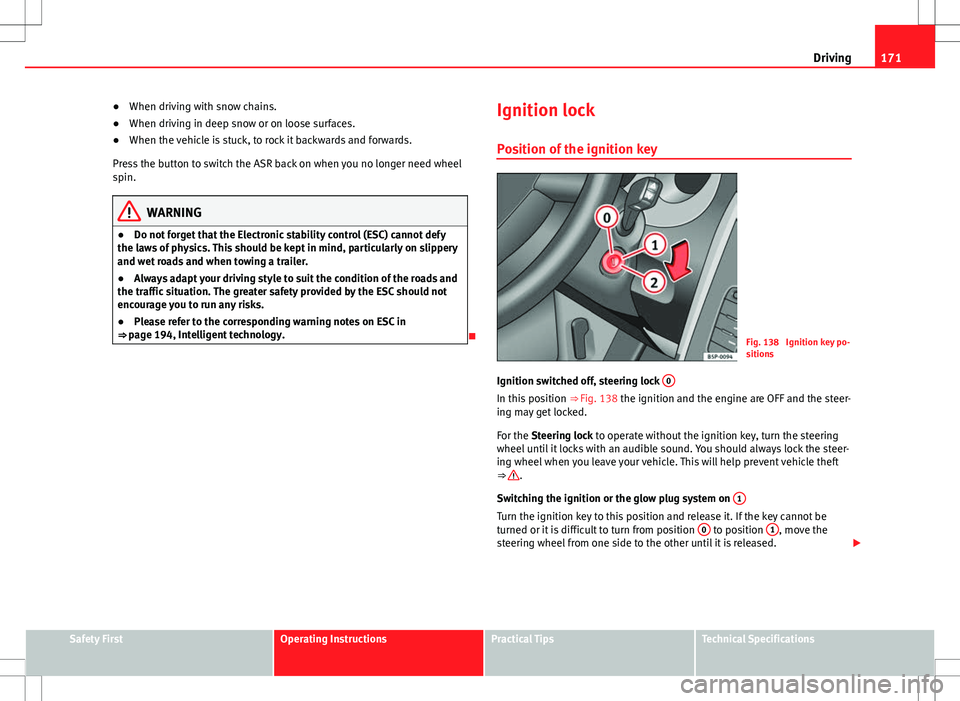
Position of the ignition keyFig. 138 Ignition key po-
sitions
Ignition switched off, steering lock 0
In this position
⇒ Fig. 138 the ignition and the engine are OFF and the steer-
ing may get locked.
For the Steering lock to operate without the ignition key, turn the steering
wheel until it locks with an audible sound. You should always lock the steer-
ing wheel when you leave your vehicle. This will help prevent vehicle theft
⇒
.
Switching the ignition or the glow plug system on 1
Turn the ignition key to this position and release it. If the key cannot be
turned or it is difficult to turn from position 0 to position 1, move the
steering wheel from one side to the other until it is released.
Safety FirstOperating InstructionsPractical TipsTechnical Specifications
Page 174 of 317
172Driving
Starting 2
The engine is started when the key is in this position. Electrical components
with a high power consumption are switched off temporarily.
Every time the vehicle is started again, the ignition key must be turned to
position 0
. The
repetitive start prevention lock of the ignition prevents
possible damage to the starter motor if the engine is already running.
WARNING
● The ignition key must NOT be removed from the lock until the vehicle
comes to a standstill. Otherwise, the steering could be immediately
blocked- Risk of accident!
● Always remove the key from the ignition when leaving the vehicle,
even for a short period. This is especially important if children or disa-
bled people are left alone in the vehicle. They could accidentally start the
engine or work electrical equipment such as the electric windows, conse-
quently resulting in an accident.
● Unsupervised use of the keys could start the engine or any electrical
system, such as the electric window. This could result in serious injury.
CAUTION
The starter motor will only work when the engine is stopped (ignition key
position 2
).
Electronic immobiliser
The electronic immobiliser prevents unauthorised persons
from driving the vehicle.
Inside the key there is a chip that deactivates the electronic immobiliser au-
tomatically when the key is inserted into the ignition. The electronic immobiliser will be activated again automatically as soon as
you pull the key out of the ignition lock.
The engine can only be started using a genuine SEAT key with its correct
code.
Note
A perfect operation of the vehicle is ensured if genuine SEAT keys are used.
Starting and stopping the engine Starting petrol engines
The engine can only be started using a genuine SEAT key
with its correct code. – Move the gearbox lever to the neutral position and depress the
clutch pedal thoroughly and hold it in this position for the start-
er to turn the engine on.
– Turn the ignition key to the starting ⇒ page 171 position.
– Let go of the ignition key as soon as the engine starts; the start-
er motor must not run on with the engine.
After starting a very hot engine, you may need to slightly press down the ac-
celerator.
When starting a very cold engine, it may be a little noisy for the first few sec-
onds until oil pressure has built up in the hydraulic valve compensators.
This is quite normal, and no cause for concern.
Page 175 of 317
173
Driving
If the engine does not start immediately, switch the starter off after 10 sec-
onds and try again after half a minute. If the engine still does not start, the
fuel pump fuse should be checked ⇒ page 269, Fuses.
WARNING
● Never start or run the engine in unventilated or closed rooms. The ex-
haust gases contain carbon monoxide, an odourless and colourless poi-
sonous gas. Risk of fatal accidents. Carbon monoxide can cause loss of
consciousness. It can also result in death.
● Never leave the vehicle unattended if the engine is running.
● Never use “cold start sprays”, they could explode or cause the engine
to run at high revs. Risk of injury.
CAUTION
● When the engine is cold, you should avoid high engine speeds, driving
at full throttle and over-loading the engine. Risk of engine damage.
● The vehicle should not be pushed or towed more than 50 metres to start
the engine. Unburnt fuel could enter the catalytic converter and damage it.
● Before attempting to push-start or tow a vehicle in order to start it, you
should first try to start it using the battery of another vehicle. Note and fol-
low the instructions in ⇒ page 282, Jump-starting.
For the sake of the environment
Do not warm-up the engine by running the engine with the vehicle station-
ary. Start off immediately, driving gently. This helps the engine reach oper-
ating temperature faster and reduces emissions. Starting diesel engines
The engine can only be started using a genuine SEAT key
with its correct code.
– Move the gearbox lever to the neutral position and depress the
clutch pedal thoroughly and hold it in this position for the start-
er to turn the engine on.
– Turn the ignition key to the starting position.
– Turn the ignition key to position ⇒ Fig. 138 1
. The warning
lamp will light for engine pre-heating.
– When the lamp turns off, turn the ignition key to position 2
to
start the engine. Do not press the accelerator.
– Let go of the ignition key as soon as the engine starts, the start-
er motor must not be allowed to run on with the engine.
When starting a very cold engine, it may be a little noisy for the first few sec-
onds until oil pressure has built up in the hydraulic valve compensators.
This is quite normal, and no cause for concern.
If there are problems starting the engine, see the ⇒ page 282.
Glow plug system for the diesel engine
To avoid unnecessary discharging of the battery, do not use any other major
electrical equipment while the glow plugs are pre-heating.
Start the engine as soon as the glow plug warning lamp ⇒ page 83 goes
out.
Starting the diesel engine after the fuel tank has been completely run dry
If the fuel tank has been completely run dry, it may take longer than normal
(up to one minute) to start a diesel engine after refuelling. This is because
the fuel system must eliminate air first.
Safety FirstOperating InstructionsPractical TipsTechnical Specifications