technical specifications Seat Altea XL 2013 Owner's Guide
[x] Cancel search | Manufacturer: SEAT, Model Year: 2013, Model line: Altea XL, Model: Seat Altea XL 2013Pages: 317, PDF Size: 4.69 MB
Page 65 of 317
63
Cockpit
Indications for vehicles with LongLife service
Technical progress has made it possible to considerably reduce servicing re-
quirements. With the LongLife System, SEAT ensures that your vehicle only
has an interval service when it is necessary. The length of the Interval Serv-
ices (max. two years) is determined by factors such as conditions under
which the vehicle is used and personal driving style.
The service pre-warning will first appear 20 days before the date on which
the service is due. The distance travelled is rounded off to the nearest
100 km (miles) and the time to full days. The current service message can
only be consulted 500 km (300 miles) after the last service. Until that time,
only dashes are displayed.
Note
● If you reset the display manually, the next service interval will be indica-
ted after 15 000 km (10 000 miles) or one year and will not be calculated
individually.
● Do not reset the display between service intervals as the display will
otherwise be incorrect.
● In LongLife Service vehicles, if the battery is disconnected for a long pe-
riod, the days remaining until the next service cannot be calculated. There-
fore, the service message displays on the instrument panel may be incor-
rect. Take into account the maximum authorised service intervals. Multifunction display (MFI)*
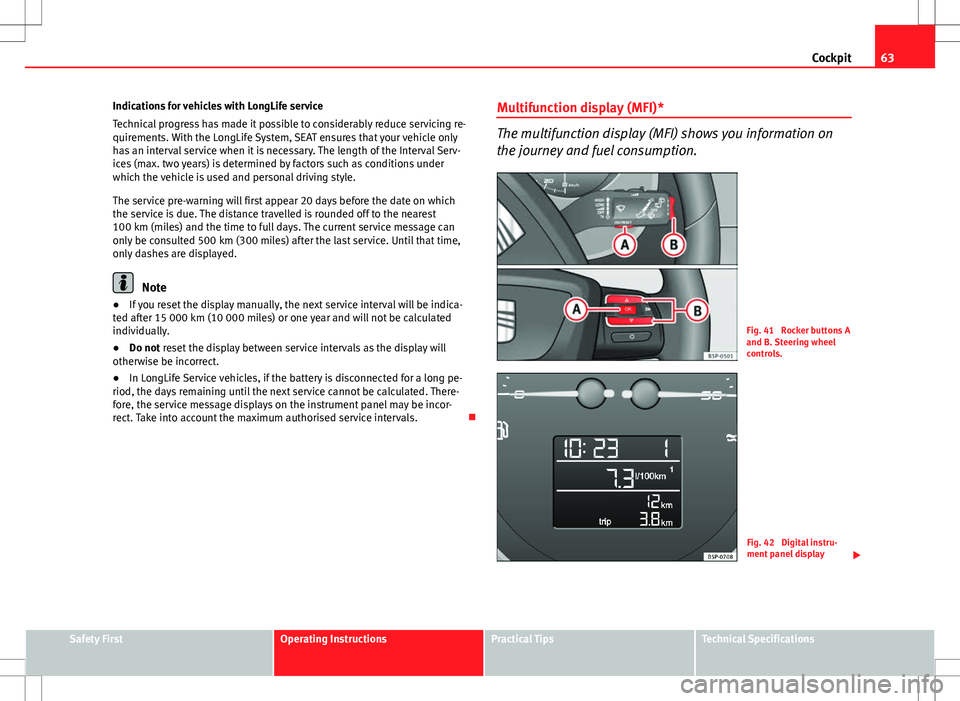
The multifunction display (MFI) shows you information on
the journey and fuel consumption.
Fig. 41 Rocker buttons A
and B. Steering wheel
controls.
Fig. 42 Digital instru-
ment panel display
Safety FirstOperating InstructionsPractical TipsTechnical Specifications
Page 67 of 317
65
Cockpit
Memory displays
● Distance
● Average speed
● Driving speed
● Speed warning at --- km/h (mph)
● Journey duration
● Current fuel consumption
● Average fuel consumption
● Fuel range
km (miles) - Distance travelled The display shows the distance travelled since the ignition was switched on.
The maximum display value in both memories is 1999 km (miles). The
memory will automatically be deleted once this value has been reached.
km/h (mph) - Average speed
The average speed will be shown after running a distance of approximately
100 metres. Until then dashes will appear in the display. The display will be
updated every 5 seconds while the vehicle is in motion.
km/h (mph) - Driving speed Driving speed is digitally shown in the display.
Set speed indicator
When driving at the required speed, enter the speed indicator mode and
press the button A
(Reset), the display remembers the indicated speed. If
the indicated speed is exceeded, a warning message is displayed on the
screen 1)
and an acoustic signal is given.
This may be deactivated by pressing the button A
(Reset).The speed may be altered using the rocker switch
B
in steps of 5 km/h
(mph) within 5 seconds of the initial memory value.
min - Journey duration
The display shows the amount of time which has elapsed since the ignition
was switched on.
The maximum display value in both memories is 19 hours and 59 minutes.
The memory will automatically be deleted once this value has been
reached.
l/100 km or l/h - Current fuel consumption The display will show the current fuel consumption in litre/km whilst the ve-
hicle is in motion or in litre/hour when the vehicle is in a stationary position
with the engine running.
Using this display you can see how your driving style affects fuel consump-
tion ⇒ page 204.
litre/100 km - Average fuel consumption
The average fuel consumption will be shown ⇒ Fig. 44 after a distance of
approximately 100 metres has been travelled. Until then dashes will appear
in the display. The display will be updated every 5 seconds while the vehicle
is in motion. The amount of fuel used will not be shown.
Km (miles) - Fuel range
The fuel range is calculated using the figures for tank content and current
fuel consumption. It shows how far the vehicle can travel using the same
conditions as a reference.
Outside temperature indicator
The measurement margin ranges from -45 °C (-49 °F) to +58 °C (+136.4 °F).
At temperatures lower than +4 °C (+39.2 °F), an “ice crystal symbol” is dis-
played and an audible “gong” warning is given if the vehicle is moving at
1)
Depending on the model version, the message on the screen may vary and may be repre-
sented by flashing of the speed indication or by a speed message.
Safety FirstOperating InstructionsPractical TipsTechnical Specifications
Page 69 of 317
67
Cockpit
If several priority 2 warning messages are detected at the same time, the
symbols are displayed one after the other for about 2 seconds at a time. Af-
ter a set time, the information text will disappear and the symbol will be
shown as a reminder at the side of the display.
Priority 2 warning messages will not be shown until all Priority 1 warning
messages have been dealt with!
Examples of priority 2 warning messages (yellow): 1)
● Fuel warning light with the information text PLEASE REFUEL.
● Windscreen washer fluid level symbol with the information message
ADD WINDSCREEN WASHER FLUID . Refill the windscreen washer tank
⇒ page 242.
1)
Depending on the version of the model.
Safety FirstOperating InstructionsPractical TipsTechnical Specifications
Page 71 of 317
69
Cockpit
2. Access the Configuration menu with the steering wheel controls
– To access the “Configuration” menu, press button C
⇒ Fig. 46
until the menu is displayed. Now you are in this menu.
3. Open the main menu “Winter tyres”
– Select option Winter tyres using switch B
.
– Press the button A
. The menu
Winter tyres is opened.
4. Program a speed limit warning
– Use switch B
to select the menu entry
+ 10 km/h or - 10 km/h
and press button B to either increase or decrease the set
speed.
5. To activate and deactivate the speed limit warning
– Use switch B
to select the menu point
On / Off and press the
button to switch the speed warning on or off. If the speed warn-
ing is deactivated, three dashes will be displayed ---
6. To close the menu “Winter tyres”
– In the menu select Back.
The function “Winter tyres” sends an optical and an acoustic signal when
the vehicle reaches the set speed.
Example menu “Winter tyres”
In the menu
Winter tyresFunction
Name of menu displayed
X km/hThe current set speed is displayedor ---or dashes will be shown if the function is deactivated.On / OffIf the function is activated or deactivated+10 km/h (mph)The set value increases by 10 km/h (mph)
-10 km/h (mph)The set value decreases by 10 km/h (mph)BackThe menu “Winter tyres” is closed and the last dis-
played menu is shown.
Note
For electronic and vehicle equipment one or more of these menus will be
displayed.
Safety FirstOperating InstructionsPractical TipsTechnical Specifications
Page 73 of 317
71
Cockpit
TelephoneThis menu is only available in vehicles with radio
unit if the vehicle is fitted with the telephone func-
tion. In vehicles fitted with a radio navigation sys-
tem, this menu is available in the central unit (navi-
gator) ⇒ Booklet SEAT Media System.
Vehicle conditionThis menu displays current warning or information
texts: “Vehicle status menu”
This option flashes when one of these texts is dis-
played.
ConfigurationThis option allows the time, the speed warning when
using winter tyres, units, language, independent
heating, the Light and visibility menu and the Con-
venience menu to be reset.
a)
Only in vehicles fitted with a radio navigation system.
Note
For electronic and vehicle equipment one or more of these menus will be
displayed. Multifunction display menu (MFI)
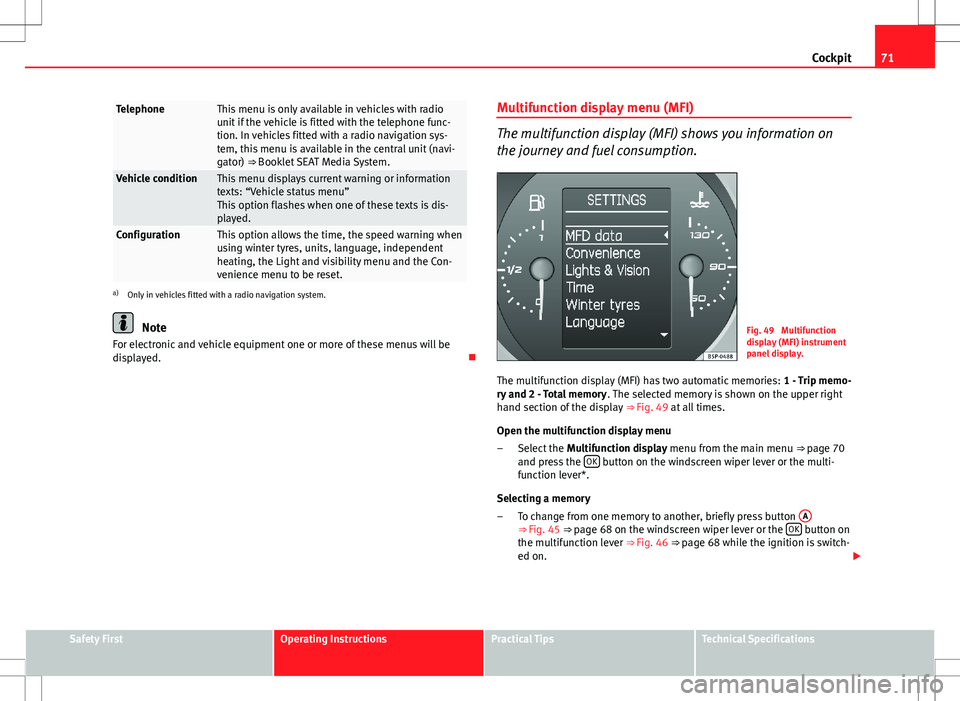
The multifunction display (MFI) shows you information on
the journey and fuel consumption.
Fig. 49 Multifunction
display (MFI) instrument
panel display.
The multifunction display (MFI) has two automatic memories: 1 - Trip memo-
ry and 2 - Total memory . The selected memory is shown on the upper right
hand section of the display ⇒ Fig. 49 at all times.
Open the multifunction display menu Select the Multifunction display menu from the main menu
⇒ page 70
and press the OK
button on the windscreen wiper lever or the multi-
function lever*.
Selecting a memory To change from one memory to another, briefly press button A
⇒
Fig. 45
⇒ page 68 on the windscreen wiper lever or the OK button on
the multifunction lever ⇒ Fig. 46
⇒ page 68 while the ignition is switch-
ed on.
–
–
Safety FirstOperating InstructionsPractical TipsTechnical Specifications
Page 75 of 317
73
Cockpit
stored and the warning is activated. If the set speed is exceeded, an audible
warning is heard and a warning message is displayed until the speed is re-
duced to at least 4 km/h (2 mph) below the stored speed. The function is
switched off by pressing the OK
button again. Speed warning --- km/h
(miles) is now displayed on the instrument panel.
WARNING
There could be black ice on the road surface even if the “snowflake sym-
bol” is not shown. For this reason you should not rely exclusively on this
display - Risk of accident!
Note
● There are different instrument panels; therefore the multifunction dis-
play may vary.
● When the vehicle is stationary or travelling at very low speeds, the tem-
perature displayed may be slightly higher than the actual outside tempera-
ture as a result of the heat radiated from the engine.
● Vehicles with a multifunction steering wheel* do not have buttons on
the windscreen wiper lever. The multifunction display can only be controlled
from the buttons on the multifunction steering wheel*.
Vehicle status menu
This menu shows warning or information texts
Open Vehicle Condition menu
– Select the option Vehicle status from the main menu: “Main
menu” and press button OK
on the windscreen wiper lever
A⇒
Fig. 47. Or –
Press button
or on the multifunction steering wheel*
⇒ Fig. 46 until the Vehicle Status menu is displayed.
Priority 2 warning messages and information texts: “Information and warn-
ing messages on the screen” will automatically disappear from the screen
after a time and will be stored in the Vehicle status menu.
The warning and information texts may be viewed in this menu. If there is
no warning or information message, the option Vehicle status is not dis-
played. If there are several messages, each one is shown for a few seconds.
Example of menu use ⇒ page 68
Note
If there are no warning messages, this menu is not available.
Configuration menu
This menu is used to make the settings for the vehicle func-
tions. Open Configuration menu
– Select the option Configuration from the main menu: “Main
menu” and press button OK
A ⇒ Fig. 45 on the windscreen
wiper lever. Or
– Press button
or on the multifunction steering wheel*
⇒ Fig. 46 until the Configuration menu is displayed.
Example of menu use ⇒ page 68
Safety FirstOperating InstructionsPractical TipsTechnical Specifications
Page 77 of 317
75
Cockpit
Displayed on the
screenFunction
Central locking.One door: individual unlocking activated.
Auto lock: The doors are automatically locked
when the vehicle is travelling at more than approx
15 km/h (10 mph).
Auto unlock: the doors are unlocked when the key
is removed from the ignition.
Elec. window controlOpening and closing electric windows: this deter-
mines whether to open or close all the windows
when the vehicle is unlocked or locked. The open
function can also be activated for the driver door
only.
Exterior mirror adjust.If synchronised adjustment is selected, when the
driver side exterior mirror is adjusted, the passen-
ger exterior mirror is also moved.
Factory settingsThe predefined factory values for the functions of
this menu are restored.
BackThis returns to the Configuration menu
Note
For electronic and vehicle equipment one or more of these menus will be
displayed. Lights and visibility menu
From this menu it is it possible to alter the vehicle lighting
settings.
Open Lights and visibility Menu
– Select the option Configuration from the main menu: “Main
menu” and press button OK
A ⇒ page 68 on the windscreen
wiper lever. Or
– Press button
or on the multifunction steering wheel*
⇒ Fig. 46 until the Configuration menu is displayed.
– Select the option Lights & visibil. from the menu and press but-
ton A
on the windscreen wiper lever.
Example of menu use ⇒ page 68
Displayed on the
screenFunction
Coming Home/
Leaving HomeThis option permits the adjustment of the time
during which the headlamps remain lit after the
vehicle is locked, as well as connecting and dis-
connecting this function.
Indicator conf.The convenience turn signal function can be acti-
vated or deactivated here. With the convenience
mode activated, the turn signal will blink at least
three times when turned on.
Factory settingsThe predefined factory values for the functions of
this menu are restored.
BackThis returns to the Configuration menu.
Safety FirstOperating InstructionsPractical TipsTechnical Specifications
Page 79 of 317
77
Cockpit
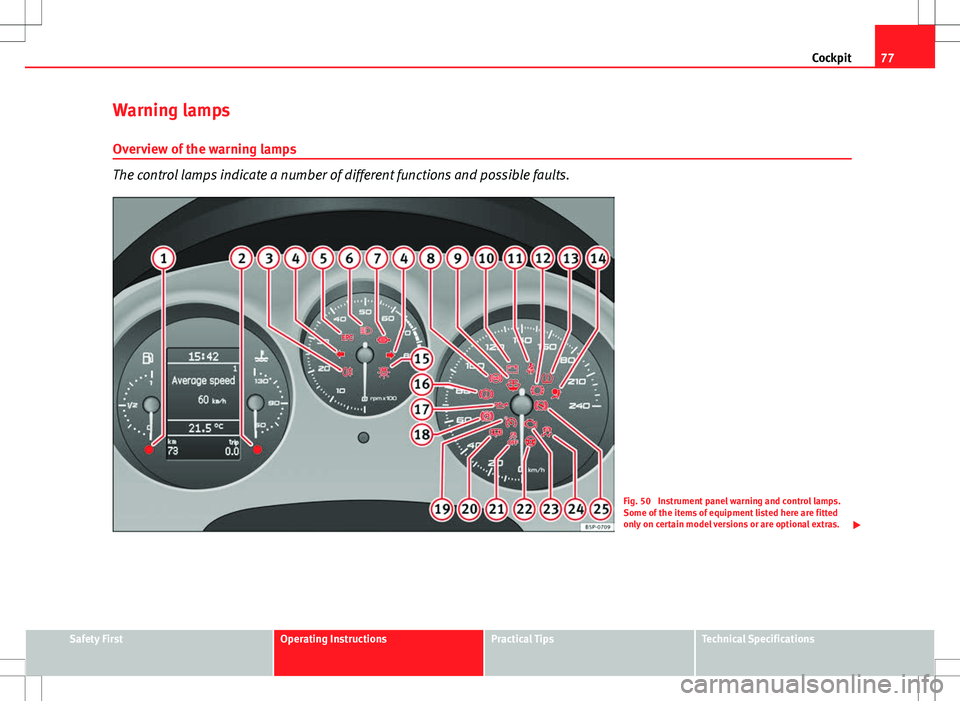
Warning lamps Overview of the warning lamps
The control lamps indicate a number of different functions and possible faults.
Fig. 50 Instrument panel warning and control lamps.
Some of the items of equipment listed here are fitted
only on certain model versions or are optional extras.
Safety FirstOperating InstructionsPractical TipsTechnical Specifications
Page 81 of 317
79
Cockpit
WARNING
● Failure to observe control lamps and warning messages can result in
serious personal injury or damage to your vehicle.
● The risk of an accident increases if your vehicle breaks down. Use a
warning triangle to draw the attention of other road users in order to pre-
vent danger to third parties.
● The engine compartment is a dangerous area. Before you open the
bonnet to work on the engine or in the engine compartment, you must
switch the engine off and allow it to cool to reduce the risk of scalding or
other injuries. Read and observe the relevant warnings ⇒ page 233.
Note
● The appropriate control lamp for a fault will light up in vehicles without
warning or information messages in the display.
● In vehicles with warning or information messages on the screen, the ap-
propriate control lamp for a fault will light up and a warning or information
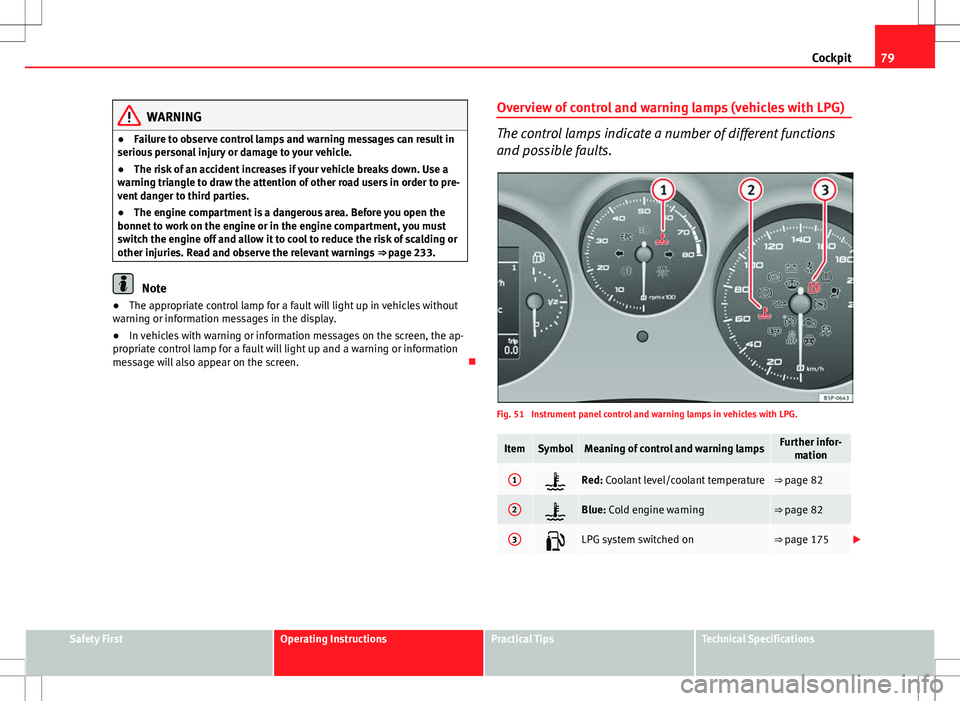
message will also appear on the screen. Overview of control and warning lamps (vehicles with LPG)
The control lamps indicate a number of different functions
and possible faults.
Fig. 51 Instrument panel control and warning lamps in vehicles with LPG.
ItemSymbolMeaning of control and warning lampsFurther infor-
mation
1Red: Coolant level/coolant temperature⇒ page 82
2Blue: Cold engine warning⇒ page 82
3LPG system switched on⇒ page 175
Safety FirstOperating InstructionsPractical TipsTechnical Specifications
Page 83 of 317
81
Cockpit
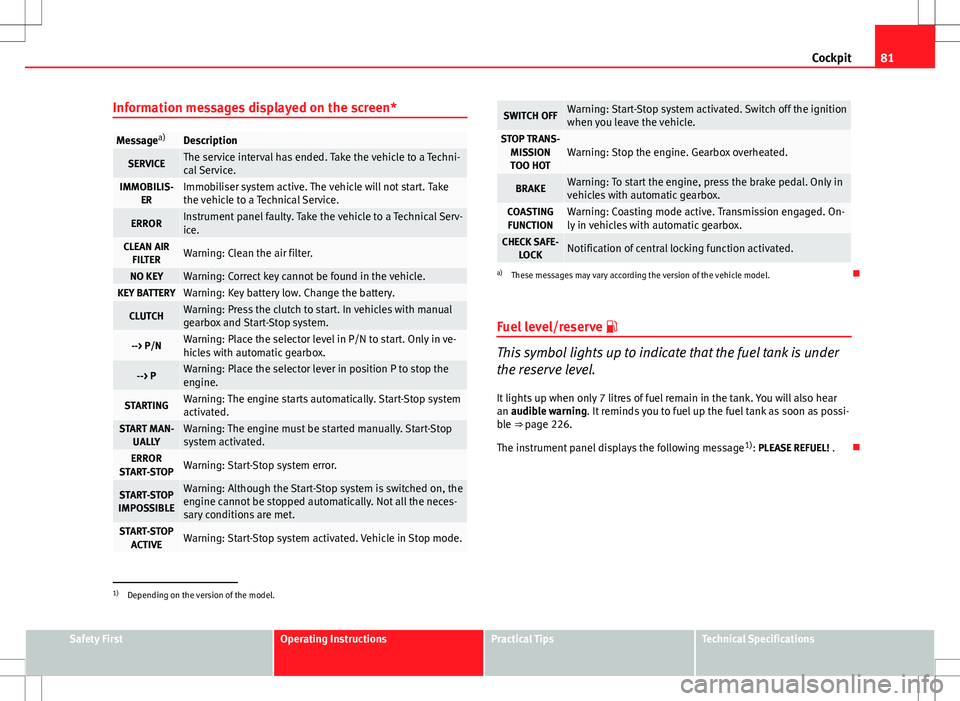
Information messages displayed on the screen*
Message a)Description
SERVICEThe service interval has ended. Take the vehicle to a Techni-
cal Service.
IMMOBILIS-
ERImmobiliser system active. The vehicle will not start. Take
the vehicle to a Technical Service.
ERRORInstrument panel faulty. Take the vehicle to a Technical Serv-
ice.
CLEAN AIRFILTERWarning: Clean the air filter.
NO KEYWarning: Correct key cannot be found in the vehicle.KEY BATTERYWarning: Key battery low. Change the battery.
CLUTCHWarning: Press the clutch to start. In vehicles with manual
gearbox and Start-Stop system.
--> P/NWarning: Place the selector level in P/N to start. Only in ve-
hicles with automatic gearbox.
--> PWarning: Place the selector lever in position P to stop the
engine.
STARTINGWarning: The engine starts automatically. Start-Stop system
activated.
START MAN- UALLYWarning: The engine must be started manually. Start-Stop
system activated.
ERROR
START-STOPWarning: Start-Stop system error.
START-STOP
IMPOSSIBLEWarning: Although the Start-Stop system is switched on, the
engine cannot be stopped automatically. Not all the neces-
sary conditions are met.
START-STOP ACTIVEWarning: Start-Stop system activated. Vehicle in Stop mode.
SWITCH OFFWarning: Start-Stop system activated. Switch off the ignition
when you leave the vehicle.
STOP TRANS-MISSIONTOO HOTWarning: Stop the engine. Gearbox overheated.
BRAKEWarning: To start the engine, press the brake pedal. Only in
vehicles with automatic gearbox.
COASTING FUNCTIONWarning: Coasting mode active. Transmission engaged. On-
ly in vehicles with automatic gearbox.
CHECK SAFE- LOCKNotification of central locking function activated.
a)These messages may vary according the version of the vehicle model.
Fuel level/reserve
This symbol lights up to indicate that the fuel tank is under
the reserve level.
It lights up when only 7 litres of fuel remain in the tank. You will also hear
an audible warning. It reminds you to fuel up the fuel tank as soon as possi-
ble ⇒ page 226.
The instrument panel displays the following message 1)
: PLEASE REFUEL! .
1)
Depending on the version of the model.
Safety FirstOperating InstructionsPractical TipsTechnical Specifications