ECO mode Seat Altea XL 2014 User Guide
[x] Cancel search | Manufacturer: SEAT, Model Year: 2014, Model line: Altea XL, Model: Seat Altea XL 2014Pages: 321, PDF Size: 4.52 MB
Page 119 of 321
117
Lights and visibility
Daytime driving lights*
The daytime light reduces the risk of accidents by increasing
the visibility of the vehicle. The daytime running lights are
enabled automatically when the ignition is switched on. It is
automatically switched off when the side lights are turned
on.
Daytime running lights are signalling devices for improving road safety. The
lights are built into the headlights and come on each time the ignition is
turned on if the light switch is in position 0 or .
Automatic control of the dipped beam in combination with the daytime
running lights
If the dipped beam control and the daytime running lights are activated at
the same time, the dipped beams and the instrument panel lighting will au-
tomatically come on as required (e.g. when entering a tunnel) and the day-
time running lights will switch off. When the automatic dipped beam control
switches off the dipped beams (e.g. when coming out of a tunnel), the day-
time running lights come back on.
Activating the daytime driving lights
● Remove the key from the ignition, move the turn signal lever upwards
(right turn signal), press it backwards to flash position and hold it in this po-
sition.
● Insert the key and switch the ignition on, holding it in this position for 3
seconds. Then, switch off the ignition. The daytime lights are activated and
can be switched on. Switching off daytime driving lights
●
Remove the key from the ignition, move the turn signal lever downwards
(left turn signal), press it backwards to flash position and hold it in this po-
sition.
● Insert the key and switch the ignition on, holding it in this position for 3
seconds. Then, switch off the ignition. The daytime lights are deactivated
and cannot be switched on.
Note
Please observe any relevant legal requirements which may apply in your
country.
Nordic country solution 1)
The so-called “Nordic country solution” is an alternative solution to daytime
running lights in vehicles without this function. It consists of simultaneous-
ly connecting the dimmed dipped beams, the sidelights and the licence
plate lights.
Said lights come on each time the ignition is turned on if the light switch is
in position 0 or . Depending upon the model, the control lamp
on the
light control switch or the lighting up of the instrument panel will indicate
that the lighting is on.
Activation of the Nordic country solution
● Remove the key from the ignition, move the turn signal lever upwards
(right turn signal), press it backwards to flash position and hold it in this po-
sition.
● Insert the key and switch the ignition on, holding it in this position for 3
seconds. Then, switch off the ignition. The Nordic country solution is now
activated and the corresponding lights may come on.
1)
Only available in certain countries or as an optional extra.
Safety FirstOperating instructionsPractical TipsTechnical Specifications
Page 168 of 321
166Air conditioning
Viewing Climatronic information
Information about the Climatronic system can be displayed
on the radio or radio and navigation screen mounted at fac-
tory.
Fig. 134 Navigation dis-
play with information
about the Climatronic
Fig. 135 Radio display
with information about
Climatronic The LEDs on the Climatronic controls indicate that the selected function has
been activated.
In addition, the radio or radio and navigation displays mounted at factory
briefly display the current settings of the Climatronic if any are modified.
The symbols used on the radio or radio and navigation displays are the
same as the symbols used for the Climatronic controls.
Automatic mode
In automatic mode air temperature, air flow and distribution
are automatically regulated so that a specified temperature
is attained as quickly as possible and then maintained. The temperature can be adjusted separately for the left and right
sides of the vehicle interior.
Switching on automatic mode
– Press the AUTO
⇒
Fig. 133 button. “AUTO High” is shown on the
radio display (high fan speed).
– Press the AUTO
button again ⇒ Fig. 133. “AUTO Low” is shown
on the radio display (low fan speed).
Depending upon the version and finish, the vehicle may include:
A pleasant temperature is quickly reached in automatic mode at a tempera-
ture of +22 °C (+72 °F). Therefore, we recommend you not to change this ad-
justment, except as necessary to suit individual preferences or particular cir-
cumstances. It is possible to select interior temperatures from +18 °C
(+64 °F) to +26 °C (+80 °F). These are approximate temperatures and the ac-
tual temperature may be slightly higher or lower depending on the ambient
conditions.
Page 171 of 321
169
Air conditioning
With high outside temperatures, the air recirculation increases the effective-
ness of the air conditioning system by cooling the air inside the vehicle
rather than the ambient air.
If the windscreen air output is on and the air recirculation mode is pressed,
this remains active. When the recirculation mode is on, if the air distribution
towards the windscreen mode is selected, the recirculation mode is deacti-
vated. For safety reasons, the air recirculation mode should not be connec-
ted.
WARNING
In air recirculation mode, no cold air from the outside enters the vehicle
interior. If the air conditioning system is switched off, the windows can
quickly mist over. Therefore, never leave the air recirculation mode
switched on for a long time (risk of accident).
General notes
Pollution filter
The pollution filter (a combined particulate filter and active carbon filter)
serves as a barrier against impurities in the outside air, including dust and
pollen.
For the air conditioner to work with maximum efficiency, the pollution filter
must be replaced at the intervals specified in the Service Plan.
If the filter loses efficiency prematurely due to use in areas reaching very
high pollution levels, the pollen filter must be changed more frequently
than stated in the Service Schedule.
Air conditioner
When the air conditioning system is switched on, not only the temperature,
but also the air humidity in the vehicle interior is reduced. This improves comfort for the vehicle occupants and prevents misting of the windows
when the ambient air humidity is high.
If the air conditioning system cannot be switched on this may be caused by
the following reasons:
●
The engine is not running.
● The AC
button is disconnected.
● The outside temperature is lower than approximately +3 °C (+37 °F).
● The air conditioning system compressor has been temporarily switched
off because the engine coolant temperature is too high.
● The air conditioner fuse is faulty.
● Another fault in the vehicle. Have the air conditioner checked by a speci-
alised workshop.
CAUTION
● If you suspect that the air conditioner is damaged, switch it off with but-
ton AC
to prevent further damage and have it checked by a specialised
workshop.
● Repairs to the air conditioner require specialist knowledge and special
tools. Therefore, we recommend you to take the vehicle to a specialised
workshop.
Note
● If the humidity and temperature outside the vehicle are high, condensa-
tion can drip off the evaporator in the cooling system and so forming a pud-
dle underneath the vehicle. This is completely normal and there is no need
to suspect a leak.
● Keep the air intake slots in front of the windscreen free of snow, ice and
leaves to ensure heating and cooling are not impaired, and to prevent the
windows from misting over.
● The air from the vents flows through the vehicle interior and is extracted
by slots designed for this purpose. Therefore, do not cover these slots with
items of clothing or other objects.
Safety FirstOperating instructionsPractical TipsTechnical Specifications
Page 185 of 321
183
Driving
Automatic gearbox/DSG automatic gearbox* Selector lever positions
Fig. 146 Centre console:
Selector lever for auto-
matic gearbox / DSG au-
tomatic gearbox
Selector lever positions indicated on the cover Parking position (lever locked).
Reverse position.
Neutral position (lever locked). This position is similar to the neutral po-
sition for manual gearboxes).
Drive position (economic driving programme).
Sports driving position.Tiptronic driving position (this programme is similar to the operation of
a manual gearbox).
P
R
N
D
S
+/- Driving programmes
The automatic gearbox / DSG automatic gearbox has three
programmes.
Fig. 147 Programme se-
lection
Selecting the economy programme
– This programme selects a higher gear earlier rather than remain
in a lower gear.
– Put the selector lever into position D to drive forwards
– Put the selector lever into position R to reverse. This position is
shared by all programmes for reversing.
Selecting the sport programme
– Move the lever to position S.
If you select the sport programme, S, the programme is designed for a
sports mode, that is, a programme which changes up at higher engine
Safety FirstOperating instructionsPractical TipsTechnical Specifications
Page 187 of 321
185
Driving
– Select a gear for driving ( R, D or S).
– Release the button and wait a few seconds for the gear to en-
gage, a light jerk will be felt.
– Release the brake and accelerate.
Short stop
– Hold the vehicle stationary with the brake pressed down (for ex-
ample at traffic lights). The selector lever does not need to be
put into the positions P or N for this.
– Do not press the accelerator.
Parking
– Press the brake pedal and hold to bring the vehicle to a stop.
– Apply the handbrake firmly.
– Press in the button on the selector lever knob, move the lever to
the position P and release the button.
Driving slowly
– Move the selector lever to position D and press to the right to
put the lever into tiptronic mode.
– Press the gear lever towards (-) to select a lower gear.
Hill stop
– Hold the vehicle, in all cases, using the brake pedal to prevent
rolling back.
– Do not try to slow the vehicle using another forward gear (en-
gine braking). Descending gradients
–
With the gear engaged, release the brake and accelerate.
The steeper the gradient the lower the gear must be for effective engine
braking. For example, if 3rd gear is used on a very steep gradient, the en-
gine braking is insufficient and vehicle accelerates. So that the engine
speed does not become excessive, the gearbox changes to the next highest
gear. Depress the brake pedal and move the selector lever to the tiptronic
gate to return to 3rd gear.
WARNING
● The driver should never leave the vehicle while the engine is running
or with any gear selected. If for any reason you must leave the vehicle
with the engine running, apply the handbrake and move the selector lev-
er to position P.
● When the engine is running and the positions D, S or R are selected,
it is necessary to hold the vehicle with the brake pedal because the vehi-
cle will creep at a low speed.
● Never accelerate while changing the position of the gear lever (risk of
an accident).
● The gear lever must never be moved into the positions R or P while
moving (risk of an accident).
● Before descending a steep gradient, reduce speed and use the tip-
tronic programme to select a lower gear.
● If you must stop on a hill, always hold the vehicle using the footbrake
to avoid rolling back.
Safety FirstOperating instructionsPractical TipsTechnical Specifications
Page 188 of 321
186Driving
WARNING (Continued)
● The footbrake must not be held for a long period of time, not even
lightly; continuous braking will cause overheating of the brakes and a re-
duction or even a loss of braking power and a significant increase in
braking distances.
● Never allow the vehicle to coast down a gradient with the selector lev-
er in positions N or D, even when the engine is not running. For descents,
the use of the tiptronic programme is recommended to keep the speed
reduced.
CAUTION
● Never use the automatic gearbox to hold the vehicle stationary on a hill,
even for short periods, as this may overheat the gearbox and cause dam-
age. Apply the handbrake or depress the foot brake to hold the vehicle in
position.
● If the vehicle is allowed to roll with the engine stopped but the selector
in position N then the gearbox may be damaged because it will not be lubri-
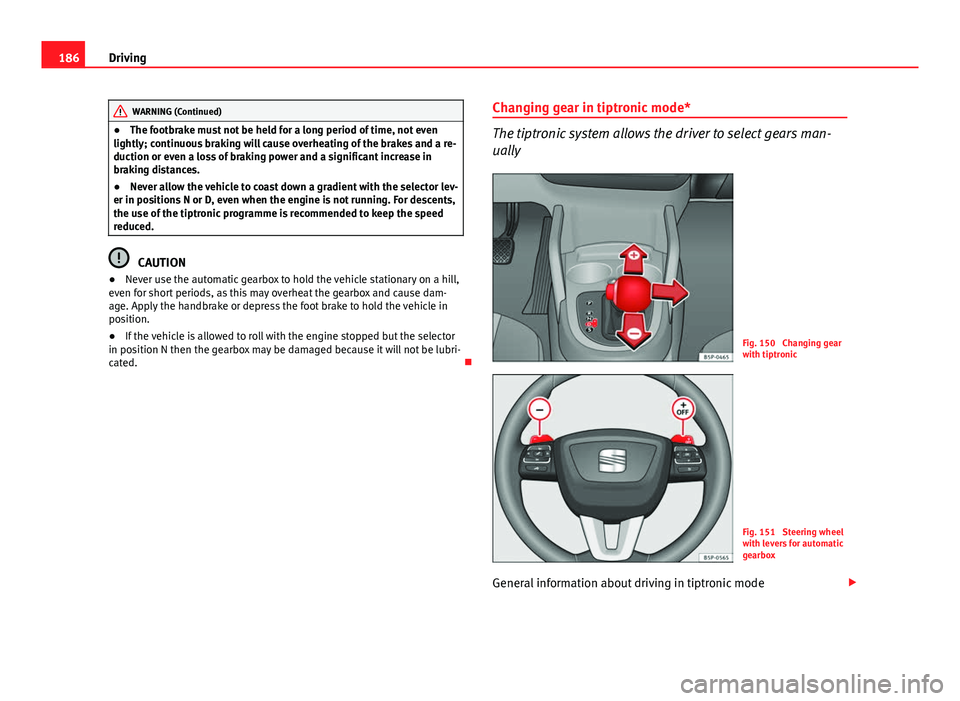
cated. Changing gear in tiptronic mode*
The tiptronic system allows the driver to select gears man-
ually
Fig. 150 Changing gear
with tiptronic
Fig. 151 Steering wheel
with levers for automatic
gearbox
General information about driving in tiptronic mode
Page 189 of 321
187
Driving
Changing gear with the selector lever
– Put the lever in position D and press towards the right to enter
the tiptronic gate ⇒ Fig. 150.
– Press the gear lever forwards +
⇒ Fig. 150 to select a higher
gear.
– Press the gear lever back –
⇒ Fig. 150 to select a lower gear.
Changing gear with the steering wheel levers
– Press the right paddle lever +
(+OFF) towards the steering
wheel to change up ⇒ Fig. 151.
– Press the left paddle –
towards the steering wheel to change
down ⇒ Fig. 151.
Using the paddle levers on the steering wheel, you can access manual driv-
ing mode regardless of the pre-selected driving mode.
General information about driving in tiptronic mode
When accelerating, the automatic gearbox / DSG automatic gearbox goes
into a higher gear a little before the engine reaches its maximum permitted
revolutions.
If a lower gear is selected, the automatic gearbox / DSG automatic gearbox
will only change down when the engine cannot go over its maximum permit-
ted revolutions.
If tiptronic is selected whilst the vehicle is in motion and the automatic
gearbox / DSG automatic gearbox is in third gear and selector lever position
D, tiptronic mode will then also be in third gear.
Changing gears in the normal or sport programme using the steering wheel
paddle levers
If the paddle levers ⇒ Fig. 151 are used in the normal or sport programme,
the system switches temporarily to tiptronic mode. To exit tiptronic mode again, press the right paddle lever
+ OFF
towards the steering wheel for ap-
proximately one second. You will also leave “Tiptronic” mode if the paddle
levers are not moved for a certain time.
Note
● The gearbox controls on the steering wheel can operate with the selector
lever in any position and with the vehicle in motion.
Kick-down feature
This feature allows maximum acceleration. If you press the accelerator down thoroughly, the gearbox automatically
changes down, depending on speed and engine speed, into a lower gear to
take full advantage of give the vehicle maximum acceleration.
The gearbox does not change gear until the engine reaches the maximum
determined engine speed for the gear.
WARNING
You could lose control of the vehicle if you accelerate on slippery road
surfaces. Risk of serious injury.
● Be particularly careful when using the kick-down features on slippery
road surfaces. With a fast acceleration, the vehicle could lose traction
and skid.
● You should use the kick-down feature only when traffic and weather
conditions allow it to be used safely.
Safety FirstOperating instructionsPractical TipsTechnical Specifications
Page 194 of 321
192Driving
an obstacle. As the vehicle gets closer to the obstacle, the colour of the seg-
ment changes to red and the acoustic signal beeps continuously. When the
penultimate segment is displayed, this means that the vehicle has reached
the collision zone. Stop moving immediately! ⇒
.
WARNING
● The parking aid is not a replacement for driver awareness. The driver
is personally responsible for safe parking and other manoeuvres.
● The sensors have blind spots in which obstacles are not registered.
Always look out for small children and animals because the system will
not always detect them. Always pay attention when reversing to avoid ac-
cidents.
● Always keep a close eye on the area around the vehicle and make full
use of the rear vision mirrors.
CAUTION
Please note that low obstacles detected by the system may no longer be
registered by the sensors as the vehicle moves closer, so the system will not
give any further warning. Certain kinds of obstacles (such as wire fences,
chains, thin painted posts or trailer draw bars, etc) may not always be de-
tected by the system, so take care not to damage the vehicle in such cases.
Note
● Please refer to the notes on towing ⇒ page 192.
● There is a slight delay in the picture display.
Towing bracket
In towing mode, the rear parking aid sensors are not enabled when you se-
lect reverse gear or press the switch . This function may not be guaran- teed on towing brackets that are not factory fitted. This results in the follow-
ing restrictions:
SEAT Parking System*
No warning is given
SEAT Parking System Plus*
There is no rear distance warning. The system will still give a warning when
obstacles are detected while driving forward. The optical display changes to
towing mode.
Fault messages
If you hear a long beep for a few seconds and the LED on the switch *
starts flashing when you switch on the parking aid, a system fault has oc-
curred. Please refer the problem to a SEAT Official Service or specialised
workshop.
Note
If the fault is not corrected before you switch off the ignition, it will only be
indicated by the flashing LED on the switch the next time you switch on
the parking aid.
Page 202 of 321
200Intelligent technology
To prevent the disc brake of the braking wheel from overheating, the EDL
cuts out automatically if subjected to excessive loads. The vehicle will con-
tinue to function normally without EDL. For this reason, the driver is not in-
formed that the EDL has been switched off.
The EDL will switch on again automatically when the brake has cooled
down.
WARNING
● When accelerating on a slippery surface, for example on ice and
snow, press the accelerator carefully. Despite EDL, the driven wheels may
start to spin. This could impair the vehicle's stability.
● Always adapt your driving style to suit road conditions and the traffic
situation. Do not let the extra safety afforded by EDL tempt you into tak-
ing any risks when driving, this can cause accidents.
CAUTION
Modifications to the vehicle (e.g. to the engine, the brake system, running
gear or any components affecting the wheels and tyres) could affect the effi-
ciency of the EDL ⇒ page 226.
Drive wheel traction control system (ASR)
The traction control system prevents the driven wheels from spinning when
the vehicle is accelerating ⇒ page 197. All-wheel drive*
On all-wheel drive models, the engine power is distributed
to all four wheels
General notes
The all-wheel drive system operates completely automatically. The propul-
sion force is distributed among the four wheels and adapted to the driving
style and the road conditions.
The all-wheel drive is specially designed to complement the superior engine
power. This combination gives the vehicle exceptional handling and per-
formance capabilities, both on normal roads and in more difficult condi-
tions, such as snow and ice.
Winter tyres
Thanks to its all-wheel drive, your vehicle will have plenty of traction in win-
ter conditions, even with the standard tyres. Nevertheless, we still recom-
mend that winter tyres or all-season tyres should be fitted on all four wheels
when winter road conditions are expected, mainly because this will give a
better braking response.
Snow chains
On roads where snow chains are mandatory, this also applies to cars with
all-wheel drive.
Changing tyres
On vehicles with all-wheel drive, all four tyres must have the same rolling
circumference ⇒ page 258.
Page 209 of 321
207
Driving and the environment
let the vehicle roll with a gear engaged, for example, if you see a red light
ahead. The braking effect achieved in this way helps to reduce the wear of
brakes and tyres; emissions and fuel consumption are reduced to zero (dis-
connection due to inertia).
Change gear early to save energy
An effective way of saving fuel is to change up quickly through the gears.
Running the engine at high rpm in the lower gears uses an unnecessary
amount of fuel.
Manual gearbox: Change from first to second gear as quickly as possible.
We recommend that, whenever possible, you change to a higher gear upon
reaching 2000 rpm. Follow the “recommended gear” indication that ap-
pears on the instrument panel ⇒ page 62.
Avoid driving at high speed
We advise you not to drive at the top speed permitted by the vehicle. Fuel
consumption, exhaust emissions and noise levels all increase very rapidly
at higher speeds. Driving at moderate speeds will help to save fuel.
Avoid idling
It is worthwhile switching off the engine when waiting in a traffic jam, at lev-
el crossings or at traffic lights with a long red phase. The fuel saved after
only 30 - 40 seconds is greater than the amount of fuel needed to restart
the engine.
The engine takes a long time to warm up when it is idling. Mechanical wear
and pollutant emissions are also especially high during this initial warm-up
phase. It is therefore best to drive off immediately after starting the engine.
Avoid running the engine at high speed.
Periodic maintenance
Periodic maintenance work guarantees that, before beginning a journey,
you will not consume more than the required amount of fuel. A well-serviced
engine gives you the benefit of improved fuel efficiency as well as maxi-
mum reliability and an enhanced resale value.
A badly serviced engine can consume up to 10% more fuel than necessary. Avoid short journeys
To reduce the consumption and emission of polluting exhaust gases, the
engine and the exhaust gas filtration systems should reach the optimum
operating temperature.
With the engine cold, fuel consumption is proportionally higher. The engine
does not warm up and fuel consumption does not normalise until having
driven approximately
four kilometres (2.5 miles). This is why we recommend
avoiding short trips whenever possible.
Maintain the correct tyre pressures
Bear in mind that keeping the tyres at an adequate pressure saves fuel. If
the tyre pressure is just one bar (14.5 psi / 100 kPa) too low, fuel consump-
tion can increase by as much as 5%. Due to the greater rolling resistance,
under-inflation also increases tyre wear and impairs handling.
The tyre pressures should always be checked when the tyres are cold.
Do not use winter tyres all year round as they increase fuel consumption by
up to 10%.
Avoid unnecessary weight
Given that every kilo of extra weight will increase the fuel consumption, it is
advisable to always check the luggage compartment to make sure that no
unnecessary loads are being transported.
A roof rack is often left in place for the sake of convenience, even when it is
no longer needed. At a speed of 100 km/h (62 mph) and 120 km/h
(75 mph) your vehicle will use about 12% more fuel as a result of the extra
wind resistance caused by the roof rack even when it is not in use.
Save electricity
The engine activates the alternator, which produces electricity. With the
need for electricity, fuel consumption is also increased. Because of this, al-
ways turn off electrical components when you do not need them. Examples
of components that use a lot of electricity are: the fan at high speeds, the
rear window heating or the seat heaters*.
Safety FirstOperating instructionsPractical TipsTechnical Specifications