check engine Seat Arona 2017 Owner's Guide
[x] Cancel search | Manufacturer: SEAT, Model Year: 2017, Model line: Arona, Model: Seat Arona 2017Pages: 308, PDF Size: 6.66 MB
Page 195 of 308
Driving
Maintain the correct tyre pressures
B e
ar in mind th
at keeping the tyres at an ad-
equate pressure saves fuel. If the tyre pres-
sure is just one bar (14.5 psi/100 kPa) too
low, fuel consumption can increase by as
much as 5%. Due to the greater rolling resist-
ance, under-inflation also increases tyre wear
wear and impairs handling.
The tyre pressures should always be checked
when the tyres are cold.
Do not use winter tyres all year round as they
increase fuel consumption by up to 10%.
Avoid unnecessary weight
Given that every kilo of extra weight will in-
crease the fuel consumption, it is advisable
to always check the luggage compartment to
make sure that no unnecessary loads are be-
ing transported.
A roof rack is often left in place for the sake
of convenience, even when it is no longer
needed. At a speed of 100 km/h (62 mph)
and 120 km/h (75 mph) your vehicle will use
about 12% more fuel as a result of the extra
wind resistance caused by the roof rack even
when it is not in use.
Save electricity
The engine activates the alternator, which
produces electricity. With the need for elec-
tricity, fuel consumption also increases. Be-
cause of this, always turn off electrical devi- ces when you do not need them. Examples of
device
s that use a lot of electricity are: the
blower at high speeds, the rear window heat-
ing or the seat heaters*. Note
● If y
our vehicle has Start-Stop, it is not rec-
ommended that you switch this function off.
● It is recommended that you close
the win-
dows when driving at more than 60 km/h
(37 mph).
● Do not drive with your foot resting on the
clutc
h pedal,, as the pressure can make the
plate spin, more fuel will be used and it can
burn the clutch plate lining, causing a serious
fault.
● Do not hold the car on a hill with the clutch,
use the foot
brake or hand brake, using the
latter to start. The fuel consumption will be
lower and you will prevent the clutch plate
from being damaged.
● On descents, use the engine brake, chang-
ing to the g
ear that is more suitable for the
slope. Fuel consumption will be “zero” and
the brakes will not suffer. Engine management and ex-
h
au
s
t gas purification system
Introduction WARNING
● Bec au
se of the high temperatures which
can occur in the exhaust purification system
(catalytic converter or diesel particulate fil-
ter), do not park the vehicle where the ex-
haust can come into contact with flammable
materials under the car (e.g. on grass or at
the forest edge). Fire hazard!
● Do not apply wax underneath the vehicle
around the ar
ea of the exhaust system: Fire
hazard! Note
While the control lamps , , or re-
m ain lit, ther
e may be engine problems, fuel
consumption may increase and the engine
may lose power. Catalytic converter
To maintain the useful life of the catalytic
c
on
v
erter
– Use only unleaded petrol with petrol en-
gines, as
lead damages the catalytic con-
verter.
– Do not let the fuel get too low in the tank. »
193
Technical data
Advice
Operation
Emergencies
Safety
Page 196 of 308
Operation
– For en
gine oi
l changes, do not replenish
with too much engine oil ››› page 272, Top-
ping up engine oil.
– Never tow the vehicle to start it, use jump
lea
ds if necessary ›››
page 67.
If you notice misfiring, uneven running or
loss of power when the vehicle is moving, re-
duce speed immediately and have the vehi-
cle inspected at the nearest specialised
workshop. In general, the exhaust warning
lamp will light up when any of the described
symptoms occur ››› page 117. If this hap-
pens, unburnt fuel can enter the exhaust sys-
tem and escape into the environment. The
catalytic converter can also be damaged by
overheating. CAUTION
Never run the fuel tank completely dry be-
cau se the irr
egularity of the fuel supply may
cause ignition problems. This allows unburnt
fuel to enter the exhaust system, which could
cause overheating and damage the catalytic
converter. For the sake of the environment
Even when the emission control system is
work in
g perfectly, there may be a smell of
sulphur from the exhaust gas under some
conditions. This depends on the sulphur con-
tent of the fuel used. Quite often the problem
can be solved by changing to another brand
of fuel. Diesel particulate filter
3 Applies to vehicles with diesel engine
The die sel
engine particulate filter eliminates
most of the soot from the exhaust gas sys-
tem. Under normal driving conditions, the fil-
ter cleans itself. The diesel particulate filter is
cleaned automatically without need for indi-
cation by the warning lamp . This may be
noticed because the engine idle speed in-
creases and an odour may be detected.
If automatic filter purification cannot be car-
ried out (because only short trips are taken,
for example), soot will accumulate on the fil-
ter and the Diesel particulate filter warning
lamp will switch on.
Facilitate the automatic filter cleaning proc-
ess by driving in the following manner: drive
for approximately 15 minutes at a minimum
speed of 60 km/h (37 mph) in 4th or 5th gear
(automatic gearbox: gear S). Maintain the en-
gine speed at approximately 2,000 rpm. The
rise in temperature causes the soot on the fil-
ter to burn. On completion of the cleaning
the warning lamp will switch off. If the warn-
ing lamp does not switch off, go immediately
to a specialised workshop to rectify the prob-
lem. Engine management* This warning lamp monitors the engine man-
agement
sy
stem for petrol engines.
The warning lamp (Electronic Power Con-
trol) lights up when the ignition is switched
on while system operation is being verified. It
should go out once the engine is started.
If there is a fault in the electronic engine
management system while you are driving,
this warning lamp will light up. Take the vehi-
cle to a specialised workshop as soon as
possible and have the engine checked.
Emission control system* Control lamp
fla
she
s:
When there is misfiring that can damage the
catalytic converter. Reduce speed and drive
carefully to the nearest specialised workshop
to have the engine checked.
The control lamp lights up:
If a fault has developed during driving which
has reduced the quality of the exhaust gas
(e.g. lambda probe fault). Reduce speed and
drive carefully to the nearest specialised
workshop to have the engine checked.
194
Page 197 of 308
Driving
Engine pre-heating/fault system* The warning lamp lights up to show that the
glow p
lug
s are preheating the diesel engine.
The control lamp lights up
If the control lamp lights up when the en-
gine is started it means that the glow plugs
are preheating. The engine can be started
straight away when the lamp switches off.
Control lamp flashes
If a fault develops in the engine management
system while you are driving, the glow plug
system lamp will flash . Take the vehicle to
a specialised workshop as soon as possible
and have the engine checked.
Driving tips Drivin g abr
oadTo drive abroad, the following must be taken
int
o c
on
sideration:
● For vehicles fitted with a catalytic converter
ensur
e that unleaded petrol is available for
the journey. See the chapter “Refuelling”. Au-
tomobile organisations will have information
about service station networks selling unlea-
ded fuel. ●
In some countrie
s, it is possible that your
car model is not sold, and therefore some
spare parts are not available or the technical
services may only be able to carry out limited
repairs.
SEAT importers and distributors will gladly
provide information about the technical prep-
aration that your vehicle requires and also
about necessary maintenance and repair
possibilities.
Adhesive strips for headlights
In countries where vehicles drive on the other
side of the road to your home country, the
asymmetric dipped beam may dazzle drivers
of oncoming vehicles.
To prevent dazzling, you must apply stickers
to certain parts of the headlight lenses. Fur-
ther information is available at any Technical
Service.
Driving on flooded roads To prevent damage to the vehicle when driv-
in
g thr
ough w
ater, for example, along a floo-
ded road, please observe the following:
● The water should never come above the
lower edg
e of the bodywork.
● Drive at pedestrian speed. WARNING
After driving through water, mud, sludge,
etc ., the br
aking effect can be delayed slight-
ly due to moisture build-up on the discs and
brake pads. Applying the brakes carefully
several times will remove the moisture and
restore the full braking effect. CAUTION
● Drivin g thr
ough flooded areas may severely
damage vehicle components such as the en-
gine, transmission, running gear or electrical
system.
● Whenever driving through water, the Start-
Stop sys
tem* must be switched off
››› page 196. Note
● Check the depth of
the water before enter-
ing the flooded zone.
● Do not stop in the water, drive in reverse, or
stop the en
gine in any situation.
● Note that vehicles travelling in the opposite
direction ma
y splash water that could exceed
the maximum permitted water height for your
vehicle.
● Avoid driving through salt water (corro-
sion). 195
Technical data
Advice
Operation
Emergencies
Safety
Page 213 of 308
Driver assistance systems
●
Rep air
s to the radar sensor require special-
ist knowledge and special tools. SEAT recom-
mends visiting a SEAT dealership for this pur-
pose. Note
● If the A C
C system does not work as descri-
bed in this chapter, do not use it until it has
been checked by a specialised workshop.
SEAT recommends visiting a SEAT dealership
for this purpose.
● Maximum speed with the ACC activated is
limited to 210 km/h (150 mph).
● When the A
CC is switched on, strange
noises
may be heard during automatic brak-
ing cause by the braking system. Indications on the display, warning
and c
ontr
o
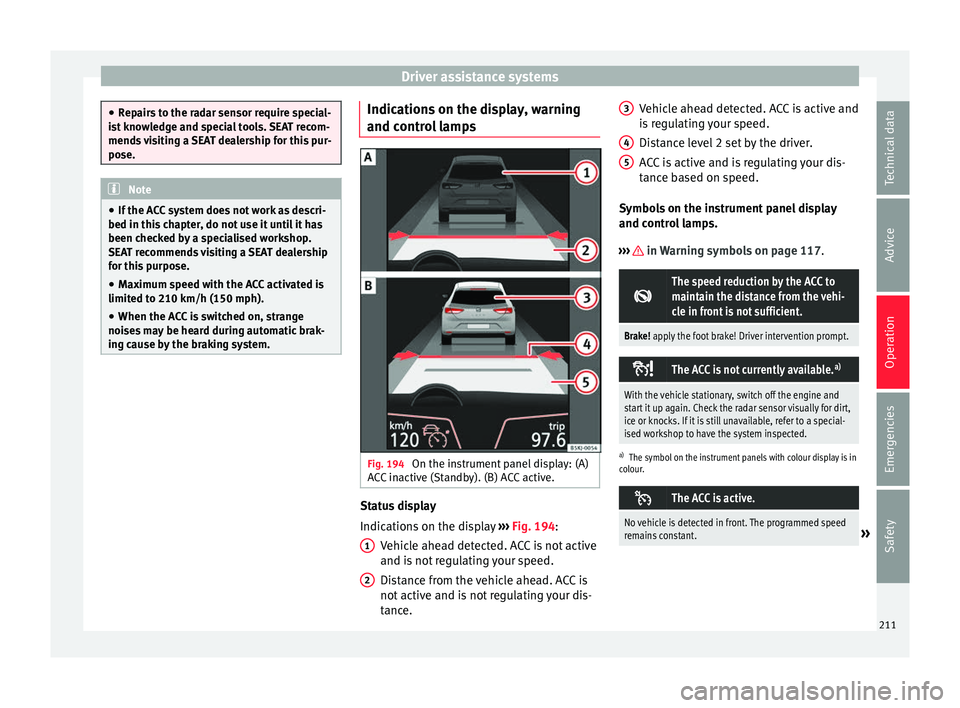
l lamps Fig. 194
On the instrument panel display: (A)
A C
C
inactive (Standby). (B) ACC active. Status display
Indic
ation
s
on the display ››› Fig. 194:
Vehicle ahead detected. ACC is not active
and is not regulating your speed.
Distance from the vehicle ahead. ACC is
not active and is not regulating your dis-
tance.
1 2 Vehicle ahead detected. ACC is active and
i
s
r
egulating your speed.
Distance level 2 set by the driver.
ACC is active and is regulating your dis-
tance based on speed.
Symbols on the instrument panel display
and control lamps.
››› in Warning symbols on page 117.
The speed reduction by the ACC to
maintain the distance from the vehi-
cle in front is not sufficient.
Brake! apply the foot brake! Driver intervention prompt.
The ACC is not currently available.
a)
With the vehicle stationary, switch off the engine and
start it up again. Check the radar sensor visually for dirt,
ice or knocks. If it is still unavailable, refer to a special-
ised workshop to have the system inspected.
a)
The symbol on the instrument panels with colour display is in
colour.
The ACC is active.
No vehicle is detected in front. The programmed speed
remains constant.»3
4
5
211
Technical data
Advice
Operation
Emergencies
Safety
Page 227 of 308
Driver assistance systems
Open the Assistants menu.
● Blind s pot
● Ex
it Assist
If the
verification box on the control panel is
checked , the functionality will be automat-
ically activated at ignition.
When the blind spot detector is ready to op-
erate, the indications in the external mirrors
will turn on briefly as confirmation.
When the vehicle is restarted, the last adjust-
ment in the system will remain active.
If the blind spot detector was automatically
deactivated, it will only be possible to restart
the system after turning the vehicle off and
restarting it.
Automatic deactivation of the blind spot de-
tector (BSD)
The radar sensors of the blind spot detector
with rear cross traffic alert will be automati-
cally deactivated when, among other rea-
sons, one of the sensors is detected to be
permanently covered. This may be the case if,
for example, there is a layer of snow or ice in
front of one of the sensors.
The relevant text message will appear in the
dash panel display. Trailer mode
The Blind spot det
ector and the rear cross
traffic alert will be automatically deactivated
and it will be impossible to activate them if
the tow hitch is electrically connected to a
trailer or other similar object.
As soon as the driver starts to drive with a
trailer connected electrically to the vehicle, a
message will appear on the instrument panel
display indicating that the blind spot detec-
tor and the rear cross traffic alert are deacti-
vated. Once the trailer has been unhitched
from the vehicle, if you want to use the blind
spot detector and the rear cross traffic alert,
you will have to reactivate them in the corre-
sponding menu.
If the towing hitch is not factory equipped,
then the blind spot detector and the rear
cross traffic alert will have to be deactivated
manually when driving with a trailer.
SEAT Drive Profile*
Introduction SEAT Drive Profile enables the driver to
c
hoo
se betw
een four profiles or modes, Nor-
mal , Sport , Eco and Individual , that
modify the behaviour of various vehicle func-
tions, providing different driving experiences. The Individual
profil
e can be configured
according to personal preferences. The other
profiles are fixed.
Description Depending on the equipment fitted in the ve-
hicl
e,
SEAT Drive Profile can operate on the
following functions:
Engine
Depending on the profile selected, the en-
gine responds more spontaneously or more
in harmony with the movements of the accel-
erator. Additionally, when Eco mode is selec-
ted, the Start-stop function is automatically
activated.
In vehicles with automatic transmission, the
gear change points are modified to position
them in lower or higher engine speed ranges.
Additionally, the Eco mode activates the In-
ertia function, enabling consumption to be
further reduced.
In manual gearbox vehicles, Eco mode cau-
ses the gear change recommendation indica-
tions that appear on the instrument panel to
vary, facilitating more efficient driving.
“Dual Ride” suspension
The “Dual Ride” suspension features a com-
fortable suspension in the Eco and Normal»
225
Technical data
Advice
Operation
Emergencies
Safety
Page 252 of 308

Operation
Trailer towing Wh at
do
you need to bear in mind
when towing a trailer? Your vehicle may be used to tow a trailer
when fitted w
ith the c
orrect equipment.
If you wish to retrofit a towing bracket, con-
sult ››› page 253.
Connectors
Your vehicle is fitted with a 13-pin connector
for the electrical connection between the
trailer and the vehicle.
If the trailer has a 7-pin plug you will need to
use an adapter cable. It is available at any
Technical Service.
Trailer weight/drawbar load
Never exceed the authorised trailer weight. If
you do not load the trailer up to the maxi-
mum permitted trailer weight, you can then
climb correspondingly steeper slopes.
The maximum trailer weights listed are only
applicable for altitudes up to 1000 m above
sea level. With increasing altitude the engine
power and therefore the vehicle climbing
ability are impaired because of the reduced
air density. The maximum trailer weight has
to be reduced accordingly. The weight of the
vehicle and trailer combination must be re- duced by 10% for every further 1000 m (or
par
t
thereof). The gross combination weight
is the actual weight of the laden vehicle plus
the actual weight of the laden trailer. When
possible, operate the trailer with the maxi-
mum permitted drawbar load on the ball joint
of the towing bracket, but do not exceed the
specified limit.
The figures for trailer weights and drawbar
loads that are given on the data plate of the
towing bracket are for certification purposes
only. The correct figures for your specific
model, which may be lower than these fig-
ures for the towing bracket, are given in the
vehicle documentation or in ››› chapter Tech-
nical Data .
Distributing the load
Distribute loads in the trailer so that heavy
objects are as near to the axle as possible.
Loads carried in the trailer must be secured
to prevent them moving.
Tyre pressure
The maximum permissible tyre pressure val-
ues are shown on the sticker on the back of
the right front door frame. Set the tyre pres-
sure of the trailer tyres in accordance with the
trailer manufacturer's recommendations. Exterior mirrors
Check whether
you can see enough of the
road behind the trailer with the standard rear
vision mirrors. If this is not the case, you
should have additional exterior mirrors fitted.
Both exterior mirrors should be mounted on
hinged extension brackets. Adjust the mirrors
to give sufficient vision to the rear.
Tow rope
Always use a cable between the vehicle and
the trailer ››› page 251.
Trailer rear lights
The trailer's rear lights should comply with
the statutory safety regulations ››› page 251. WARNING
Never transport people in a trailer. This could
re s
ult in fatal accidents. Note
● To w
ing a trailer places additional demands
on the vehicle. We recommend additional
services between the normal inspection inter-
vals if the vehicle is used frequently for tow-
ing a trailer.
● Find out whether special regulations apply
to to
wing a trailer in your country. 250
Page 263 of 308
Care and maintenance
Steel wheel rims –
Clean steel wheel rims regularly using a
separ at
e sponge.
Use an industrial cleaner to remove brake
dust. Any damage to the paint on steel wheel
rims should be repaired before starting to
rust. WARNING
● Never w a
sh tyres with a cylindrical jet. Even
at large spraying distances and short clean-
ing times, damage can occur to the tyres.
This may cause an accident.
● Water, ice and salt on the brake system can
reduce br
aking effectiveness. Risk of acci-
dent. Directly after washing, avoid sudden
and sharp braking. “Dry” the brakes by brak-
ing several times ››› page 174, Braking ca-
pacity and braking distance .Alloy wheel rims
Every two weeks
– Wash salt and brake dust from alloy
wheel s.
– Use an ac
id free detergent to clean the
wheel rims.
Ev
ery 3 months
– Apply a hard wax compound to the wheels. Alloy wheels require regular attention to pre-
serve their ap
pearance. If road salt and brake
dust are not often removed, the aluminium
finish will be impaired.
Always use an acid-free detergent for alloy
wheel rims.
Car polish or other abrasive agents should
not be used for maintaining the rims. If the
protective coating is damaged, e.g. by flying
stones, the damaged area should be re-
paired immediately. WARNING
Observe the safety warnings ›››
in Steel
wheel rims on p
age 261. Vehicle underbody protection
The vehicle underbody is coated to protect it
fr
om c
hemic
al and mechanical damage.
The protective coating can be damaged when
driving. We recommend that you check the
protective coating under the body and on the
running gear, and retouch it if necessary, be-
fore and after the winter season.
We recommend that you go to your Technical
Service to carry out repair work and addition-
al anti-corrosion work. WARNING
Do not apply underseal or anti-corrosion
co atin
gs to the exhaust pipes, catalytic con-
verter or the heat shields on the exhaust sys-
tem. The heat of the exhaust system or the
engine could cause them to ignite. Risk of
fire. Cleaning engine compartment
Take special care when cleaning the engine
comp
ar
tment.
Anti-corrosion treatment
The engine compartment and the surface of
the power unit are given anti-corrosion treat-
ment at the factory.
Good corrosion protection is particularly im-
portant in winter when the vehicle is fre-
quently driven on salted roads. To prevent
the salt corroding the vehicle, the entire en-
gine compartment should be thoroughly
cleaned before and after winter.
Technical Services have the proper products
for cleaning and preservation as well as the
necessary workshop equipment. For this rea-
son, we recommend having this work per-
formed by them.
The anti-corrosion protection is usually re-
moved if the engine compartment is cleaned
with grease removing solutions, or if you »
261
Technical data
Advice
Operation
Emergencies
Safety
Page 267 of 308
Checking and refilling levels
Checking and refilling levels
R ef
uel
ling
Refuelling Read the additional information carefully
›› ›
page 54
If the automatic filler nozzle is operated cor-
rectly, it will switch itself off as soon as the
tank is “full”. Never attempt to fill beyond
this point, as this will fill the expansion
chamber. Fuel may leak out if ambient condi-
tions are warm.
The correct fuel grade for your vehicle is giv-
en on a sticker on the inside of the fuel tank
flap. WARNING
● Fuel i
s highly flammable and can cause se-
rious burns and other injuries.
–Never smoke or come into contact with
sparks when filling the fuel tank of the
vehicle or a spare fuel canister with fuel.
This is an explosion hazard.
– Follow legal requirements for the use of
spare fuel canisters.
– For safety reasons we do not recommend
carrying a spare fuel canister in the vehi-
cle. The canister could be damaged in an
accident and leak. ●
If, in e x
ceptional circumstances, you have
to carry a spare fuel canister, please observe
the following:
–Never fill the spare fuel canister inside
the vehicle or on it. An electrostatic
charge could build up during filling, caus-
ing the fuel fumes to ignite. This could
cause an explosion. Always place the
canister on the ground to fill it.
– Insert the fuel nozzle into the mouth of
the canister as far as possible.
– If the spare fuel canister is made of met-
al, the filling nozzle must be in contact
with the canister during filling. This
helps prevent an electrostatic charge
building up.
– Never spill fuel in the vehicle or in the
luggage compartment. Fuel vapours are
explosive. Danger of death. CAUTION
● Fuel s
pills should be removed from the
paintwork immediately.
● Never run the tank completely dry. Irregular
fuel s
upply can cause misfiring. As a result,
unburnt fuel could enter the catalytic convert-
er and cause damage.
● When filling the fuel tank after having run it
compl
etely dry on a vehicle with a diesel en-
gine the ignition must be switched on for at
least 30 seconds before starting the engine.
Subsequently, when you start the engine it
may take longer than normal to start firing (up to one minute). This is due to the fact that
the fuel
sy
stem has to purge itself of air be-
fore starting. For the sake of the environment
Do not try to put in more fuel after the auto-
m atic fi
ller nozzle has switched off, this may
cause the fuel to overflow if it becomes warm. Note
There is no emergency mechanism for the
manua l
release of the fuel tank flap. If neces-
sary, request assistance from specialised per-
sonnel. Fuel
Ty
pe
s of petrol The correct grade of petrol is listed inside the
f
uel
t
ank flap.
The vehicle is equipped with a catalytic con-
verter and must only be run on unleaded pet-
rol. The petrol must comply with European
Standard EN 228 or German standard DIN
51626-1 and must be unleaded. You can re-
fuel with a maximum ethanol proportion of
10 % (E10). The types of petrol are differenti-
ated by their octane rating (RON). »
265
Technical data
Advice
Operation
Emergencies
Safety
Page 269 of 308
Checking and refilling levels
We recommend the use of diesel
f uel which
complies to European standard EN 590. If
diesel fuel which meets European standard
EN 590 is not available, the Cetane number
(CZ) must, at minimum, be 51. If the engine
is equipped with a particulate filter, the sul-
phur content of the fuel must be below 50
parts per million.
Winter-grade diesel
Summer fuel becomes thicker in winter and it
is more difficult to start the engine. For this
reason, petrol stations in some countries al-
so offer winter diesel with improved fluidity
when cold (winter-grade diesel). CAUTION
● The v ehic
le is not designed for the use of
FAME fuel (biodiesel). The fuel system would
be damaged if you used biodiesel.
● Do not mix fuel additives, the so-called
“thinners”, petro
l or similar additives with
diesel fuel.
● If poor-quality diesel fuel is used, it may be
neces
sary to drain the fuel filter more fre-
quently than is specified in the Maintenance
Programme. We recommend having this done
by a specialised workshop. If water is allowed
to collect in the filter, this can cause engine
performance problems. Working in the engine compart-
ment
saf
ety
notes for work in the engine
compartment Read the additional information carefully
›› ›
page 17
Before starting any work on the engine or in
the engine compartment:
1. Switch off the engine and remove the key from the ignition.
2. Ap
ply the handbrake.
3. Move the gear lever to neutral or the selec- tor lev
er to position P.
4. Wait for the engine to cool down.
5. Keep children away from the vehicle.
6. Raise the bonnet ›››
page 268.
You should not do any work in the engine
compartment unless you know exactly how to
carry out the jobs and have the correct tools!
Have the work carried out by a specialised
workshop if you are uncertain.
All service fluids and consumables, e.g. cool-
ant, engine oil, spark plugs and batteries,
are under constant development. SEAT pro-
vides a constant flow of information to Tech-
nical Services concerning modifications. For
this reason, we recommend you have service fluids and consumables replaced by a Techni-
cal
Service. Please observe the relevant in-
structions ››› page 255. The engine compart-
ment of the vehicle is a hazardous area ››› .
WARNING
All work on the engine or in the engine com-
par tment, e.
g. checking and refilling fluids,
involves the danger of injury and burns, acci-
dents and even fire.
● Never open the bonnet if you see steam,
smoke or coo
lant escaping from the engine
compartment. Otherwise, there is a risk of
sustaining burns. Wait until no more steam or
coolant is emitted, then allow the engine to
cool before carefully opening the bonnet.
● Switch off the engine and remove the key
from the ignition.
● App
ly the handbrake and move the gear
lever t
o neutral or selector lever to position P.
● Keep children away from the vehicle.
● Never touch hot engine parts. There is a
risk of
burns.
● Never spill liquids on a hot engine or on a
hot exh
aust gas system. This is a fire hazard.
● Avoid causing short-circuits in the electri-
cal
system, particularly at the points where
the jump leads are attached ›››
page 68.
The battery could explode.
● Never touch the radiator fan. It is tempera-
ture c
ontrolled and could start automatically,
even when the engine has been switched off
and the key removed from the ignition! » 267
Technical data
Advice
Operation
Emergencies
Safety
Page 270 of 308
Advice
●
Never c o
ver the engine with additional in-
sulating materials such as a blanket. Risk of
fire!
● Do not unscrew the cap on the coolant ex-
pans
ion tank when the engine is hot. If the
coolant is hot, the cooling system will be
pressurised!
● Protect face, hands and arms by covering
the cap with a l
arge, thick cloth to protect
against escaping coolant and steam.
● Always make sure you have not left any ob-
jects, s
uch as cleaning cloths or tools, in the
engine compartment.
● If you have to work underneath the vehicle,
you mus
t use suitable stands additionally to
support the vehicle, there is a risk of acci-
dent!. A hydraulic jack is insufficient for se-
curing the vehicle and there is a risk of injury.
● If any work has to be performed when the
engine is
started or with the engine running,
there is an additional, potentially fatal, safety
risk from the rotating parts, such as the drive
belts, alternator, radiator fan, etc., and from
the high-voltage ignition system. You should
also observe the following:
– Never touch the electrical wiring of the
ignition system.
– Ensure that jewellery, loose clothing and
long hair do not get trapped in rotating
engine parts. Danger of death. Before
starting any work remove jewellery, tie
back and cover hair, and wear tight-fit-
ting clothes. –
Never ac c
elerate with a gear engaged
without taking the necessary precau-
tions. The vehicle could move, even if the
handbrake is applied. Danger of death.
● If work has to be carried out on the fuel
syst
em or on electrical components, you
must observe the following safety notes in
addition to the above warnings:
– Always disconnect the battery from the
on-board network. The vehicle must be
unlocked when this is done, otherwise
the alarm will be triggered.
– Do not smoke.
– Never work near naked flames.
– Always have a fire extinguisher on hand. WARNING
If the bonnet is not correctly closed, it could
sud den
ly open while driving leaving the driv-
er without visibility. This could result in a se-
rious accident.
● After closing the bonnet, always check that
it is
properly secured by the locking mecha-
nism in the lock carrier piece. The bonnet
must be flush with the surrounding body pan-
els.
● While driving, if you notice that the bonnet
is not
correctly closed then stop immediately
and close it correctly.
● Only open and close the bonnet when there
is no
body within its range. CAUTION
When topping up service fluids, make sure
not t o mi
stake them. Using the wrong fluids
could cause serious malfunctions and engine
damage! For the sake of the environment
Service fluids leaks are harmful to the envi-
ronment . F
or this reason you should make
regular checks on the ground underneath
your vehicle. If you find spots of oil or other
fluids, have your vehicle inspected in a speci-
alised workshop. Opening the bonnet
Read the additional information carefully
› ›
›
page 17
The bonnet is released from inside the vehi-
cle.
Before opening the bonnet ensure that the
windscreen wipers are in rest position. WARNING
Hot coolant can scald!
● Never open the bonnet if you see steam,
smoke or c oo
lant escaping from the engine
compartment. 268