check engine Seat Arona 2018 User Guide
[x] Cancel search | Manufacturer: SEAT, Model Year: 2018, Model line: Arona, Model: Seat Arona 2018Pages: 316, PDF Size: 6.77 MB
Page 123 of 316
Instruments and warning/control lamps
Normal temperature
If in norm
al
operations, the diodes light up
until the central zone, it means that the en-
gine has reached operating temperature. At
high outside temperatures and when making
the engine work hard, the diodes may contin-
ue lighting up and reach the upper zone. This
is no cause for concern, provided the control
lamp does not light up on the instrument
panel digital display.
Heat range
When the diodes light up in the upper area of
the display and the control lamp appears
on the instrument panel display, the coolant
temperature is excessive ››› page 278. CAUTION
● To en s
ure a long useful life for the engine,
avoid high revs, driving at high speed and
making the engine work hard for approxi-
mately the first 15 minutes when the engine
is cold. The phase until the engine is warm al-
so depends on the outside temperature. If
necessary, use the engine oil temperature*
››› page 42 as a guide.
● Additional lights and other accessories in
front of
the air inlet reduce the cooling effect
of the coolant. At high outside temperatures
and high engine loads, there is a risk of the
engine overheating.
● The front spoiler also ensures proper distri-
bution of the c
ooling air when the vehicle is moving. If the spoiler is damaged this can re-
duce the c
oo
ling effect, which could cause
the engine to overheat. Seek specialist assis-
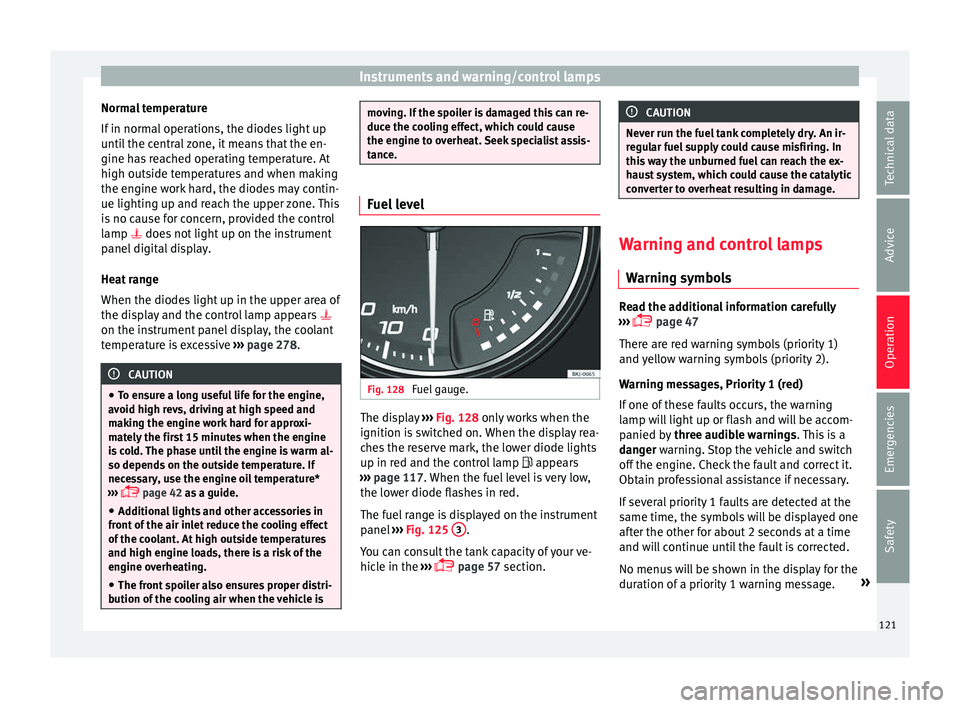
tance. Fuel level
Fig. 128
Fuel gauge. The display
››
› Fig. 128
only works when the
ignition is switched on. When the display rea-
ches the reserve mark, the lower diode lights
up in red and the control lamp appears
››› page 117. When the fuel level is very low,
the lower diode flashes in red.
The fuel range is displayed on the instrument
panel ››› Fig. 125 3 .
Y ou c
an c
onsult the tank capacity of your ve-
hicle in the ›››
page 57 section. CAUTION
Never run the fuel tank completely dry. An ir-
re gu
lar fuel supply could cause misfiring. In
this way the unburned fuel can reach the ex-
haust system, which could cause the catalytic
converter to overheat resulting in damage. Warning and control lamps
Warnin g symbo
ls Read the additional information carefully
› ›
›
page 47
There are red warning symbols (priority 1)
and yellow warning symbols (priority 2).
Warning messages, Priority 1 (red)
If one of these faults occurs, the warning
lamp will light up or flash and will be accom-
panied by three audible warnings. This is a
danger warning. Stop the vehicle and switch
off the engine. Check the fault and correct it.
Obtain professional assistance if necessary.
If several priority 1 faults are detected at the
same time, the symbols will be displayed one
after the other for about 2 seconds at a time
and will continue until the fault is corrected.
No menus will be shown in the display for the
duration of a priority 1 warning message. »
121
Technical data
Advice
Operation
Emergencies
Safety
Page 124 of 316
Operation
Examples of priority 1 warning messages
(r ed)
● Br ak
e system symbol with the warnin
g
message STOP BRAKE FLUID INSTRUC-
TION MANUAL or STOP BRAKE FAULT IN-
STRUCTION MANUAL .
● Coolant symbol with the warnin
g mes-
sage STOP SEE COOLANT INSTRUCTION
MANUAL .
● Engine oil pressure symbol with the
warnin
g message STOP ENGINE OIL
PRESSURE LOW! INSTRUCTION MANUAL .
Warning messages, Priority 2 (yellow)
If one of these faults occurs, the correspond-
ing warning lamp lights up and is accompa-
nied by an audible warning. Check the corre-
sponding function as soon as possible al-
though the vehicle may be used without risk.
If several priority 2 warning messages are de-
tected at the same time, the symbols are dis-
played one after the other for about 2 sec-
onds at a time. After a set time, the informa-
tion text will disappear and the symbol will
be shown as a reminder at the side of the
display.
Priority 2 warning messages will not be
shown until all Priority 1 warning messages
have been dealt with! Examples of priority 2 warning reports (yel-
low):*
●
Fuel
warning light with the information text
PLEASE REFUEL . WARNING
If the warning lamps and messages are ignor-
ed, the v ehic
le may stall in traffic, or may
cause accidents and severe injuries.
● Never ignore the warning lamps or text
mess
ages.
● Stop the vehicle safely as soon as possible.
● Park the vehicle away from traffic and en-
sure th
at there are no highly flammable ma-
terials under the vehicle that could come into
contact with the exhaust system (e.g. dry
grass, fuel).
● A faulty vehicle represents a risk of acci-
dent for the driv
er and for other road users. If
necessary, switch on the hazard warning
lamps and put out the warning triangle to ad-
vise other drivers.
● Before opening the bonnet, switch off the
engine and al
low it to cool.
● In any vehicle, the engine compartment is a
hazar
dous area and could cause severe inju-
ries ››› page 273. CAUTION
Failure to heed the control lamps and text
mes s
ages when they appear may result in
faults in the vehicle. Introduction to the Easy
C
onnect
sy
stem*
System settings (CAR)* CAR menu Read the additional information carefully
›› ›
page 34
To select the settings menus, depending on
the version, press the Easy Connect button and the
S
ET
TINGS function button, OR
pr e
s
s the button and then SETTINGS .
The act ual
number of
menus available and
the name of the various options in these me-
nus will depend on the vehicle’s electronics
and equipment.
When the function button check box is activa-
ted , the function is active.
Pressing the menu button will always take
y ou t
o the l
ast menu used.
Any changes made using the settings menus
are automatically saved on closing those me-
nus.
Menu Vehicle settingsPage
ESC system››› page 181
Tyres››› page 287 122
Page 139 of 316
Opening and closing
blocked for engine ignition ››
› page 173. In
order to enable engine ignition, the button
on the key inside the vehicle needs to be
pressed.
Automatically disabling sensors
If the vehicle is not locked or unlocked for a
long period of time, the proximity sensors on
the passenger doors are automatically disa-
bled.
If one of the sensor surfaces on the door han-
dles is often activated in an unusual manner
with the vehicle locked (e.g. by the branches
of a bush rubbing against it), all proximity
sensors are disabled for a certain period of
time.
Sensors will again be enabled:
● After a time.
● OR: if the vehicle is unlocked with the
butt
on on the key.
● OR: if the boot is opened.
● OR: if
the vehicle is unlocked manually with
the key
.
Keyless Access temporary disconnection
function*
You can deactivate the vehicle's Keyless Ac-
cess unlocking for a locking and unlocking
cycle. ●
Move the g
ear lever to position P (if the ve-
hicle has automatic gearbox), since other-
wise the vehicle cannot be locked.
● Close the door.
● Push the central locking button on the
remote c
ontrol and touch the locking sensor
surface ››› Fig. 143 B on the driver door han-
dl e onc
e w
ithin the following 5 seconds. Do
not grip the door handle, otherwise the vehi-
cle will not lock. Deactivation is also possible
if the vehicle is locked through the driver’s
door lock.
● To check that the function has been deacti-
vated, w
ait at least 10 seconds, grip and pull
on the door handle. The door should not
open.
The next time the door can only be unlocked
via the remote control or the lock cylinder.
The next time the door is locked/unlocked,
Keyless Access will be active again.
Convenience functions
To close all the electric windows using the
convenience function, keep a finger on the
locking sensor surface B (arrow) of the door
h andl
e f
or a few seconds until the windows
have closed.
The doors opened by touching the sensor
surface of the door handle depend on the
settings that have been activated in the Easy
Connect system with the button and theSETTINGS and
Openin
g and c
lo
sing function but-
t on
s. CAUTION
The sensor surfaces on the door handles
cou l
d engage if hit with a water jet or high
pressure steam if there is a valid vehicle key
in the proximity. If at least one of the electric
windows is open and the sensor surface B (arrow) on the handle is activated continu-
ous
ly
, all windows will close. Note
● If the v
ehicle battery has little or no charge,
or the vehicle key battery is almost or entire-
ly out of charge, you will probably not be able
to lock or unlock the vehicle with the Keyless
Access system. The vehicle can be unlocked
or locked manually.
● To control the proper locking of the vehicle,
the rele
ase function is disabled for approx. 2
seconds.
● If the message Keyless access system
faulty is di
splayed on the screen of the
dash panel, abnormalities may occur in the
operation of the Keyless Access system. Con-
tact a specialised workshop. SEAT recom-
mends visiting a SEAT dealership for this.
● Depending on the function set on the info-
tainment sy
stem for the mirrors, the exterior
mirrors will unfold and the surround lighting
will come on when unlocking the vehicle us-
ing the sensor surface on the driver door han-
dle. » 137
Technical data
Advice
Operation
Emergencies
Safety
Page 166 of 316
Operation
Air conditioning
He atin
g,
ventilation and cool-
ing
General notes Read the additional information carefully
›› ›
page 51
Pollution filter
The pollution filter (a combined particulate
filter and active carbon filter) serves as a bar-
rier against impurities in the outside air, in-
cluding dust and pollen.
For the climate control system to work with
maximum efficiency, the pollution filter must
be replaced at the specified intervals in the
Maintenance Programme.
If the filter loses efficiency prematurely due
to use in areas reaching very high pollution
levels, the pollen filter must be changed
more frequently than stated in the Service
Schedule. WARNING
Reduced visibility through the windows in-
cr e
ases the risk of serious accidents.
● Always ensure that all windows are free of
ice and sno
w, and that they are not fogged, so as to maintain good visibility of everything
outs
ide.
● The m
aximum heat output required to de-
fros
t windows as quickly as possible is only
available when the engine has reached its
normal running temperature. Only drive when
you have good visibility.
● Always ensure that you use the heating
syst
em, fresh air system, air conditioner and
the heated rear window to maintain good visi-
bility to the outside.
● Never leave the air recirculation on for a
long period of time. If
the cooling system is
switched off and air recirculation mode
switched on, the windows can mist over very
quickly, considerably limiting visibility.
● Switch air recirculation mode off when it is
not requir
ed. WARNING
Stuffy or used air will increase fatigue and re-
duce driv er c
oncentration possibly resulting
in a serious accident.
● Never leave the fresh air fan turned off or
use the air rec
irculation for long periods of
time; the air in the vehicle interior will not be
refreshed. CAUTION
● If y
ou suspect that the air conditioner is
damaged, switch it off with the A/C button to prevent further damage and have it checked
by
a s
pecialised workshop.
● Repairs to the air conditioner require spe-
cia
list knowledge and special tools. There-
fore, we recommend you to take the vehicle
to a specialised workshop. Note
● If the humidity and t
emperature outside the
vehicle are high, condensation can drip off
the evaporator in the cooling system and
form a pool underneath the vehicle. This is
normal and does not indicate a leak.
● Keep the air intake slots in front of the
winds
creen free of snow, ice and leaves to en-
sure heating and cooling are not impaired,
and to prevent the windows from misting
over.
● The air from the vents flows through the ve-
hicle int
erior and is extracted by slots in the
luggage compartment designed for this pur-
pose. Therefore, you should avoid obstruct-
ing these slots with any kind of object.
● The air conditioner operates most effective-
ly with the w
indows closed. However, if the
temperature inside the vehicle is excessive
because of the sun, the air inside can be
cooled faster by opening the windows for a
short time.
● Do not smoke while air recirculation mode
is on, a
s smoke drawn into the air condition-
ing system leaves residue on the evaporator,
producing a permanent unpleasant odour. 164
Page 167 of 316
Air conditioning
●
At lo w out
side temperatures, the compres-
sor switches off automatically and cannot be
switched on even with the AUTO button.
● It is advisable to turn on the air condition-
ing at l
east once a month, to lubricate the
system gaskets and prevent leaks. If a de-
crease in the cooling capacity is detected, a
Technical Service should be consulted to
check the system.
● To ensure correct operation, the grilles on
both sides
of the screen must not be obstruc-
ted. ●
When the engine i s
under extreme strain,
switch off the compressor for a moment. Economic use of the air conditioning
When the air conditioning is switched on, the
compr
e
ssor consumes engine power and has
influence on fuel consumption. Consider the
following points in order to have the system
operating in the minimum possible time. ●
If the v
ehicle interior has overheated due to
an excessive solar radiation, it is best to
open the windows or doors to allow the hot
air to escape.
● While in motion, the air conditioning
should not
be switched on if the windows are
open.
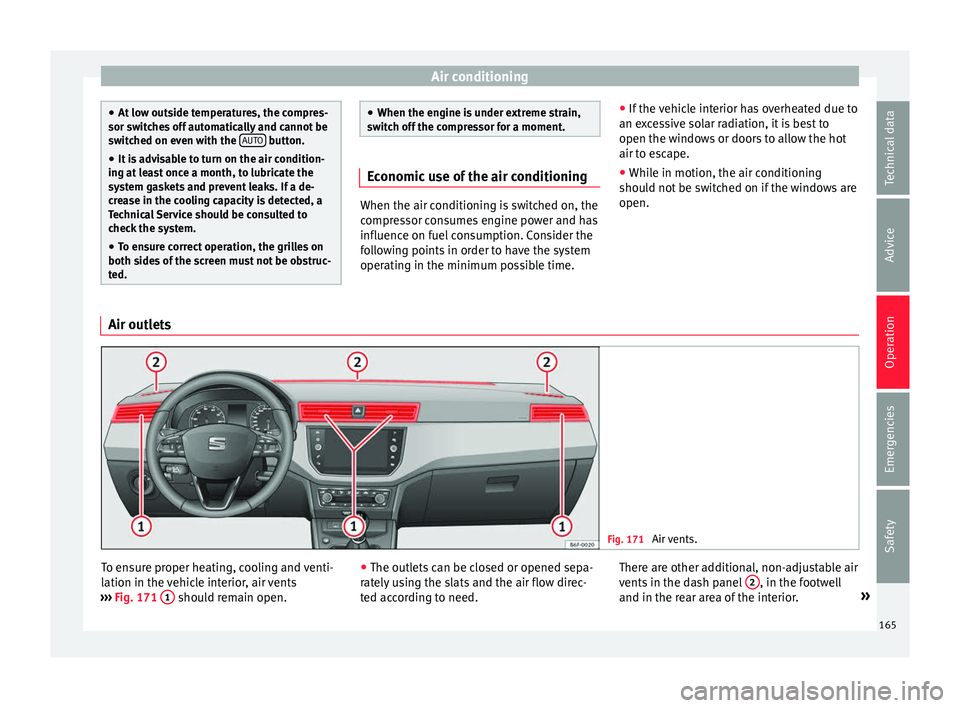
Air outlets Fig. 171
Air vents. To ensure proper heating, cooling and venti-
l
ation in the
v
ehicle interior, air vents
››› Fig. 171 1 should remain open.
●
The outl ets
c
an be closed or opened sepa-
rately using the slats and the air flow direc-
ted according to need. There are other additional, non-adjustable air
vents in the d
ash panel 2 , in the footwell
and in the r e
ar ar
ea of the interior. »
165
Technical data
Advice
Operation
Emergencies
Safety
Page 176 of 316
Operation
If the engine does not start immediately,
sw it
c
h the starter off after 10 seconds and try
again after half a minute. If the engine still
does not start, the fuel pump fuse should be
checked ››› page 104, Fuses. WARNING
● Never s t
art or run the engine in unventila-
ted or closed rooms. The exhaust gases con-
tain carbon monoxide, an odourless and col-
ourless poisonous gas. Risk of fatal acci-
dents. Carbon monoxide can cause loss of
consciousness and result in death.
● Never leave the vehicle unattended if the
engine is
running.
● Never use “cold start sprays”, they could
explode or c
ause the engine to run at high
revs. Risk of injury. CAUTION
● When the engine i s
cold, you should avoid
high engine speeds, driving at full throttle
and over-loading the engine. Risk of engine
damage.
● The vehicle should not be pushed or towed
more than 50 metr
es to start the engine. Un-
burnt fuel could enter the catalytic converter
and damage it.
● Before attempting to push-start or tow a ve-
hicle in or
der to start it, you should first try to
start it using the battery of another vehicle.
Please observe and follow the notes on the
››› page 71, How to jump start. For the sake of the environment
Do not warm-up the engine by running the
engine w ith the
vehicle stationary. Start off
immediately, driving gently. This helps the
engine reach operating temperature faster
and reduces emissions. Starting diesel engines
The engine can only be started using a genu-
ine S
EA
T key with its correct code.
– Move the gearbox lever to the neutral posi-
tion and depre s
s the clutch pedal thor-
oughly and hold it in this position for the
starter to turn the engine on.
– Turn the ignition key to position ›››
Fig. 175
2 . The warning lamp
wi
l l light for en-
gine pre-heating.
– When the lamp turns off, turn the ignition
key t
o position 3 to start the engine. Do
not pr
e
ss the accelerator.
– Release the ignition key as soon as the en-
gine star
ts. The starter motor should not
turn at the same time.
When starting a cold engine, it may be a little
noisy for the first few seconds until oil pres-
sure has built up in the hydraulic valve com-
pensators. This is quite normal, and no cause
for concern. If there are problems starting the engine, see
the
›››
page 71.
Glow plug system for diesel engines
To avoid unnecessary discharging of the bat-
tery, do not use any other major electrical
equipment while the glow plugs are pre-heat-
ing.
Start the engine as soon as the glow plug
warning lamp goes out.
Starting a diesel engine after the fuel tank
has run dry
If the fuel tank has been completely run dry,
it may take longer than normal (up to one mi-
nute) to start a diesel engine after refuelling.
This is because the fuel system must elimi-
nate air first. WARNING
Observe the safety warnings ›››
in Starting
petro l
engines on page 174. CAUTION
● When the engine i s
cold, you should avoid
high engine speeds, driving at full throttle
and over-loading the engine. Risk of engine
damage.
● The vehicle should not be pushed or towed
more than 50 metr
es to start the engine. Un-
burnt fuel could enter the particulate filter
and damage it. 174
Page 181 of 316
Driving
the S
T
OP ENGINE START button stops flashing
and g oe
s
out.
With the engine running, the START ENGINE STOP button light stays on, indi-
c atin
g th
at the engine is running. The time
that lapses between the moment the user
starts the engine with the START ENGINE STOPbutton and the lighting changes from flash-
in
g t
o fi
xed will depend on specific engine
size characteristics. Upon switching the igni-
tion off with the START ENGINE STOP button, it
s t
ar
ts flashing again.
In vehicles with the Start-Stop system , the
“My Beat” function also offers additional in-
formation:
● When the engine stops during the Stop
phase, the light
of the START ENGINE STOP but-
t on s
t
ays on, since, even though the engine
is off, the Start-Stop system is active.
● When the engine cannot be stated again
with the St
art-Stop system, ››› page 202, and
needs to be started manually, the START ENGINE STOP button flashes to indicate
thi s
f
act.
Braking and parking Brakin
g capacity and braking distance The efficiency of the brakes depends directly
on the br
ak
e p
ad wear. This wear depends to a great extent on the conditions under which
the vehic
le is operated and the way the vehi-
cle is driven. If you often drive in town, drive
short distances or have a sporty driving style,
we recommend that you have the thickness
of your brake pads checked by technical serv-
ices more frequently than recommended in
the Maintenance Programme.
If you drive with wet brakes, for example, af-
ter crossing areas of water, on days of heavy
rainfall or even after washing the car, the ef-
fect of the brakes is reduced as the brake
discs are wet or even frozen (in winter): in
this case, the brakes should be “dried” by
pressing the brake pedal several times. WARNING
Longer braking distances and faults in the
brak e sy
stem increase the risk of accidents.
● New brake pads must be run in and do not
have the c
orrect friction during the first
200 km (124 miles). This reduced braking ca-
pacity may be compensated for by pressing
on the brake pedal a little harder, which also
applies when the brake pads have to be
changed further on.
● If brakes are wet or frozen, or if you are
driving on r
oads which have been salted,
braking power may be lower than normal.
● On steep slopes, if brakes are excessively
used, they w
ill overheat. Before driving down
a long steep slope, it is advisable to reduce
speed and change down into a lower gear or range (depending on the type of transmis-
sion).
Thu
s, make use of engine braking and
relieve the brakes.
● Never let the brakes “drag” by applying
light pre
ssure. Continuous braking will cause
the brakes to overheat and the braking dis-
tance will increase. Apply and then release
the brakes alternately.
● Never let the vehicle run with the engine
switc
hed off. The braking distance is in-
creased considerably when the brake servo is
not active.
● If the brake fluid loses its viscosity and is
subj
ected to heavy use, vapour bubbles can
form in the brake system. This reduces the ef-
ficiency of the brakes.
● Non-standard or damaged front spoilers
coul
d restrict the airflow to the brakes and
cause them to overheat. Before purchasing
accessories please observe the relevant in-
structions ››› page 259, Technical modifica-
tions.
● If a brake system circuit fails, the braking
dist
ance will be increased considerably. Con-
tact a specialised workshop immediately and
avoid unnecessary journeys. Control lamp
Situations in which the warning lamp lights
up *
●
the brake fluid level is too low
› ›
›
page 280. »
179
Technical data
Advice
Operation
Emergencies
Safety
Page 183 of 316
Driving
● If the
v
ehicle is parked facing downhill,
turn the front wheels so that they point to-
wards the kerb .
● If the vehicle is parked facing uphill
, turn
the front wheels so that they point away from
the kerb.
● Secure the vehicle as usual by applying the
handbrak
e firmly and putting it in 1st gear. WARNING
● Tak e me
asures to reduce the risk of injury
when you leave your vehicle unattended.
● Never park where the hot exhaust system
coul
d ignite inflammable materials, such as
dry grass, low bushes, spilt fuel etc.
● Never allow vehicle occupants to remain in
the vehic
le when it is locked. They would be
unable to open the vehicle from the inside,
and could become trapped in the vehicle in
an emergency. In the event of an emergency,
locked doors will delay assistance to vehicle
occupants.
● Never leave children alone in the vehicle.
They cou
ld set the vehicle in motion, for ex-
ample, by releasing the handbrake or the
gearbox lever.
● Depending on weather conditions, it may
become extr
emely hot or cold inside the vehi-
cle. This can be fatal. Braking and stability systems
El ectr
onic
Stability Control (ESC)* This Electronic Stability System reduces the
risk
of
skidding and improves the vehicle's
stability and ability to hold the road.
The Electronic Stability Control (ESC) contains
the electronic differential lock (EDL) and the
traction control system (ASR). The ESC works
together with the ABS. Both control lamps
will light up if the ESC or ABS systems are
faulty.
The ESC system is started automatically
when the engine is started.
The ESC system is always active and cannot
be switched off. With the Easy Connect sys-
tem it is only possible to deactivate the ASR
or else select Sport mode.
The ASR can be deactivated when wheel spin
is desirable ›››
page 182.
For example:
● When driving with snow chains.
● When driving in deep snow or on loose sur-
fac e
s.
● When the vehicle is stuck, to rock it back-
ward
s and forwards.
Press the button to switch the ASR back on
when you no longer need wheel spin. Electronic Stability Control (ESC)*
The ESC r
educes the risk of skidding by brak-
ing the wheels individually.
The system uses the steering wheel angle
and road speed to calculate the changes of
direction desired by the driver, and constant-
ly compares them with the actual behaviour
of the vehicle. When irregularities occur, for
example, if the vehicle begins to skid, the
ESC brakes the appropriate wheel automati-
cally.
The forces acting on the braked wheel bring
the vehicle back to a stable condition. If the
vehicle tends to oversteer (the rear end
slides out), the system will act on the front
wheel on the outside of the turn.
Control lamp
There are two control lamps for the electronic
stability control. The lamp provides infor-
mation concerning function and disconnec-
tion status.
Both control lamps light up together when
the ignition is switched on and should turn
off after approximately 2 seconds. This is the
time taken for the function check.
This programme includes the ABS, EDL and
ASR. It also includes emergency braking as-
sistance (BAS). »
181
Technical data
Advice
Operation
Emergencies
Safety
Page 184 of 316
Operation
The control lamp ha
s the following func-
tions:
● It flashes whilst driving when the ASR/ESC
is activ
ated.
● It will light up if there is a fault in the ESC.
● As the ESC operates in conjunction with the
ABS, the ESC light
will also come on if a fault
should occur in the ABS.
If the ESC control lamp lights up and stays
on after the engine is started, this may mean
that the control system has temporarily
switched off the ESC. In this case the ESC can
be reactivated by switching the ignition off
and then on again. If the control lamp goes
out, this means the system is fully functional.
The lamp provides information about the
disconnection status of the system:
● It stays lit when the ASR is disconnected or
if y
ou select ESC Sport mode, only by means
of Easy Connect. WARNING
● Do not f or
get that the electronic stability
control ESC cannot defy the laws of physics.
Bear this in mind, particularly on slippery
and wet roads and when towing a trailer.
● Always adapt your driving style to suit the
condition of the r
oads and the traffic situa-
tion. The greater safety provided by the ESC
should not encourage you to run any risks. CAUTION
● To en s
ure that the ESC works correctly, all
four wheels must be fitted with the same
tyres. Any differences in the rolling radius of
the tyres can cause the system to reduce en-
gine power when this is not desired.
● Any modifications made to the vehicle (for
examp
le, to the engine, brake system, run-
ning gear or to the combination of wheels
and tyres) may affect the operation of the
ABS, EDL, ESC and ASR. Traction control system (ASR)
The traction control system prevents the driv-
en wheel
s
fr
om spinning when the vehicle is
accelerating.
Description and operation of the traction
control system during acceleration (ASR)
The ASR system intervenes by reducing en-
gine power and preventing the driven wheels
from slipping during acceleration.
TCS helps the car to start moving, accelerate
and climb a gradient in slippery conditions
where this may otherwise be difficult or even
impossible.
The ASR automatically switches on when the
engine is started. If necessary, it could be
switched on or off using the Easy Connect
system*. When the ASR is off, the warning lamp lights
up . The ASR shoul
d normally be left on.
Only in exceptional cases can it be discon-
nected, i.e. when you want the wheels to
slide; this done through the Easy Connect
system, by means of the button and the
f u
nction b
utton SETTINGS> ESC system ,
for example:
● With compact temporary spare wheel.
● When using the snow chains.
● When driving in deep snow or on soft ter-
rain.
● When the v
ehicle is bogged-down, to free it
“by r
ocking it.”
The ASR should be switched on again as
soon as possible.
Control lamp
There are three control lamps for the traction
control system: (for vehicles equipped
with M-ABS), (for vehicles equipped with
ESC) and . Both control lamps light up to-
gether when the ignition is switched on and
should turn off after approximately 2 sec-
onds, which is the time taken for the function
check.
The or lamp has the following function:
● It flashes when the ASR is working if the ve-
hicl e i
s moving.
182
Page 188 of 316
Operation
WARNING
● Before opening the bonnet, read and ob-
serve the warnings ››› page 273, Working in
the engine compartment.
● If the br
ake system warning lamp should
light up together with the ABS warning lamp
, stop the vehicle immediately and check
the brake fluid level in the reservoir
››› page 280, Brake fluid. If the brake fluid
lev
el has dropped below the “MIN” mark you
must not drive on. Risk of accident. Obtain
technical assistance.
● If the brake fluid level is correct, the fault in
the brake system may have been caused by a
failure of the ABS system. This could cause
the rear wheels to lock quickly when you
brake. This could cause the rear to break
away. Risk of skidding. Stop the vehicle and
seek technical assistance. Electronic differential lock (XDS)*
When taking a curve, the driveshaft differen-
tial mechanism allows the outer wheel to turn
at a higher speed than the inner wheel. In
this way, the wheel that is turning faster (out-
er wheel) receives less drive torque than the
inner wheel. This may mean that in certain
situations the torque delivered to the inner
wheel is too high, causing the wheels to
spin. On the other hand, the outer wheel is
receiving a lower drive torque than it could
transmit. This causes an overall loss of lateral grip on the front axle, resulting in understeer
or “lengthening” of the trajectory.
The XDS system can detect and correct this
effect via the sensors and signals of the ESC.
Via the ESC, the XDS will brake the inside
wheel and counter the excess driving torque
of that wheel. This means that the driver's
desired trajectory is much more precise.
The XDS system works in combination with
the ESC and is always active, even when ASR
traction control is disconnected or the ESC is
in Sport mode.
Mul t
i
-collision Brake In an accident, the multi-collision brake can
help the driver by braking to avoid the risk of
skidding during the accident, which could
lead to further collisions.
The multi-collision brake works for front, side
or rear accidents, when the airbag control
unit records its activation level and the acci-
dent takes place at a speed of over 10 km/h
(6 mph). The ESC automatically brakes the
vehicle, as long as the accident has not dam-
aged the ESC, the brake hydraulics or the on-
board network
The following actions control automatic brak-
ing during the accident:●
When the driver presses the accelerator,
the automatic braking does not take place.
● When the braking pressure through press-
ing the brake pedal is greater than the sys-
tem’s braking pressure the vehicle will brake
automatically.
● Multi-collision braking will not be available
if ESC is malfunctioning.
Brake servo The brake servo increases the pressure you
apply to the brake pedal. It works
only when
the engine is running .
If the brake servo is not functioning, e.g. due
to a malfunction, or if the vehicle is being
towed, you will have to press the brake pedal
considerably harder to make up for the lack
of servo assistance. WARNING
The braking distance can also be affected by
external factors.
● Never let the vehicle coast with the engine
switched off. Failure to follow this instruction
could result in an accident. The braking dis-
tance is increased considerably when the
brake servo is not active.
● If the brake servo is not working, for exam-
ple when the vehicle is being towed, you will
have to press the brake pedal considerably
harder than normal. 186 *