set clock Seat Ateca XL 2006 Owner's Manual
[x] Cancel search | Manufacturer: SEAT, Model Year: 2006, Model line: Ateca XL, Model: Seat Ateca XL 2006Pages: 288, PDF Size: 9.08 MB
Page 60 of 288

Cockpit
584) . Stop the car and switch off the engine. Check the coolant level
⇒ page 213 ⇒ .
Even if the coolant level is correct do not continue driving. You should obtain
technical assistance.
WARNING
When working in the engine compartment, always bear in mind the safety
warnings. ⇒page 206
Caution
Accessories in front of the air inlet reduce the cooling effect of the coolant. At
high outside temperatures and high engine loads, there is a risk of the
engine overheating.Rev counter
The rev. counter displays the engine speed in revolutions per
minute.The start of the red zone on the dial ⇒page 56, fig. 33 indicates the
maximum engine speed which may be used briefly when the engine is warm
and after it has been run in properly. However, it is advisable to change up a
gear or move the selector lever to D (or l ift your foot off the accelerator) before
the needle reaches the red zone.
Caution
The rev counter needle must never enter the red zone on the scale. Risk of
engine damage.
For the sake of the environment
Changing up a gear early will help you to save fuel and minimise engine
noise.Setting the digital clock*
The digital clock is located in the instrument panel display.– Turn the setting knob ⇒page 56, fig. 33 anti-clockwise to
the stop to set the hour. If the kn ob is turned briefly anti-clock-
wise the clock will advance one hour further.
– Turn the setting knob clockwise to the limit stop to set the minutes. If the knob is turned briefly clockwise the clock will
advance one minute further.
4)Depending on the model version
A4
A5
AlteaXL_ingles_02_06 Seite 58 Dienstag, 1. August 2006 11:11 11
Page 62 of 288

Cockpit
60Displayed categories
The display in the instrument panel shows the mileage and
trip recorder as well as the selector lever position.
Control and warning lamps: “Control and warning lamps”
Clock: “Setting the time”. In some vehicles the ambient temperature is
displayed to the right of the clock.
There are optional and automatic displays in this field.
- Selectable displays: e.g. Multi-function display (MFD) and ambient
temperature display
- Automatic indications: information or warning messages: “Information
or warning messages on the screen”
- Menus with diverse information are shown on the screen allowing many adjustments to be made: “Instrument panel menus” Mileage display or Service Interval Display “Mileage display or Service
Interval Display”
Selector lever position display for the automatic gearbox. The actual
position of the selector lever or the gear which is engaged (for Tiptronic)
are highlighted.
Mileage display or Service Interval DisplayDistance display
The left-hand counter in the display registers the total amount of distance
covered by the vehicle.
The right-hand counter regi
sters the short journeys. The last digit indicates
steps of 100 metres. The trip recorder counter may be reset by the reset
button ⇒page 56, fig. 33 .
Service interval display
A Service pre-warning will appear in the mileage displays if a service is due
soon. A “spanner” symbol appears and the display “km” with the distance
that can be driven until the next service appointment is due. The display will
change after approximately 10 seconds. A “clock symbol” appears and the
number of days until the service appointment should be carried out. The
message displayed in the instrument panel display is
5): SERV. IN ... KM OR
... DAYS . The service message will disappear approximately 20 seconds after
the ignition is switched on or the en gine is running. The normal display can
be resumed by pressing the reset button on the trip counter or by pressing the
rocker switch of the MFI ⇒page 61, fig. 39 .
With the ignition switched on, you can call up the current service message by
pressing the trip counter reset knob for 2 seconds.
Fig. 38 Digital display in
the instrument panel
A1A1A2
5)Depending on the model versionA3A4
A5
AB
AlteaXL_ingles_02_06 Seite 60 Dienstag, 1. August 2006 11:11 11
Page 71 of 288

Cockpit69
Safety First
Operating instructions
Tips and Maintenance
Te c h n i c a l D a t a
Vehicle status menu
This menu shows warning or information textsOpen Vehicle Condition menu
– Choose option Vehicle condition from main menu: “Main menu”
and press the button on the windscreen wiper lever.
Priority 2 warning messages and inform ation texts: “Warning and information
texts on the screen” automatically di sappear after a certain time and are
saved in the menu “Vehicle condition”.
The warning and information texts may be viewed in this menu. If there are no
messages, ok appears on the display. If there are several messages, each one
is shown for four seconds.
Configuration menu
This menu is used to make the settings for the vehicle functions.Open Configuration menu
– Choose the Configuration option from main menu “Main menu” and press the button on the windscreen wiper lever.
Example of use of menus: “E xample of use of menus”.
Configuration Function
Time The hours and minutes of the clock and the navigation system can be changed. Both 12- and 24-hour
formats are available and the time may be changed to summer time (an S appears in the upper part of
the screen)
Winter tyres The menu allows the setting of a speed at which an optical and acoustic warning will be given by the
system. You can use this function, for example, if you have fitted winter tyres which are not suited for the
top speed of your vehicle . See chapter “Wheels” in owner’s manual
Settings: Language The display texts and the navigation system texts can be seen in seven different languages
Units This option allows you to select the units for displaying temperature, fuel consumption values and dis-
tances.
Convenience From this menu it is it possible to alter the Convenience function.
AlteaXL_ingles_02_06 Seite 69 Dienstag, 1. August 2006 11:11 11
Page 154 of 288

Heating, Ventilation and Air conditioning
152
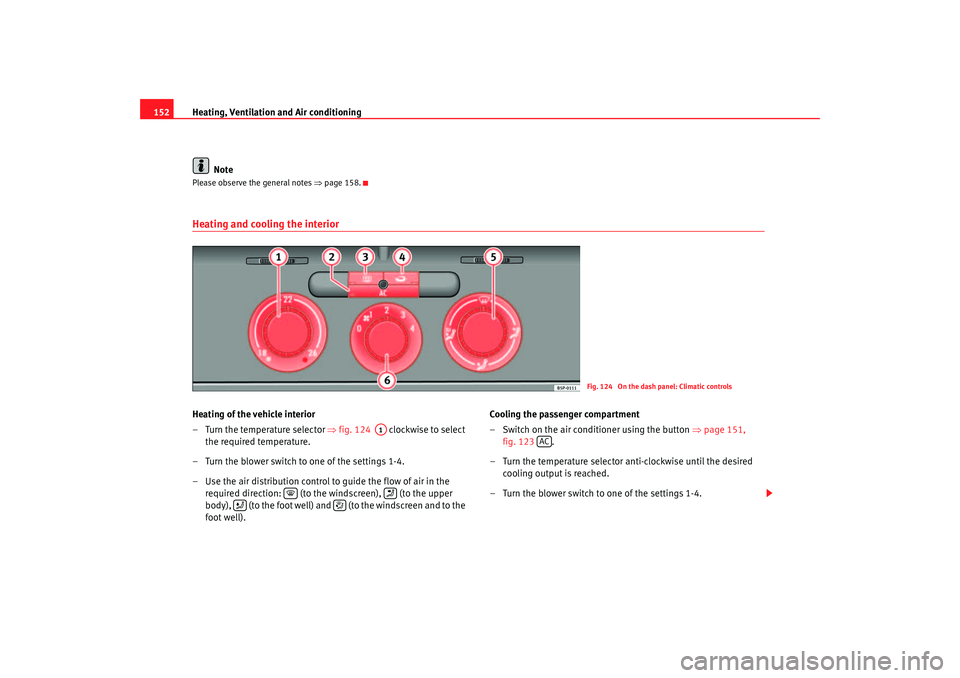
NotePlease observe the general notes ⇒page 158.Heating and cooling the interiorHeating of the vehicle interior
– Turn the temperature selector ⇒fig. 124 clockwise to select
the required temperature.
– Turn the blower switch to one of the settings 1-4.
– Use the air distribution control to guide the flow of air in the required direction: (to the windscreen), (to the upper
body), (to the foot well) and (to the windscreen and to the
foot well). Cooling the passenger compartment
– Switch on the air conditioner using the button
⇒page 151,
fig. 123 .
– Turn the temperature selector anti-clockwise until the desired cooling output is reached.
– Turn the blower switch to one of the settings 1-4.
Fig. 124 On the dash panel: Climatic controls
A1
AC
AlteaXL_ingles_02_06 Seite 152 Dienstag, 1. August 2006 11:11 11