window Seat Cordoba 2008 User Guide
[x] Cancel search | Manufacturer: SEAT, Model Year: 2008, Model line: Cordoba, Model: Seat Cordoba 2008Pages: 258, PDF Size: 7.87 MB
Page 81 of 258

Unlocking and locking79
Safety First
Operating instructions
Tips and Maintenance
Te c h n i c a l D a t a
lock
the
vehicle, press the lo ck button brie fly ⇒ fig. 48 . The indicators
flash once.
By pressing the lock button twice ⇒page 78, fig. 48 both the locking
security mechanism (double lock) and th e volumetric alarm* are deactivated
but the perimetric alarm* remains active and this is indicated by the indicator
light on the driver’s door.
Selective unlocking*
When the button ⇒page 78, fig. 48 is pressed once, the driver's door
is unlocked, all others remain locked.
Press the button ⇒page 78, fig. 48 twice to unlock all doors.
WARNING
•
Incorrect use of the key can result in critical injuries.
•
Never leave children or disabled persons in the vehicle; in case of emer-
gency they may not be able to leave the vehicle or look after themselves.
•
Never leave any of the vehicle keys in the vehicle. This could result in
serious injuries, accidents or the theft of your vehicle. Always take the key
with you when you leave the vehicle.
•
Unsupervised use of a key could me an that the engine is started or that
electrical equipment is used (e.g. elec tric windows). Risk of accident. The
vehicle can be locked using the remote control key. This could result in
people being trapped in the vehicle in an emergency.Note
•
The radio-frequency remote control ca n also be programmed so that only
the driver's door is unlocked the first time that the unlocking button on the
radio frequency remote control key is pressed. When the button is pressed
once more, all doors and the tailgate will be unlocked.
•
The remote control functions only when you are in range ⇒page 78,
fig. 49 (red area).
•
If the vehicle is unlocked using the button, the vehicle will be
locked again automatically if any of the doors or the tailgate are not opened
within 30 seconds of unlocking the vehicle. This function prevents the vehicle
from remaining unlocked if the unlocking button is pressed by mistake.
•
If the vehicle cannot be opened and closed using the remote control, the
remote control key will have to be re-synchronised ⇒page 79.
Changing the batteryIf the battery indicator does not flash when the buttons are pushed, the
battery must be replaced.
Caution
Use of inappropriate batteries may damage the radio frequency remote
control. For this reason, always replac e the dead battery with another of the
same size and power.
For the sake of the environment
The flat batteries must be disposed of in accordance with regulations
governing the protection of the environment.Synchronising the remote control keySynchronising the remote control key
– Use both keys that have been delivered with the vehicle; the key with the remote and the normal key ⇒page 78, fig. 48
⇒ page 78, fig. 49 .
A2
A2
A1
A1
A1
COR_ING_0707 Seite 79 Mittwoch, 1. August 2007 6:25 18
Page 83 of 258

Unlocking and locking81
Safety First
Operating instructions
Tips and Maintenance
Te c h n i c a l D a t a
The acoustic signals sound and the indicators flash for approx. 30 seconds.
How is the alarm switched off?
To deactivate the anti theft alarm, the key must be turned to the open position
in the driver’s door and the ignition
must be turned on within 15 seconds, or
the button on the remote control may also be used.
•
The indicator light flashes twice on opening and the alarm is deactivated.
•
The indicator light flashes once on closing and the alarm is activated.
In vehicles equipped with an additional* alarm system, if the vehicle is
opened using the driver's door key, you have 15 sec to insert the key in the
ignition lock and activate the ignition. Otherwise, the alarm will go off for 30
sec. and the ignition will be blocked.
In vehicles with keys without remote co ntrol it is necessary to wait 30 seconds
until the alarm stops. Then lock the vehicle using the key and repeat the
above process.
If the vehicle is opened at any door othe r than the driver's door or the tailgate
the alarm will go off for 30 seconds.Note
•
After 28 days the indicator light will switch off to prevent the battery
running down where the vehicle has been left parked for a long period of
time. The alarm system remains activated.
•
If, after the alarm has stopped, attempts are made to open another
protection zone, the alarm will be triggered again.
•
The alarm system can be activated or deactivated using the remote
control ⇒page 78.
Volumetric sensor*
Monitoring or control function incorporated in the anti-theft
alarm*, that detects unauthoriz ed vehicle entry using ultra-
sound.The system consists of 3 sensor s, 2 emitters and a receptor.
Activation
– It is automatically turned on with the anti-theft alarm, when the vehicle is locked mechanically with the key and when the button on the remote control is used.
Deactivation
– Open the vehicle with the key, either mechanically
3) or by
pressing the button on the remote control.
– Press the button on the remote control twice. Only the volu- metric sensor is deactivated. The alarm system remains acti-
vated.
The interior monitoring system will be switched on automatically with the
anti-theft alarm. All of the doors and the tailgate must be closed to activate
the sensor of the interior monitoring system.
The interior monitor should be switched off, if for example animals are briefly
left in the locked vehicle. Their movements could otherwise trigger an alarm.
The interior monitor should also be deactivated if the windows are left
slightly open, otherwise the alarm may be triggered due to the effect caused
by wind entering the vehicle.
3)The time period from when the door is opened until the key is inserted in the contact
should not exceed 15 sec., otherwise the alarm will be triggered.
COR_ING_0707 Seite 81 Mittwoch, 1. August 2007 6:25 18
Page 86 of 258

Unlocking and locking
84If the keyhole is in horizontal position, this implies that the tailgate is locked
and can only be opened using the main key.
WARNING
•
Always close the tailgate properly. Risk of accident or injury.
•
Do not close the tailgate by pushing it down with your hand on the
window. The glass could shatter. Risk of injury!
•
Ensure the tailgate is locked after closing. If not, it may open unexpect-
edly while driving.
•
Never allow children to play in or around the vehicle. A locked vehicle
can be subjected to extremely high and low temperatures, depending on
the time of year. This could cause serious injuries/illness. It could even
have fatal consequences. Close and lock both the tailgate and all the other
doors when you are not using the vehicle.
•
Never close the tailgate without observin g a n d e n s u r i n g i t i s c l e a r, t o d o
otherwise could cause serious injury to you and others. Make sure that no
one is in the path of the tailgate.
•
Never drive with the tailgate open or half-closed, exhaust gasses may
penetrate into the interior of the vehicle. Danger of poisoning!
•
If only the boot is opened then do not leave the key inside. The vehicle
may not be opened if the key is left inside.
WindowsOpening or closing the windows electrically*
The front and rear electric windows can be operated using the
controls in the driver's door.Opening and closing the windows
– Press the button to open a window.
– Pull button to close a window ⇒.Always close the windows fully if you park the vehicle or leave it unattended
⇒.
You can use the electric windows for approx. 10 minutes after switching off
the ignition if neither the driver door nor the front passenger door has been
opened and the key has not been removed from the ignition.
Fig. 52 Detail of driver
door: controls for the front
and rear windows
COR_ING_0707 Seite 84 Mittwoch, 1. August 2007 6:25 18
Page 87 of 258

Unlocking and locking85
Safety First
Operating instructions
Tips and Maintenance
Te c h n i c a l D a t a
Buttons in the driver door
Button for window in front left door
Button for window in front right door
Buttons for rear windows* Safety switch for deactivating the electric window buttons in the rear
doors
Button for window in rear right door
Button for window in rear left door
Safety switch
*
Safety switch in the driver door can be used to disable the electric window
buttons in the rear doors.
Safety switch not pressed: buttons on rear doors are activated.
Safety switch pressed: buttons on rear doors are deactivated.
WARNING
•
Incorrect use of the electric windows can result in injury.
•
Never close the tailgate without observing and ensuring it is clear, to do
otherwise could cause serious injury to you and others. Make sure that no
one is in the path of a window.
•
Always take the vehicle key with you when you leave the vehicle.
•
Never leave children or disabled persons in the vehicle, particularly if
they have access to the keys. Unsupervised use of a key could mean that
the engine is started or that electrical equipment is used (e.g. electric
windows). Risk of accident. The door s can be locked using the remote
control key. This could result in people being trapped in the vehicle in an
emergency.
•
The electric windows will work until the key has been removed from the
ignition and one of the front doors has been opened.
•
If necessary, use the safety switch to disable the rear electric windows.
Make sure that they have been disabled.Note
If the window is not able to close becau se it is stiff or because of an obstruc-
tion, the window will automatically open again ⇒ page 86. If this happens,
check why the window could not be closed before attempting to close it
again.One-touch opening and closing*
The one-touch opening and closing function is only possible
on the front doors and can only be activated from the driver's
door.One-touch closing
– Pull up the button for the window briefly to the second position. The window closes fully.
One-touch opening
– Push down the button for the window briefly to the second posi- tion. The window opens fully.
Restoring one-touch opening and closing
– Close all windows.
A1A2A3A4A5
A3
WARNING (continued)
COR_ING_0707 Seite 85 Mittwoch, 1. August 2007 6:25 18
Page 88 of 258
Unlocking and locking
86
– Use the key to lock the vehicle from outside and hold the key in
the lock position for at least one second. The one-touch function
is now ready for operation.The buttons ⇒page 84, fig. 52 and have two levels for opening the
window and two for closing it. This makes it easier to open or close windows
to the desired position.
One-touch closing does not work when the ignition has been switched off,
even if the key is in the ignition.
The automatic open and close function will not work if the battery has been
temporarily disconnected, or if the batter y is flat. The function then has to be
reactivated.
The one-touch function and roll-back fu nction will not work if there is a
malfunction in the electric windows. Contact an Authorised Service Centre.Roll-back function
The windows have a roll-back function. This reduces the risk
of injuries when the windows are closing.•
If a window is obstructed when closing automatically, the window stops
at this point and lowers immediately ⇒.
•
If this happens, check immediately (within 10 seconds) why the window
could not be closed before attempting to close it again. After 10 seconds the
normal automatic function resumes.
•
If the window is still obstructed, the window stops at this point.
•
If there is no obvious reason why the window cannot be closed, try to
close it again within five seconds.
If you wait longer than 5 - 10 seconds, the window will open fully when you
operate one of the buttons. On e-touch closing is reactivated. The one-touch function and roll-back function will not work if there is a
malfunction in the electric windows.
Contact an Authorised Service Centre.
WARNING
•
Incorrect use of the electric windows can result in injury.
•
Always take the key with you when leaving the vehicle, even if you only
intend to be gone for a short time. Please ensure that children are never left
unsupervised in the vehicle.
•
The electric windows will work unti l the key has been removed from the
ignition and one of the front doors has been opened.
•
Never close the tailgate without observing and ensuring it is clear, to do
otherwise could cause serious injury to you and others. Make sure that no
one is in the path of a window.
•
Never allow people to remain in the vehicle when you close the vehicle
from the outside. The windows cannot be opened even in an emergency.Note
The roll-back function is deactivate d if the windows are closed from the
outside of the vehicle using the ignition key for convenience closing
⇒ page 86.Convenience opening and closing* Using the door lock
– Hold the key in the door lock of the driver door in either the
locking or the unlocking position until all windows are either
opened or closed.
– Release the key to interrupt this function.
A1
A2
COR_ING_0707 Seite 86 Mittwoch, 1. August 2007 6:25 18
Page 92 of 258
Lights and visibility
90•
The rear fog light is so bright that it can dazzle drivers behind you. You
should use the rear fog light only when visibility is very poor.
•
If you are towing a trailer equipped with a rear fog light on a vehicle with
a factory-fitted towing bracket, the rear fog light on the car will automatically
be switched off.
•
The use of the lighting described here is subject to the relevant statutory
requirements.
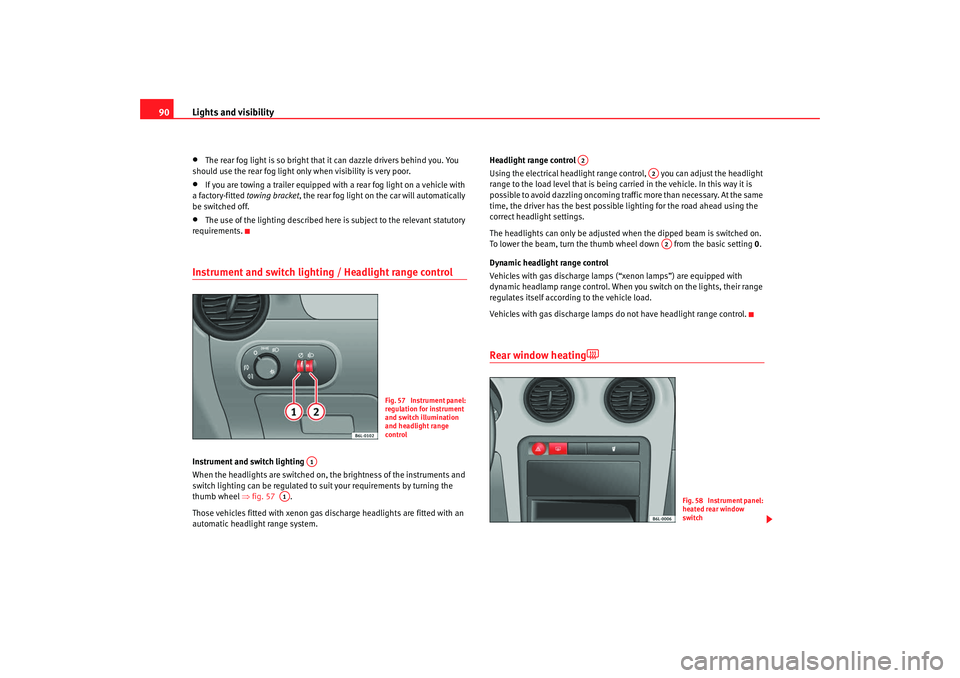
Instrument and switch lighting / Headlight range controlInstrument and switch lighting
When the headlights are switched on, the brightness of the instruments and
switch lighting can be regulated to suit your requirements by turning the
thumb wheel ⇒fig. 57 .
Those vehicles fitted with xenon gas discharge headlights are fitted with an
automatic headlight range system. Headlight range control
Using the electrical headlight range control, you can adjust the headlight
range to the load level that is being carried in the vehicle. In this way it is
possible to avoid dazzling oncoming tra
ffic more than necessary. At the same
time, the driver has the best possible lighting for the road ahead using the
correct headli ght settings.
The headlights can only be adjusted when the dipped beam is switched on.
To lower the beam, turn the thumb wheel down from the basic setting 0.
Dynamic headlight range control
Vehicles with gas discharge lamps (“xenon lamps”) are equipped with
dynamic headlamp range control. When you switch on the lights, their range
regulates itself according to the vehicle load.
Vehicles with gas discharge lamps do not have headlight range control.
Rear window heating
Fig. 57 Instrument panel:
regulation for instrument
and switch illumination
and headlight range
control
A1
A1
A2
A2A2
Fig. 58 Instrument panel:
heated rear window
switch
COR_ING_0707 Seite 90 Mittwoch, 1. August 2007 6:25 18
Page 93 of 258

Lights and visibility91
Safety First
Operating instructions
Tips and Maintenance
Te c h n i c a l D a t a
The rear window heating only works when
the engine is running. When it is
switched on, a lamp lights up on the switch.
After 20 minutes, the heati ng device of the rear window switches off automat-
ically. If the button is pushed again, after 20 minutes the rear window heater
stays on continuously until the ignition is switched off.
For the sake of the environment
The rear window heater should be disconnected as soon as the glass is
demisted. By saving electrical power you can also save fuel.
Note
To avoid possible damage to the battery, an automatic temporary disconnec-
tion of this function is possible, coming back on when normal operating
conditions are reestablished.
Hazard warning lights
The hazard warning lights are used to draw the attention of
other road users to your vehicle in emergencies.
If your vehicle breaks down:
1. Park your vehicle at a safe distance from moving traffic.
2. Press the button to switch on the hazard warning lights ⇒.
3. Switch the engine off.
4. Apply the handbrake.
5. On a manual gearbox engage 1st gear, and for an automatic move the selector lever to P.
6. Use the warning triangle to draw the attention of other road users to your vehicle.
Fig. 59 Instrument panel:
switch for hazard warning
lights
COR_ING_0707 Seite 91 Mittwoch, 1. August 2007 6:25 18
Page 101 of 258
Lights and visibility99
Safety First
Operating instructions
Tips and Maintenance
Te c h n i c a l D a t a
MirrorsAdjusting the head restraintsBefore beginning any journey, adjust the rear-view mirrors for correct
visibility.Interior mirror
It is dangerous to drive if you cannot see clearly through the
rear window.Manual anti-dazzle function for interior mirror
In the basic mirror position, the lever at the bottom edge of the mirror should
be at the front. Pull the lever to the back to select the anti-dazzle function.
Automatic anti-dazzle interior mirror*
The automatic anti-da zzle function can be switched on and off
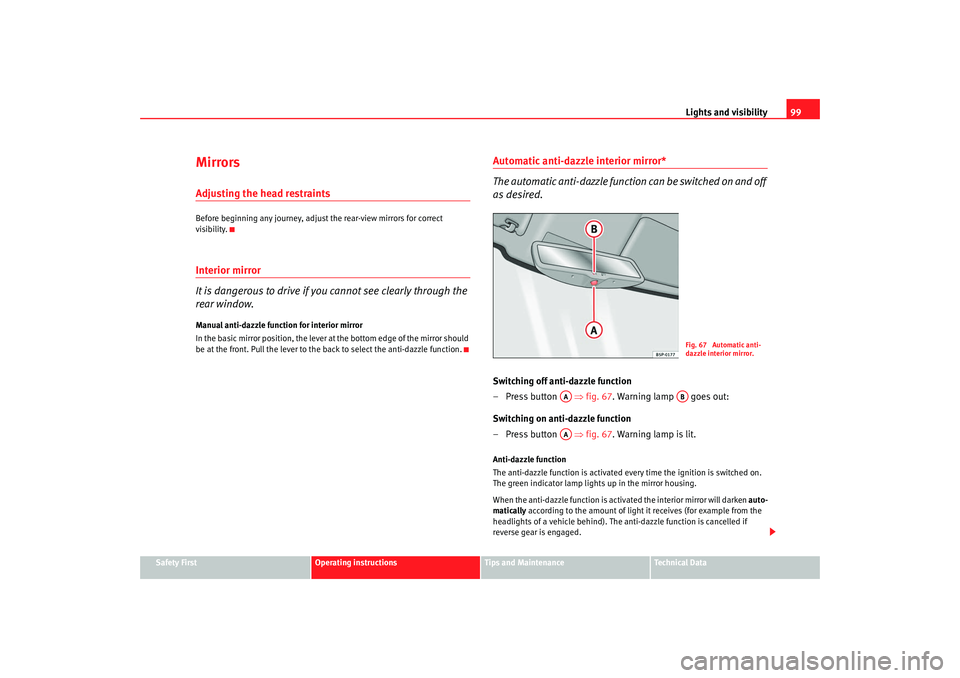
as desired.Switching off anti-dazzle function
– Press button ⇒ fig. 67. Warning lamp goes out:
Switching on anti-dazzle function
– Press button ⇒ fig. 67. Warning lamp is lit.Anti-dazzle function
The anti-dazzle function is activated every time the ignition is switched on.
The green indicator lamp ligh ts up in the mirror housing.
When the anti-dazzle function is activa ted the interior mirror will darken auto-
matically according to the amount of light it receives (for example from the
headlights of a vehicle behind). The anti-dazzle function is cancelled if
reverse gear is engaged.
Fig. 67 Automatic anti-
dazzle interior mirror.
AA
AB
AA
COR_ING_0707 Seite 99 Mittwoch, 1. August 2007 6:25 18
Page 102 of 258

Lights and visibility
100
Note•
The automatic anti-dazzle function will only work properly if the sun
blind* for the rear window is retracted and there are no other objects
preventing light from reac hing the interior mirror.
•
If you have to stick any type of sticker on the windscreen, do not do so in
front of the sensors. Doing so could pr event the anti-dazzle function from
working well or even from working at all.
Folding in the wing mirrorsThe wing mirrors of the vehicle may be folded in. For this, press the mirror
housing towards the vehicle.
Note
Before washing the vehicle with an automatic car wash, fold in the mirrors to
avoid damage.
Electric wing mirrors*
The exterior mirrors can be adjusted using the rotary knob in
the centre console.Basic setting of exterior mirrors
1. Turn knob ⇒fig. 68 to position L ( left exterior mirror ).
2. Turn the rotary knob to position the mirror so that you have a good view to the rear of the vehicle.
3. Turn knob to position R (right exterior mirror ).
4. Swivel the rotary knob to position the mirror so that you have a good view to the rear of the car ⇒.
Heating the exterior mirrors*
– Turn the control to the demisting position
⇒ fig. 68 .Fig. 68 Exterior mirror
control
COR_ING_0707 Seite 100 Mittwoch, 1. August 2007 6:25 18
Page 104 of 258
Seats and stowage
102Seats and stowageThe importance of correct seat adjustmentProper seat adjustment optimi ses the level of protection
offered by seat belts and airbags.Your vehicle has five passenger places, two individual front seats and three
places on the rear seat. Each seat is equipped with a three-point seat belt.
The driver seat and front passenger seat can be adjusted in many ways to suit
the physical requirements of the vehicl e occupants. The correct seat position
is very important for:•
fast and easy operation of all controls on the instrument panel,
•
relaxed posture that does not cause drowsiness,
•
safe driving ⇒page 7,
•
and to ensure that the seat belts and airbag system provide maximum
protection ⇒page 16.
WARNING
•
If the driver and passengers assume improper sitting positions, they
may sustain critical injuries.
•
Never transport more people than there are seats available in the
vehicle.
•
Every occupant in the vehicle must properly fasten and wear the seat
belt belonging to his or her seat. Children must be protected with an appro-
priate child restraint system ⇒page 42, “Child safety”.
•
The front seats and all head restraints must always be adjusted to body
size and the seat belt must always be properly adjusted to provide you and
your passengers with optimum protection.
•
Always keep your feet in the foot well when the vehicle is moving; never
rest them on the dash panel, out of the window or on the seat. This also
applies to passengers. An incorrect sitting position exposes you to an
increased risk of injury in the event of a braking manoeuvre or an accident.
If the airbag is triggered, you could sustain severe injuries due to an incor-
rect sitting position.
•
It is important for the driver and front passenger to maintain a distance
of at least 25 cm from the steering wh eel or dash panel. Failure to respect
the minimum distance means that the airbag will not protect you. Risk of
fatal injury. The distance between the driver and the steering wheel or
between the front passenger and the dash panel should always be as great
as possible.
•
Adjust the driver or front passenger seat only when the vehicle is
stationary. Otherwise your seat could move unexpectedly while the vehicle
is moving. This could increase the risk of an accident and therefore injury.
In addition, while adjusting your seat, you will assume an incorrect sitting
position. Risk of fatal accidents.
•
Special guidelines apply to installing a child seat on the front
passenger seat. When installing a chil d seat, observe the warning note in
the ⇒page 42, “Child safety”.WARNING (continued)
COR_ING_0707 Seite 102 Mittwoch, 1. August 2007 6:25 18