display Seat Exeo 2008 ADAGIO
[x] Cancel search | Manufacturer: SEAT, Model Year: 2008, Model line: Exeo, Model: Seat Exeo 2008Pages: 47, PDF Size: 1.76 MB
Page 17 of 47
Media drives
16
Do not use any force when inserting a CD into the drive. The CD will
be drawn into the slot automatically.
– Make sure that a CD is not already loaded in the CD slot.
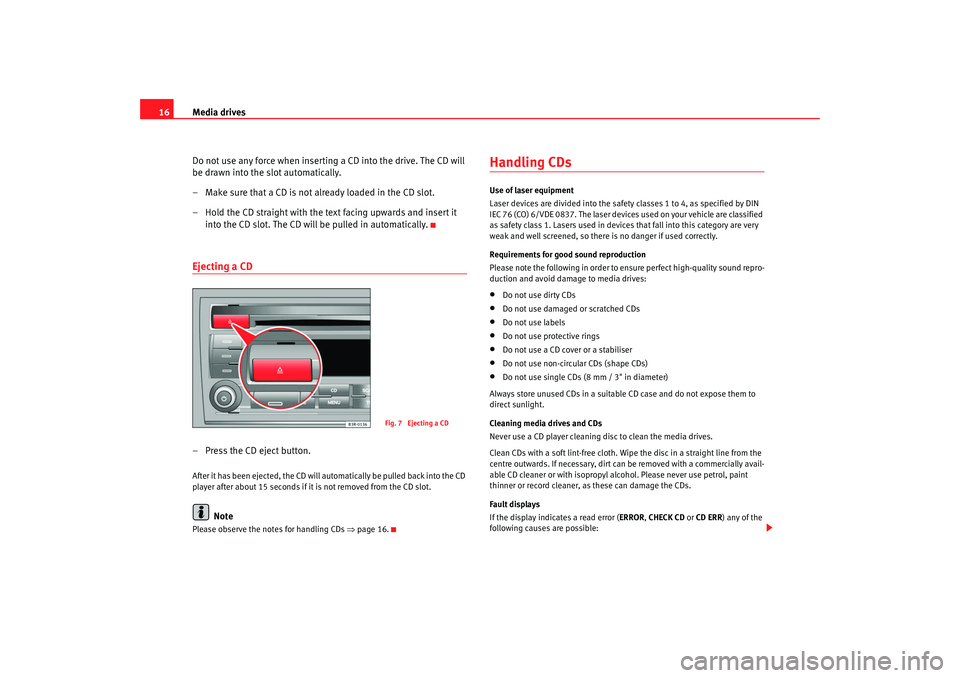
– Hold the CD straight with the text facing upwards and insert it into the CD slot. The CD will be pulled in automatically.Ejecting a CD– Press the CD eject button.After it has been ejected, the CD will automatically be pulled back into the CD
player after about 15 seconds if it is not removed from the CD slot.
Note
Please observe the notes for handling CDs ⇒page 16.
Handling CDsUse of laser equipment
Laser devices are divided into the safety classes 1 to 4, as specified by DIN
IEC 76 (CO) 6/VDE 0837. The laser devices used on your vehicle are classified
as safety class 1. Lasers used in devices that fall into this category are very
weak and well screened, so there is no danger if used correctly.
Requirements for good sound reproduction
Please note the following in order to ensure perfect high-quality sound repro-
duction and avoid damage to media drives:•
Do not use dirty CDs
•
Do not use damaged or scratched CDs
•
Do not use labels
•
Do not use protective rings
•
Do not use a CD cover or a stabiliser
•
Do not use non-circular CDs (shape CDs)
•
Do not use single CDs (8 mm / 3" in diameter)
Always store unused CDs in a suitable CD case and do not expose them to
direct sunlight.
Cleaning media drives and CDs
Never use a CD player cleaning disc to clean the media drives.
Clean CDs with a soft lint-free cloth. Wipe the disc in a straight line from the
centre outwards. If necessary, dirt ca n be removed with a commercially avail-
able CD cleaner or with isopropyl al cohol. Please never use petrol, paint
thinner or record cleaner, as these can damage the CDs.
Fault displays
If the display indicates a read error (ERROR , CHECK CD or CD ERR ) any of the
following causes are possible:
Fig. 7 Ejecting a CD
Adagio_EN Seite 16 Dienstag, 7. Oktober 2008 10:55 10
Page 18 of 47
Media drives17
If SERVICE appears on the display, please contact a Dealer or qualified work-
shop.
Note
Never remove the cover of the equipment. The equipment has no compo-
nents that can be serviced by the owner.
iPod interface*General notes
The iPod interface can be used to connect an iPod to your in-
car entertainment system and allows you to play audio files
directly over the car's sound system.The iPod interface is located in your car' s glove box. It is compatible with 3rd
generation or higher iPod
1) devices (made from about 2003 onwards), with
the exception of the iPod Shuffle.
The iPod is controlled using the CD function ⇒page 24.
•
The sound system orders (first numerically and then alphabetically) the
playlists with the tracks stored in the iPod and then assigns them in the
sequence CD 1 to CD 5. For easier playing of these playlists through the
vehicle's sound system, we recommend you create five playlists (e.g. 1.... to
5....) in your iPod.
•
If you select CD 6, all the tracks on th e iPod will be played even if they are
stored in different playlists. If you select an artist, a track, an album or a
podcast before connecting the iPod, your selection will be kept until you
change CD.
Information stored on the iPod, such as artist, track, album and genre, or the
name of a playlist, does not appear on the sound system display.Caution
Very high or very low temperatures (a common occurrence in a car's interior)
can cause damage to the iPod and/or impair its performance.•
Please do not leave your iPod in the vehicle in case of extreme tempera-
tures.
Problem
Remedy
CD is dirty.
Clean the CD.
CD is scratched.
Inspect the CD for scratches.
CD was inserted upside down.
Insert the CD with the text facing
upwards.
Condensation has formed on the CD.
Wait until the equipment is dry.
A mechanical malfunction has
occurred on the media drive.
Contact a Dealer or qualified work-
shop.
1)iPod is a registered trademark of Apple Computer Inc.
Adagio_EN Seite 17 Dienstag, 7. Oktober 2008 10:55 10
Page 20 of 47
Media drives19
•
Make sure that the iPod is fixed in place with one of the adapters
supplied.Note
•
Your Dealer also offers appropriate adapters for iPods that are not latest
generation.
•
For further information on adapter adaptation, please see the information
enclosed with the adapters supplied.
Inserting the iPod into the iPod interface– Switch on the sound system ⇒page 9.
– With the display facing upwards and the contact towards the front, slide the iPod into the bay until you hear it engage. The
iPod will switch on automatically and the battery will be charged.
– If the sound system does not detect the iPod after you insert it, please “reset” the iPod (refer to the iPod operating instructions).To start the iPod, press the button several times ⇒page 19.
The iPod is switched off automatically when you switch off the sound system
or the ignition.
Note
•
To ensure optimum sound quality, you should enable the “sound check”
setting on the iPod and disable the “EQ” (equaliser) before inserting the iPod
(please refer to the iPod operating instructions).
•
Slight scoring marks may occur on the iPod when used with the adapter.
Functions
The iPod is operated just like an external CD changer using
the controls on your car's sound system.To start the iPod, press the button until the display shows CD positions
CD 1 to CD 6 ⇒ page 24.
The following functions are available:•
Play all tracks stored on the iPod
•
Select and play up to five playlists (just like selecting CD 1 to 5 on an
external CD changer)
•
Change between playlists (just like changing the CD on an external CD
changer)
•
Change tracks within a playlist
•
Fast forward and rewind within a track
•
Play tracks in shuffle mode ("mix")
•
SCAN function
For further information on operation, please refer to the “CD” chapter
⇒ page 24.
NotesHere are some tips and points to remember when using the iPod in the car:•
Track numbers appear with a maximum of two digits in the sound system
display. The first digit is suppressed if you select a track with a three-digit
number, i.e. track 125 and track 25 are both displayed as track “25”. For this
reason we do not recommend allocating mo re than 99 tracks to each playlist.
•
If you reach the end of a playlist when selecting a track directly
(forward/reverse), the count is resumed at track “1”.
CD
CD
Adagio_EN Seite 19 Dienstag, 7. Oktober 2008 10:55 10
Page 21 of 47
Media drives
20•
The track numbers are counted up sequentially in the sound system
display when you play tracks in shuffle mode (MIX).
USB port*Introduction
You can connect a memory stick or an MP3 player to the USB
port for operating through the sound system.The USB port is located in your car's glove compartment. The port is compat-
ible with all memory sticks and MP3 players ( ⇒table on page 21). Problems
can occur if you use a memory stick or MP3 player not listed in the table. Your
memory device must be USB-certi fied as a minimum requirement.
WARNING
Today's driving conditions require your full attention. As the driver, you
bear the responsibility for road safety. Do not remove the memory stick or
MP3 player while driving. Failure to do so may cause an accident.
Caution
Very high or very low temperatures (a common occurrence in a car's interior)
can cause damage to the memory stick or MP3 player and/or impair its
performance.•
Never leave your memory stick or MP3 player in the vehicle in case of
extreme temperatures.
Note
Please refer to the manufacturer's oper ating instructions for important infor-
mation on how to use your memory stick or MP3 player.Connecting a memory stick / MP3 player
For problem-free operation, use only approved memory sticks
and MP3 players.– Switch on your car's sound system.
–Enable radio mode.
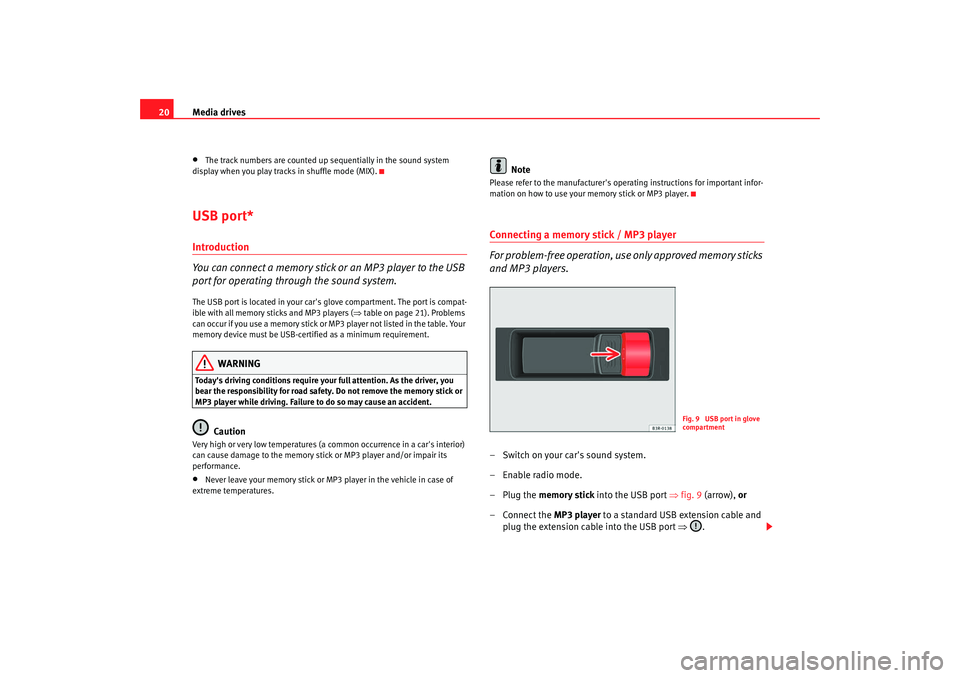
–Plug the memory stick into the USB port ⇒fig. 9 (arrow), or
–Connect the MP3 player to a standard USB extension cable and
plug the extension cable into the USB port ⇒ .
Fig. 9 USB port in glove
compartment
Adagio_EN Seite 20 Dienstag, 7. Oktober 2008 10:55 10
Page 23 of 47
Media drives
22
Caution•
Do not connect a device other than a memory stick or MP3 player to the
USB port. It is not possible to operate hard disks or USB hubs, etc. via the USB
port.
•
Do not connect the MP3 player directly to the USB port. This could
damage the device.
•
Never remove a memory device when the USB port is selected as source
(CD). This could damage your memory device.
Functions
Music files are played just like on a CD changer using the
controls on the sound system.To start the memory stick or MP3 player, press the button several times
until the display shows CD positions CD 1 to CD 6 ⇒ page 24.
The following functions are available:•
Play all tracks stored on the memory device (if no folders are stored on the
memory device)
•
Select and play up to six main folders with music files (just like selecting
CD 1 to 6 on a CD changer)
•
Change between main folders with music files (just like changing the CD
on a CD changer)
•
Change tracks within a main folder
•
Fast forward and rewind within a track
•
SCAN function
•
Play tracks in shuffle mode ("mix")
For further information on operations, please refer to the “CD” chapter
⇒ page 24.
NotesHere are some tips and points to reme mber when playing music files in the
car:•
We recommend that, instead of storing music files in the main directory of
the memory stick or MP3 player, you create separate folders e.g. for tracks
belonging to the same genre or artist. Therefore, bear in mind that your sound
system can display and play a maximum of six folders. The folders are allo-
cated first in numerical order and then in alphabetical order as CD 1 to CD 6.
Folders that do not contain music file s are automatically ignored. You can
create any number of subfolders.
•
If there are no folders on your memory device, the sound system will allo-
cate all the music files it finds to CD 1.
•
Track numbers appear with a maximum of two digits in the sound system
display. The first digit is suppressed if you select a track with a three-digit
number, i.e. track 125 and track 25 are both displayed as track “25”. We
therefore do not recommend allocating more than 99 tracks to each folder.
•
Bear in mind that special characters (umlauts, accents, etc) are at the end
of the alphabet.
The following music formats are supported:
•
mp3 (MPEG1 Layer3 from 32 to 320 kbps)
•
wma (from 8 to 192 kbps)
•
wav (11.025, 22.050 and 44.1 kHz sa mpling frequency with 16-bit
encoding, stereo)
•
ogg vorbis (up to q10, 48 kHz, stereo)
DRM music formats are not supported.Caution
Never store important data on the memory stick or MP3 player. SEAT is not
liable in any manner for any data or files that may be damaged or lost.
CD
Adagio_EN Seite 22 Dienstag, 7. Oktober 2008 10:55 10
Page 24 of 47
Media drives23
Aux-in connectionIntroduction
Portable players can be plugged into the Aux-in connection
using a 3.5 mm jack plug.The Aux-in socket is located in the centre console. It is compatible with port-
able players with a 3.5 mm jack plug. It cannot be guaranteed that all port-
able players will function without any problems.
Caution
•
Very high or very low temperatures (a common occurrence in a car's inte-
rior) can cause damage to portable pl ayers and/or impair their performance.
Never leave the portable player in the vehicle in case of extreme temperatures
(either very high or very low)
•
Never store important data on portable players. SEAT is not liable in any
manner for any data or files that may be damaged or lost.Note
Please refer to the operating instructions of your portable player for important
information on its operation.Connecting a portable player– Switch on your car's sound system.
– Enable radio mode. – Connect the portable player to a 3.5 mm jack plug and plug the
extension cable into the Aux-in socket.
– Before you remove the memory device, switch the audio source for the sound system back to radio.
To start the portable player, press the button several times until the EXT.
SOURCE ("external source") message appears on the display ⇒page 26.
After the player has been detected successfully, the display will show
External audio source is active .
You can select the audio files using the controls on the portable player.
The volume can be adjusted using the sound system in your vehicle, the
multi-function steering wheel* or the portable player.
WARNING
Today's driving conditions require your full attention. As the driver, you
bear the responsibility for road safety. Never operate a portable player
while driving, as this could result in an accident.
Note
•
We recommend setting the output level of the portable player to about
70 percent of maximum. Before adjusting the volume using the sound system
in your vehicle, you should first use the volume adjuster of the portable
player.
•
Using a portable player with the engine switched off will drain the
battery.
CD
Adagio_EN Seite 23 Dienstag, 7. Oktober 2008 10:55 10
Page 25 of 47
CD
24CDSelecting CD ModeImportant: A CD must have been inserted in the CD player
⇒ page 15.
– Press the button.The following information appears in the display:•
Duration
•
CD track
2)
•
Number of the track on the CD
•
Name of the directory/ album
2)
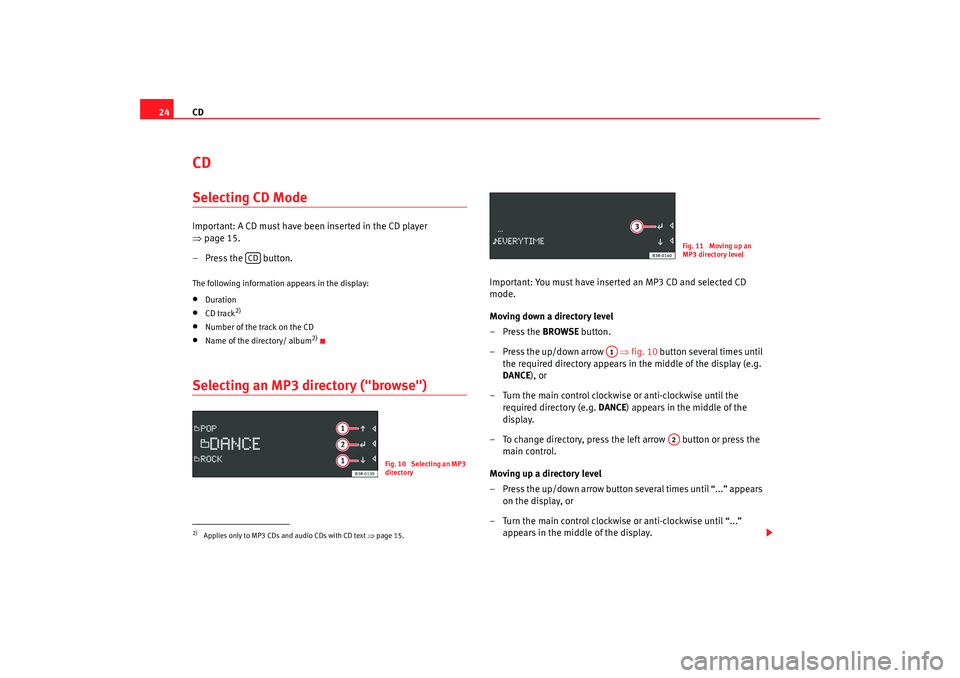
Selecting an MP3 directory ("browse")
Important: You must have inserted an MP3 CD and selected CD
mode.
Moving down a directory level
–Press the BROWSE button.
– Press the up/down arrow ⇒fig. 10 button several times until
the required directory appears in the middle of the display (e.g.
DANCE ), or
– Turn the main control clockwise or anti-clockwise until the required directory (e.g. DANCE) appears in the middle of the
display.
– To change directory, press the left arrow button or press the main control.
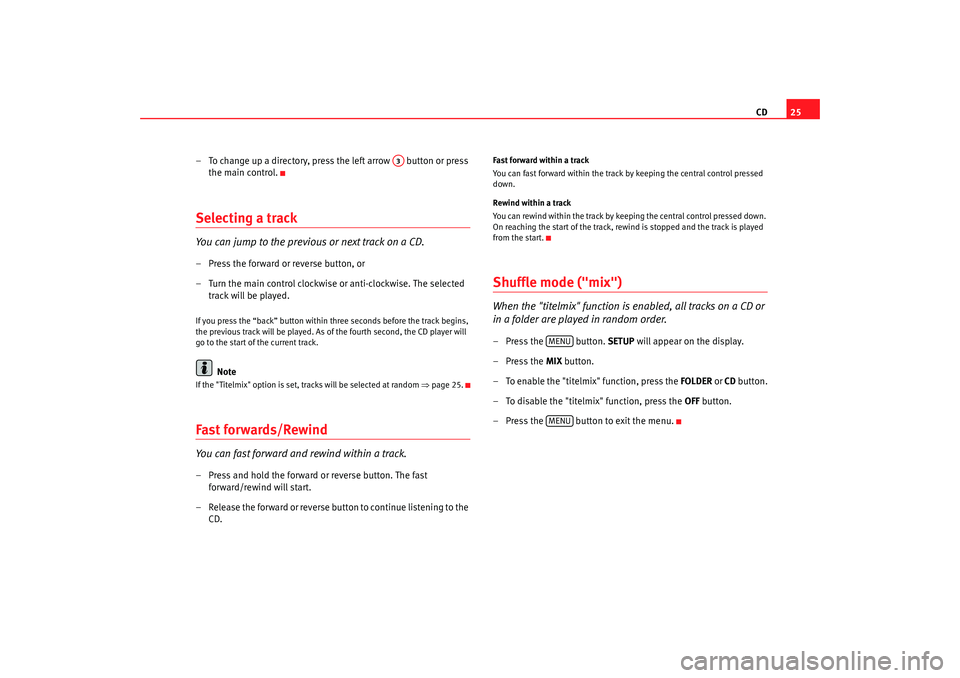
Moving up a directory level
– Press the up/down arrow button several times until “...” appears on the display, or
– Turn the main control clockwise or anti-clockwise until “...” appears in the middle of the display.
2)Applies only to MP3 CDs and audio CDs with CD text ⇒page 15.
CD
Fig. 10 Selecting an MP3
directory
Fig. 11 Moving up an
MP3 directory level
A1
A2
Adagio_EN Seite 24 Dienstag, 7. Oktober 2008 10:55 10
Page 26 of 47
CD25
– To change up a directory, press the left arrow button or press the main control.
Selecting a trackYou can jump to the previous or next track on a CD.– Press the forward or reverse button, or
– Turn the main control clockwise or anti-clockwise. The selected track will be played.If you press the “back” button within three seconds before the track begins,
the previous track will be played. As of the fourth second, the CD player will
go to the start of the current track.
Note
If the "Titelmix" option is set, tracks will be selected at random ⇒page 25.Fast forwards/RewindYou can fast forward and rewind within a track.– Press and hold the forward or reverse button. The fast
forward/rewind will start.
– Release the forward or reverse button to continue listening to the CD.
Fast forward within a track
You can fast forward within the track by keeping the central control pressed
down.
Rewind within a track
You can rewind within the track by keeping the central control pressed down.
On reaching the start of the track, rewind is stopped and the track is played
from the start.Shuffle mode ("mix")When the "titelmix" function is enabled, all tracks on a CD or
in a folder are played in random order.– Press the button. SETUP will appear on the display.
– Press the MIX button.
– To enable the "titelmix" function, press the FOLDER or CD button.
– To disable the "titelmix" function, press the OFF button.
– Press the button to exit the menu.
A3
MENUMENU
Adagio_EN Seite 25 Dienstag, 7. Oktober 2008 10:55 10
Page 27 of 47
CD
26Playing all tracks on the CD briefly ("scan")The "scan" function plays each of the tracks on a CD for a few
seconds.– Press the main control. SCAN CD appears on the display and the
tracks on the CD are played for a few seconds.
– Press the main control to listen to the track currently playing in full.
NoteIf you switch on the "scan" function w hile the "titelmix" function is enabled,
the latter will be disabled.External audio source (AUX)Data from an external audio source can be played back on the
sound system.Important:
– An external audio source must have been connected to the sound system beforehand by your Dealer or specialist retailer.
Press the the button several times until EXT. SOURCE
appears on the display.
NoteThe external audio source is operated from the connected device itself.
CD
Adagio_EN Seite 26 Dienstag, 7. Oktober 2008 10:55 10
Page 32 of 47
Mobile phone interface31
Phone book
The phone book entries on your SIM card and your mobile
phone directory are automatically stored in the mobile phone
interface.Loading the phone book entries
Provided your mobile phone supports this function, the phone book entries
will be automatically scanned into the memory of the mobile phone interface
after you have switched on the ignition and inserted the mobile phone in the
adapter. It may take several minutes to load the entries, depending on how
many entries are stored on the mobile phone. The message Please wait... will
appear on the instrument panel display during this process.
The last four phone books loaded into the mobile phone interface remain
stored there. When you link a fifth mobile phone to the mobile phone inter-
face, the phone book from the mobile phone which has not been used for the
longest time is deleted from the mobi le phone interface. Up to 500 phone
book entries per phone book ca n be stored in the memory.
Using the mobile phone again later
If the SIM card is identical, the phone book entries are already stored in the
mobile phone interface. You can use the phone book almost immediately.
The system automatically searches for changes or new entries and stores
them automatically. This process can take several minutes. If your vehicle is
equipped with the speech control system* ⇒ page 31, you cannot record any
spoken names in the phone book for the speech control system while phone
book entries are being loaded from the mobile phone.
Speech control systemIntroduction
You can use speech commands to operate various functions
of the telephone.Functions
When used in combination with the hands-free system, you can make calls
without touching your mobile phone. The speech control system recognises
commands and digits spoken by different people.
The speech control system allows you to do the following:•
Create an acoustic phone book for the speech control system ⇒page 32
•
Enter and dial a telephone number ⇒page 35
Traffic reports are not announced duri ng a running dialogue. The dialogue
will be ended immediately when an incoming phone call is received. To
answer the call, press the left thumbwheel on the multi-function steering
wheel* or the talk button on the mobile phone adapter.
Unclear speech commands
The system acknowledges your commands with an acoustic signal. If the
system does not recognise a speech command, it will answer with Pardon?
and request you to repeat the command. After a third failed attempt the
system will answer with Cancel and the dialogue will be ended.
How to help the system understand you
•
Speak clearly in a normal volume. Speak louder if you are driving fast.
•
Speak in a normal tone without long pauses.
•
Avoid speaking when the system is saying a cue.
•
Close doors, windows and sun roof* to reduce background noise. Make
sure that passengers are not talking when you say a command.
Adagio_EN Seite 31 Dienstag, 7. Oktober 2008 10:55 10