towing Seat Exeo 2009 Owner's Guide
[x] Cancel search | Manufacturer: SEAT, Model Year: 2009, Model line: Exeo, Model: Seat Exeo 2009Pages: 310, PDF Size: 8.54 MB
Page 205 of 310
Trailer towing203
Safety First
Controls and equipment
Practical tips
Technical Data
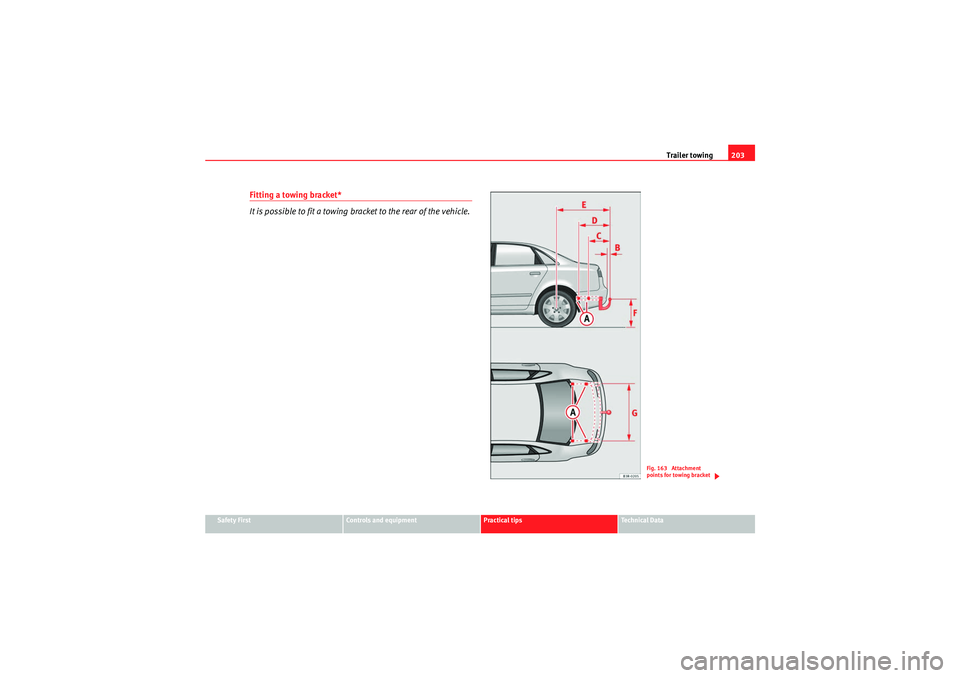
Fitting a towing bracket*
It is possible to fit a towing bracket to the rear of the vehicle.
Fig. 163 Attachment
points for towing bracket
Exeo_EN.book Seite 203 Freitag, 28. August 2009 10:14 10
Page 206 of 310
Trailer towing
204If a towing bracket is to be fitted after the vehicle is purchased, this must be
completed according to the instructions of the towing bracket manufacturer.
The attachment points for the towing bracket are on the lower part of the
vehicle.
The distance between the centre of the ball coupling and the ground should
never be lower than the indicated value, even with a fully loaded vehicle and
including the maximum resting weight.
Elevation values for securing the towing bracket:
65 mm (minimum)
403
629 mm
1112 mm (vehicle with max. load)
from 350 to 420 mm (fully loaded vehicle)
1,000 mm
Fitting a towing bracket•Driving with a trailer involves an extra effort for the vehicle. Therefore,
before fitting a towing bracket, please contact an Authorised Service Centre
to check whether your cooling system needs modification.•Submit to the legal requirements in your country (e.g. the fitting of a sepa-
rate warning lamp).•Certain vehicle components, e.g. the rear bumper, must be removed and
reinstalled. The towing bracket securing bolts must be tightened using a
torque wrench, and an electrical socket must be connected to the vehicle's
electrical system. The above-mentioned require specialized knowledge and
tools.•Figures in the illustration show the elevation value and the attachment
points which must be considered if you are retrofitting a towing bracket.WARNING
Towing brackets should be fitted by specialists.
•If the towing bracket is incorrectly installed, there is serious danger of
accident.•For your own safety, please observe the instructions provided by the
manufacturer of the towing bracket.Caution
•If the electrical socket is incorrectly installed, this could cause damage to
the vehicle's electrical system.Note
For the Sport finish, fitting a trailer bracket is not recommended due to the
design of the bumpers.
AA
ABACADAEAFAG
WARNING (continued)
Exeo_EN.book Seite 204 Freitag, 28. August 2009 10:14 10
Page 248 of 310

If and when
246Your vehicle can be equipped with a steel spare wheel at the factory. The
spare wheel does not usually meet the same performance standards as the
wheels fitted on the vehicle because of the wheel/tyre dimensions, rubber
composition, tread pattern, etc. Therefore, note the following restrictions:•The spare steel rim wheel is designed only for your vehicle model. Do not
attempt to mount the wheel on any vehicle but your own.•Your vehicle will have different driving characteristics when the spare
steel rim wheel is mounted ⇒.•The spare wheel is only intended for temporary use after having a flat tyre.
Replace the spare wheel with a normal wheel that has the proper tyre dimen-
sions as soon as possible.•If the size of the spare steel rim wheel is different to that of the other
wheels, it is unlikely that snow chains suitable for the other wheels will fit it.WARNING
•After mounting the spare steel rim wheel, the tyre pressure must be
checked and corrected as soon as possible. The inflating pressure must
adapt to the vehicle load (consult the table containing the inflation pres-
sures). Otherwise there is danger of causing an accident. Use the highest
tyre pressure as indicated in the table.•Do not drive faster than 80 km/h, as higher speeds can cause an acci-
dent.•Avoid heavy acceleration, hard braking and fast cornering, as this could
cause an accident.
Changing a wheelPreparation work
What you must do before changing a wheel.– If you have a flat tyre or puncture, park the car as far away from the flow of traffic as possible. Choose a location that is as level
as possible.
– All passengers should leave the vehicle. They should wait in a
safe place (e.g. behind the roadside crash barrier).
–Apply the handbrake firmly.
–Engage 1st gear.
– When towing a trailer: Unhitch the trailer from your vehicle.
–Take the tools and the spare wheel ⇒ page 244 out of the
luggage compartment.
WARNING
If you have a puncture in heavy traffic, switch on the hazard warning lights
and place the warning triangle in a visible location. This is for your own
safety and also warns other road users.
Caution
If you have to change the tyre on a gradient, block the wheel opposite the
wheel being changed by placing a stone or similar object under it to prevent
the vehicle from rolling away.
Exeo_EN.book Seite 246 Freitag, 28. August 2009 10:14 10
Page 258 of 310
If and when
256Fuse assignment
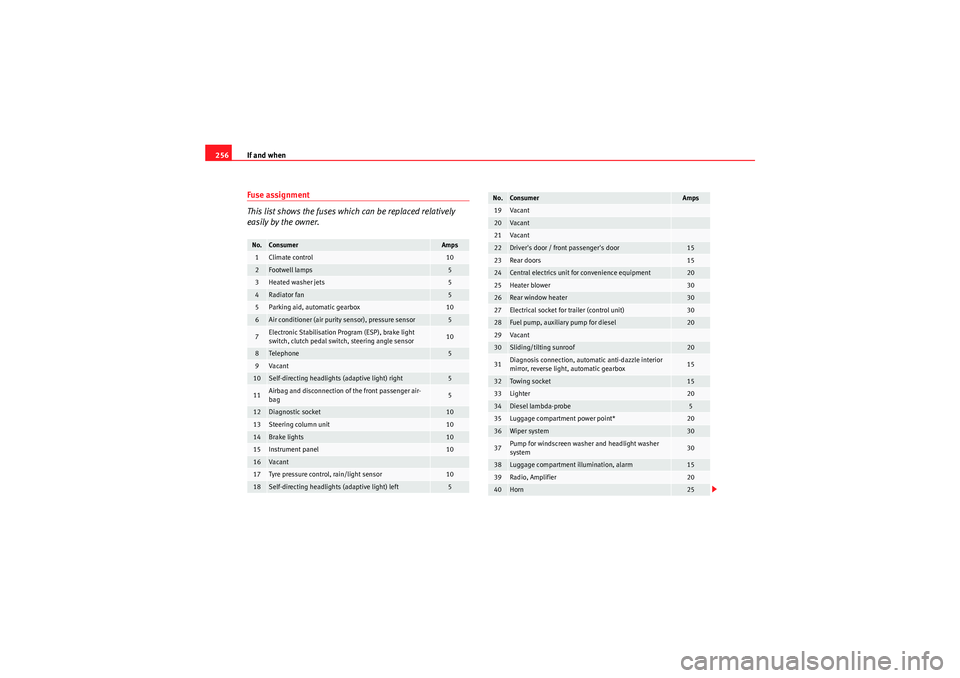
This list shows the fuses which can be replaced relatively
easily by the owner.No.
Consumer
Amps
1
Climate control
10
2
Footwell lamps
5
3
Heated washer jets
5
4
Radiator fan
5
5
Parking aid, automatic gearbox
10
6
Air conditioner (air purity sensor), pressure sensor
5
7
Electronic Stabilisation Program (ESP), brake light
switch, clutch pedal switch, steering angle sensor
10
8
Tele ph one
5
9
Va can t
10
Self-directing headlights (adaptive light) right
5
11
Airbag and disconnection of the front passenger air-
bag
5
12
Diagnostic socket
10
13
Steering column unit
10
14
Brake lights
10
15
Instrument panel
10
16
Va can t
17
Tyre pressure control, rain/light sensor
10
18
Self-directing headlights (adaptive light) left
5
19
Va can t
20
Va can t
21
Va can t
22
Driver's door / front passenger's door
15
23
Rear doors
15
24
Central electrics unit for convenience equipment
20
25
Heater blower
30
26
Rear window heater
30
27
Electrical socket for trailer (control unit)
30
28
Fuel pump, auxiliary pump for diesel
20
29
Va can t
30
Sliding/tilting sunroof
20
31
Diagnosis connection, automatic anti-dazzle interior
mirror, reverse light, automatic gearbox
15
32
Towing socket
15
33
Lighter
20
34
Diesel lambda-probe
5
35
Luggage compartment power point*
20
36
Wiper system
30
37
Pump for windscreen washer and headlight washer
system
30
38
Luggage compartment illumination, alarm
15
39
Radio, Amplifier
20
40
Horn
25
No.
Consumer
Amps
Exeo_EN.book Seite 256 Freitag, 28. August 2009 10:14 10
Page 284 of 310
If and when
282Towing and tow-startingTo w - s t a r t i n g
The use of jump leads is preferable to tow-starting.We recommend that you do not tow-start your vehicle. Jump-starting
is preferable ⇒ page 279.
However, if your vehicle has to be tow-started:
– Engage the 2
nd or the 3
rd gear.
– Keep the clutch pressed down.
– Switch the ignition on.
– Once both vehicles are moving, release the clutch.
– As soon as the engine starts, press the clutch and move the gear lever into neutral. This helps to prevent driving into the towing
vehicle.
WARNING
The risk of accidents is high when tow-starting. The vehicle being towed
can easily collide with the towing vehicle.
Caution
When tow-starting, fuel could enter the catalytic converter and damage it.
CommentsPlease observe the following points if you use a tow-rope:
Notes for the driver of the towing vehicle
– Drive slowly at first until the tow-rope is taut. Then accelerate gradually.
– Begin and change gears cautiously. If you are driving an auto- matic vehicle, accelerate gently.
– Remember that the brake servo and power steering are not working in the vehicle you are towing. Brake earlier than you
would normally, but with a more gentle pressure on the brake.
Notes for the driver of the towed vehicle
– Ensure that the tow-rope remains taut at all times when towing.Tow-rope or tow-bar
It is easier and safer to tow a vehicle with a tow-bar. You should only use a
tow-rope if you do not have a tow-bar.
A tow-rope should be slightly elastic to reduce the loading on both vehicles.
It is advisable to use a tow-rope made of synthetic fibre or similarly elastic
material.
Attach the tow-rope or the tow-bar only to the towing eyes provided or a
towing bracket.
Driving style
Towing requires some experience, especially when using a tow-rope. Both
drivers should be familiar with the technique required for towing. Inexperi-
enced drivers should not attempt to tow-start or tow away another vehicle.
Exeo_EN.book Seite 282 Freitag, 28. August 2009 10:14 10
Page 285 of 310
If and when283
Safety First
Controls and equipment
Practical tips
Technical Data
Do not pull too hard with the towing vehicle and take care to avoid jerking the
tow-rope. When towing on an unpaved road, there is always a risk of over-
loading and damaging the anchorage points.
The ignition of the vehicle being towed must be switched on to prevent the
steering wheel from locking and also to allow the use of the indicators, horn,
windscreen wipers and washers.
As the brake servo does not work if the engine is not running, you must apply
considerably more pressure to the brake pedal than you normally would.
As the power assisted steering does not work if the engine is not running, you
will need more strength to steer than you normally would.
Towing vehicles with an automatic gearbox
•Put the selector lever into position “N”.•Do not drive faster than 50 km/h when towing a vehicle.•Do not tow further than 50 km.•If a breakdown vehicle is used, the vehicle must be towed with the front
wheels raised.Note
•Observe legal requirements when towing or tow-starting.•Switch on the hazard warning lights of both vehicles. However, observe
any regulations to the contrary.•For technical reasons, vehicles with an automatic gearbox must not be
tow-started.•If damage to your vehicle means that there is no lubricant in the gearbox,
you must raise the drive wheels while the vehicle is being towed.•If the vehicle has to be towed more than 50 km, the front wheels must be
raised during towing, and towing should be carried out by a qualified person.•The steering wheel is locked when the vehicle has no electrical power. The
vehicle must then be towed with the front wheels raised. Towing should be
carried out by a qualified person.
•The towing eye should always be kept in the vehicle. Please refer to the
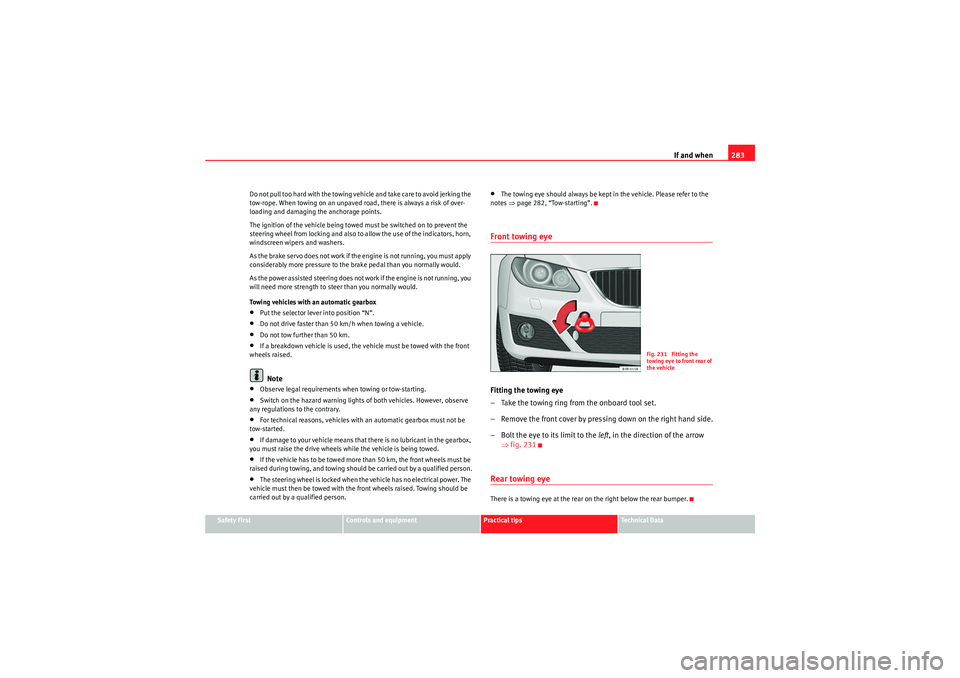
notes ⇒page 282, “Tow-starting”.Front towing eyeFitting the towing eye
– Take the towing ring from the onboard tool set.
– Remove the front cover by pressing down on the right hand side.
– Bolt the eye to its limit to the left, in the direction of the arrow
⇒ fig. 231Rear towing eyeThere is a towing eye at the rear on the right below the rear bumper.
Fig. 231 Fitting the
towing eye to front rear of
the vehicle
Exeo_EN.book Seite 283 Freitag, 28. August 2009 10:14 10
Page 290 of 310
General notes on the technical data
288Towing a trailerTrailer weightsTrailer weights
The trailer weights and drawbar loads approved are selected in intensive
trials according to precisely defined criteria. The approved trailer weights are
valid for vehicles in the EU for maximum speeds of 80 km/h (in certain
circumstances up to 100 km/h). The figures may be different in other coun-
tries. All data in the official vehicle documents take precedence over these
data ⇒ .
Drawbar load
The maximum permitted weight exerted by the trailer drawbar on the ball joint
of the towing bracket must not exceed 75 kg.
In the interest of road safety, we recommend that you always tow
approaching the maximum drawbar load. The response of the trailer on the
road will be poor if the drawbar load is too small.
If the maximum permissible drawbar load cannot be met (e.g. with small,
empty and light-weight single axle trailers o r ta n d e m a x l e t r a i l e r s wi t h a n a x le
base of less than 1 metre), at least 4% of the actual trailer weight is a legal
stipulation for a drawbar load.
WARNING
•For safet y reas ons , d o not excee d the 8 0 k m/h limit . Th is is als o valid in
countries where higher speeds are permitted.•Never exceed the maximum trailer weights or the draw bar loading. If
the permissible axle load or the permissible total weight is exceeded, the
driving characteristics of the vehicle may change, leading to accidents,
injuries and damage to the vehicle.
WheelsTyre pressure, snow chains, wheel boltsTyre pressures
The sticker with the tyre pressure values can be found on the inside of the
tank flap. The tyre pressure values given there are for cold tyres. The slightly
raised pressures of warm tyres must not be reduced. ⇒
Snow chains
Snow chains may be fitted only to the front wheels.
Consult the chapter “wheels” of this manual.
Wheel bolts
After the wheels have been changed, the tightening torque of the wheel bolts
s ho uld b e che cke d as s o on as p ossible wit h a to rqu e w re nch ⇒ . The tight-
ening torque for steel and alloy wheels is 120 Nm.
WARNING
•Check the tyre pressure at least once per month. Checking tyre pressure
value is very important. If the tyre pressure is too high or too low, there is
an increased danger of accidents, particularly at high speeds.•If the torque of the wheel bolts is too low, they could loosen while the
vehicle is in motion. Risk of accident! If the tightening torque is too high,
the wheel bolts and threads can be damaged.Note
We recommend that you ask your Authorised Service Centre for information
about appropriate wheel, tyre and snow chain size.
Exeo_EN.book Seite 288 Freitag, 28. August 2009 10:14 10
Page 301 of 310
Index299
Index
AAccessories . . . . . . . . . . . . . . . . . . . . . . . . . . . . 214
Towing . . . . . . . . . . . . . . . . . . . . . . . . . . . . . 196
Adaptive headlights . . . . . . . . . . . . . . . . . . . . . 121
Air conditioner 2C-Climatronic . . . . . . . . . . . . . . . . . . . . . . . 154
Defrosting . . . . . . . . . . . . . . . . . . . . . . . . . . . 158
Solar-powered blower/solar roof . . . . . . . . 163
Air duct Fitting . . . . . . . . . . . . . . . . . . . . . . . . . 259, 266
Removing . . . . . . . . . . . . . . . . . . . . . . 258, 265
Air purity sensor . . . . . . . . . . . . . . . . . . . . . . . . . 159
Airbag Warning lamp . . . . . . . . . . . . . . . . . . . . . . . . . 66
Airbag covers . . . . . . . . . . . . . . . . . . . . . . . . . . . . 33
Airbag system . . . . . . . . . . . . . . . . . . . . . . . . . . . 28 Curtain airbags . . . . . . . . . . . . . . . . . . . . . . . 41
Front airbags . . . . . . . . . . . . . . . . . . . . . . . . . 31
Side airbags . . . . . . . . . . . . . . . . . . . . . . . . . . 37
Warning lamp . . . . . . . . . . . . . . . . . . . . . . . . . 29
Alternator Warning lamp . . . . . . . . . . . . . . . . . . . . . . . . . 69
Ambient temperature display . . . . . . . . . . . . . . . 72
Anti-freeze . . . . . . . . . . . . . . . . . . . . . . . . . . . . . 225
Anti-lock brake system How it works . . . . . . . . . . . . . . . . . . . . . . . . . 184
Anti-puncture tyres . . . . . . . . . . . . . . . . . . . . . . 240 Anti-theft alarm system . . . . . . . . . . . . . . . . . . . 106
Interior monitoring . . . . . . . . . . . . . . . . . . . 107
Aquaplaning . . . . . . . . . . . . . . . . . . . . . . . . . . . 239
Armrest Storage compartment in front armrest . . . . 141
Armrests Adjusting the front armrest . . . . . . . . . . . . . 141
Ashtray Front . . . . . . . . . . . . . . . . . . . . . . . . . . . . . . . 148
Rear . . . . . . . . . . . . . . . . . . . . . . . . . . . . . . . 149
Athermic windscreen . . . . . . . . . . . . . . . . . . . . . 215
Auto-check system . . . . . . . . . . . . . . . . . . . . . . . 75
Automatic car wash tunnel . . . . . . . . . . . . . . . . 206
Automatic gearbox Dynamic gear control program . . . . . . . . . . 180
Kick-down feature . . . . . . . . . . . . . . . . . . . . 179
multitronic® . . . . . . . . . . . . . . . . . . . . . . . . 175
Paddle levers (tiptronic mode) . . . . . . . . . . 182
Safety interlock for ignition key . . . . . . . . . 165
Selector lever lock . . . . . . . . . . . . . . . . . . . . 179
Selector lever positions . . . . . . . . . . . . . . . . 177
Steering wheel with paddle levers . . . . . . . 182
tiptronic . . . . . . . . . . . . . . . . . . . . . . . 175, 181
Automatic headlight control . . . . . . . . . . . . . . . 115
BBackground lighting . . . . . . . . . . . . . . . . . . . . . 124 Battery . . . . . . . . . . . . . . . . . . . . . . . . . . . . . . . . 231
Battery voltage . . . . . . . . . . . . . . . . . . . . . . . . 81
Charging . . . . . . . . . . . . . . . . . . . . . . . . . . . . 233
Disconnection . . . . . . . . . . . . . . . . . . . . . . . 231
Long periods of non-use . . . . . . . . . . . . . . . 231
Replacing . . . . . . . . . . . . . . . . . . . . . . 231, 232
Testing . . . . . . . . . . . . . . . . . . . . . . . . . . . . . 231
Winter operations . . . . . . . . . . . . . . . 231, 232
Belt tension device Disposal . . . . . . . . . . . . . . . . . . . . . . . . . . . . . 27
Warning lamp . . . . . . . . . . . . . . . . . . . . . . . . 29
Belt tension devices . . . . . . . . . . . . . . . . . . . . . . 26
Bicycle rack Towing . . . . . . . . . . . . . . . . . . . . . . . . . . . . . 196
Biodiesel . . . . . . . . . . . . . . . . . . . . . . . . . . . . . . 218
Biodiesel fuel . . . . . . . . . . . . . . . . . . . . . . . . . . . 218
Bonnet . . . . . . . . . . . . . . . . . . . . . . . . . . . . . . . . 220 Closing . . . . . . . . . . . . . . . . . . . . . . . . . . . . . 222
Opening . . . . . . . . . . . . . . . . . . . . . . . . . . . . 220
Releasing . . . . . . . . . . . . . . . . . . . . . . . . . . . 220
Brake light Failure control . . . . . . . . . . . . . . . . . . . . . . . . 80
Brake pads . . . . . . . . . . . . . . . . . . . . . . . . . . . . . 189
Brake servo . . . . . . . . . . . . . . . . . . . . . . . . . . . . 189
Brake system Brake servo . . . . . . . . . . . . . . . . . . . . . . . . . 186
Brakes . . . . . . . . . . . . . . . . . . . . . . . . . . . . . 186
Malfunction . . . . . . . . . . . . . . . . . . . . . . . . . . 77
Exeo_EN.book Seite 299 Freitag, 28. August 2009 10:14 10
Page 308 of 310
Index
306Sun visors . . . . . . . . . . . . . . . . . . . . . . . . . . . . . 126
Sunroof . . . . . . . . . . . . . . . . . . . . . . . . . . . . . . . 112
Automatic close function . . . . . . . . . . . . . . 112
Closing . . . . . . . . . . . . . . . . . . . . . . . . . . . . . 112
Manual operation . . . . . . . . . . . . . . . . . . . . 113
Override function . . . . . . . . . . . . . . . . . . . . 113
Supplementary heating . . . . . . . . . . . . . . . . . . 163
Switches in the driver's door Electric windows . . . . . . . . . . . . . . . . . . . . . 109
Symbols Red symbols in central display . . . . . . . . . . 77
Yellow symbols in central display . . . . . . . . 79TTailgateCentral locking system . . . . . . . . . . . . . . . . 103
Light . . . . . . . . . . . . . . . . . . . . . . . . . . . . . . . 125
TCS How the system works . . . . . . . . . . . . . . . . 186
Technical modifications . . . . . . . . . . . . . . . . . . 214
The danger of not using the seat belt . . . . . . . . 20
The environment Heated rear window . . . . . . . . . . . . . . . . . . 126
Leaks . . . . . . . . . . . . . . . . . . . . . . . . . . . . . . 221
Roof carriers . . . . . . . . . . . . . . . . . . . . . . . . 147
Warming up the engine . . . . . . . . . . . . . . . 166
Tightening torque of wheel bolts . . . . . . . . . . . 288
tiptronic . . . . . . . . . . . . . . . . . . . . . . . . . . . 175, 181
Tools . . . . . . . . . . . . . . . . . . . . . . . . . . . . . . . . . . 244 Tow starting
Comments . . . . . . . . . . . . . . . . . . . . . . . . . . 282
Towing . . . . . . . . . . . . . . . . . . . . . . . . . . . . 194, 282 Accessories . . . . . . . . . . . . . . . . . . . . . . . . . 196
Notes on towing . . . . . . . . . . . . . . . . . 194, 195
Removable towing bracket . . . . . . . . . . . . . 197
Technical requirements . . . . . . . . . . . . . . . 194
Towing a trailer . . . . . . . . . . . . . . . . . . . . . . . . . 288
Towing bracket, fitting . . . . . . . . . . . . . . . . . . . 203
Towing eye . . . . . . . . . . . . . . . . . . . . . . . . . . . . . 282
Towing eyes . . . . . . . . . . . . . . . . . . . . . . . . . . . . 283
Tow-starting . . . . . . . . . . . . . . . . . . . . . . . . . . . . 282
Traction control system How the system works . . . . . . . . . . . . . . . . 186
Trailer weights . . . . . . . . . . . . . . . . . . . . . . . . . . 288
Trip recorder . . . . . . . . . . . . . . . . . . . . . . . . . . . . 63
Type plate . . . . . . . . . . . . . . . . . . . . . . . . . . . . . 286
Tyre Mobility System . . . . . . . . . . . . . . . . . . . . . 251
Tyre mobility system . . . . . . . . . . . . . . . . . . . . . 245
Tyre pressure . . . . . . . . . . . . . . . . . . . . . 66, 90, 235 Loss . . . . . . . . . . . . . . . . . . . . . . . . . . . . . . . 237
Tyre pressure monitoring . . . . . . . . . . . . . . . . . 236
Tyre pressure monitoring system . . . . . . . . . . . . 89
Tyre pressures . . . . . . . . . . . . . . . . . . . . . . . . . . 288
Tyre repair kit Tyre Mobility System . . . . . . . . . . . . . . . . . . 251
Tyres and wheels Dimensions . . . . . . . . . . . . . . . . . . . . . . . . . 241
Tyres service life . . . . . . . . . . . . . . . . . . . . . . . . 238
Tyres tread depth . . . . . . . . . . . . . . . . . . . . . . . 239 Tyres with directional tread pattern . . . . . . . . . 235
UUnderbody maintenance . . . . . . . . . . . . . . . . . 210VVehicle data . . . . . . . . . . . . . . . . . . . . . . . . . . . . 286
Vehicle identification data . . . . . . . . . . . . . . . . 286
Vehicle identification number . . . . . . . . . . . . . 286
Vehicle Maintenance
Exterior . . . . . . . . . . . . . . . . . . . . . . . . . . . . . 206
Vehicle modifications . . . . . . . . . . . . . . . . . . . . 214
Vehicle paintwork Products for vehicle maintenance . . . . . . . 205
Waxing . . . . . . . . . . . . . . . . . . . . . . . . . . . . . 207
Vehicle washing . . . . . . . . . . . . . . . . . . . . . . . . 206
Ventilation slits . . . . . . . . . . . . . . . . . . . . . . . . . . 17WWarning lamp . . . . . . . . . . . . . . . . . . . . . . . . . . . 29 Alternator . . . . . . . . . . . . . . . . . . . . . . . . . . . . 69
Warning lamps Airbag . . . . . . . . . . . . . . . . . . . . . . . . . . . . . . 66
Anti-lock brake system . . . . . . . . . . . . . . . . . 67
Electronic differential lock . . . . . . . . . . . . . . 67
Electronic stabilisation programme . . . . . . . 68
Engine management (EPC) . . . . . . . . . . . . . . 69
Exhaust emission control system . . . . . . . . 66
Handbrake . . . . . . . . . . . . . . . . . . . . . . . . . . . 70
Exeo_EN.book Seite 306 Freitag, 28. August 2009 10:14 10