warning Seat Exeo 2010 Owner's manual
[x] Cancel search | Manufacturer: SEAT, Model Year: 2010, Model line: Exeo, Model: Seat Exeo 2010Pages: 319, PDF Size: 9.64 MB
Page 221 of 319
Accessories, parts replacement and modifications219
Safety First
Operating Instructions
Practical Tips
Technical Specifications
WARNING
Incorrectly performed modifications or other kind of work on your vehicle
can lead to malfunctions and cause accidents.Mobile phones and two-way radiosFirst consult your Authorised Service Centre if you wish to use a mobile tele-
phone or a two-way radio with a transmitting power output in excess of 10
watts. Here you will receive information concerning the technical possibilities
for retrofitting this equipment.
Mobile telephones and two-way radios should be only fitted by a specialised
workshop, for example an Authorised Service Centre.
WARNING
•Always concentrate primarily on driving. If you are distracted while
driving you could have an accident.•Never attach the telephone mountings to the surfaces covering the
airbag units or within the range of the airbags. There is a high danger of
injury if the airbag is triggered.Note
Please observe the operating instructions of your mobile telephone / two-way
radio.
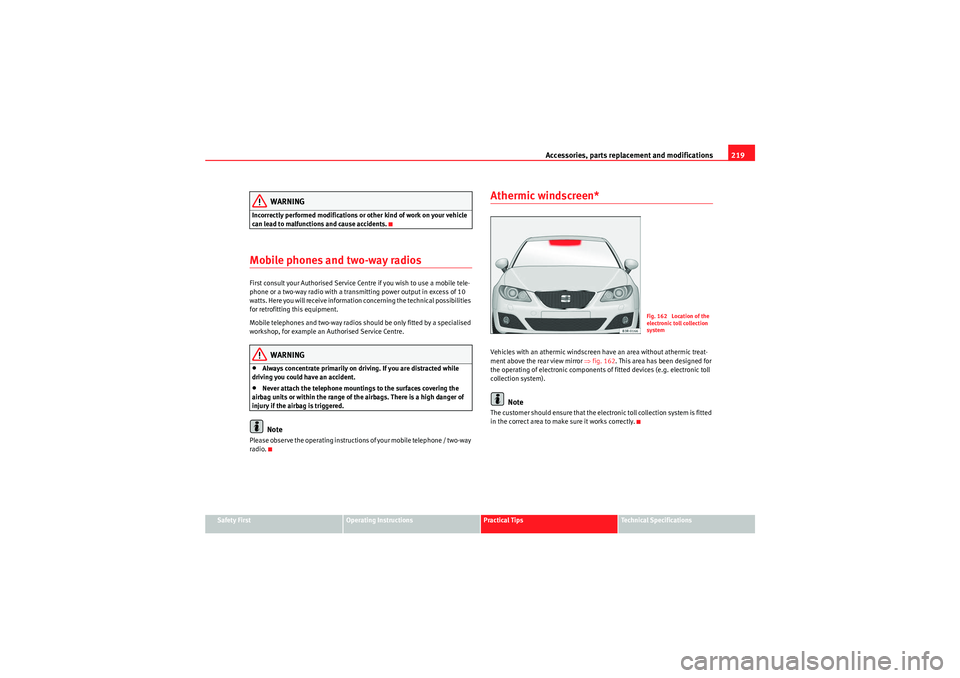
Athermic windscreen*Vehicles with an athermic windscreen have an area without athermic treat-
ment above the rear view mirror ⇒fig. 162 . This area has been designed for
the operating of electronic components of fitted devices (e.g. electronic toll
collection system).
Note
The customer should ensure that the electronic toll collection system is fitted
in the correct area to make sure it works correctly.
Fig. 162 Location of the
electronic toll collection
system
exeo_EN.book Seite 219 Montag, 30. August 2010 4:45 16
Page 222 of 319
Checking and refilling levels
220Checking and refilling levelsRefuellingThe tank flap is released manually. The tank holds approxi-
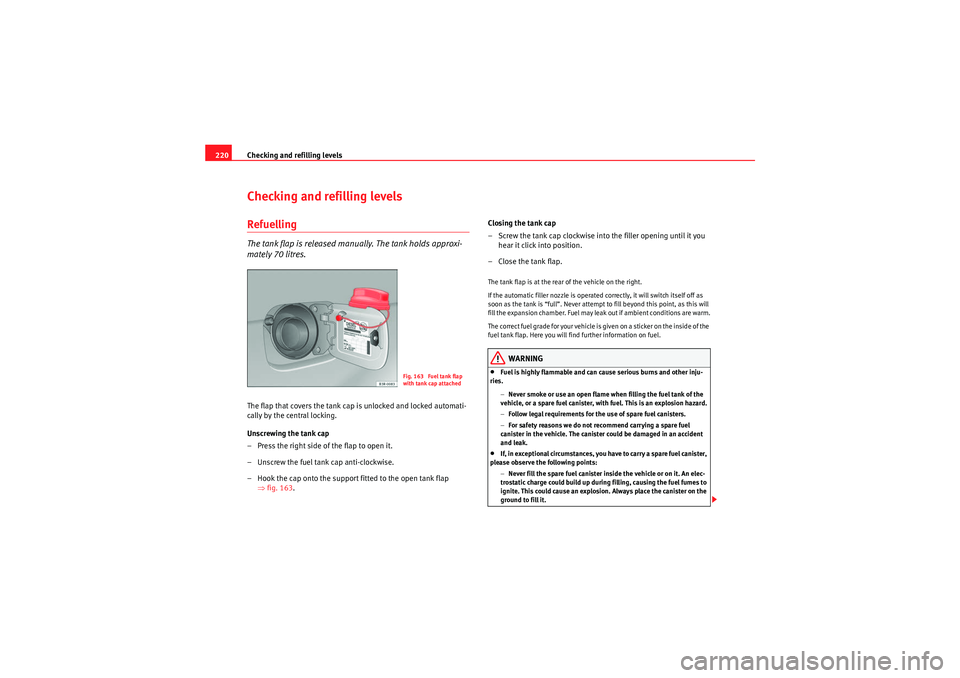
mately 70 litres.The flap that covers the tank cap is unlocked and locked automati-
cally by the central locking.
Unscrewing the tank cap
– Press the right side of the flap to open it.
– Unscrew the fuel tank cap anti-clockwise.
– Hook the cap onto the support fitted to the open tank flap
⇒fig. 163 . Closing the tank cap
– Screw the tank cap clockwise into the filler opening until it you
hear it click into position.
– Close the tank flap.
The tank flap is at the rear of the vehicle on the right.
If the automatic filler nozzle is operated correctly, it will switch itself off as
soon as the tank is “full”. Never attempt to fill beyond this point, as this will
fill the expansion chamber. Fuel may leak out if ambient conditions are warm.
T he co rr ec t fu el g rad e fo r you r v eh icle is giv en on a sti cker o n th e i nsid e of the
fuel tank flap. Here you will find further information on fuel.
WARNING
•Fuel is highly flammable and can cause serious burns and other inju-
ries.
−Never smoke or use an open flame when filling the fuel tank of the
vehicle, or a spare fuel canister, with fuel. This is an explosion hazard.
− Follow legal requirements for the use of spare fuel canisters.
− For safety reasons we do not recommend carrying a spare fuel
canister in the vehicle. The canister could be damaged in an accident
and leak.•If, in exceptional circumstances, you have to carry a spare fuel canister,
please observe the following points:
−Never fill the spare fuel canister inside the vehicle or on it. An elec-
trostatic charge could build up during filling, causing the fuel fumes to
ignite. This could cause an explosion. Always place the canister on the
ground to fill it.
Fig. 163 Fuel tank flap
with tank cap attached
exeo_EN.book Seite 220 Montag, 30. August 2010 4:45 16
Page 223 of 319
Checking and refilling levels221
Safety First
Operating Instructions
Practical Tips
Technical Specifications
−
Insert the fuel nozzle into the mouth of the canister as far as
possible.
− If the spare fuel canister is made of metal, the filling nozzle must be
in contact with the canister during filling. This helps prevent an electro-
static charge building up.
− Never spill fuel in the vehicle or in the luggage compartment. Fuel
vapours are explosive. Danger of death.
Caution
•Fuel spills should be removed from the paintwork immediately.•Never run the tank completely dry. An irregular fuel supply could cause
misfiring. As a result, unburnt fuel could enter the catalytic converter and
cause damage.•When filling the fuel tank after having run it completely dry on a vehicle
with a diesel engine the ignition must be switched on for at least 30 seconds
without starting the engine. When you then start the engine it may take
longer than normal (up to one minute) for the engine to start firing. This is due
to the fact that the fuel system has to purge itself of air before starting.For the sake of the environment
Do not try to put in more fuel after the automatic filler nozzle has switched off;
this may cause the fuel to overflow if it becomes warm.
PetrolPetrol types
The recommended fuel types are listed on a sticker inside the
fuel tank flap.Only unleaded petrol conforming to standard DIN EN 228 may be used for
vehicles with catalytic converters (EN = “European Standard”).
Fuel types are differentiated by the octane rating, e.g: 91, 95, 98 RON (RON
= “Research Octane Number”, unit for determining the knock resistance of
petrol). You may use petrol with a higher octane number than the one recom-
mended for your engine. However, this has no advantage in terms of fuel
consumption and engine power.
The correct fuel type for your vehicle is given in the technical table for the
engine, in the Technical Data section.
Caution
•Petrol with standard EN 228 may be mixed with small quantities of
ethanol. However, the bioethanol fuels available at commercial establish-
ments with reference E50 or E85, which contain a high percentage of ethanol,
may not be used, as they will damage the fuel system.•Even one tankful of leaded fuel would permanently impair the efficiency
of the catalytic converter.•High engine speed and full throttle can damage the engine when using
petrol with an octane rating lower than the correct grade for the engine.For the sake of the environment
Just one full tank of leaded fuel would seriously impair the efficiency of the
catalytic converter.
WARNING (continued)
exeo_EN.book Seite 221 Montag, 30. August 2010 4:45 16
Page 226 of 319

Checking and refilling levels
224
WARNING
Never open the bonnet if you see steam or drips of coolant being released
from th e eng ine compar t ment . Fail ure to comp ly could resul t in bur ns. Wait
until no steam or coolant can be seen before opening the bonnet.Work in the engine compartment
Extra caution is necessary when working on components in
the engine compartment.Always be aware of the danger of injury and scalding as well as the risk of
accident or even fire when working in the engine compartment (e.g. when
checking and refilling fluids). Always observe the warnings listed below and
follow all general safety precautions. The engine compartment of the vehicle
is a potentially hazardous area ⇒
WARNING
•Switch the engine off.•Remove the ignition key.•Apply the handbrake firmly.•If your vehicle is equipped with a manual gearbox, place the gear lever
in neutral. If you are driving an automatic vehicle, place the selector lever
in position P.•Wait for the engine to cool down.•Children should not be allowed to approach the engine compartment.•Never spill liquids used for vehicle operation on the engine compart-
ment, as these may catch fire (e.g. coolant).•Take care not to cause short circuits in the electrical system, especially
when working on the battery.
•Never touch the radiator fan while the engine is hot, as the fan could
start up suddenly.•Never open the expansion tank when the engine is hot. The cooling
system is under pressure.•Protect face, hands and arms from any hot steam or hot coolant fluid
released by covering the cap with a large, thick rag when opening the
expansion tank.•If any tests have to be performed with the engine running, there is an
added safety risk from the rotating parts (e.g. drive belts, alternator, radi-
ator fan, etc.) and from the high-voltage ignition system.•Observe the following additional warnings if work on the fuel system or
the electrical system is necessary:
−Always disconnect the battery.
− Do not smoke.
− Never work near open flames.
− Always keep an approved fire extinguisher immediately available.Caution
When topping up fluids, make sure the correct fluid is put into the correct
filler opening. This can otherwise cause serious malfunctions or engine
damage.
For the sake of the environment
Inspect the ground underneath your vehicle regularly so that any leaks are
detected at an early stage. If you find spots of oil or other fluids, have your
vehicle inspected at the workshop.
WARNING (continued)
exeo_EN.book Seite 224 Montag, 30. August 2010 4:45 16
Page 227 of 319
Checking and refilling levels225
Safety First
Operating Instructions
Practical Tips
Technical Specifications
Note
On right-hand drive vehicles some of the reservoirs mentioned below are
located on the other side of the engine compartment.Closing the bonnet– To close the bonnet, push it down until it overcomes the spring
pressure.
– Let the bonnet engage in the locking part. Do not force it ⇒ .
WARNING
•For safety reasons the bonnet must always be completely closed when
the vehicle is moving. After closing it always check that it is properly
secured. The bonnet must be flush with the adjacent body panels.•Should you notice that the bonnet is not safely secured when the
vehicle is moving, stop the vehicle immediately and close the bonnet.
Failure to do so could result in an accident.
Engine oilGeneral notesThe engine comes with a special, high quality, multi grade oil that can be
used in all seasons of the year except for those regions affected by extreme
cold. As the use of good quality oil is necessary for the correct operation and long
service life of the engine, when it becomes necessary to replenish or change
the oil, always use an oil that complies to the VW standards.
The specifications (VW standards) set out in the following page should
appear on the container of the service oil; when the container displays the
specific standards for petrol and diesel
engines together, it means that the
oil can be used for both types of engines.
We recommend that the oil change, indicated in the Maintenance
Programme, be performed by an Authorised Service Centre or a qualified
workshop.
The correct oil specifications for your engine are listed in ⇒page 226, “Oil
properties”.
Service intervals
Service intervals can be flexible (LongLife service) or fixed (dependent on
time/distance travelled).
If the PR code that appears on the back of the Maintenance Programme
booklet is QG1, this means that your vehicle has the LongLife service
programmed. If it has the codes QG0 or QG2 the interval service is dependent
on time/distance travelled.
Flexible service intervals (LongLife*)
Special oils and processes have been developed which, depending on the
characteristics and individual driving profiles, allow to extend the oil change
service (LongLife service intervals).
Because this oil is essential for extending the service intervals, it must only
be used observing the following indications:
•Avoid mixing it with oil for fixed service intervals.•Only in exceptional circumstances, if the engine oil level is too low
⇒ page 226 and LongLife oil is not available, it is permitted to top up (once)
with oil for fixed service intervals (up to a maximum of 0.5 litres).
exeo_EN.book Seite 225 Montag, 30. August 2010 4:45 16
Page 229 of 319

Checking and refilling levels227
Safety First
Operating Instructions
Practical Tips
Technical Specifications
Checking oil level
– Park the vehicle in a horizontal position.
– Briefly run the engine at idle speed until the service temperature
is reached and stop.
– Wait two minutes.
– Pull out the dipstick. Wipe the dipstick with a clean cloth and insert it again, pushing it in as far as it will go.
– Then pull it out once more and check the oil level ⇒ page 226,
fig. 166. If the oil level is too low, add more engine oil
⇒ page 227.
Oil level in area
–Do not top up oil.
Oil level in area
–Oil can be topped up. After topping up the oil level should be in
area .
Oil level in area
–Oil must be topped up. After topping up the oil level should be in
area .Depending on how you drive and the conditions in which the vehicle is used,
oil consumption can be up to 0.5 l/1000 km. Oil consumption is likely to be
higher for the first 5000 km. Therefore, the engine oil level must be checked
at regular intervals, preferably when filling the tank and before a journey.
Topping up the engine oil
�E
–Unscrew cap
�E
from oil filler opening ⇒page 295, fig. 233 .
– Carefully put in the specified grade of oil ⇒page 226, adding
0.5 litres at a time.
– After two minutes, check the oil level once again ⇒page 226.
– Where necessary, add more engine oil.
– Replace the oil filler cap carefully and push the dipstick all the way in.
WARNING
•When refilling with oil, make sure no oil falls onto hot engine parts.
Failure to comply could result in fire.•Wash your skin thoroughly if it comes into contact with engine oil.
AaAb
Aa
Ac
Aa
Fig. 167 In the engine
compartment: Engine oil
filler cap
exeo_EN.book Seite 227 Montag, 30. August 2010 4:45 16
Page 231 of 319

Checking and refilling levels229
Safety First
Operating Instructions
Practical Tips
Technical Specifications
tion. The damage caused by the use of these antifreezes may lead to a loss of
coolant fluid, causing serious damage to the engine.
•G12++ antifreeze can be mixed only with antifreeze additives G11, G12
and G12+.Checking the coolant level
The coolant level can be checked visually.– Switch the ignition off.
– Check the coolant level on coolant fluid expansion tank ⇒fig. 168 . When the engine is cold, it should be between the
“min” and “max” marks. When the engine is hot, it may be
slightly above the “max” mark.Its location is shown in the corresponding general overview of the engine
compartment. The coolant level should be checked with the engine switched off.
The coolant level is monitored by a warning lamp on the instrument panel
display
⇒page 78. However, we recommend that it should be checked occa-
sionally.
Coolant fluid loss
Any loss of coolant fluid normally indicates a leak in the cooling system. In
this case the cooling system should be inspected by a qualified workshop
without delay. It is not sufficient merely to top up the coolant fluid.
If there are no leaks in the system, a loss of coolant fluid can only occur if the
coolant boils and is forced out of the system as a result of overheating.
Caution
Radiator sealants must not be added to the coolant fluid. Such additives
could seriously impair the function of the cooling system.To p p i n g u p t h e c o o l a n t f l u i d
Be careful when topping up with coolant fluid.– Switch the engine off.
– Wait for the engine to cool down.
– Cover the cap on the expansion tank ⇒fig. 168 with a cloth, and
carefully unscrew the cap anti-clockwise ⇒.
– Add coolant fluid.
– Screw on the cap tightly.
Fig. 168 Engine compart-
ment: Coolant fluid
deposit
exeo_EN.book Seite 229 Montag, 30. August 2010 4:45 16
Page 232 of 319
Checking and refilling levels
230Make sure that the coolant fluid meets the required specifications
⇒ page 228, “Coolant fluid”. Do not use a different type of antifreeze if
G12++ antifreeze is not available. In this case, use only water and bring the
antifreeze concentration back up to the correct level as soon as possible.
Always top up with new coolant fluid.
Do not fill above the “max” mark. Excess coolant fluid is forced out of the
system through the valve in the filler cap when the engine gets hot.
If a lot of coolant fluid has been lost, wait for the engine to cool down before
putting in cold coolant. Failure to do so could result in serious engine
damage.
WARNING
•The cooling system is under pressure. Do not unscrew the cap on the
expansion tank when the engine is hot. Failure to comply could result in
burns.•The antifreeze and coolant fluid can be a health hazard. Therefore, the
antifreeze should be stored in the orig inal container in a safe place out of
reach of children. Failure to comply could result in poisoning.For the sake of the environment
Drained off coolant should not be used again. Drain off the used coolant into
a suitable container and dispose of it in the proper manner (observe environ-
mental regulations).
Radiator fan
The radiator fan can start running spontaneously.The auxiliary fan can continue to run for as long as 10 minutes after stopping
the engine, even after the ignition is switched off. It may also start running
suddenly ⇒ after some while if•Stored heat raises the coolant temperature, or•The hot engine compartment is additionally heated up by the sun.WARNING
When working in the engine compartment be aware that the radiator fan
may start running suddenly, leading to the risk of injury.
exeo_EN.book Seite 230 Montag, 30. August 2010 4:45 16
Page 234 of 319

Checking and refilling levels
232Changing windscreen wiper blades
If the windscreen wiper blades are in perfect condition, you
will benefit from an improved visibility. Damaged wiper
blades should be replaced immediately.
Removing the wiper blade
– Lift the wiper arm away from the windscreen.
– Slide the retainer catch on the wiper blade in the direction indi-
cated ⇒fig. 170 . Hold onto the wiper blade at the same time.
– Pull the wiper blade out of its mounting on the wiper arm.
Fitting the wiper blade
– Slide back the retainer catch on the new wiper blade. The mounting on the wiper blade should now be visible.
– Fit the new wiper blade into the mounting on the wiper arm ⇒fig. 171 .
– Slide the retainer catch on the wi per blade in direction so that
it clicks into place on the wiper arm.
– Fold the wiper arm back down onto the glass.If the windscreen wipers smear , t h e y s h o u l d b e r e p l a ce d i f t h e y a r e d a m a g e d ,
or cleaned if they are soiled.
If this does not produce the desired results, the setting angle of the wind-
screen wiper arms might be incorrect. They should be checked by a qualified
workshop and corrected if necessary.
WARNING
Do not drive unless you have good visibility through all windows!•The ignition must not be switched on while the front wiper arms are in
a raised position. The wipers would return to their park position and
damage the paintwork on the bonnet.
Fig. 170 Removing the
wiper bladeFig. 171 Fitting the wiper
blade
AAAB
AC
AD
exeo_EN.book Seite 232 Montag, 30. August 2010 4:45 16
Page 235 of 319
Checking and refilling levels233
Safety First
Operating Instructions
Practical Tips
Technical Specifications
•To prevent smearing on the windscreen, the wiper blades should be
cleaned regularly using a window cleaner solution. If the wiper blades are
very dirty (e.g. insects etc.), they should be cleaned using a sponge or
cloth. Failure to do so could result in an accident.•For safety reasons, the wiper blades should be changed once or twice a
year.Caution
•Damaged or dirty windscreen wipers could scratch the windscreen.•Never use fuel, nail varnish remover, paint thinner or similar products to
clean the windows. This could damage the windscreen wiper blades.•Never move the windscreen wiper or windscreen wiper arm manually. This
could cause damage.•Do not pull the windscreen wipers forward unless they are in the service
position. Otherwise the bonnet could be damaged.
Brake fluidChecking the brake fluid level
The brake fluid level can be checked visually.The brake fluid level must be between the “Min” and “Max” ⇒fig. 172 mark-
ings.
The fluid level may drop slightly after a period of time due to the automatic
compensation for brake pad wear. This is quite normal.
H owe ve r, if th e le ve l goes d own not icea bly i n a short time, or drops below the
“Min” mark, there may be a leak in the brake system. If the fluid level in the
reservoir is too low, this will be indicated by the brake warning lamp
⇒ page 70 and ⇒page 77. If this should happen, take the vehicle to a qual-
ified workshop immediately and have the brake system inspected.
WARNING (continued)
Fig. 172 Engine compart-
ment: markings on brake
fluid reservoir
exeo_EN.book Seite 233 Montag, 30. August 2010 4:45 16