change time Seat Exeo 2010 User Guide
[x] Cancel search | Manufacturer: SEAT, Model Year: 2010, Model line: Exeo, Model: Seat Exeo 2010Pages: 319, PDF Size: 9.64 MB
Page 191 of 319

Intelligent technology189
Safety First
Operating Instructions
Practical Tips
Technical Specifications
BrakesGeneral notesNew brake pads
New brake pads do not provide optimal performance during the first 200 km;
first they must be “run in”. However, the reduced braking capacity may be
compensated by pressing on the brake pedal a little harder. Avoid over-
loading the brakes during run-in.
Wear
The rate of wear on the brake pads depends a great deal on how you drive and
the conditions in which the vehicle is operated. Negative factors are, for
instance, city traffic, frequent short trips or hard driving with abrupt starts
and stops.
Wet roads or road salt
In certain conditions, such as in heavy rain, or after washing the vehicle or
driving through water, the full braking effect can be delayed by moisture (or
in winter by ice) on the discs and brake pads. In this case the brakes should
be dried by pressing the brake pedal several times.
When the speed is over 80 km/h and the windscreen wipers are on, the brake
system moves the pads towards the brake discs for a few seconds. This
occurs - without the driver knowing - at regular intervals and allows a faster
response from the brakes when driving on wet roads.
The effectiveness of the brakes can also be temporarily reduced if the vehicle
is driven for some distance without using the brakes when there is a lot of salt
on the road in winter. In this case, the layer of salt on the brake discs and pads
has to wear off before braking. Corrosion
There may be a tendency for corrosion to form on the discs and dirt to build
up on the brake pads if the vehicle is used infrequently or the brakes are not
used very often.
If the brakes are not used frequently, or if rust has formed on the disks, it is
advisable to clean off the pads and disks by braking firmly a few times at a
moderately high speed
⇒.
Faults in the brake system
If the brake pedal travel should ever increase suddenly, this may mean that
one of the two brake circuits has failed. Drive immediately to the nearest
specialised workshop and have the fault repaired. Drive there slowly and
remember that you will have to apply more pressure on the brake pedal and
allow for longer stopping distances.
Low brake fluid level
Malfunctions can occur in the brake system if the brake fluid level is too low.
The brake fluid level is monitored electronically.
WARNING
When applying the brakes to clean off deposits on the pads and discs,
select a clear, dry road. Be sure not to inconvenience or endanger other
road users. Risk of accident.
Caution
•Never let the brakes “drag” by leaving your foot on the pedal when it is
not necessary to brake. This overheats the brakes, resulting in longer stop-
ping distances and greater wear.•Before driving down a long, steep gradient, it is advisable to reduce speed
and change to a lower gear (or move the gear lever to a lower gear position if
your vehicle has automatic transmission). This makes use of engine braking
exeo_EN.book Seite 189 Montag, 30. August 2010 4:45 16
Page 194 of 319
Driving and the environment
192Driving and the environmentRunning-inRunning in a new engine
The engine needs to be run in over the first 1500 km.Up to 1000 kilometres
– Do not drive at speeds of more than 2/3 the maximum speed.
– Do not accelerate hard.
– Avoid high engine revolutions.
– Do not tow a trailer.
From 1000 to 1500 kilometres
–Speeds can be gradually increased to the maximum road speed
or maximum permissible engine speed (rpm).During its first few hours of running, the internal friction in the engine is
greater than later on, when all the moving parts have bedded in.
For the sake of the environment
If the engine is run in gently, its life will be increased and its oil consumption
reduced.
Braking capacity and braking distance
The braking capacity and braking distance are influenced by
driving situations and road conditions.The efficiency of the brakes depends directly on the brake pad wear. The rate
of wear of the brake pads depends to a great extent on the conditions under
which the vehicle is operated and the way the vehicle is driven. If you often
drive in town traffic, drive short distances or have a sporty driving style, we
recommend that you have the thickness of your brake pads checked by an
Authorised Service Centre more frequently than recommended in the Service
Plan.
If you drive with wet brakes, for example, after crossing areas of water, in
heavy rainfall or even after washing the vehicle, the effect of the brakes is
lessened as the brake discs are wet or even frozen (in winter). In this case the
brakes should be dried by pressing the brake pedal several times.
WARNING
Longer braking distances and faults in the brake system increase the risk
of accidents.•New brake pads must be run in and do not have the correct friction
during the first 200 km. However, the reduced braking capacity may be
compensated by pressing on the brake pedal a little harder. This also
applies when the brake pads have to be changed further on.•If brakes are wet or frozen, or if you are driving on roads which have
been salted, braking power may be lower than normal.•On steep slopes, if brakes are excessively used, they will overheat.
Before driving down a long steep slope, it is advisable to reduce speed and
exeo_EN.book Seite 192 Montag, 30. August 2010 4:45 16
Page 227 of 319
Checking and refilling levels225
Safety First
Operating Instructions
Practical Tips
Technical Specifications
Note
On right-hand drive vehicles some of the reservoirs mentioned below are
located on the other side of the engine compartment.Closing the bonnet– To close the bonnet, push it down until it overcomes the spring
pressure.
– Let the bonnet engage in the locking part. Do not force it ⇒ .
WARNING
•For safety reasons the bonnet must always be completely closed when
the vehicle is moving. After closing it always check that it is properly
secured. The bonnet must be flush with the adjacent body panels.•Should you notice that the bonnet is not safely secured when the
vehicle is moving, stop the vehicle immediately and close the bonnet.
Failure to do so could result in an accident.
Engine oilGeneral notesThe engine comes with a special, high quality, multi grade oil that can be
used in all seasons of the year except for those regions affected by extreme
cold. As the use of good quality oil is necessary for the correct operation and long
service life of the engine, when it becomes necessary to replenish or change
the oil, always use an oil that complies to the VW standards.
The specifications (VW standards) set out in the following page should
appear on the container of the service oil; when the container displays the
specific standards for petrol and diesel
engines together, it means that the
oil can be used for both types of engines.
We recommend that the oil change, indicated in the Maintenance
Programme, be performed by an Authorised Service Centre or a qualified
workshop.
The correct oil specifications for your engine are listed in ⇒page 226, “Oil
properties”.
Service intervals
Service intervals can be flexible (LongLife service) or fixed (dependent on
time/distance travelled).
If the PR code that appears on the back of the Maintenance Programme
booklet is QG1, this means that your vehicle has the LongLife service
programmed. If it has the codes QG0 or QG2 the interval service is dependent
on time/distance travelled.
Flexible service intervals (LongLife*)
Special oils and processes have been developed which, depending on the
characteristics and individual driving profiles, allow to extend the oil change
service (LongLife service intervals).
Because this oil is essential for extending the service intervals, it must only
be used observing the following indications:
•Avoid mixing it with oil for fixed service intervals.•Only in exceptional circumstances, if the engine oil level is too low
⇒ page 226 and LongLife oil is not available, it is permitted to top up (once)
with oil for fixed service intervals (up to a maximum of 0.5 litres).
exeo_EN.book Seite 225 Montag, 30. August 2010 4:45 16
Page 235 of 319
Checking and refilling levels233
Safety First
Operating Instructions
Practical Tips
Technical Specifications
•To prevent smearing on the windscreen, the wiper blades should be
cleaned regularly using a window cleaner solution. If the wiper blades are
very dirty (e.g. insects etc.), they should be cleaned using a sponge or
cloth. Failure to do so could result in an accident.•For safety reasons, the wiper blades should be changed once or twice a
year.Caution
•Damaged or dirty windscreen wipers could scratch the windscreen.•Never use fuel, nail varnish remover, paint thinner or similar products to
clean the windows. This could damage the windscreen wiper blades.•Never move the windscreen wiper or windscreen wiper arm manually. This
could cause damage.•Do not pull the windscreen wipers forward unless they are in the service
position. Otherwise the bonnet could be damaged.
Brake fluidChecking the brake fluid level
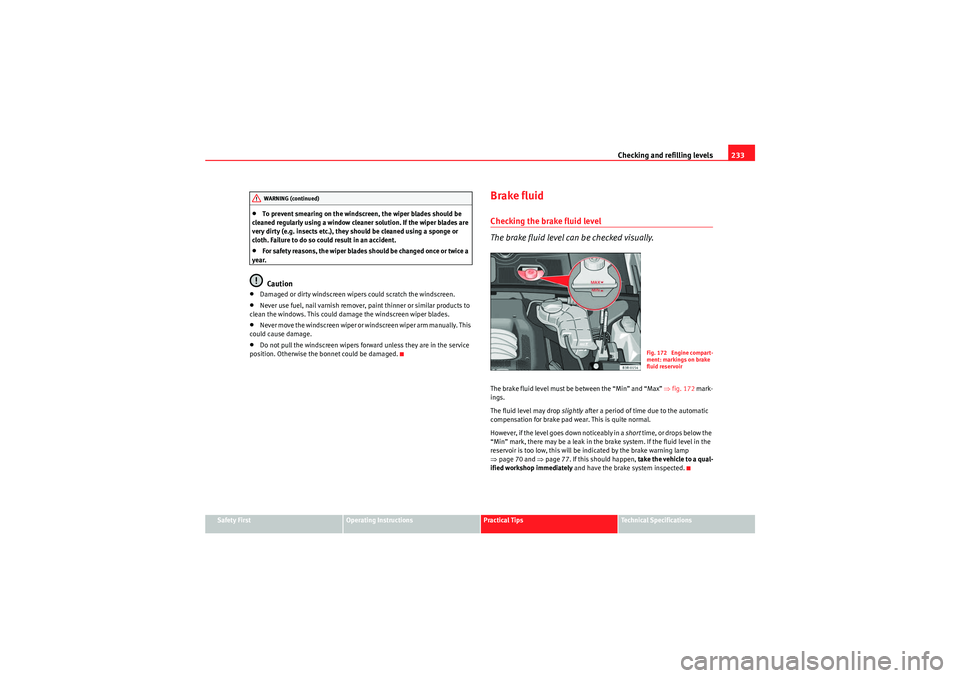
The brake fluid level can be checked visually.The brake fluid level must be between the “Min” and “Max” ⇒fig. 172 mark-
ings.
The fluid level may drop slightly after a period of time due to the automatic
compensation for brake pad wear. This is quite normal.
H owe ve r, if th e le ve l goes d own not icea bly i n a short time, or drops below the
“Min” mark, there may be a leak in the brake system. If the fluid level in the
reservoir is too low, this will be indicated by the brake warning lamp
⇒ page 70 and ⇒page 77. If this should happen, take the vehicle to a qual-
ified workshop immediately and have the brake system inspected.
WARNING (continued)
Fig. 172 Engine compart-
ment: markings on brake
fluid reservoir
exeo_EN.book Seite 233 Montag, 30. August 2010 4:45 16
Page 236 of 319
Checking and refilling levels
234Topping up and changing the brake fluid
It is best to have the brake fluid changed by a professional.Brake fluid absorbs moisture. Therefore, in the course of time it will absorb
water from the air. If the water content in the brake fluid is too high, the brake
system could corrode. In addition, the boiling point of the brake fluid will be
considerably reduced. This could adversely affect the braking ability in
certain circumstances.
For this reason the brake fluid must be changed periodically.
Your vehicle’s Service Plan will tell you when the brake fluid has to be
renewed.
We recommend you have the brake fluid changed as part of a regular Inspec-
tion Service at a workshop. They are familiar with the procedure and have the
necessary special tools and spare parts as well as the proper facilities for
disposing of the old fluid.
Use only approved brake fluid. Specialised workshops are informed about
the factory-approved brake fluid -DOT 4-. The brake fluid must be new.
WARNING
•Brake fluid must always be kept closed in its original container. Keep
out of the reach of children. Failure to comply could result in poisoning.•If the brake fluid is left in the system for too long and the brakes are
subjected to heavy use, vapour bubbles may form in the brake system. This
would seriously affect the efficiency of the brakes and the safety of the
vehicle, leading to the risk of accident.Caution
Please note that brake fluid will attack the paintwork on contact.
For the sake of the environment
The brake pads and fluid must be collected and disposed of according the
applicable regulations. The SEAT service network has the necessary equip-
ment and qualified personnel for collecting and disposing of this waste
material.Vehicle batteryGeneral notes
All work on batteries requires specialist knowledge.The battery is virtually maintenance-free and is checked in the Inspection
Services.
We recommend replacing the battery after 5 years.
Disconnecting the battery
If the battery is disconnected, some of the vehicle’s functions will become
inoperative (e.g. electric windows). These functions will require resetting
after the battery is reconnected. For this reason, the battery should only be
disconnected from the vehicle’s electrical system when absolutely necessary.
Long periods of non-use
The battery will gradually lose its charge because certain electrical equip-
ment continues to draw current even when the ignition is off. If you park the
vehicle for long periods of time in winter you should take the battery out of
the vehicle and store it in a place protected from frost. This way it will not
freeze and become damaged. At warm outside temperatures it is sufficient to
disconnect the negative terminal of the battery. Even when the battery is not
connected you should charge it from time to time.
exeo_EN.book Seite 234 Montag, 30. August 2010 4:45 16
Page 238 of 319
Checking and refilling levels
236•A highly explosive mixture of gases is released when the battery is
under charge. The batteries should be charged in a well-ventilated room
only.•Keep children away from acid and batteries.•Before working on the electrical system, you must switch off the
engine, the ignition and all consumers. The negative cable on the battery
must be disconnected. When a light bulb is changed, you need only switch
off the light.•Deactivate the anti-theft alarm by unlocking the vehicle before you
disconnect the battery! The alarm will otherwise be triggered.•When disconnecting the battery from the vehicle electrical system,
disconnect first the negative cable and then the positive cable.•Switch off all electrical consumers before reconnecting the battery.
Reconnect first the positive cable and then the negative cable. Never
reverse the polarity of the connections. This could cause an electrical fire.•Never charge a frozen battery, or one which has thawed. This could
result in explosions and chemical burns. Always replace a battery which
has frozen. A flat battery can freeze at temperatures around 0°C.•Ensure that the vent hose is always connected to the battery.•Never use a defective battery. This could cause an explosion. Replace a
damaged battery immediately.Caution
•Never disconnect the battery if the ignition is switched on or if the engine
is running. This could damage the electrical system or electronic compo-
nents.•Do not expose the battery to direct sunlight over a long period of time, as
the intense ultraviolet radiation can damage the battery housing.•If the vehicle is left standing in cold conditions for a long period, protect
the battery from frost. If it freezes it will be damaged.
Charging the battery
A fully-charged battery is important for reliable starting.– Note the warnings ⇒ in “Important safety warnings for
handling a vehicle battery” on page 235 and ⇒.
– Switch off the ignition and all electrical equipment.
– Only if fast-charging: both battery cables must be disconnected (first the negative cable, then the positive cable).
– Connect the charger cables to the battery terminals, noting the colour code (red = positive; black or brown = negative).
– Now connect the battery charger to the power socket and switch on.
– After charging the battery: switch off the battery charger and disconnect the power point cable.
– Finally disconnect the charger cables from the battery.
– If necessary, reconnect both battery cables to the battery (first the positive cable, then the negative cable).When charging with a low current (for instance with a small battery charger)
the battery does not normally have to be disconnected. However, both
battery cables must be disconnected before fast-charging the battery with a
high current. However, always follow the instructions given by the manufac-
turer of the battery charger.
The fast-charging procedure for a battery is dangerous ⇒ in “Important
safety warnings for handling a vehicle battery” on page 235, as it requires a
special charger and the corresponding level of knowledge. We therefore
recommend that this work should only be performed by a qualified workshop.
WARNING (continued)
exeo_EN.book Seite 236 Montag, 30. August 2010 4:45 16
Page 244 of 319
Wheels and tyres
242Wear indicators
The original tyres on your vehicle have 1.6 mm high tread wear indicators
⇒ page 241, fig. 174 , running across the tread. Depending on the make,
there will be six to eight of them evenly spaced around the tyre. Markings on
the tyre sidewall (for instance the letters “TWI” or other symbols) indicate the
positions of the tread wear indicators. The minimum tread depth required by
law is 1.6 mm (measured in the tread grooves next to the tread wear indica-
tors). Worn tyres must be replaced. Different figures may apply in export
countries ⇒.
Tyre pressure
Under-inflation or over-inflation will reduce the life of the tyres considerably
and also impair the vehicle’s handling. The inflation pressures are listed on a
sticker on the inside of the fuel tank flap.
Correct inflation pressures are very important, especially at high speeds. The
pressure should therefore be checked at least once a month and before
starting any long journey.
Tyre pressure monitoring (RKA+)*
Monitoring of the tyre pressures is based on the tyre pressures you have
stored. The tyre pressure monitoring system cannot function as intended if
you store tyre pressure settings for a normal load, but then drive with the
vehicle fully laden. The tyre pressure must be adapted to the actual load and
stored accordingly in the tyre pressure monitoring system ⇒ page 240.
Driving style
Fast cornering, heavy acceleration and hard braking all increase tyre wear.
Changing wheels around
If the front tyres are worn considerably more than the rear ones it is advisable
to change them around as shown ⇒page 241, fig. 175. All the tyres will then
last for about the same time. Wheel balance
The wheels on new vehicles are balanced. However, various factors encoun-
tered in normal driving can cause them to become unbalanced, which results
in steering vibration.
Unbalanced wheels should be rebalanced, as they otherwise cause excessive
wear on steering, suspension and tyres. A wheel must also be rebalanced
when a new tyre is fitted.
Incorrect wheel alignment
Incorrect wheel alignment causes excessive tyre wear, impairing the safety of
the vehicle. If tyres show excessive wear, you should have the wheel align-
ment checked by an Authorised Service Centre.
WARNING
There is a serious danger of accidents if a tyre bursts during driving!•The tyres must be replaced at the latest when the tread is worn down to
the tread wear indicators. Failure to do so could result in an accident. Worn
tyres do not grip well at high speeds on wet roads. There is also a greater
risk of aquaplaning.•At continuously high speeds, a tyre with insufficient pressure flexes
more. This causes it to overheat. This can cause tread separation and tyre
blow-out. Risk of accident. Always observe the recommended tyre pres-
sures.•I f t y r e s s h o w e x ce s s i v e w e a r, y o u s h o u l d h a v e t h e r u n n i n g g e a r ch e cke d
by an Authorised Service Centre.•Keep chemicals such as oil, fuel and brake fluid away from tyres.•Damaged wheels and tyres must be replaced immediately!For the sake of the environment
Under-inflated tyres will increase fuel consumption.
exeo_EN.book Seite 242 Montag, 30. August 2010 4:45 16
Page 247 of 319
Wheels and tyres245
Safety First
Operating Instructions
Practical Tips
Technical Specifications
For the sake of the environment
Old tyres must be disposed of according to the laws in the country concerned.
Note
•For technical reasons, it is not generally possible to use the wheels from
other vehicles. This can also apply to wheels of the same model. The use of
wheels or tyres which have not been approved by SEAT for use with your
model may invalidate the vehicle’s type approval for use on public roads.•If the spare tyre is not the same as the tyres that are mounted on the
vehicle - for example with winter tyres - you should only use the spare tyre for
a short period of time and drive with extra care. Refit the normal road wheel
as soon as possible.Wheel bolts
Wheel bolts must be tightened to the correct torque.The design of wheel bolts is matched to the rims. If different wheel rims are
fitted, the correct wheel bolts with the right length and correctly shaped bolt
heads must be used. This ensures that wheels are fitted securely and that the
brake system functions correctly.
In certain circumstances, you should not use wheel bolts from a different
vehicle, even if it is the same model ⇒page 218.
After the wheels have been changed, the tightening torque of the wheel bolts
s ho uld b e ch ecke d as so on as possi ble wi th a to rq ue wre nch. ⇒ The tight-
ening torque for steel and alloy wheels is 120 Nm.
WARNING
If the wheel bolts are not tightened correctly, the wheel could become
loose while driving. Risk of accident.•The wheel bolts must be clean and turn easily. Never apply grease or oil
to them.•Use only wheel bolts which belong to the wheel.•If the torque of the wheel bolts is too low, they could loosen whilst the
vehicle is in motion. Risk of accident! If the tightening torque is too high,
the wheel bolts and threads can be damaged.Caution
The prescribed tightening torque for wheel bolts for steel and alloy wheels is
120 Nm.Winter tyres
Winter tyres will improve the vehicles handling on snow and
ice.In winter conditions winter tyres will considerably improve the vehicle’s
handling. The design of summer tyre s (width, rubber compound, tread
pattern) gives less grip on ice and snow.
Winter tyres must be inflated to a pressure 0.2 bar higher than the pressures
specified for summer tyres (see sticker on tank flap).
Winter tyres must be fitted on all four wheels.
Information on permitted winter tyre sizes can be found in the vehicle’s regis-
tration documents. Use only radial winter tyres. All tyre sizes listed in the
vehicle documentation also apply to winter tyres.
exeo_EN.book Seite 245 Montag, 30. August 2010 4:45 16
Page 262 of 319
If and when
260Some of the electrical items listed in the table are only fitted on certain
models or are optional extras.
The electric windows and electric seat adjusters are protected by circuit
breakers . These reset automatically after a few seconds when the overload
(caused for example by frozen windows) has been corrected.
Note
Please note that the above list contains all data at the time of going to press,
so it is subject to modifications. If discrepancies should occur, please refer to
the sticker on the inside of the fuse cover for the correct information for your
model.BulbsGeneral informationYou can change the following bulbs for exterior lights yourself:•Main headlights: all bulbs (except xenon headlights)•Tail lights: all bulbs•Side turn signal bulb
The following bulbs can only be changed by a qualified workshop:
•Main headlights: Xenon* bulb ⇒page 267•Front fog light bulbs
As a rule, you require a certain degree of practical skill to change defective
bulbs. This applies in particular to those bulbs which are only accessible from
the engine compartment.
If in doubt, we recommend that you have defective bulbs changed by a qual-
ified workshop or qualified mechanic.
If you do decide to change bulbs in the engine compartment yourself, be
aware of the safety risks involved ⇒page 224 ⇒ in “Types of bulbs”.Changing bulbs. Halogen headlightsTypes of bulbsYou must only replace a bulb with a bulb of the same type. The name can be
found on the base of the bulb holder.
WARNING
•Take particular care when working on components in the engine
compartment if the engine is warm - risk of burns!
41
230 volt socket
30
42
Electronic Stability Programme (ESP)
25
43
Engine management
15
44
Seat heating
35
No.
Consumer
Amps
Bulb
Type
Dipped beam headlights (halogen)
12 V/55 W (H7 LL)
Main beam headlights
12 V/55 W (H1)
Turn signal
12 V/21 W (PY21W)
Side lights
12 V/5 W (W5W LL)
exeo_EN.book Seite 260 Montag, 30. August 2010 4:45 16
Page 272 of 319
If and when
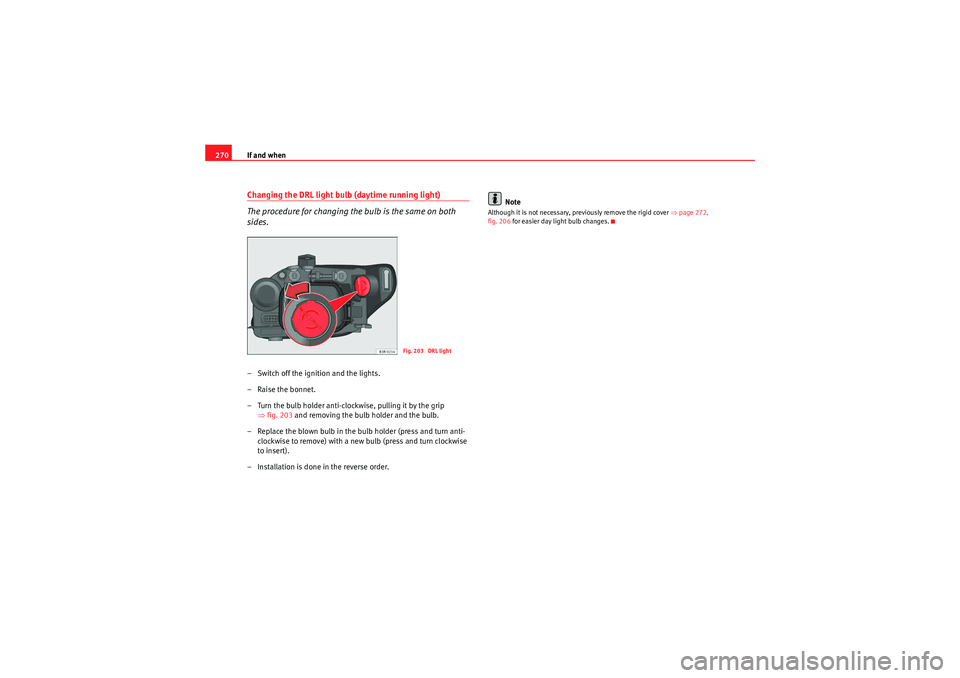
270Changing the DRL light bulb (daytime running light)
The procedure for changing the bulb is the same on both
sides.– Switch off the ignition and the lights.
– Raise the bonnet.
– Turn the bulb holder anti-clockwise, pulling it by the grip
⇒fig. 203 and removing the bulb holder and the bulb.
– Replace the blown bulb in the bulb holder (press and turn anti- clockwise to remove) with a new bulb (press and turn clockwise
to insert).
– Installation is done in the reverse order. Note
Although it is not necessary, previously remove the rigid cover
⇒page 272,
fig. 206 for easier day light bulb changes.
Fig. 203 DRL light
exeo_EN.book Seite 270 Montag, 30. August 2010 4:45 16