ESP Seat Exeo 2010 Workshop Manual
[x] Cancel search | Manufacturer: SEAT, Model Year: 2010, Model line: Exeo, Model: Seat Exeo 2010Pages: 319, PDF Size: 9.64 MB
Page 218 of 319
Vehicle maintenance and cleaning
216Wooden trim cleaning*– Clean the wooden trim with a water-moistened clean cloth.
– If this does not provide satisfactory results, use a gentle soap
solution.
CautionCleaning products which contain solvents will damage the material.Cloth seat covers and fabric trim cleaningCloth seat covers and fabric trim on the doors, headlining etc. can be cleaned
with a special interior cleaner or with dry foam and a soft brush.Leather cleaning*Normal cleaning
– Moisten a cotton or woollen cloth with water and wipe over the leather surfaces.
Cleaning stubborn stains
– More stubborn dirt can be removed using a mild soap solution (pure liquid soap; two tablespoons diluted in one litre of water)
and a cloth.
– Do not let the water soak through the leather or soak into the seams. – Then wipe off with a soft, dry cloth.
Leather maintenance
– The leather should be treated twice a year with a special leather-
care product, available in your Authorised Service Centre.
– Apply these products very sparingly.
– Then wipe off with a soft, dry cloth.
SEAT does everything possible to preserve the genuine qualities of this
natural product. Due to the natural properties of the specially selected hides
employed, the finished leather has a certain sensitivity to grease and dirt, etc.
so a degree of care is required in everyday use and when looking after the
leather.
Dust and grit in the pores and seams can scratch and damage the surface. If
the vehicle is under solar radiation for long periods, the leather should be
protected to prevent it from fading. However, slight colour variations in high-
quality natural leather are normal.
Caution
•Do not use solvents, wax polish, shoe cream, spot removers or similar
products on leather.•To avoid damage, stubborn stains should be removed by a qualified
workshop.Seat belt cleaning
A dirty belt may not work properly.Check all seat belts regularly and keep them clean.
exeo_EN.book Seite 216 Montag, 30. August 2010 4:45 16
Page 220 of 319
Accessories, parts replacement and modifications
218Accessories, parts replacement and modificationsAccessories and spare partsAlways consult an Authorised Service Centre before
purchasing accessories and parts.Your vehicle is designed to offer a high standard of active and passive safety.
Before purchasing accessories and parts, and before making technical
changes to your vehicle, we recommend you to consult your Authorised
Service Centre.
SEAT dealerships will be happy to provide you with the latest information
about the use, legal requirements and recommendations from the manufac-
turer regarding accessories and parts.
We recommend you use only SEAT Approved Accessories
® and SEAT
Approved Spare Parts
®. This way, SEAT can guarantee that the product in
question is suitable, reliable and safe. SEAT Authorised Service Centres have
the necessary experience and facilities to ensure that parts are correctly and
professionally installed.
Despite a continuous observation of the market, SEAT is not able to assess
the reliability, safety and suitability of those parts SEAT has not approved. For
this reason, SEAT cannot assume responsibility for any non-genuine parts
used, even if these parts have been approved by an official testing agency or
are covered by an official approval certificate.
Any equipment subsequently installed which has a direct effect on the
driver’s control of the vehicle (e.g. cruise control system or electronically-
controlled suspension) must be approved by SEAT and bear the e mark (the
European Union’s authorisation symbol). Any
additional electrical components that do not affect the control of the
vehicle itself (e.g. refrigerator box, laptop, ventilator fan, etc.), must bear the
CE mark (European Union manufacturer conformity declaration).
WARNING
Accessories, for example telephone holders or cup holders, should never
be fitted on the covers, or within the working range, of the airbags. Other-
wise, there is a danger of injury if the airbag is triggered in an accident.Technical modificationsModifications must always be carried out according to our
specifications.Unauthorised modifications to the electronic components or software in the
vehicle may cause malfunctions. Due to the way the electronic components
are linked together in networks, other indirect systems may be affected by the
faults. This can seriously impair safety, lead to excessive wear of compo-
nents, and also invalidate your vehicle registration documents.
SEAT Authorised Service Centres cannot be held liable for any damage
caused by modifications and/or work incorrectly performed.
For this reason, we recommend that all work should be performed by an
Authorised Service Centre using Genuine SEAT
® approved parts and acces-
sories .
exeo_EN.book Seite 218 Montag, 30. August 2010 4:45 16
Page 226 of 319

Checking and refilling levels
224
WARNING
Never open the bonnet if you see steam or drips of coolant being released
from th e eng ine compar t ment . Fail ure to comp ly could resul t in bur ns. Wait
until no steam or coolant can be seen before opening the bonnet.Work in the engine compartment
Extra caution is necessary when working on components in
the engine compartment.Always be aware of the danger of injury and scalding as well as the risk of
accident or even fire when working in the engine compartment (e.g. when
checking and refilling fluids). Always observe the warnings listed below and
follow all general safety precautions. The engine compartment of the vehicle
is a potentially hazardous area ⇒
WARNING
•Switch the engine off.•Remove the ignition key.•Apply the handbrake firmly.•If your vehicle is equipped with a manual gearbox, place the gear lever
in neutral. If you are driving an automatic vehicle, place the selector lever
in position P.•Wait for the engine to cool down.•Children should not be allowed to approach the engine compartment.•Never spill liquids used for vehicle operation on the engine compart-
ment, as these may catch fire (e.g. coolant).•Take care not to cause short circuits in the electrical system, especially
when working on the battery.
•Never touch the radiator fan while the engine is hot, as the fan could
start up suddenly.•Never open the expansion tank when the engine is hot. The cooling
system is under pressure.•Protect face, hands and arms from any hot steam or hot coolant fluid
released by covering the cap with a large, thick rag when opening the
expansion tank.•If any tests have to be performed with the engine running, there is an
added safety risk from the rotating parts (e.g. drive belts, alternator, radi-
ator fan, etc.) and from the high-voltage ignition system.•Observe the following additional warnings if work on the fuel system or
the electrical system is necessary:
−Always disconnect the battery.
− Do not smoke.
− Never work near open flames.
− Always keep an approved fire extinguisher immediately available.Caution
When topping up fluids, make sure the correct fluid is put into the correct
filler opening. This can otherwise cause serious malfunctions or engine
damage.
For the sake of the environment
Inspect the ground underneath your vehicle regularly so that any leaks are
detected at an early stage. If you find spots of oil or other fluids, have your
vehicle inspected at the workshop.
WARNING (continued)
exeo_EN.book Seite 224 Montag, 30. August 2010 4:45 16
Page 228 of 319

Checking and refilling levels
226Fixed service intervals*
If your vehicle does not have the “LongLife service interval” or it has been
disabled (by request), you may use oils for fixed service intervals, which also
appear in ⇒page 226, “Oil properties”. In this case, your vehicle must be
serviced after a fixed interval of 1 year / 15,000 km (whatever comes first)
⇒ Booklet “Maintenance Programme”.•In exceptional circumstances, if the engine oil level is too low
⇒ page 226 and you cannot obtain the oil specified for your vehicle, you can
put in a small quantity of oil conforming to the specification ACEA A2 or
ACEA A3 (petrol engines) or ACEA B3 or ACEA B4 (diesel engines) (up to 0.5l).
Vehicles with diesel particulate filter*
All Exeo vehicles with a diesel engine have a diesel particulate filter and must
only be filled with VW 507 00 engine oil, which has a low level of soot forma-
tion. Using other types of oil will cause a higher soot concentration and
reduce the life of the DPF. Therefore:•Avoid mixing this oil with other engine oils.•Only in exceptional circumstances, if the engine oil level is too low
⇒ page 226 and you cannot obtain the oil specified for your vehicle, can you
put in a small quantity of oil (once) conforming to the VW 506 00, VW 506 01,
VW 505 00, VW 505 01 or ACEA B3 / ACEA B4 specification. (up to 0.5 l).Oil properties
Engine oil additives
No type of additive should be mixed with the engine oil. The deterioration
caused by these additives is not covered by the warranty.
Note
Before a long trip, we recommend finding an engine oil that conforms to the
corresponding VW specifications and keeping it in the vehicle. This way, the
correct engine oil will always be available for a top-up if needed.Checking the oil level
Engine type
Specification
Petrol
VW 502 00/ VW 504 00
Diesel. Engines with particu-
late filter (DPF)
a)
a)Only use recommended oils, otherwise you may damage the engine.
VW 507 00
Oils for LongLife service intervals *
Engine type
Specification
Petrol
VW 504 00
Diesel
VW 507 00
Fig. 166 Markings on oil
dipstick
exeo_EN.book Seite 226 Montag, 30. August 2010 4:45 16
Page 231 of 319

Checking and refilling levels229
Safety First
Operating Instructions
Practical Tips
Technical Specifications
tion. The damage caused by the use of these antifreezes may lead to a loss of
coolant fluid, causing serious damage to the engine.
•G12++ antifreeze can be mixed only with antifreeze additives G11, G12
and G12+.Checking the coolant level
The coolant level can be checked visually.– Switch the ignition off.
– Check the coolant level on coolant fluid expansion tank ⇒fig. 168 . When the engine is cold, it should be between the
“min” and “max” marks. When the engine is hot, it may be
slightly above the “max” mark.Its location is shown in the corresponding general overview of the engine
compartment. The coolant level should be checked with the engine switched off.
The coolant level is monitored by a warning lamp on the instrument panel
display
⇒page 78. However, we recommend that it should be checked occa-
sionally.
Coolant fluid loss
Any loss of coolant fluid normally indicates a leak in the cooling system. In
this case the cooling system should be inspected by a qualified workshop
without delay. It is not sufficient merely to top up the coolant fluid.
If there are no leaks in the system, a loss of coolant fluid can only occur if the
coolant boils and is forced out of the system as a result of overheating.
Caution
Radiator sealants must not be added to the coolant fluid. Such additives
could seriously impair the function of the cooling system.To p p i n g u p t h e c o o l a n t f l u i d
Be careful when topping up with coolant fluid.– Switch the engine off.
– Wait for the engine to cool down.
– Cover the cap on the expansion tank ⇒fig. 168 with a cloth, and
carefully unscrew the cap anti-clockwise ⇒.
– Add coolant fluid.
– Screw on the cap tightly.
Fig. 168 Engine compart-
ment: Coolant fluid
deposit
exeo_EN.book Seite 229 Montag, 30. August 2010 4:45 16
Page 238 of 319
Checking and refilling levels
236•A highly explosive mixture of gases is released when the battery is
under charge. The batteries should be charged in a well-ventilated room
only.•Keep children away from acid and batteries.•Before working on the electrical system, you must switch off the
engine, the ignition and all consumers. The negative cable on the battery
must be disconnected. When a light bulb is changed, you need only switch
off the light.•Deactivate the anti-theft alarm by unlocking the vehicle before you
disconnect the battery! The alarm will otherwise be triggered.•When disconnecting the battery from the vehicle electrical system,
disconnect first the negative cable and then the positive cable.•Switch off all electrical consumers before reconnecting the battery.
Reconnect first the positive cable and then the negative cable. Never
reverse the polarity of the connections. This could cause an electrical fire.•Never charge a frozen battery, or one which has thawed. This could
result in explosions and chemical burns. Always replace a battery which
has frozen. A flat battery can freeze at temperatures around 0°C.•Ensure that the vent hose is always connected to the battery.•Never use a defective battery. This could cause an explosion. Replace a
damaged battery immediately.Caution
•Never disconnect the battery if the ignition is switched on or if the engine
is running. This could damage the electrical system or electronic compo-
nents.•Do not expose the battery to direct sunlight over a long period of time, as
the intense ultraviolet radiation can damage the battery housing.•If the vehicle is left standing in cold conditions for a long period, protect
the battery from frost. If it freezes it will be damaged.
Charging the battery
A fully-charged battery is important for reliable starting.– Note the warnings ⇒ in “Important safety warnings for
handling a vehicle battery” on page 235 and ⇒.
– Switch off the ignition and all electrical equipment.
– Only if fast-charging: both battery cables must be disconnected (first the negative cable, then the positive cable).
– Connect the charger cables to the battery terminals, noting the colour code (red = positive; black or brown = negative).
– Now connect the battery charger to the power socket and switch on.
– After charging the battery: switch off the battery charger and disconnect the power point cable.
– Finally disconnect the charger cables from the battery.
– If necessary, reconnect both battery cables to the battery (first the positive cable, then the negative cable).When charging with a low current (for instance with a small battery charger)
the battery does not normally have to be disconnected. However, both
battery cables must be disconnected before fast-charging the battery with a
high current. However, always follow the instructions given by the manufac-
turer of the battery charger.
The fast-charging procedure for a battery is dangerous ⇒ in “Important
safety warnings for handling a vehicle battery” on page 235, as it requires a
special charger and the corresponding level of knowledge. We therefore
recommend that this work should only be performed by a qualified workshop.
WARNING (continued)
exeo_EN.book Seite 236 Montag, 30. August 2010 4:45 16
Page 241 of 319
Wheels and tyres239
Safety First
Operating Instructions
Practical Tips
Technical Specifications
2. The tyre pressures should only be checked when the tyres are
cold. The slightly raised pressures of warm tyres must not be
reduced.
3. Adjust the tyre pressure to the load you are carrying.Tyre pressure
The correct tyre pressure is especially important at high speeds. The pressure
should therefore be checked at least once a month and before starting a
journey.
The sticker with the tyre pressure values can be found on the inside of the
tank flap. The tyre pressure values given are for cold tyres. Do not reduce the
slightly raised pressures of warm tyres ⇒.
WARNING
•Check the tyre pressure at least once per month. Checking the tyre
pressure is very important. If the tyre pressure is too high or too low, there
is an increased danger of accidents - particularly at high speeds.•A tyre can easily burst if the pressure is too low, causing an accident!•At continuously high speeds, a tyre with insufficient pressure flexes
more. In this way it becomes too hot, and this can cause tread separation
and tyre blow-out. Always observe the recommended tyre pressures.•If the tyre pressure is too low or too high, the tyres will wear prema-
turely and the vehicle will not handle well. Risk of accident!For the sake of the environment
Under-inflated tyres will increase fuel consumption.
Tyre pressure monitoring*
The tyre pressure monitoring system constantly checks the
pressure of the tyres.The system warns the driver in the event of a loss of pressure by means of
symbols and messages in the instrument panel display.
Note that tyre pressure also depends on tyre temperature. Tyre pressure
increases about 0.1 bar for each 10°C in tyre temperature increase. The tyre
heats up while the vehicle is being driven and the tyre pressure will rise
accordingly. For this reason, you should only adjust the tyre pressures when
they are cold (i.e. approximately at ambient temperature).
To ensure that the tyre pressure monitoring system works reliably, you should
check and, if necessary, adjust the tyre pressures at regular intervals and
store the correct pressures (reference values) in the system.
A tyre pr essure i nfor ma ti on lab e l is a tta che d to t he insi de o f the fu el ta nk f lap.
WARNING
•Never adjust tyre pressure when the tyres are hot. This may damage or
even burst the tyres. Risk of accident!•An insufficiently inflated tyre flexes a lot more at high speeds and
causes significant heating of the tyre. Under these conditions, the tyre
bead may be released or the tyre may burst. Risk of accident!For the sake of the environment
Under-inflated tyres lead to increased fuel consumption and tyre wear.
exeo_EN.book Seite 239 Montag, 30. August 2010 4:45 16
Page 243 of 319
Wheels and tyres241
Safety First
Operating Instructions
Practical Tips
Technical Specifications
display TMPS (Tyre Pressure Monitoring System). Please contact the nearest
qualified workshop as soon as possible.
The tyre pressure warning lamp
�~ lights up if the tyre pressure on one or
more wheels is significantly lower than the tyre pressure setting which was
confirmed by the driver ⇒.
WARNING
•If the tyre pressure warning lamp lights up
�~ you must slow down
immediately and avoid any severe braking or steering manoeuvres. Stop
the vehicle as soon as possible and check the tyres and their pressure.
•The driver is responsible for maintaining correct tyre pressures. There-
fore, the tyre pressure must be regularly checked.•Under certain conditions (e.g. driving at high speeds, on ice and snow
or on poor road surfaces) the tyre pressure warning lamp
�~ may not light
up immediately or not at all.
•Please ask your Dealer or qualified workshop whether run-flat tyres can
be used on your vehicle. Fitting this type of tyre in an undue manner could
lead to your driving licence being taken away from you. Furthermore, it may
led to damage to the vehicle or, under certain circumstances, may cause
accidents.•If you change normal tyres for run-flat tyres or vice versa, the control
unit must be reprogrammed by the Dealer or a qualified workshop.Note
If you did not press the button for the tyre pressure monitoring system to
confirm a new tyre pressure setting after making changes to the tyre pres-
sures or changing one or more wheels, the warning lamp
�~ may light up
although the tyre pressures are correct. In this case, stop the vehicle as soon
as possible and, after examining the tyres, press the button for the tyre pres-
sure monitoring system.
Tyre ser vice life
The service life of tyres is dependent on tyre pressure, driving
style and fitting.
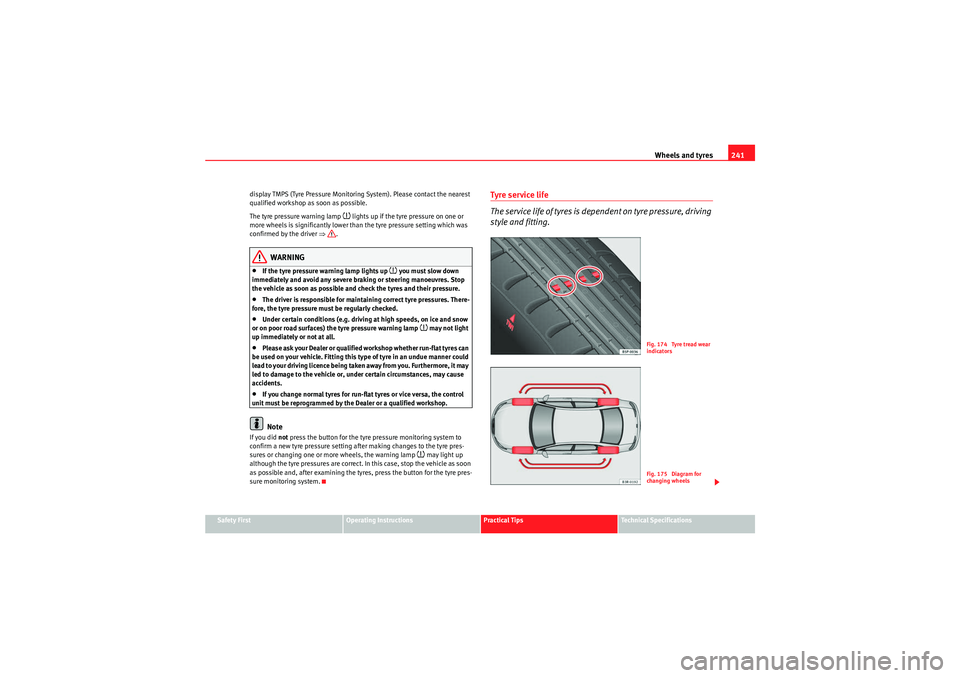
Fig. 174 Tyre tread wear
indicatorsFig. 175 Diagram for
changing wheels
exeo_EN.book Seite 241 Montag, 30. August 2010 4:45 16
Page 244 of 319
Wheels and tyres
242Wear indicators
The original tyres on your vehicle have 1.6 mm high tread wear indicators
⇒ page 241, fig. 174 , running across the tread. Depending on the make,
there will be six to eight of them evenly spaced around the tyre. Markings on
the tyre sidewall (for instance the letters “TWI” or other symbols) indicate the
positions of the tread wear indicators. The minimum tread depth required by
law is 1.6 mm (measured in the tread grooves next to the tread wear indica-
tors). Worn tyres must be replaced. Different figures may apply in export
countries ⇒.
Tyre pressure
Under-inflation or over-inflation will reduce the life of the tyres considerably
and also impair the vehicle’s handling. The inflation pressures are listed on a
sticker on the inside of the fuel tank flap.
Correct inflation pressures are very important, especially at high speeds. The
pressure should therefore be checked at least once a month and before
starting any long journey.
Tyre pressure monitoring (RKA+)*
Monitoring of the tyre pressures is based on the tyre pressures you have
stored. The tyre pressure monitoring system cannot function as intended if
you store tyre pressure settings for a normal load, but then drive with the
vehicle fully laden. The tyre pressure must be adapted to the actual load and
stored accordingly in the tyre pressure monitoring system ⇒ page 240.
Driving style
Fast cornering, heavy acceleration and hard braking all increase tyre wear.
Changing wheels around
If the front tyres are worn considerably more than the rear ones it is advisable
to change them around as shown ⇒page 241, fig. 175. All the tyres will then
last for about the same time. Wheel balance
The wheels on new vehicles are balanced. However, various factors encoun-
tered in normal driving can cause them to become unbalanced, which results
in steering vibration.
Unbalanced wheels should be rebalanced, as they otherwise cause excessive
wear on steering, suspension and tyres. A wheel must also be rebalanced
when a new tyre is fitted.
Incorrect wheel alignment
Incorrect wheel alignment causes excessive tyre wear, impairing the safety of
the vehicle. If tyres show excessive wear, you should have the wheel align-
ment checked by an Authorised Service Centre.
WARNING
There is a serious danger of accidents if a tyre bursts during driving!•The tyres must be replaced at the latest when the tread is worn down to
the tread wear indicators. Failure to do so could result in an accident. Worn
tyres do not grip well at high speeds on wet roads. There is also a greater
risk of aquaplaning.•At continuously high speeds, a tyre with insufficient pressure flexes
more. This causes it to overheat. This can cause tread separation and tyre
blow-out. Risk of accident. Always observe the recommended tyre pres-
sures.•I f t y r e s s h o w e x ce s s i v e w e a r, y o u s h o u l d h a v e t h e r u n n i n g g e a r ch e cke d
by an Authorised Service Centre.•Keep chemicals such as oil, fuel and brake fluid away from tyres.•Damaged wheels and tyres must be replaced immediately!For the sake of the environment
Under-inflated tyres will increase fuel consumption.
exeo_EN.book Seite 242 Montag, 30. August 2010 4:45 16
Page 245 of 319
Wheels and tyres243
Safety First
Operating Instructions
Practical Tips
Technical Specifications
Run-flat tyres*
Run-flat tyres allow you to cont inue driving even with a punc-
tured tyre, in the majority of cases.In vehicles that are factory-fitted with run-flat tyres
3) the loss of tyre
pressure is indicated on the instrument panel.
Driving with run-flat tyres (emergency running)
– Leave the ESP/TCS (Electronic Stability Programme) switched on, or switch on ⇒page 68.
– Continue driving carefully and slowly (80 km/h maximum).
– Avoid sudden manoeuvres and sharp turns.
– Avoid driving over obstacles (for example kerbs) or potholes.
– Look out for the ESP/TCS intervening often, smoke coming from the tyres or the smell of rubber, the vehicle vibrating or a clat-
tering noise. If any of these occur, stop the vehicle.
The run-flat tyres have a tag on the side of the tyre, with the description:
“DSST”, “Eufonia”, “RFT”, “ROF”, “RSC”, “SSR” or “ZP”.
The sides of this type of tyre are reinforced. When the tyres lose air they are
supported on the sides (emergency driving).
The loss of pressure in the tyre is shown on the instrument panel. You can
then drive a maximum of 80 km and if the circumstances are favourable (for
example, low load), even more.
The damaged tyre should be changed as soon as possible. The rim should be
checked in a specialist workshop to detect possible damage and replace it if necessary. We recommend you contact Technical Service. If more than one
tyre is being used under emergency conditions, this reduces the distance
which can be travelled.
Starting driving in emergency conditions
When loss in tyre pressure is displayed on the instrument panel, this means
that at least one tyre is being driven in emergency conditions
⇒.
End of emergency operation
Do not drive on if:
•smoke is coming from one of the tyres,•there is a smell of rubber,•the vehicle vibrates,•there is a rattling noise.
When is it no longer possible to continue driving even using run-flat tyres?•If the Electronic Stability Programme (ESP) is out of operation.•If the tyre pressure monitoring system* does not work.•If one of the tyres has been severely damaged in an accident, etc. If a tyre
has been badly damaged there is a risk that parts of the tread can be thrown
off and cause damage to the fuel lines, brake pipes or fuel filler.•It is also advisable to stop driving if severe vibrations occur, or if the wheel
starts overheating and gives off smoke.WARNING
When driving in emergency conditions, the driving quality of the vehicle is
considerably impaired.•The maximum permitted speed of 80 km/h is subject to road and
weather conditions. Please observe legal requirements when doing so.•Avoid sharp turns and rapid manoeuvres, and brake earlier than usual.•Avoid driving over obstacles (for example kerbs) or potholes.
3)Depending upon version and country.
exeo_EN.book Seite 243 Montag, 30. August 2010 4:45 16