parking brake Seat Exeo 2010 Owner's manual
[x] Cancel search | Manufacturer: SEAT, Model Year: 2010, Model line: Exeo, Model: Seat Exeo 2010Pages: 319, PDF Size: 9.64 MB
Page 5 of 319
Contents3
ContentsManual structure
. . . . . . . . . . . . . . . . . . . .
Content
. . . . . . . . . . . . . . . . . . . . . . . . . . . . . . . .
Safety First
. . . . . . . . . . . . . . . . . . . . . . . . . . .
Safe driving
. . . . . . . . . . . . . . . . . . . . . . . . . . . . . .
Brief introduction . . . . . . . . . . . . . . . . . . . . . . . .
Proper sitting position for occupants . . . . . . . . .
Pedal area . . . . . . . . . . . . . . . . . . . . . . . . . . . . . .
Storing objects . . . . . . . . . . . . . . . . . . . . . . . . . .
Seat belts
. . . . . . . . . . . . . . . . . . . . . . . . . . . . . . . .
Brief introduction . . . . . . . . . . . . . . . . . . . . . . . .
Why wear seat belts? . . . . . . . . . . . . . . . . . . . . . .
Seat belts . . . . . . . . . . . . . . . . . . . . . . . . . . . . . . .
Seat belt tensioners . . . . . . . . . . . . . . . . . . . . . .
Airbag system
. . . . . . . . . . . . . . . . . . . . . . . . . . . .
Brief introduction . . . . . . . . . . . . . . . . . . . . . . . .
Front airbags . . . . . . . . . . . . . . . . . . . . . . . . . . . .
Knee airbag* . . . . . . . . . . . . . . . . . . . . . . . . . . . .
Side airbags* . . . . . . . . . . . . . . . . . . . . . . . . . . . .
Curtain airbags . . . . . . . . . . . . . . . . . . . . . . . . . .
Deactivating airbags . . . . . . . . . . . . . . . . . . . . . .
Child safety
. . . . . . . . . . . . . . . . . . . . . . . . . . . . . .
Brief introduction . . . . . . . . . . . . . . . . . . . . . . . .
Child seats . . . . . . . . . . . . . . . . . . . . . . . . . . . . . .
Securing child seats . . . . . . . . . . . . . . . . . . . . . .
Operating Instructions
. . . . . . . . . . . .
Cockpit
. . . . . . . . . . . . . . . . . . . . . . . . . . . . . . . . . . .
Overview . . . . . . . . . . . . . . . . . . . . . . . . . . . . . . .
Instruments . . . . . . . . . . . . . . . . . . . . . . . . . . . . .
Warning and indicator lamps . . . . . . . . . . . . . . .
Driver information system . . . . . . . . . . . . . . . . . .
Auto-check system . . . . . . . . . . . . . . . . . . . . . . .
Speed warning* . . . . . . . . . . . . . . . . . . . . . . .
Onboard computer . . . . . . . . . . . . . . . . . . . . . . .
Menu display . . . . . . . . . . . . . . . . . . . . . . . . . . . .
Tyre pressure monitoring* . . . . . . . . . . . . . . . . .
Steering wheel controls
. . . . . . . . . . . . . . . . . . .
Multifunction steering wheel* . . . . . . . . . . . . . .
Unlocking and locking
. . . . . . . . . . . . . . . . . . . .
Remote control keys . . . . . . . . . . . . . . . . . . . . . .
Central locking . . . . . . . . . . . . . . . . . . . . . . . . . . .
Tailgate . . . . . . . . . . . . . . . . . . . . . . . . . . . . . . . . .
Childproof lock . . . . . . . . . . . . . . . . . . . . . . . . . .
Remote control key . . . . . . . . . . . . . . . . . . . . . . .
Anti-theft alarm system* . . . . . . . . . . . . . . . . . . .
Electric windows . . . . . . . . . . . . . . . . . . . . . . . . .
Sliding/tilting sunroof* . . . . . . . . . . . . . . . . . . . .
Lights and visibility
. . . . . . . . . . . . . . . . . . . . . . .
Lights . . . . . . . . . . . . . . . . . . . . . . . . . . . . . . . . . .
Interior lights . . . . . . . . . . . . . . . . . . . . . . . . . . . .
Visibility . . . . . . . . . . . . . . . . . . . . . . . . . . . . . . . .
Windscreen wipers . . . . . . . . . . . . . . . . . . . . . . .
Rear view mirrors . . . . . . . . . . . . . . . . . . . . . . . . .
Seats and storage compartments
. . . . . . . . . .
Manual adjustment of the front seats . . . . . . . .
Electric adjustment of front seats* . . . . . . . . . . .
Lumbar support* . . . . . . . . . . . . . . . . . . . . . . . . . Driver seat memory* . . . . . . . . . . . . . . . . . . . . . .
Head restraints . . . . . . . . . . . . . . . . . . . . . . . . . .
Armrests . . . . . . . . . . . . . . . . . . . . . . . . . . . . . . . .
Luggage compartment . . . . . . . . . . . . . . . . . . . .
Roof rack . . . . . . . . . . . . . . . . . . . . . . . . . . . . . . .
Drink holder . . . . . . . . . . . . . . . . . . . . . . . . . . . . .
Ashtray*, cigarette lighter* and electric sockets*
Compartments . . . . . . . . . . . . . . . . . . . . . . . . . . .
Air conditioning
. . . . . . . . . . . . . . . . . . . . . . . . . .
2C-Climatronic . . . . . . . . . . . . . . . . . . . . . . . . . . .
Driving
. . . . . . . . . . . . . . . . . . . . . . . . . . . . . . . . . . .
Steering . . . . . . . . . . . . . . . . . . . . . . . . . . . . . . . .
Safety . . . . . . . . . . . . . . . . . . . . . . . . . . . . . . . . . .
Ignition lock . . . . . . . . . . . . . . . . . . . . . . . . . . . . .
Starting and stopping the engine . . . . . . . . . . .
Handbrake . . . . . . . . . . . . . . . . . . . . . . . . . . . . . .
Parking aid acoustic system . . . . . . . . . . . . . . . .
Cruise control* . . . . . . . . . . . . . . . . . . . . . . . . . . .
Manual gearbox . . . . . . . . . . . . . . . . . . . . . . . . . .
Automatic gearbox* . . . . . . . . . . . . . . . . . . . . . .
Practical Tips
. . . . . . . . . . . . . . . . . . . . . . . .
Intelligent technology
. . . . . . . . . . . . . . . . . . . . .
Electronic Stability Programme (ESP) . . . . . . . .
Brakes . . . . . . . . . . . . . . . . . . . . . . . . . . . . . . . . .
Power steering . . . . . . . . . . . . . . . . . . . . . . . . . . .
Servotronic* . . . . . . . . . . . . . . . . . . . . . . . . . . . . .
Driving and the environment
. . . . . . . . . . . . . .
Running-in . . . . . . . . . . . . . . . . . . . . . . . . . . . . . .
Exhaust gas purification system . . . . . . . . . . . . .
5
6
7
7
7
10
15
16
18
18
19
22
26
28
28
32
35
38
41
44
46
46
48
51 57
57
57
59
65
71
75
82
85
87
89
91
91
96
96
98
103
104
104
106
108
111
115
115
123
126
129
131
134
134
136
137 138
140
142
143
146
147
148
153
156
156
166
166
166
167
168
170
171
174
177
177
185
185
185
189
190
191
192
192
193
exeo_EN.book Seite 3 Montag, 30. August 2010 4:45 16
Page 59 of 319
Cockpit57
Safety First
Operating Instructions
Practical Tips
Technical Specifications
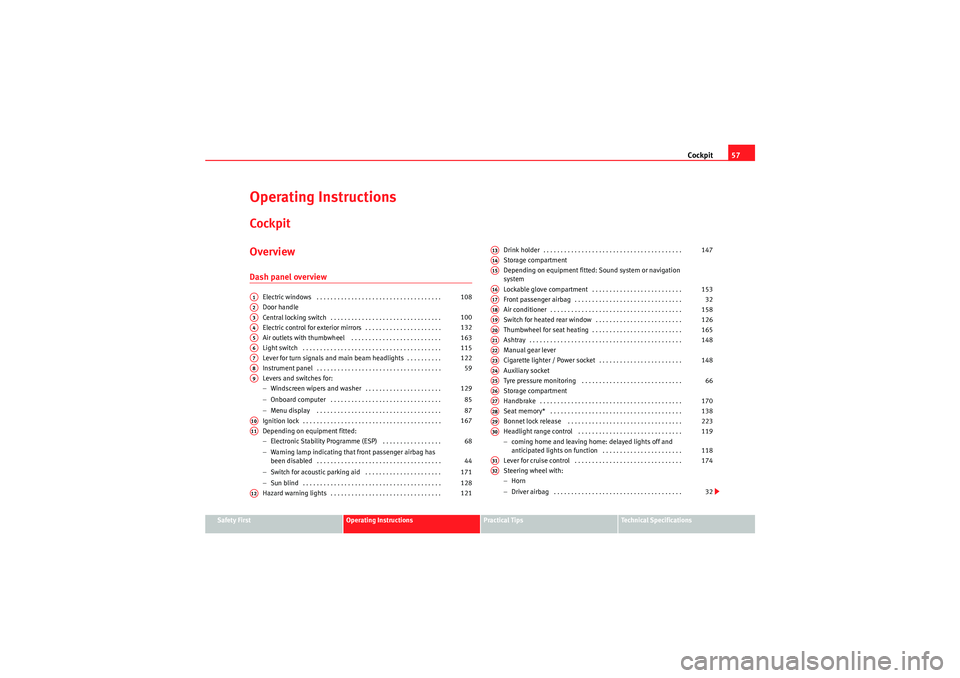
Operating InstructionsCockpitOverviewDash panel overview
Electric windows . . . . . . . . . . . . . . . . . . . . . . . . . . . . . . . . . . . .
Door handle
Central locking switch . . . . . . . . . . . . . . . . . . . . . . . . . . . . . . . .
Electric control for exterior mirrors . . . . . . . . . . . . . . . . . . . . . .
Air outlets with thumbwheel . . . . . . . . . . . . . . . . . . . . . . . . . .
Light switch . . . . . . . . . . . . . . . . . . . . . . . . . . . . . . . . . . . . . . . .
Lever for turn signals and main beam headlights . . . . . . . . . .
Instrument panel . . . . . . . . . . . . . . . . . . . . . . . . . . . . . . . . . . . .
Levers and switches for:
−Windscreen wipers and washer . . . . . . . . . . . . . . . . . . . . . .
− Onboard computer . . . . . . . . . . . . . . . . . . . . . . . . . . . . . . . .
− Menu display . . . . . . . . . . . . . . . . . . . . . . . . . . . . . . . . . . . .
Ignition lock . . . . . . . . . . . . . . . . . . . . . . . . . . . . . . . . . . . . . . . .
Depending on equipment fitted:
− Electronic Stability Programme (ESP) . . . . . . . . . . . . . . . . .
− Warning lamp indicating that front passenger airbag has
been disabled . . . . . . . . . . . . . . . . . . . . . . . . . . . . . . . . . . . .
− Switch for acoustic parking aid . . . . . . . . . . . . . . . . . . . . . .
− Sun blind . . . . . . . . . . . . . . . . . . . . . . . . . . . . . . . . . . . . . . . .
Hazard warning lights . . . . . . . . . . . . . . . . . . . . . . . . . . . . . . . . Drink holder . . . . . . . . . . . . . . . . . . . . . . . . . . . . . . . . . . . . . . . .
Storage compartment
Depending on equipment fitted: Sound system or navigation
system
Lockable glove compartment . . . . . . . . . . . . . . . . . . . . . . . . . .
Front passenger airbag . . . . . . . . . . . . . . . . . . . . . . . . . . . . . . .
Air conditioner . . . . . . . . . . . . . . . . . . . . . . . . . . . . . . . . . . . . . .
Switch for heated rear window . . . . . . . . . . . . . . . . . . . . . . . . .
Thumbwheel for seat heating . . . . . . . . . . . . . . . . . . . . . . . . . .
Ashtray . . . . . . . . . . . . . . . . . . . . . . . . . . . . . . . . . . . . . . . . . . . .
Manual gear lever
Cigarette lighter / Power socket . . . . . . . . . . . . . . . . . . . . . . . .
Auxiliary socket
Tyre pressure monitoring . . . . . . . . . . . . . . . . . . . . . . . . . . . . .
Storage compartment
Handbrake . . . . . . . . . . . . . . . . . . . . . . . . . . . . . . . . . . . . . . . . .
Seat memory* . . . . . . . . . . . . . . . . . . . . . . . . . . . . . . . . . . . . . .
Bonnet lock release . . . . . . . . . . . . . . . . . . . . . . . . . . . . . . . . .
Headlight range control . . . . . . . . . . . . . . . . . . . . . . . . . . . . . .
−
coming home and leaving home: delayed lights off and
anticipated lights on function . . . . . . . . . . . . . . . . . . . . . . .
Lever for cruise control . . . . . . . . . . . . . . . . . . . . . . . . . . . . . . .
Steering wheel with:
− Horn
− Driver airbag . . . . . . . . . . . . . . . . . . . . . . . . . . . . . . . . . . . . .
A1
108
A2A3
100
A4
132
A5
163
A6
115
A7
122
A8
59
A9
129
85
87
A10
167
A11
68
44
171
128
A12
121
A13
147
A14A15A16
153
A17
32
A18
158
A19
126
A20
165
A21
148
A22A23
148
A24A25
66
A26A27
170
A28
138
A29
223
A30
119
118
A31
174
A32
32
exeo_EN.book Seite 57 Montag, 30. August 2010 4:45 16
Page 170 of 319
Driving
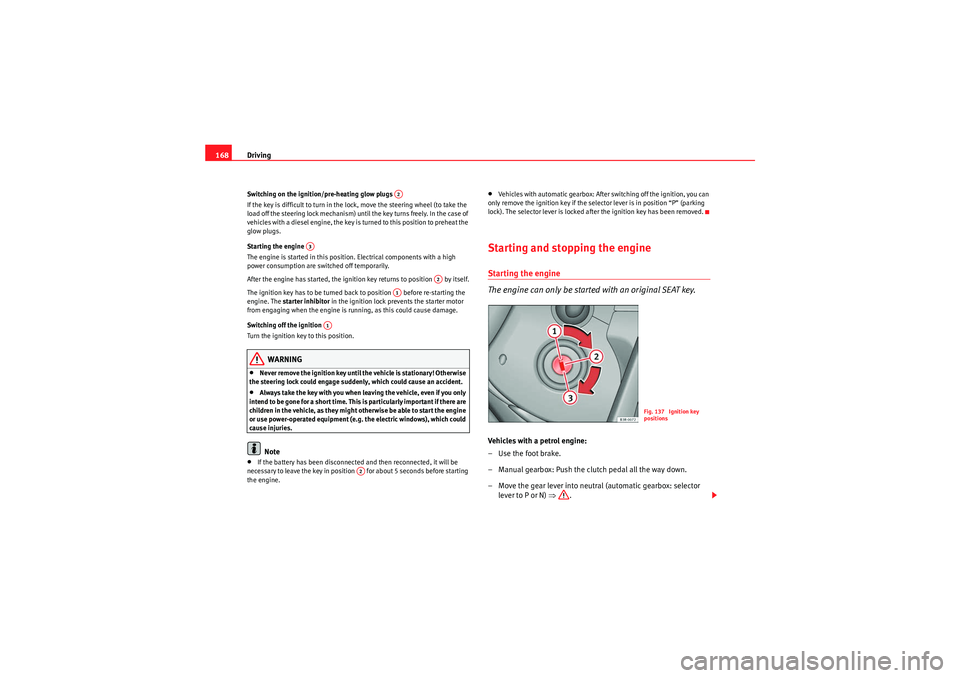
168Switching on the ignition/pre-heating glow plugs
If the key is difficult to turn in the lock, move the steering wheel (to take the
load off the steering lock mechanism) until the key turns freely. In the case of
vehicles with a diesel engine, the key is turned to this position to preheat the
glow plugs.
Starting the engine
The engine is started in this position. Electrical components with a high
power consumption are switched off temporarily.
After the engine has started, the ignition key returns to position by itself.
The ignition key has to be turned back to position before re-starting the
engine. The starter inhibitor in the ignition lock prevents the starter motor
from engaging when the engine is running, as this could cause damage.
Switching off the ignition
Turn the ignition key to this position.
WARNING
•Never remove the ignition key until the vehicle is stationary! Otherwise
the steering lock could engage suddenly, which could cause an accident.•Always take the key with you when leaving the vehicle, even if you only
intend to be gone for a short time. This is particularly important if there are
children in the vehicle, as they might otherwise be able to start the engine
or use power-operated equipment (e.g. the electric windows), which could
cause injuries.Note
•If the battery has been disconnected and then reconnected, it will be
necessary to leave the key in position for about 5 seconds before starting
the engine.
•Vehicles with automatic gearbox: After switching off the ignition, you can
only remove the ignition key if the selector lever is in position “P” (parking
lock). The selector lever is locked after the ignition key has been removed.Starting and stopping the engineStarting the engine
The engine can only be started with an original SEAT key.Vehicles with a petrol engine:
– Use the foot brake.
– Manual gearbox: Push the clutch pedal all the way down.
– Move the gear lever into neutral (automatic gearbox: selector lever to P or N) ⇒.
A2
A3
A2
A1
A1
A2
Fig. 137 Ignition key
positions
exeo_EN.book Seite 168 Montag, 30. August 2010 4:45 16
Page 173 of 319
Driving171
Safety First
Operating Instructions
Practical Tips
Technical Specifications
If you drive by mistake with the handbrake still applied, you will hear a
warning buzzer and the display will show the message:
Handbrake on
The handbrake warning switches on after driving for 3 seconds at speeds
above 5 km/h.
The handbrake warning lamp
�H lights up when the handbrake is applied
with the ignition on.
WARNING
Please note that the handbrake should be released all the way. If it is only
partially released, this will cause rear brakes overheating, which can
impair the function of the brake system and could lead to an accident.
Caution
Once the vehicle has come to a standstill, always apply the handbrake firmly
and then, on a manual gearbox, engage a gear, or select P on an automatic.Parking
The following points will ensure there is no risk of the vehicle
rolling away accidentally after it is parked:– Use the foot brake to stop the vehicle.
– Apply the handbrake firmly.
– Switch the engine off.
– On a manual gearbox engage 1st gear or on an automatic move the selector lever to P ⇒ .
When parking on slopes:
Turn the steering wheel so that the, if the vehicle moves, it will do so towards
the curb.
WARNING
•Do not leave anyone (especially children) in the vehicle when it is
locked. Locked doors could delay assistance in an emergency, potentially
putting lives at risk.•Never leave children unsupervised in the vehicle. They could release
e.g. the handbrake or gear lever, moving the vehicle and causing an
accident.
Parking aid acoustic systemGeneral notesVarious systems are available to help you when parking or manoeuvring in
tight spaces, depending on the equipment fitted on your vehicle.
The SEAT Parking System gives an acoustic warning if there are any obstacles
behind your vehicle ⇒page 172.
When you are parking, SEAT Parking System Plus warns you acoustically and
optically about obstacles in front of and behind the vehicle ⇒page 172.
Note
To ensure the acoustic parking aid works properly, the sensors must be kept
clean and free of snow and ice.
exeo_EN.book Seite 171 Montag, 30. August 2010 4:45 16
Page 176 of 319
Driving
174SEAT Parking System*
There is no distance warning.
SEAT Parking System Plus*
There is no rear distance warning. The system will still give a warning when
obstacles are detected while driving forward.Fault messages*If you hear a long beep for a few seconds and the LED on the
button* starts
flashing when you switch on the parking aid, a system fault has occurred.
Please have the fault corrected by a Dealer or qualified workshop.
Note
If the fault is not corrected before you switch off the ignition, it will only be
indicated by the flashing LED on the switch
* the next time you switch on
the parking aid.
Cruise control*Introduction
The cruise control system allows you to maintain a constant
speed.Using this system, any speed over 30 km/h can be kept constant, as long as
the engine power allows it. This is subject to power output and braking ability
of the engine. This helps to reduce fatigue, especially on long journeys. The indicator lamp
on the instrument panel lights up when the cruise
control system is operating.
WARNING
For safety reasons, the cruise control system should not be used in dense
traffic or poor road conditions (with ice, slippery surfaces, loose grit or
gravel), as this could cause an accident.
Caution
In vehicles with a manual gearbox: do not go into neutral if the device is
enabled without previously releasing the clutch, as the engine will increase
its revs and, under certain conditions, could break down.
Note
The cruise control cannot maintain a constant speed when travelling down
steep hills. The vehicle tends to accelerate under its own weight. Change
down to a lower gear or use the foot brake to slow the vehicle.
exeo_EN.book Seite 174 Montag, 30. August 2010 4:45 16
Page 180 of 319
Driving
178If desired, you can also select the gears manually (tiptronic mode)
⇒ page 183.
Please note that in vehicles with a multitronic® gearbox, torque is trans-
mitted via a multi-plate clutch, and not via a torque converter as on conven-
tional automatics. This means that the vehicle will not “creep” as much as
conventional automatics when the engine is idling if you stop temporarily
with the selector lever in position D, S or R.
Vehicles with tiptronic gearbox
The vehicle is equipped with an electronically controlled 7-speed automatic
gearbox. The gearbox changes up and down automatically .
If desired, you can also select the gears manually (tiptronic mode)
⇒ page 183.Driving instructions
The gears are changed automatically.
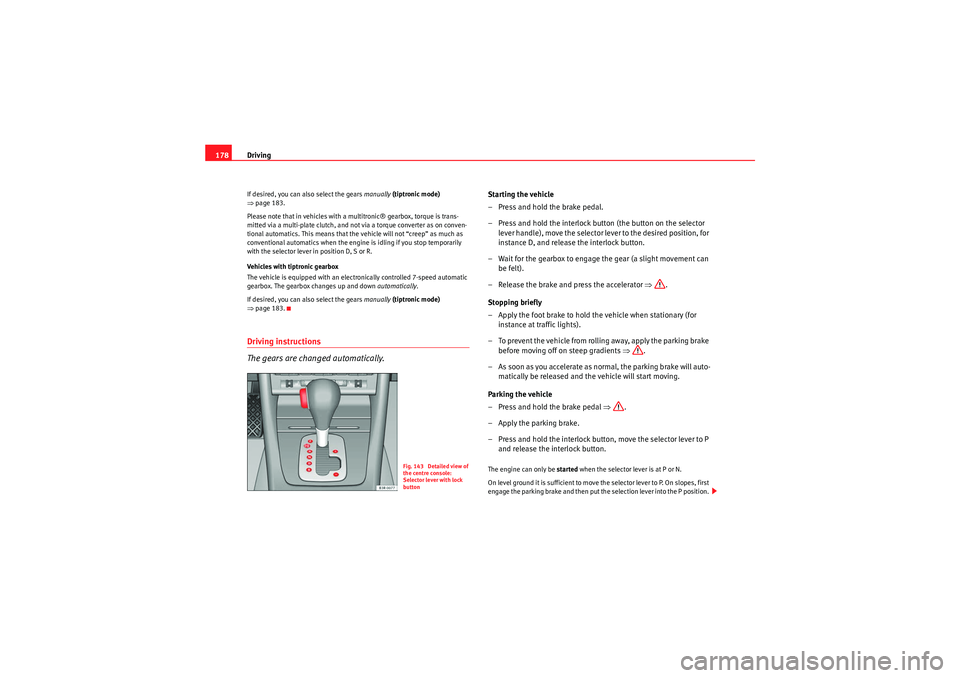
Starting the vehicle
–Press and hold the brake pedal.
– Press and hold the interlock button (the button on the selector
lever handle), move the selector lever to the desired position, for
instance D, and release the interlock button.
– Wait for the gearbox to engage the gear (a slight movement can be felt).
– Release the brake and press the accelerator ⇒.
Stopping briefly
– Apply the foot brake to hold the vehicle when stationary (for instance at traffic lights).
– To prevent the vehicle from rolling away, apply the parking brake before moving off on steep gradients ⇒.
– As soon as you accelerate as normal, the parking brake will auto- matically be released and the vehicle will start moving.
Parking the vehicle
–Press and hold the brake pedal ⇒.
– Apply the parking brake.
– Press and hold the interlock button, move the selector lever to P and release the interlock button.The engine can only be started when the selector lever is at P or N.
On level ground it is sufficient to move the selector lever to P. On slopes, first
engage the parking brake and then put the selection lever into the P position.
Fig. 143 Detailed view of
the centre console:
Selector lever with lock
button
exeo_EN.book Seite 178 Montag, 30. August 2010 4:45 16
Page 181 of 319
Driving179
Safety First
Operating Instructions
Practical Tips
Technical Specifications
This avoids overloading the locking mechanism and it will be easier to move
the selector lever from position P.
Vehicles with multitronic® gearbox: Your vehicle is equipped with the
hill
hold assist function which makes it easier to start off on a slope. The system
is activated when you press and hold the brake pedal for a few seconds.
When you release the brake pedal the braking force will be maintained for a
short moment in order to prevent the vehicle rolling back when you drive
away.
WARNING
•While you are selecting a gear and the vehicle is stopped with the
engine running, do not accelerate. Failure to do so could result in an acci-
dent.•Please note that some power will still be transmitted when you stop
temporarily with the selector lever in position D, S or R. Therefore, when
stopping you will need to press the brake with the force required to hold
the vehicle still. Failure to do so could result in an accident.•N e v e r m ov e t h e s e l e c t o r l e v e r t o R o r P w h e n d r i v i n g , a s t h i s co u l d ca u s e
an accident.•Vehicles with multitronic® gearbox: Please note that some power will
still be transmitted when you stop temporarily with the selector lever in
position D, S or R. Therefore, when stopping you will need to press the
brake with the force required to hold the vehicle still. Failure to do so could
result in an accident.
Selector lever positions
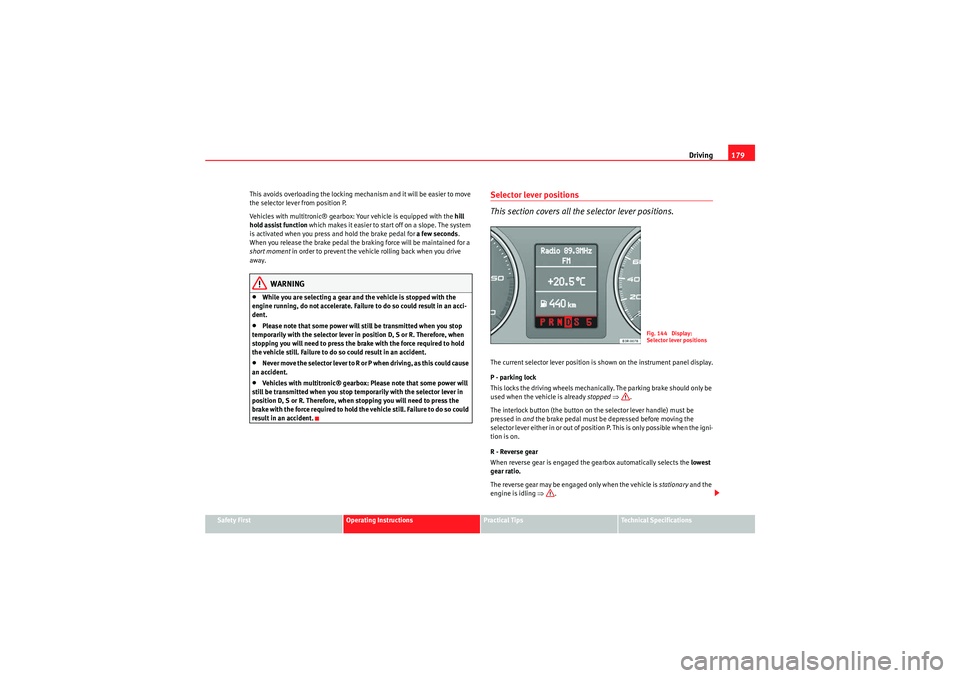
This section covers all th e selector lever positions.The current selector lever position is shown on the instrument panel display.
P - parking lock
This locks the driving wheels mechanically. The parking brake should only be
used when the vehicle is already stopped ⇒ .
The interlock button (the button on the selector lever handle) must be
pressed in and the brake pedal must be depressed before moving the
selector lever either in or out of position P. This is only possible when the igni-
tion is on.
R - Reverse gear
When reverse gear is engaged the gearbox automatically selects the lowest
gear ratio.
The reverse gear may be engaged only when the vehicle is stationary and the
engine is idling ⇒.
Fig. 144 Display:
Selector lever positions
exeo_EN.book Seite 179 Montag, 30. August 2010 4:45 16
Page 182 of 319
Driving
180To move the selector lever to position R, press in the interlock button and at
the same time press the brake pedal. Depending on the model, one or two
reverse lights will come on in selector lever position R (when ignition is
switched on).
N - Neutral (idling)
In this position the gearbox is in neutral ⇒.
D - Drive (forward)
In this position, the gearbox selects the optimal transmission ratio
depending on the engine load, speed and the dynamic gear regulation
programme (DRP).
Press the brake pedal when moving the selector lever from N to D if the
vehicle is stationary or at speeds below 5 km/h ⇒.
Under certain circumstances (e.g. when driving in mountains or towing a
trailer or caravan) it can be advantageous to switch temporarily to tiptronic
mode ⇒page 183, so that the gear ratios can be selected manually to suit
the driving conditions.
S - Sport position
To drive in sports mode, select the position S. The engine power reserve is
used to its maximum. When accelerating the gear shifts will be noticeable.
Press the brake pedal when moving the selector lever from N to S if the
vehicle is stationary or at speeds below 5 km/h ⇒.
WARNING
•Never move the selector lever to R or P when driving. Failure to do so
could result in an accident.•In selector position D or S the vehicle must always be held with the foot
brake when the engine is running. This is because an automatic gearbox
still transmits power even at idling speed, and the vehicle tends to “creep”.
The throttle must on no account be opened inadvertently (for instance by hand from the engine compartment) when a gear is engaged with the
vehicle stationary. The vehicle could otherwise start moving immediately
(in some cases even if the parking brake is engaged) and possibly cause an
accident.
•To avoid accidents, apply the parking brake and put the selector lever
in position P before opening the bonnet and working on the vehicle with
the engine running. Please observe the important safety warnings
⇒ page 224, “Work in the engine compartment”.Note
•Applies to vehicles with tiptronic gearbox:•If the lever is moved accidentally to N when driving, release the acceler-
ator and let the engine speed drop to idling before selecting D or S again.•For the sake of fuel economy (and the environment), the gearbox ratios on
some models are designed so that maximum speed is only obtained when
the gear lever is in position S.WARNING (continued)
exeo_EN.book Seite 180 Montag, 30. August 2010 4:45 16
Page 261 of 319
If and when259
Safety First
Operating Instructions
Practical Tips
Technical Specifications
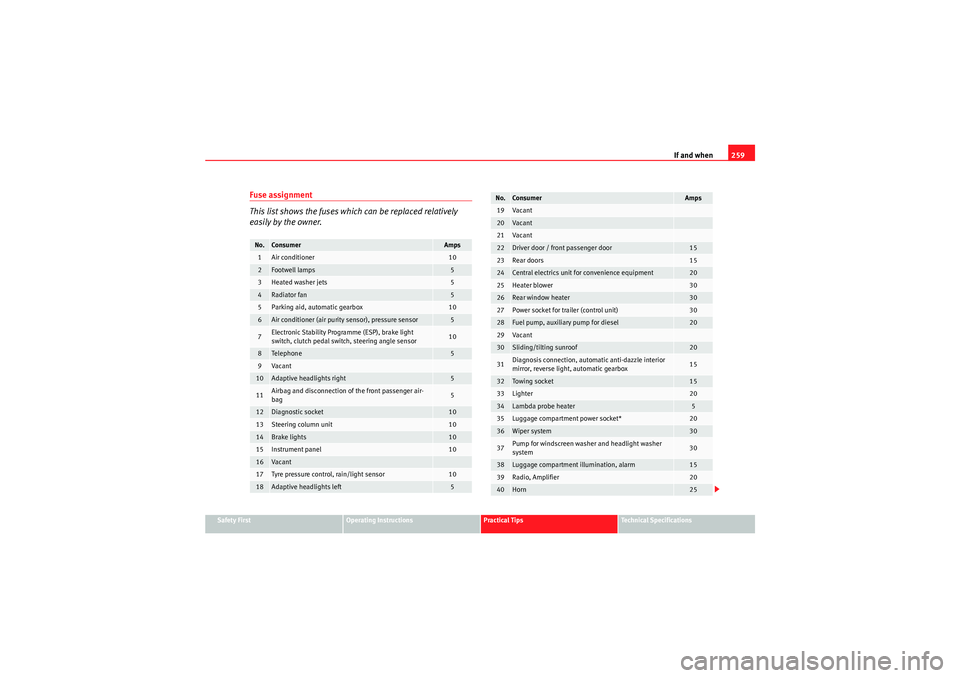
Fuse assignment
This list shows the fuses which can be replaced relatively
easily by the owner.No.
Consumer
Amps
1
Air conditioner
10
2
Footwell lamps
5
3
Heated washer jets
5
4
Radiator fan
5
5
Parking aid, automatic gearbox
10
6
Air conditioner (air purity sensor), pressure sensor
5
7
Electronic Stability Programme (ESP), brake light
switch, clutch pedal switch, steering angle sensor
10
8
Te le p hon e
5
9
Va can t
10
Adaptive headlights right
5
11
Airbag and disconnection of the front passenger air-
bag
5
12
Diagnostic socket
10
13
Steering column unit
10
14
Brake lights
10
15
Instrument panel
10
16
Va can t
17
Tyre pressure control, rain/light sensor
10
18
Adaptive headlights left
5
19
Va can t
20
Va can t
21
Va can t
22
Driver door / front passenger door
15
23
Rear doors
15
24
Central electrics unit for convenience equipment
20
25
Heater blower
30
26
Rear window heater
30
27
Power socket for trailer (control unit)
30
28
Fuel pump, auxiliary pump for diesel
20
29
Va can t
30
Sliding/tilting sunroof
20
31
Diagnosis connection, automatic anti-dazzle interior
mirror, reverse light, automatic gearbox
15
32
Towi ng s ocke t
15
33
Lighter
20
34
Lambda probe heater
5
35
Luggage compartment power socket*
20
36
Wiper system
30
37
Pump for windscreen washer and headlight washer
system
30
38
Luggage compartment illumination, alarm
15
39
Radio, Amplifier
20
40
Horn
25
No.
Consumer
Amps
exeo_EN.book Seite 259 Montag, 30. August 2010 4:45 16