break Seat Exeo 2011 Owner's manual
[x] Cancel search | Manufacturer: SEAT, Model Year: 2011, Model line: Exeo, Model: Seat Exeo 2011Pages: 313, PDF Size: 5.02 MB
Page 10 of 313
8Safe driving
Therefore, this chapter explains why these safety features are so important,
how they can protect you, what you need to remember when using them
and how you and your passengers can gain the most benefit from them.
There are also a number of important safety warnings that you and your
passengers should always observe in order to minimise the risk of injury.
Safety is everyone's responsibility!
Before setting off
The driver is responsible for the safety of the passengers
and the safe operation of the vehicle at all times. For your own safety and the safety of your passengers, always note
the following points before setting off:
– Make sure that all lights and indicators are working properly.
– Check tyre pressure.
– Make sure that all windows are clean and give good visibility to
the outside.
– Secure all luggage and other items carefully ⇒ page 16.
– Make sure that no objects can interfere with the pedals.
– Adjust the front seat, head restraint and mirrors correctly.
– Make sure that the head restraints for all passengers are adjus-
ted to the correct position.
– Make sure that children are protected with suitable safety seats
and properly worn seat belts ⇒ page 46. –
Sit in a correct position. Inform your passengers as to how they
should sit ⇒ page 10.
– Fasten your seat belt correctly. Make sure that your passengers
do the same ⇒ page 18.
What affects safe driving?
Safety on the road is directly related to how you drive, and
can also be affected by the passengers in the vehicle. The driver is responsible for the safety of the vehicle and all its oc-
cupants. If your ability to drive is impaired in any way, you endan-
ger yourself and other road users ⇒
. Therefore:
– Do not let yourself be distracted by passengers or by using a
mobile phone, etc.
– Never drive when your driving ability is impaired (by medica-
tion, alcohol, drugs, etc.).
– Obey all traffic regulations and speed limits and always main-
tain a safe distance to the vehicle in front.
– Always adjust your speed to suit the road, traffic and weather
conditions.
– Take frequent breaks on long trips. Do not drive for more than
two hours without a stop.
– If possible, avoid driving when you are tired or stressed.
Page 11 of 313
9
Safe driving
WARNING
When driving safety is impaired during a trip, the risk of injury and acci-
dents increases.
What affects driving safety?
Driving safety is largely determined by your driving style
and the personal behaviour of all occupants. As a driver, you are responsible for yourself and your passengers.
When your concentration or driving safety is affected by any cir-
cumstance, you endanger yourself as well as others on the road
⇒
, for this reason:
– Always pay attention to traffic and do not get distracted by pas-
sengers or telephone calls.
– Never drive when your driving ability is impaired (e.g. by medi-
cation, alcohol, drugs).
– Observe traffic laws and speed limits.
– Always reduce your speed as appropriate for road, traffic and
weather conditions.
– When travelling long distances, take breaks regularly - at least
every two hours.
– If possible, avoid driving when you are tired or stressed.
WARNING
When driving safety is impaired during a trip, the risk of injury and acci-
dents increases.
Safety FirstOperating InstructionsPractical TipsTechnical Specifications
Page 48 of 313
46Child safety
Child safety
Brief introduction Introduction
Statistics show that children are generally safer on the rear
seat than on the front passenger seat.For safety reasons we recommend that children under 12 years of age travel
on the rear seats. Depending on their age, height and weight, children trav-
elling on the rear seat must use a child seat or a seat belt. It is advisable
that children always travel in the rear seats, the rear central position being
the safest seat, since the risk of injuries in a side collision is diminished.
The physical laws involved and the forces acting in a collision apply also to
children. ⇒ page 19, Why wear seat belts?. But unlike adults, children do
not have muscle and bone structures fully developed. This means that chil-
dren are subject to a greater risk of injury.
To reduce this risk, children must always use special child restraint systems
when travelling in the vehicle.
We recommend the use of child safety products from the SEAT Genuine Ac-
cessories Programme, which includes systems for all ages made by Peke 1)
.
These systems have been especially designed and approved, complying
with the ECE-R44. regulation.
Follow the manufacturer's instructions and observe any statutory require-
ments when installing and using child seats. Always read and note
⇒ page 46, Safety notes on using child seats. We recommend you to include the manufacturer's Child Seat instruction
manual together with the on-board documentation.
Safety notes on using child seats
Proper use of child seats substantially reduces the risk of in-
jury in an accident! As the driver, you are responsible for any children you transport in
your vehicle.
– Protect your children by properly using the appropriate child
seats ⇒ page 48.
– Always ensure that the seat belt is properly positioned accord-
ing to the instructions provided by the manufacturer of the child
seat.
– When travelling, do not allow children to distract you from traf-
fic.
– Take breaks regularly during long trips. Take a break at least ev-
ery two hours.
1)
Not for all countries
Page 84 of 313

82Cockpit
Bulb monitor
The bulb monitor checks whether the lights on the vehicle
are working.
If a defective bulb is detected, or if one of the lights has failed for any rea-
son, the bulb monitor symbol will appear in the display together with an
additional message (which goes out after 5 seconds). For instance, if the
rear left turn signal is not working, the display in the instrument panel will
show the following message:
Left rear turn signal
The message disappears after 5 seconds. Press the CHECK button briefly if
you wish to call up the message again.
If the display indicates that one of the lights is not working, this can have a
number of causes:
● Bulb failure ⇒ page 258.
● A “blown” fuse ⇒ page 256, Changing fuses.
● Faulty electrical wiring.
It is not necessary to have lamps replaced in a specialised workshop, how-
ever the use of Xenon lamps is recommended.
LED lamps
If any of the LED (Light Emitting Diode) functions fail, the complete lamp
should be replaced.
The failure of the lamp is only shown when the LED function goes out com-
pletely. Sometimes, a LED will stop working, without displaying the warning
as the function continues to operate.WARNING
● Bulbs are highly sensitive to pressure. The glass can break when you
touch the bulb, causing injury.
● The high voltage element of gas discharge bulbs* (xenon light) must
be handled correctly. Otherwise, there is a risk of death.
Speed warning* Introduction
The speed warning function can help prevent you exceeding
a particular pre-set maximum speed.
Fig. 56 Display: Speed
warning function
The speed warning function will warn the driver if a pre-set maximum speed
is exceeded. The system gives an warning buzzer signal if the set speed is
Page 88 of 313

86Cockpit
Driving time warning
After 2 hours of continuous driving, the display automatically switches over
to the driving time display of 2:00. At the same time the driving time display
starts flashing. This is to remind the driver to take a break.
The driving time warning can be switched off by briefly pressing the func-
tion selector switch or the Reset
button ⇒ fig. 60.
If you continue driving or take a break for less than 10 minutes, the driving
time warning will switch on once again when the total driving time is 4:00
hours, 6:00 hours, etc. However, if you take a break for more than 10 mi- nutes, the driving time warning clock will be erased.
Distance covered
This display shows the distance you have covered since the memory was
last cancelled. The longest possible distance which can be recorded is
9999.9 km.
Note
● The displays for fuel consumption (average and instantaneous), dis-
tance to empty and speed are shown in metric units.
● The information in the memory is lost if the battery is disconnected. Operation
The onboard computer is controlled by means of two
switches on the windscreen wiper lever.
Fig. 60 Windscreen wip-
er lever: Onboard com-
puter controls
Activating the onboard computer
– Press the reset button B
repeatedly until the onboard comput-
er (memory 1 or 2) ⇒ fig. 59 is displayed.
Selecting the function
– Press the top or bottom of the function selector switch A
⇒ fig. 60. This displays the functions of the onboard computer
in sequence.
Resetting to zero
– Press and hold the Reset button B
for at least two seconds.
The following values can be reset to zero using the Reset button:
Page 102 of 313
100Unlocking and locking
–To unlock the vehicle, turn the key in the driver door to position
A
⇒ fig. 70.
– Pull the handle to open the door.
● This will unlock all the doors, the tailgate and the tank flap simultane-
ously.
● The anti-theft security system will be disabled.
Locking with the key
– To lock the vehicle, turn the key in the driver door to position B⇒ fig. 70 ⇒ .
● This will lock all the doors and the tailgate.
● The interior lights are switched off, provided the light switch is in the
courtesy light position.
● The windows and the sunroof* will close as the key is held in the locking
position.
● The anti-theft security system will be enabled immediately.
Locking the vehicle without activating the anti-theft security system
With the anti-theft security system enabled, it is more difficult to break into
the vehicle. If the anti-theft security system has been enabled, the inside
door handles and the central locking switch will not work ⇒
.
If you are leaving passengers in the vehicle while it is parked, it is possible
to lock the vehicle without activating the anti-theft security system.
To do so, turn the key in the driver door twice in quick succession to posi-
tion B
⇒ fig. 70.
WARNING
Do not leave anyone (especially children) in the vehicle if it is locked from
the outside and the anti-theft security system is enabled, as the doors
and windows cannot then be opened from the inside. Locked doors could
delay assistance in an emergency, potentially putting lives at risk.
CAUTION
If the driver door is locked using the key while open, the vehicle will be au-
tomatically immobilised and the alarm triggered.
Note
● Please note that when the vehicle is locked without activating the anti-
theft mechanism, the anti-theft alarm* remains operative. You should there-
fore switch off the interior monitoring* before locking the vehicle, as other-
wise the alarm* could be triggered unintentionally.
● The driver door cannot be locked using the central locking system when
it is still open. The door must be locked separately after it has been closed.
This helps to prevent you from being locked out of the vehicle.
Page 108 of 313

106Unlocking and locking
Note
● The remote control should only be used when the doors and the tailgate
are closed.
● The remote control should not be used when the vehicle is out of sight.
● The anti-theft alarm* can be accidentally triggered and the vehicle
locked if you press the locking button
on the remote control inside the
vehicle before inserting the key in the ignition. If this should happen by
mistake, press the unlock button
.
Re-synchronising
Should the remote control fail to lock or unlock the vehicle,
the system must be re-synchronised.
– If the vehicle is locked, use the key to unlock the driver door.
– Press the unlock button
on the remote control.
– Insert the key into the ignition and switch on the ignition.
– Switch off the ignition and remove the key.
– Press the unlock
or the lock button . Anti-theft alarm system*
Description
The system triggers an alarm if anyone attempts to break in-
to the vehicle.
The anti-theft alarm helps to prevent the vehicle being broken into or sto-
len. If the system senses interference with the vehicle, it triggers an audible
and visible alarm.
How is the system enabled?
The anti-theft alarm system is enabled automatically when the vehicle is
locked with the remote control or by turning the key in the driver door (if the
door is closed). The anti-theft alarm is enabled about 30 seconds after the
vehicle is locked.
How is the system disabled?
The anti-theft alarm is only disabled when the vehicle is unlocked using the
remote control. The vehicle will lock again automatically if none of the doors
is opened within 60 seconds after pressing the remote control button.
If the vehicle is unlocked by turning the key in the driver door, all the other
doors, the tailgate and the tank flap will remain locked.
If the vehicle has been unlocked with the key in the driver door, the key
must be inserted in the ignition lock and the ignition switched on within 15
seconds of opening the door in order to disable the alarm. The alarm will be
triggered if the ignition is not switched on within 15 seconds.
Opening and closing function in cars with alarm
When using the key only without remote control to lock and unlock:
in unlocking all the doors, they unlock simultaneously.
When using the key only without remote control to lock and unlock:
–
Page 120 of 313
118Lights and visibility
Activating the function
–Briefly press the knob ⇒ fig. 86 to release it from its set posi-
tion.
– Turn the knob to position 1.
– Press the knob in again to prevent the setting from being
changed unintentionally.
Deactivating the function
– Briefly press the knob ⇒ fig. 86 to release it from its set posi-
tion.
– Turn the knob to position 0.
– Press the knob in again to prevent the setting from being
changed unintentionally.
The coming home and leaving home functions are controlled by light sen-
sors in the interior mirror housing. The system will function when the follow-
ing requirements are met:
● The knob is set to position 1.
● The headlights and the ignition are switched off.
● Dark conditions; the sensors register little or no light.
Coming home
When the system is enabled and it is dark, the corresponding exterior lights
switch on as soon as the driver door is opened.
The exterior lights will stay on for up to a maximum of 2 minutes as long as
one of the doors or the tailgate is open.
The exterior lights stay on for about 30 seconds to light up the area around
the vehicle after all the doors and the tailgate have been closed. This time interval is factory-set, but you can have it changed by a qualified
workshop to suit your own requirements (max. setting is 60 seconds).
Leaving home
The exterior lights are switched on when the vehicle is unlocked with the
button on the remote control key.
The exterior lights go out when the driver door is opened or after 60 sec-
onds when the vehicle locks itself again automatically
⇒ page 105.
WARNING
Before leaving the vehicle, remove the key from the ignition, as the lights
will not go out if the coming home function is activated. This will lead to
battery discharge and vehicle breakdown.
Note
● If you always wish to use the coming home and leaving home functions,
you can leave them permanently switched on. As the system is controlled
via a photosensor, it will only work in dark conditions.
● Permanent use of the coming home and leaving home functions, partic-
ularly on short journeys, will increase the load on the battery. To make sure
the battery is always sufficiently charged, occasionally drive longer distan-
ces.
● If the fog lights have been switched on by the coming home and leaving
home functions, they will always be switched off when you switch on the ig-
nition.
● Observe all relevant legal requirements when using the signalling and
lighting systems described here.
Page 124 of 313
122Lights and visibility
All four turn signals flash simultaneously when the hazard warning lights
are switched on. The turn signal indicators and the hazard warning
light indicator flash at the same time. The hazard warning lights also
work when the ignition is switched off.
In an accident in which the airbags are triggered, the hazard warning lights
are switched on automatically.
Note
You should switch on the hazard warning lights to warn other road users,
e.g.
● When reaching the tail end of a traffic jam
● If your vehicle breaks down or there is an emergency
● If your vehicle is being towed away or if you are towing another vehicle Turn signal
and main beam headlight lever
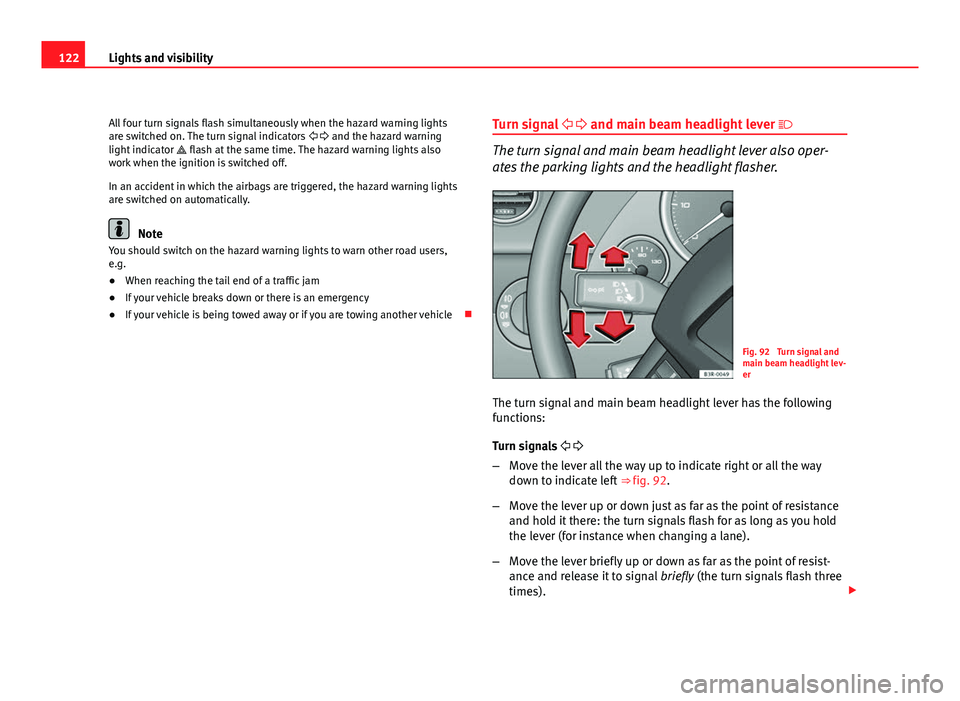
The turn signal and main beam headlight lever also oper-
ates the parking lights and the headlight flasher.
Fig. 92 Turn signal and
main beam headlight lev-
er
The turn signal and main beam headlight lever has the following
functions:
Turn signals
– Move the lever all the way up to indicate right or all the way
down to indicate left ⇒ fig. 92.
– Move the lever up or down just as far as the point of resistance
and hold it there: the turn signals flash for as long as you hold
the lever (for instance when changing a lane).
– Move the lever briefly up or down as far as the point of resist-
ance and release it to signal briefly (the turn signals flash three
times).
Page 153 of 313

151
Seats and storage compartments
WARNING
● Heavy appliances or connectors (for example, adapters) which hang
down directly from the Europlug socket may damage the socket with the
resultant risk of injury.
● Ensure that appliances connected to the socket are secure to prevent
them from being thrown around the vehicle in the event of sharp braking
or an accident. This could result in severe injury or loss of life ⇒ page 16,
Storing objects.
● Never spill liquid over the socket – there is a risk of death. If any
moisture enters the socket, ensure that it is thoroughly dry before using.
● Improper use of the sockets or electrical accessories can lead to seri-
ous injuries or cause a fire, with the resultant risk of injury.
● Children must never be left alone in the vehicle with the engine run-
ning. They could cause an accident.
● Appliances connected to the socket do not behave in the same way as
when they are connected to the mains power supply. They may overheat
during use and cause injury.
● When using adapters and extension leads, the childproof safety de-
vice on the 230 volt socket is disconnected and the socket is live. Risk of
injury!.
● Never insert objects which conduct electricity, such as a needle, in
the pins of the 230 volt socket. There is a risk of death.
● Always switch off electrical appliances connected to the socket if the
inverter goes off as a result of overheating. Failure to comply could result
in injuries.
CAUTION
● The instructions for handling appliances connected to the socket must
be observed.
● If the power consumption of the appliances connected exceeds 150
watts, the socket inverter will overheat. If the temperature exceeds a certain
value, the inverter will switch off. It may also switch off if the outside tem- perature is very high, even if the power consumption is normal. The inverter
will switch on again automatically after it has cooled down. Appliances con-
nected to the socket, and which have been left switched on, will automati-
cally come back on
⇒
.
● Do not connect neon lamps to the socket. For technical reasons, these
could break down.
● Do not connect 115 volt appliances to the 230 volt power socket, as
they could be damaged. If you have any queries, please check the manufac-
turer's label for details of the power supply accepted by the appliance.
● With some adapters, for example for laptops, their built-in overload dis-
connection system prevents the equipment from switching on in the event
of an excessive start-up current. In this case, disconnect the adapter from
the power supply and try to reconnect after ten seconds.
Note
● Non-insulated equipment may cause interference to the radio or vehicle
electronics.
● The Europlug socket has a built-in childproof device and only carries live
current when the Europlug is correctly plugged in.
● Some appliances may not operate correctly in the absence of adequate
power (watts).
● In some countries this socket is 115 volts. Therefore the socket should
have a different inverter installed at the factory. You can obtain retrofit kits
from your Authorised Technical Service. Do not connect 115 Volt appliances
to the 230 Volt socket.
● The use of electrical equipment in the vicinity of the aerial in the rear
window may cause interference to the reception of stations broadcasting in
AM.
Safety FirstOperating InstructionsPractical TipsTechnical Specifications