Battery Seat Exeo 2011 User Guide
[x] Cancel search | Manufacturer: SEAT, Model Year: 2011, Model line: Exeo, Model: Seat Exeo 2011Pages: 313, PDF Size: 5.02 MB
Page 106 of 313
104Unlocking and locking
Childproof lock
Childproof locks on rear doors
The childproof lock prevents the rear doors from being
opened from the inside.
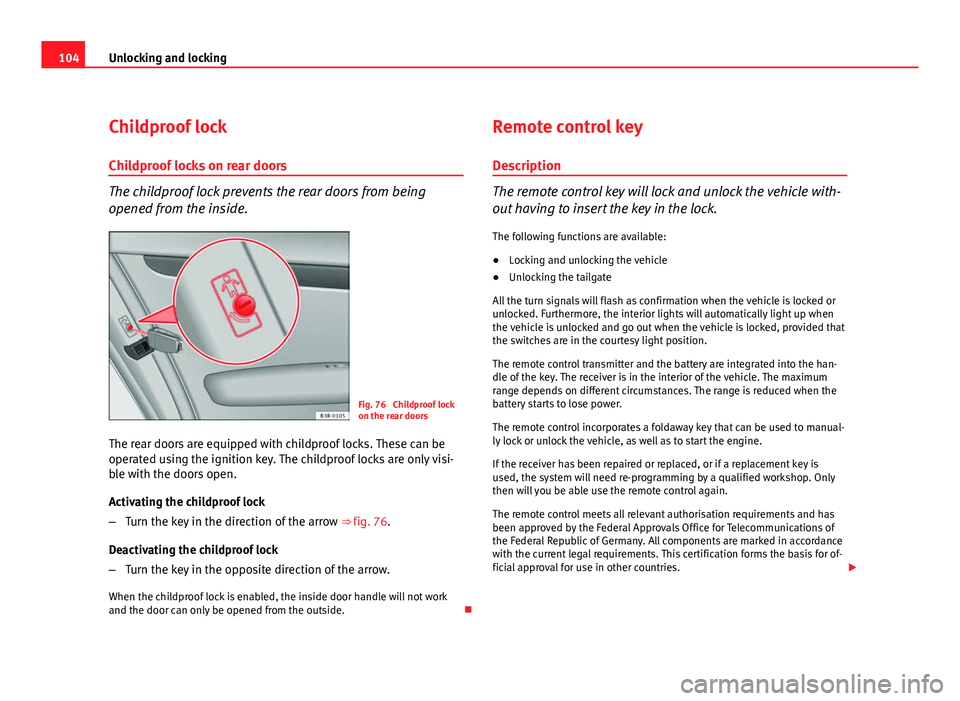
Fig. 76 Childproof lock
on the rear doors
The rear doors are equipped with childproof locks. These can be
operated using the ignition key. The childproof locks are only visi-
ble with the doors open.
Activating the childproof lock
– Turn the key in the direction of the arrow ⇒ fig. 76.
Deactivating the childproof lock
– Turn the key in the opposite direction of the arrow.
When the childproof lock is enabled, the inside door handle will not work
and the door can only be opened from the outside. Remote control key
Description
The remote control key will lock and unlock the vehicle with-
out having to insert the key in the lock. The following functions are available:
● Locking and unlocking the vehicle
● Unlocking the tailgate
All the turn signals will flash as confirmation when the vehicle is locked or
unlocked. Furthermore, the interior lights will automatically light up when
the vehicle is unlocked and go out when the vehicle is locked, provided that
the switches are in the courtesy light position.
The remote control transmitter and the battery are integrated into the han-
dle of the key. The receiver is in the interior of the vehicle. The maximum
range depends on different circumstances. The range is reduced when the
battery starts to lose power.
The remote control incorporates a foldaway key that can be used to manual-
ly lock or unlock the vehicle, as well as to start the engine.
If the receiver has been repaired or replaced, or if a replacement key is
used, the system will need re-programming by a qualified workshop. Only
then will you be able use the remote control again.
The remote control meets all relevant authorisation requirements and has
been approved by the Federal Approvals Office for Telecommunications of
the Federal Republic of Germany. All components are marked in accordance
with the current legal requirements. This certification forms the basis for of-
ficial approval for use in other countries.
Page 109 of 313
107
Unlocking and locking
in unlocking all the doors, they unlock simultaneously.
When combining locking using the remote control key and unlocking using
the key but without the remote control: when unlocking, only the driver door will unlock.
When does the system trigger the alarm?
The following parts of the vehicle are monitored when the vehicle is locked:
● Engine compartment (bonnet)
● Luggage compartment
● Doors
● Tilt angle (tow-away protection)
● Ignition
● Radio (only with a factory-fitted SEAT radio)
● Interior ⇒ page 107
If any of these areas are entered, the alarm will be triggered.
How is the alarm disabled?
The alarm can be switched off by unlocking the vehicle using the remote
control, or by switching on the ignition with the key, thus “disabling” the
alarm system. The alarm will also switch off when it comes to the end of its
cycle.
Turn signals
The turn signals flash briefly when the vehicle is locked to confirm that the
doors, the engine bonnet and the tailgate are properly closed and locked.
If the turn signals do not flash, check the doors, the bonnet and the tailgate
to make sure they are properly closed. The turn signals will also flash briefly
if one of the doors or the tailgate or engine bonnet is closed after the alarm
system has been enabled. –
– LED
When the vehicle is locked, the LED on the top of the driver door trim will
flash rapidly for about 30 seconds and then continue flashing slowly. This is
to indicate that the anti-theft alarm system (including the
interior monitor-
ing and tow-away protection ) is operative. If the LED lights up continuously
for about 30 seconds when the vehicle is locked instead of flashing, this
means the alarm system is not working properly.
Note
● To make sure that the alarm is fully operative when leaving the vehicle,
briefly check that all the doors and windows and the sunroof* are closed.
● The alarm is triggered immediately if one of the battery cables is discon-
nected while the alarm system is enabled.
Interior monitoring*
The interior monitoring triggers an alarm if it detects move-
ment inside the vehicle.
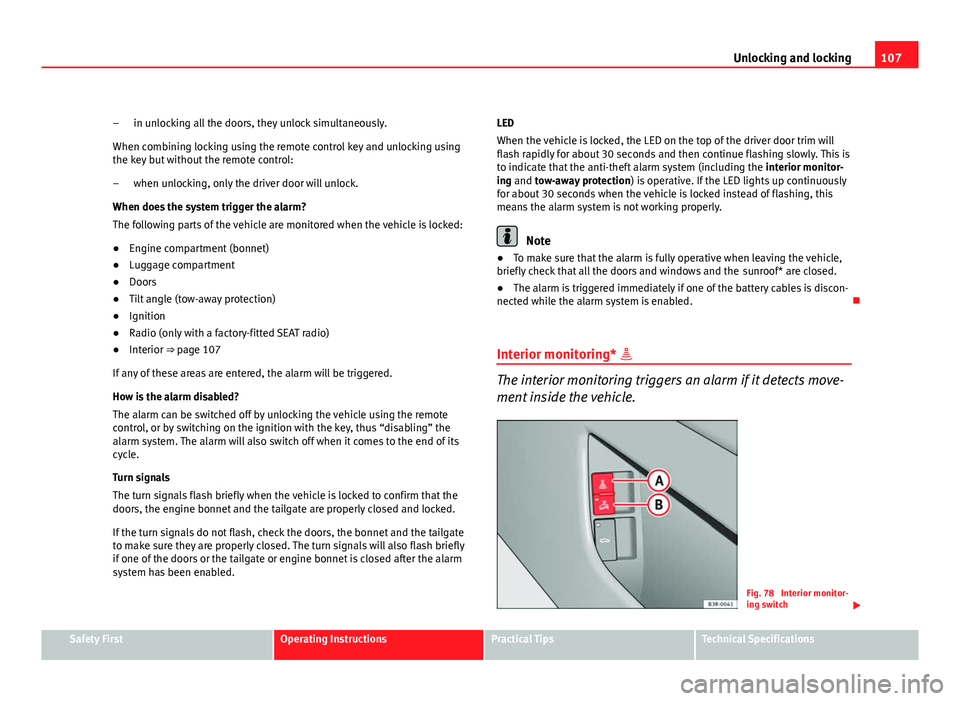
Fig. 78 Interior monitor-
ing switch
Safety FirstOperating InstructionsPractical TipsTechnical Specifications
Page 113 of 313
111
Unlocking and locking
WARNING
● Be careful when closing the windows to ensure nobody is hurt.
● For safety reasons, you should only use the remote control open and
close functions within about 2 metres of the vehicle. To avoid injuries, al-
ways keep an eye on the windows when pressing the button to close
them. The windows stop moving as soon as the button is released.
Possible malfunctions
Automatic open and close function not working
The automatic open and close function will not work if the battery has been
temporarily disconnected. The function can be restored as follows:
● Close the window as far as it will go by lifting and holding the window
switch.
● Release the switch and then lift it again for one second. This will re-ena-
ble the automatic function.
Sliding/tilting sunroof* Description
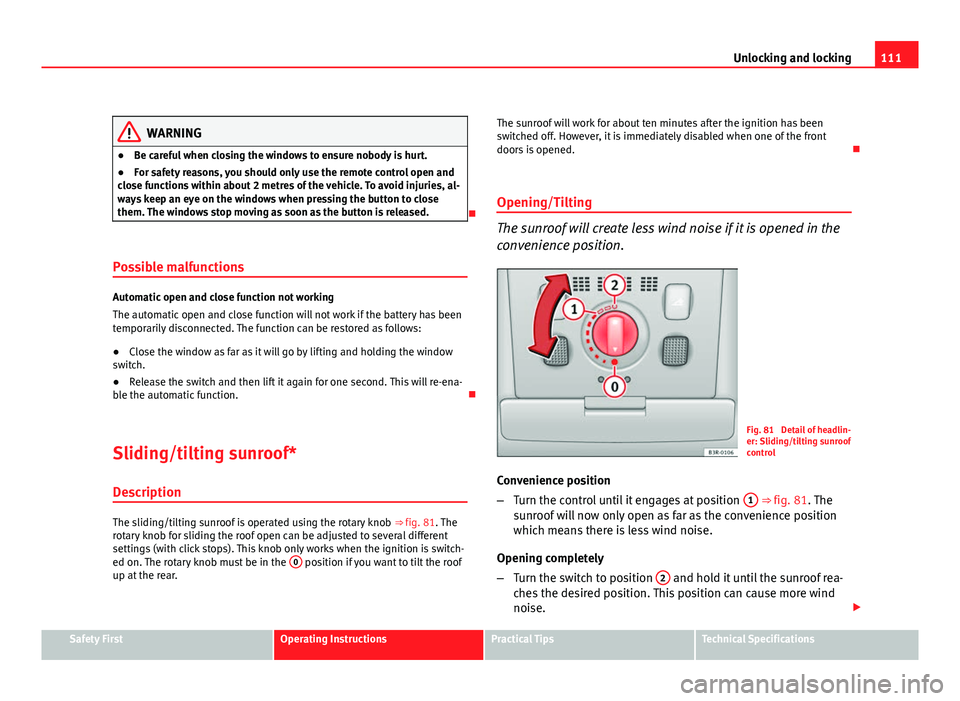
The sliding/tilting sunroof is operated using the rotary knob ⇒ fig. 81. The
rotary knob for sliding the roof open can be adjusted to several different
settings (with click stops). This knob only works when the ignition is switch-
ed on. The rotary knob must be in the 0
position if you want to tilt the roof
up at the rear. The sunroof will work for about ten minutes after the ignition has been
switched off. However, it is immediately disabled when one of the front
doors is opened.
Opening/Tilting
The sunroof will create less wind noise if it is opened in the
convenience position.
Fig. 81 Detail of headlin-
er: Sliding/tilting sunroof
control
Convenience position
– Turn the control until it engages at position 1
⇒ fig. 81. The
sunroof will now only open as far as the convenience position
which means there is less wind noise.
Opening completely
– Turn the switch to position 2
and hold it until the sunroof rea-
ches the desired position. This position can cause more wind
noise.
Safety FirstOperating InstructionsPractical TipsTechnical Specifications
Page 120 of 313
118Lights and visibility
Activating the function
–Briefly press the knob ⇒ fig. 86 to release it from its set posi-
tion.
– Turn the knob to position 1.
– Press the knob in again to prevent the setting from being
changed unintentionally.
Deactivating the function
– Briefly press the knob ⇒ fig. 86 to release it from its set posi-
tion.
– Turn the knob to position 0.
– Press the knob in again to prevent the setting from being
changed unintentionally.
The coming home and leaving home functions are controlled by light sen-
sors in the interior mirror housing. The system will function when the follow-
ing requirements are met:
● The knob is set to position 1.
● The headlights and the ignition are switched off.
● Dark conditions; the sensors register little or no light.
Coming home
When the system is enabled and it is dark, the corresponding exterior lights
switch on as soon as the driver door is opened.
The exterior lights will stay on for up to a maximum of 2 minutes as long as
one of the doors or the tailgate is open.
The exterior lights stay on for about 30 seconds to light up the area around
the vehicle after all the doors and the tailgate have been closed. This time interval is factory-set, but you can have it changed by a qualified
workshop to suit your own requirements (max. setting is 60 seconds).
Leaving home
The exterior lights are switched on when the vehicle is unlocked with the
button on the remote control key.
The exterior lights go out when the driver door is opened or after 60 sec-
onds when the vehicle locks itself again automatically
⇒ page 105.
WARNING
Before leaving the vehicle, remove the key from the ignition, as the lights
will not go out if the coming home function is activated. This will lead to
battery discharge and vehicle breakdown.
Note
● If you always wish to use the coming home and leaving home functions,
you can leave them permanently switched on. As the system is controlled
via a photosensor, it will only work in dark conditions.
● Permanent use of the coming home and leaving home functions, partic-
ularly on short journeys, will increase the load on the battery. To make sure
the battery is always sufficiently charged, occasionally drive longer distan-
ces.
● If the fog lights have been switched on by the coming home and leaving
home functions, they will always be switched off when you switch on the ig-
nition.
● Observe all relevant legal requirements when using the signalling and
lighting systems described here.
Page 126 of 313
124Lights and visibility
Interior light switched on
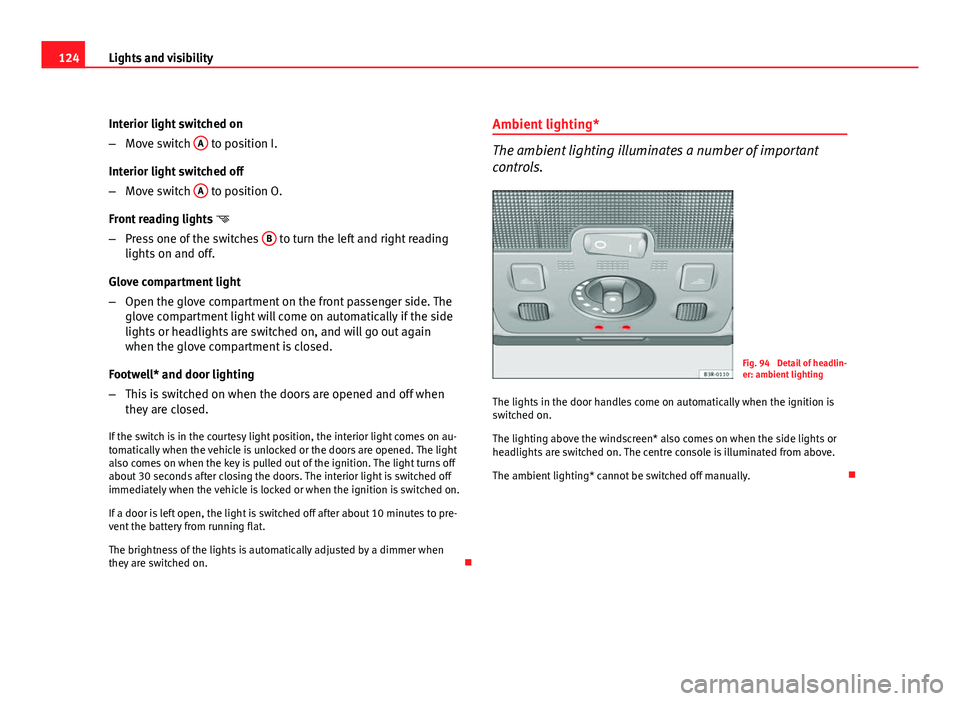
–Move switch A
to position I.
Interior light switched off
– Move switch A
to position O.
Front reading lights
– Press one of the switches B
to turn the left and right reading
lights on and off.
Glove compartment light
– Open the glove compartment on the front passenger side. The
glove compartment light will come on automatically if the side
lights or headlights are switched on, and will go out again
when the glove compartment is closed.
Footwell* and door lighting
– This is switched on when the doors are opened and off when
they are closed.
If the switch is in the courtesy light position, the interior light comes on au-
tomatically when the vehicle is unlocked or the doors are opened. The light
also comes on when the key is pulled out of the ignition. The light turns off
about 30 seconds after closing the doors. The interior light is switched off
immediately when the vehicle is locked or when the ignition is switched on.
If a door is left open, the light is switched off after about 10 minutes to pre-
vent the battery from running flat.
The brightness of the lights is automatically adjusted by a dimmer when
they are switched on. Ambient lighting*
The ambient lighting illuminates a number of important
controls.
Fig. 94 Detail of headlin-
er: ambient lighting
The lights in the door handles come on automatically when the ignition is
switched on.
The lighting above the windscreen* also comes on when the side lights or
headlights are switched on. The centre console is illuminated from above.
The ambient lighting* cannot be switched off manually.
Page 151 of 313

149
Seats and storage compartments
Using the cigarette lighter
– Press in the cigarette lighter button.
– Wait for the lighter to pop out slightly.
– Pull out the cigarette lighter immediately.
– Use the glowing heater element of the cigarette lighter to light
your cigarette.
– Put the cigarette lighter back in its socket.
Operating the socket
– Take out the cigarette lighter.
– Insert the plug of the electrical appliance into the cigarette
lighter socket.
The cigarette lighter ⇒ fig. 124 employs a standard 12 volt socket, which can also be used as a power source for electrical appliances. The applian-
ces connected to the socket must not exceed a power rating of 100 W.
WARNING
● Be careful when using the electric cigarette lighter. Carelessness or
negligence when using the cigarette lighter can cause burns.
● The lighter will only work when the ignition is switched on.
● The electrical sockets and, therefore, any appliances connected to
them will only work when the ignition is switched on.
CAUTION
Always use the correct type of plugs to avoid damaging the sockets.
Note
The use of electrical appliances with the engine switched off will cause a
battery discharge.
Power socket*
Electrical equipment can be connected to the 12 volt socket.
Fig. 125 Detailed view of
the side trim in the lug-
gage compartment: 12
volt socket
– Lift the power socket cover ⇒ fig. 125.
– Insert the plug of the electrical appliance into the socket.
Electrical equipment can be connected to the 12 volt socket. The appliances
connected to the socket must not exceed a power rating of 100 W.
Safety FirstOperating InstructionsPractical TipsTechnical Specifications
Page 152 of 313
150Seats and storage compartments
WARNING
The electrical sockets and, therefore, any appliances connected to them
will only work when the ignition is switched on.
CAUTION
Always use the correct type of plugs to avoid damaging the sockets.
Note
The use of electrical appliances with the engine switched off will cause a
battery discharge.
230 volt socket for Europlug*
Electrical equipment can also be connected to the 230 volt
socket in the centre console.
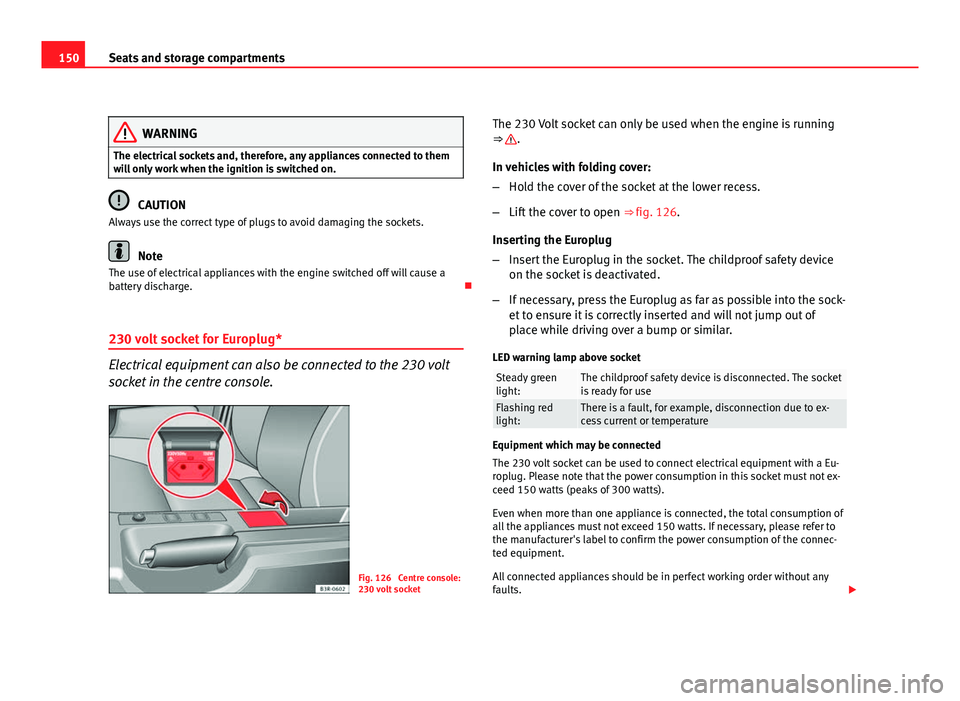
Fig. 126 Centre console:
230 volt socket The 230 Volt socket can only be used when the engine is running
⇒
.
In vehicles with folding cover:
– Hold the cover of the socket at the lower recess.
– Lift the cover to open ⇒ fig. 126.
Inserting the Europlug
– Insert the Europlug in the socket. The childproof safety device
on the socket is deactivated.
– If necessary, press the Europlug as far as possible into the sock-
et to ensure it is correctly inserted and will not jump out of
place while driving over a bump or similar.
LED warning lamp above socket
Steady green
light:The childproof safety device is disconnected. The socket
is ready for use
Flashing red
light:There is a fault, for example, disconnection due to ex-
cess current or temperature
Equipment which may be connected
The 230 volt socket can be used to connect electrical equipment with a Eu-
roplug. Please note that the power consumption in this socket must not ex-
ceed 150 watts (peaks of 300 watts).
Even when more than one appliance is connected, the total consumption of
all the appliances must not exceed 150 watts. If necessary, please refer to
the manufacturer's label to confirm the power consumption of the connec-
ted equipment.
All connected appliances should be in perfect working order without any
faults.
Page 169 of 313

167
Driving
Position 1
The ignition key is inserted in this position. To
engage the steering wheel
lock, take out the key and turn the wheel until you hear the pin engage. You
should always engage the steering lock when you leave the vehicle. This
will help to deter thefts ⇒
.
Switching on the ignition/pre-heating glow plugs 2
If the key is difficult to turn in the lock, move the steering wheel (to take the
load off the steering lock mechanism) until the key turns freely. In the case
of vehicles with a diesel engine, the key is turned to this position to preheat
the glow plugs.
Starting the engine 3
The engine is started in this position. Electrical components with a high
power consumption are switched off temporarily.
After the engine has started, the ignition key returns to position 2
by itself.
The ignition key has to be turned back to position 1
before re-starting the
engine. The starter inhibitor in the ignition lock prevents the starter motor
from engaging when the engine is running, as this could cause damage.
Switching off the ignition 1
Turn the ignition key to this position.
WARNING
● Never remove the ignition key until the vehicle is stationary! Other-
wise the steering lock could engage suddenly, which could cause an acci-
dent.
● Always take the key with you when leaving the vehicle, even if you
only intend to be gone for a short time. This is particularly important if
there are children in the vehicle, as they might otherwise be able to start
the engine or use power-operated equipment (e.g. the electric windows),
which could cause injuries.
Note
● If the battery has been disconnected and then reconnected, it will be
necessary to leave the key in position 2
for about 5 seconds before start-
ing the engine.
● Vehicles with automatic gearbox: After switching off the ignition, you
can only remove the ignition key if the selector lever is in position “P” (park-
ing lock). The selector lever is locked after the ignition key has been re-
moved.
Starting and stopping the engine Starting the engine
The engine can only be started with an original SEAT key.
Fig. 137 Ignition key po-
sitions
Safety FirstOperating InstructionsPractical TipsTechnical Specifications
Page 223 of 313

221
Checking and refilling levels
Opening the bonnet
Fig. 165 Release catch
under the bonnet
Before opening the bonnet make sure that the windscreen wiper
arms are not lifted away from the glass. Otherwise the paint may
be damaged.
– Lift the bonnet slightly ⇒
.
– Press the release catch under the bonnet upwards ⇒ fig. 165.
This will release the arrester hook under the bonnet.
– Open the bonnet.
The bonnet is held in position by a gas-filled strut.
WARNING
Never open the bonnet if you see steam or drips of coolant being re-
leased from the engine compartment. Failure to comply could result in
burns. Wait until no steam or coolant can be seen before opening the
bonnet.
Work in the engine compartment
Extra caution is necessary when working on components in
the engine compartment.
Always be aware of the danger of injury and scalding as well as the risk of
accident or even fire when working in the engine compartment (e.g. when
checking and refilling fluids). Always observe the warnings listed below
and follow all general safety precautions. The engine compartment of the
vehicle is a potentially hazardous area ⇒
WARNING
● Switch the engine off.
● Remove the ignition key.
● Apply the handbrake firmly.
● If your vehicle is equipped with a manual gearbox, place the gear lev-
er in neutral. If you are driving an automatic vehicle, place the selector
lever in position P.
● Wait for the engine to cool down.
● Children should not be allowed to approach the engine compartment.
● Never spill liquids used for vehicle operation on the engine compart-
ment, as these may catch fire (e.g. coolant).
● Take care not to cause short circuits in the electrical system, especial-
ly when working on the battery.
● Never touch the radiator fan while the engine is hot, as the fan could
start up suddenly.
● Never open the expansion tank when the engine is hot. The cooling
system is under pressure.
● Protect face, hands and arms from any hot steam or hot coolant fluid
released by covering the cap with a large, thick rag when opening the ex-
pansion tank.
Safety FirstOperating InstructionsPractical TipsTechnical Specifications
Page 224 of 313
222Checking and refilling levels
WARNING (Continued)
● If any tests have to be performed with the engine running, there is an
added safety risk from the rotating parts (e.g. drive belts, alternator, ra-
diator fan, etc.) and from the high-voltage ignition system.
● Observe the following additional warnings if work on the fuel system
or the electrical system is necessary:
–Always disconnect the battery.
– Do not smoke.
– Never work near open flames.
– Always keep an approved fire extinguisher immediately available.
CAUTION
When topping up fluids, make sure the correct fluid is put into the correct
filler opening. This can otherwise cause serious malfunctions or engine
damage.
For the sake of the environment
Inspect the ground underneath your vehicle regularly so that any leaks are
detected at an early stage. If you find spots of oil or other fluids, have your
vehicle inspected at the workshop.
● When the external temperature and level of humidity are high or when
the engine stops, it is possible for water to drop from the air conditioning
system evaporator potentially forming a small puddle on the ground. This is
normal and does not indicate a leak.
Note
On right-hand drive vehicles some of the reservoirs mentioned below are lo-
cated on the other side of the engine compartment. Closing the bonnet
–
To close the bonnet, push it down until it overcomes the spring
pressure.
– Let the bonnet engage in the locking part. Do not force it ⇒
.
WARNING
● For safety reasons the bonnet must always be completely closed
when the vehicle is moving. After closing it always check that it is proper-
ly secured. The bonnet must be flush with the adjacent body panels.
● Should you notice that the bonnet is not safely secured when the ve-
hicle is moving, stop the vehicle immediately and close the bonnet. Fail-
ure to do so could result in an accident.
Engine oil General notes
The engine comes with a special, high quality, multi grade oil that can be
used in all seasons of the year except for those regions affected by extreme
cold.
As the use of good quality oil is necessary for the correct operation and long
service life of the engine, when it becomes necessary to replenish or
change the oil, always use an oil that complies to the VW standards.
The specifications (VW standards) set out in the following page should ap-
pear on the container of the service oil; when the container displays the
specific standards for petrol and diesel engines together, it means that the
oil can be used for both types of engines.