ESP Seat Exeo 2011 Repair Manual
[x] Cancel search | Manufacturer: SEAT, Model Year: 2011, Model line: Exeo, Model: Seat Exeo 2011Pages: 313, PDF Size: 5.02 MB
Page 242 of 313
240Wheels and tyres
Wheel balance
The wheels on new vehicles are balanced. However, various factors encoun-
tered in normal driving can cause them to become unbalanced, which re-
sults in steering vibration.
Unbalanced wheels should be rebalanced, as they otherwise cause exces-
sive wear on steering, suspension and tyres. A wheel must also be reba-
lanced when a new tyre is fitted.
Incorrect wheel alignment
Incorrect wheel alignment causes excessive tyre wear, impairing the safety
of the vehicle. If tyres show excessive wear, you should have the wheel
alignment checked by an Authorised Service Centre.
WARNING
There is a serious danger of accidents if a tyre bursts during driving!
● The tyres must be replaced at the latest when the tread wear indica-
tors are worn ⇒ page 239. Failure to do so could result in an accident.
Worn tyres do not grip well at high speeds on wet roads. There is also a
greater risk of aquaplaning.
● At continuously high speeds, a tyre with insufficient pressure flexes
more. This causes it to overheat. This can cause tread separation and tyre
blow-out. Risk of accident. Always observe the recommended tyre pres-
sures.
● If tyres show excessive wear, you should have the running gear
checked by an Authorised Service Centre.
● Keep chemicals such as oil, fuel and brake fluid away from tyres.
● Damaged wheels and tyres must be replaced immediately!
For the sake of the environment
Under-inflated tyres will increase fuel consumption. Run-flat tyres*
Run-flat tyres allow you to continue driving even with a
punctured tyre, in the majority of cases.
In vehicles that are factory-fitted with run-flat tyres 1)
the loss of tyre
pressure is indicated on the instrument panel.
Driving with run-flat tyres (emergency running)
– Leave the ESP/TCS (Electronic Stability Programme) switched
on, or switch on ⇒ page 68.
– Continue driving carefully and slowly (80 km/h maximum).
– Avoid sudden manoeuvres and sharp turns.
– Avoid driving over obstacles (for example kerbs) or potholes.
– Look out for the ESP/TCS intervening often, smoke coming from
the tyres or the smell of rubber, the vehicle vibrating or a clat-
tering noise. If any of these occur, stop the vehicle.
The run-flat tyres have a tag on the side of the tyre, with the description:
“DSST”, “Eufonia”, “RFT”, “ROF”, “RSC”, “SSR” or “ZP”.
The sides of this type of tyre are reinforced. When the tyres lose air they are
supported on the sides (emergency driving).
The loss of pressure in the tyre is shown on the instrument panel. You can
then drive a maximum of 80 km and if the circumstances are favourable (for
example, low load), even more.
The damaged tyre should be changed as soon as possible. The rim should
be checked in a specialist workshop to detect possible damage and replace
1)
Depending upon version and country.
Page 243 of 313
241
Wheels and tyres
it if necessary. We recommend you contact Technical Service. If more than
one tyre is being used under emergency conditions, this reduces the dis-
tance which can be travelled.
Starting driving in emergency conditions
When loss in tyre pressure is displayed on the instrument panel, this means
that at least one tyre is being driven in emergency conditions ⇒
.
End of emergency operation
Do not drive on if:
● smoke is coming from one of the tyres,
● there is a smell of rubber,
● the vehicle vibrates,
● there is a rattling noise.
When is it no longer possible to continue driving even using run-flat tyres?
● If the Electronic Stability Programme (ESP) is out of operation.
● If the tyre pressure monitoring system* does not work.
● If one of the tyres has been severely damaged in an accident, etc. If a
tyre has been badly damaged there is a risk that parts of the tread can be
thrown off and cause damage to the fuel lines, brake pipes or fuel filler.
● It is also advisable to stop driving if severe vibrations occur, or if the
wheel starts overheating and gives off smoke.
WARNING
When driving in emergency conditions, the driving quality of the vehicle
is considerably impaired.
● The maximum permitted speed of 80 km/h is subject to road and
weather conditions. Please observe legal requirements when doing so.
● Avoid sharp turns and rapid manoeuvres, and brake earlier than usu-
al.
WARNING (Continued)
● Avoid driving over obstacles (for example kerbs) or potholes.
● If one or more tyres are being driven in emergency conditions, the
driving quality of the vehicle is impaired and there is a risk of accident.
Note
● The run-flat tyres do not “deflate” on losing pressure because they are
supported on the reinforced sides. Therefore defects in the tyre cannot be
detected with a visual inspection.
● Snow chains must not be used on front tyres used in emergency condi-
tions.
New tyres and wheels
New tyres and wheels have to be run in.
The tyres and wheel rims are an essential part of the vehicle's design. The
tyres and rims approved by SEAT are specially matched to the characteris-
tics of the vehicle and make a major contribution to good road holding and
safe handling ⇒
.
Tyres should be replaced at least in pairs and not individually (i.e. both front
tyres or both rear tyres together). A knowledge of tyre designations makes it
easier to choose the correct tyres. Radial tyres have the tyre designations
marked on the sidewall, for example: 195/65 R15 91T
This contains the following information: Tyre width in mm
Height/width ratio in %
Tyre construction: Radial
195
65
R
Safety FirstOperating InstructionsPractical TipsTechnical Specifications
Page 258 of 313

256If and when
Fuses
Changing fuses
If a fuse has blown, it must be replaced.
Fig. 185 Left side of
dash panel: Fuse box cov-
er
Fig. 186 Schematic
drawing of fuse box at
the left-hand end of dash
panel: Fuses (without
fuse cover) –
Switch off the ignition and its failed electrical component.
– Remove the fuse cover using a screwdriver ⇒ fig. 185.
– Identify the fuse corresponding to the damaged electric con-
sumer ⇒ page 257, Fuse assignment.
– Take the plastic clip from inside the fuse cover, fit it onto the
blown fuse, and pull the fuse out.
– Replace the blown fuse (which will have a melted metal strip)
with a new fuse of the same amp rating.
– Fit the fuse cover back on.
The individual electrical circuits are protected by fuses. The fuses are loca-
ted behind a cover at the left-hand end of the dash panel.
Two spare fuses and a sticker identifying the fuses are provided on the in-
side of the fuse cover. There is also a crank handle for operating the sun-
roof* by hand (if the electrical system fails).
CAUTION
Never “repair” damaged fuses and never replace them with fuses with a
higher rating. Failure to comply could result in fire. It could also cause dam-
age to other parts of the electrical system.
Note
If a newly replaced fuse blows again after a short time, the electrical system
must be checked by a qualified workshop as soon as possible.
Page 259 of 313
257
If and when
Fuse assignment
This list shows the fuses which can be replaced relatively
easily by the owner.
No.ConsumerAmps1Air conditioner102Footwell lamps53Heated washer jets54Radiator fan55Parking aid, automatic gearbox106Air conditioner (air purity sensor), pressure sensor5
7Electronic Stability Programme (ESP), brake light
switch, clutch pedal switch, steering angle sensor10
8Telephone59Vacant 10Adaptive headlights right5
11Airbag and disconnection of the front passenger air-
bag5
12Diagnostic socket1013Steering column unit1014Brake lights1015Instrument panel1016Vacant 17Tyre pressure control, rain/light sensor1018Adaptive headlights left519Vacant 20Vacant 21Vacant 22Driver door / front passenger door1523Rear doors15
No.ConsumerAmps24Central electrics unit for convenience equipment2025Heater blower3026Rear window heater3027Power socket for trailer (control unit)3028Fuel pump, auxiliary pump for diesel2029Vacant 30Sliding/tilting sunroof20
31Diagnosis connection, automatic anti-dazzle interior
mirror, reverse light, automatic gearbox15
32Towing socket1533Lighter2034Lambda probe heater1035Luggage compartment power socket*2036Wiper system30
37Pump for windscreen washer and headlight washer
system30
38Luggage compartment illumination, alarm1539Radio, Amplifier2040Horn2541230 volt socket3042Electronic Stability Programme (ESP)2543Engine management1544Seat heating35
Some of the electrical items listed in the table are only fitted on certain
models or are optional extras.
The electric windows and electric seat adjusters are protected by circuit
breakers. These reset automatically after a few seconds when the overload
(caused for example by frozen windows) has been corrected.
Safety FirstOperating InstructionsPractical TipsTechnical Specifications
Page 261 of 313

259
If and when
Changing bulbs. Halogen headlights Types of bulbs
You must only replace a bulb with a bulb of the same type. The name can be
found on the base of the bulb holder.
BulbTypeDipped beam headlights (halogen)12 V/55 W (H7 LL)Main beam headlights12 V/55 W (H1)Turn signal12 V/21 W (PY21W)Side lights12 V/5 W (W5W LL)
WARNING
● Take particular care when working on components in the engine com-
partment if the engine is warm - risk of burns!
● Bulbs are highly sensitive to pressure. The glass can break when you
touch the bulb, causing injury.
● The high voltage element of gas discharge bulbs* (xenon light) must
be handled correctly. Otherwise, there is a risk of death.
● When changing bulbs, please take care not to injure yourself on sharp
parts in the headlight housing.
CAUTION
● Remove the ignition key before working on the electric system. If not, a
short circuit could occur.
● Switch off the lights or parking lights before you change a bulb.
For the sake of the environment
Please ask your specialist retailer how to dispose of used bulbs in the prop-
er manner.
Note
● Depending on weather conditions (cold or wet), the front lights, the fog
lights, the tail lights and the turn signals may be temporarily misted. This
has no influence on the useful life of the lighting system. By switching on
the lights, the area through which the beam of light is projected will quickly
be demisted. However, the edges may continue to be misted.
● Please check at regular intervals that all lighting (especially the exterior
lighting) on your vehicle is functioning properly. This is not only in the inter-
est of your own safety, but also in that of all other road users.
● Before changing a bulb, make sure you have the correct new bulb.
● Do not touch the glass part of the bulb with your bare hands, use a cloth
or paper towel instead. Otherwise, the fingerprints left on the glass will va-
porise as a result of the heat generated by the bulb, be deposited on the
reflector and impair its surface.
Safety FirstOperating InstructionsPractical TipsTechnical Specifications
Page 268 of 313

266If and when
● Main headlight lamps: Xenon ⇒
lights.
● Sources of the DRL (daylight) light unit and position.
WARNING
● Take particular care when working on components in the engine com-
partment if the engine is warm - risk of burns!
● Bulbs are highly sensitive to pressure. The glass can break when you
touch the bulb, causing injury.
● The high voltage element of gas discharge bulbs* (xenon light) must
be handled correctly. Otherwise, there is a risk of death.
● When changing bulbs, please take care not to injure yourself on sharp
parts in the headlight housing.
CAUTION
● Remove the ignition key before working on the electric system. If not, a
short circuit could occur.
● Switch off the lights or parking lights before you change a bulb.
For the sake of the environment
Please ask your specialist retailer how to dispose of used bulbs in the prop-
er manner.
Note
● Depending on weather conditions (cold or wet), the front lights, the fog
lights, the tail lights and the turn signals may be temporarily misted. This
has no influence on the useful life of the lighting system. By switching on
the lights, the area through which the beam of light is projected will quickly
be demisted. However, the edges may continue to be misted.
● Please check at regular intervals that all lighting (especially the exterior
lighting) on your vehicle is functioning properly. This is not only in the inter-
est of your own safety, but also in that of all other road users. ●
Before changing a bulb, make sure you have the correct new bulb.
● Do not touch the glass part of the bulb with your bare hands, use a cloth
or paper towel instead. Otherwise, the fingerprints left on the glass will va-
porise as a result of the heat generated by the bulb, be deposited on the
reflector and impair its surface.
Removing the air duct
The air duct has to be removed to gain access to the bulbs
for the right-side headlight.
Fig. 199 Air duct on
right side of vehicle
– Unscrew bolts A
⇒ fig. 199.
– Detach air duct from guide B
and take it out.
Page 285 of 313

283
If and when
Towing and tow-starting
Tow-starting
The use of jump leads is preferable to tow-starting.
We recommend that you do not tow-start your vehicle. Jump-start-
ing is preferable ⇒ page 280.
However, if your vehicle has to be tow-started:
– Engage the 2nd or the 3rd gear.
– Keep the clutch pressed down.
– Switch the ignition on.
– Once both vehicles are moving, release the clutch.
– As soon as the engine starts, press the clutch and move the
gear lever into neutral. This helps to prevent driving into the
towing vehicle.
WARNING
The risk of accidents is high when tow-starting. The vehicle being towed
can easily collide with the towing vehicle.
CAUTION
When tow-starting, fuel could enter the catalytic converter and damage it. General notes
Please observe the following points if you use a tow-rope:
Notes for the driver of the towing vehicle
–
Drive slowly at first until the tow-rope is taut. Then accelerate
gradually.
– Begin and change gears cautiously. If you are driving an auto-
matic vehicle, accelerate gently.
– Remember that the brake servo and power steering are not
working in the vehicle you are towing. Brake sooner than nor-
mal and pressing the pedal gently.
Notes for the driver of the towed vehicle
– Ensure that the tow-rope remains taut at all times when towing.
Tow-rope or tow-bar
It is easier and safer to tow a vehicle with a tow-bar. You should only use a
tow-rope if you do not have a tow-bar.
A tow-rope should be slightly elastic to reduce the loading on both vehicles.
It is advisable to use a tow-rope made of synthetic fibre or similarly elastic
material.
Attach the tow-rope or the tow-bar only to the towing eyes provided or a
towing bracket.
Driving style
Towing requires some experience, especially when using a tow-rope. Both
drivers should be familiar with the technique required for towing. Inexper-
ienced drivers should not attempt to tow.
Safety FirstOperating InstructionsPractical TipsTechnical Specifications
Page 291 of 313
289
Description of specifications
Drawbar load
The maximum permitted drawbar load on the ball joint of the towing bracket
must not exceed 75 kg.
In the interest of road safety, we recommend that you always tow approach-
ing the maximum drawbar load. The response of the trailer on the road will
be poor if the drawbar load is too small.
If the maximum permissible drawbar load cannot be met (e.g. with small,
empty and light-weight single axle trailers or tandem axle trailers with a
wheelbase of less than 1 metre), a minimum of 4% of the actual trailer
weight is legally required for the drawbar load.
WARNING
● For safety reasons, do not exceed the 80 km/h limit. This is also valid
in countries where higher speeds are permitted.
● Never exceed the maximum trailer weights or the drawbar load. If the
permissible axle load or the permissible total weight is exceeded, the
driving characteristics of the vehicle may change, leading to accidents,
injuries and damage to the vehicle.
Wheels
Tyre pressure, snow chains, wheel bolts
Tyre pressures
The sticker with the tyre pressure values can be found on the inside of the
tank flap. The tyre pressure values given there are for cold tyres. The slightly
raised pressures of warm tyres must not be reduced. ⇒
Snow chains
Snow chains may be fitted only to the front wheels. Consult the chapter “wheels” of this manual.
Wheel bolts
After the wheels have been changed, the
tightening torque of the wheel
bolts should be checked as soon as possible with a torque wrench ⇒
.
The tightening torque for steel and alloy wheels is 120 Nm.
WARNING
● Check the tyre pressure at least once per month. Checking the tyre
pressure is very important. If the tyre pressure is too high or too low,
there is an increased danger of accidents, particularly at high speeds.
● If the torque of the wheel bolts is too low, they could loosen while the
vehicle is in motion. Risk of accident! If the tightening torque is too high,
the wheel bolts and threads can be damaged.
Note
We recommend that you ask your Authorised Service Centre for information
about appropriate wheel, tyre and snow chain size.
Safety FirstOperating InstructionsPractical TipsTechnical Specifications
Page 306 of 313
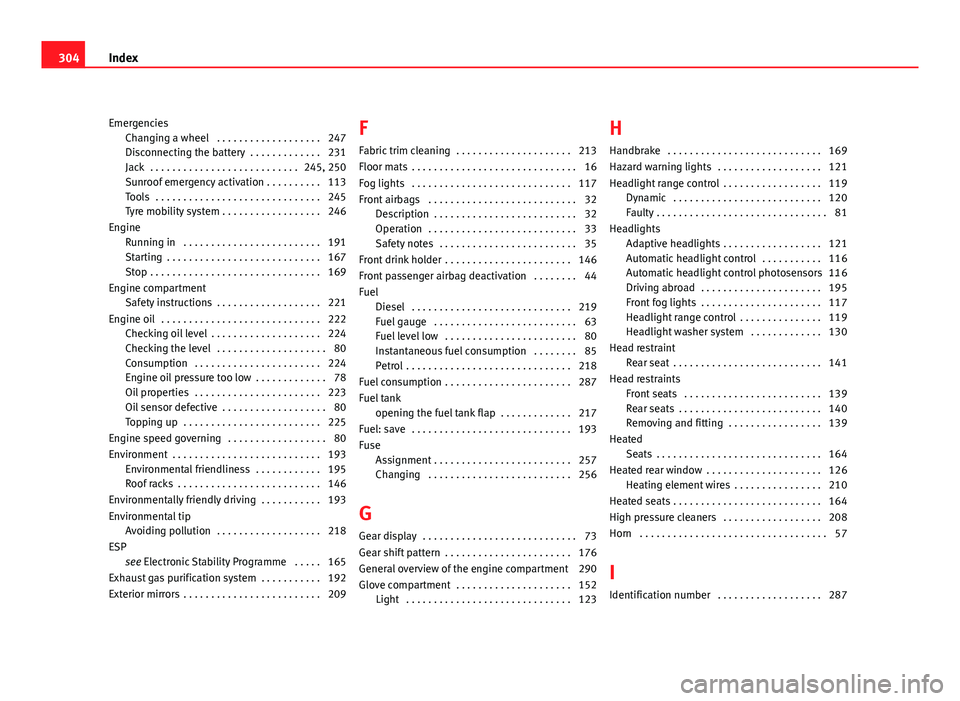
EmergenciesChanging a wheel . . . . . . . . . . . . . . . . . . . 247
Disconnecting the battery . . . . . . . . . . . . . 231
Jack . . . . . . . . . . . . . . . . . . . . . . . . . . . 245, 250
Sunroof emergency activation . . . . . . . . . . 113
Tools . . . . . . . . . . . . . . . . . . . . . . . . . . . . . . 245
Tyre mobility system . . . . . . . . . . . . . . . . . . 246
Engine Running in . . . . . . . . . . . . . . . . . . . . . . . . . 191
Starting . . . . . . . . . . . . . . . . . . . . . . . . . . . . 167
Stop . . . . . . . . . . . . . . . . . . . . . . . . . . . . . . . 169
Engine compartment Safety instructions . . . . . . . . . . . . . . . . . . . 221
Engine oil . . . . . . . . . . . . . . . . . . . . . . . . . . . . . 222 Checking oil level . . . . . . . . . . . . . . . . . . . . 224
Checking the level . . . . . . . . . . . . . . . . . . . . 80
Consumption . . . . . . . . . . . . . . . . . . . . . . . 224
Engine oil pressure too low . . . . . . . . . . . . . 78
Oil properties . . . . . . . . . . . . . . . . . . . . . . . 223
Oil sensor defective . . . . . . . . . . . . . . . . . . . 80
Topping up . . . . . . . . . . . . . . . . . . . . . . . . . 225
Engine speed governing . . . . . . . . . . . . . . . . . . 80
Environment . . . . . . . . . . . . . . . . . . . . . . . . . . . 193 Environmental friendliness . . . . . . . . . . . . 195
Roof racks . . . . . . . . . . . . . . . . . . . . . . . . . . 146
Environmentally friendly driving . . . . . . . . . . . 193
Environmental tip Avoiding pollution . . . . . . . . . . . . . . . . . . . 218
ESP see Electronic Stability Programme . . . . . 165
Exhaust gas purification system . . . . . . . . . . . 192
Exterior mirrors . . . . . . . . . . . . . . . . . . . . . . . . . 209 F
Fabric trim cleaning . . . . . . . . . . . . . . . . . . . . . 213
Floor mats . . . . . . . . . . . . . . . . . . . . . . . . . . . . . . 16
Fog lights . . . . . . . . . . . . . . . . . . . . . . . . . . . . . 117
Front airbags . . . . . . . . . . . . . . . . . . . . . . . . . . . 32 Description . . . . . . . . . . . . . . . . . . . . . . . . . . 32
Operation . . . . . . . . . . . . . . . . . . . . . . . . . . . 33
Safety notes . . . . . . . . . . . . . . . . . . . . . . . . . 35
Front drink holder . . . . . . . . . . . . . . . . . . . . . . . 146
Front passenger airbag deactivation . . . . . . . . 44
Fuel Diesel . . . . . . . . . . . . . . . . . . . . . . . . . . . . . 219
Fuel gauge . . . . . . . . . . . . . . . . . . . . . . . . . . 63
Fuel level low . . . . . . . . . . . . . . . . . . . . . . . . 80
Instantaneous fuel consumption . . . . . . . . 85
Petrol . . . . . . . . . . . . . . . . . . . . . . . . . . . . . . 218
Fuel consumption . . . . . . . . . . . . . . . . . . . . . . . 287
Fuel tank opening the fuel tank flap . . . . . . . . . . . . . 217
Fuel: save . . . . . . . . . . . . . . . . . . . . . . . . . . . . . 193
Fuse Assignment . . . . . . . . . . . . . . . . . . . . . . . . . 257
Changing . . . . . . . . . . . . . . . . . . . . . . . . . . 256
G
Gear display . . . . . . . . . . . . . . . . . . . . . . . . . . . . 73
Gear shift pattern . . . . . . . . . . . . . . . . . . . . . . . 176
General overview of the engine compartment 290
Glove compartment . . . . . . . . . . . . . . . . . . . . . 152 Light . . . . . . . . . . . . . . . . . . . . . . . . . . . . . . 123 H
Handbrake . . . . . . . . . . . . . . . . . . . . . . . . . . . . 169
Hazard warning lights . . . . . . . . . . . . . . . . . . . 121
Headlight range control . . . . . . . . . . . . . . . . . . 119 Dynamic . . . . . . . . . . . . . . . . . . . . . . . . . . . 120
Faulty . . . . . . . . . . . . . . . . . . . . . . . . . . . . . . . 81
Headlights Adaptive headlights . . . . . . . . . . . . . . . . . . 121
Automatic headlight control . . . . . . . . . . . 116
Automatic headlight control photosensors . .116
Driving abroad . . . . . . . . . . . . . . . . . . . . . . 195
Front fog lights . . . . . . . . . . . . . . . . . . . . . . 117
Headlight range control . . . . . . . . . . . . . . . 119
Headlight washer system . . . . . . . . . . . . . 130
Head restraint Rear seat . . . . . . . . . . . . . . . . . . . . . . . . . . . 141
Head restraints Front seats . . . . . . . . . . . . . . . . . . . . . . . . . 139
Rear seats . . . . . . . . . . . . . . . . . . . . . . . . . . 140
Removing and fitting . . . . . . . . . . . . . . . . . 139
Heated Seats . . . . . . . . . . . . . . . . . . . . . . . . . . . . . . 164
Heated rear window . . . . . . . . . . . . . . . . . . . . . 126 Heating element wires . . . . . . . . . . . . . . . . 210
Heated seats . . . . . . . . . . . . . . . . . . . . . . . . . . . 164
High pressure cleaners . . . . . . . . . . . . . . . . . . 208
Horn . . . . . . . . . . . . . . . . . . . . . . . . . . . . . . . . . . 57
I
Identification number . . . . . . . . . . . . . . . . . . . 287
304 Index