sensor Seat Exeo 2011 Owner's manual
[x] Cancel search | Manufacturer: SEAT, Model Year: 2011, Model line: Exeo, Model: Seat Exeo 2011Pages: 313, PDF Size: 5.02 MB
Page 29 of 313

27
Seat belts
WARNING
● An incorrectly worn seat belt increases the risk of severe injuries.
● Before every trip, instruct your passengers to adjust their seat belts
properly and to wear them for the whole journey.
● Read and always observe information and warnings concerning the
use of seat belts ⇒ page 21.
Seat belt tensioners
Function of the seat belt tensioner
During a frontal collision, the seat belts on the front seats
are retracted automatically. The seat belts for the front occupants are equipped with belt tensioners.
Sensors will trigger the belt tensioners during severe head-on, lateral and
rear collisions only if the seat belt is being worn. This retracts and tightens
the seat belts, reducing the forward motion of the occupants.
The seat belt tensioner can be triggered only once.
The seat belt tensioners will not be triggered in the event of a light frontal,
side or rear collision, if the vehicle overturns or in situations where no large
forces act on the front, side or rear of the vehicle.
Note
● If the seat belt tensioners are triggered, a fine dust is produced. This is
normal and it is not an indication of fire in the vehicle.
● The relevant safety requirements must be observed when the vehicle or
components of the system are scrapped. Specialised workshops are famili-
ar with these regulations, which are also available to you. Service and disposal of belt tensioners
The belt tensioners are components of the seat belts that are installed in
the seats of your vehicle. If you work on the belt tensioners or remove and
install parts of the system when performing other repair work, the seat belt
may be damaged. The consequence may be that, in the event of an acci-
dent, the belt tensioners function incorrectly or not at all.
So that the effectiveness of the seat belt tensioner is not reduced and that
removed parts do not cause any injuries or environmental pollution, regula-
tions, which are known to the specialised workshops, must be observed.
WARNING
● Improper use or repairs not carried out by qualified mechanics in-
crease the risk of severe or fatal injuries. The belt tensioners may fail to
trigger or may trigger in the wrong circumstances.
● Never attempt to repair, adjust, remove or install parts of the belt ten-
sioners or seat belts.
● The seat belt tensioner, seat belt and automatic retractor cannot be
repaired.
● Any work on the belt tensioners and seat belts, including the removal
and refitting of system parts in conjunction with other repair work, must
be performed by a specialised workshop only.
● The belt tensioners will only provide protection for one accident and
must be changed if they have been activated.
Safety FirstOperating InstructionsPractical TipsTechnical Specifications
Page 40 of 313
38Airbag system
Side airbags*
Description of side airbags
The airbag system is not a substitute for the seat belts.
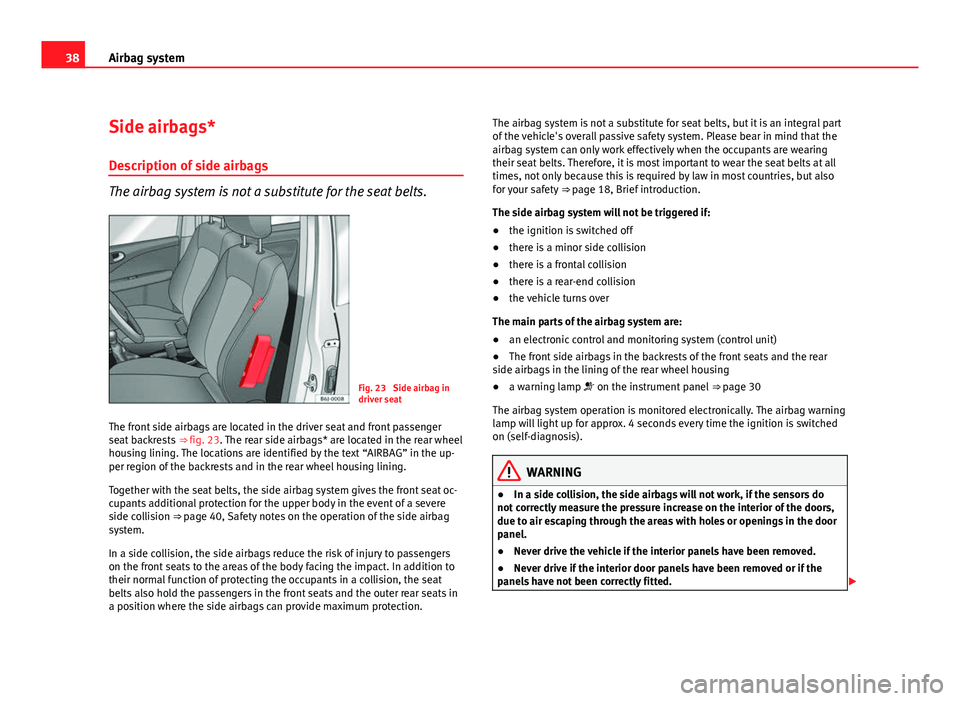
Fig. 23 Side airbag in
driver seat
The front side airbags are located in the driver seat and front passenger
seat backrests ⇒ fig. 23. The rear side airbags* are located in the rear wheel
housing lining. The locations are identified by the text “AIRBAG” in the up-
per region of the backrests and in the rear wheel housing lining.
Together with the seat belts, the side airbag system gives the front seat oc-
cupants additional protection for the upper body in the event of a severe
side collision ⇒ page 40, Safety notes on the operation of the side airbag system.
In a side collision, the side airbags reduce the risk of injury to passengers
on the front seats to the areas of the body facing the impact. In addition to
their normal function of protecting the occupants in a collision, the seat
belts also hold the passengers in the front seats and the outer rear seats in
a position where the side airbags can provide maximum protection. The airbag system is not a substitute for seat belts, but it is an integral part
of the vehicle's overall passive safety system. Please bear in mind that the
airbag system can only work effectively when the occupants are wearing
their seat belts. Therefore, it is most important to wear the seat belts at all
times, not only because this is required by law in most countries, but also
for your safety
⇒ page 18, Brief introduction.
The side airbag system will not be triggered if:
● the ignition is switched off
● there is a minor side collision
● there is a frontal collision
● there is a rear-end collision
● the vehicle turns over
The main parts of the airbag system are:
● an electronic control and monitoring system (control unit)
● The front side airbags in the backrests of the front seats and the rear
side airbags in the lining of the rear wheel housing
● a warning lamp on the instrument panel ⇒ page 30
The airbag system operation is monitored electronically. The airbag warning
lamp will light up for approx. 4 seconds every time the ignition is switched
on (self-diagnosis).
WARNING
● In a side collision, the side airbags will not work, if the sensors do
not correctly measure the pressure increase on the interior of the doors,
due to air escaping through the areas with holes or openings in the door
panel.
● Never drive the vehicle if the interior panels have been removed.
● Never drive if the interior door panels have been removed or if the
panels have not been correctly fitted.
Page 42 of 313

40Airbag system
The special design of the airbag allows the controlled escape of the propel-
lant gas when an occupant puts pressure on the bag. Thus, the head and
chest are surrounded and protected by the airbag.
Safety notes on the operation of the side airbag system
If airbags are used correctly, they can considerably reduce
the risk of injury in side impact collisions.
WARNING
● If you do not wear a seat belt, if you lean forward, or are not seated
correctly while the vehicle is in motion, you are at a greater risk of injury
if the side airbag system is triggered in an accident.
● In order for the side airbags to provide their maximum protection, the
prescribed sitting position must always be maintained with seat belts
fastened while travelling.
● Occupants of the outer seats must never carry any objects or pets in
the deployment space between them and the airbags, or allow children
or other passengers to travel in this position. It is also important not to
attach any accessories (such as cup holders) to the doors. This would im-
pair the protection offered by the side airbags.
● The built-in coat hooks should be used only for lightweight clothing.
Do not leave any heavy or sharp-edged objects in the pockets.
● Great forces, such as hard blows or kicks, must not be exerted upon
the backrest bolster because the system may be damaged. In this case,
the side airbags would not be triggered.
● Under no circumstances should protective covers be fitted over seats
with side airbags unless the covers have been approved for use in your
vehicle. Because the airbag is triggered from the side of the backrest, the
WARNING (Continued)
use of non-approved seat covers would obstruct the side airbag, serious-
ly reducing the airbag's effectiveness ⇒ page 215, Accessories, parts re-
placement and modifications.
● Any damage to the original seat upholstery or around the seams of
the side airbag units must be repaired immediately by a specialised
workshop.
● The airbags provide protection for just one accident; replace them
once they have deployed.
● When children assume an incorrect sitting position, they expose
themselves to an increased risk of injury in the event of an accident. This
is particularly the case if the child is travelling on the front passenger
seat and the airbag system is triggered in an accident; this could have
critical consequences including serious injury or death ⇒ page 46,
Child safety.
● Any work on the side airbag system or removal and installation of the
airbag components for other repairs (such as removal of the front seat)
should only be performed by a specialised workshop. Otherwise, faults
may occur during the airbag system operation.
● Do not attempt to modify components of the airbag system in any
way.
● The side and head airbags are managed through sensors located in
the interior of the front doors. To ensure the correct functioning of the
side and head airbags neither the doors nor the door panels should be
modified in any way (e.g. fitting loudspeakers). If the front door is dam-
aged, the airbag system may not work correctly. All work carried out on
the front door must be made in a specialised workshop.
Page 45 of 313

43
Airbag system
WARNING (Continued)
● Any work on the curtain airbag system or removal and installation of
the airbag components for other repairs (such as removal of the roof lin-
ing) should only be performed by a specialised workshop. Otherwise,
faults may occur during the airbag system operation.
● Do not attempt to modify components of the airbag system in any
way.
● The side and head airbags are managed through sensors located in
the interior of the front doors. To ensure the correct functioning of the
side and head airbags neither the doors nor the door panels should be
modified in any way (e.g. fitting loudspeakers). If the front door is dam-
aged, the airbag system may not work correctly. All work carried out on
the front door must be made in a specialised workshop.
Safety FirstOperating InstructionsPractical TipsTechnical Specifications
Page 81 of 313
79
Cockpit
Engine oil level correct
If the symbol flashes and the engine oil level is correct, obtain profes-
sional assistance. Do not drive on! Do not continue to run the engine, even
at idle speed .
Note
The oil pressure warning lamp is not an indicator for the oil level. The oil
level should therefore be checked regularly, preferably every time you fill
the tank.
Yellow symbols
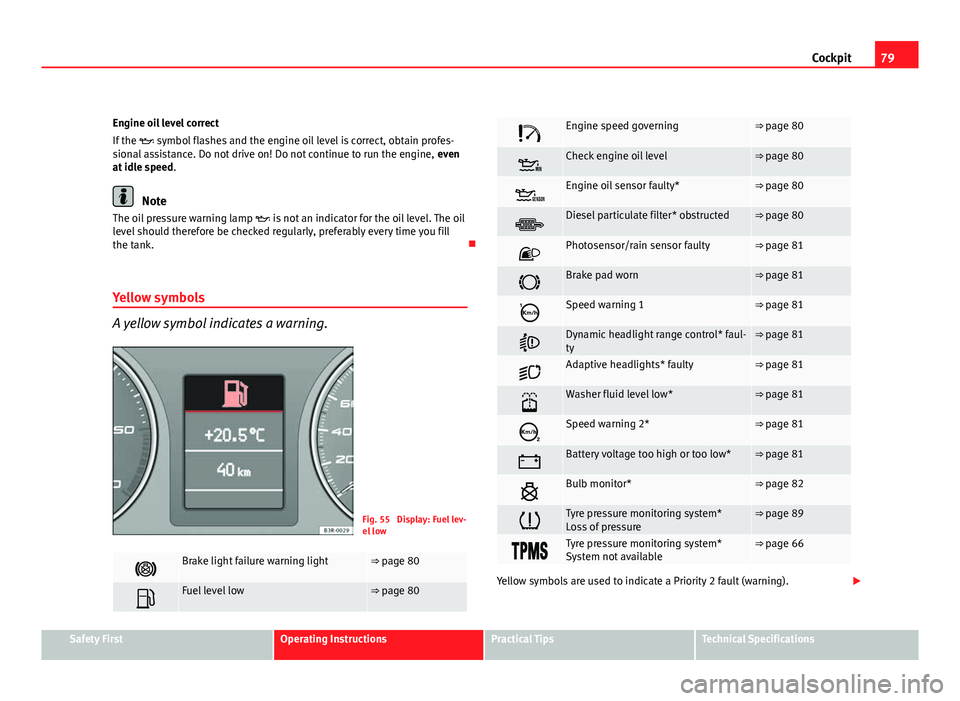
A yellow symbol indicates a warning.
Fig. 55 Display: Fuel lev-
el low
Brake light failure warning light⇒ page 80
Fuel level low⇒ page 80
Engine speed governing⇒ page 80
Check engine oil level⇒ page 80
Engine oil sensor faulty*⇒ page 80
Diesel particulate filter* obstructed⇒ page 80
Photosensor/rain sensor faulty⇒ page 81
Brake pad worn⇒ page 81
Speed warning 1⇒ page 81
Dynamic headlight range control* faul-
ty⇒ page 81
Adaptive headlights* faulty⇒ page 81
Washer fluid level low*⇒ page 81
Speed warning 2*⇒ page 81
Battery voltage too high or too low*⇒ page 81
Bulb monitor*⇒ page 82
Tyre pressure monitoring system*
Loss of pressure⇒ page 89
Tyre pressure monitoring system*
System not available⇒ page 66
Yellow symbols are used to indicate a Priority 2 fault (warning).
Safety FirstOperating InstructionsPractical TipsTechnical Specifications
Page 82 of 313
80Cockpit
Yellow symbols are accompanied by one warning buzzer. The function indi-
cated should be checked as soon as possible. If several Priority 2 faults are
detected at the same time, the symbols are displayed one after the other for
about 2 seconds at a time.
Brake light failure
This warning light will appear on the upper part of the display if any of the
brake lights has failed. A text message in the central part of the display indi-
cates which brake light has failed (left or right).
Fuel level low
When this symbol comes on for the first time, there are about 8 to 10 li-
tres of fuel left in the tank. You should fill up as soon as possible
⇒ page 217.
Engine speed governing
Max. engine speed XXXX rpm
There is a fault in the engine management. In addition, the warning lamp
on the instrument panel will light up. The engine speed will be governed to
the speed displayed in the driver information system. Please ensure that
the engine speed does not exceed the speed shown (for example, when
changing down a gear).
Take the vehicle to a qualified workshop immediately to have the fault re-
paired. Checking the engine oil level
If the symbol lights up, please check the engine oil level as soon as pos-
sible ⇒ page 224. Top up the oil at the next opportunity ⇒ page 225.
Engine oil sensor defective*
If the symbol lights up, take the vehicle to a qualified workshop and
have the oil level sensor checked. Until then it is advisable to check the oil
level every time you fill up with fuel ⇒ page 224.
Diesel particulate filter obstructed
If the symbol lights up, you can contribute towards automatic filter
cleaning by driving in the right manner. To do this, drive about 15 minutes
in 4th or 5th gear (automatic gearbox: S gear range) at a speed of 60 km/h,
with the engine running at approximately 2000 rpm. The increase in temper-
ature will burn off any soot in the filter. When cleaning is successful, the
symbol switches off.
If the symbol does not turn off, or the three lamps turn on (particulate
filter , emission control system fault and heaters ), take the vehicle
to a qualified workshop to repair the fault.
For further information on the diesel particulate filter, see ⇒ page 193.
WARNING
It is essential that you adjust your speed to suit the weather, road, ter-
rain and traffic conditions. The recommended driving speed must never
lead to the driver disregarding the traffic regulations.
Page 83 of 313
81
Cockpit
Photosensor/rain sensor faulty
Automatic headlights / automatic wipers faulty
If the symbol lights up, this means that the photosensor/rain sensor is
not working. For safety reasons, the dipped beam headlights will then be
switched on permanently when the light switch is set to the AUTO position.
However, you can still switch the lights on and off in the normal way with
the light switch. If the rain sensor is faulty, the functions operated via the
windscreen wiper lever will still be available. You should have the photosen-
sor/rain sensor checked by a specialised workshop as soon as possible.
Worn brake pads
If the symbol lights up, have the front brake pads (and, for safety rea-
sons, the rear pads as well) inspected by a specialised workshop.
Speed warning 1
If the symbol lights up, this means you are exceeding the speed that has
been pre-set with the speed warning function. You should reduce your
speed accordingly ⇒ page 82.
Headlight range control faulty
This symbol indicates a malfunction in the dynamic headlight range con-
trol. Take the vehicle to a qualified workshop to have the dynamic headlight
range control function repaired. Adaptive headlights* faulty
Adaptive headlights faulty
This symbol indicates that the adaptive headlight system is faulty. Take
the vehicle to a qualified workshop to have the headlights or the adaptive
headlight control unit repaired.
Washer fluid level low
If the symbol lights up, top up the fluid for the windscreen washer and
headlight washer system* ⇒ page 228.
Speed warning 2
If the symbol lights up, this means you are exceeding the speed that has
been pre-set. You should reduce your speed accordingly ⇒ page 82.
Battery voltage too high or too low
If the symbol lights up, take the vehicle to a qualified workshop and
have the following items checked:
● Poly V-belt
● Battery condition
It is also advisable to check whether the alternator warning lamp has come
on ⇒ page 69.
Safety FirstOperating InstructionsPractical TipsTechnical Specifications
Page 91 of 313
89
Cockpit
Controlling the menu
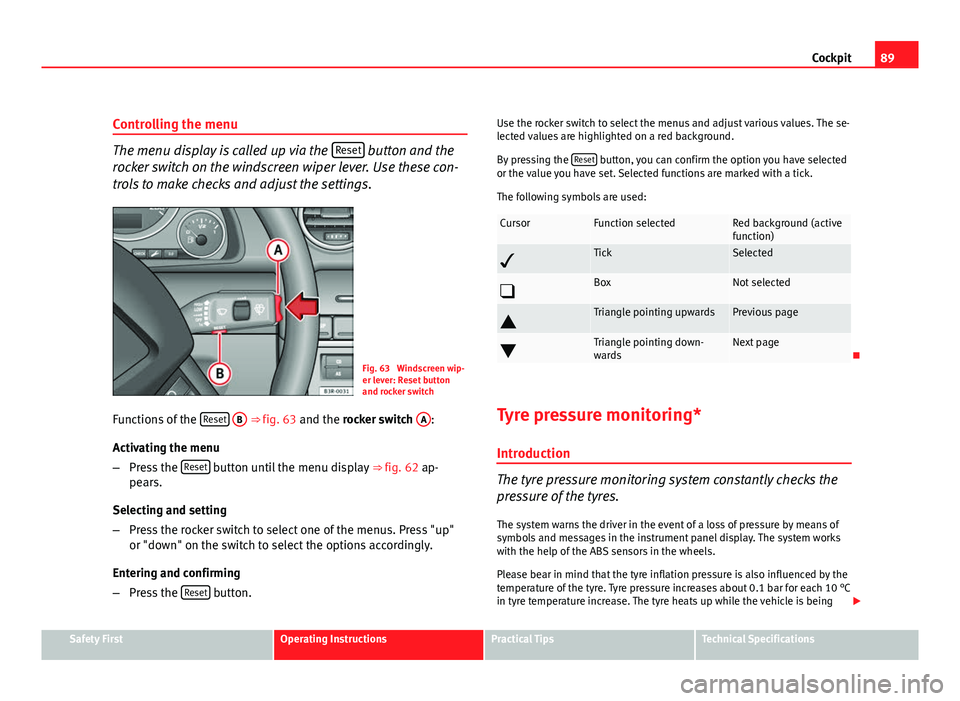
The menu display is called up via the Reset button and the
rocker switch on the windscreen wiper lever. Use these con-
trols to make checks and adjust the settings.
Fig. 63 Windscreen wip-
er lever: Reset button
and rocker switch
Functions of the Reset
B ⇒
fig. 63 and the rocker switch A:
Activating the menu
– Press the Reset
button until the menu display
⇒ fig. 62 ap-
pears.
Selecting and setting
– Press the rocker switch to select one of the menus. Press "up"
or "down" on the switch to select the options accordingly.
Entering and confirming
– Press the Reset
button. Use the rocker switch to select the menus and adjust various values. The se-
lected values are highlighted on a red background.
By pressing the
Reset
button, you can confirm the option you have selected
or the value you have set. Selected functions are marked with a tick.
The following symbols are used:
CursorFunction selectedRed background (active
function)
TickSelected
BoxNot selected
Triangle pointing upwardsPrevious page
Triangle pointing down-
wardsNext page
Tyre pressure monitoring* Introduction
The tyre pressure monitoring system constantly checks the
pressure of the tyres.
The system warns the driver in the event of a loss of pressure by means of
symbols and messages in the instrument panel display. The system works
with the help of the ABS sensors in the wheels.
Please bear in mind that the tyre inflation pressure is also influenced by the
temperature of the tyre. Tyre pressure increases about 0.1 bar for each 10 °C
in tyre temperature increase. The tyre heats up while the vehicle is being
Safety FirstOperating InstructionsPractical TipsTechnical Specifications
Page 118 of 313

116Lights and visibility
Automatic headlight switch* (sensor-controlled)
If you set the light switch to “AUTO”, the dipped headlights
will switch on and off automatically according to the ambi-
ent light level.
Fig. 85 Detailed view of
the dash panel: Light
switch
Turning on dipped beam headlights
– Turn the light switch ⇒ fig. 85 to the AUTO position.
Turning off dipped beam headlights
– Turn the light switch to position O.
The symbol on the switch lights up when the switch is in the AUTO position.
The dipped beams, side lights, tail lights and number plate lights come on
together when the headlights are switched on automatically.
When you are using the automatic headlights switch, you can also operate
the main beam headlights, however, please note the following: If you ena-
ble the main beam headlights while using the automatic headlights func- tion during the day (e.g. when driving through a tunnel), but do not disable
them again, only the dipped beam headlights will come on the next time
the lights are automatically switched on. To be able to use the main beam
headlights again, you must first pull the main beam lever back to the "off"
position and then push it forward again to "on".
The side lights, headlights, fog lights and rear fog light can still be switched
on manually in the normal way by using lights switch
⇒ page 115.
The interior mirror is fitted with sensors that measure the ambient light. The
dipped beam headlights will be switched on automatically if the available
light drops below the factory preset value (for instance when driving
through a tunnel, etc.). The headlights switch off again automatically when
the light level increases ⇒
.
WARNING
● The automatic dipped beam headlights are only intended to assist
the driver. Automatic dipped beam headlights do not relieve the driver of
his or her responsibility to control them and turn off or turn on the lights
manually according to weather or lighting conditions. The light sensors
are, for example, unable to detect rain and fog - you should therefore al-
ways switch on the dipped beam headlights manually in these condi-
tions and when driving after dark.
● Observe all relevant legal requirements when using the signalling
and lighting systems described here.
Note
● If automatic headlight switching is activated, when the ignition is turned
off the dipped beam headlights are turned off, and when the key is removed
from the ignition the side lights are turned off.
● If you have to attach any type of sticker on the windscreen, do not do so
in front of the sensors. Doing so could prevent the automatic dipped beam
headlight or anti-dazzle function from working correctly or even from work-
ing at all.
Page 120 of 313
118Lights and visibility
Activating the function
–Briefly press the knob ⇒ fig. 86 to release it from its set posi-
tion.
– Turn the knob to position 1.
– Press the knob in again to prevent the setting from being
changed unintentionally.
Deactivating the function
– Briefly press the knob ⇒ fig. 86 to release it from its set posi-
tion.
– Turn the knob to position 0.
– Press the knob in again to prevent the setting from being
changed unintentionally.
The coming home and leaving home functions are controlled by light sen-
sors in the interior mirror housing. The system will function when the follow-
ing requirements are met:
● The knob is set to position 1.
● The headlights and the ignition are switched off.
● Dark conditions; the sensors register little or no light.
Coming home
When the system is enabled and it is dark, the corresponding exterior lights
switch on as soon as the driver door is opened.
The exterior lights will stay on for up to a maximum of 2 minutes as long as
one of the doors or the tailgate is open.
The exterior lights stay on for about 30 seconds to light up the area around
the vehicle after all the doors and the tailgate have been closed. This time interval is factory-set, but you can have it changed by a qualified
workshop to suit your own requirements (max. setting is 60 seconds).
Leaving home
The exterior lights are switched on when the vehicle is unlocked with the
button on the remote control key.
The exterior lights go out when the driver door is opened or after 60 sec-
onds when the vehicle locks itself again automatically
⇒ page 105.
WARNING
Before leaving the vehicle, remove the key from the ignition, as the lights
will not go out if the coming home function is activated. This will lead to
battery discharge and vehicle breakdown.
Note
● If you always wish to use the coming home and leaving home functions,
you can leave them permanently switched on. As the system is controlled
via a photosensor, it will only work in dark conditions.
● Permanent use of the coming home and leaving home functions, partic-
ularly on short journeys, will increase the load on the battery. To make sure
the battery is always sufficiently charged, occasionally drive longer distan-
ces.
● If the fog lights have been switched on by the coming home and leaving
home functions, they will always be switched off when you switch on the ig-
nition.
● Observe all relevant legal requirements when using the signalling and
lighting systems described here.