change Seat Exeo 2012 MEDIA SYSTEM E
[x] Cancel search | Manufacturer: SEAT, Model Year: 2012, Model line: Exeo, Model: Seat Exeo 2012Pages: 167, PDF Size: 5.48 MB
Page 13 of 167
Handling: General information
12Multi-function steering wheel*Introduction
The multi-function steering wh eel enables quick and easy
operation of selected functions of the navigation system.
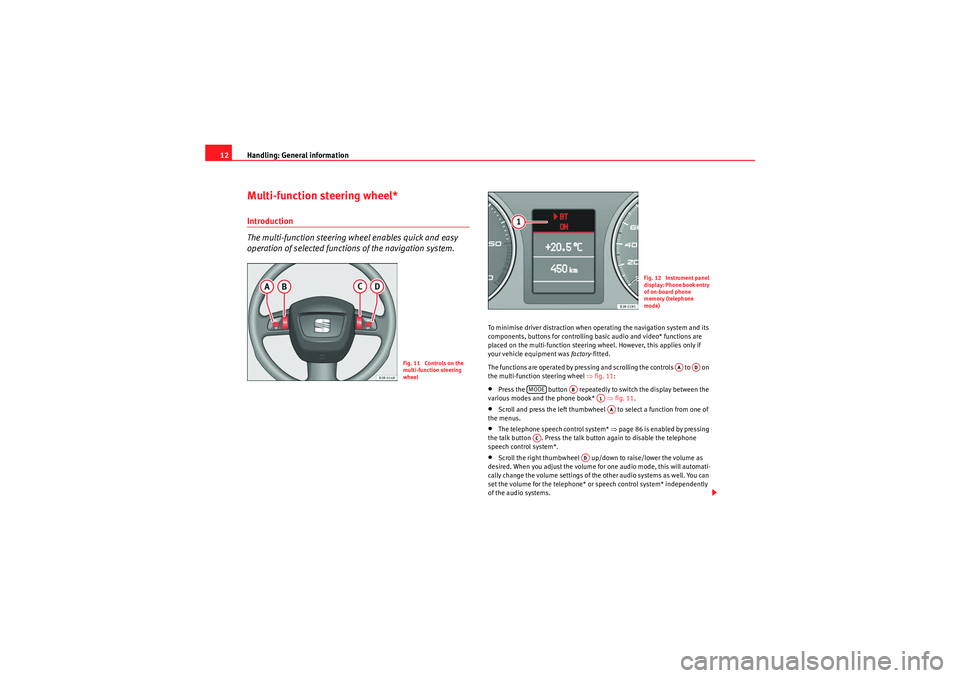
To minimise driver distraction when operating the navigation system and its
components, buttons for controlling basic audio and video* functions are
placed on the multi-function steering wheel. However, this applies only if
your vehicle equipment was factory-fitted.
The functions are operated by pressing and scrolling the controls to on
the multi-function steering wheel ⇒fig. 11 :•Press the button repeatedly to switch the display between the
various modes and the phone book* ⇒fig. 11 .•Scroll and press the left thumbwheel to select a function from one of
the menus.•The telephone speech control system* ⇒page 86 is enabled by pressing
the talk button . Press the talk button again to disable the telephone
speech control system*.•Scroll the right thumbwheel up/down to raise/lower the volume as
desired. When you adjust the volume for one audio mode, this will automati-
cally change the volume settings of the other audio systems as well. You can
set the volume for the telephone* or speech control system* independently
of the audio systems.
Fig. 11 Controls on the
multi-function steering
wheel
Fig. 12 Instrument panel
display: Phone book entry
of on-board phone
memory (telephone
mode)
AA
AD
MODE
AB
A1AA
AC
AD
media_systemE_EN.book Seite 12 Montag, 21. September 2009 1:48 13
Page 14 of 167
Handling: General information13
Operating
RADIO, MEDIA (audiovisual
systems)
NAME, TEL
NAV, INFO
CAR, SETUP
•Press the right thumbwheel while the route guidance is enabled to
repeat the last navigation voice cue*.Note
•During an active call, the speech commands of the telephone* cannot be
enabled.•If certain equipment has not been installed in the vehicle, the multi-func-
tion steering wheel assigned to that equipment will be inoperative.Radio modeSelecting the radio
– Press the button ⇒page 12, fig. 11 until a
station/station name from the radio station list appears in the
instrument panel display.
Changing between stations in the radio station list
–Use the left thumbwheel ⇒ page 12, fig. 11 to scroll
up/down
1).
Tuning
– Press the left thumbwheel once to start the station search ⇒page 12, fig. 11 .
– Press the left thumbwheel again to stop the station search.
If you hear only a hissing noise when you change stations, the current station
number has not been assigned or the selected station is currently not within
the reception range.CD/MP3 ModeSelecting CD/MP3 mode
–Press the button ⇒ page 12, fig. 11 until a CD or MP3
track appears in the instrument panel display.
Next/previous track
– Use the left thumbwheel ⇒page 12, fig. 11 to scroll
up/down.
Fast forward
– Press and hold the left thumbwheel to start the fast forward ⇒page 12, fig. 11 .
– Release the left thumbwheel again to continue listening to the CD.Scroll the left thumbwheel up or down several click stops to skip up or down
through the tracks.Te l e p h o n e m o d e *Selecting a phone number
–Press the button ⇒page 12, fig. 11 until a telephone
number appears in the instrument panel display.
1)When the navigation system display shows the radio memory list you can also use the
left thumbwheel to select a station from the list.
AD
MODE
ABAAAAAA
MODE
ABAA
AA
MODE
AB
media_systemE_EN.book Seite 13 Montag, 21. September 2009 1:48 13
Page 31 of 167
Drives
30•Make sure that the iPod is fixed in place with one of the adapters
supplied.Note
•Your Dealer also offers appropriate adapters for iPods that are not latest
generation.•For further information on adapter adaptation, please see the information
enclosed with the adapters supplied.Inserting the iPod into the iPod interface– Switch on the navigation system ⇒ page 4.
– With the display facing upwards and the contact towards the front, slide the iPod into the bay until you hear it engages. The
iPod will switch on automatically and the battery will be charged.
– If the navigation system does not detect the iPod after you insert it, please “reset” the iPod (refer to the iPod operating instruc-
tions).To start the iPod, press the button ⇒page 48.
The iPod is switched off automatically when you switch off the navigation
system or the ignition.
Note
•To ensure optimum sound quality, you should enable the “sound check”
setting on the iPod and disable the “EQ” (equaliser) before inserting the iPod
(please refer to the iPod operating instructions).•Slight scoring marks may occur on the iPod when used with the adapter.
Functions
The iPod is operated using the navigation system controls.– To start the iPod, press the button.The following functions are available:•Play all tracks stored on the iPod•Select directly and play up to five track lists•Switch between the different track lists•Fast forward and rewind within a track•Change tracks within a playlist•Play tracks in shuffle mode ("shuffle")•SCAN function
For further information on handling, please refer to the “MEDIA” chapter
⇒ page 48.TipsHere are some tips and points to remember when using the iPod in the
vehicle:•Track numbers appear with a maximum of two digits in the navigation
system display. The first digit is suppressed if you select a track with a three-
digit number, i.e. track 125 and track 25 are both displayed as track “25”. For
this reason we do not recommend allocating more than 99 tracks to each
playlist.•If you reach the end of a playlist when selecting a track directly
(forward/reverse), the count is resumed at track “1”.
MEDIA
MEDIA
media_systemE_EN.book Seite 30 Montag, 21. September 2009 1:48 13
Page 33 of 167
Drives
32you were playing. If you do not alter the contents of your memory device, the
music will be continued at the point where you stopped playing.
MP3 players and USB sticks which are not explicitly approved must have
“CERTIFIED USB
TM” or “CERTIFIED HIGH SPEED USB
TM” status.
Caution
•Do not connect a device other than a memory stick or MP3 player to the
USB port. It is not possible to operate hard discs or USB hubs, etc. via the USB
port.•Do not connect the MP3 player directly to the USB port. This could
damage the device.•Never remove a memory device when the USB port is selected as source
(CD). This could damage your memory device.Note
For up-to-date information on compatible MP3 players and USB sticks, please
ask a SEAT dealer or visit www.seat.es.Functions
Music files are played just like on a CD changer using the
controls on your car's sound system.To start the memory stick or MP3 player, select the “CD changer” function on
the sound system.
The following functions are available:•Play all tracks stored on the memory device (if no folders are stored on the
memory device)
•Select and play up to six main folders with music files (just like selecting
CD 1 to 6 on a CD changer)•Change between main folders with music files (just like changing the CD
on a CD changer)•Change tracks within a main folder•Fast forward and rewind within a track•SCAN function•Play tracks in random or shuffle mode
For more information on how to operate the system, please refer to the “CD”
chapter in the operating manual for your sound system.TipsHere are some tips and points to remember when playing music files in the
car:•We recommend that, instead of storing music files in the main directory of
the memory stick or MP3 player, you create separate folders e.g. for tracks
belonging to the same genre or artist. Your sound system can display and
play a maximum of six folders, however. The folders are allocated first in
numerical order and then in alphabetical order as CD 1 to CD 6. Folders that
do not contain music files are automatically ignored. You can create any
number of subfolders.•If there are no folders on your memory device, the sound system will allo-
cate all the music files it finds to CD 1.•Track numbers appear with a maximum of two digits in the sound system
display. The first digit is suppressed if you select a track with a three-digit
number, i.e. track 125 and track 25 are both displayed as track “25”. We
therefore do not recommend allocating more than 99 tracks to each folder.•We recommend you not to use the “Name CD” function on vehicles with
the BNS 5.0 navigation system, as the folders may not be named correctly.
media_systemE_EN.book Seite 32 Montag, 21. September 2009 1:48 13
Page 40 of 167
RADIO39
Operating
RADIO, MEDIA (audiovisual
systems)
NAME, TEL
NAV, INFO
CAR, SETUP
Note
If you are outside the transmission range for the stations saved in the list, you
will not be able to select them (the station names will be greyed out). You can
try to tune into stations with a weak reception signal using the tuning func-
tion ⇒page 39.Tuning MenuManual tuning
With the manual tuning option, even weak stations can be set
and saved.– Press the Tuning control button in the radio menu.
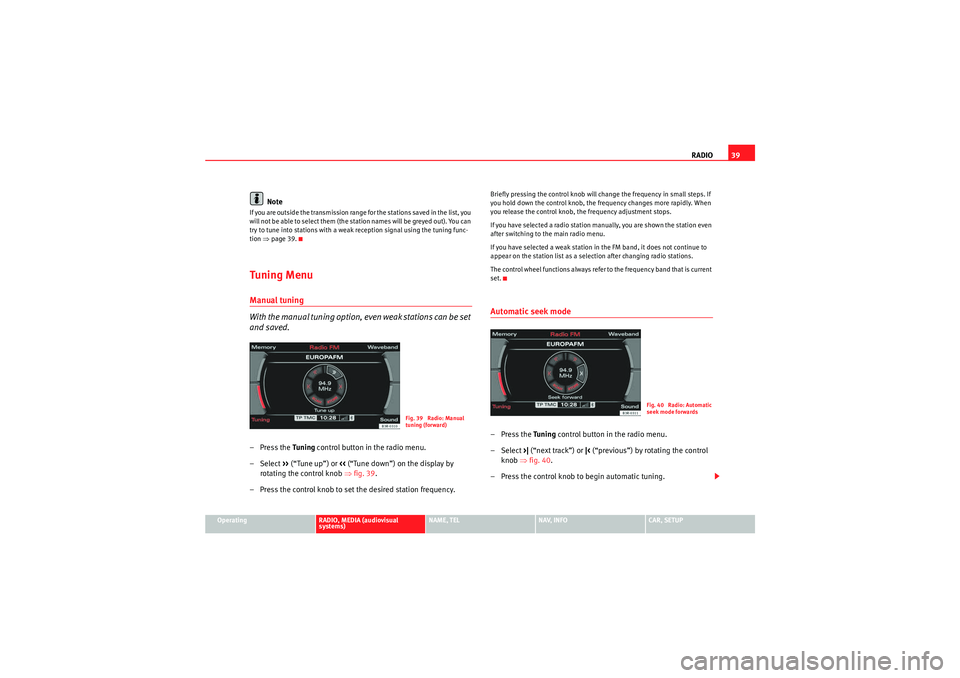
–Select >> (“Tune up”) or << (“Tune down”) on the display by
rotating the control knob ⇒fig. 39 .
– Press the control knob to set the desired station frequency.
Briefly pressing the control knob will change the frequency in small steps. If
you hold down the control knob, the frequency changes more rapidly. When
you release the control knob, the frequency adjustment stops.
If you have selected a radio station manually, you are shown the station even
after switching to the main radio menu.
If you have selected a weak station in the FM band, it does not continue to
appear on the station list as a selection after changing radio stations.
The control wheel functions always refer to the frequency band that is current
set.Automatic seek mode–Press the Tuning control button in the radio menu.
– Select >| (“next track”) or |< (“previous”) by rotating the control
knob ⇒fig. 40.
– Press the control knob to begin automatic tuning.
Fig. 39 Radio: Manual
tuning (forward)
Fig. 40 Radio: Automatic
seek mode forwards
media_systemE_EN.book Seite 39 Montag, 21. September 2009 1:48 13
Page 45 of 167
RADIO
44tion quality. This avoids switching back and forth between different regional
programmes, whenever the reception quality changes. The current regional
programme remains set. This can, however, lead to reception problems.
You can select any other regional programme broadcast by the regional
station you are tuned to from the station list ⇒ page 36.
We recommend you have the “Regional stations” function switched on (on ) at
all times.
Regional stations switched off
If the Regional stations function is off, only the strongest regional programme
of a specific broadcasting station will be received. In some cases, the radio
will then switch between stations with differing programme contents.Station reception
The sensitivity level of the automatic seek function can be
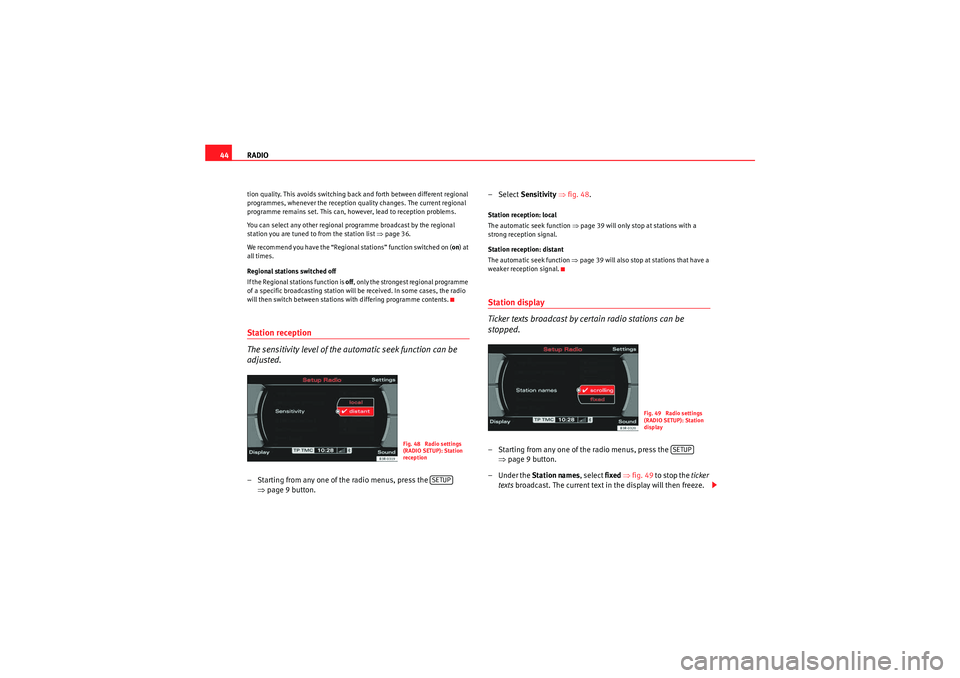
adjusted.– Starting from any one of the radio menus, press the ⇒page 9 button. – Select
Sensitivity ⇒ fig. 48.
Station reception: local
The automatic seek function ⇒page 39 will only stop at stations with a
strong reception signal.
Station reception: distant
The automatic seek function ⇒page 39 will also stop at stations that have a
weaker reception signal.Station display
Ticker texts broadcast by certain radio stations can be
stopped.– Starting from any one of the radio menus, press the ⇒page 9 button.
– Under the Station names , select fixed ⇒ fig. 49 to stop the ticker
texts broadcast. The current text in the display will then freeze.
Fig. 48 Radio settings
(RADIO SETUP): Station
recep tion
SETUP
Fig. 49 Radio settings
(RADIO SETUP): Station
display
SETUP
media_systemE_EN.book Seite 44 Montag, 21. September 2009 1:48 13
Page 46 of 167
RADIO45
Operating
RADIO, MEDIA (audiovisual
systems)
NAME, TEL
NAV, INFO
CAR, SETUP
If you have set the station display to
moving ⇒ page 44, fig. 49, the ticker
text will be shown when you tune into a station broadcasting this type of
information.
Alternative frequencies– Starting from any one of the radio menus, press the ⇒page 9 button.
– Switch on the Alt. frequency function (on) ⇒ page 41, fig. 44 to
automatically change frequency within the same station.Because of the limited range of FM (VHF) signals, a radio station may broad-
cast from several transmitters on different frequencies. If the Alt. frequency
function is switched on (on), the radio-navigation system searches for the
strongest frequency signal and tunes into it.
The radio switches from one frequency to another inaudibly. The programme
name appearing on the display is not changed. The control wheel ⇒page 39
displays the corresponding frequency.
Note
To ensure optimum reception, the alternative frequency function will auto-
matically be set to on when you switch on the navigation system or switch to
another station.
Selecting programme type: PTY filter
Use the programme filter to sort the station list according to
your preferences.Switching on the filter function
– Starting from any one of the radio menus, press the ⇒page 9 button.
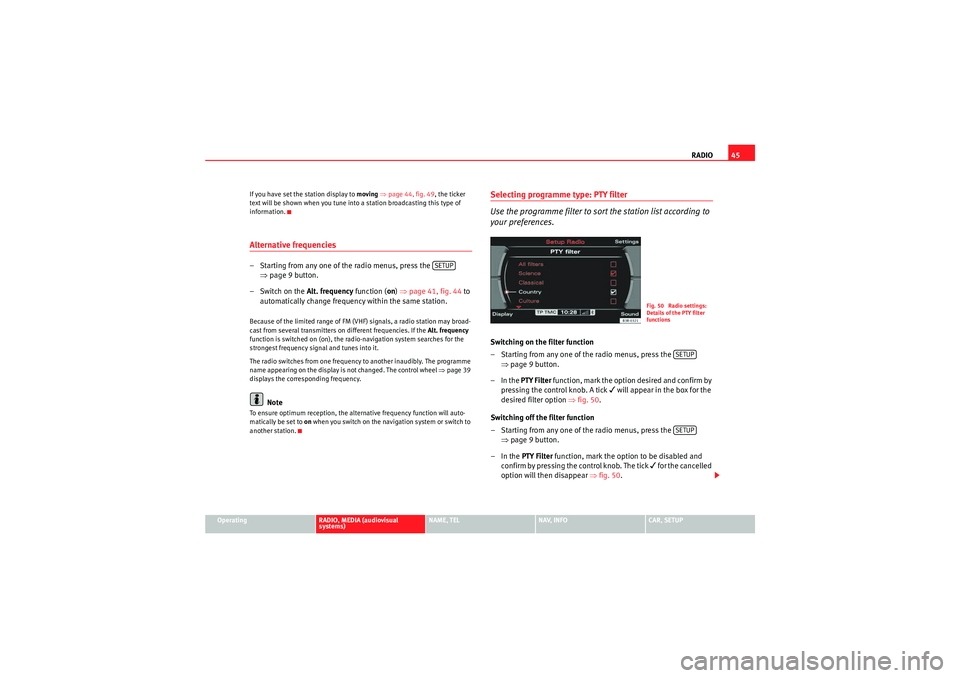
–In the PTY Filter function, mark the option desired and confirm by
pressing the control knob. A tick
will appear in the box for the
desired filter option ⇒fig. 50 .
Switching off the filter function
– Starting from any one of the radio menus, press the ⇒page 9 button.
–In the PTY Filter function, mark the option to be disabled and
confirm by pressing the control knob. The tick
for the cancelled
option will then disappear ⇒fig. 50 .
SETUP
Fig. 50 Radio settings:
Details of the PTY filter
functions
SETUPSETUP
media_systemE_EN.book Seite 45 Montag, 21. September 2009 1:48 13
Page 60 of 167
Adjusting sound settings59
Operating
RADIO, MEDIA (audiovisual
systems)
NAME, TEL
NAV, INFO
CAR, SETUP
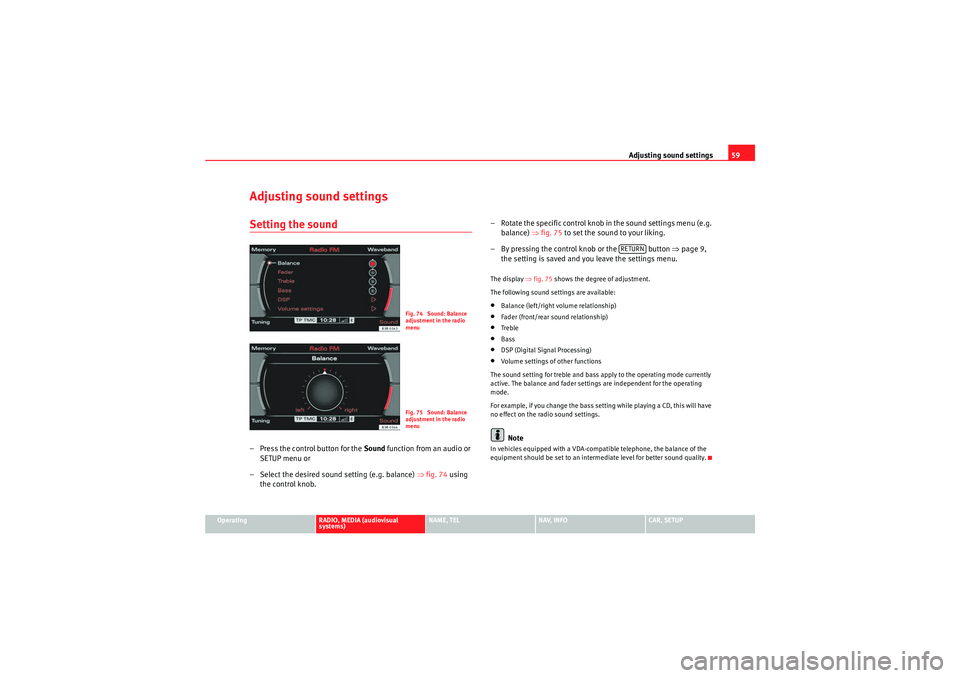
Adjusting sound settingsSetting the sound– Press the control button for the Sound function from an audio or
SETUP menu or
– Select the desired sound setting (e.g. balance) ⇒fig. 74 using
the control knob. – Rotate the specific control knob
in the sound settings menu (e.g.
balance) ⇒fig. 75 to set the sound to your liking.
– By pressing the control knob or the button ⇒page 9,
the setting is saved and you leave the settings menu.
The display ⇒fig. 75 shows the degree of adjustment.
The following sound settings are available:•Balance (left/right volume relationship)•Fader (front/rear sound relationship)•Treble•Bass•DSP (Digital Signal Processing)•Volume settings of other functions
The sound setting for treble and bass apply to the operating mode currently
active. The balance and fader settings are independent for the operating
mode.
For example, if you change the bass setting while playing a CD, this will have
no effect on the radio sound settings.Note
In vehicles equipped with a VDA-compatible telephone, the balance of the
equipment should be set to an intermediate level for better sound quality.
Fig. 74 Sound: Balance
adjustment in the radio
menuFig. 75 Sound: Balance
adjustment in the radio
menu
RETURN
media_systemE_EN.book Seite 59 Montag, 21. September 2009 1:48 13
Page 66 of 167
NAME (Directory)65
Operating
RADIO, MEDIA (audiovisual
systems)
NAME, TEL
NAV, INFO
CAR, SETUP
Searching a directory entry
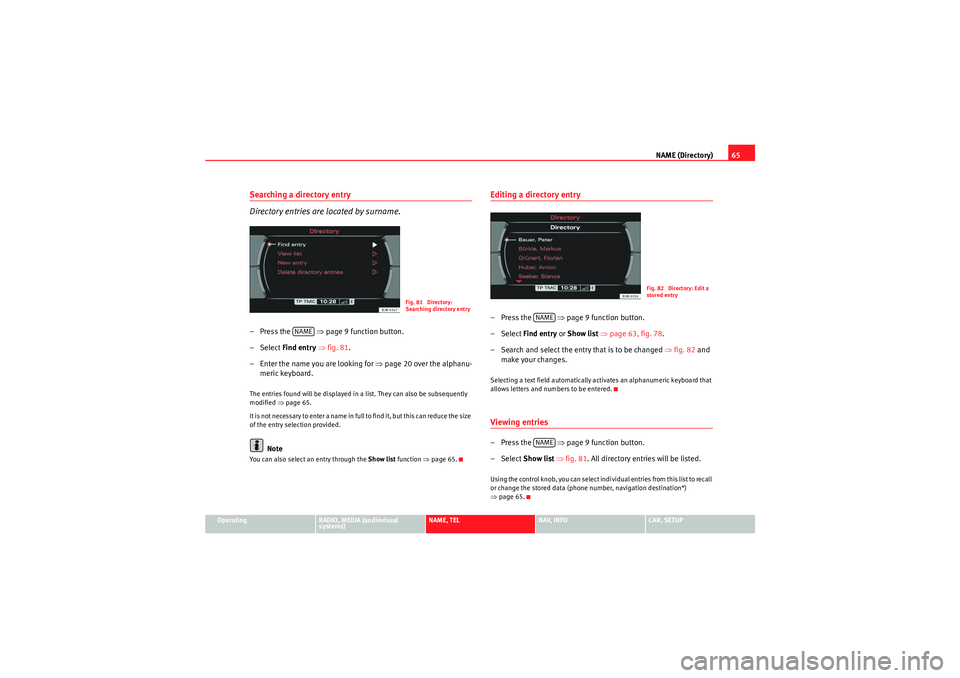
Directory entries are located by surname.– Press the ⇒page 9 function button.
–Select Find entry ⇒ fig. 81.
– Enter the name you are looking for ⇒page 20 over the alphanu-
meric keyboard.The entries found will be displayed in a list. They can also be subsequently
modified ⇒page 65.
It is no t n e ces sa r y t o e n te r a na me in fu ll to f in d i t, b ut t h is c a n re d uc e t h e s ize
of the entry selection provided.
Note
You can also select an entry through the Show list function ⇒page 65.
Editing a directory entry–Press the ⇒page 9 function button.
– Select Find entry or Show list ⇒ page 63, fig. 78 .
– Search and select the entry that is to be changed ⇒ fig. 82 and
make your changes.Selecting a text field automatically activates an alphanumeric keyboard that
allows letters and numbers to be entered.Viewing entries–Press the ⇒page 9 function button.
– Select Show list ⇒ fig. 81 . All directory entries will be listed.Using the control knob, you can select individual entries from this list to recall
or change the stored data (phone number, navigation destination*)
⇒page 65.
Fig. 81 Directory:
Searching directory entry
NAME
Fig. 82 Directory: Edit a
stored entry
NAMENAME
media_systemE_EN.book Seite 65 Montag, 21. September 2009 1:48 13
Page 74 of 167
Mobile phone system*73
Operating
RADIO, MEDIA (audiovisual
systems)
NAME, TEL
NAV, INFO
CAR, SETUP
Requirements for using the telephone
•The vehicle must be fitted with a mobile phone adapter ⇒
page 68.•A mobile phone has been connected to the mobile phone adapter
⇒ page 70 or•A Bluetooth connection exists between the Bluetooth mobile phone and
the on-board phone system, and the ignition is switched on ⇒page 71.
The telephone functions described in this chapter depend on the following:•The telephone used must be compatible with the mobile phone adapter
and it must support the telephone functions described.•The mobile network service provider must support the telephone func-
tions described.
After switching off the ignition, the telephone system will remain in standby
mode for about 30 minutes (shutdown delay
5)) if the phone is left in the
adapter.
Note
•For technical reasons, mobile phones may be temporarily affected by
interference. Please refer to the instru ctions for your mobile phone for more
information.•The range of the handset may be affected in isolated areas (such as a
tunnel or underground garage).•Some places have no range at all. You will not be able to use the tele-
phone in these places.•The activated audio source is muted during a phone conversation.•The basic functions of the telephone can be operated using the multi-
function steering wheel* only if the telephone equipment was installed at the
factory .•For more information about the functions of the multi-function steering
wheel*, please refer to ⇒page 12.
PIN Code (Personal Identification Number)– Press the function button.
– Enter the PIN code using the alphanumeric keyboard and confirm
with OK.The PIN message displayed in the status line indicates that you must enter
your PIN code. You receive the PIN code from your mobile network service
provider together with the SIM card.
You can also enter the PIN code using the speech control system and the
command Enter PIN or Enter PIN code ⇒ page 73 or using the keypad of your
mobile phone.
The alphanumeric keyboard will be displayed automatically when the PIN
code is to be entered in the telephone menu. This will be the case, for
example, when you switch on the mobile phone.
The SIM card will automatically be blocked if you enter the PIN code incor-
rectly 3 times
6). The SIM card can be unblocked with the PUK (personal
unblocking key).
Note
•When you enter the PIN code the digits appear as * in the display.•The PIN symbol may not always be shown in the display (depends on type
of mobile phone).•Depending on your type of mobile phone, you may need to enter the PIN
code at the phone. In this case, no message will appear in the display indi-
cating that you need to enter the PIN code.
5)You can have the shutdown delay changed by a Dealer or Qualified workshop.
6)The total number of times you can enter the PIN code may vary depending on your type
of SIM card
TEL
media_systemE_EN.book Seite 73 Montag, 21. September 2009 1:48 13