oil dipstick Seat Exeo ST 2011 Owner's manual
[x] Cancel search | Manufacturer: SEAT, Model Year: 2011, Model line: Exeo ST, Model: Seat Exeo ST 2011Pages: 319, PDF Size: 5.12 MB
Page 231 of 319

229
Checking and refilling levels
Engine oil additives
No type of additive should be mixed with the engine oil. The deterioration
caused by these additives is not covered by the warranty.
Note
Before a long trip, we recommend finding an engine oil that conforms to the
corresponding VW specifications and keeping it in the vehicle. This way, the
correct engine oil will always be available for a top-up if needed.
Checking the oil level
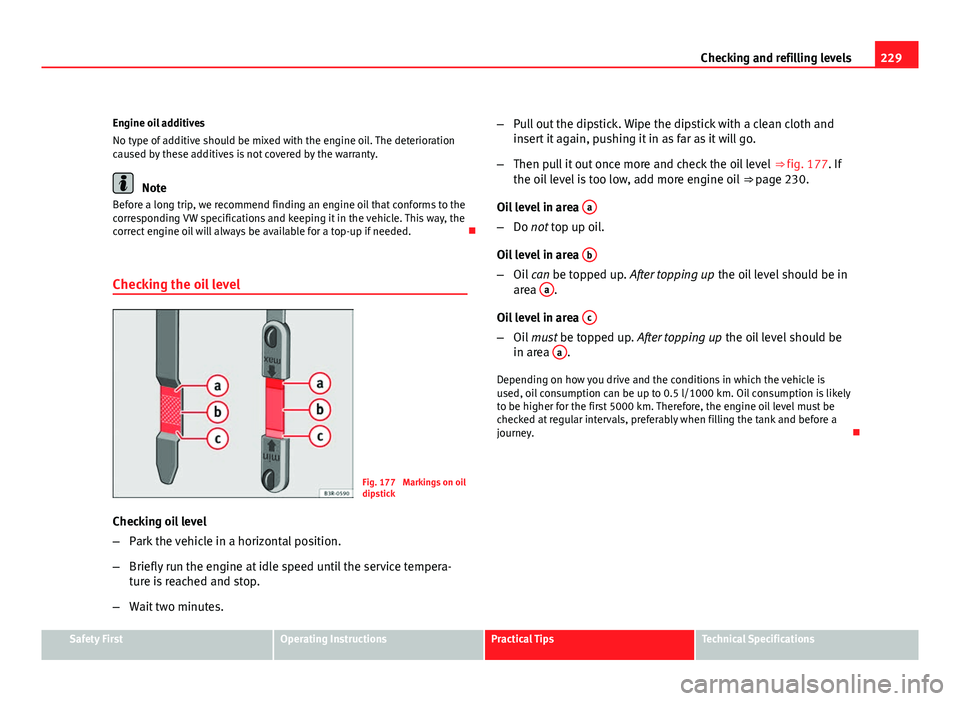
Fig. 177 Markings on oil
dipstick
Checking oil level
– Park the vehicle in a horizontal position.
– Briefly run the engine at idle speed until the service tempera-
ture is reached and stop.
– Wait two minutes. –
Pull out the dipstick. Wipe the dipstick with a clean cloth and
insert it again, pushing it in as far as it will go.
– Then pull it out once more and check the oil level ⇒ fig. 177. If
the oil level is too low, add more engine oil ⇒ page 230.
Oil level in area a
–
Do not top up oil.
Oil level in area b
–
Oil can be topped up. After topping up the oil level should be in
area a.
Oil level in area c
–
Oil must be topped up. After topping up the oil level should be
in area a.
Depending on how you drive and the conditions in which the vehicle is
used, oil consumption can be up to 0.5 l/1000 km. Oil consumption is likely
to be higher for the first 5000 km. Therefore, the engine oil level must be
checked at regular intervals, preferably when filling the tank and before a
journey.
Safety FirstOperating InstructionsPractical TipsTechnical Specifications
Page 232 of 319

230Checking and refilling levels
Topping up the engine oil
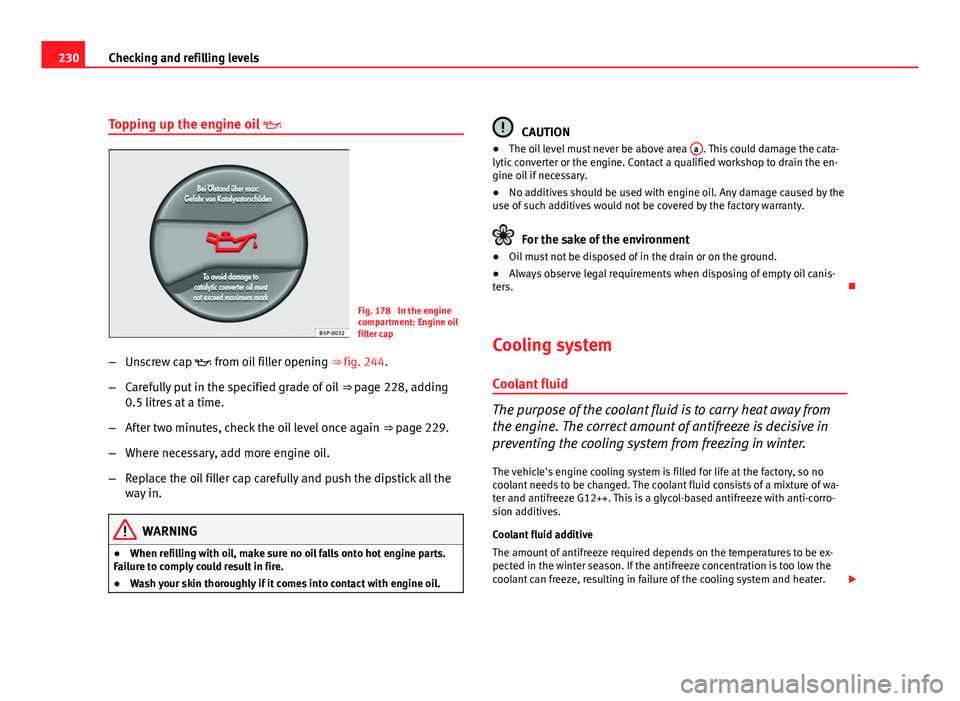
Fig. 178 In the engine
compartment: Engine oil
filler cap
– Unscrew cap from oil filler opening ⇒ fig. 244.
– Carefully put in the specified grade of oil ⇒ page 228, adding
0.5 litres at a time.
– After two minutes, check the oil level once again ⇒ page 229.
– Where necessary, add more engine oil.
– Replace the oil filler cap carefully and push the dipstick all the
way in.
WARNING
● When refilling with oil, make sure no oil falls onto hot engine parts.
Failure to comply could result in fire.
● Wash your skin thoroughly if it comes into contact with engine oil.
CAUTION
● The oil level must never be above area a. This could damage the cata-
lytic converter or the engine. Contact a qualified workshop to drain the en-
gine oil if necessary.
● No additives should be used with engine oil. Any damage caused by the
use of such additives would not be covered by the factory warranty.
For the sake of the environment
● Oil must not be disposed of in the drain or on the ground.
● Always observe legal requirements when disposing of empty oil canis-
ters.
Cooling system Coolant fluid
The purpose of the coolant fluid is to carry heat away from
the engine. The correct amount of antifreeze is decisive in
preventing the cooling system from freezing in winter. The vehicle's engine cooling system is filled for life at the factory, so no
coolant needs to be changed. The coolant fluid consists of a mixture of wa-
ter and antifreeze G12++. This is a glycol-based antifreeze with anti-corro-
sion additives.
Coolant fluid additive
The amount of antifreeze required depends on the temperatures to be ex-
pected in the winter season. If the antifreeze concentration is too low the
coolant can freeze, resulting in failure of the cooling system and heater.
Page 298 of 319

296Technical specifications
Technical specifications
Engine specifications Checking fluid levels
From time to time, the levels of the different fluids in the ve-
hicle must be checked. Never fill with incorrect fluids, other-
wise serious damage to the engine may be caused.
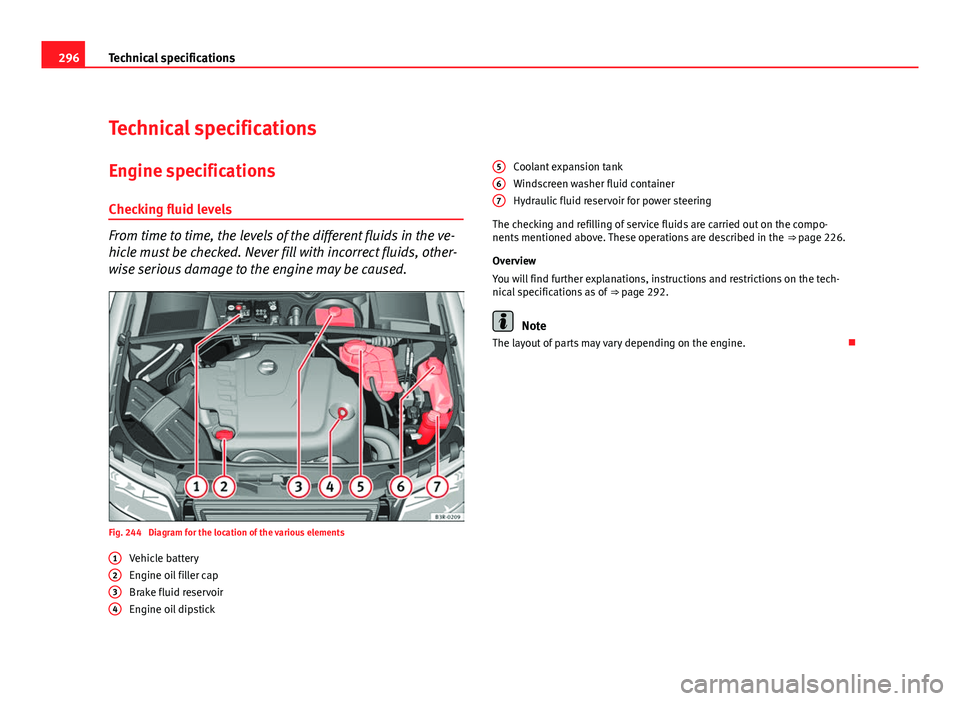
Fig. 244 Diagram for the location of the various elements Vehicle battery
Engine oil filler cap
Brake fluid reservoir
Engine oil dipstick
1
234
Coolant expansion tank
Windscreen washer fluid container
Hydraulic fluid reservoir for power steering
The checking and refilling of service fluids are carried out on the compo-
nents mentioned above. These operations are described in the ⇒ page 226.
Overview
You will find further explanations, instructions and restrictions on the tech-
nical specifications as of ⇒ page 292.
Note
The layout of parts may vary depending on the engine.
567
Page 314 of 319

MirrorsActivating stored settings . . . . . . . . . . . . . 138
Automatic exterior mirror adjustment . . . . 137
Heated exterior mirrors . . . . . . . . . . . . . . . 131
Storing settings . . . . . . . . . . . . . . . . . . . . . 138
Vanity mirrors . . . . . . . . . . . . . . . . . . . . . . . 126
Mobile phones and two-way radios . . . . . . . . 221
multitronic® . . . . . . . . . . . . . . . . . . . . . . . . . . . 182 Driving . . . . . . . . . . . . . . . . . . . . . . . . . . . . . 183
N
Net partition Removing . . . . . . . . . . . . . . . . . . . . . . . . . . 146
Number of seats . . . . . . . . . . . . . . . . . . . . . . . . . 19
O
Observations . . . . . . . . . . . . . . . . . . . . . . . . . . 200
Octane number . . . . . . . . . . . . . . . . . . . . . . . . . 223
Odometer . . . . . . . . . . . . . . . . . . . . . . . . . . . . . . 63
Oil consumption . . . . . . . . . . . . . . . . . . . . . . . . 229
Oil dipstick . . . . . . . . . . . . . . . . . . . . . . . . . . . . 229
Oil properties . . . . . . . . . . . . . . . . . . . . . . . . . . 228
Onboard computer . . . . . . . . . . . . . . . . . . . . . . . 85
Outside temperature display . . . . . . . . . . . . . . . 72
Overview Cockpit . . . . . . . . . . . . . . . . . . . . . . . . . . . . . 57 P
Paddle levers tiptronic . . . . . . . . . . . . . . . . . . . . . . . . . . . 189
Paintwork Polishing . . . . . . . . . . . . . . . . . . . . . . . . . . . 214
Parking . . . . . . . . . . . . . . . . . . . . . . . . . . . . . . . 176 multitronic® . . . . . . . . . . . . . . . . . . . . . . . . 183
Parking aid SEAT Parking System . . . . . . . . . . . . . . . . . 177
SEAT Parking System plus . . . . . . . . . . . . . 177
Parking aid acoustic system . . . . . . . . . . . . . . 176
Passenger see Correct sitting position . . . . . . . 10, 11, 12
Pedals . . . . . . . . . . . . . . . . . . . . . . . . . . . . . . . . . 16
Petrol . . . . . . . . . . . . . . . . . . . . . . . . . . . . . . . . . 223 Driving abroad . . . . . . . . . . . . . . . . . . . . . . 200
Petrol additives . . . . . . . . . . . . . . . . . . . . . . . . 224
Photosensor faulty . . . . . . . . . . . . . . . . . . . . . . . 81
Physical principles of a frontal collision . . . . . . 20
Plastic parts . . . . . . . . . . . . . . . . . . . . . . . . . . . 214
Plastic parts cleaning . . . . . . . . . . . . . . . . . . . . 217
Power socket . . . . . . . . . . . . . . . . . . . . . . . . . . 154
Power steering . . . . . . . . . . . . . . . . . . . . . . . . . 194
Products for vehicle maintenance . . . . . . . . . . 211
Q
Quartz clock . . . . . . . . . . . . . . . . . . . . . . . . . . . . 61 R
Radiator fan . . . . . . . . . . . . . . . . . . . . . . . . . . . 233
Radio display . . . . . . . . . . . . . . . . . . . . . . . . . . . 72
Rain sensor . . . . . . . . . . . . . . . . . . . . . . . . . . . . 127
Rain sensor faulty . . . . . . . . . . . . . . . . . . . . . . . . 81
Reading lights Front . . . . . . . . . . . . . . . . . . . . . . . . . . . . . . 123
Rear . . . . . . . . . . . . . . . . . . . . . . . . . . . . . . . 125
Rear drink holder . . . . . . . . . . . . . . . . . . . . . . . 152
Rear fog light . . . . . . . . . . . . . . . . . . . . . . . . . . 117
Rear seat bench . . . . . . . . . . . . . . . . . . . . . . . . 148
Rear side window sun blind . . . . . . . . . . . . . . . 127
Rear view mirrors Anti-dazzle interior mirror with automaticadjustment . . . . . . . . . . . . . . . . . . . . . . . 130
Anti-dazzle setting . . . . . . . . . . . . . . . . . . . 130
Interior mirror . . . . . . . . . . . . . . . . . . . . . . . 130
Rear window sun blind . . . . . . . . . . . . . . . . . . . 127
Rear window wiper Intermittent wipe . . . . . . . . . . . . . . . . . . . . 129
Rear window automatic wash and wipe . . 129
Refuelling . . . . . . . . . . . . . . . . . . . . . . . . . . . . . 222
Registration light . . . . . . . . . . . . . . . . . . . . . . . 285
Remote control key Indicator light . . . . . . . . . . . . . . . . . . . . . . . . 97
Locking and unlocking . . . . . . . . . . . . . . . . 105
Locking and unlocking the vehicle . . . . . . 105
Replacing the battery . . . . . . . . . . . . . . . . . . 97
Remote control keys . . . . . . . . . . . . . . . . . . . . . . 96 Re-synchronising . . . . . . . . . . . . . . . . . . . . 106
Removing and fitting the wheel . . . . . . . . . . . 257
312 Index