air conditioning Seat Exeo ST 2012 Owner's manual
[x] Cancel search | Manufacturer: SEAT, Model Year: 2012, Model line: Exeo ST, Model: Seat Exeo ST 2012Pages: 325, PDF Size: 5.56 MB
Page 5 of 325
Table of Contents
Manual structure . . . . . . . . . . . . . . . . . . . . 5
Content . . . . . . . . . . . . . . . . . . . . . . . . . . . . . . . . 6
Safety First . . . . . . . . . . . . . . . . . . . . . . . . . . . . 7
Safe driving . . . . . . . . . . . . . . . . . . . . . . . . . . . . . . . 7
Brief introduction . . . . . . . . . . . . . . . . . . . . . . . . . 7
Proper sitting position for occupants . . . . . . . . . 10
Pedal area . . . . . . . . . . . . . . . . . . . . . . . . . . . . . . . 16
Storing objects . . . . . . . . . . . . . . . . . . . . . . . . . . . 16
Seat belts . . . . . . . . . . . . . . . . . . . . . . . . . . . . . . . . . 19
Brief introduction . . . . . . . . . . . . . . . . . . . . . . . . . 19
Why wear seat belts? . . . . . . . . . . . . . . . . . . . . . . 20
Seat belts . . . . . . . . . . . . . . . . . . . . . . . . . . . . . . . 24
Seat belt tensioners . . . . . . . . . . . . . . . . . . . . . . . 28
Airbag system . . . . . . . . . . . . . . . . . . . . . . . . . . . . . 29
Brief introduction . . . . . . . . . . . . . . . . . . . . . . . . . 29
Front airbags . . . . . . . . . . . . . . . . . . . . . . . . . . . . . 33
Knee airbag* . . . . . . . . . . . . . . . . . . . . . . . . . . . . . 36
Side airbags* . . . . . . . . . . . . . . . . . . . . . . . . . . . . 39
Curtain airbags . . . . . . . . . . . . . . . . . . . . . . . . . . . 42
Deactivating airbags . . . . . . . . . . . . . . . . . . . . . . . 45
Child safety . . . . . . . . . . . . . . . . . . . . . . . . . . . . . . . 47
Brief introduction . . . . . . . . . . . . . . . . . . . . . . . . . 47
Child seats . . . . . . . . . . . . . . . . . . . . . . . . . . . . . . . 49
Securing child seats . . . . . . . . . . . . . . . . . . . . . . . 52 Operating Instructions
. . . . . . . . . . . . . 59
Cockpit . . . . . . . . . . . . . . . . . . . . . . . . . . . . . . . . . . . 59
Overview . . . . . . . . . . . . . . . . . . . . . . . . . . . . . . . . 59
Instruments . . . . . . . . . . . . . . . . . . . . . . . . . . . . . . 61
Warning and indicator lamps . . . . . . . . . . . . . . . . 67
Driver information system . . . . . . . . . . . . . . . . . . 74
Auto-check system . . . . . . . . . . . . . . . . . . . . . . . . 78
Speed warning* . . . . . . . . . . . . . . . . . . . . . . . . 85
Onboard computer . . . . . . . . . . . . . . . . . . . . . . . . 88
Menu display . . . . . . . . . . . . . . . . . . . . . . . . . . . . . 91
Tyre pressure monitoring* . . . . . . . . . . . . . . . . . . 92
Steering wheel controls . . . . . . . . . . . . . . . . . . . . 94
Multifunction steering wheel* . . . . . . . . . . . . . . . 94
Unlocking and locking . . . . . . . . . . . . . . . . . . . . . 99
Remote control keys . . . . . . . . . . . . . . . . . . . . . . . 99
Central locking . . . . . . . . . . . . . . . . . . . . . . . . . . . 101
Rear lid . . . . . . . . . . . . . . . . . . . . . . . . . . . . . . . . . . 106
Childproof lock . . . . . . . . . . . . . . . . . . . . . . . . . . . 107
Remote control key . . . . . . . . . . . . . . . . . . . . . . . . 108
Anti-theft alarm system* . . . . . . . . . . . . . . . . . . . 110
Electric windows . . . . . . . . . . . . . . . . . . . . . . . . . . 112
Sliding/tilting sunroof* . . . . . . . . . . . . . . . . . . . . 114
Lights and visibility . . . . . . . . . . . . . . . . . . . . . . . . 117
Lights . . . . . . . . . . . . . . . . . . . . . . . . . . . . . . . . . . . 117
Interior lights . . . . . . . . . . . . . . . . . . . . . . . . . . . . . 125
Visibility . . . . . . . . . . . . . . . . . . . . . . . . . . . . . . . . . 128
Windscreen wipers . . . . . . . . . . . . . . . . . . . . . . . . 129
Rear view mirrors . . . . . . . . . . . . . . . . . . . . . . . . . . 132
Seats and storage compartments . . . . . . . . . . 135
Manual adjustment of the front seats . . . . . . . . . 135
Electric adjustment of front seats* . . . . . . . . . . . 137
Lumbar support* . . . . . . . . . . . . . . . . . . . . . . . . . . 138
Driver seat memory* . . . . . . . . . . . . . . . . . . . . . . . 139 Head restraints . . . . . . . . . . . . . . . . . . . . . . . . . . . 141
Armrests . . . . . . . . . . . . . . . . . . . . . . . . . . . . . . . . 143
Luggage compartment . . . . . . . . . . . . . . . . . . . . . 144
Roof rack / roof rails* . . . . . . . . . . . . . . . . . . . . . . 152
Drink holder . . . . . . . . . . . . . . . . . . . . . . . . . . . . . . 153
Ashtray*, cigarette lighter* and electric sockets* . .154
Compartments . . . . . . . . . . . . . . . . . . . . . . . . . . . . 159
Air conditioning . . . . . . . . . . . . . . . . . . . . . . . . . . . 162
2C-Climatronic . . . . . . . . . . . . . . . . . . . . . . . . . . . . 162
Driving . . . . . . . . . . . . . . . . . . . . . . . . . . . . . . . . . . . . 172
Steering . . . . . . . . . . . . . . . . . . . . . . . . . . . . . . . . . 172
Safety . . . . . . . . . . . . . . . . . . . . . . . . . . . . . . . . . . . 172
Ignition lock . . . . . . . . . . . . . . . . . . . . . . . . . . . . . . 173
Starting and stopping the engine . . . . . . . . . . . . 174
Start-Stop function* . . . . . . . . . . . . . . . . . . . . . . . 176
Handbrake . . . . . . . . . . . . . . . . . . . . . . . . . . . . . . . 179
Parking aid acoustic system . . . . . . . . . . . . . . . . . 181
Cruise speed* (Cruise control system) . . . . . . . . 183
Manual gearbox . . . . . . . . . . . . . . . . . . . . . . . . . . 186
Automatic gearbox* . . . . . . . . . . . . . . . . . . . . . . . 187
Practical Tips . . . . . . . . . . . . . . . . . . . . . . . . . 195
Intelligent technology . . . . . . . . . . . . . . . . . . . . . 195
Electronic Stability Control (ESC) . . . . . . . . . . . . . 195
Brakes . . . . . . . . . . . . . . . . . . . . . . . . . . . . . . . . . . 198
Power steering . . . . . . . . . . . . . . . . . . . . . . . . . . . 199
Servotronic* . . . . . . . . . . . . . . . . . . . . . . . . . . . . . 200
Driving and the environment . . . . . . . . . . . . . . . 201
Running-in . . . . . . . . . . . . . . . . . . . . . . . . . . . . . . . 201
Exhaust gas purification system . . . . . . . . . . . . . 202
Economical and environmentally friendly driving 203
Driving abroad . . . . . . . . . . . . . . . . . . . . . . . . . . . . 205
3
Table of Contents
Page 8 of 325
6Content
Content
This manual is structured to provide the information you need in an organ-
ised way. The content of this Manual is divided into sections which belong
to chapters (e.g. “Air conditioning”). The entire manual is divided into five
large parts which are:
1. Safety First Information on the vehicle equipment relating to passive safety such as
seat belts, airbags, seats, etc.
2. Operating instructions
Information about the distribution of controls in the driver position of your
vehicle, about the seat adjustment possibilities, about how to create a suit-
able climate in the passenger compartment, etc.
3. Practical Tips
Advice relating to the driving, caring and maintenance of your vehicle and
certain problems you can solve yourself.
4. Technical specifications
Figures, values and the dimensions of your vehicle.
5. Alphabetic index
At the end of this manual there is a detailed alphabetical index, this will
help you to rapidly find the information you require.
Page 164 of 325
162Air conditioning
Air conditioning
2C-Climatronic
Description
The air conditioner is designed to automatically keep the
passenger compartment at the temperature you find most
comfortable at all times of the year. Recommended settings:
– Set the temperature to 22°C (71°F).
– Press the AUTO
⇒ Fig. 139 button.
The following setting quickly provides a comfortable temperature inside the
vehicle. We therefore recommend you do not modify the setting unless you
find this temperature uncomfortable or where circumstances require as
such.
The air conditioner provides heating and ventilation and also cools and de-
humidifies the air inside the vehicle.
The air conditioner is fully automatic and will constantly maintain the tem-
perature which has been set. To achieve this, the temperature of the air sup-
plied to the interior, the blower speed (volume of air delivery) and the air
distribution are regulated automatically. The system also takes solar radia-
tion into account and, therefore, no subsequent manual readjustments are
required. Therefore, automatic mode ⇒ page 165 should be used for the
comfort of all the passengers in virtually all conditions throughout the year.
Please note the following points: The humidity of the air is automatically reduced when the system cools the
interior of the vehicle. This helps to prevent condensation on the windows.
If the humidity and temperature outside the vehicle are high,
condensation
can drip off the evaporator in the air cooling system and form a pool under-
neath the vehicle. This is normal and does not indicate a leak.
If the outside temperature is low, the blower normally only switches to a
higher speed once the coolant has warmed up sufficiently (this does not ap-
ply to the defrost setting).
In order to achieve maximum engine power, the air conditioner compressor
is temporarily switched off when pulling away from standstill with full throt-
tle.
The compressor also switches off if the coolant temperature is excessively
high to ensure adequate engine cooling under extreme loads.
Pollution filter
The pollution filter (a combined particulate filter and activated charcoal fil-
ter) serves as a barrier against impurities in the outside air, including dust
and pollen.
For the air conditioner to work with maximum efficiency, the pollution filter
element must be replaced at the intervals specified in the Service Plan.
If the vehicle is driven in areas with a high level of air pollution and the filter
is no longer fully effective, it may be necessary to change the filter element
more frequently.
Page 165 of 325
163
Air conditioning
CAUTION
● If you suspect that the air conditioner system is damaged, switch over to
ECON mode to prevent further damage and have the system checked by a
specialised workshop.
● Repairs to the air conditioner require specialist knowledge and special
tools. For this reason, please contact a specialised workshop if the system
is not working properly.
Note
● Keep the air intake slots in front of the windscreen clear of snow, ice and
leaves to ensure unimpaired heating and cooling and to prevent the win-
dows misting over.
● The air from the outlets flows through the passenger compartment and
out through the slots below the rear window. Therefore, do not cover these
slots with items of clothing or other objects.
● The air conditioner operates most effectively with the windows and the
sliding/tilting sunroof* closed. However, if the vehicle has heated up after
standing in the sun for some time, the air inside can be cooled more quickly
by opening the windows briefly.
Safety FirstOperating InstructionsPractical TipsTechnical Specifications
Page 166 of 325
164Air conditioning
Controls
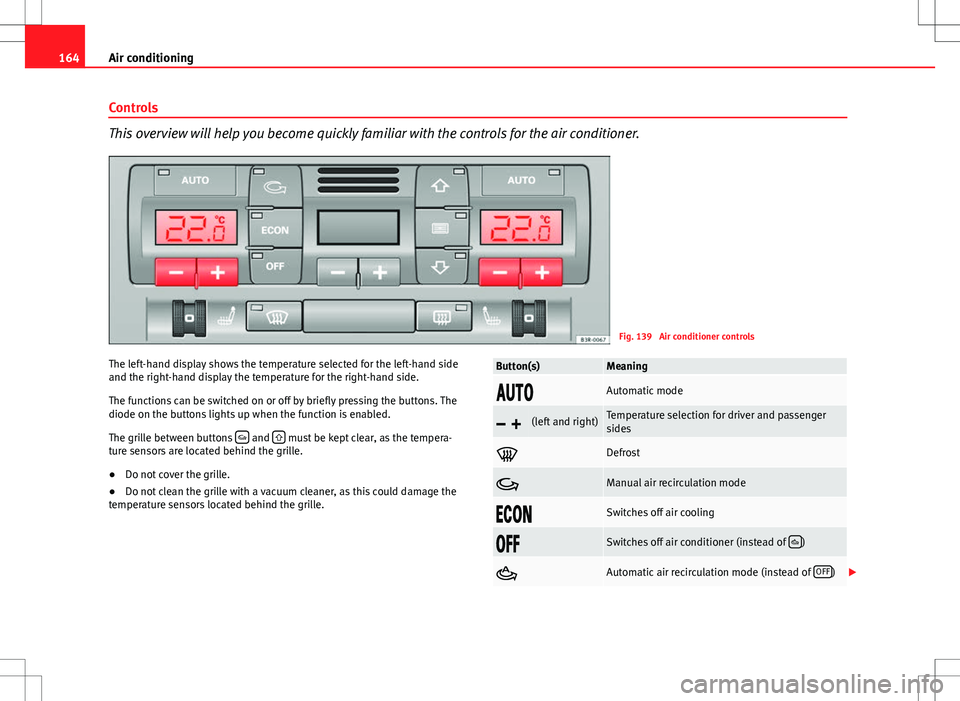
This overview will help you become quickly familiar with the controls for the air conditioner.
Fig. 139 Air conditioner controls
The left-hand display shows the temperature selected for the left-hand side
and the right-hand display the temperature for the right-hand side.
The functions can be switched on or off by briefly pressing the buttons. The
diode on the buttons lights up when the function is enabled.
The grille between buttons
and must be kept clear, as the tempera-
ture sensors are located behind the grille.
● Do not cover the grille.
● Do not clean the grille with a vacuum cleaner, as this could damage the
temperature sensors located behind the grille.
Button(s)Meaning
Automatic mode
(left and right)Temperature selection for driver and passenger
sides
Defrost
Manual air recirculation mode
Switches off air cooling
Switches off air conditioner (instead of )
Automatic air recirculation mode (instead of OFF)
Page 167 of 325

165
Air conditioning
Button(s)Meaning
(in the centre)Adjusts blower speed
Air to the windows
Air from the dashboard outlets
Air to the footwells
The , and buttons (which regulate air distribution) can either be
selected individually or in combination.
Automatic mode AUTO
Standard setting for all seasons.
Switching on automatic mode
– It is possible to select interior temperatures from +18°C (64°F)
to +29°C (86°F).
– Press the AUTO
⇒
Fig. 139 button.
The automatic mode maintains a constant temperature inside the vehicle
and dehumidifies the air. Air temperature, air delivery and air distribution
are regulated automatically to reach the desired interior temperature as
quickly as possible, and then to maintain this temperature. The system au-
tomatically compensates for any variations in the outside temperature and
for the effect of direct sunlight.
The automatic temperature regulation only operates at temperature settings
between +18°C and +29°C. If a temperature below +18°C is selected, LO ap-
pears on the display. If a temperature is selected which is higher than +29°C, the display will show
HI. In the maximum and minimum settings, the
climate control operates continuously with maximum cooling or heating
output and the temperature is not regulated automatically. The temperature
is not regulated.
Note
By keeping the AUTO button on the driver side pressed for several seconds,
the temperature of the passenger side can be set to the temperature of the
driver side or vice versa. The display indicates the new temperature value.
Selecting the temperature -
+
Separate temperatures can be selected for the driver and
front passenger sides.
– Press the -
or + buttons below the displays
⇒ Fig. 139 until
the desired temperature is selected for the driver side or front
passenger side.
The currently selected temperature setting is shown in the display above
the buttons.
By keeping the AUTO
button on the driver side pressed for several seconds,
the temperature of the passenger side can be set to the temperature of the
driver side or vice versa. The display indicates the new temperature value.
The previous temperature setting can be restored by resetting the display
on the driver or passenger side as required.
Safety FirstOperating InstructionsPractical TipsTechnical Specifications
Page 168 of 325

166Air conditioning
Defrosting
The windscreen and side windows are defrosted or demisted
as quickly as possible.
– To enable this mode, press the
⇒
Fig. 139 button.
– To switch off, press the
button again, or select the AUTO but-
ton.
The temperature is regulated automatically. The air output is increased to
maximum and most of the air comes out of outlets 1 and 2 ⇒ page 169.
The air recirculation and ECON modes are switched off when the
button
is pressed.
Air recirculation: manual activation
The air recirculation setting prevents fumes etc. from enter-
ing the interior.
Activating air recirculation mode
– Press button
⇒ Fig. 139 ⇒ .
Deactivating air recirculation mode
– Press the
button again or
– Press the AUTO
button or
– Press button
.
In this setting, the air in the vehicle is constantly recirculated. We recom-
mend using the air recirculation mode in the following circumstances: ●
When driving through a tunnel or in traffic congestions, to prevent ex-
haust gas entering the interior of the vehicle.
WARNING
Do not drive for too long with the air recirculation mode enabled because,
if the compressor is disconnected, the windscreen may mist up because
no fresh air is entering the interior of the vehicle, with the subsequent
risk of accidents.
ECON Mode (economy) ECON
ECON mode helps save fuel.
– To activate, press the ECON
button ⇒ Fig. 139.
– To deactivate, press the ECON
button again or select the AUTObutton.
Air cooling is disconnected in ECON mode. The heating and the blower are
adjusted automatically. “ECON” stands for “Economy”. Disconnecting air
cooling (compressor) reduces fuel consumption.
Please note that the interior temperature must not be lower than the outside
temperature in ECON mode. The blower does not cool or dehumidify the air
in the interior. The windows could therefore mist up.
In diesel vehicles, the auxiliary heater is switched off in ECON mode to save
fuel.
Page 169 of 325

167
Air conditioning
Note
If the diode on the ECON button continues to light up when the ECON mode
has been switched off (i.e. the air conditioner has been switched on) this is
due to a defect in one of the air conditioner components. If a malfunction
should occur, please contact a specialised workshop.
Air recirculation: automatic activation*
If the outside air is polluted by diesel and petrol emissions,
an air quality sensor in the vehicle will automatically switch
on the air recirculation.
Fig. 140 Button for auto-
matic air recirculation
Activating air recirculation mode
– Press the button
⇒
Fig. 140.
Deactivating air recirculation mode
– Press the
button again or –
Press the AUTO
button or
– Press button
.
The automatic air recirculation mode should normally be left switched on at
all times.
The system is ready to operate approx. 30 seconds after the engine ignition
key has been turned. During this initial period, fresh air is fed into the vehi-
cle.
If the air purity sensor in the air conditioner detects a certain concentration
of fumes in the outside air, the control unit will either pass the incoming air
through the pollution filter or automatically switch on the air recirculation. If
there is a high concentration of pollution in the outside air, the air condi-
tioner automatically switches to air recirculation and the supply of air from
the outside is cut off. As soon as the level of pollution decreases, air is fed
into the vehicle from the outside again.
The automatic air recirculation operates for a maximum period of 12 mi-
nutes. If the windows mist up when the automatic air recirculation is on,
press the
button immediately.
The automatic air recirculation switches itself off under certain circumstan-
ces (for instance if
or is selected). In “ECON” and at temperatures
lower than approx. 8°C below zero, the automatic air recirculation mode is
limited to 12 seconds.
Safety FirstOperating InstructionsPractical TipsTechnical Specifications
Page 170 of 325

168Air conditioning
Switching the temperature display from °C to °F and vice
versa
The outside temperature indicator can be switched from °C
(degrees Celsius) to °F (degrees Fahrenheit) and vice versa.
– Press and hold the
button for air recirculation mode and
briefly press the plus button of the left-hand temperature selec-
tor ⇒ Fig. 139.
Switching the air conditioner on/off
Switching the air conditioner off: models with an OFF button
– Press the OFF
button. The air conditioner is switched off and
the supply of air from outside the vehicle is cut off.
Switching the air conditioner off: models with a
button
– Keep pressing the -
button for the blower until the display seg-
ment is empty. The air conditioner is switched off and the sup-
ply of air from outside the vehicle is cut off.
Switching the air conditioner on: models with an OFF
button
– Press the OFF
button again, or
– Press the AUTO
button or
– Press one of the air distribution buttons
, or .
Switching the air conditioner on: models with a
button
– Press the +
button for the blower, or –
Press the AUTO
button or
– Press one of the air distribution buttons
, or .
The air conditioner also starts to operate if one of the blower or temperature
selector buttons is pressed.
Blower speed -
+
The automatically selected blower speed can be reduced or
increased manually.
– Press the -
and + buttons in the centre of the control panel
⇒ Fig. 139 to set the blower to the desired speed (and regulate the volume of air delivery).
The air conditioner system automatically regulates the blower speed accord-
ing to the interior temperature. However, you can also adjust the air delivery
manually. The current blower setting is illustrated by a bar in the middle dis-
play (above the buttons).
Automatic change of passenger temperature
In order to automatically set the passenger temperature like the driver tem-
perature, press the AUTO button on the driver side for 2 seconds approxi-
mately. In order to automatically set the driver temperature like the passen-
ger temperature, press the AUTO
button on the passenger side for 2 sec-
onds approximately.
Page 171 of 325
169
Air conditioning
Air outlets
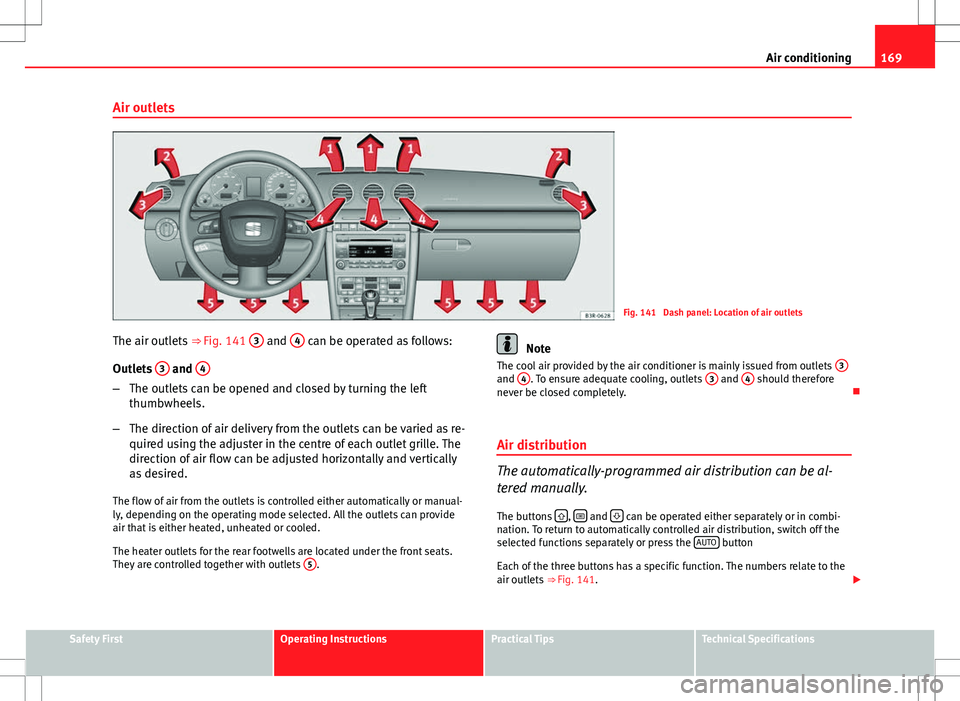
Fig. 141 Dash panel: Location of air outlets
The air outlets ⇒ Fig. 141 3
and 4 can be operated as follows:
Outlets 3
and 4
–
The outlets can be opened and closed by turning the left
thumbwheels.
– The direction of air delivery from the outlets can be varied as re-
quired using the adjuster in the centre of each outlet grille. The
direction of air flow can be adjusted horizontally and vertically
as desired.
The flow of air from the outlets is controlled either automatically or manual-
ly, depending on the operating mode selected. All the outlets can provide
air that is either heated, unheated or cooled.
The heater outlets for the rear footwells are located under the front seats.
They are controlled together with outlets 5
.
Note
The cool air provided by the air conditioner is mainly issued from outlets 3
and 4. To ensure adequate cooling, outlets 3 and 4 should therefore
never be closed completely.
Air distribution
The automatically-programmed air distribution can be al-
tered manually.
The buttons
, and can be operated either separately or in combi-
nation. To return to automatically controlled air distribution, switch off the
selected functions separately or press the AUTO
button
Each of the three buttons has a specific function. The numbers relate to the
air outlets ⇒ Fig. 141.
Safety FirstOperating InstructionsPractical TipsTechnical Specifications