ECO mode Seat Exeo ST 2013 User Guide
[x] Cancel search | Manufacturer: SEAT, Model Year: 2013, Model line: Exeo ST, Model: Seat Exeo ST 2013Pages: 327, PDF Size: 5.07 MB
Page 167 of 327
165
Air conditioning
Controls
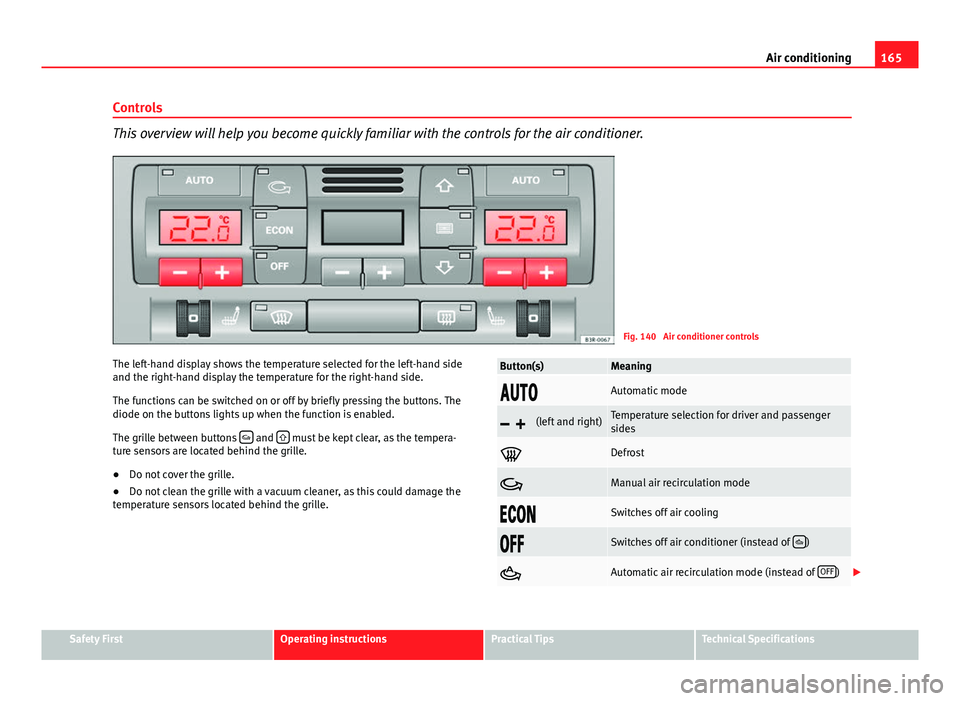
This overview will help you become quickly familiar with the controls for the air conditioner.
Fig. 140 Air conditioner controls
The left-hand display shows the temperature selected for the left-hand side
and the right-hand display the temperature for the right-hand side.
The functions can be switched on or off by briefly pressing the buttons. The
diode on the buttons lights up when the function is enabled.
The grille between buttons
and must be kept clear, as the tempera-
ture sensors are located behind the grille.
● Do not cover the grille.
● Do not clean the grille with a vacuum cleaner, as this could damage the
temperature sensors located behind the grille.
Button(s)Meaning
Automatic mode
(left and right)Temperature selection for driver and passenger
sides
Defrost
Manual air recirculation mode
Switches off air cooling
Switches off air conditioner (instead of )
Automatic air recirculation mode (instead of OFF)
Safety FirstOperating instructionsPractical TipsTechnical Specifications
Page 168 of 327
166Air conditioning
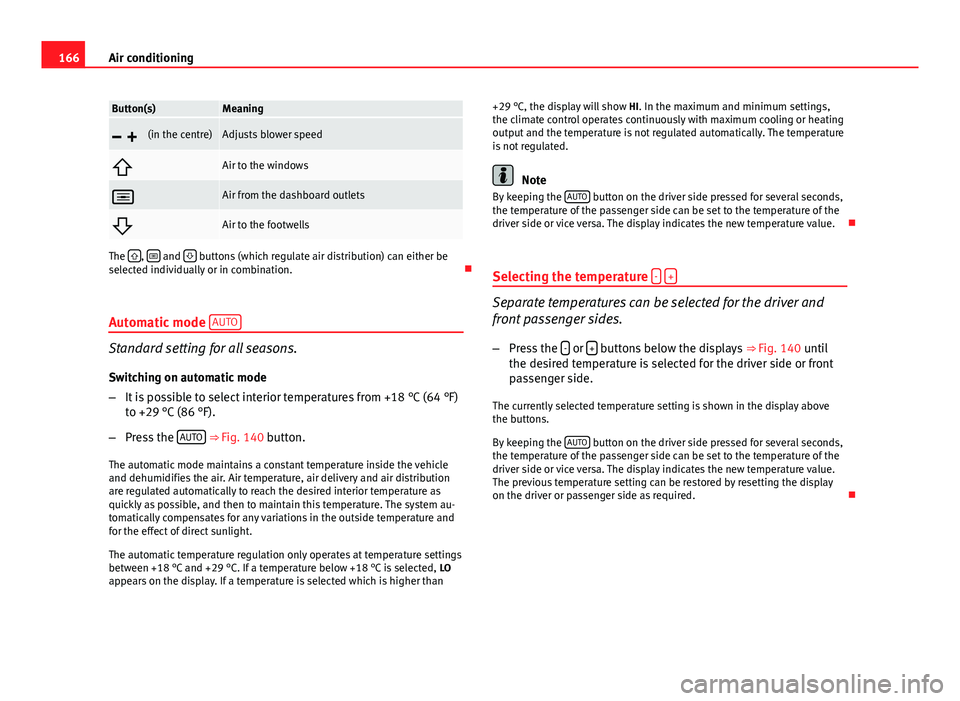
Button(s)Meaning
(in the centre)Adjusts blower speed
Air to the windows
Air from the dashboard outlets
Air to the footwells
The , and buttons (which regulate air distribution) can either be
selected individually or in combination.
Automatic mode AUTO
Standard setting for all seasons.
Switching on automatic mode
– It is possible to select interior temperatures from +18 °C (64 °F)
to +29 °C (86 °F).
– Press the AUTO
⇒
Fig. 140 button.
The automatic mode maintains a constant temperature inside the vehicle
and dehumidifies the air. Air temperature, air delivery and air distribution
are regulated automatically to reach the desired interior temperature as
quickly as possible, and then to maintain this temperature. The system au-
tomatically compensates for any variations in the outside temperature and
for the effect of direct sunlight.
The automatic temperature regulation only operates at temperature settings
between +18 °C and +29 °C. If a temperature below +18 °C is selected, LO
appears on the display. If a temperature is selected which is higher than +29 °C, the display will show
HI. In the maximum and minimum settings,
the climate control operates continuously with maximum cooling or heating
output and the temperature is not regulated automatically. The temperature
is not regulated.
Note
By keeping the AUTO button on the driver side pressed for several seconds,
the temperature of the passenger side can be set to the temperature of the
driver side or vice versa. The display indicates the new temperature value.
Selecting the temperature -
+
Separate temperatures can be selected for the driver and
front passenger sides.
– Press the -
or + buttons below the displays
⇒ Fig. 140 until
the desired temperature is selected for the driver side or front
passenger side.
The currently selected temperature setting is shown in the display above
the buttons.
By keeping the AUTO
button on the driver side pressed for several seconds,
the temperature of the passenger side can be set to the temperature of the
driver side or vice versa. The display indicates the new temperature value.
The previous temperature setting can be restored by resetting the display
on the driver or passenger side as required.
Page 169 of 327

167
Air conditioning
Defrosting
The windscreen and side windows are defrosted or demisted
as quickly as possible.
– To enable this mode, press the
⇒
Fig. 140 button.
– To switch off, press the
button again, or select the AUTO but-
ton.
The temperature is regulated automatically. The air output is increased to
maximum and most of the air comes out of outlets 1 and 2 ⇒ page 170.
The air recirculation and ECON modes are switched off when the
button
is pressed.
Air recirculation: manual activation
The air recirculation setting prevents fumes etc. from enter-
ing the interior.
Activating air recirculation mode
– Press button
⇒ Fig. 140 ⇒ .
Deactivating air recirculation mode
– Press the
button again or
– Press the AUTO
button or
– Press button
.
In this setting, the air in the vehicle is constantly recirculated. We recom-
mend using the air recirculation mode in the following circumstances: ●
When driving through a tunnel or in traffic congestions, to prevent ex-
haust gas entering the interior of the vehicle.
WARNING
Do not drive for too long with the air recirculation mode enabled because,
if the compressor is disconnected, the windscreen may mist up because
no fresh air is entering the interior of the vehicle, with the subsequent
risk of accidents.
ECON Mode (economy) ECON
ECON mode helps save fuel.
– To activate, press the ECON
button ⇒ Fig. 140.
– To deactivate, press the ECON
button again or select the AUTObutton.
Air cooling is disconnected in ECON mode. The heating and the blower are
adjusted automatically. “ECON” stands for “Economy”. Disconnecting air
cooling (compressor) reduces fuel consumption.
Please note that the interior temperature must not be lower than the outside
temperature in ECON mode. The blower does not cool or dehumidify the air
in the interior. The windows could therefore mist up.
In diesel vehicles, the auxiliary heater is switched off in ECON mode to save
fuel.
Safety FirstOperating instructionsPractical TipsTechnical Specifications
Page 170 of 327
168Air conditioning
Note
If the diode on the ECON button continues to light up when the ECON mode
has been switched off (i.e. the air conditioner has been switched on) this is
due to a defect in one of the air conditioner components. If a malfunction
should occur, please contact a specialised workshop.
Air recirculation: automatic activation*
If the outside air is polluted by diesel and petrol emissions,
an air quality sensor in the vehicle will automatically switch
on the air recirculation.
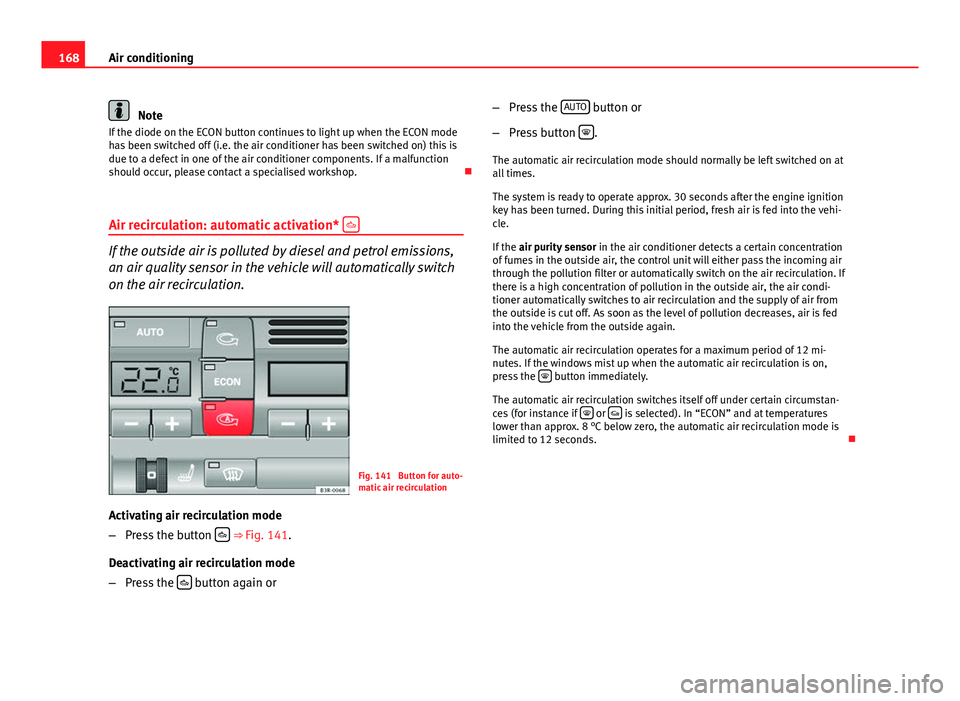
Fig. 141 Button for auto-
matic air recirculation
Activating air recirculation mode
– Press the button
⇒
Fig. 141.
Deactivating air recirculation mode
– Press the
button again or –
Press the AUTO
button or
– Press button
.
The automatic air recirculation mode should normally be left switched on at
all times.
The system is ready to operate approx. 30 seconds after the engine ignition
key has been turned. During this initial period, fresh air is fed into the vehi-
cle.
If the air purity sensor in the air conditioner detects a certain concentration
of fumes in the outside air, the control unit will either pass the incoming air
through the pollution filter or automatically switch on the air recirculation. If
there is a high concentration of pollution in the outside air, the air condi-
tioner automatically switches to air recirculation and the supply of air from
the outside is cut off. As soon as the level of pollution decreases, air is fed
into the vehicle from the outside again.
The automatic air recirculation operates for a maximum period of 12 mi-
nutes. If the windows mist up when the automatic air recirculation is on,
press the
button immediately.
The automatic air recirculation switches itself off under certain circumstan-
ces (for instance if
or is selected). In “ECON” and at temperatures
lower than approx. 8 °C below zero, the automatic air recirculation mode is
limited to 12 seconds.
Page 171 of 327

169
Air conditioning
Switching the temperature display from °C to °F and vice
versa
The outside temperature indicator can be switched from °C
(degrees Celsius) to °F (degrees Fahrenheit) and vice versa. – Press and hold the
button for air recirculation mode and
briefly press the plus button of the left-hand temperature selec-
tor ⇒ Fig. 140.
Switching the air conditioner on/off
Switching the air conditioner off: models with an OFF button
– Press the OFF
button. The air conditioner is switched off and
the supply of air from outside the vehicle is cut off.
Switching the air conditioner off: models with a
button
– Keep pressing the -
button for the blower until the display seg-
ment is empty. The air conditioner is switched off and the sup-
ply of air from outside the vehicle is cut off.
Switching the air conditioner on: models with an OFF
button
– Press the OFF
button again, or
– Press the AUTO
button or
– Press one of the air distribution buttons
, or .
Switching the air conditioner on: models with a
button
– Press the +
button for the blower, or –
Press the AUTO
button or
– Press one of the air distribution buttons
, or .
The air conditioner also starts to operate if one of the blower or temperature
selector buttons is pressed.
Blower speed -
+
The automatically selected blower speed can be reduced or
increased manually.
– Press the -
and + buttons in the centre of the control panel
⇒ Fig. 140 to set the blower to the desired speed (and regulate the volume of air delivery).
The air conditioner system automatically regulates the blower speed accord-
ing to the interior temperature. However, you can also adjust the air delivery
manually. The current blower setting is illustrated by a bar in the middle dis-
play (above the buttons).
Automatic change of passenger temperature
In order to automatically set the passenger temperature like the driver tem-
perature, press the AUTO button on the driver side for 2 seconds approxi-
mately. In order to automatically set the driver temperature like the passen-
ger temperature, press the AUTO
button on the passenger side for 2 sec-
onds approximately.
Safety FirstOperating instructionsPractical TipsTechnical Specifications
Page 173 of 327

171
Air conditioning
Air directed to windows
This setting directs all the air to outlets 1 and 2. Unlike in setting , the
volume of air delivery remains the same.
Air to the driver/front passenger
All the air comes from outlets 3 and 4 in the dash panel and from the rear of
the centre console.
Air to the footwells
Most of the air emerges from outlets 5 and the outlets under the front seats.
Some of the air will also be issued from outlets 3 and 4.
Note
In all of the above air distribution settings, a small amount of air will still
come from the other outlets.
Economical use of the air conditioner
Economical use of the air conditioner will help save fuel.
Engine power is reduced and fuel consumption increases when the
air conditioner is in cooling mode. To ensure that the system is on-
ly switched on when it is really necessary, please note the follow-
ing points:
– Select ECON mode if you wish to save fuel.
– Select ECON mode if you decide to open the windows or sun-
roof* while driving.
– If the vehicle has heated up after standing in the sun, open the
windows and doors for a short time to cool the vehicle.
For the sake of the environment
By saving fuel you also reduce the amount of pollutants emitted from your
vehicle.
Key settings
When the ignition is switched on, the air conditioner set-
tings assigned to the key are selected automatically.
The air conditioner settings selected are automatically stored and assigned
to the key in use. When the vehicle is started, the air conditioner automati-
cally selects the settings assigned to the key. Hence, every driver automati-
cally obtains his/her preferred settings without having to select them man-
ually.
Note
Should another driver use the key and enter other settings, the previous
settings will be deleted.
Solar-powered blower/sunroof*
If the vehicle is parked in sufficiently strong sunlight, the
blower will operate in solar-powered mode when the igni-
tion is switched off.
After the ignition is switched off, the blower is supplied with electrical pow-
er from the sunroof. Please ensure that outlets 3 and 4 are open ⇒ Fig. 142
to ensure the best possible ventilation.
The blower only works when the sunroof is closed or tilted open at the rear.
Safety FirstOperating instructionsPractical TipsTechnical Specifications
Page 179 of 327

177
Driving
WARNING
● Never switch the engine off until the vehicle is stationary.
● The brake servo and the power steering system work only when the
engine is running. You need more strength to steer and brake the vehicle
when the engine is switched off. Given that you will be unable to steer
and brake as usual, this could lead to a risk of accidents and injuries.
CAUTION
If the engine has been running under high load for a long time, there is a
risk of heat building up in the engine compartment after the engine has
been switched off; this could cause engine damage. Therefore, you should
let the engine idle for approximately 2 minutes before you switch it off.
Note
After the engine is switched off the radiator fan may run on for up to 10 mi-
nutes, even if the ignition is switched off. It may also start running again af-
ter some time if the coolant temperature rises due to a build-up of heat un-
der the bonnet, or if the engine is already warm and the engine compart-
ment is heated up further by direct sunlight.
Start-Stop function* Description and operation
The Start-Stop function stops the engine when the vehicle is stop-
ped and starts it automatically when required.
– When the vehicle is stopped, put it in neutral and release the
clutch pedal. The engine will stop. –
When the clutch pedal is pressed, the engine starts again.
– The instrument panel display shows information about the sta-
tus of the Start-Stop function ⇒ Fig. 149.
Start-Stop function conditions
● The driver seat belt must be buckled.
● The bonnet must be closed.
● The engine must be at operating temperature.
● The steering wheel must not be turned more than 270°.
● The vehicle must not be on a steep gradient.
● The vehicle must not be in reverse.
● A trailer must not be connected.
● The temperature of the passenger compartment must be within the con-
venience limits ( ECON
button should not be selected).
● The windscreen de-mist function must be off.
● Otherwise it requires more than 50% of the airflow that the fan can sup-
ply.
● The temperature must not be set to HI or LO.
● The driver door must be closed.
● The diesel particulate filter must not be in regeneration mode, for diesel
engines.
● The battery charge must not be low for the next start.
● The battery temperature must be between -1 °C and 60 °C.
Start-Stop function interruption
In the following situations, the Start-Stop function will be interrupted and
the engine will automatically start:
● The vehicle starts moving.
● The brake pedal is pressed several times in a row.
● The battery has been discharged excessively.
Safety FirstOperating instructionsPractical TipsTechnical Specifications
Page 186 of 327
184Driving
WARNING
● The parking aid is not a replacement for driver awareness. The driver
is personally responsible for safe parking and other manoeuvres.
● The sensors have blind spots in which obstacles are not registered.
Always look out for small children and animals because the system will
not always detect them. Always pay attention when reversing to avoid ac-
cidents.
● Always keep a close eye on the area around the vehicle and make full
use of the rear vision mirrors.
CAUTION
Please note that low obstacles detected by the system may no longer be
registered by the sensors as the vehicle moves closer, so the system will not
give any further warning. Certain kinds of obstacles (such as wire fences,
chains, thin painted posts or trailer draw bars, etc) may not always be de-
tected by the system, so take care not to damage the vehicle in such cases.
Note
● Please refer to the notes on towing ⇒ page 184.
● There is a slight delay in the picture display.
Towing bracket*
In towing mode, the rear parking aid sensors are not enabled when you se-
lect reverse gear or press the switch . This function may not be guaran-
teed on towing brackets that are not factory fitted. This results in the follow-
ing restrictions:
SEAT Parking System*
There is no distance warning. SEAT Parking System Plus*
There is no rear distance warning. The system will still give a warning when
obstacles are detected while driving forward.
Fault messages*
If you hear a long beep for a few seconds and the LED on the button*
starts flashing when you switch on the parking aid, a system fault has oc-
curred. Please have the fault corrected by a Technical Service or specialised
workshop.
Note
If the fault is not corrected before you switch off the ignition, it will only be
indicated by the flashing LED on the switch * the next time you switch on
the parking aid.
Cruise speed* (Cruise control system)
Introduction
The cruise control system allows you to maintain a constant
speed. Using this system, any speed over 30 km/h can be kept constant, as long as
the engine power allows it. This is subject to power output and braking abil-
ity of the engine. This helps to reduce fatigue, especially on long journeys.
The control lamp on the instrument panel lights up when the cruise con-
trol system is operating.
Page 190 of 327
188Driving
WARNING
● When the engine is running, the vehicle will start to move as soon as
a gear is engaged and the clutch released.
● Never select the reverse gear when the vehicle is in motion. Risk of
accident.
Note
● Do not rest your hand on the gear lever while driving. The pressure of
your hand could cause premature wear on the selector forks in the gearbox.
● When changing gear, you should always depress the clutch fully to
avoid unnecessary wear and damage.
● Do not hold the vehicle “on the clutch” on hills. This causes premature
wear and damage to the clutch.
● Do not leave your foot on the clutch pedal; although the pressure may
seem insignificant, it can cause the premature wear of the clutch plate. Use
the foot rest when you do not need to change gear.
Automatic gearbox* Introduction
multitronic ®
, tiptronic (7-speed gearbox)
Vehicles with multitronic ®
gearbox
The vehicle is equipped with an electronically controlled continuously varia-
ble transmission (multitronic ®
). Unlike conventional automatics, the gear
ratios are not shifted in fixed steps but continuously variable. This gives
smoother transmission and makes for better fuel economy. The gearbox selects the gear ratio and shifts up or down automatically ac-
cording to the gear change programmes stored in the control unit
⇒ page 192.
If desired, you can also select the gears
manually (tiptronic mode)
⇒ page 193.
Please note that in vehicles with a multitronic® gearbox, torque is transmit-
ted via a multi-plate clutch, and not via a torque converter as on convention-
al automatics. This means that the vehicle will not “creep” as much as con-
ventional automatics when the engine is idling if you stop temporarily with
the selector lever in position D, S or R.
Vehicles with tiptronic gearbox
The vehicle is equipped with an electronically controlled 7-speed automatic
gearbox. The gearbox changes up and down automatically.
If desired, you can also select the gears manually (tiptronic mode)
⇒ page 193.
Page 193 of 327

191
Driving
WARNING (Continued)
to “creep”. The throttle must on no account be opened inadvertently (for
instance by hand from the engine compartment) when a gear is engaged
with the vehicle stationary. The vehicle could otherwise start moving im-
mediately (in some cases even if the parking brake is engaged) and pos-
sibly cause an accident.
● To avoid accidents, apply the parking brake and put the selector lever
in position P before opening the bonnet and working on the vehicle with
the engine running. Please always observe the important safety warn-
ings ⇒ page 235, Work in the engine compartment.
Note
● Applies to vehicles with tiptronic gearbox:
● If the lever is moved accidentally to N when driving, release the accelera-
tor and let the engine speed drop to idling before selecting D or S again.
● For the sake of fuel economy (and the environment), the gearbox ratios
on some models are designed so that maximum speed is only obtained
when the gear lever is in position S. Selector lever lock
The selector lever lock prevents gears from being engaged
inadvertently, so that the vehicle is not set in motion unin-
tentionally.
Fig. 160 Selector lever
lock
The selector lever lock is released as follows:
– Switch the ignition on.
– Press the brake pedal and at the same time press in the inter-
lock button.
Automatic selector lever lock
With the ignition turned on, the selector lever is locked in the positions P
and N. To remove it from these positions, press on the brake. The following
message appears in the instrument panel as a reminder for the driver when
the selector lever is in position P or N: WHEN STATIONARY APPLY FOOTBRAKE WHILE SELECTING GEAR
Safety FirstOperating instructionsPractical TipsTechnical Specifications