buttons Seat Ibiza 2017 Edition 11.17 User Guide
[x] Cancel search | Manufacturer: SEAT, Model Year: 2017, Model line: Ibiza, Model: Seat Ibiza 2017Pages: 312, PDF Size: 6.51 MB
Page 134 of 312

Operation
For the sake of the environment
Please dispose of your used batteries correct-
ly and w ith r
espect for the environment.Synchronising the remote control key
If it is not possible to unlock or lock the door
with the r
emot
e control, it should be re-
synchronised.
While the vehicle is open:
– Press the button 2
› ›
›
Fig. 136 on the re-
mote control.
– Then close the vehicle using the key shaft
within one minute.
Whi
le the vehicle is closed:
– Press the button 1
› ›
›
Fig. 136 on the re-
mote control.
– Then close the vehicle using the key shaft
within one minute.
It
is possible that the vehicle could no longer
be opened and closed with the remote con-
trol if the button is repeatedly pressed out-
side of the effective range of the radio fre-
quency remote control. The remote control
key will have to be resynchronised. Spare remote control keys are available at
your T
echnical Service, where they must be
matched to the locking system.
Up to five remote control keys can be used.
Central locking system Des
cription Read the additional information carefully
›› ›
page 15.
The central locking system enables you to
lock and unlock all doors and the rear lid by
just pushing the button.
Central locking can be activated by using any
of the following options:
● the key, by inserting it into the driver door
cylinder and r ot
ating it in the opening direc-
tion. Depending on the vehicle version, ei-
ther all doors will be unlocked or only the
driver door will be unlocked. All doors will be
locked on locking the vehicle using the key.
● the interior central lock button
›››
page 134.
● the radio frequency remote control , usin
g
the buttons on the key ›››
page 130.
Various functions are available to improve
the vehicle safety: Locking system “Safe*”
Selective* u
nlocking system
Self-locking system to prevent involunta-
ry unlocking
Automatic speed dependent locking and
unlocking system*
Emergency unlocking system
Unlocking the vehicle* Press the button ››› Fig. 136 on the re-
mote control to unlock all the doors and
the rear lid.
Locking the vehicle* Press the button ››› Fig. 136 on the re-
mote control to lock all doors and the
rear lid or turn the key in the door to lock
all doors and the rear lid. WARNING
● Loc k
ing from the outside carelessly or with-
out good visibility may lead to bruising, par-
ticularly in the case of children.
● When locking a vehicle, never leave chil-
dren un
accompanied inside, as from the out-
side it will be difficult to provide assistance if
required.
● Having the doors locked prevents intruders
from gettin
g in, for example when stopped at
a traffic light. –
–
–
–
–
–
–
132
Page 144 of 312

Operation
neither the driver door nor the front passen-
g er door h
a
s been opened and the key has
not been removed from the ignition.
Safety switch *
The safety switch ››› Fig. 146 5 on the driver
door c an be u
sed t
o disable the electric win-
dow buttons on the rear doors.
● Safety switch not pressed: button
s on rear
doors are activated.
● Safety switch pressed: button
s on rear
doors are deactivated. The safety control
symbol lights up in yellow if the buttons
on the rear doors are switched off. WARNING
Observe the safety warnings ›››
in Set of
key s on p
age 130.
● Incorrect use of the electric windows can
res
ult in injury.
● Never close the rear lid without observing
and ensurin
g it is clear, to do otherwise could
cause serious injury to you and third parties.
Make sure that no one is in the path of a win-
dow.
● If the ignition is switched on, the electric
equipment cou
ld be activated with risk of in-
jury, for example, in the electric windows.
● The doors can be locked using the remote
contro
l key. This could become an obstacle
for assistance in an emergency situation. ●
Theref or
e always take the key with you
when you leave the vehicle.
● The electric windows will work until the ig-
nition has
been switched off and one of the
front doors has been opened.
● If necessary, use the safety switch to disa-
ble the r
ear electric windows. Make sure that
they have been disabled. Note
If the window is not able to close because it
i s s
tiff or because of an obstruction, the win-
dow will automatically open again
››› page 142. If this happens, check why the
window could not be closed before attempt-
ing to close it again. Roll-back function
The roll-back function reduces the risk of in-
jur
y
when the el
ectric windows close.
● If a window is obstructed when closing au-
tomatic
ally, the window stops at this point
and lowers immediately ››› .
● Next, check why the window does not close
bef or
e att
empting it again.
● If you try within the following 10 seconds
and the window c
loses again with difficulty
or there is an obstruction, the automatic clos-
ing will stop working for 10 seconds. ●
If the windo
w is still obstructed, the win-
dow will stop at this point.
● If there is no obvious reason why the win-
dow cannot
be closed, try to close it again by
pulling the tab within ten seconds. The win-
dow closes with maximum force. The roll-
back function is now deactivated.
If more than 10 seconds pass, the window
will open fully when you operate one of the
buttons. One-touch closing is reactivated. WARNING
● Alw a
ys take the ignition key with you when
leaving the vehicle, even if you only intend to
be gone for a short time. Please ensure that
children are never left alone inside the vehi-
cle.
● The electric windows will work until the ig-
nition has
been switched off and one of the
front doors has been opened.
● Closing the windows without observing and
ensurin
g it is clear could cause serious injury
to you and third parties. Make sure that no
one is in the path of a window.
● Never allow people to remain in the vehicle
when you c
lose the vehicle from the outside.
The windows cannot be opened even in an
emergency.
● The roll-back function does not prevent fin-
gers
or other parts of the body getting
pinched against the window frame. Risk of
accident. 142
Page 145 of 312

Opening and closing
Convenience opening and closing Use the convenience opening/closing func-
tion to e
a
sily open/close all the windows and
the sliding/tilting sunroof* from the outside.
Convenience open function
– Press and hold the button on the r
emote
control key until all the windows and the
sliding/tilting sunroof* have reached the
desired position, or
– First unlock the vehicle using the button
on the r
emote control key and then keep
the key in the driver door lock until all the
windows and the sliding/tilting sunroof*
have reached the required position.
Convenience close function
– Press and hold button on the remote
c
ontrol key until all the windows and the
sliding/tilting sunroof* are closed ››› , or
– Keep the key in the driver door in the "lock"
po s
ition u
ntil all the windows and the slid-
ing/tilting sunroof* are closed.
Programming convenience opening in the
Easy Connect*
– Select: button > SETTINGS
fu
nction
b
utton > Opening and closing > Elec-
tric windows > Convenience open-
ing , to choose between all the windows (All
), only the driver’s window ( Driver)
or none (Deactivated ). WARNING
● Tak e c
are when closing the sliding/tilting
sunroof* and windows. There is a risk of suf-
fering injury.
● For safety reasons, you should only use the
remote c
ontrol open and close functions with-
in about 2 metres of the vehicle. To avoid in-
juries, always keep an eye on the windows
and the sliding/tilting sunroof* when press-
ing the button to close them. The windows
stop moving as soon as the button is re-
leased. One-touch opening and closing*
One-touch opening and closing means you
do not
h
av
e to hold down the button.
Buttons ›››
Fig. 146 1 ,
2 ,
3 and
4 have
tw o po
s
itions for opening windows and two
for closing them. This makes it easier to open
and close windows to the desired position.
One-touch closing
– Pull up the window button briefly up to the
second pos
ition. The window closes fully. One-touch opening
– Push down the window button briefly up to
the second pos
ition. The window opens
fully.
Resetting one-touch opening and closing
– The automatic open and close function will
not work
if the battery has been temporari-
ly disconnected. The function can be re-
stored as follows:
– Close the window as far as it will go by lift-
ing and hol
ding the electric window switch.
– Release the switch and then lift it again for
1 second. Thi
s will re-enable the automatic
function.
If you push (or pull) a button to the first
stage, the window will open (or close) until
you release the button. If you push or lift the
button briefly to the second stage, the win-
dow will open (one-touch opening) or close
(one-touch closing) automatically. If you op-
erate the button while the window is opening
or closing, it stops at this position.
143
Technical data
Advice
Operation
Emergencies
Safety
Page 176 of 312

Operation
● Adju s
t
the vents so that the air flow is di-
rected slightly upwards.
Change between degrees Centigrade and de-
grees Fahrenheit
The units of degrees can be changed via the
Easy Connect system using the button
and the f u
nction b
utton SETTINGS >
Units > Temperature .
Automatic mode
Automatic mode is used to maintain a con-
stant temperature and demist the windows
inside the vehicle.
● Set a interior temperature between +16°C
(+64°F) and +29°C (+84°F).
● Adjus
t the vents so that the air flow is di-
rected s
lightly upwards.
● Press the butt
on, AUTO is displayed on
the screen.
Automatic mode is switched off by pressing
the air distribution buttons or increasing or
decreasing the blower speed. However, the
temperature remains regulated.
Adjusting the temperature
● When you switch on the ignition, control 1›››
Fig. 176 can be u sed t
o set the required in-
terior temperature. It is possible to select interior temperatures
from +16°C
(+64°F) t
o +29°C (+84°F). In this
range the temperature is regulated automati-
cally. If a temperature below +16°C (+64°F) is
selected, “LO” is displayed on the screen. If a
temperature above +29°C (+84°F) is selected,
“HI” is displayed on the screen. At both ex-
tremes, Climatronic works at maximum cool-
ing or heating power, respectively. The tem-
perature is not regulated.
In the event of prolonged, irregular distribu-
tion of the air flow from the outlets (particu-
larly the footwells) and significant differen-
ces in temperature, e.g. on leaving the vehi-
cle, sensitive people may catch cold.
Fan regulation
Climatronic automatically regulates blower
speed according to the interior temperature.
It is possible, however, to set the blower
speed to suit requirements.
● Press the 2 buttons to increase or reduce
f an s
peed.
C
limatronic will switch off when the blower
switches off.
Turn on windscreen defrost
● Press the button ›››
Fig. 176. Switching off windscreen defrosting
●
Press the button sev
eral times or
press the button.
The temperature is regulated automatically.
The air output from the vents ››› Fig. 173 2 is increased.
WARNING
Read and observe the safety warnings ›››
in
Genera l
notes on page 166. Note
● A v i
sit to the specialised service once a
year is recommended to clean the Climatronic
system.
● The interior temperature sensor is at the
bottom. Do not c
over it with stickers or the
like, as this could have a negative effect on
Climatronic operations. 174
Page 188 of 312

Operation
the
button and the
S
ET
TINGS and
E SC
System function buttons.
WARNING
You should switch on the ESC Sport mode on-
ly if the tr
affic conditions and your driving
ability allow you to do so safely: risk of skid-
ding!
● With ESC in Sport mode, the stabilising
function w
ill be limited to allow for a sportier
drive. The driving wheels could spin and the
vehicle could skid. Note
If the ASR is disconnected or the ESC’s Sport
mode is sel
ected, cruise control* will be
switched off. Electronic differential lock (EDS)*
The EDL operates along with the ABS in vehi-
c
l
e
s equipped with Electronic Stability Con-
trol (ESC)*.
EDL helps the vehicle to start moving, accel-
erate and climb a gradient in slippery condi-
tions where this may otherwise be difficult or
even impossible.
It uses the ABS sensors to monitor the speed
of the driven wheels.
At speeds of up to approximately 80 km/h
(50 mph), it is able to balance out differences in the speed of the driven wheels of approxi-
mately
100 rpm/min caused by a partially
slippery road surface. It does this by braking
the wheel which has lost traction and distrib-
uting more driving force to the other driven
wheel via the differential.
To prevent the disc brake of the braking
wheel from overheating, the EDL cuts out au-
tomatically if subjected to excessive loads.
The vehicle will continue to function normally
without EDL. For this reason, the driver is not
informed that the EDL has been switched off.
The EDL will switch on again automatically
when the brake has cooled down.
Control lamp
A malfunction in the EDL is indicated by the
ESC control lamp . Take the vehicle to a
specialised workshop as soon as possible. WARNING
● When acc el
erating on a slippery surface,
for example on ice and snow, press the accel-
erator carefully. Despite EDL, the driven
wheels may start to spin. This could impair
the vehicle's stability.
● Always adapt your driving style to suit road
conditions
and the traffic situation. Do not let
the extra safety afforded by EDL tempt you in-
to taking any risks when driving, this can
cause accidents. CAUTION
Modifications to the vehicle (e.g. to the en-
gine, the brak e sy
stem, running gear or any
components affecting the wheels and tyres)
could affect the efficiency of the EDL
››› page 247. Hydraulic Brake Assist (HBA)*
The function (Hydraulic Brake Assist HBA) is
only
inc
luded in vehicles with ESC.
In an emergency, most drivers brake in time,
but not with maximum force. This results in
unnecessarily long braking distances.
This is when the brake assist system comes
into action. When pressing the brake pedal
rapidly, the assistant interprets it as an emer-
gency. It very quickly builds up the full brake
pressure so that the ABS can be activated
more quickly and efficiently, thus reducing
braking distance.
Do not reduce the pressure on the brake ped-
al, since the brake assist system switches off
automatically as soon as you release the
brake.
Automatic hazard warning lights activation
The brake lights flash automatically to indi-
cate that the vehicle is braking suddenly or in
an emergency situation. If the emergency
braking continues until the vehicle comes to
186
Page 212 of 312

Operation
●
When drivin g do
wnhill, the speed limiter
cannot limit the vehicle speed. Its speed will
increase due to its own weight. In this case,
select a lower gear or use the foot brake to
slow the vehicle. WARNING
Observe the safety warnings ›
››
in Warning
symbol s on p
age 122. Note
● Differ ent
versions of the instrument panel
are available and therefore the versions and
instructions on the display may vary.
● If when switching the ignition off, the
cruise c
ontrol system (CCS), the adaptive
cruise control (ACC) or the speed limiter were
switched on, then the cruise control system or the adaptive cruise control will automati-
ca
l
ly switch themselves on when the ignition
is back on. However, no speed will be stored.
The last set speed of the speed limiter will be
stored. Operate the speed limiter
Fig. 189
On the left of the steering column:
contr o
l and buttons to operate the speed lim-
iter. Fig. 190
On the left of the steering column:
third l ev
er for operating the speed limiter.
FunctionPosition of the turn signal lever ››› Fig. 189
or the third lever ››› Fig. 190Effect
Switching on the speed limiterMove controller 1 to position and press button 2 of the turn signal
lever or move the third lever forward and press button 2.The system switches on. The last set speed of the speed lim-
iter is stored. It does not take effect yet.210
Page 217 of 312

Driver assistance systems
●
The sensor m a
y become damaged or lose
its settings when knocked, for example, dur-
ing a parking manoeuvre. This may compro-
mise the system's efficacy or disconnect it.
● Repairs to the radar sensor require special-
ist
knowledge and special tools. SEAT recom-
mends visiting a SEAT dealership for this pur-
pose.
● A registration plate or plate holder on the
front th
at is larger than the space for the reg-
istration plate, or a registration plate that is
curved or warped can cause the radar to mal-
function.
● Clean away the snow with a brush and the
ice pref
erably with a solvent-free de-icer
spray. Operating the Emergency braking as-
s
i
s
tance system (Front Assist) Fig. 193
On the instrument panel display:
Fr ont As
sist switched off message. The Front Assist is active whenever the igni-
tion i
s
sw
itched on.
When the Front Assist is switched off, so too
are the advance warning function (pre warn-
ing) and the distance warning.
SEAT recommends leaving the Front Assist al-
ways switched on. Exceptions ››› page 216,
Switching the Front Assist off temporarily in
the following situations.
Switching the Front Assist on and off
With the ignition switched on, the Front As-
sist can be switched on and off as follows:
● Select the corresponding menu option us-
ing the butt
on for the driver assistance sys-
tems ›››
page 37.
● OR: switch the system on and off in Easy
Connect
using the button and the
S ET
TINGS and
Driv
er a
s
sistance function but-
t on
s
›››
page 34.
When Front Assist is switched off, the instru-
ment panel will inform that it has been
switched off with the following indicator
››› Fig. 193.
Activating or deactivating the pre-warning
(advance warning)
The pre-warning function (advance warning)
can be switched on or off in the Easy Connect
system with the button and the
S
ET
TINGS and
Driv
er a
s
sistance function buttons
› ›
›
page 34.
The system will store the setting for the next
time the ignition is switched on.
SEAT recommends keeping the pre-warning
function switched on at all times.
Depending on the infotainment system in-
stalled in the vehicle, the advance warning
function may be adjusted as follows:
● Advance
● Medium
● Delayed
● Deactivated
SEAT r
ecommends driving with the function
in “Medium” mode.
Switching distance warning on and off
If the safe distance with regard to the vehicle
in front is exceeded, the relevant warning will
appear on the instrument panel display
. In this case, increase the safe dis-
tance.
The distance warning can be switched on and
off in the Easy Connect system using the button and the
S
ET
TINGS and
Driv er a
s
sistance function buttons
› ›
›
page 34.
The system will store the setting for the next
time the ignition is switched on. »
215
Technical data
Advice
Operation
Emergencies
Safety
Page 223 of 312

Driver assistance systems
In the Easy Connect system you can adjust
the di s
t
ance level that will be applied when
the ACC is connected using the button
and the S
ET
TINGS and
Driv
er a
s
sistance function
b utt
on
s ›››
page 34.
Changing the driving profile
In vehicles with SEAT Drive Profile , the driving
profile selected can have an influence on the
ACC’s acceleration and braking behaviour
››› page 225.
In vehicles without SEAT Drive Profile , the be-
haviour of the ACC can also be affected by se-
lecting any of the following drive profiles in
the Easy Connect system:
● Normal
● Sport
● Eco
● Convenience
In this c
ase, you should access the ACC set-
tings using the button and the
S
ET
TINGS >
Driv er a
s
sistance >
A
C
C function buttons
› ›
›
page 34.
The following conditions may lead the ACC
not to react:
● If the accelerator is pressed.
● If there is no gear engaged.
● If the ESC is controlling. ●
If the driver i
s not wearing his/her seat
belt.
● If several brake lights of the vehicle or elec-
trically
connected trailer are damaged.
● If the vehicle is reversing.
● Driving faster than 210 km/h (150 mph).
Driver mes
sages
ACC not available
The system can no longer continue to guar-
antee safe vehicle detection and will be de-
activated. The sensor has lost its setting or is
damaged. Take the vehicle to a specialised
workshop and have the fault repaired. ACC and Front Assist: cur-
rently not available. No sensor
vision
This message will be displayed to the driver if
the radar sensor's vision is impaired due, for
example, to leaves, snow, heavy fog or dirt.
Clean the sensor ››› Fig. 197.
ACC: currently not available.
Gradient too steep
The maximum road slope has been excee-
ded, hence safe ACC operation cannot be
guaranteed. The ACC cannot be switched on. ACC: only available in D, S
or M
Select the D/S or M position on the selector
lever. ACC: parking brake applied
The ACC
is deactivated if the parking brake is
applied. The ACC is available once again after
the parking brake is released.
ACC: currently not available.
Intervention of stability con-
trol
The message for the driver is displayed when
the electronic stability control (ESC) inter-
venes. In this case, the ACC is automatically
switched off. ACC: Take action!
The message for the driver is displayed if,
when the vehicle starts up on a hill with a
mild slope, the vehicle rolls back even al-
though the ACC is activated. Apply the brake
to stop the vehicle from moving/colliding
with another vehicle. ACC: speed limit
The message for the driver is displayed if, in
vehicles with manual gearbox, the current
speed is too low for the ACC mode.
The speed to be stored must be at least
30 km/h (18 mph). The speed limiter
switches off if the speed falls below 20 km/h
(12 mph). ACC: available as of the 2nd
gear »
221
Technical data
Advice
Operation
Emergencies
Safety
Page 236 of 312

Operation
The braking while manoeuvring function is
c ontr
o
lled in the Easy Connect system with
the menu and the
S
ET
TINGS and
P ark
and m
anoeuvre function buttons.
● on – permits the u
se of the braking
while manoeuvring function.
● off – does not
permit the use of the
braking while manoeuvring function.
Temporary suppression of emergency brak-
ing
● When the function is deactivated with the
Brak in
g while manoeuvring button that appears
on the P ark
in
g System screen of the Easy
Connect system.
● Whenever any of the car doors, rear lid or
bonnet are opened.
R
ear Assist “Rear View Cam-
era”*
Rel
ated video Fig. 210
Safety Operating and safety warnings
WARNING
● The Re ar As
sist does not make it possible
to precisely calculate the distance from ob-
stacles (people, vehicles, etc.) and nor can it
overcome the system's own limits, hence us-
ing it may cause serious accidents and inju-
ries if used negligently or without due care.
The driver should be aware of his/her sur-
roundings at all times to ensure safe driving.
● The camera lens expands and distorts the
field of
vision and displays the objects on the
screen in a different, vague manner. The per-
ception of distances is also distorted by this
effect.
● Due to the screen resolution or insufficient
light condition
s, some items may be dis-
played in an unsatisfactory manner or not at
all. Take special care with thin posts, fences,
railings or trees that might not be displayed
on screen and could damage the vehicle.
● The rear assist has blind spots where it is
not pos
sible to represent people or objects
(small children, animals and certain objects
cannot be detected in its field of vision). Mon-
itor the vehicle's surrounding area at all
times.
● Keep the camera lens clean, free of ice and
snow
, and do not cover it.
● The system is not a replacement for driver
awar
eness. Supervise the parking operation
at all times, as well as the vehicle's surround-
ing area. Adapt your speed and driving style at all times to suit visibility, weather, road
and traffic
c
onditions.
● Do not be distracted from the traffic by
looking at
the screen.
● The images on the rear assist screen are
only tw
o-dimensional. Due to a lack of spatial
depth, protruding parts or holes in the road,
for example, are more difficult to detect or
may not be seen at all.
● Vehicle load modifies the representation of
the orientation lines
displayed. The width
represented by the lines diminishes with ve-
hicle load. Pay special attention to the vehi-
cle's surroundings when the inside of the ve-
hicle of the luggage compartment is carrying
a heavy load.
● In the following situations, the objects or
other vehic
les shown in the navigation sys-
tem display appear to be further away or
closer than they really are: Pay special atten-
tion:
– On moving from a horizontal plane to a
slope.
– On moving from a slope to a horizontal
plane.
– If the vehicle is heavily loaded at the
rear.
– When the vehicle approaches objects
that are not on the ground surface or are
jutting out from it. These objects may al-
so be outside the camera's angle of vi-
sion when reversing. 234
Page 237 of 312
Driver assistance systems
Note
● It i s
important to take great care and pay
special attention if you are not yet familiar
with the system.
● Rear assist will not be available if the vehi-
cle's
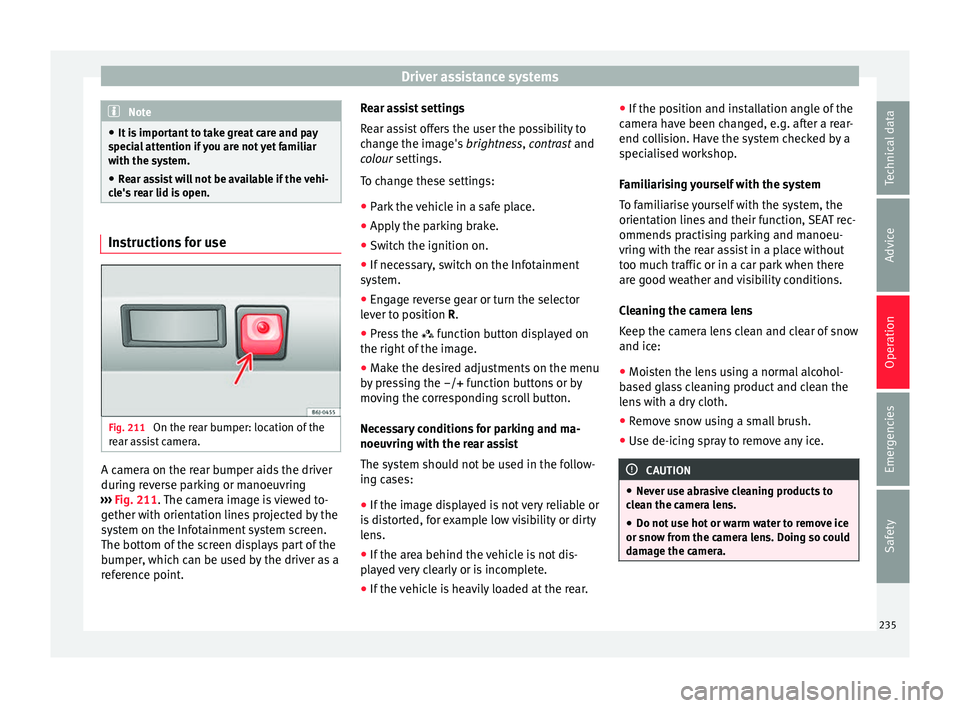
rear lid is open. Instructions for use
Fig. 211
On the rear bumper: location of the
r e
ar a
ssist camera. A camera on the rear bumper aids the driver
durin
g r
ev
erse parking or manoeuvring
››› Fig. 211. The camera image is viewed to-
gether with orientation lines projected by the
system on the Infotainment system screen.
The bottom of the screen displays part of the
bumper, which can be used by the driver as a
reference point. Rear assist settings
Rear a
ssist offers the user the possibility to
change the image's brightness, contrast and
colour settings.
To change these settings:
● Park the vehicle in a safe place.
● Apply the parking brake.
● Switch the ignition on.
● If necessary, switch on the Infotainment
syst
em.
● Engage reverse gear or turn the selector
lever t
o position R.
● Press the function b
utton displayed on
the right of the image.
● Make the desired adjustments on the menu
by pr
essing the –/+ function buttons or by
moving the corresponding scroll button.
Necessary conditions for parking and ma-
noeuvring with the rear assist
The system should not be used in the follow-
ing cases:
● If the image displayed is not very reliable or
is di
storted, for example low visibility or dirty
lens.
● If the area behind the vehicle is not dis-
pla
yed very clearly or is incomplete.
● If the vehicle is heavily loaded at the rear. ●
If the pos
ition and installation angle of the
camera have been changed, e.g. after a rear-
end collision. Have the system checked by a
specialised workshop.
Familiarising yourself with the system
To familiarise yourself with the system, the
orientation lines and their function, SEAT rec-
ommends practising parking and manoeu-
vring with the rear assist in a place without
too much traffic or in a car park when there
are good weather and visibility conditions.
Cleaning the camera lens
Keep the camera lens clean and clear of snow
and ice:
● Moisten the lens using a normal alcohol-
based gl
ass cleaning product and clean the
lens with a dry cloth.
● Remove snow using a small brush.
● Use de-icing spray to remove any ice. CAUTION
● Never u se abr
asive cleaning products to
clean the camera lens.
● Do not use hot or warm water to remove ice
or snow fr
om the camera lens. Doing so could
damage the camera. 235
Technical data
Advice
Operation
Emergencies
Safety