check oil Seat Ibiza 2017 Edition 11.17 User Guide
[x] Cancel search | Manufacturer: SEAT, Model Year: 2017, Model line: Ibiza, Model: Seat Ibiza 2017Pages: 312, PDF Size: 6.51 MB
Page 268 of 312
Advice
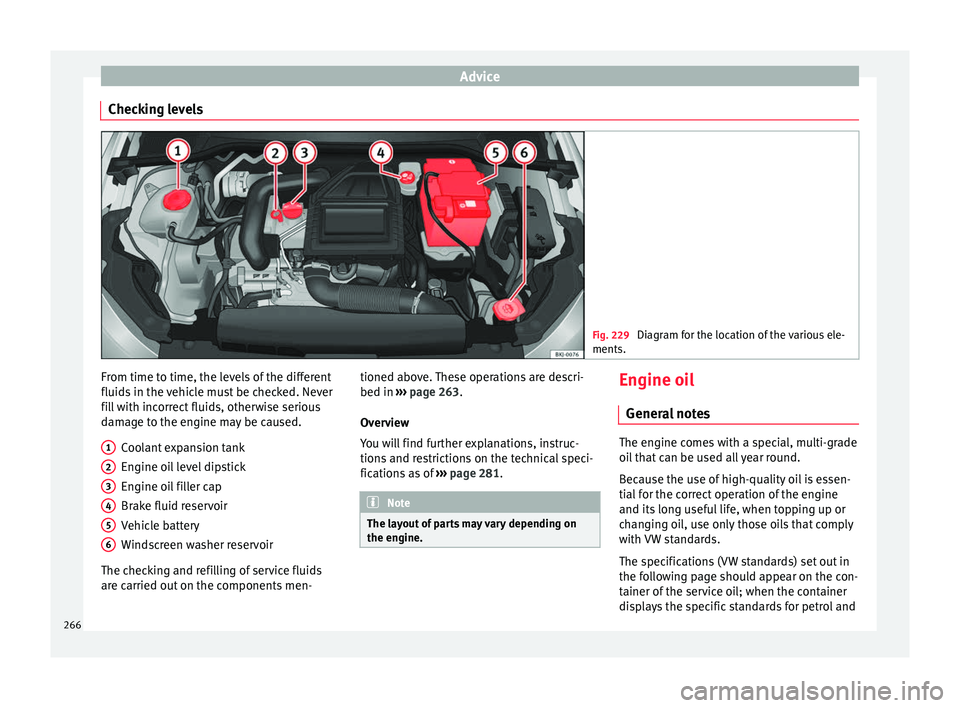
Checking levels Fig. 229
Diagram for the location of the various ele-
ments. From time to time, the levels of the different
fluid
s
in the
vehicle must be checked. Never
fill with incorrect fluids, otherwise serious
damage to the engine may be caused.
Coolant expansion tank
Engine oil level dipstick
Engine oil filler cap
Brake fluid reservoir
Vehicle battery
Windscreen washer reservoir
The checking and refilling of service fluids
are carried out on the components men- 1 2
3
4
5
6 tioned above. These operations are descri-
bed in
››
›
page 263.
Overview
You will find further explanations, instruc-
tions and restrictions on the technical speci-
fications as of ››› page 281. Note
The layout of parts may vary depending on
the engine. Engine oil
Gener a
l
notes The engine comes with a special, multi-grade
oil
th
at can be used all year round.
Because the use of high-quality oil is essen-
tial for the correct operation of the engine
and its long useful life, when topping up or
changing oil, use only those oils that comply
with VW standards.
The specifications (VW standards) set out in
the following page should appear on the con-
tainer of the service oil; when the container
displays the specific standards for petrol and
266
Page 269 of 312
Checking and refilling levels
diesel engines together, it means that the oil
c an be u
sed f
or both types of engines.
We recommend that the oil change indicated
in the Maintenance Programme, be per-
formed by a technical service or specialised
workshop.
The correct oil specifications for your engine
are listed in the ›››
page 59.
Service intervals
Service intervals can be flexible (LongLife
service) or fixed (dependent on time/dis-
tance travelled).
If the PR code that appears on the back of the
Maintenance Programme booklet is PR QI6,
this means that your vehicle has the LongLife
service program. If it lists the codes QI1, QI2,
QI3, QI4 or QI7, the interval service is de-
pendent on the time/distance travelled.
Flexible service intervals (LongLife service
intervals*)
Special oils and processes have been devel-
oped which, depending on the characteris-
tics and individual driving profiles, enable
the extension of the oil change service (Long-
Life service intervals).
Because this oil is essential for extending the
service intervals, it must only be used ob-
serving the following indications: ●
Avoid mi xing it with oil for fixed service in-
tervals.
● Only in exceptional circumstances, if the
engine oil
level is too low ››› page 268 and
LongLife oil is not available, it is permitted to
top up (once) with oil for fixed service inter-
vals ›››
page 59 (up to a maximum of 0.5
litres).
Fixed service intervals*
If your vehicle does not have the “LongLife
service interval” or it has been disabled (by
request), you may use oils for fixed service
intervals, which also appear in
››› page 59. In this case, your vehicle
must be serviced after a fixed interval of 1
year/15,000 km (10,000 miles)(whatever
comes first) ››› Booklet Maintenance Pro-
gramme.
● In exceptional circumstances, if the engine
oil l
evel is too low ››› page 268 and you can-
not obtain the oil specified for your vehicle,
you can add a small quantity of oil conform-
ing to the specification ACEA A2 or ACEA A3
(petrol engines) or ACEA B3 or ACEA B4 (die-
sel engines) (up to 0.5 l).
Vehicles with diesel particulate filter*
The Maintenance Programme states whether
your vehicle is fitted with a diesel particulate
filter. Only VW 507 00 engine oil, with reduced ash
formation, m
ay be used in diesel engines
equipped with particulate filter. Using other
types of oil will cause a higher soot concen-
tration and reduce the life of the DPF. There-
fore:
● Avoid mixing this oil with other engine oils.
● Only in exceptional circumstances, if the
engine oil
level is too low ››› page 268,
Checking engine oil level and you cannot ob-
tain the oil specified for your vehicle, you can
use a small quantity of oil (once) conforming
to the VW 506 00, VW 506 01, VW 505 00,
VW 505 01 or ACEA B3/ACEA B4 specification
(up to 0.5 l). Note
Before a long trip, we recommend finding an
engine oi l
that conforms to the correspond-
ing VW specifications and recommend keep-
ing it in the vehicle. This way, the correct en-
gine oil will always be available for a top-up if
needed. Warning lamp
If this warning lamp
is
r
ed it indicates
that the engine oil pressure is too low.
If this warning symbol starts to flash, and is
accompanied by three audible warnings,
switch off the engine and check the oil level.
If necessary, add more oil ›››
page 268. »
267
Technical data
Advice
Operation
Emergencies
Safety
Page 270 of 312
Advice
If the warning lamp flashes although the oil
l ev
el
is correct, stop driving. Do not even run
the engine at idle speed! Obtain technical as-
sistance.
Checking oil level
If the warning lamp is yellow the engine
oil level should be checked as soon as possi-
ble. Top up the oil at the next opportunity
››› page 268.
Oil level sensor faulty*
If the yellow warning lamp flashes, take
the vehicle to a specialised workshop to have
the oil level sensor checked. Until then it is
advisable to check the oil level every time
you refuel.
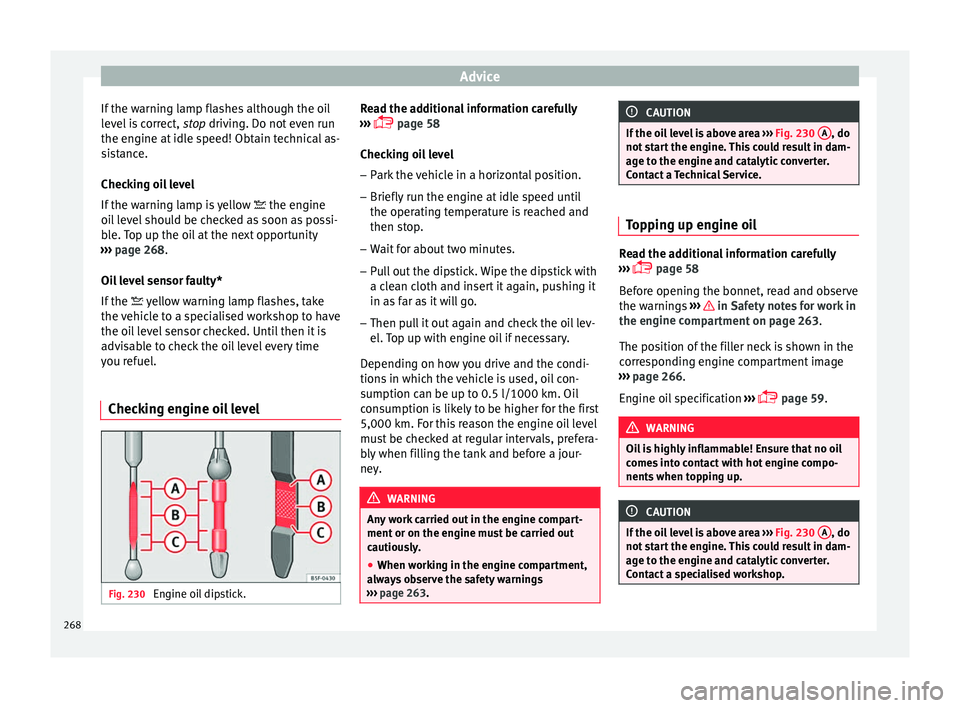
Checking engine oil level Fig. 230
Engine oil dipstick. Read the additional information carefully
› ›
›
page 58
Checking oil level
– Park the vehicle in a horizontal position.
– Briefly run the engine at idle speed until
the operating t
emperature is reached and
then stop.
– Wait for about two minutes.
– Pull out the dipstick. Wipe the dipstick with
a cle
an cloth and insert it again, pushing it
in as far as it will go.
– Then pull it out again and check the oil lev-
el. T
op up with engine oil if necessary.
Depending on how you drive and the condi-
tions in which the vehicle is used, oil con-
sumption can be up to 0.5 l/1000 km. Oil
consumption is likely to be higher for the first
5,000 km. For this reason the engine oil level
must be checked at regular intervals, prefera-
bly when filling the tank and before a jour-
ney. WARNING
Any work carried out in the engine compart-
ment or on the en gine mu
st be carried out
cautiously.
● When working in the engine compartment,
alwa
ys observe the safety warnings
››› page 263. CAUTION
If the oil level is above area ›››
Fig. 230 A , do
not s t
art the engine. This could result in dam-
age to the engine and catalytic converter.
Contact a Technical Service. Topping up engine oil
Read the additional information carefully
›› ›
page 58
Before opening the bonnet, read and observe
the warnings ››› in Safety notes for work in
the en gine c
omp
artment on page 263.
The position of the filler neck is shown in the
corresponding engine compartment image
››› page 266.
Engine oil specification ›››
page 59. WARNING
Oil is highly inflammable! Ensure that no oil
come s
into contact with hot engine compo-
nents when topping up. CAUTION
If the oil level is above area ›››
Fig. 230 A , do
not s t
art the engine. This could result in dam-
age to the engine and catalytic converter.
Contact a specialised workshop. 268
Page 271 of 312
Checking and refilling levels
For the sake of the environment
The oil level must never be above area
›› ›
Fig. 230 A . Otherwise oil can be drawn in
through the c r
ankcase breather and escape
into the atmosphere via the exhaust system. Changing engine oil
Read the additional information carefully
›› ›
page 58
The engine oil must be changed at the inter-
vals given in the service schedule.
We recommend that you have the engine oil
changed by a Technical Service.
The oil change intervals are shown in the
Maintenance Programme. WARNING
Only change the engine oil yourself if you
hav e the s
pecialist knowledge required!
● Before opening the bonnet, read and ob-
serve the w
arnings ››› page 263, Safety notes
for work in the engine compartment .
● Wait for the engine to cool down. Hot oil
may
cause burn injuries.
● Wear eye protection to avoid injuries, such
as ac
id burns, caused by splashes of oil.
● When removing the oil drain plug with your
finger
s, keep your arm horizontal to help pre-
vent oil from running down your arm. ●
Wa sh
your skin thoroughly if it comes into
contact with engine oil.
● Engine oil is poisonous! Used engine oil
must
be stored in a safe place out of the
reach of children. CAUTION
No additives should be used with engine oil.
Thi s c
ould result in engine damage. Any dam-
age caused by the use of such additives
would not be covered by the factory warranty. For the sake of the environment
● Bec au
se of disposal problems and the spe-
cial tools and specialist knowledge required,
we recommend that you have the engine oil
and filter changed by a Technical Service.
● Never pour oil down drains or into the
ground.
● U
se a suitable container when draining the
used oil
. It must be large enough to hold all
the engine oil. Cooling system
C ontr o
l lamp There is a fault if:
● The l amp does not go out again after a
f ew sec
onds. ●
The lamp lights up or fl
ashes while the
vehicle is running, and three acoustic warn-
ing signals are emitted ››› .
Thi s
me
ans that either the coolant level is too
low or the coolant temperature is too high.
Coolant temperature too high
If the lamp lights up, stop the vehicle,
turn off the engine and wait for it to cool
down. Check the coolant level.
If the coolant level is correct, the overheating
may be caused by a malfunction of the radia-
tor fan. Check the radiator fan fuse and have
it replaced if necessary ››› page 104.
If the control lamp lights up again after driv-
ing on for a short distance, stop the vehicle
and switch the engine off. Contact a Techni-
cal Service or a specialised workshop.
Coolant level too low
If the lamp lights up, stop the vehicle,
turn off the engine and wait for it to cool
down. First check the coolant level. If the lev-
el of the coolant is below the “MIN” mark,
top up with coolant liquid ››› .
WARNING
● If y
our vehicle is immobilised for technical
reasons, move it to a safe distance from traf-
fic. Turn the engine off, turn the hazard lights
on and place the warning triangle. » 269
Technical data
Advice
Operation
Emergencies
Safety
Page 272 of 312
Advice
●
Never open the bonnet if
you can see or
hear steam or coolant escaping from the en-
gine compartment. Risk of scalding. Wait un-
til you can no longer see or hear escaping
steam or coolant.
● The engine compartment is a dangerous
area. B
efore carrying out any work in the en-
gine compartment, switch off the engine and
allow it to cool down. Always note the corre-
sponding warnings ››› page 263. Topping up coolant
Read the additional information carefully
› ›
›
page 59
Top up coolant when the level is below the
MIN (minimum) mark.
Checking coolant level – Park the vehicle in a horizontal position.
– Switch the ignition off.
– Read off the coolant level on coolant ex-
pans
ion tank. When the engine is cold, the
coolant level should be between the marks.
When the engine is hot, it may be slightly
above the upper mark.
Topping up coolant – Wait for the engine to cool down. –
Cov
er the coolant expansion tank cap with
a cloth and carefully unscrew it to the left
››› .
– Top up the coolant only if there is still cool-
ant in the e
xp
ansion tank, otherwise you
could damage the engine. If there is no
coolant in the expansion tank, do not con-
tinue driving. You should obtain professio- nal assistance ››› .
– If there is still some coolant in the expan-
sion t
ank, t
op up to the upper mark.
– Top up with coolant until the level becomes
stab
le.
– Screw the cap back on correctly.
Any lo
ss of coolant fluid normally indicates a
leak in the cooling system. Take the vehicle
straight to a specialised workshop to have
the cooling system examined. If there are no
leaks in the engine cooling system, a loss of
coolant can only occur if the coolant boils
and is forced out of the system as a result of
overheating. WARNING
● The coo lin
g system is under pressure. Do
not unscrew the cap on the coolant expan-
sion tank when the engine is hot: risk of
burns!
● The antifreeze and coolant fluid can be a
health h
azard. Therefore, the antifreeze
should be stored in the original container in a safe place out of reach of children. Failure to
comp
ly
could result in poisoning.
● If working inside the engine compartment,
remember that, ev
en when the ignition is
switched off, the radiator fan may start up au-
tomatically, and therefore there is a risk of in-
jury. WARNING
If there is not enough anti-freeze in the cool-
ant sys
tem, the engine may fail leading to se-
rious damage.
● Please make sure that the percentage of
additiv
e is correct with respect to the lowest
expected ambient temperature in the zone in
which the vehicle is to be used.
● When the outside temperature is very low,
the cool
ant could freeze and the vehicle
would be immobilised. In this case, the heat-
ing would not work either and inadequately
dressed passengers could die of cold. CAUTION
Do not top up the expansion tank with cool-
ant fluid if it
is empty! Air could enter the
cooling system. In this case, stop driving.
Seek specialist assistance. Otherwise, there
is a risk of engine damage. 270
Page 273 of 312
Checking and refilling levels
CAUTION
The original additives should never be mixed
with c oo
lants which are not approved by
SEAT. Otherwise, you run the risk of causing
severe damage to the engine and the engine
cooling system.
● If the fluid in the expansion tank is not pur-
ple b
ut is, for example, brown, this indicates
that the G13 additive has been mixed with an
inadequate coolant. The coolant must be
changed as soon as possible if this is the
case! This could result in serious faults and
engine damage. For the sake of the environment
Coolants and additives can contaminate the
env ir
onment. If any fluids are spilled, they
should be collected and correctly disposed
of, with respect to the environment. Brake fluid
Chec k
in
g the brake fluid levelRead the additional information carefully
› ›
›
page 60
The position of the brake fluid reservoir is
shown in the corresponding engine compart-
ment image ›››
page 266. The brake fluid res-
ervoir has a black and yellow cap. The brake fluid level drops slightly when the
vehicl
e is being used as the brake pads are
automatically adjusted as they wear.
However, if the level goes down noticeably in
a short time, or drops below the “MIN” mark,
there may be a leak in the brake system. A
display on the instrument panel will warn you
if the brake fluid level is too low ››› page 122. WARNING
Before opening the bonnet to check the brake
fluid lev el, r
ead and observe the warnings
››› page 263. Changing the brake fluid
The Maintenance Programme indicates brake
fluid c
h
an
ge intervals.
We recommend that you have the brake fluid
changed by a Technical Service.
Before opening the bonnet, please read and
follow the warnings ››› in Safety notes for
w ork
in the en
gine compartment on
page 263 in section “Safety notes for work-
ing in the engine compartment”.
In the course of time, brake fluid becomes
hygroscopic and absorbs water from the am-
bient air. If the water content in the brake flu-
id is too high, the brake system could cor-
rode. This also considerably reduces the boil-
ing point of the brake fluid. Heavy use of the brakes may then cause a vapour lock which
coul
d impair the braking effect.
Be sure to always use the correct brake fluid.
Only use brake fluid that expressly meets the
VW 501 14 standard.
You can buy VW 501 14 standard brake fluid
in a SEAT dealership or a SEAT Official Serv-
ice. If none is available, use only high-quality
brake fluid that meets DIN ISO 4925 CLASS 4
standards, or USA Standards FMVSS 116 DOT
4.
Using any other kind of brake fluid or one
that is not of a high quality may affect opera-
tion of the brake system and reduce its effec-
tiveness. Never use a brake fluid if the con-
tainer does not state that it complies with VW
501 14, DIN ISO 4925 CLASS 4 standards, or
USA standards FMVSS 116 DOT 4. WARNING
Brake fluid is poisonous. Old brake fluid im-
pair s
the braking effect.
● Before opening the bonnet to check the
brake fluid l
evel, read and observe the warn-
ings ››› page 263.
● Brake fluid should be stored in the closed
original
container in a safe place out of reach
of children. There is a toxic risk.
● Perform the brake fluid change according to
the Mainten
ance Programme. Heavy use of
the brakes may cause a vapour lock if the
brake fluid is left in the brake system for too » 271
Technical data
Advice
Operation
Emergencies
Safety
Page 276 of 312
Advice
The position of the battery is shown in the
c orr
e
sponding engine compartment diagram
››› page 266.
The “magic eye” indicator, located on the top
of the battery changes colour, depending on
the charge state and electrolyte level of the
battery.
There are two different colours:
● Black: correct charge status.
● Transparent/clear yellow: the battery must
be repl
aced. Contact a specialised workshop.
Charging or changing the battery The battery is maintenance-free and is
c
hec
k
ed during the inspection service. All
work on the vehicle battery requires special-
ist knowledge.
If you often drive short distances or if the ve-
hicle is not driven for long periods, the bat-
tery should be checked by a specialised
workshop between the scheduled services.
If the battery has discharged and you have
problems starting the vehicle, the battery
might be damaged. If this happens, we rec-
ommend you have the vehicle battery
checked by a Technical Service where it will
be re-charged or replaced. Charging the battery
The vehic
le battery should be charged by a
specialised workshop only, as batteries us-
ing special technology have been installed
and they must be charged in a controlled en-
vironment.
Replacing a vehicle battery
The battery has been developed to suit the
conditions of its location and has special
safety features.
Genuine SEAT batteries meet the mainte-
nance, performance and safety specifications
of your vehicle. WARNING
● We r ec
ommend you use only maintenance-
free or cycle free leak-proof batteries which
comply with standards T 825 06 and
VW 7 50 73. This standard applies as of
2001.
● Before starting any work on the batteries,
you mus
t read and observe the warnings
››› in Symbols and warnings on handling
the batt er
y on page 272. For the sake of the environment
Batteries contain toxic substances such as
su lphuric
acid and lead. They must be dis-
posed of appropriately and must not be dis-
posed of with ordinary household waste. Wheels
Wheel s
and ty
res
General notes Avoiding damage
– If you have to drive over a kerb or similar
ob s
tacle, drive very slowly and at a right
angle.
– Keep grease, oil and fuel off the tyres.
– Inspect the tyres regularly for damage
(cuts, c r
acks or blisters, etc.). Remove any
foreign objects embedded in the treads.
Storing tyres
– When you remove the tyres, mark them in
order to m
aintain the same direction of ro-
tation when they are installed again.
– When removed, the wheels and/or tyres
should be s
tored in a cool, dry and prefera-
bly dark location.
– Store tyres in a vertical position, if they are
not fitted on wheel
rims.
New tyres
New tyres must be run in ›››
page 199.
The tread depth of new tyres may vary, ac-
cording to the type and make of tyre and the
tread pattern.
274
Page 278 of 312
Advice
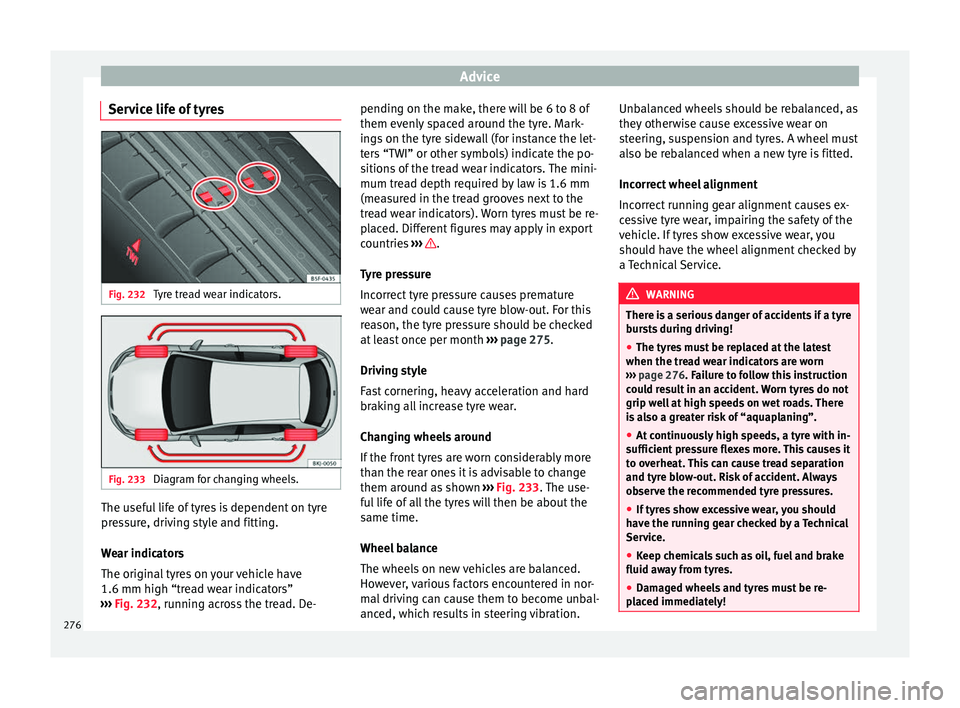
Service life of tyres Fig. 232
Tyre tread wear indicators. Fig. 233
Diagram for changing wheels. The useful life of tyres is dependent on tyre
pr
e
s
sure, driving style and fitting.
Wear indicators
The original tyres on your vehicle have
1.6 mm high “tread wear indicators”
››› Fig. 232, running across the tread. De- pending on the make, there will be 6 to 8 of
them evenly
spaced around the tyre. Mark-
ings on the tyre sidewall (for instance the let-
ters “TWI” or other symbols) indicate the po-
sitions of the tread wear indicators. The mini-
mum tread depth required by law is 1.6 mm
(measured in the tread grooves next to the
tread wear indicators). Worn tyres must be re-
placed. Different figures may apply in export
countries ››› .
T y
r
e pressure
Incorrect tyre pressure causes premature
wear and could cause tyre blow-out. For this
reason, the tyre pressure should be checked
at least once per month ››› page 275.
Driving style
Fast cornering, heavy acceleration and hard
braking all increase tyre wear.
Changing wheels around
If the front tyres are worn considerably more
than the rear ones it is advisable to change
them around as shown ››› Fig. 233. The use-
ful life of all the tyres will then be about the
same time.
Wheel balance
The wheels on new vehicles are balanced.
However, various factors encountered in nor-
mal driving can cause them to become unbal-
anced, which results in steering vibration. Unbalanced wheels should be rebalanced, as
they otherw
ise cause excessive wear on
steering, suspension and tyres. A wheel must
also be rebalanced when a new tyre is fitted.
Incorrect wheel alignment
Incorrect running gear alignment causes ex-
cessive tyre wear, impairing the safety of the
vehicle. If tyres show excessive wear, you
should have the wheel alignment checked by
a Technical Service. WARNING
There is a serious danger of accidents if a tyre
bur s
ts during driving!
● The tyres must be replaced at the latest
when the trea
d wear indicators are worn
››› page 276. Failure to follow this instruction
could result in an accident. Worn tyres do not
grip well at high speeds on wet roads. There
is also a greater risk of “aquaplaning”.
● At continuously high speeds, a tyre with in-
sufficient
pressure flexes more. This causes it
to overheat. This can cause tread separation
and tyre blow-out. Risk of accident. Always
observe the recommended tyre pressures.
● If tyres show excessive wear, you should
have the ru
nning gear checked by a Technical
Service.
● Keep chemicals such as oil, fuel and brake
fluid awa
y from tyres.
● Damaged wheels and tyres must be re-
plac
ed immediately! 276
Page 280 of 312
Advice
Wheel bolts The design of wheel bolts is matched to the
rims. If diff
er
ent wheel rims are fitted, the
correct wheel bolts with the right length and
correctly shaped bolt heads must be used.
This ensures that wheels are fitted securely
and that the brake system functions correctly.
In certain circumstances, you should not use
wheel bolts from a different vehicle, even if it
is the same model ››› page 247. WARNING
If the wheel bolts are not tightened correctly,
the wheel c ou
ld become loose while driving.
Risk of accident.
● The wheel bolts must be clean and turn
eas
ily. Never apply grease or oil to them.
● Use only wheel bolts which belong to the
wheel.
● If the pr
escribed torque of the wheel bolts
is t
oo low, they could loosen whilst the vehi-
cle is in motion. Risk of accident! If the tight-
ening torque is too high, the wheel bolts and
threads can be damaged. CAUTION
The prescribed tightening torque for wheel
bolt s
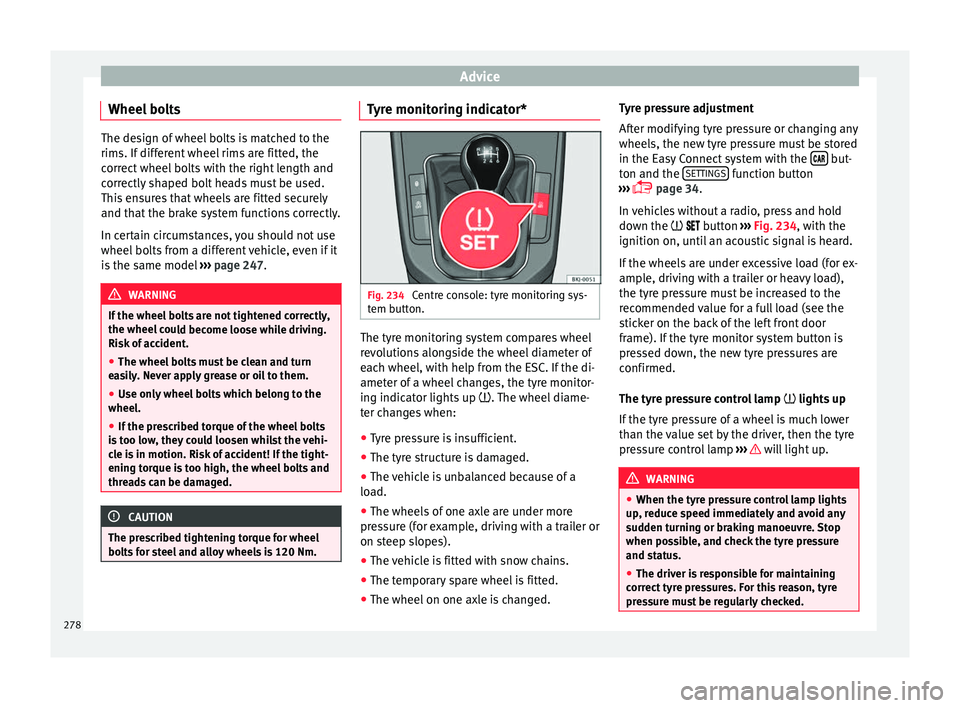
for steel and alloy wheels is 120 Nm. Tyre monitoring indicator*
Fig. 234
Centre console: tyre monitoring sys-
t em b
utt
on. The tyre monitoring system compares wheel
r
ev
o
lutions alongside the wheel diameter of
each wheel, with help from the ESC. If the di-
ameter of a wheel changes, the tyre monitor-
ing indicator lights up . The wheel diame-
ter changes when:
● Tyre pressure is insufficient.
● The tyre structure is damaged.
● The vehicle is unbalanced because of a
load.
● The wheel
s of one axle are under more
pres
sure (for example, driving with a trailer or
on steep slopes).
● The vehicle is fitted with snow chains.
● The temporary spare wheel is fitted.
● The wheel on one axle is changed. Tyre pressure adjustment
After modif
ying tyre pressure or changing any
wheels, the new tyre pressure must be stored
in the Easy Connect system with the but-
t on and the S
ET
TINGS function button
› ›
›
page 34.
In vehicles without a radio, press and hold
down the button ››› Fig. 234, with the
ignition on, until an acoustic signal is heard.
If the wheels are under excessive load (for ex-
ample, driving with a trailer or heavy load),
the tyre pressure must be increased to the
recommended value for a full load (see the
sticker on the back of the left front door
frame). If the tyre monitor system button is
pressed down, the new tyre pressures are
confirmed.
The tyre pressure control lamp lights up
If the tyre pressure of a wheel is much lower
than the value set by the driver, then the tyre
pressure control lamp ››› will light up.
WARNING
● When the tyr e pr
essure control lamp lights
up, reduce speed immediately and avoid any
sudden turning or braking manoeuvre. Stop
when possible, and check the tyre pressure
and status.
● The driver is responsible for maintaining
correct
tyre pressures. For this reason, tyre
pressure must be regularly checked. 278
Page 301 of 312
Index
leather . . . . . . . . . . . . . . . . . . . . . . . . . . . . . . . . 255
p l
a
stic parts . . . . . . . . . . . . . . . . . . . . . . 251, 254
radio screen . . . . . . . . . . . . . . . . . . . . . . . . . . . 254
rubber seals . . . . . . . . . . . . . . . . . . . . . . . . . . . 252
seat belts . . . . . . . . . . . . . . . . . . . . . . . . . . . . . 256
steel wheel rims . . . . . . . . . . . . . . . . . . . . . . . . 253
washing the vehicle . . . . . . . . . . . . . . . . . . . . . 249
windows and exterior mirrors . . . . . . . . . . . . . 251
windscreen wiper blades . . . . . . . . . . . . . . . . . 252
wooden trim . . . . . . . . . . . . . . . . . . . . . . . . . . . 254
Climatronic . . . . . . . . . . . . . . . . . . . . . . . . . . . . . . . 52 adjusting the temperature . . . . . . . . . . . . . . . . 174
automatic mode . . . . . . . . . . . . . . . . . . . . . . . . 174
controls . . . . . . . . . . . . . . . . . . . . . . . . . . . . . . . 173
fan regulation . . . . . . . . . . . . . . . . . . . . . . . . . . 174
general notes . . . . . . . . . . . . . . . . . . . . . . . . . . 166
windscreen defrost . . . . . . . . . . . . . . . . . . . . . . 174
Close sunroof . . . . . . . . . . . . . . . . . . . . . . . . . . . . . . . 144
Closing . . . . . . . . . . . . . . . . . . . . . . . . . . . . . . . . . 130 bonnet . . . . . . . . . . . . . . . . . . . . . . . . . . . . . . . . 265
sunroof . . . . . . . . . . . . . . . . . . . . . . . . . . . . . . . 144
windows . . . . . . . . . . . . . . . . . . . . . . . . . . . . . . 141
Clutch (warning lamp) . . . . . . . . . . . . . . . . . . . . . 196
Coming Home . . . . . . . . . . . . . . . . . . . . . . . . . . . . 148
Coming Home Function . . . . . . . . . . . . . . . . . . . . 148
Connectivity Box . . . . . . . . . . . . . . . . . . . . . . . . . . 129
Contact key . . . . . . . . . . . . . . . . . . . . . . . . . . . . . . 175
Control and warning lamps airbag system . . . . . . . . . . . . . . . . . . . . . . . . . . . 91
alternator . . . . . . . . . . . . . . . . . . . . . . . . . . . . . 273
Anti-lock brake system (ABS) . . . . . . . . . . . . . . 187
ASR . . . . . . . . . . . . . . . . . . . . . . . . . . . . . . . . . . 184
braking system . . . . . . . . . . . . . . . . . . . . . . . . . 181
coolant . . . . . . . . . . . . . . . . . . . . . . . . . . . . . . . 269
cruise control system (CCS) . . . . . . . . . . . . . . . 208
depress the brake . . . . . . . . . . . . . . . . . . . . . . . 212 diesel particulate filter . . . . . . . . . . . . . . . . . . . 202
EDL . . . . . . . . . . . . . . . . . . . . . . . . . . . . . . . . . . 186
emis
sion control . . . . . . . . . . . . . . . . . . . . . . . . 203
engine oil . . . . . . . . . . . . . . . . . . . . . . . . . . . . . 267
ESC . . . . . . . . . . . . . . . . . . . . . . . . . . . . . . . . . . 183
instrument panel . . . . . . . . . . . . . . . . . . . . . 47, 49
lights . . . . . . . . . . . . . . . . . . . . . . . . . . . . . . . . . 146
speed limiter . . . . . . . . . . . . . . . . . . . . . . . . . . . 209
steering column lock . . . . . . . . . . . . . . . . . . . . 198
tyres . . . . . . . . . . . . . . . . . . . . . . . . . . . . . . . . . . 278
Controls and displays general instrument panel . . . . . . . . . . . . . . . . . 115
Controls for the windows . . . . . . . . . . . . . . . 18, 141
Controls on the steering wheel without voice control . . . . . . . . . . . . . . . . . . . . 127
with voice control . . . . . . . . . . . . . . . . . . . . . . . 125
Coolant checking level . . . . . . . . . . . . . . . . . . . . . . . . . . 270
Coolant level control lamp . . . . . . . . . . . . . . . . . . . . . . . . . . . 269
Coolant temperature control lamp . . . . . . . . . . . . . . . . . . . . . . . . . . . 269
safety instructions . . . . . . . . . . . . . . . . . . . . . . 270
Cooling coolant temperature gauge . . . . . . . . . . . . . . . 120
Cooling system checking coolant . . . . . . . . . . . . . . . . . . 269, 270
topping up coolant . . . . . . . . . . . . . . . . . 269, 270
Correct sitting position . . . . . . . . . . . . . . . . . . . . . 76 driver . . . . . . . . . . . . . . . . . . . . . . . . . . . . . . . . . . 76
front passenger . . . . . . . . . . . . . . . . . . . . . . . . . 77
rear seat passengers . . . . . . . . . . . . . . . . . . . . . 78
Cruise control . . . . . . . . . . . . . . . . . . . . . . . . . . . . . 45 control and warning lamps . . . . . . . . . . . . . . . 208
operation . . . . . . . . . . . . . . . . . . . . . . . . . . . . . . 208
Cruise control system . . . . . . . . . . . . . . . . . . . . . . 207
Current . . . . . . . . . . . . . . . . . . . . . . . . . . . . . . . . . 160 D
Danger
s in not using the seat belt . . . . . . . . . . . . 83
Dash panel . . . . . . . . . . . . . . . . . . . . . . . . . . . . . . . 47
Data label . . . . . . . . . . . . . . . . . . . . . . . . . . . . . . . 281
Deactivating the front passenger front airbag . . . 22
Deactivation of front airbag . . . . . . . . . . . . . . . . . . 90
Detachable ball assembling . . . . . . . . . . . . . . . . . . . . . . . . . . . . 239
checking attachment . . . . . . . . . . . . . . . . . . . . 240
placing in standby position . . . . . . . . . . . . . . . 238
removing . . . . . . . . . . . . . . . . . . . . . . . . . 240, 241
standby position . . . . . . . . . . . . . . . . . . . . . . . . 238
Diesel diesel particulate filter . . . . . . . . . . . . . . . . . . . 202
refuelling . . . . . . . . . . . . . . . . . . . . . . . . . . . . . . 260
Diesel particulate filter . . . . . . . . . . . . . . . . . . . . 202 malfunction . . . . . . . . . . . . . . . . . . . . . . . . . . . . 202
Digital clock . . . . . . . . . . . . . . . . . . . . . . . . . . . . . 118
Dimensions . . . . . . . . . . . . . . . . . . . . . . . . . . . . . . 295
Direction of rotation tyres . . . . . . . . . . . . . . . . . . . . . . . . . . . . . . . . . . . 69
Display . . . . . . . . . . . . . . . . . . . . . . . . . . . . 117, 118
Display messages speed limiter . . . . . . . . . . . . . . . . . . . . . . . . . . . 209
Disposal belt tensioners . . . . . . . . . . . . . . . . . . . . . . . . . . 85
Distance control see Adaptive cruise control . . . . . . . . . . . . . . . 216
Door cylinder . . . . . . . . . . . . . . . . . . . . . . . . . . . . . 15
Door handle . . . . . . . . . . . . . . . . . . . . . . . . . . . . . . 15 de-icing . . . . . . . . . . . . . . . . . . . . . . . . . . . . . . . 252
Door lock . . . . . . . . . . . . . . . . . . . . . . . . . . . . . . . . . 15 de-icing . . . . . . . . . . . . . . . . . . . . . . . . . . . . . . . 252
Door lock cylinder de-icing . . . . . . . . . . . . . . . . . . . . . . . . . . . . . . . 252
Door release lever . . . . . . . . . . . . . . . . . . . . . . . . 115
299