ECU Seat Ibiza 2017 Owner's manual Edition 11.17
[x] Cancel search | Manufacturer: SEAT, Model Year: 2017, Model line: Ibiza, Model: Seat Ibiza 2017Pages: 312, PDF Size: 6.51 MB
Page 20 of 312
The essentials
● To lif
t
the bonnet, press towards the left on
the lever located under the bonnet, in the
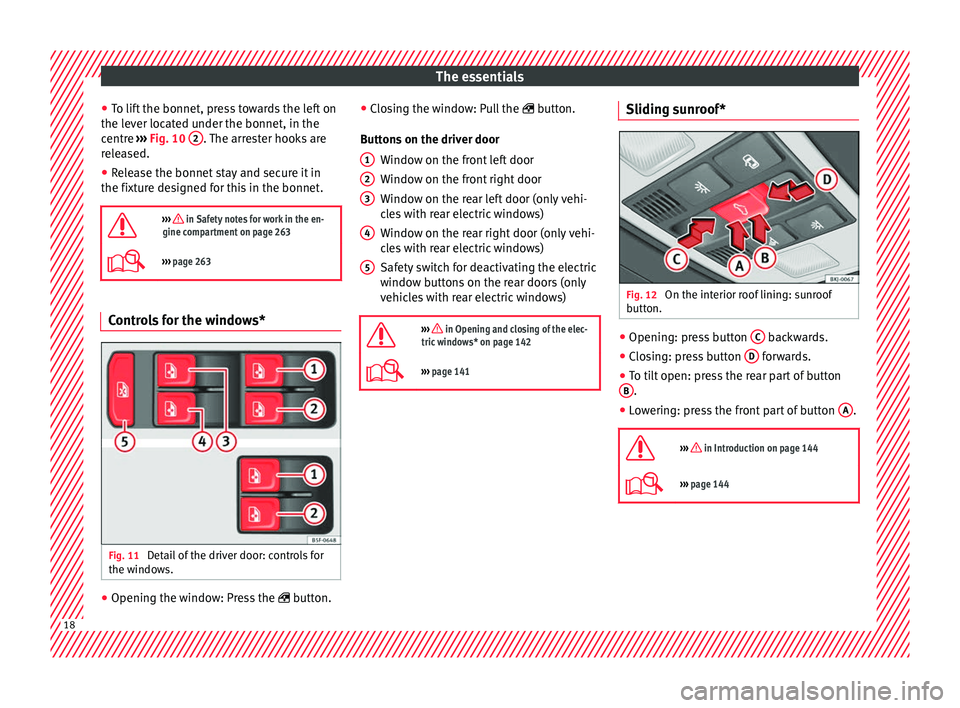
centre ››› Fig. 10 2 . The arrester hooks are
r el
e
ased.
● Release the bonnet stay and secure it in
the fixtur
e designed for this in the bonnet.
››› in Safety notes for work in the en-
gine compartment on page 263
››› page 263 Controls for the windows*
Fig. 11
Detail of the driver door: controls for
the w indo
w
s. ●
Opening the window: Press the butt
on. ●
C
los
ing the window: Pull the button.
Buttons on the driver door Window on the front left door
Window on the front right door
Window on the rear left door (only vehi-
cles with rear electric windows)
Window on the rear right door (only vehi-
cles with rear electric windows)
Safety switch for deactivating the electric
window buttons on the rear doors (only
vehicles with rear electric windows)
››› in Opening and closing of the elec-
tric windows* on page 142
››› page 141 1
2
3
4
5 Sliding sunroof*
Fig. 12
On the interior roof lining: sunroof
b utt
on. ●
Opening: press button C backwards.
● Closing: press button D forwards.
● To tilt open: press the rear part of button
B .
● Lowering: press the front part of button A .
››› in Introduction on page 144
››› page 144 18
Page 27 of 312
The essentials
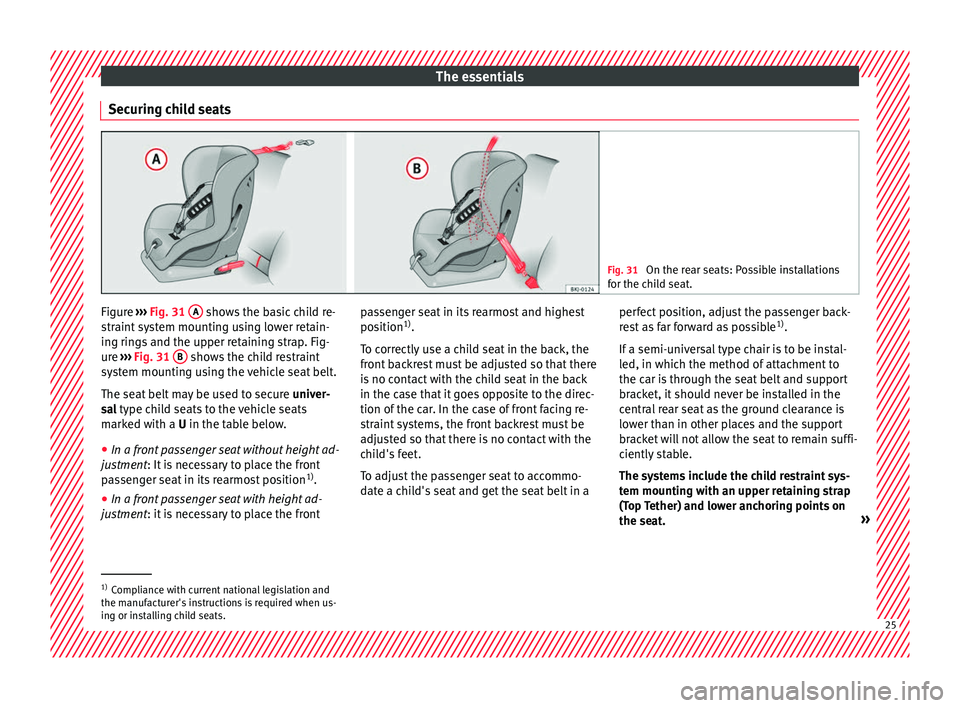
Securing child seats Fig. 31
On the rear seats: Possible installations
for the c hi
ld seat. Figure
›››
Fig. 31
A shows the basic child re-
s tr
aint
system mounting using lower retain-
ing rings and the upper retaining strap. Fig-
ure ››› Fig. 31 B shows the child restraint
sy s
t
em mounting using the vehicle seat belt.
The seat belt may be used to secure univer-
sal type child seats to the vehicle seats
marked with a U in the table below.
● In a front passenger seat without height ad-
justment
: It is necessary to place the front
passenger seat in its rearmost position 1)
.
● In a front passenger seat with height ad-
justment
: it is necessary to place the front passenger seat in its rearmost and highest
position
1)
.
T
o correctly use a child seat in the back, the
front backrest must be adjusted so that there
is no contact with the child seat in the back
in the case that it goes opposite to the direc-
tion of the car. In the case of front facing re-
straint systems, the front backrest must be
adjusted so that there is no contact with the
child's feet.
To adjust the passenger seat to accommo-
date a child's seat and get the seat belt in a perfect position, adjust the passenger back-
res
t as far forward as possible 1)
.
If a semi-universal type chair is to be instal-
led, in which the method of attachment to
the car is through the seat belt and support
bracket, it should never be installed in the
central rear seat as the ground clearance is
lower than in other places and the support
bracket will not allow the seat to remain suffi-
ciently stable.
The systems include the child restraint sys-
tem mounting with an upper retaining strap
(Top Tether) and lower anchoring points on
the seat. »1)
Compliance with current national legislation and
the manuf act
urer's instructions is required when us-
ing or installing child seats. 25
Page 28 of 312
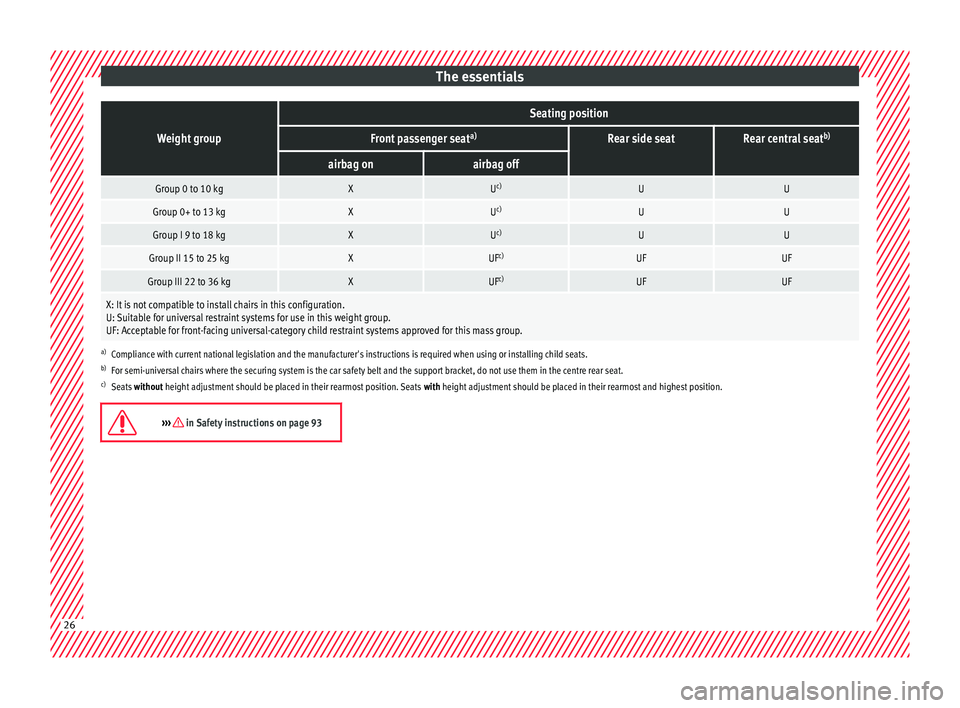
The essentialsWeight group
Seating position
Front passenger seat
a)Rear side seatRear central seatb)
airbag onairbag off
Group 0 to 10 kgXU
c)UU
Group 0+ to 13 kgXUc)UU
Group I 9 to 18 kgXUc)UU
Group II 15 to 25 kgXUF c)UFUF
Group III 22 to 36 kgXUFc)UFUF
X: It is not compatible to install chairs in this configuration.
U: Suitable for universal restraint systems for use in this weight group.
UF: Acceptable for front-facing universal-category child restraint systems approved for this mass group.
a)
Compliance with current national legislation and the manufacturer's instructions is required when using or installing child seats.
b) For semi-universal chairs where the securing system is the car safety belt and the support bracket, do not use them in the centre rear seat.
c) Seats without height adjustment should be placed in their rearmost position. Seats with height adjustment should be placed in their rearmost and highest position.
››› in Safety instructions on page 9326
Page 29 of 312
The essentials
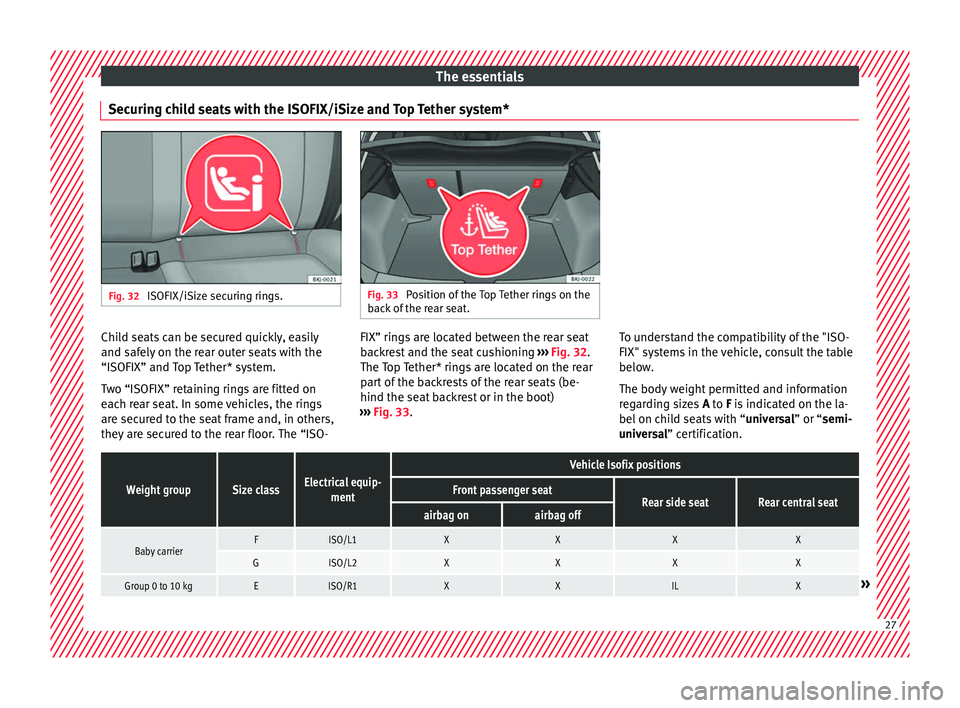
Securing child seats with the ISOFIX/iSize and Top Tether system* Fig. 32
ISOFIX/iSize securing rings. Fig. 33
Position of the Top Tether rings on the
bac k
of the rear seat. Child seats can be secured quickly, easily
and s
af
ely
on the rear outer seats with the
“ISOFIX” and Top Tether* system.
Two “ISOFIX” retaining rings are fitted on
each rear seat. In some vehicles, the rings are secured to the seat frame and, in others,
they are secured to the rear floor. The “ISO- FIX” rings are located between the rear seat
back
rest and the seat cushioning ››› Fig. 32.
The Top Tether* rings are located on the rear
part of the backrests of the rear seats (be-
hind the seat backrest or in the boot)
››› Fig. 33. To understand the compatibility of the "ISO-
FIX" syst
ems in the vehicle, consult the table
below.
The body weight permitted and information
regarding sizes A to F is indicated on the la-
bel on child seats with “ universal” or “semi-
universal” certification.
Weight groupSize classElectrical equip- ment
Vehicle Isofix positions
Front passenger seatRear side seatRear central seatairbag onairbag off
Baby carrierFISO/L1XXXX
GISO/L2XXXX
Group 0 to 10 kgEISO/R1XXILX» 27
Page 31 of 312
The essentials
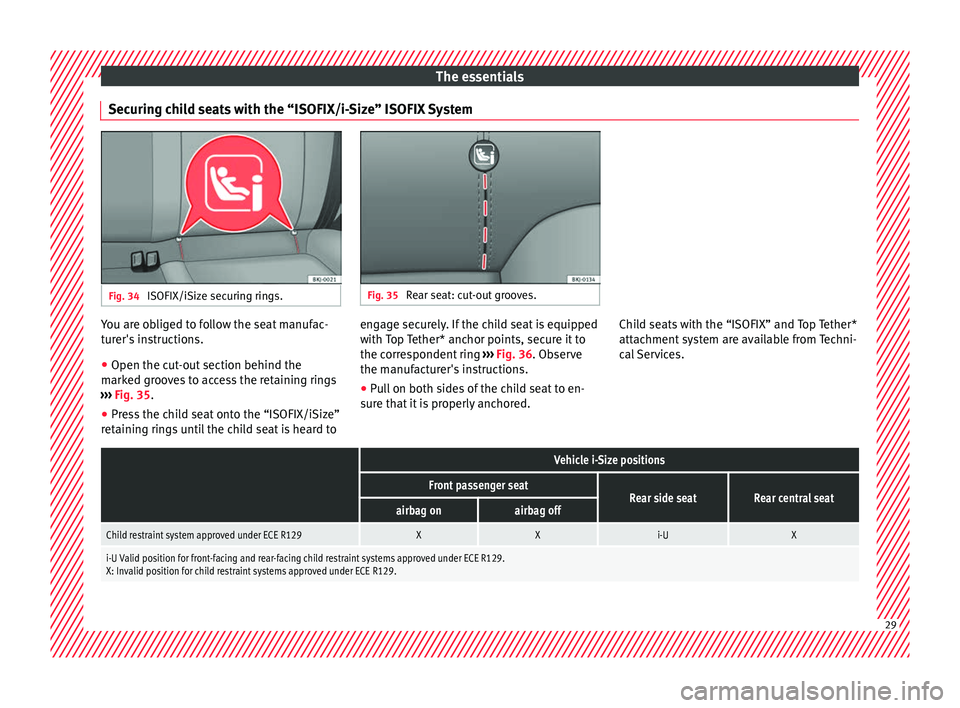
Securing child seats with the “ISOFIX/i-Size” ISOFIX System Fig. 34
ISOFIX/iSize securing rings. Fig. 35
Rear seat: cut-out grooves. You are obliged to follow the seat manufac-
t
ur
er's
instructions.
● Open the cut-out section behind the
marked gr
ooves to access the retaining rings
››› Fig. 35.
● Press the child seat onto the “ISOFIX/iSize”
retainin
g rings until the child seat is heard to engage securely. If the child seat is equipped
with Top
Tether* anchor points, secure it to
the correspondent ring ››› Fig. 36. Observe
the manufacturer's instructions.
● Pull on both sides of the child seat to en-
sure th
at it is properly anchored. Child seats with the “ISOFIX” and Top Tether*
attachment
system are available from Techni-
cal Services.
Vehicle i-Size positions
Front passenger seatRear side seatRear central seatairbag onairbag off
Child restraint system approved under ECE R129XXi-UX
i-U Valid position for front-facing and rear-facing child restraint systems approved under ECE R129.
X: Invalid position for child restraint systems approved under ECE R129. 29
Page 32 of 312
The essentials
Securing child seats with the Top
T ether* r
et
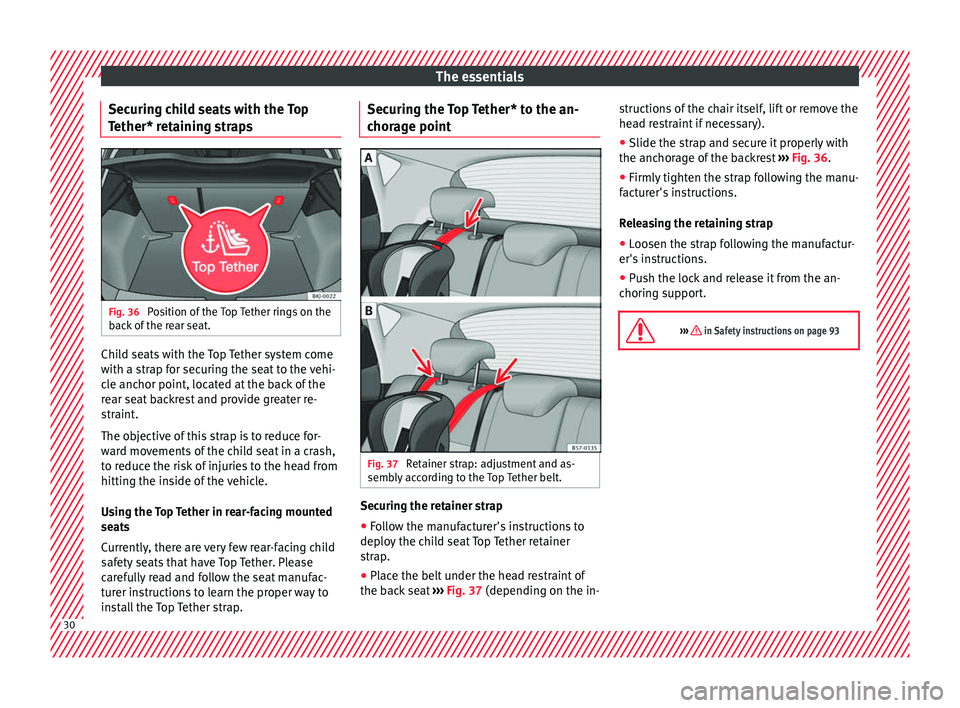
aining strapsFig. 36
Position of the Top Tether rings on the
b ac
k
of the rear seat. Child seats with the Top Tether system come
w
ith a s
tr
ap for securing the seat to the vehi-
cle anchor point, located at the back of the
rear seat backrest and provide greater re-
straint.
The objective of this strap is to reduce for-
ward movements of the child seat in a crash,
to reduce the risk of injuries to the head from
hitting the inside of the vehicle.
Using the Top Tether in rear-facing mounted
seats
Currently, there are very few rear-facing child
safety seats that have Top Tether. Please
carefully read and follow the seat manufac-
turer instructions to learn the proper way to
install the Top Tether strap. Securing the Top Tether* to the an-
chorag
e point Fig. 37
Retainer strap: adjustment and as-
semb ly
ac
cording to the Top Tether belt. Securing the retainer strap
●
Follow the manufacturer's instructions to
dep lo
y
the child seat Top Tether retainer
strap.
● Place the belt under the head restraint of
the back
seat ››› Fig. 37 (depending on the in- structions of the chair itself, lift or remove the
head r
estraint if necessary).
● Slide the strap and secure it properly with
the anchorag
e of the backrest ››› Fig. 36.
● Firmly tighten the strap following the manu-
factur
er's instructions.
Releasing the retaining strap
● Loosen the strap following the manufactur-
er's ins
tructions.
● Push the lock and release it from the an-
choring s
upport.
››› in Safety instructions on page 93 30
Page 53 of 312
The essentials
Removing the cover from the selector lever
● Apply the handbrake › ›
› to ensure that
the c ar doe
s
not move.
● Carefully pull the corners of the selector
lever boot
and twist it upwards above the lev-
er handle.
Releasing the selector lever
● Using a screwdriver, press and hold the yel-
low un
locking tab sideways ››› Fig. 60.
● Press the interlock button on the selector
lever and mo
ve the selector lever to posi-
tion N.
● After carrying out the manual release, at-
tach the sel
ector lever boot on the gearbox
console again. If the power supply should ever fail (e.g. dis-
char
ged battery) and the vehicle has to be
pushed or towed, the selector lever must first
be moved to position N, after operating the
manual release mechanism. WARNING
The selector lever may be moved out of posi-
tion P only when the h
andbrake is firmly ap-
plied. If this does not work, secure the vehi-
cle with the brake pedal. On a slope the vehi-
cle could otherwise start to move inadver-
tently after shifting the selector lever out of
position P - accident risk! Air conditioning
R el
at
ed video Fig. 61
Air conditioning 51
Page 69 of 312
The essentials
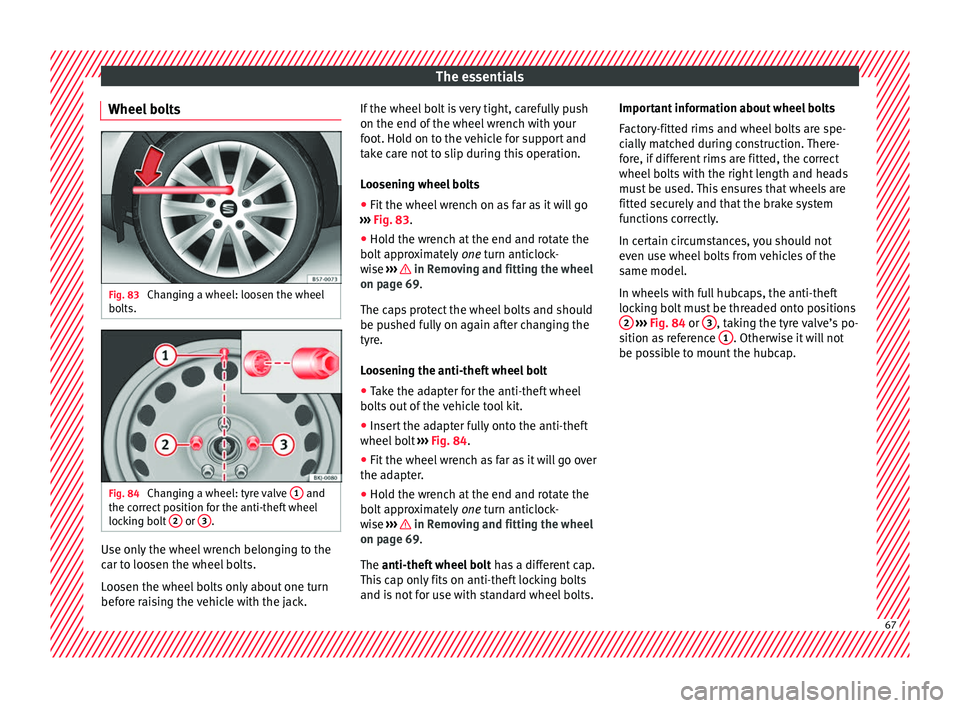
Wheel bolts Fig. 83
Changing a wheel: loosen the wheel
bo lts. Fig. 84
Changing a wheel: tyre valve 1 and
the c orrect
position for the anti-theft wheel
locking bolt 2 or
3 .
Use only the wheel wrench belonging to the
c
ar t
o loo
sen the wheel bolts.
Loosen the wheel bolts only about one turn
before raising the vehicle with the jack. If the wheel bolt is very tight, carefully push
on the end of the wheel wr
ench with your
foot. Hold on to the vehicle for support and
take care not to slip during this operation.
Loosening wheel bolts
● Fit the wheel wrench on as far as it will go
›››
Fig. 83.
● Hold the wrench at the end and rotate the
bolt ap
proximately one turn anticlock-
wise ››› in Removing and fitting the wheel
on p ag
e 69
.
The caps protect the wheel bolts and should
be pushed fully on again after changing the
tyre.
Loosening the anti-theft wheel bolt
● Take the adapter for the anti-theft wheel
bolts out
of the vehicle tool kit.
● Insert the adapter fully onto the anti-theft
wheel bolt
››› Fig. 84.
● Fit the wheel wrench as far as it will go over
the adapt
er.
● Hold the wrench at the end and rotate the
bolt ap
proximately one turn anticlock-
wise ››› in Removing and fitting the wheel
on p ag
e 69
.
The anti-theft wheel bolt has a different cap.
This cap only fits on anti-theft locking bolts
and is not for use with standard wheel bolts. Important information about wheel bolts
Factor
y-fitted rims and wheel bolts are spe-
cially matched during construction. There-
fore, if different rims are fitted, the correct
wheel bolts with the right length and heads
must be used. This ensures that wheels are
fitted securely and that the brake system
functions correctly.
In certain circumstances, you should not
even use wheel bolts from vehicles of the
same model.
In wheels with full hubcaps, the anti-theft
locking bolt must be threaded onto positions 2
› ›
› Fig. 84
or 3 , taking the tyre valve’s po-
s ition a
s
reference 1 . Otherwise it will not
be po s
s
ible to mount the hubcap. 67
Page 76 of 312
The essentials
Do not change the windscreen wipers when
out of
the ser
vice position, as it could cause
paint to flake off the bonnet due to friction
with the windscreen wiper arm.
Service position (for changing wiper blades)
● Ensure that the wiper blades are not frozen.
● Turn the ignition on and off and then (with-
in appro
ximately 9 seconds) push the wind-
screen wiper lever down (short wipe). The
windscreen wipers will move to the service
position ››› Fig. 91.
Removing the wiper blade
● Lift the windscreen wiper arm.
● Press the securing tab down 1
› ›
› Fig. 92
.
● Extract the wiper blade from the wiper arm.
Fitting the wiper b
lade
● Insert the wiper blade onto the windscreen
wiper arm unti
l it clicks into place.
● Place the windscreen wiper arms to their in-
itial po
sition.
● Turn the ignition on, push the windscreen
wiper lev
er down (touch wipe) and then turn
the ignition off.
››› in Changing the windscreen and
rear window wiper blades on page 100
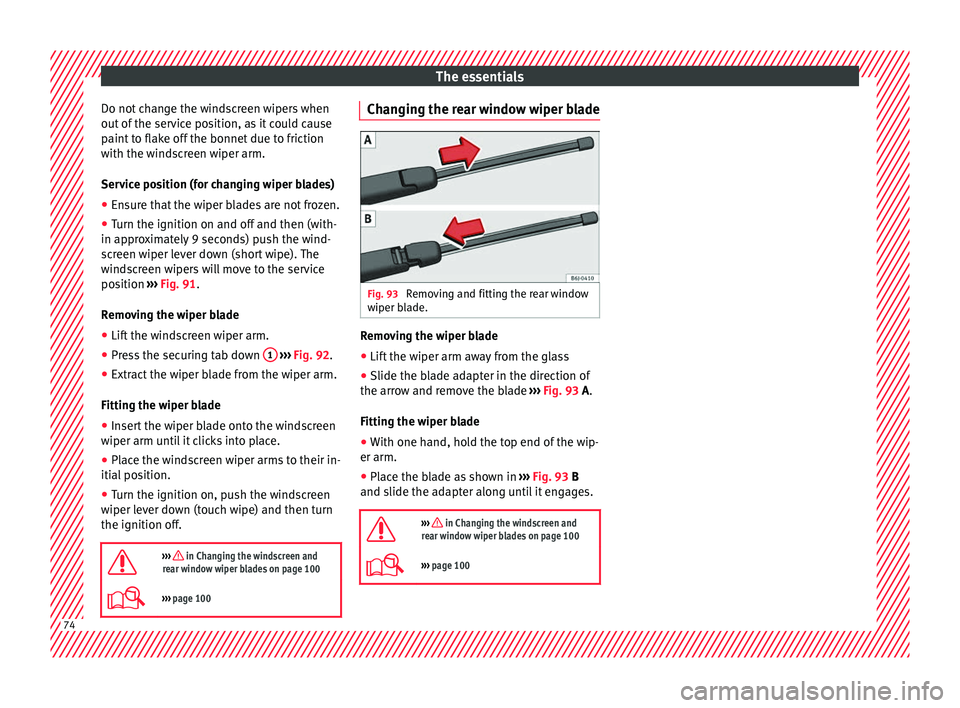
››› page 100 Changing the rear window wiper blade
Fig. 93
Removing and fitting the rear window
w iper b
l
ade. Removing the wiper blade
● Lift the wiper arm away from the glass
● Slide the blade adapter in the direction of
the arr o
w and r
emove the blade ››› Fig. 93 A.
Fitting the wiper blade
● With one hand, hold the top end of the wip-
er arm.
● Place the blade as shown in ›››
Fig. 93 B
and slide the adapter along until it engages.
››› in Changing the windscreen and
rear window wiper blades on page 100
››› page 100 74
Page 77 of 312
Safe driving
Safety
Saf e driv
in
g
Safety first! This chapter contains important information,
tips, s
ug
gestions and warnings that you
should read and consider for both your own
safety and for your passengers' safety. WARNING
● This m
anual contains important informa-
tion about the operation of the vehicle, both
for the driver and the passengers. The other
sections of the on-board documentation also
contain further information that you should
be aware of for your own safety and for the
safety of your passengers.
● Ensure that the on-board documentation is
kept in the
vehicle at all times. This is espe-
cially important when lending or selling the
vehicle to another person. Advice about driving
B ef or
e setting off For your own safety and the safety of your
p
a
s
sengers, always note the following points
before every trip: –
Make s
ure that the vehicle's lights and turn
signals are working properly.
– Check tyre pressure.
– Ensure that all windows provide a clear and
good v
iew of the surroundings.
– Ensure that all luggage is correctly secured
›››
page 160.
– Make sure that no objects can interfere
with the pedal
s.
– Adjust front seat, head restraint and mir-
rors
properly according to your size.
– Ensure that the passenger in the central
rear se
at always has the head restraint in
the correct position for use.
– Instruct passengers to adjust the head re-
straints
according to their height.
– Protect children with appropriate child
seats and pr
operly applied seat belts
››› page 92.
– Assume the correct sitting position. Instruct
your pa
ssengers also to assume a proper
sitting position ››› page 76.
– Fasten your seat belt securely. Instruct your
pas
sengers also to fasten their seat belts
properly ››› page 81. What affects driving safety? As a driver, you are responsible for yourself
and y
our p
assengers. When your concentra-
tion or driving safety is affected by any cir-
cumstance, you endanger yourself as well as
others on the road ››› , for this reason:
– Always pay attention to traffic and do not
get di
stracted by passengers or telephone
calls.
– Never drive when your driving ability is im-
paired (e.
g. by medication, alcohol, drugs).
– Observe traffic laws and speed limits.
– Always reduce your speed as appropriate
for r o
ad, traffic and weather conditions.
– When travelling long distances, take
break
s regularly - at least every two hours.
– If possible, avoid driving when you are tired
or stre
ssed. WARNING
When driving safety is impaired during a trip,
the risk of
injury and accidents increases. Safety equipment
Never put your safety or the safety of your
p
a
s
sengers in danger. In the event of an acci-
dent, the safety equipment may reduce the »
75
Technical data
Advice
Operation
Emergencies
Safety