check engine Seat Ibiza 5D 2006 Owner's manual
[x] Cancel search | Manufacturer: SEAT, Model Year: 2006, Model line: Ibiza 5D, Model: Seat Ibiza 5D 2006Pages: 268, PDF Size: 8.14 MB
Page 6 of 268
Contents
4Cleaning and caring for your vehicle
. . . . . . .
General notes . . . . . . . . . . . . . . . . . . . . . . . . . . .
Care of the vehicle exterior . . . . . . . . . . . . . . . . .
Care of the vehicle interior . . . . . . . . . . . . . . . . .
Accessories, parts replacement and
modifications
. . . . . . . . . . . . . . . . . . . . . . . . . . . .
Accessories and parts . . . . . . . . . . . . . . . . . . . . .
Modifications . . . . . . . . . . . . . . . . . . . . . . . . . . . .
Roof aerial* . . . . . . . . . . . . . . . . . . . . . . . . . . . . .
Mobile telephones and two-way radios . . . . . . .
Fitting a towing bracket* . . . . . . . . . . . . . . . . . . .
Checking and refilling levels
. . . . . . . . . . . . . .
Refuelling . . . . . . . . . . . . . . . . . . . . . . . . . . . . . . .
Petrol . . . . . . . . . . . . . . . . . . . . . . . . . . . . . . . . . .
Diesel . . . . . . . . . . . . . . . . . . . . . . . . . . . . . . . . . .
Working in the engine compartment . . . . . . . . .
Engine oil . . . . . . . . . . . . . . . . . . . . . . . . . . . . . . .
Coolant . . . . . . . . . . . . . . . . . . . . . . . . . . . . . . . . .
Washer fluid and windscreen wiper blades . . . .
Brake fluid . . . . . . . . . . . . . . . . . . . . . . . . . . . . . .
Battery . . . . . . . . . . . . . . . . . . . . . . . . . . . . . . . . .
Wheels . . . . . . . . . . . . . . . . . . . . . . . . . . . . . . . . .
If and when
. . . . . . . . . . . . . . . . . . . . . . . . . . . . . .
Vehicle tools, spare wheel . . . . . . . . . . . . . . . . .
Wheel change . . . . . . . . . . . . . . . . . . . . . . . . . . .
Tyre repair kit* (Tyre Mobility System) . . . . . . . .
Fuses . . . . . . . . . . . . . . . . . . . . . . . . . . . . . . . . . .
Bulb change . . . . . . . . . . . . . . . . . . . . . . . . . . . . .
Jump-starting . . . . . . . . . . . . . . . . . . . . . . . . . . . .
Towing and tow-starting . . . . . . . . . . . . . . . . . . .
Te c h n i c a l D a t a
. . . . . . . . . . . . . . . . . . . . . . .
General notes on the technical data
. . . . . . .
What you should be aware of . . . . . . . . . . . . . . .
How are the figures measured? . . . . . . . . . . . . . Towing a trailer . . . . . . . . . . . . . . . . . . . . . . . . . .
Wheels . . . . . . . . . . . . . . . . . . . . . . . . . . . . . . . . .
Techn ical Data
. . . . . . . . . . . . . . . . . . . . . . . . . . . .
Checking fluid levels . . . . . . . . . . . . . . . . . . . . . .
Petrol engine 1.2 litre 51 kW (69 bhp) . . . . . . .
Petrol engine 1.4 litre 63 kW (86 bhp) . . . . . . .
Petrol engine 1.4 litre 55 kW (75 hp). Automatic
Petrol engine 1.4 litre 74 kW (100 bhp) . . . . . .
Petrol engine 1.6 litre 77 kW (105 bhp) . . . . . .
Petrol engine 1.8 litre 110 kW (150 bhp) . . . . .
Petrol engine 1.8 litre 132 kW (180 bhp) . . . . .
Diesel engine 1.4 litre TDI 51 kW (70 bhp) . . . .
Diesel engine 1.4 litre TDI 59 kW (80 bhp) . . . .
Diesel engine 1.9l TDI 74 kW (100 bhp) . . . . . .
Diesel engine 1.9l TDI 96 kW (131 bhp) . . . . . .
Diesel engine 1.9 TDI 118kW (160 bhp) . . . . . .
Dimensions and capacities . . . . . . . . . . . . . . . .
Index
. . . . . . . . . . . . . . . . . . . . . . . . . . . . . . . . . .
160
160
161
166
169
169
169
170
170
171
173
173
174
175
176
179
183
185
188
190
192
198
198
201
206
208
214
225
228
233
233
233
235 236
236
238
238
239
240
241
243
244
245
247
248
249
250
252
253
255
257
ibiza_angles_0706_DEF Seite 4 Freitag, 1. September 2006 1:18 13
Page 53 of 268
Cockpit51
Safety First
Operating instructions
Tips and Maintenance
Te c h n i c a l D a t a
Rev counter
The rev. counter displays the engine speed in revolutions per
minute.The start of the red zone on the dial ⇒ page 50, fig. 31 indicates the
maximum engine speed which may be used briefly when the engine is warm
and after it has been run-in properly. However, it is advisable to change up a
gear or move the selector lever to D (or li ft your foot off the accelerator) before
the needle reaches the red zone.
Caution
The rev counter needle must never enter the red zone on the scale. Risk of
engine damage.
For the sake of the environment
Changing up a gear early will help you to save fuel and minimise engine
noise.
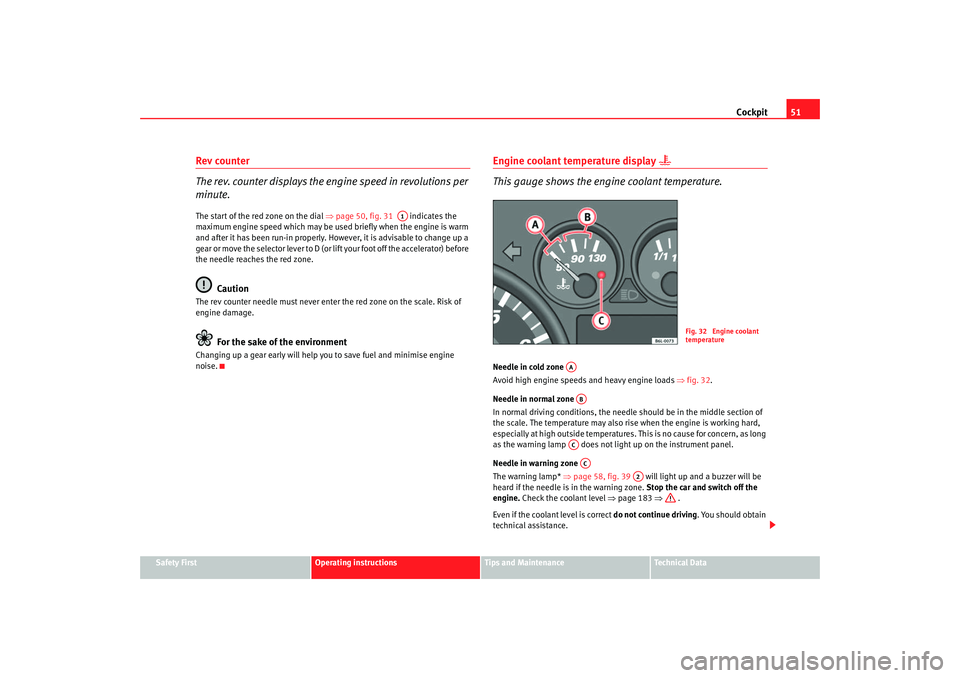
Engine coolant temperature display
This gauge shows the engine coolant temperature.
Needle in cold zone
Avoid high engine speeds and heavy engine loads ⇒fig. 32.
Needle in normal zone
In normal driving conditions, the needle should be in the middle section of
the scale. The temperature may also rise when the engine is working hard,
especially at high outside temperatures. This is no cause for concern, as long
as the warning lamp does not li ght up on the instrument panel.
Needle in warning zone
The warning lamp* ⇒page 58, fig. 39 will light up and a buzzer will be
heard if the needle is in the warning zone. Stop the car and switch off the
engine. Check the coolant level ⇒ page 183 ⇒ .
Even if the coolant level is correct do not continue driving. You should obtain
technical assistance.
A1
Fig. 32 Engine coolant
temperature
AAABACAC
A2
ibiza_angles_0706_DEF Seite 51 Freitag, 1. September 2006 1:18 13
Page 63 of 268
Cockpit61
Safety First
Operating instructions
Tips and Maintenance
Te c h n i c a l D a t a
There is a fault in the electro-hydraulic steering system if the lamp does not
go out or lights up whilst the vehicle is in motion. Take the vehicle to the
Authorised Service Centre as soon as possible.
Engine management
This warning lamp monitors th e engine management system
for petrol engines.
The warning lamp
(Electronic Power Control) lights up when the ignition
is switched on to show that the lamp is working properly. It should go out
when the engine has started running.
If a fault develops in the electronic engine management system while you are
driving, this warning lamp will light up. Stop the vehicle and seek technical
assistance.
Glow plug system / Engine fault*
The warning lamp lights up to show that the glow plugs are
preheating. It flashes if there is an engine fault.
Warning lamp
is lit
The warning lamp lights up while the glow plugs are preheating. When the
warning lamp goes off, the engine should be started straight away.
Warning lamp
flashes
If a fault develops in the engine management system while you are driving,
the glow plug lamp will flash
. Take the vehicle to an Authorised Service
Centre as soon as possible and have the engine checked.
Tu r n si g nals
The warning lamp flashes when the turn signals are in oper-
ation.Depending on which turn signal is operated, either the left
or right
indi-
cator lamp flashes. Both warning lamps will flash at the same time when the
hazard warning lights are switched on.
If one turn signal fails, the warning lamp will start flashing twice as fast.
Further information on the turn signals ⇒page 91.
Coolant Level* / temperature
The warning lamp lights up if the coolant temperature is too
high or if the coolant level is too low.There is a fault if:•
The warning symbol does not go out again after a few seconds.
•
The warning lamp lights up or flashes while the vehicle is moving, while
three acoustic warning signals ⇒ are emitted.
This means that either the coolant level is too low or the coolant temperature
is too high.
Coolant temperature too high
First look at the coolant temperature gauge. The coolant temperature is too
high if the needle is over the warning area on the dial. Stop the vehicle,
switch off the engine and wait for it to cool down. Check the coolant level.
If the coolant level is correct, the over heating may be caused by a malfunction
of the radiator fan. Check the radiator fan fuse and have it replaced if neces-
sary ⇒page 208.
ibiza_angles_0706_DEF Seite 61 Freitag, 1. September 2006 1:18 13
Page 65 of 268
Cockpit63
Safety First
Operating instructions
Tips and Maintenance
Te c h n i c a l D a t a
WARNING
•
Before opening the bonnet, read and observe the warnings on
⇒ page 176, “Working in the engine compartment”.
•
If the brake warning lamp
should light up together with the ABS
warning lamp
, stop the vehicle immediately and check the brake fluid
level in the reservoir ⇒page 188, “Brake fluid”. If the fluid level has
dropped below the “MIN” mark you must not drive on. Risk of accident.
Obtain technical assistance.
•
If the brake fluid level is correct, the fault in the brake system may have
been caused by a failure of the ABS system. This could cause the rear
wheels to lock quickly when you brake. This could cause the rear to break
away. Risk of skidding. Stop the vehicle and seek technical assistance.
Brake system* / handbrake
The warning lamp lights up if the handbrake is applied, if the
brake fluid level falls too low or if there is a fault in the brake
system.
This warning lamp
lights up if
•
If the handbrake is on
•
If the brake fluid level is too low ⇒page 188
•
If there is a fault in the brake system
This warning lamp can light up together with the anti-lock brake system
warning lamp.
WARNING
•
If the brake warning lamp does not go out, or if it lights up when
driving, the brake fluid level ⇒page 188, “Brake fluid” in the reservoir is
too low. Risk of accident. Stop the vehicle and do not drive on. Obtain tech-
nical assistance.
•
If the brake warning lamp
lights up together with the ABS warning
lamp
, the control function of the ABS could be out of action. This could
cause the rear wheels to lock quickly when you brake. This could cause the
rear to break away. Risk of skidding. Stop the vehicle and seek technical
assistance.
Emission control system*
This warning lamp monitors the exhaust system.
Warning lamp
flashes:
When there is misfiring that can damage the catalytic converter. Reduce
speed and drive carefully to the nearest qualified workshop to have the
engine checked.
Warning lamp is lit:
If a fault has developed during driving which has reduced the quality of the
exhaust gas (e. g. lambda probe fault). Reduce speed and drive carefully to
the nearest qualified workshop to have the engine checked.
ibiza_angles_0706_DEF Seite 63 Freitag, 1. September 2006 1:18 13
Page 67 of 268
Cockpit65
Safety First
Operating instructions
Tips and Maintenance
Te c h n i c a l D a t a
Electronic immobiliser
Inside the key there is a chip that deac tivates the electronic immobiliser auto-
matically when the key is inserted into the ignition. The immobiliser will be
activated again automatically as soon as you pull the key out of the ignition
lock.
The engine can, however, be started if the appropriate coded SEAT genuine
key is used.
Note
The vehicle cannot be operated properly if you do not have a genuine SEAT
key.Engine oil pressure
This warning lamp indicates that the engine oil pressure is
too low.If this warning symbol starts to flash, and is accompanied by three audible
warnings , switch off the engine and check the oil level. If the oil level is too
low, add more engine oil ⇒page 179.
If the symbol flashes although the oil level is correct, do not drive on. The
engine must not even run at idle speed. Obtain technical assistance.
Trailer turn signals
This warning lamp also flashe s when the turn signals are
operated while towing a caravan or trailer.The warning lamp
flashes when the turn signals are operated, provided a
trailer is correctly attached and connected to the vehicle.
The warning lamp will not flash if one of the turn signals on the trailer fails.
Differential lock fault (EDL)*
EDL operates along with the ABS in vehicles equipped with an
Electronic Stabilisation Program (ESP)*A malfunction in the EDL is indicated by the ABS warning lamp
. Please
take the vehicle to a qualified workshop as soon as possible. For further infor-
mation on the EDL ⇒page 148, “Electronic diff erential lock (EDL)*”.
ibiza_angles_0706_DEF Seite 65 Freitag, 1. September 2006 1:18 13
Page 85 of 268
Unlocking and locking83
Safety First
Operating instructions
Tips and Maintenance
Te c h n i c a l D a t a
Buttons in the driver door
Button for window in front left door
Button for window in front right door
Buttons for rear windows* Safety switch for deactivating the electric window buttons in the rear
doors
Button for window in rear right door
Button for window in rear left door
Safety switch
*
Safety switch in the driver door can be used to disable the electric window
buttons in the rear doors.
Safety switch not pushed in: the buttons in the rear doors are enabled.
Safety switch pushed in: the buttons in the rear doors are disabled.
WARNING
•
Incorrect use of the electric windows can result in injury.
•
Never close the tailgate without observing and ensuring it is clear, to do
otherwise could cause serious injury to you and others. Make sure that no
one is in the path of a window.
•
Always take the vehicle key with you when you leave the vehicle.
•
Never leave children or disabled persons in the vehicle, particularly if
they have access to the keys. Unsupervised use of a key could mean that
the engine is started or that electrical equipment is used (e.g. electric
windows). Risk of accident. The door s can be locked using the remote
control key. This could result in people being trapped in the vehicle in an
emergency.
•
The electric windows will work until the key has been removed from the
ignition and one of the front doors has been opened.
•
If necessary, use the safety switch to disable the rear electric windows.
Make sure that they have been disabled.Note
If the window is not able to close becau se it is stiff or because of an obstruc-
tion, the window will automatically open again ⇒ page 84. If this happens,
check why the window could not be closed before attempting to close it
again.One-touch opening and closing*
The one-touch opening and closing function is only possible
on the front doors and can only be activated from the driver's
door.One-touch closing
– Pull up the button for the window briefly to the second position. The window closes fully.
One-touch opening
– Push down the button for the window briefly to the second posi- tion. The window opens fully.
Restoring one-touch opening and closing
– Close all windows.
A1A2A3A4A5
A3
WARNING (continued)
ibiza_angles_0706_DEF Seite 83 Freitag, 1. September 2006 1:18 13
Page 124 of 268
Heating, Ventilation and Air conditioning
122
– Turn the temperature control switch until the desired interior temperature is obtained.
– Turn the blower switch to one of the settings 1-4.
– Use the air distribution control to guide the flow of air in the required direction: (to the windscreen), (to the upper
body), (to the foot well) and (to the windscreen and to the
foot well).Heating system
Maximum heat output, which is needed to defrost the windows quickly, is
only available when the engine has reached its operating temperature.
Cooling system
When the cooling system is switched on, not only the temperature, but also
the air humidity in the vehicle interior is reduced. This improves comfort for
the vehicle occupants and prevents misting of the windows when the outside
air humidity is high.
If the cooling system cannot be switched on this may be due to the following
reasons:•
the engine is not running.
•
The blower is switched off.
•
The outside temperature is lower than +5°C.
•
the cooling system compressor has been temporarily switched off
because the engine coolant temperature is too high.
•
The air conditioner fuse is faulty.
•
Another fault in the vehicle. Have the air conditioner checked by a quali-
fied workshop.
Air recirculation
Air recirculation mode prevents fumes or unpleasant smells
from entering the vehicle.When air recirculation mode is switched on (button ⇒page 121, fig. 94
with warning lamp) strong odours in the outside air do not enter the vehicle
interior, for example when passing through a tunnel or in queuing traffic.
When the outside temperature is low, us ing air recirculation mode provides
more effective heating by heating air from the vehicle interior instead of cold
air from outside.
When the outside temperature is high, using air recirculation mode provides
more effective cooling by cooling air fr om the vehicle interior instead of warm
air from outside.
For reasons of safety, air recirculation is not possible when the control for air
distribution is set to the windscreen setting
.
WARNING
In air recirculation mode, no ambient air enters the vehicle interior. If the
air conditioning system is switched off, the windows can quickly mist over.
Therefore, you should never leave the air recirculation mode switched on
for longer periods, as this increases the risk of an accident.
Note
•
When reverse gear is engaged the air recirculation connects automatically
to prevent the entrance of exhaust fumes in the vehicle on travelling back-
wards. The control light on th e button does not light up.
•
If the temperature control is turned to the coldest setting (blue point) and
the switch is activated, the “Air recirculation” function is automatically
activated in order to cool the passenger compartment rapidly using a
minimum of energy and the function indicator will light.
AC
ibiza_angles_0706_DEF Seite 122 Freitag, 1. September 2006 1:18 13
Page 134 of 268
Driving
132
– Let go of the ignition key as soon as the engine starts; the starter motor must not be allowed to run on with the engine.After starting a very hot engine, you may need to press the accelerator briefly.
When starting from cold, the engine ma y be a little noisy for the first few
seconds until oil pressure has built up in the hydraulic valve compensators.
This is quite normal, and no cause for concern.
If the engine does not start immediately, switch off the starter after about
10 seconds and try again after about half a minute. If the engine still does not
start, the fuel pump fuse should be checked ⇒page 208, “Fuses”.
WARNING
•
Never start or run the engine in un ventilated or closed rooms. The
exhaust fumes contain carbon mono xide, an odourless and colourless
poisonous gas. Risk of fatal accidents. Carbon monoxide can cause loss of
consciousness. It can also cause death.
•
Never leave the vehicle unattended if the engine is running.
•
Never use “cold start sprays”, they could explode or cause the engine
to run at high revs. Risk of injury.Caution
•
When the engine is cold, you should av oid high engine speeds, driving at
full throttle and overloading the engine. Risk of engine damage.
•
The vehicle should not be pushed or towed for more than approximately
50 metres to start the engine. Fuel could enter the catalytic converter and
damage it.
•
Before attempting to push-start or tow a vehicle to start it, you should first
try to start it using the battery of another vehicle. Note and follow the instruc-
tions ⇒page 225, “Jump-starting”.
For the sake of the environment
Do not warm up the engine by running th e engine with the vehicle stationary.
You should drive off as soon as you start the engine. This helps the engine
reach operating temperature faster and reduces emissions.Starting diesel engines
The engine can only be started using a genuine SEAT key with
the correct code.– Move the gear lever to the ne utral position and depress the
clutch pedal fully and hold it in this position, the starter will then
only have to turn the engine.
– Turn the ignition key to the starting position.
– Turn the ignition key to position ⇒page 130, fig. 99 . The
indication lamp
will light for engine pre-heating.
– When the warning lamp goes out, turn the key to position to start the engine. Do not press the accelerator.
– Let go of the ignition key as soon as the engine starts, the starter motor must not be allowed to run on with the engine.
When starting from cold, the engine may be a little noisy for the first few
seconds until oil pressure has built up in the hydraulic valve compensators.
This is quite normal, and no cause for concern.
If there are problems starting the engine, see ⇒page 225.
A1
A2
ibiza_angles_0706_DEF Seite 132 Freitag, 1. September 2006 1:18 13
Page 152 of 268
Driving and the environment
150Braking effect and braking distance
The braking effect and braking distance are influenced by
driving situations and road conditions.The efficiency of the brakes depends directly on the brake pad wear. The rate
of wear of the brake pads depends to a great extent on the conditions under
which the vehicle is operated and the way the vehicle is driven. If you often
drive in town traffic, drive short distances or have a sporty driving style, we
recommend that you have the thickness of your brake pads checked by an
Authorised Service Centre more frequently than recommended in the Service
Schedule.
If you drive with wet brakes, for example after driving through water, after
heavy rainfall or after washing the car, the braking effect will be reduced as
the brake discs will be wet, or possibly frozen (in winter): the brakes must be
“dried” through careful braking.
The brake fluid must be changed every two years at the latest. Heavy use of
the brakes may cause a vapour lock if the brake fluid is left in the system for
too long. This prevents the brakes developing their full braking effect.
WARNING
Longer braking distances and faults in the brake system increase the risk
of accidents.•
New brake pads must be run-in and do not have the correct friction
during the first 200 km. However, the reduced braking capacity may be
compensated by pressing on the brake pedal a little harder. This also
applies when new brake pads are fitted.
•
If brakes are wet or frozen, or if you are driving on roads which have
been gritted with salt, braking power may set in later than normal.
•
On steep descents if the brakes are excessively used they will over
heat. Before driving down a long steep gradient, it is advisable to reduce
speed and change to a lower gear (or mo ve the selector lever to a lower gear if your vehicle has automatic transmission). This makes use of engine
braking and relieves the brakes.
•
Never let the brakes “rub” by applying light pressure. Continuous
braking will cause the brakes to overheat and will increase the braking
distance. Apply and then release the brakes alternately.
•
Never let the vehicle coast with the engine switched off. The braking
distance is increased considerably as the brake servo does not function.
•
Very heavy use of the brakes may cause a vapour lock if the brake fluid
is left in the system for too long . This impairs the braking effect.
•
Non-standard or damaged front spoilers could restrict the airflow to the
brakes and cause them to overheat. Observe the relevant instructions
before purchasing accessories ⇒page 169, “Modifications”.
•
If a brake circuit fails, the braking distance will be increased consider-
ably. Contact a qualified workshop immediately and avoid unnecessary
journeys.
Exhaust gases purification systemCatalytic converter*To conserve the useful life of the catalytic converter
– Always use unleaded petrol.
– Do not run the fuel tank dry.
– For engine oil changes, do not replenish with too much engine oil ⇒page 181, “Topping up engine oil ”.
WARNING (continued)
ibiza_angles_0706_DEF Seite 150 Freitag, 1. September 2006 1:18 13
Page 161 of 268
Driving and the environment159
Safety First
Operating instructions
Tips and Maintenance
Te c h n i c a l D a t a
Regular servicingBy taking your car to an Authorised Service Centre for regular servicing you
can establish a basis for good fuel economy before you start driving. A well-
serviced engine gives you the benefit of improved fuel efficiency as well as
maximum reliability and an enhanced resale value.
A badly serviced engine can consume up to 10% more fuel than necessary.
Check the oil level every time you fill the tank ⇒page 180. Oil consumption
depends to a great extent on the engine load and engine speed. Depending
on your personal driving s tyle, oil con s
umption can be up to 1 litre per
1,000
km.
Avoid short journeysThe engine and catalytic converter need to reach their proper working
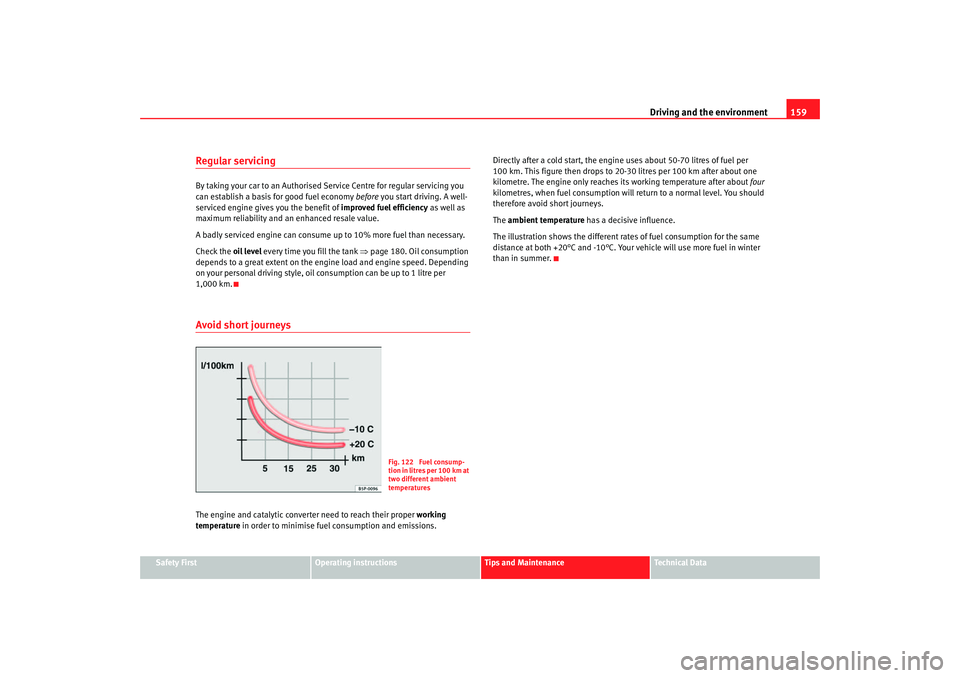
temperature in order to minimise fuel consumption and emissions. Directly after a cold start, the engine uses about 50-70 litres of fuel per
100 km. This figure then drops to 20
-30 litres per 100 km after about one
kilometre. The engine only reaches its working temperature after about four
kilometres, when fuel consumption will return to a normal level. You should
therefore avoid short journeys.
The ambient temperature has a decisive influence.
The illustration shows the different rates of fuel consumption for the same
distance at both +20°C and -10°C. Your vehicle will use more fuel in winter
than in summer.
Fig. 122 Fuel consump-
tion in litres per 100 km at
two different ambient
temperatures
ibiza_angles_0706_DEF Seite 159 Freitag, 1. September 2006 1:18 13