ECO mode Seat Ibiza 5D 2014 User Guide
[x] Cancel search | Manufacturer: SEAT, Model Year: 2014, Model line: Ibiza 5D, Model: Seat Ibiza 5D 2014Pages: 240, PDF Size: 4.89 MB
Page 100 of 240
Operation
again, you have to turn the ignition off and
then on again.
● Do not put stickers on the windscreen in
front of the rain sensor*. This may cause sen-
sor disruption or faults. Rear window wiper
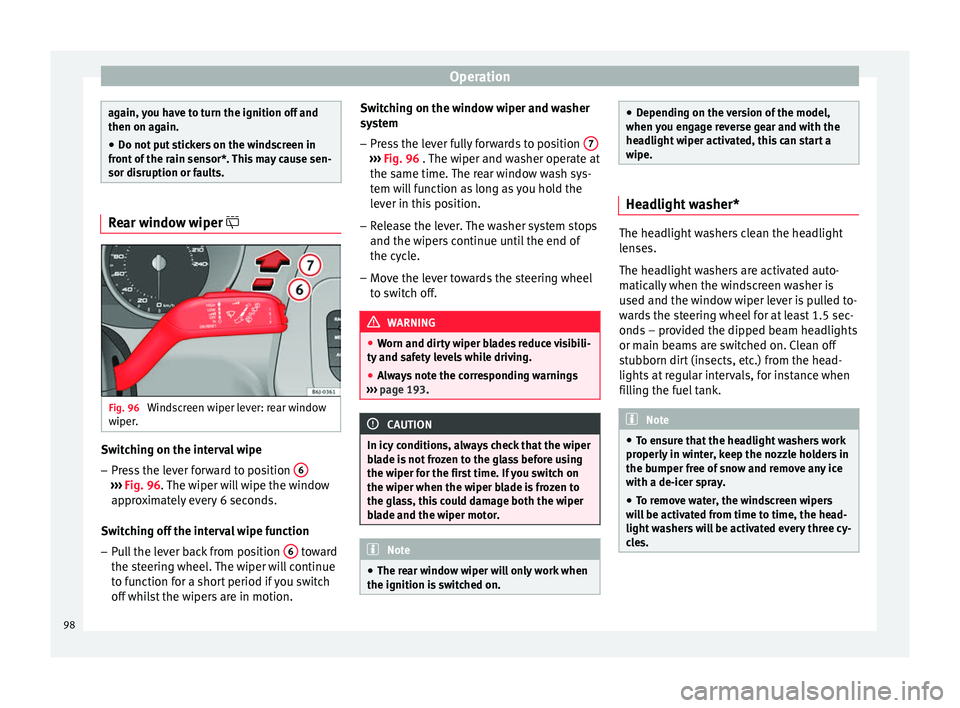
Fig. 96
Windscreen wiper lever: rear window
wiper. Switching on the interval wipe
– Press the lever forward to position 6›››
Fig. 96 . The wiper will wipe the window
ap pr
oximately every 6 seconds.
Switching off the interval wipe function
– Pull the lever back from position 6 toward
the steering wheel. The wiper will continue
to function for a short period if you switch
off whilst the wipers are in motion. Switching on the window wiper and washer
system
– Press the lever fully forwards to position 7 ›››
Fig. 96 . The wiper and washer operate at
the s ame time.
The rear window wash sys-
tem will function as long as you hold the
lever in this position.
– Release the lever. The washer system stops
and the wipers continue until the end of
the cycle.
– Move the lever towards the steering wheel
to switch off. WARNING
● Worn and dirty wiper blades reduce visibili-
ty and safety levels while driving.
● Always note the corresponding warnings
››› page 193. CAUTION
In icy conditions, always check that the wiper
blade is not frozen to the glass before using
the wiper for the first time. If you switch on
the wiper when the wiper blade is frozen to
the glass, this could damage both the wiper
blade and the wiper motor. Note
● The rear window wiper will only work when
the ignition is switched on. ●
Depending on the version of the model,
when you engage reverse gear and with the
headlight wiper activated, this can start a
wipe. Headlight washer*
The headlight washers clean the headlight
lenses.
The headlight washers are activated auto-
matically when the windscreen washer is
used and the window wiper lever is pulled to-
wards the steering wheel for at least 1.5 sec-
onds – provided the dipped beam headlights
or main beams are switched on. Clean off
stubborn dirt (insects, etc.) from the head-
lights at regular intervals, for instance when
filling the fuel tank.
Note
● To ensure that the headlight washers work
properly in winter, keep the nozzle holders in
the bumper free of snow and remove any ice
with a de-icer spray.
● To remove water, the windscreen wipers
will be activated from time to time, the head-
light washers will be activated every three cy-
cles. 98
Page 115 of 240
Air conditioning
Note
Always read the assembly instructions that
come with the crossbars and the roof carrier
system carefully and keep them in the vehi-
cle. Air conditioning
General notes The pollution filter
The pollution filter (a combined particulate
filter and active carbon filter) serves as a bar-
rier against impurities in the outside air, in-
cluding dust and pollen.
For the climate control system to work with
maximum efficiency, the pollution filter must
be replaced at the specified intervals in the
Maintenance Programme.
If the filter loses efficiency prematurely due
to use in areas reaching very high pollution
levels, the pollen filter must be changed
more frequently than stated in the Service
Schedule.
CAUTION
● If you suspect that the air conditioner is
damaged, switch it off with the A/C button to
prevent further damage and have it checked
by a specialised workshop.
● Repairs to the air conditioner require spe-
cialist knowledge and special tools. There-
fore, we recommend you to take the vehicle
to a specialised workshop. Note
● If the humidity and temperature outside the
vehicle are high, condensation can drip off
the evaporator in the cooling system and
form a pool underneath the vehicle. This is
normal and does not indicate a leak.
● Keep the air intake slots in front of the
windscreen free of snow, ice and leaves to en-
sure heating and cooling are not impaired,
and to prevent the windows from misting
over.
● The air from the vents flows through the ve-
hicle interior and is extracted by slots in the
luggage compartment designed for this pur-
pose. Therefore, you should avoid obstruct-
ing these slots with any kind of object.
● The air conditioner operates most effective-
ly with the windows and the sliding/tilting
sunroof* closed. However, if the temperature
inside the vehicle is excessive because of the
sun, the air inside can be cooled faster by
opening the windows for a short time.
● Do not smoke while air recirculation mode
is on, as smoke drawn into the air condition-
ing system leaves residue on the evaporator,
producing a permanent unpleasant odour.
● At low outside temperatures, the compres-
sor switches off automatically and cannot be
switched on even with the AUTO button.
● It is advisable to turn on the air condition-
ing at least once a month, to lubricate the
system gaskets and prevent leaks. If a de-
crease in the cooling capacity is detected, a » 113Technical specifications
Advice
Operation
Safety
The essentials
Page 117 of 240
Air conditioning
Blower
The air flow can be set at four speeds with
switch B . The blower should always be set
at the lowest speed when driving slowly.
Air distribution
Control C for setting the flow of air in the re-
quired direction.
– Air distribution towards the windscreen
in or der t
o demist. For safety reasons, it is
not recommended to switch air recirculation
on.
– Air distribution to upper body.
– Air distribution to footwell
– Air distribution to the windscreen and
the footwell. Air recirculation mode
Air rec
irculation mode D on (a lamp lights
up in red) prevents strong odours from out-
side from entering the vehicle, for example
when passing through a tunnel or in a traffic
jam ››› .
When the outside temperature is low, air re-
circulation mode improves heating perform-
ance by heating air from the interior instead
of cold air from the outside. WARNING
● For your safety, the windows should never
be fogged up or covered with snow or ice.
This is essential to ensure good visibility.
Please familiarise yourself with the correct
operation of the heating and ventilation sys-
tem, including the demist/defrost functions
for the windows. ●
In air recirculation mode, no cold air from
the outside enters the vehicle interior. The
windows can quickly fog over if the heating is
switched off. Therefore, never leave the air re-
circulation mode switched on for a long time
(risk of accident). Note
● Please consider the general notes
››› page 113
. 115
Technical specifications
Advice
Operation
Safety
The essentials
Page 122 of 240
Operation
Coolant system
When the air conditioning is switched on, the
temperature and the air humidity go down.
This way, if the outside humidity is extreme,
the air conditioning prevents the misting of
the windows and therefore, comfort is im-
proved.
If the air conditioning does not work, this
may be due to the following reasons:
● The engine is stationary.
● The fan blower is switched off.
● The outside temperature is lower than ap-
proximately +3 °C (+37 °F).
● The air conditioning system compressor
has been temporarily switched off because of
an increased engine coolant temperature.
● The air conditioner fuse is faulty.
● Another fault in the vehicle. Have the air
conditioning checked by a specialised work-
shop.
Air recirculation Air recirculation mode on
›››
Fig. 129 (a
lamp lights up on the button) prevents strong
odours or contaminated air from the outside air from entering in the vehicle, for example
when passing through a tunnel or in a traffic
jam.
When the outside temperature is low, air re-
circulation mode improves heating perform-
ance by heating air from the interior instead
of cold air from the outside.
When the outside temperature is high, air re-
circulation mode improves cooling perform-
ance by cooling air from the interior instead
of warm air from outside.
For safety reasons, the air recirculation
should not be switched on
when the air dis-
tribution control is set to the windscreen set-
ting . WARNING
In air recirculation mode, no cold air from the
outside enters the vehicle interior. If the air
conditioner is switched off, the windows can
quickly mist over. Therefore, never leave the
air recirculation mode switched on for a long
time (risk of accident). Note
● When engaging reverse gear, the air recir-
culation is connected automatically to pre-
vent the entrance of exhaust gases in the ve-
hicle on travelling backwards. The control
lamp on the button does not light up.
● If the temperature control is turned to the
coldest setting (blue point) and the A/C but- ton is on, the “Air recirculation” function is
automatically activated in order to cool the
vehicle faster using less energy, and its func-
tion control lamp will light up.
● If the function is not deactivated by press-
ing the button, it will deactivate after approx-
imately 20 minutes. Economic use of the air conditioning
When the air conditioning is switched on, the
compressor consumes engine power and has
influence on fuel consumption. Consider the
following points in order to have the system
operating in the minimum possible time.
● If the vehicle interior has overheated due to
an excessive solar radiation, it is best to
open the windows or doors to allow the hot
air to escape.
● While in motion, the air conditioning
should not be switched on if the windows or
the sunroof* are open.
120
Page 123 of 240
Air conditioning
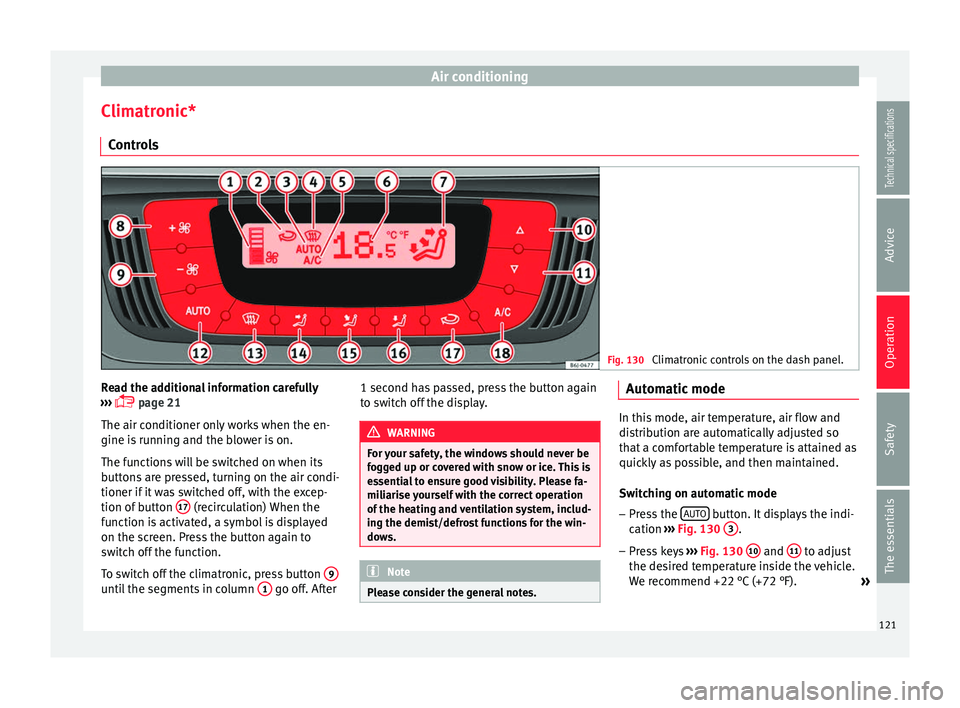
Climatronic* Controls Fig. 130
Climatronic controls on the dash panel. Read the additional information carefully
››› page 21
The air conditioner only works when the en-
gine is running and the blower is on.
The functions will be switched on when its
buttons are pressed, turning on the air condi-
tioner if it was switched off, with the excep-
tion of button 17 (recirculation) When the
function is activated, a symbol is displayed
on the screen. Press the button again to
switch off the function.
To switch off the climatronic, press button 9until the segments in column
1 go off. After1 second has passed, press the button again
to switch off the display. WARNING
For your safety, the windows should never be
fogged up or covered with snow or ice. This is
essential to ensure good visibility. Please fa-
miliarise yourself with the correct operation
of the heating and ventilation system, includ-
ing the demist/defrost functions for the win-
dows. Note
Please consider the general notes. Automatic mode
In this mode, air temperature, air flow and
distribution are automatically adjusted so
that a comfortable temperature is attained as
quickly as possible, and then maintained.
Switching on automatic mode
– Press the AUTO button. It displays the indi-
cation ››› Fig. 130 3 .
– Press keys ››› Fig. 130 10 and
11 to adjust
the desired temperature inside the vehicle.
We recommend +22 °C (+72 °F). »
121Technical specifications
Advice
Operation
Safety
The essentials
Page 124 of 240
Operation
A comfortable interior climate is quickly
reached when a temperature of +22 °C
(+72 °F) is set in automatic mode. Therefore,
we recommend you not to change this adjust-
ment, except as necessary to suit individual
preferences or particular circumstances. It is
possible to select interior temperatures from
+18 °C (+64 °F) to +29 °C (+86 °F). If a lower
or higher temperature is selected, LO or
HI
ar
e respectively displayed on the screen.
These are approximate temperatures which
may slightly vary depending on the outside
conditions.
Climatronic maintains an excellent, comforta-
ble temperature by automatically adjusting
the supplied air temperature, the blower
speed and the air distribution. The system al-
so considers the sunlight radiation, so there
is no need for manual readjustment. There-
fore, automatic mode alwa
ys provides the
best comfort for the vehicle occupants
throughout the year.
Automatic mode is switched off whenever an
adjustment is made using the buttons for air
distribution or blower. The temperature con-
tinues to self-regulate.
To switch off Climatronic, press the –
9 button repeatedly until the display switches
off. Manual mode In manual mode the air temperature, flow,
and the desired air distribution can be adjus-
ted.
Switching on manual mode
– Press one of the buttons ››› Fig. 130 14 to
16 or press the blower control
8 and
9 .
The indicator is switched off 3 .
Temperature
It is possible to select interior temperatures
from +18 °C (+64 °F) to +29 °C (+86 °F).
These are approximate temperatures which
may slightly vary depending on the outside
conditions.
If you select temperatures below +18 ℃
(+17.78 ℃), the indication: L O
will appear on
the screen. In this setting the system runs at
maximum cooling output and the tempera-
ture is not regulated.
If a temperature above +29 °C (+86 °F) is se-
lected, the screen will show HI
. In this setting
the system runs at maximum heating output
and the temperature is not controlled.
Blower
The blower can be adjusted using buttons
››› Fig. 130 8 and
9 . If the blower is off
(level 1 is not shown on the screen) andbutton
9 is pressed after 1 second, the Cli-
matronic switches off.
Air distribution
The air distribution is adjusted using the but-
tons ,
and
. It is also possible to
open and close some of the air outlets sepa-
rately.
Switching the air conditioning on and off
By pressing the A/C button, the air cooling
system can be switched off in order to save
fuel. The temperature continues to self-regu-
late. The set temperature can then only be
reached if it is higher than the outside tem-
perature.
In rain or high humidity, we recommend
switching the A/C on so that the evaporator
does not allow the windscreen to steam up.
Air recirculation mode –
Press the button to switch air recircula-
tion mode on or off. This is ON if the sym-
bol ›››
Fig. 130 is displayed on the
s c
reen.
Air recirculation mode prevents strong
odours or contaminated air from the outside
air from entering in the vehicle, for example
when passing through a tunnel or in a traffic
jam.
122
Page 130 of 240
Operation
The hill driving assistant helps the driver to
move off and upward on a hill when the vehi-
cle is stationary.
The system maintains brake pressure for ap-
proximately two seconds after the driver
takes his foot off the brake pedal to prevent
the vehicle from lurching backward when it is
started. During these 2 seconds, the driver
has enough time to release the clutch pedal
and accelerate without the vehicle moving
and without having to use the handbrake,
making start-up easier, more comfortable
and safer.
These are the basic operation conditions:
● being on a ramp or hill/slope,
● doors closed,
● vehicle completely stationary,
● engine running and foot on the brake,
● besides having a gear engaged or being in
neutral for manual gear change and with the
selector lever at position S,
D or R for an au-
tomatic gearbox.
This system is also active when reversing up-
hill. WARNING
● If you do not start the vehicle immediately
after taking your foot off the brake pedal, the
vehicle may start to roll back under certain conditions. Depress the brake pedal or use
the hand brake immediately.
●
If the engine stalls, depress the brake ped-
al or use the hand brake immediately.
● When following a line of traffic uphill, if you
want to prevent the vehicle from rolling back
accidentally when starting off, hold the brake
pedal down for a few seconds before starting
off. Note
The Official Service or a specialist workshop
can tell you if your vehicle is equipped with
this system. Manual gearbox
Driving with a manual gearbox Read the additional information carefully
››› page 19
Certain versions of the model may include a
6-speed manual gearbox, and its diagram is
shown on the gearbox lever.
The reverse gear can only be engaged when
the car is stationary. When the engine is run-
ning and before engaging this gear, wait
about 6 seconds with the clutch pressed
down thoroughly in order to protect the gear-
box. The reverse lights switch on when the reverse
gear is selected and the ignition is on. WARNING
● When the engine is running, the vehicle
will start to move as soon as a gear is engag-
ed and the clutch released.
● Never select the reverse gear when the ve-
hicle is in motion. Risk of accident. Note
● Do not rest your hand on the gear lever
while driving. The pressure of your hand
could cause premature wear on the selector
forks in the gearbox.
● When changing gear, you should always
depress the clutch fully to avoid unnecessary
wear and damage.
● Do not “slip” the clutch to hold the vehicle
on a hill. This causes premature wear and
damage to the clutch.
● Do not leave your foot on the clutch pedal;
although the pressure may seem insignifi-
cant, it can cause the premature wear of the
clutch plate. Use the foot rest when you do
not need to change gear. 128
Page 131 of 240
Driving
Automatic gearbox* Gearbox programmes Read the additional information carefully
››› page 20
The automatic gearbox has got two gearbox
programmes.
Selecting the normal programme
– Put the selector lever into position D.
Selecting the sport programme – Put the selector lever into position S.
If you select the normal programme, D
, you
w i
ll drive in the economy mode, i.e. the pro-
gramme is designed to reduce fuel consump-
tion. The gearbox changes up into a higher
gear as soon as possible and down into a
lower gear as late as possible.
If you select the sport programme, S, you will
drive in a s
porty mode, i.e. a programme in
which shifts into high gears are postponed in
order to use the full power of the engine. Selector lever lock
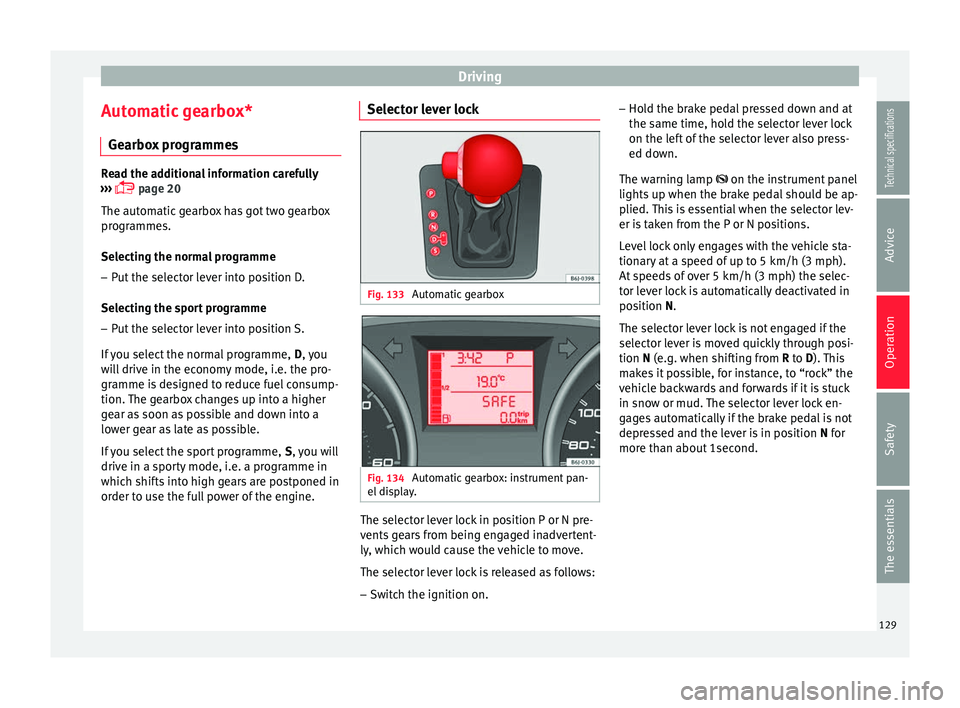
Fig. 133
Automatic gearbox Fig. 134
Automatic gearbox: instrument pan-
el display. The selector lever lock in position P or N pre-
vents gears from being engaged inadvertent-
ly, which would cause the vehicle to move.
The selector lever lock is released as follows:
– Switch the ignition on. –
Hold the brake pedal pressed down and at
the same time, hold the selector lever lock
on the left of the selector lever also press-
ed down.
The warning lamp
on the instrument panel
lights
up when the brake pedal should be ap-
plied. This is essential when the selector lev-
er is taken from the P or N positions.
Level lock only engages with the vehicle sta-
tionary at a speed of up to 5 km/h (3 mph).
At speeds of over 5 km/h (3 mph) the selec-
tor lever lock is automatically deactivated in
position
N.
The selector lever lock is not engaged if the
selector lever is moved quickly through posi-
tion
N (e.g. when shifting from R to D). This
makes it possible, for instance, to “rock” the
vehicle backwards and forwards if it is stuck
in snow or mud. The selector lever lock en-
gages automatically if the brake pedal is not
depressed and the lever is in position N for
more th
an about 1second.
129
Technical specifications
Advice
Operation
Safety
The essentials
Page 134 of 240
Operation
– Press the left paddle lever - towards the
steering wheel to change down ››› Fig. 137.
Using the paddle levers on the steering
wheel, you can access manual driving mode
regardless of the pre-selected driving mode.
General information about driving in
tiptronic mode
When accelerating, the automatic gearbox /
DSG automatic gearbox goes into a higher
gear a little before the engine reaches its
maximum permitted revolutions.
If a lower gear is selected, the automatic
gearbox / DSG automatic gearbox will only
change down when the engine cannot go
over its maximum permitted revolutions.
If “tiptronic” is selected whilst the vehicle is
in motion and the automatic gearbox / DSG
automatic gearbox is in third gear and selec-
tor lever position D
, “tiptronic” mode will
then al
so be in third gear.
Changing gears in the normal or sport
programme using the steering wheel paddle
levers
If the paddle levers ››› Fig. 137 are used in
the normal
or sport programme, the system
switches temporarily to “tiptronic” mode. To
exit “Tiptronic” mode again, press the right
paddle lever + towards the steering wheel
for approximately one second. You will also leave “tiptronic” mode if the paddle levers
are not moved for a certain time. Note
● The gear paddle levers on the steering
wheel can be operated with the selector lever
in any position and with the vehicle in mo-
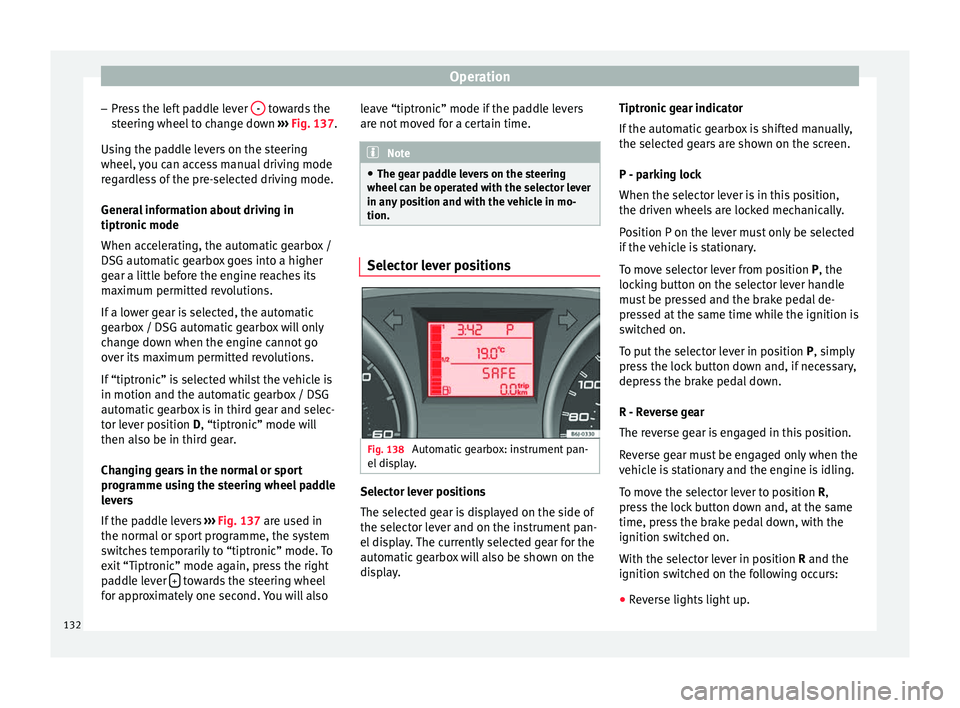
tion. Selector lever positions
Fig. 138
Automatic gearbox: instrument pan-
el display. Selector lever positions
The selected gear is displayed on the side of
the selector lever and on the instrument pan-
el display. The currently selected gear for the
automatic gearbox will also be shown on the
display.Tiptronic gear indicator
If the automatic gearbox is shifted manually,
the selected gears are shown on the screen.
P - parking lock
When the selector lever is in this position,
the driven wheels are locked mechanically.
Position P on the lever must only be selected
if the vehicle is stationary.
To move selector lever from position P, the
locking button on the selector lever handle
must be pressed and the brake pedal de-
pressed at the same time while the ignition is
switched on.
To put the selector lever in position
P, simply
pr e
ss the lock button down and, if necessary,
depress the brake pedal down.
R - Reverse gear
The reverse gear is engaged in this position.
Reverse gear must be engaged only when the
vehicle is stationary and the engine is idling.
To move the selector lever to position R,
press the lock button down and, at the same
time, press the brake pedal down, with the
ignition switched on.
With the selector lever in position R and the
ignition sw
itched on the following occurs:
● Reverse lights light up.
132
Page 139 of 240
Driving
Some tips on how to help you reduce pollu-
tion while saving money are listed below.
Active cylinder management (ACT ®
)
Depending on the equipment, the vehicle
may have active cylinder management
(ACT ®
).
The active cylinder management (ACT ®
) may
automatically deactivate some of the engine
cylinders if the driving situation does not re-
quire too much power. When it is switched
off, no fuel is injected into these cylinders,
hence total fuel consumption may be re-
duced.
Drive anticipating the traffic situation
A vehicle uses most fuel when accelerating.
When you anticipate situations, you have to
brake less often and, thus, accelerate less. If
it is possible, let the vehicle roll with a gear
engaged , for example, if you see a red light
ahe a
d. The braking effect achieved in this
way helps to reduce the wear of brakes and
tyres; emissions and fuel consumption are
reduced to zero (disconnection due to iner-
tia).
Change gear early to save energy
An effective way of saving fuel is to change
up
quickly through the gears. Running the
engine at high rpm in the lower gears uses
an unnecessary amount of fuel. Manual gearbox:
shift up from first to second
gear as soon as possible. We recommend
that, whenever possible, you change to a
higher gear upon reaching 2000 rpm. Follow
the “recommended gear” indication that ap-
pears on the instrument panel ››› page 64.
Avoid driving at high speed
We advise you not to drive at the top speed
permitted by the vehicle. Fuel consumption,
exhaust emissions and noise levels all in-
crease very rapidly at higher speeds. Driving
at moderate speeds will help to save fuel.
Avoid idling
It is worthwhile switching off the engine
when waiting in a traffic jam, at level cross-
ings or at traffic lights with a long red phase.
The fuel saved after only 30 - 40 seconds is
greater than the amount of fuel needed to re-
start the engine.
The engine takes a long time to warm up
when it is idling. Mechanical wear and pollu-
tant emissions are also especially high dur-
ing this initial warm-up phase. It is therefore
best to drive off immediately after starting
the engine. Avoid running the engine at high
speed.
Periodic maintenance
Periodic maintenance work guarantees that,
before beginning a journey, you will not con- sume more than the required amount of fuel.
A well-serviced engine gives you the benefit
of
improved fuel efficiency as well as maxi-
mum reliability and an enhanced resale val-
ue.
A badly serviced engine can consume up to
10% more fuel than necessary.
Avoid short journeys
To reduce the consumption and emission of
polluting exhaust gases, the engine and the
exhaust gas filtration systems should reach
the optimum operating temperature.
With the en
gine cold, fuel consumption is
proportionally higher. The engine does not
warm up and fuel consumption does not nor-
malise until having driven approximately four
kilometres (2.5 miles). This is why we recom-
mend avoiding short trips whenever possi-
ble.
Maintain the correct tyre pressures
Bear in mind that keeping the tyres at an ad-
equate pressure saves fuel. If the tyre pres-
sure is just one bar (14.5 psi/100 kPa) too
low, fuel consumption can increase by as
much as 5%. Due to the greater rolling resist-
ance, under-inflation also increases tyre wear
wear and impairs handling.
The tyre pressures should always be checked
when the tyres are cold.
»
137
Technical specifications
Advice
Operation
Safety
The essentials