weight Seat Ibiza 5D 2014 User Guide
[x] Cancel search | Manufacturer: SEAT, Model Year: 2014, Model line: Ibiza 5D, Model: Seat Ibiza 5D 2014Pages: 240, PDF Size: 4.89 MB
Page 111 of 240
Transport and practical equipment
●
Never leave your vehicle unattended, espe-
cially when the rear lid is open. Children
could climb into the luggage compartment,
closing the door behind them; they will be
trapped and run the risk of death.
● Never allow children to play in or around
the vehicle. Close and lock all the doors and
rear lid when you leave the vehicle. Before
you lock the vehicle, make sure that there are
no adults or children in the vehicle.
● Please observe the notes on the ››› page 29. CAUTION
Hard objects on the rear shelf could chafe
against the wires of the heating element in
the heated rear window and cause damage. Note
● The tyre pressure must be adjusted accord-
ing to the load. When necessary check the
tyre pressures on the label located on the in-
side fuel tank flap ››› page 177.
● Air c ir
culation in the vehicle helps reduce
fogging of the windows. Used air escapes
through ventilation slits in the side trim of
the luggage compartment. Ensure that the
ventilation slots are never covered.
● Straps for securing the load to the fasten-
ing rings* are commercially available from ac-
cessory shops. Fastening rings*
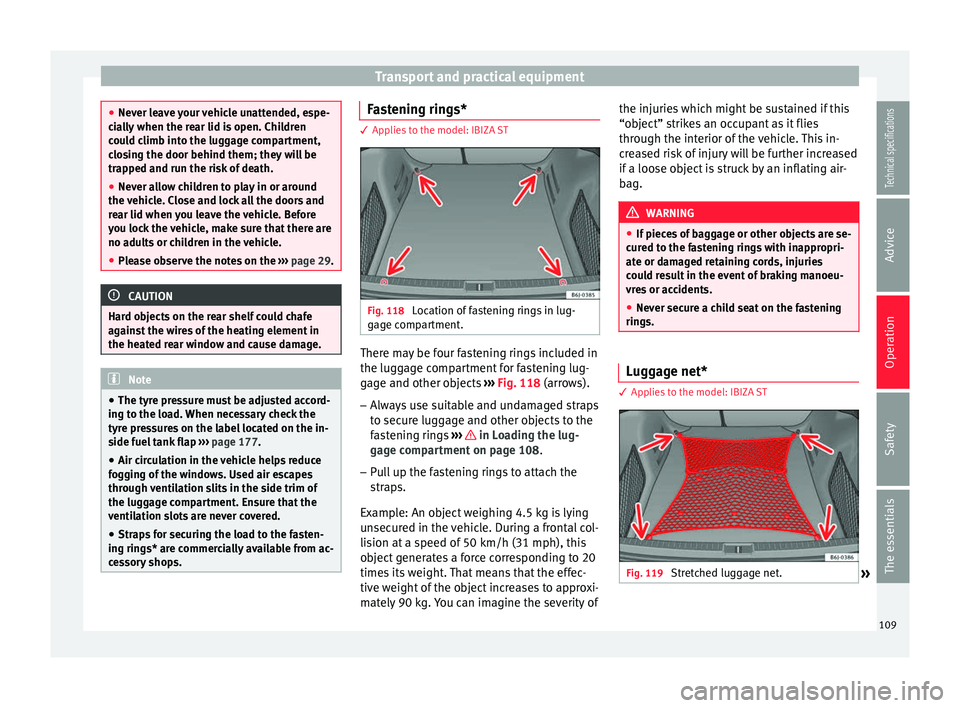
3 Applies to the model: IBIZA ST
Fig. 118
Location of fastening rings in lug-
gage compartment. There may be four fastening rings included in
the luggage compartment for fastening lug-
gage and other objects
››› Fig. 118 (arrows).
– Alw
ays use suitable and undamaged straps
to secure luggage and other objects to the
fastening rings ››› in Loading the lug-
gage compartment on page 108.
– Pull up the fastening rings to attach the
straps.
Example: An object weighing 4.5 kg is lying
unsecured in the vehicle. During a frontal col-
lision at a speed of 50 km/h (31 mph), this
object generates a force corresponding to 20
times its weight. That means that the effec-
tive weight of the object increases to approxi-
mately 90 kg. You can imagine the severity of the injuries which might be sustained if this
“object” strikes an occupant as it flies
through the interior of the vehicle. This in-
creased risk of injury will be further increased
if a loose object is struck by an inflating air-
bag.
WARNING
● If pieces of baggage or other objects are se-
cured to the fastening rings with inappropri-
ate or damaged retaining cords, injuries
could result in the event of braking manoeu-
vres or accidents.
● Never secure a child seat on the fastening
rings. Luggage net*
3 Applies to the model: IBIZA ST
Fig. 119
Stretched luggage net.
» 109
Technical specifications
Advice
Operation
Safety
The essentials
Page 113 of 240
Transport and practical equipment
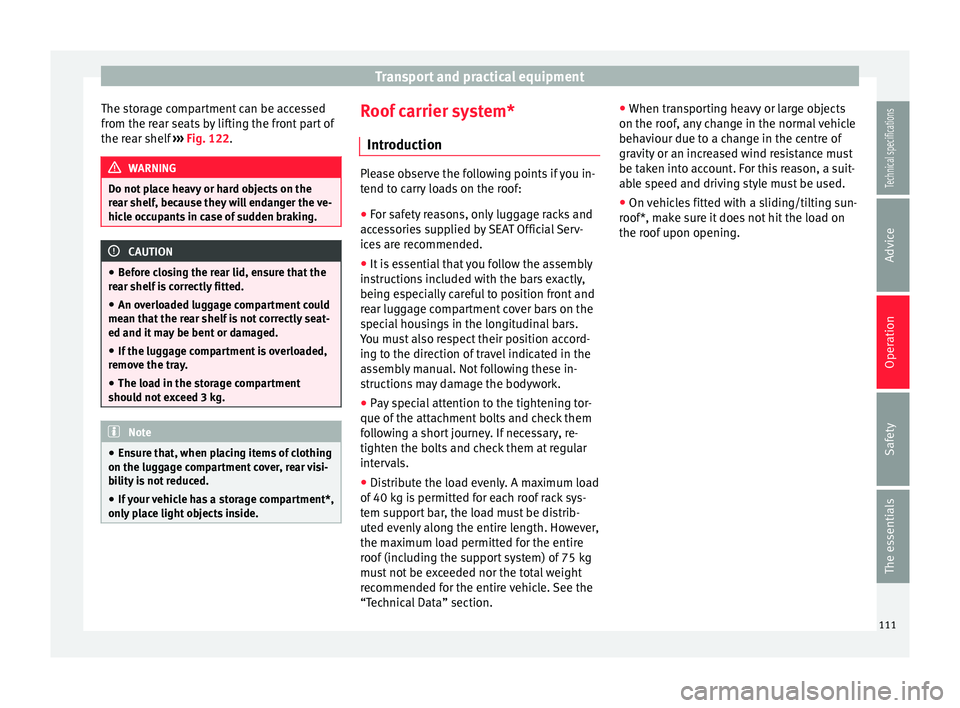
The storage compartment can be accessed
from the rear seats by lifting the front part of
the rear shelf ››› Fig. 122. WARNING
Do not place heavy or hard objects on the
rear shelf, because they will endanger the ve-
hicle occupants in case of sudden braking. CAUTION
● Before closing the rear lid, ensure that the
rear shelf is correctly fitted.
● An overloaded luggage compartment could
mean that the rear shelf is not correctly seat-
ed and it may be bent or damaged.
● If the luggage compartment is overloaded,
remove the tray.
● The load in the storage compartment
should not exceed 3 kg. Note
● Ensure that, when placing items of clothing
on the luggage compartment cover, rear visi-
bility is not reduced.
● If your vehicle has a storage compartment*,
only place light objects inside. Roof carrier system*
Introduction Please observe the following points if you in-
tend to carry loads on the roof:
● For safety reasons, only luggage racks and
accessories supplied by SEAT Official Serv-
ices are recommended.
● It is essential that you follow the assembly
instructions included with the bars exactly,
being especially careful to position front and
rear luggage compartment cover bars on the
special housings in the longitudinal bars.
You must also respect their position accord-
ing to the direction of travel indicated in the
assembly manual. Not following these in-
structions may damage the bodywork.
● Pay special attention to the tightening tor-
que of the attachment bolts and check them
following a short journey. If necessary, re-
tighten the bolts and check them at regular
intervals.
● Distribute the load evenly. A maximum load
of 40 kg is permitted for each roof rack sys-
tem support bar, the load must be distrib-
uted evenly along the entire length. However,
the maximum load permitted for the entire
roof (including the support system) of 75 kg
must not be exceeded nor the total weight
recommended for the entire vehicle. See the
“Technical Data” section. ●
When transporting heavy or large objects
on the roof, any change in the normal vehicle
behaviour due to a change in the centre of
gravity or an increased wind resistance must
be taken into account. For this reason, a suit-
able speed and driving style must be used.
● On vehicles fitted with a sliding/tilting sun-
roof*, make sure it does not hit the load on
the roof upon opening.
111Technical specifications
Advice
Operation
Safety
The essentials
Page 140 of 240
Operation
Do not use winter tyres all year round as they
increase fuel consumption by up to 10%.
Avoid unnecessary weight
Given that every kilo of extra weight will in-
c r
ease the fuel consumption, it is advisable
to always check the luggage compartment to
make sure that no unnecessary loads are be-
ing transported.
A roof rack is often left in place for the sake
of convenience, even when it is no longer
needed. At a speed of 100 km/h (62 mph)
and 120 km/h (75 mph) your vehicle will use
about 12% more fuel as a result of the extra
wind resistance caused by the roof rack even
when it is not in use.
Save electricity
The engine activates the alternator, which
produces electricity. With the need for elec-
tricity, fuel consumption also increases. Be-
cause of this, always turn off electrical devi-
ces when you do not need them. Examples of
devices that use a lot of electricity are: the
blower at high speeds, the rear window heat-
ing or the seat heaters*. Note
● If your vehicle has Start-Stop, it is not rec-
ommended th at
you switch this function off. ●
It is recommended that you close the win-
dows when driving at more than 60 km/h
(37 mph)
● Do not driv
e with your foot resting on the
clutch pedal
, as the pressure can make the
plate spin, more fuel will be used and it can
burn the clutch plate lining, causing a serious
fault.
● Do not hold the car on a hill with the clutch,
use the foot brake or hand brake, using the
latter to start. The fuel consumption will be
lower and you will prevent the clutch plate
from being damaged.
● On descents, use the engine brake, chang-
ing to the gear that is more suitable for the
slope. Fuel consumption will be “zero” and
the brakes will not suffer. Driving abroad
To drive abroad, the following must be taken
into consideration:
●
For vehicles fitted with a catalytic converter
ensure that unleaded petrol is available for
the journey. See the chapter “Refuelling”. Au-
tomobile organisations will have information
about service station networks selling unlea-
ded fuel.
● In some countries, it is possible that your
car model is not sold, and therefore some
spare parts are not available or the technical services may only be able to carry out limited
repairs.
SEAT importers and distributors will gladly
provide information about the technical prep-
aration that your vehicle requires and also
about necessary maintenance and repair
possibilities.
Adhesive strips for headlights
In countries where vehicles drive on the other
side of the road to your home country, the
asymmetric dipped beam may dazzle drivers
of oncoming vehicles.
To prevent dazzling, you must apply stickers
to certain parts of the headlight lenses. Fur-
ther information is available at any Technical
Service.
In vehicles with adaptive headlights, the ro-
tation system must previously be disconnec-
ted. To do this, please go to a specialised
workshop.
138
Page 152 of 240
Operation
front of the vehicle. At the rear, these indi-
cate obstacles located between 30 cm and
160 cm from the vehicle’s rear. As the vehicle
approaches an obstacle, the segments are
displayed closer to the vehicle. The red seg-
ments represent obstacles located at less
than 30 cm from the bumper. At this point
the driver should not move forward/reverse
any further.
Cruise speed* (cruise control
system - CCS)
Description The CCS is able to maintain the set speed in
the range from approx. 30 km/h (19 mph) to
180 km/h (112 mph).
Once the speed setting has been saved, you
may take your foot off the accelerator.
WARNING
It could be dangerous to use the cruise con-
trol system if it is not possible to drive at con-
stant speed.
● Do not use the cruise control system when
driving in dense traffic, on roads with lots of
bends or on roads with poor conditions (with
ice, slippery surfaces, loose grit or gravel), as
this could cause an accident. ●
Always switch the cruise control system off
after using it in order to avoid involuntary
use.
● It is dangerous to use a set speed which is
too high for the current road, traffic or weath-
er conditions. Risk of accident. Note
The cruise control cannot maintain a constant
speed when descending downhill. It will in-
crease due to its own weight. Use the foot
brake to slow the vehicle. Switching the cruise control system
on and off
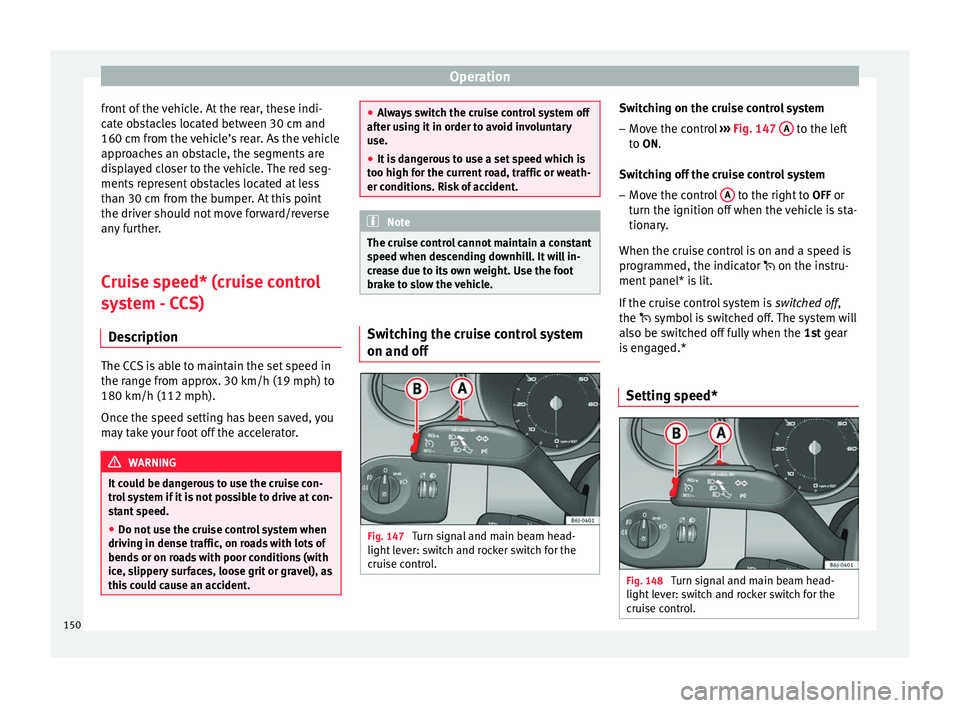
Fig. 147
Turn signal and main beam head-
light lever: switch and rocker switch for the
cruise control. Switching on the cruise control system
– Move the control ››› Fig. 147 A to the left
to ON.
Sw it
ching off the cruise control system
– Move the control A to the right to
OFF or
turn the ignition off when the vehicle is sta-
tionary.
When the cruise control is on and a speed is
programmed, the indicator
on the instru-
ment
panel* is lit.
If the cruise control system is switched off
,
the symbol is switched off. The system will
also be switched off fully when the 1st
gear
is engaged.*
Setting speed* Fig. 148
Turn signal and main beam head-
light lever: switch and rocker switch for the
cruise control. 150
Page 154 of 240
Operation
Towing bracket device
Trailer towing What do you need to bear in mind
when towing a trailer? Your vehicle may be used to tow a trailer
when fitted with the correct equipment.
If the car is supplied with a
factory-fitted tow-
in g br
acket it will already have the necessary
technical modifications and meet the statuto-
ry requirements for towing a trailer. If you
wish to retrofit a towing bracket, consult
›
›› page 153.
Connect
ors
Your vehicle is fitted with a 12-pin connector
for the electrical connection between the
trailer and the vehicle.
If the trailer has a 7-pin plug you will need to
use an a
dapter cable. It is available at any
Technical Service.
Trailer weight/drawbar load
Never exceed the authorised trailer weight. If
you do not load the trailer up to the maxi-
mum permitted trailer weight, you can then
climb correspondingly steeper slopes.
The maximum trailer weights listed are only applicable for
altitudes up to 1000 m above sea level. With increasing altitude the engine
power and therefore the vehicle climbing
ability are impaired because of the reduced
air density. The maximum trailer weight has
to be reduced accordingly. The weight of the
vehicle and trailer combination must be re-
duced by 10% for every further 1000 m (or
part thereof). The gross combination weight
is the actual weight of the laden vehicle plus
the actual weight of the laden trailer. When
possible, operate the trailer with the maxi-
mum permitted drawbar load on the ball joint
of the t
owing bracket, but do not exceed the
specified limit.
The figures for trailer weights
and drawbar
loads that are given on the data plate of the
towing bracket are for certification purposes
only. The correct figures for your specific
model, which may be lower than these fig-
ures for the towing bracket, are given in the
vehicle documentation or in ››› chapter Tech-
nical Data .
Distributing the load
Distribute loads in the trailer so that heavy
objects are as near to the axle as possible.
Loads carried in the trailer must be secured
to prevent them moving.
Tyre pressure
Set tyre pressure to the maximum permissi-
ble pressure shown on the sticker on the in-
side of the fuel tank flap. Set the tyre pres- sure of the trailer tyres in accordance with the
trailer manufacturer's recommendations.
Exterior mirrors
Check whether you can see enough of the
road behind the trailer with the standard rear
vision mirrors. If this is not the case, you
should have additional exterior mirrors fitted.
Both exterior mirrors should be mounted on
hinged extension brackets. Adjust the mirrors
to give sufficient vision to the rear.
WARNING
Never transport people in a trailer. This could
result in fatal accidents. Note
● Towing a trailer places additional demands
on the vehicle. We recommend additional
services between the normal inspection inter-
vals if the vehicle is used frequently for tow-
ing a trailer.
● Find out whether special regulations apply
to towing a trailer in your country. Ball coupling of towing bracket*
The ball coupling is provided with instruc-
tions on fitting and removing the ball cou-
pling of the towing bracket.
152
Page 155 of 240
Towing bracket device
WARNING
The towing bracket ball coupling must be
stored securely in the luggage compartment
to prevent them being flung through the vehi-
cle and causing injury. Note
● By law, the ball coupling must be removed
if a trailer is not being towed if it obscures
the number plate. Driving tips
Driving with a trailer always requires extra
care.
Weight distribution
The weight distribution of a loaded trailer
with an unladen vehicle is very unfavourable.
However, if this cannot be avoided, drive ex-
tra slowly to allow for the unbalanced weight
distribution.
Speed
The stability of the vehicle and trailer is re-
duced with increasing speed. For this reason,
it is advisable not to drive at the maximum
permissible speed in an unfavourable road,
weather or wind conditions. This applies es-
pecially when driving downhill. You should always reduce speed immediately
if the trailer shows the slightest sign of
snak-
ing . Never try to stop the “snaking” by in-
c r
easing speed.
Always brake in due course. If the trailer has
an
overrun brake, apply the brakes gently at
first and then, firmly. This will prevent the
jerking that can be caused by locking of trail-
er wheels. Select a low gear in due course
before going down a steep downhill. This en-
ables you to use the engine braking to slow
down the vehicle.
Reheating
At very high temperatures and during pro-
longed slopes, driving with a low gear and
high engine speed; always monitor whether
the excessive coolant temperature gauge is
activated ››› page 63
.
Electronic Stability Control*
The ESC* system helps to stabilise the trailer
in case of skidding or rocking. Fitting a towing bracket*
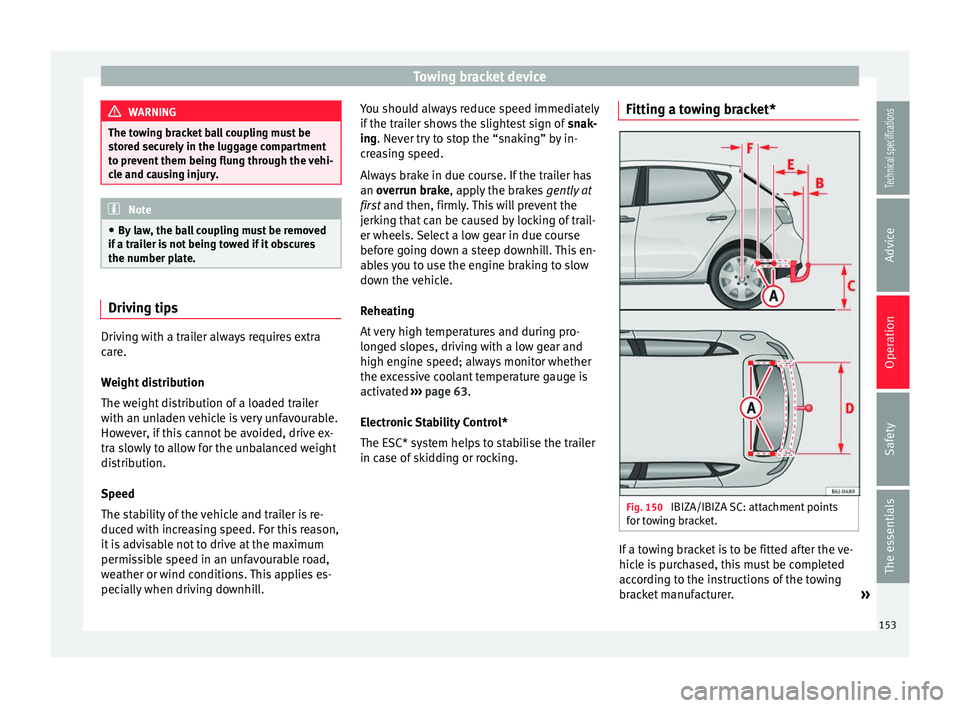
Fig. 150
IBIZA/IBIZA SC: attachment points
for towing bracket. If a towing bracket is to be fitted after the ve-
hicle is purchased, this must be completed
according to the instructions of the towing
bracket manufacturer.
»
153
Technical specifications
Advice
Operation
Safety
The essentials
Page 211 of 240
Technical features
Vehicles for certain export countries do not
have an identification plate.
Identification plate
The identification plate is located on the right
rib inside the engine compartment.
Vehicle data
The data sticker is placed on the inside of the
spare wheel well, in the boot and on the rear
cover of the Maintenance Programme.
The following information is provided on the
vehicle data sticker: ››› Fig. 207
Vehicle identification number (chassis
number)
Vehicle type, model, capacity, engine
type, finish, engine power and gearbox
type
Engine code, gearbox code, external
paint code and internal equipment code
Optional extras and PR numbers
Consumption values (l/100 km) and CO 2
emissions (g/km)
A Urban cycle consumption
B Out-of-town consumption
C Combined consumption and CO
2
emissions
1 2
3
4
5 Chassis number
The vehicle identification number can be
read from outside the vehicle through a view-
er in the windscreen
››› Fig. 208 . The viewer is
loc at
ed near the lower corner of the wind-
screen. The chassis number is printed on the
right water drain channel. The water drain
channel is located between the suspension
turret and the fender. To access the chassis
number, open the bonnet ››› page 166.
Information on fuel
consumption Fuel consumption and CO 2 emissions The consumption and emission details
shown on the vehicle data sticker differ from
one vehicle to another.
Vehicle fuel consumption and CO
2 emissions
appear on the vehicle data sticker in the
spare wheel well, inside the boot and on the
rear cover of the Maintenance Programme.
The fuel consumption and CO 2 emission val-
ues refer to the weight category assigned to
your vehicle according to the engine and
gearbox combination, as well as the specific
equipment fitted, and is only used to com-
pare between the different models. The fuel consumption and CO
2 emissions do
not depend only on the performance of the
vehicle, they can also differ from the estab-
lished values depending on other factors
such as driving style, road conditions, traffic
conditions, environmental conditions, load
and number of passengers.
Calculation of fuel consumption
The consumption values have been calcula-
ted based on measurements performed or
supervised by certified CE laboratories ac-
cording to the latest version of directives
715/2007/EC and 80/1268/CEE (for more in-
formation consult the European Union Publi-
cations Office at EUR-Lex: © European Union,
http://eur-lex.europa.eu/en/index.htm) and
are valid for the kerb weight indicated for the
vehicle. Note
In practice, and considering all the factors
mentioned here, consumption values can dif-
fer from those calculated in the current Euro-
pean regulations. Weights
Kerb weight refers to the basic model with a
fuel tank filled to 90% capacity and without
optional extras. The figure quoted includes
75 kg to allow for the weight of the driver.
»
209
Technical specifications
Advice
Operation
Safety
The essentials
Page 212 of 240
Technical specifications
Special versions, optional equipment fittings
or retro-fitting accessories will increase the
weight of the vehicle ››› .
WARNING
● Please note that the centre of gravity may
shift when transporting heavy objects; this
may affect vehicle handling and lead to an ac-
cident. Always adjust your speed and driving
style to suit road conditions and require-
ments.
● Never exceed the gross axle weight rating
or the gross vehicle weight rating. If the per-
missible axle load or the permissible total
weight is exceeded, the driving characteris-
tics of the vehicle may change, leading to ac-
cidents, injuries and damage to the vehicle. Towing a trailer
Trailer weights Trailer weight
The trailer weights and drawbar loads ap-
proved are selected in intensive trials accord-
ing to precisely defined criteria. The ap-
proved trailer weights are valid for vehicles in
the
EU
for maximum speeds of 80 km/h (50
mph) (in c ertain circumstances up to 100
km/h (62 mph)). The figures may be different
in other countries. All data in the official vehi- cle documentation takes precedence over
these data at all times
››› .
Drawbar loads
The maximum
permitted drawbar load on the
b
all joint of the towing bracket must not ex-
ceed
75 kg.
In the interest of road safety, we recommend
that you always tow approaching the maxi-
mum drawbar load. The response of the trail-
er on the road will be poor, if the drawbar
load is too small.
If the maximum permissible drawbar load
cannot be met (e.g. with small, empty and
light-weight single axle trailers or tandem
axle trailers with a wheelbase of less than 1
metre), a minimum of 4% of the actual trailer
weight is legally required for the drawbar
load. WARNING
● For safety reasons, you should not drive at
speeds above 80 km/h (50 mph) when towing
a trailer. This also applies in countries where
higher speeds are permitted.
● Never exceed the maximum trailer weights
or the drawbar load. If the permissible axle
load or the permissible total weight is excee-
ded, the driving characteristics of the vehicle
may change, leading to accidents, injuries
and damage to the vehicle. Wheels
Tyre pressure, snow chains, wheel
bolts Tyre pressures
The sticker with the tyre pressure values can
be found on the inside of the fuel tank flap.
The tyre pressure values given there are for
cold tyres. Do not reduce the slightly raised
pr
e
ssures of warm tyres ››› .
Snow chains
Snow chains may be fitted only to the front
wheels, and only for the following tyres:
175/70R14
185/60R15Chains with links not exceeding 15 mm
(including the chain closure)
215/45R16Chains with links not exceeding 9 mm
(including the chain closure)
215/40R17Chains with links not exceeding 7 mm
(including the chain closure) Wheel bolts
After the wheels have been changed, the
tightening torque
of the wheel bolts should
be c hec
ked as soon as possible with a torque
wrench ››› . The tightening torque for steel
and alloy wheels is 120 Nm.
210
Page 214 of 240
Technical specifications
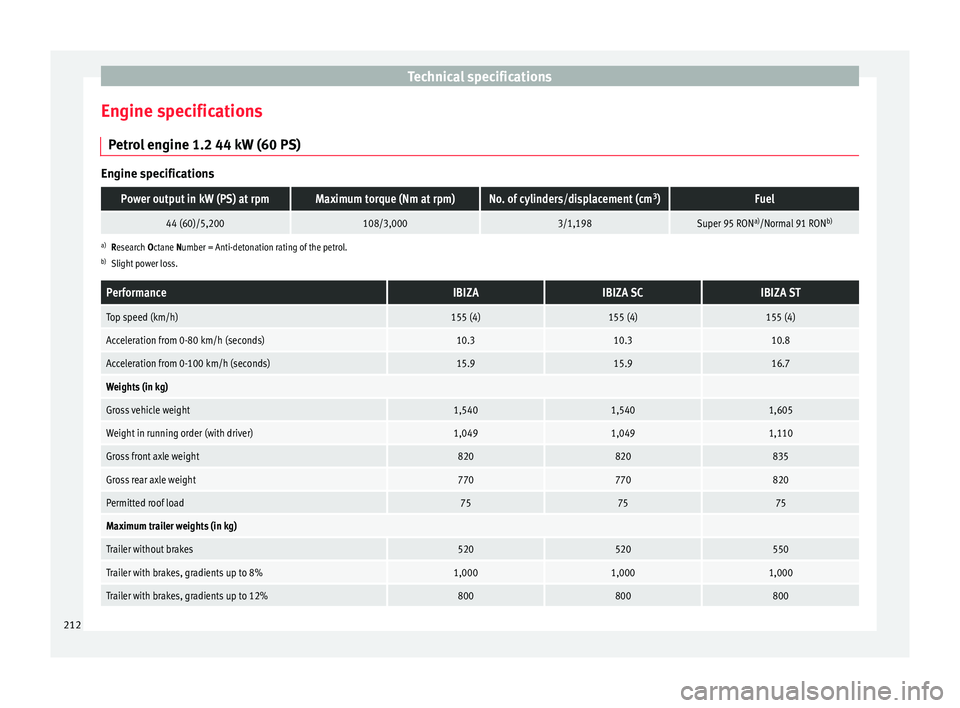
Engine specifications Petrol engine 1.2 44 kW (60 PS) Engine specificationsPower output in kW (PS) at rpmMaximum torque (Nm at rpm)No. of cylinders/displacement (cm
3
)Fuel
44 (60)/5,200108/3,0003/1,198Super 95 RON a)
/Normal 91 RON b)
a)
Research Octane Number = Anti-detonation rating of the petrol.
b) Slight power loss.
PerformanceIBIZAIBIZA SCIBIZA ST
Top speed (km/h)155 (4)155 (4)155 (4)
Acceleration from 0-80 km/h (seconds)10.310.310.8
Acceleration from 0-100 km/h (seconds)15.915.916.7
Weights (in kg)
Gross vehicle weight1,5401,5401,605
Weight in running order (with driver)1,0491,0491,110
Gross front axle weight820820835
Gross rear axle weight770770820
Permitted roof load757575
Maximum trailer weights (in kg)
Trailer without brakes520520550
Trailer with brakes, gradients up to 8%1,0001,0001,000
Trailer with brakes, gradients up to 12%800800800 212
Page 215 of 240
Technical features
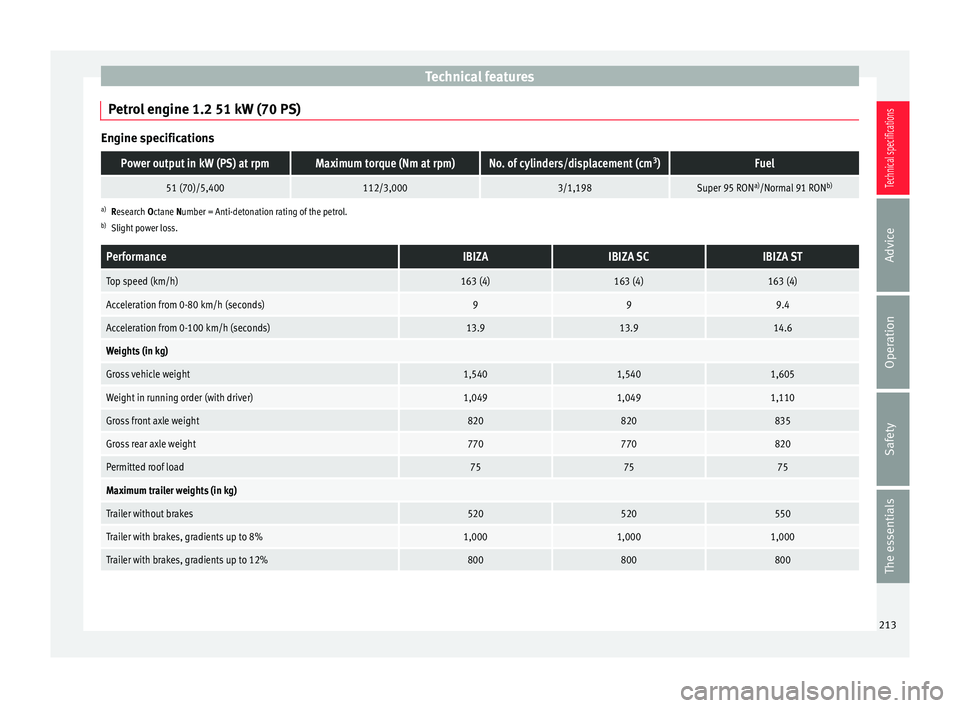
Petrol engine 1.2 51 kW (70 PS) Engine specificationsPower output in kW (PS) at rpmMaximum torque (Nm at rpm)No. of cylinders/displacement (cm
3
)Fuel
51 (70)/5,400112/3,0003/1,198Super 95 RON a)
/Normal 91 RON b)
a)
Research Octane Number = Anti-detonation rating of the petrol.
b) Slight power loss.
PerformanceIBIZAIBIZA SCIBIZA ST
Top speed (km/h)163 (4)163 (4)163 (4)
Acceleration from 0-80 km/h (seconds)999.4
Acceleration from 0-100 km/h (seconds)13.913.914.6
Weights (in kg)
Gross vehicle weight1,5401,5401,605
Weight in running order (with driver)1,0491,0491,110
Gross front axle weight820820835
Gross rear axle weight770770820
Permitted roof load757575
Maximum trailer weights (in kg)
Trailer without brakes520520550
Trailer with brakes, gradients up to 8%1,0001,0001,000
Trailer with brakes, gradients up to 12%800800800 213
Technical specifications
Advice
Operation
Safety
The essentials