stop start Seat Ibiza 5D 2014 Owner's Guide
[x] Cancel search | Manufacturer: SEAT, Model Year: 2014, Model line: Ibiza 5D, Model: Seat Ibiza 5D 2014Pages: 240, PDF Size: 4.89 MB
Page 188 of 240
Advice
Tyres with directional tread pattern A directional tread pattern can be identified
by arrows on the sidewall that point in the di-
rection of rotation. Always note the direction
of rotation indicated when fitting the wheel.
This is important so that these tyres can give
maximum grip and avoid excessive noise,
tread wear and aquaplaning.
If, in an emergency, you have to mount the
spare wheel so it rotates in the wrong direc-
tion, you must drive extremely carefully. The
tyre will not give optimum performance. This
is particularly important when driving on wet
roads.
To benefit from the advantages of tyres with
this type of tread pattern, the defective tyre
should be replaced as soon as possible so
that all tyres again rotate in the correct direc-
tion.
Tyre repair TMS (Tyre Mobility System)* Read the additional information carefully
››› page 26
The Anti-puncture kit* (Tyre Mobility System)
will reliably seal punctures caused by the
penetration of a foreign body of up to about 4 mm in diameter. Do not remove foreign ob-
jects, e.g. screws or nails, from the tyre.
After inserting the sealant residue in the tyre,
you must again check the tyre pressure about
10 minutes after starting the engine.
You should only use the tire mobility set if
the vehicle is parked in a safe place, you are
familiar with the procedure and you have the
necessary tire mobility set! Otherwise, you
should seek professional assistance.
The tyre sealant must not be used in the
following cases:
● If the wheel rim has been damaged.
● In outside temperatures below -20 °C
(-4 °F).
● In the event of cuts or perforations in the
tyre greater than 4 mm.
● If you have been driving with very low pres-
sure or a completely flat tyre.
● If the sealant bottle has passed its use by
date. WARNING
Using the tyre mobility system can be dan-
gerous, especially when filling the tyre at the
roadside. Please observe the following rules
to minimise the risk of injury:
● Stop the vehicle safely as soon as possible.
Park it at a safe distance from surrounding
traffic to fill the tyre. ●
Ensure the ground on which you park is flat
and solid.
● All passengers and particularly children
must keep a safe distance from the work area.
● Turn on the hazard warning lights to warn
other road users.
● Use the tyre mobility system only if you are
familiar with the necessary procedures. Oth-
erwise, you should seek professional assis-
tance.
● The tyre mobility set is intended for tempo-
rary emergency use only until you can reach
the nearest specialised workshop.
● Replace the repaired tyre with the tire mo-
bility set as soon as possible.
● The sealant is a health hazard and must be
cleaned immediately if it comes into contact
with the skin.
● Always keep the tire mobility set out of the
reach of small children.
● Never use an equivalent jack, even if it has
been approved for your vehicle.
● Always stop the engine, apply the hand-
brake lever firmly and engage gear if using a
manual gearbox, in order to reduce the risk of
vehicle involuntary movement. WARNING
A tyre filled with sealant does not have the
same performance properties as a conven-
tional tyre.
● Never drive faster than 80 km/h (50 mph). 186
Page 190 of 240
Advice
Check after 10 minutes of driving Screw in the inflator tube
››› Fig. 163 5 again and check the pressure on the gauge
6 .
1.3 bar (19 psi / 130 kPa) and lower:
● Stop the vehicle! The tyre cannot be sealed
sufficiently with the tyre mobility set.
● You should obtain professional assistance
››› .
1.4 bar (20 psi / 140 kPa) and higher:
● Set the tyre pressure to the correct value
again.
● Carefully resume your journey until you
reach the nearest specialised workshop with-
out exceeding 80 km/h (50 mph).
● Have the damaged tyre replaced. WARNING
Driving with an unsealed tyre is dangerous
and can cause accidents and serious injury.
● Do not continue driving if the tyre pressure
is 1.3 bar (19 psi / 130 kPa) and lower.
● Seek specialist assistance. Jump-starting
Jump leads The jump lead must have a sufficient wire
cross section.
If the engine fails to start because of a dis-
charged battery, the battery can be connec-
ted to the battery of another vehicle to start
the engine.
Jump leads
Jump leads must comply with standard
DIN
72553 (see cable manufacturer's instruc-
tion s).
The wire cross section must be at least
25 mm 2
for petrol engines and at least
35 mm 2
for diesel engines. Note
● The vehicles must not touch each other,
otherwise electricity could flow as soon as
the positive terminals are connected.
● The discharged battery must be properly
connected to the on-board network. How to jump start: description
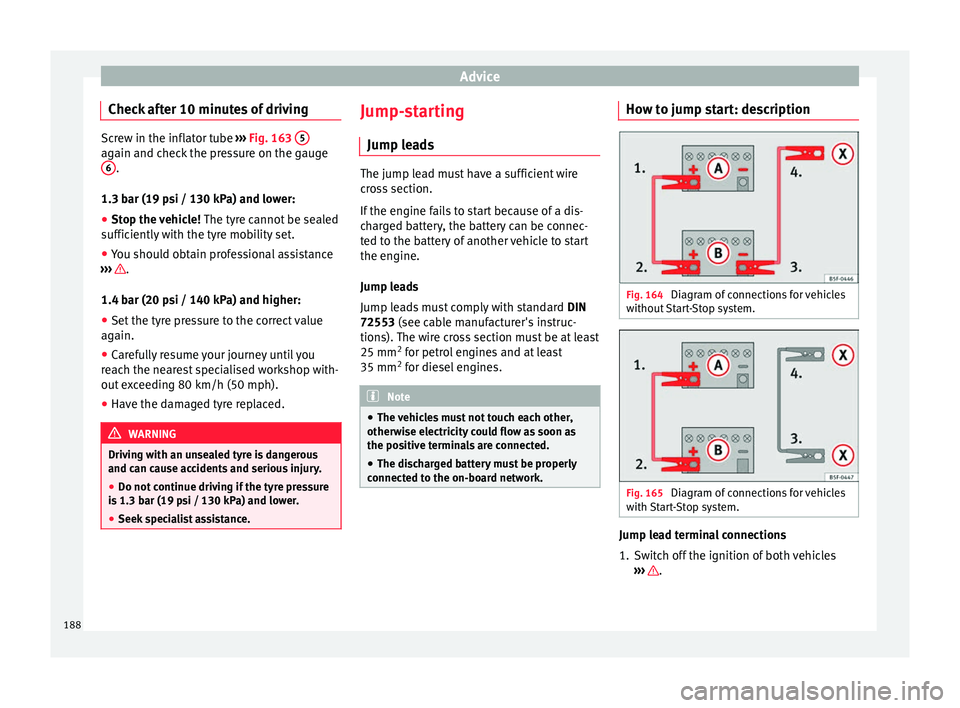
Fig. 164
Diagram of connections for vehicles
without Start-Stop system. Fig. 165
Diagram of connections for vehicles
with Start-Stop system. Jump lead terminal connections
1. Switch off the ignition of both vehicles
››› .
188
Page 191 of 240
Emergencies
2. Connect one end of the red jump lead to
the po s
itive + terminal of the vehicle
with the flat battery A
››› Fig. 164 .
3. C
onnect the other end of the red
jump
lead to the positive terminal + in the ve-
hicle providing assistance B .
4. For vehicles without Start-Stop system:
connect one end of the black jump lead to
the negative terminal – of the vehicle
providing the current B
››› Fig. 164 .
– For
vehicles with Start-Stop system: con-
nect one end of the black jump lead X to a
suitable ground terminal, to a solid piece of
metal in the engine block, or to the engine
block itself ››› Fig. 165 .
5. C
onnect the other end of the black jump
lead X to a solid metal component bolted
to the engine block or to the engine block
itself of the vehicle with the flat battery.
Do not connect it to a point near the bat-
tery A .
6. Position the leads in such a way that they cannot come into contact with any moving
parts in the engine compartment.
Starting
7. Start the engine of the vehicle with the boosting battery and let it run at idling
speed. 8. Start the engine of the vehicle with the flat
battery and wait 2 or 3 minutes until the
engine is “running”.
Removing the jump leads
9. Before you remove the jump leads, switch off the dipped beam headlights (if they
are switched on).
10. Turn on the heater blower and heated rear window in the vehicle with the flat
battery. This helps minimise voltage peaks
which are generated when the leads are
disconnected.
11. When the engine is running, disconnect
the l e
ads in reverse order to the details
given above.
Connect the battery clamps so they have
good metal-to-metal contact with the battery
terminals.
If the engine fails to start, switch off the start-
er after about 10 seconds and try again after
about a minute. WARNING
● Please note the safety warnings referring to
working in the engine compartment
››› page 166, Working in the engine compart-
ment.
● The b att
ery providing assistance must have
the same voltage as the flat battery (12 V)
and approximately the same capacity (see imprint on battery). Failure to comply could
result in an explosion.
●
Never use jump leads when one of the bat-
teries is frozen. Danger of explosion! Even af-
ter the battery has thawed, battery acid could
leak and cause chemical burns. If a battery
freezes, it should be replaced.
● Keep sparks, flames and lighted cigarettes
away from batteries, danger of explosion.
Failure to comply could result in an explo-
sion.
● Observe the instructions provided by the
manufacturer of the jump leads.
● Do not connect the negative cable from the
other vehicle directly to the negative terminal
of the flat battery. The gas emitted from the
battery could be ignited by sparks. Danger of
explosion.
● Do not attach the negative cable from the
other vehicle to parts of the fuel system or to
the brake line.
● The non-insulated parts of the battery
clamps must not be allowed to touch. The
jump lead attached to the positive battery
terminal must not touch metal parts of the ve-
hicle, this can cause a short circuit.
● Position the leads in such a way that they
cannot come into contact with any moving
parts in the engine compartment.
● Do not lean on the batteries. This could re-
sult in chemical burns. » 189
Technical specifications
Advice
Operation
Safety
The essentials
Page 216 of 240
Technical specifications
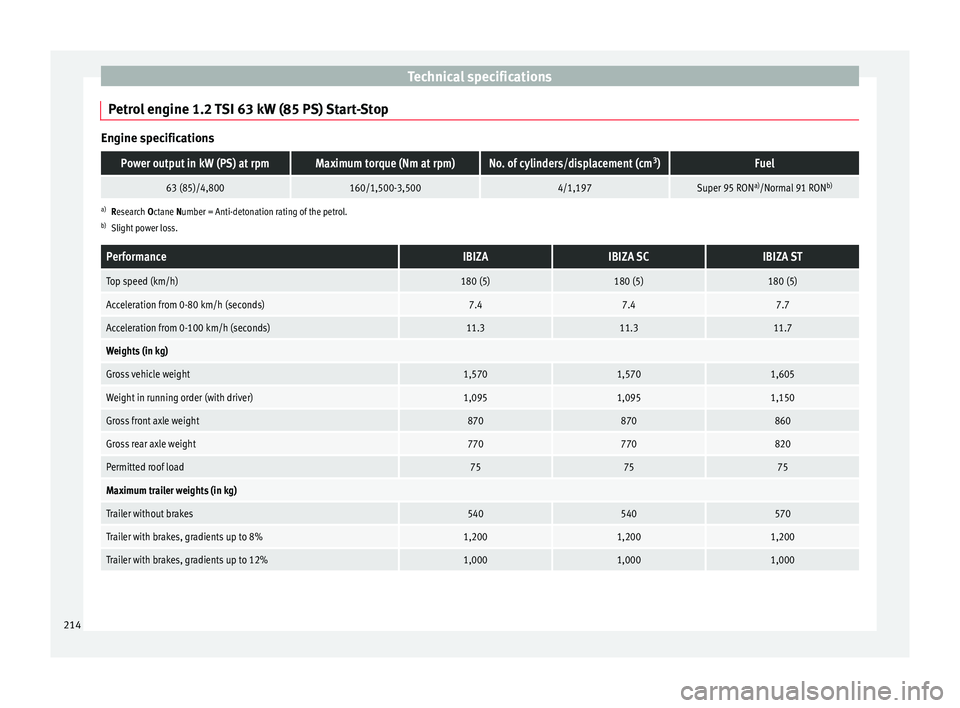
Petrol engine 1.2 TSI 63 kW (85 PS) Start-Stop Engine specificationsPower output in kW (PS) at rpmMaximum torque (Nm at rpm)No. of cylinders/displacement (cm
3
)Fuel
63 (85)/4,800160/1,500-3,5004/1,197Super 95 RON a)
/Normal 91 RON b)
a)
Research Octane Number = Anti-detonation rating of the petrol.
b) Slight power loss.
PerformanceIBIZAIBIZA SCIBIZA ST
Top speed (km/h)180 (5)180 (5)180 (5)
Acceleration from 0-80 km/h (seconds)7.47.47.7
Acceleration from 0-100 km/h (seconds)11.311.311.7
Weights (in kg)
Gross vehicle weight1,5701,5701,605
Weight in running order (with driver)1,0951,0951,150
Gross front axle weight870870860
Gross rear axle weight770770820
Permitted roof load757575
Maximum trailer weights (in kg)
Trailer without brakes540540570
Trailer with brakes, gradients up to 8%1,2001,2001,200
Trailer with brakes, gradients up to 12%1,0001,0001,000 214
Page 219 of 240
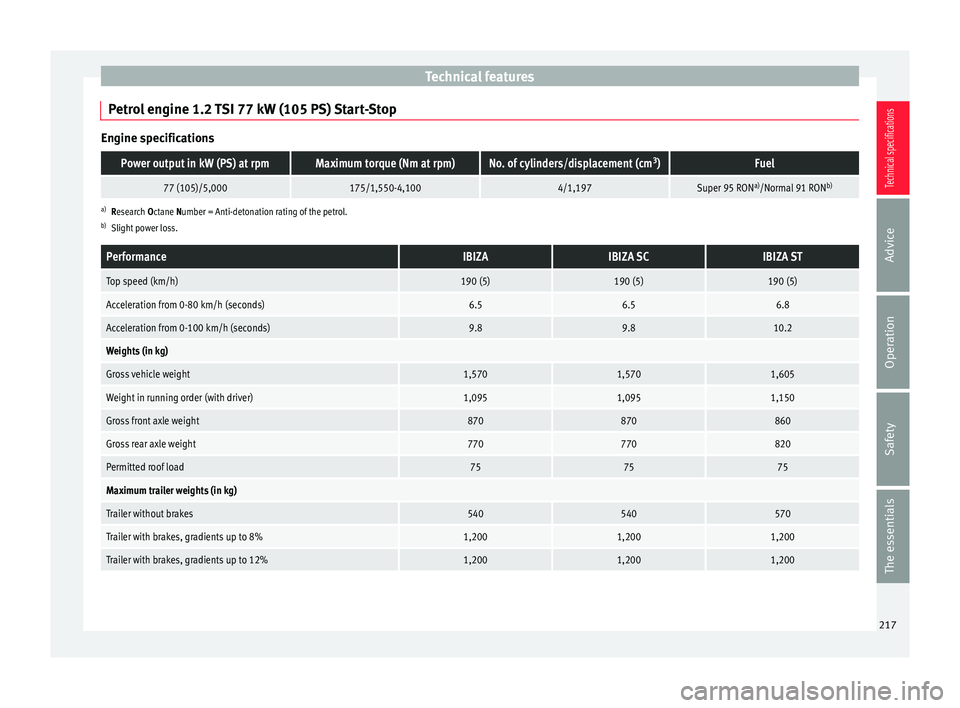
Technical features
Petrol engine 1.2 TSI 77 kW (105 PS) Start-Stop Engine specificationsPower output in kW (PS) at rpmMaximum torque (Nm at rpm)No. of cylinders/displacement (cm
3
)Fuel
77 (105)/5,000175/1,550-4,1004/1,197Super 95 RON a)
/Normal 91 RON b)
a)
Research Octane Number = Anti-detonation rating of the petrol.
b) Slight power loss.
PerformanceIBIZAIBIZA SCIBIZA ST
Top speed (km/h)190 (5)190 (5)190 (5)
Acceleration from 0-80 km/h (seconds)6.56.56.8
Acceleration from 0-100 km/h (seconds)9.89.810.2
Weights (in kg)
Gross vehicle weight1,5701,5701,605
Weight in running order (with driver)1,0951,0951,150
Gross front axle weight870870860
Gross rear axle weight770770820
Permitted roof load757575
Maximum trailer weights (in kg)
Trailer without brakes540540570
Trailer with brakes, gradients up to 8%1,2001,2001,200
Trailer with brakes, gradients up to 12%1,2001,2001,200 217
Technical specifications
Advice
Operation
Safety
The essentials
Page 224 of 240
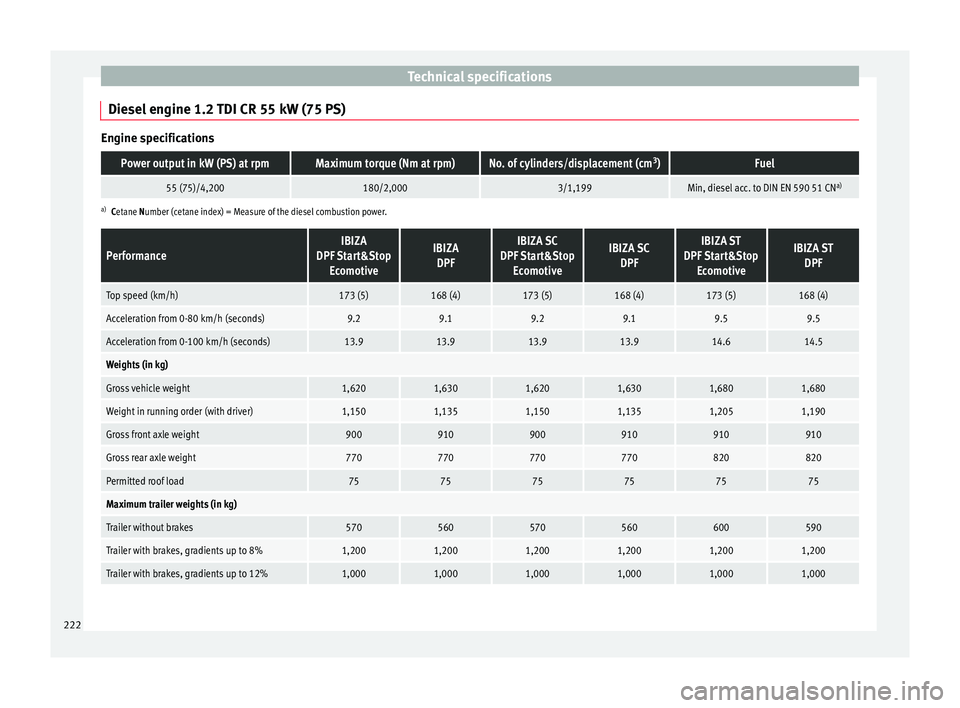
Technical specifications
Diesel engine 1.2 TDI CR 55 kW (75 PS) Engine specificationsPower output in kW (PS) at rpmMaximum torque (Nm at rpm)No. of cylinders/displacement (cm
3
)Fuel
55 (75)/4,200180/2,0003/1,199Min, diesel acc. to DIN EN 590 51 CN a)
a)
Cetane Number (cetane index) = Measure of the diesel combustion power.
PerformanceIBIZA
DPF Start&Stop EcomotiveIBIZADPFIBIZA SC
DPF Start&Stop EcomotiveIBIZA SCDPFIBIZA ST
DPF Start&Stop EcomotiveIBIZA STDPF
Top speed (km/h)173 (5)168 (4)173 (5)168 (4)173 (5)168 (4)
Acceleration from 0-80 km/h (seconds)9.29.19.29.19.59.5
Acceleration from 0-100 km/h (seconds)13.913.913.913.914.614.5
Weights (in kg)
Gross vehicle weight1,6201,6301,6201,6301,6801,680
Weight in running order (with driver)1,1501,1351,1501,1351,2051,190
Gross front axle weight900910900910910910
Gross rear axle weight770770770770820820
Permitted roof load757575757575
Maximum trailer weights (in kg)
Trailer without brakes570560570560600590
Trailer with brakes, gradients up to 8%1,2001,2001,2001,2001,2001,200
Trailer with brakes, gradients up to 12%1,0001,0001,0001,0001,0001,000 222
Page 236 of 240
Index
Remote control key Buttons . . . . . . . . . . . . . . . . . . . . . . . . . . . . . . . . 83
Synchronising . . . . . . . . . . . . . . . . . . . . . . . . . . . 84
Removing and fitting the wheel . . . . . . . . . . . . . 185
Replacement keys . . . . . . . . . . . . . . . . . . . . . . . . . 82
Replacement of parts . . . . . . . . . . . . . . . . . . . . . . 155
Rev counter . . . . . . . . . . . . . . . . . . . . . . . . . . . . . . . 56
Roll-back function panoramic/tilting sunroof . . . . . . . . . . . . . . . . . 90
Windows . . . . . . . . . . . . . . . . . . . . . . . . . . . . . . . 88
Roof aerial . . . . . . . . . . . . . . . . . . . . . . . . . . . . . . . 155
Roof carrier . . . . . . . . . . . . . . . . . . . . . . . . . . . . . . 111
Roof carrier system . . . . . . . . . . . . . . . . . . . . . . . . 111
Rubber seals . . . . . . . . . . . . . . . . . . . . . . . . . . . . . 160
Running in Brake pads . . . . . . . . . . . . . . . . . . . . . . . . . . . . 134
Engine . . . . . . . . . . . . . . . . . . . . . . . . . . . . . . . . 134
Tyres . . . . . . . . . . . . . . . . . . . . . . . . . . . . . . . . . 134
Running in tyres . . . . . . . . . . . . . . . . . . . . . . . . . . 134
S Safe . . . . . . . . . . . . . . . . . . . . . . . . . . . . . . . . . . . . . 79
Safe driving . . . . . . . . . . . . . . . . . . . . . . . . . . . . . . 29
Safe Security system . . . . . . . . . . . . . . . . . . . . . . . 79
Safety . . . . . . . . . . . . . . . . . . . . . . . . . . . . . . . . . . . 29 child safety . . . . . . . . . . . . . . . . . . . . . . . . . . . . . 46
child seats . . . . . . . . . . . . . . . . . . . . . . . . . . . . . . 46
Safety equipment . . . . . . . . . . . . . . . . . . . . . . . . . . 29
Safety information Front passenger airbag deactivation . . . . . . . . 46
Safety instructions Coolant temperature . . . . . . . . . . . . . . . . . . . . . 63
front airbags . . . . . . . . . . . . . . . . . . . . . . . . . . . . 43
side airbags . . . . . . . . . . . . . . . . . . . . . . . . . . . . 44
Safety notes Seat belt tensioners . . . . . . . . . . . . . . . . . . . . . . 39
Using seat belts . . . . . . . . . . . . . . . . . . . . . . . . . 36 Seals . . . . . . . . . . . . . . . . . . . . . . . . . . . . . . . . . . . 160
Seat belt
Adjusting . . . . . . . . . . . . . . . . . . . . . . . . . . . . . . . 12
Seat belt cleaning . . . . . . . . . . . . . . . . . . . . . . . . 163
Seat belt control lamp . . . . . . . . . . . . . . . . . . . . . . 35
Seat belt position for pregnant women . . . . . . . . . . . . . . . . . . . . . . 38
Seat belts . . . . . . . . . . . . . . . . . . . . . . . . . . . . . . 38
Seat belt protection . . . . . . . . . . . . . . . . . . . . . . . . 35
Seat belt release . . . . . . . . . . . . . . . . . . . . . . . . . . 38
Seat belts . . . . . . . . . . . . . . . . . . . . . . . . . . . . . . . . 34 Adjustment . . . . . . . . . . . . . . . . . . . . . . . . . . . . . 37
control lamp . . . . . . . . . . . . . . . . . . . . . . . . . . . . 35
Safety notes . . . . . . . . . . . . . . . . . . . . . . . . . . . . 36
unfastened . . . . . . . . . . . . . . . . . . . . . . . . . . . . . 36
Seat belt tensioner control lamp . . . . . . . . . . . . . . . . . . . . . . . . . . . . 42
Seat heating . . . . . . . . . . . . . . . . . . . . . . . . . . . . . 102
Selecting a gear . . . . . . . . . . . . . . . . . . . . . . . . . . 128
Selective opening . . . . . . . . . . . . . . . . . . . . . . . . . 80
Semiautomatic air conditioning controls . . . . . . . . . . . . . . . . . . . . . . . . . . . . . . . 118
Service interval display . . . . . . . . . . . . . . . . . . . . . 67
Side airbags . . . . . . . . . . . . . . . . . . . . . . . . . . . . . . 43 safety instructions . . . . . . . . . . . . . . . . . . . . . . . 44
Single headlight bulbs . . . . . . . . . . . . . . . . . . . . 198
Sitting position driver . . . . . . . . . . . . . . . . . . . . . . . . . . . . . . . . . . 30
Sitting position, occupants . . . . . . . . . . . . . . . . . . 30
Snow chains . . . . . . . . . . . . . . . . . . . . . . . . 180, 210
Soot accumulation in the diesel engine particu- late filter
control lamp . . . . . . . . . . . . . . . . . . . . . . . . . . . . 59
Spanner symbol . . . . . . . . . . . . . . . . . . . . . . . . . . . 67
Spare parts . . . . . . . . . . . . . . . . . . . . . . . . . . . . . . 155
Spare wheel . . . . . . . . . . . . . . . . . . . . . . . . . . . . . 182
Speedometer . . . . . . . . . . . . . . . . . . . . . . . . . . . . . 57 Speed selector lever lock
control lamp . . . . . . . . . . . . . . . . . . . . . . . . . . . . 62
Start-Stop Activating and deactivating . . . . . . . . . . . . . . . 143
functioning . . . . . . . . . . . . . . . . . . . . . . . . . . . . 142
Starting petrol engines . . . . . . . . . . . . . . . 124, 125
Starting the engine . . . . . . . . . . . . . . . . . . 124, 125 after the fuel tank has been run dry . . . . . . . . 125
Starting the vehicle . . . . . . . . . . . . . . . . . . . . . . . . 13
Steam jets . . . . . . . . . . . . . . . . . . . . . . . . . . . . . . . 158
Steering . . . . . . . . . . . . . . . . . . . . . . . . . . . . . . . . . 31 steering lock . . . . . . . . . . . . . . . . . . . . . . . . . . . 123
Steering wheel . . . . . . . . . . . . . . . . . . . . . . . . . . . . 13
Steering wheel height adjustment . . . . . . . . . . . . 31
Storage compartment . . . . . . . . . . . . . . . . . . . . . 110 Front passenger side . . . . . . . . . . . . . . . . . . . . 104
right front seat . . . . . . . . . . . . . . . . . . . . . . . . . 105
Sunroof . . . . . . . . . . . . . . . . . . . . . . . . . . . . . . . . . . 10
Sun visor Sliding/tilting sunroof . . . . . . . . . . . . . . . . . . . . 89
Sun visors . . . . . . . . . . . . . . . . . . . . . . . . . . . . . . . . 97
Switch Hazard warning lights . . . . . . . . . . . . . . . . . . . . 95
Heated rear window . . . . . . . . . . . . . . . . . . . . . . 96
Light switch . . . . . . . . . . . . . . . . . . . . . . . . . . . . . 90
Switches Electric windows . . . . . . . . . . . . . . . . . . . . . . . . . 87
Switching off the engine . . . . . . . . . . . . . . . . . . . 125
T
Tail lights . . . . . . . . . . . . . . . . . . . . . . . . . . . . . . . 203
Tank Fuel level . . . . . . . . . . . . . . . . . . . . . . . . . . . . . . . 64
Reserve indicator . . . . . . . . . . . . . . . . . . . . . . . . 64
Tank capacity . . . . . . . . . . . . . . . . . . . . . . . . . . . 64
Technical modifications . . . . . . . . . . . . . . . . . . . . 155
The PND (portable navigation device) . . . . . . . . . 69
234