open bonnet Seat Ibiza 5D 2015 Owner's manual
[x] Cancel search | Manufacturer: SEAT, Model Year: 2015, Model line: Ibiza 5D, Model: Seat Ibiza 5D 2015Pages: 248, PDF Size: 4.77 MB
Page 12 of 248
The essentials
● Openin g the r
e
ar lid: Pull on the release
lever and lift it up ››› Fig. 3. The rear lid opens
automatically.
● Closing the rear lid: Hold it by one of the
handle
s on the interior lining and close it by
pushing gently.
››› in Opening and closing on
page 120
››› page 10 Unlocking the rear lid manually
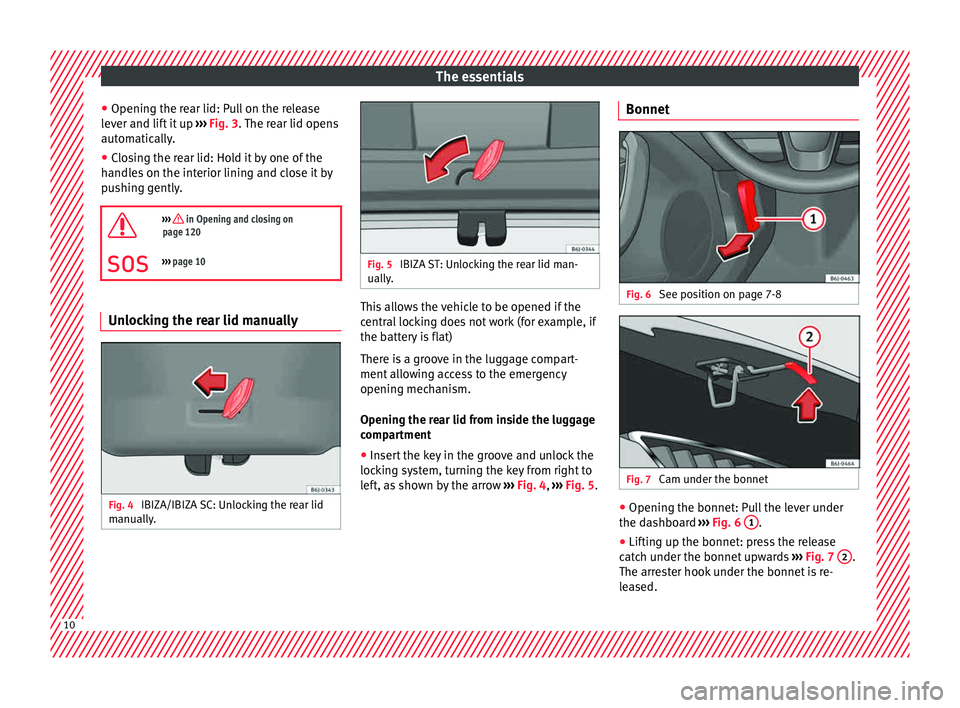
Fig. 4
IBIZA/IBIZA SC: Unlocking the rear lid
m anual
ly
. Fig. 5
IBIZA ST: Unlocking the rear lid man-
ually . This allows the vehicle to be opened if the
c
entr
al
locking does not work (for example, if
the battery is flat)
There is a groove in the luggage compart-
ment allowing access to the emergency
opening mechanism.
Opening the rear lid from inside the luggage
compartment
● Insert the key in the groove and unlock the
lockin
g system, turning the key from right to
left, as shown by the arrow ››› Fig. 4, ››› Fig. 5. Bonnet
Fig. 6
See position on page 7-8 Fig. 7
Cam under the bonnet ●
Opening the bonnet: Pull the lever under
the d ashbo
ard ››› Fig. 6 1 .
● Lifting up the bonnet: press the release
c at
c
h under the bonnet upwards ››› Fig. 7 2 .
The arr es
ter hook under the bonnet is re-
leased. 10
Page 13 of 248
The essentials
● Rel
e
ase the bonnet stay and secure it in
the fixture designed for this in the bonnet.
››› in safety notes for work in the en-
gine compartment on page 202
››› page 201 Electric windows*
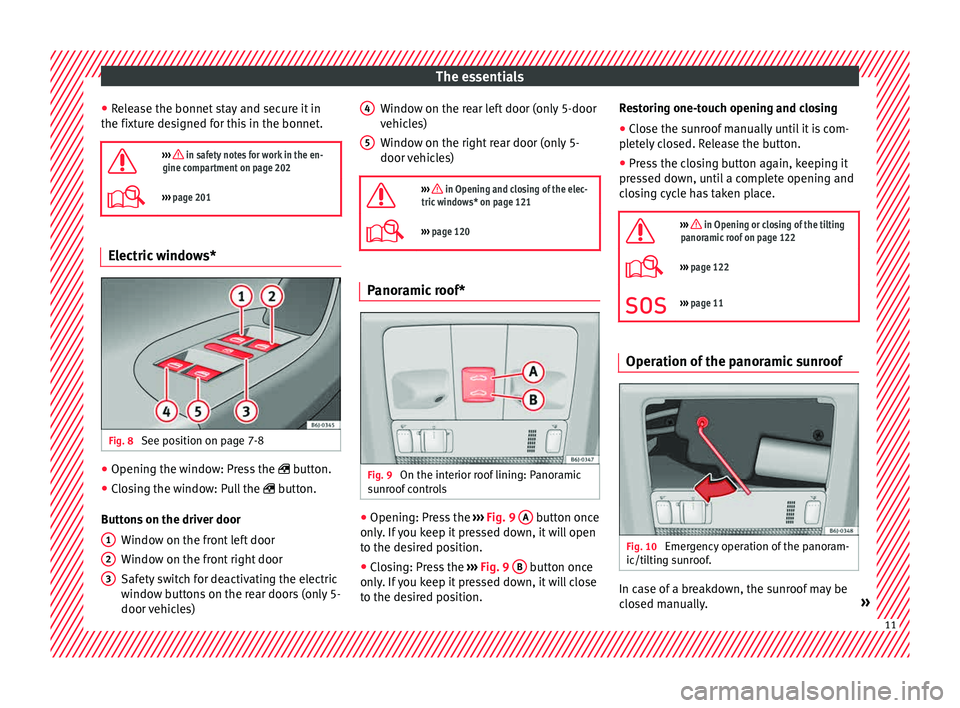
Fig. 8
See position on page 7-8 ●
Opening the window: Press the butt
on.
● C
losing the window: Pull the button.
B
uttons on the driver door Window on the front left door
Window on the front right door
Safety switch for deactivating the electric
window buttons on the rear doors (only 5-
door vehicles)
1 2
3 Window on the rear left door (only 5-door
v
ehic
l
es)
Window on the right rear door (only 5-
door vehicles)
››› in Opening and closing of the elec-
tric windows* on page 121
››› page 120 Panoramic roof*
Fig. 9
On the interior roof lining: Panoramic
s u
nr
oof controls ●
Opening: Press the ››
›
Fig. 9 A button once
on ly
. If
you keep it pressed down, it will open
to the desired position.
● Closing: Press the ›››
Fig. 9 B button once
on ly
. If
you keep it pressed down, it will close
to the desired position. 4 5 Restoring one-touch opening and closing
●
Close the sunroof manually until it is com-
p l
et
ely closed. Release the button.
● Press the closing button again, keeping it
pres
sed down, until a complete opening and
closing cycle has taken place.
››› in Opening or closing of the tilting
panoramic roof on page 122
››› page 122
››› page 11 Operation of the panoramic sunroof
Fig. 10
Emergency operation of the panoram-
ic/ti ltin
g s
unroof. In case of a breakdown, the sunroof may be
c
lo sed m
anually. » 11
Page 30 of 248
The essentials
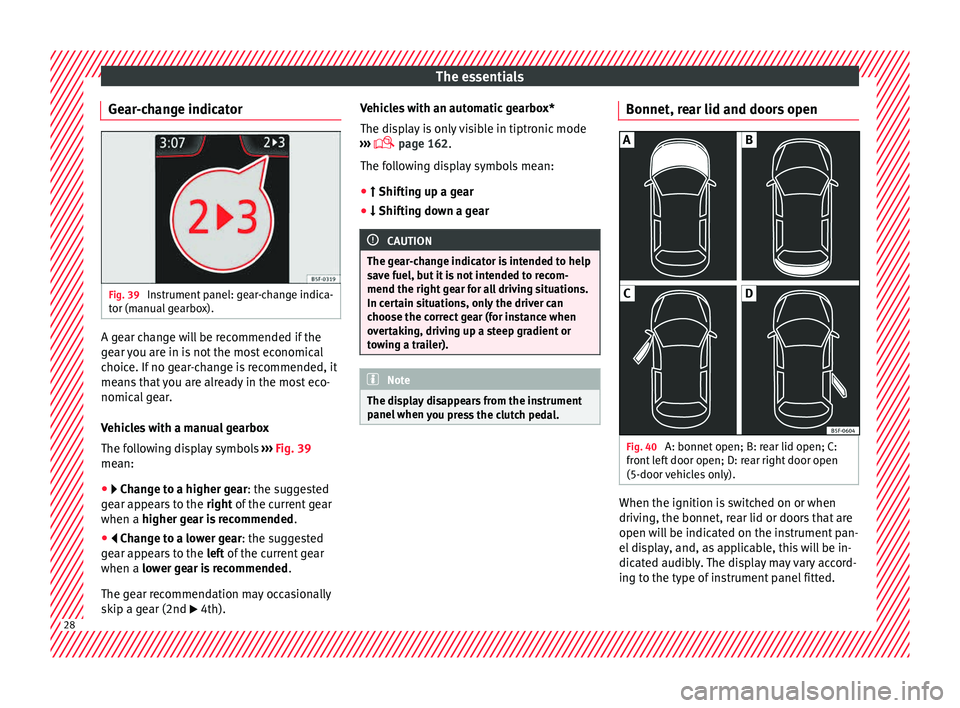
Gear-change indicator Fig. 39
Instrument panel: gear-change indica-
t or (m
anual
gearbox). A gear change will be recommended if the
g
e
ar
you are in is not the most economical
choice. If no gear-change is recommended, it
means that you are already in the most eco-
nomical gear.
Vehicles with a manual gearbox
The following display symbols ››› Fig. 39
mean:
● Chan ge to a higher gear: the suggested
g
ear appears to the right of the current gear
when a higher gear is recommended .
● Change to a lower gear: the suggested
g
ear appears to the left of the current gear
when a lower gear is recommended .
The gear recommendation may occasionally
skip a gear (2nd 4th). Vehicles with an automatic gearbox*
The dis
p
lay is only visible in tiptronic mode
››› page 162.
The following display symbols mean:
● Shiftin g up a gear
●
Shifting down a gear CAUTION
The gear-change indicator is intended to help
sav e f
uel, but it is not intended to recom-
mend the right gear for all driving situations.
In certain situations, only the driver can
choose the correct gear (for instance when
overtaking, driving up a steep gradient or
towing a trailer). Note
The display disappears from the instrument
panel when
you press the clutch pedal. Bonnet, rear lid and doors open
Fig. 40
A: bonnet open; B: rear lid open; C:
fr ont
l
eft door open; D: rear right door open
(5-door vehicles only). When the ignition is switched on or when
driv
in
g, the bonnet, r
ear lid or doors that are
open will be indicated on the instrument pan-
el display, and, as applicable, this will be in-
dicated audibly. The display may vary accord-
ing to the type of instrument panel fitted. 28
Page 31 of 248
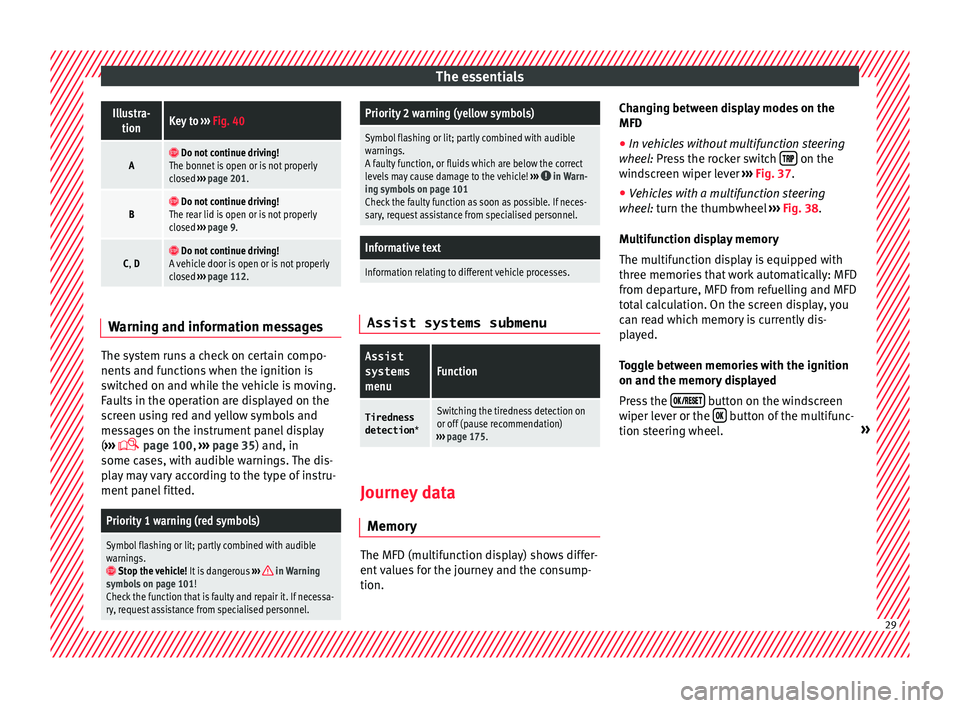
The essentialsIllustra-
tionKey to ››› Fig. 40
A Do not continue driving!
The bonnet is open or is not properly
closed ››› page 201.
B Do not continue driving!
The rear lid is open or is not properly
closed ››› page 9.
C, D Do not continue driving!
A vehicle door is open or is not properly
closed ››› page 112. Warning and information messages
The system runs a check on certain compo-
nents
and f
u
nctions when the ignition is
switched on and while the vehicle is moving.
Faults in the operation are displayed on the
screen using red and yellow symbols and
messages on the instrument panel display
( ›››
page 100,
››› page 35) and, in
some cases, with audible warnings. The dis-
play may vary according to the type of instru-
ment panel fitted.
Priority 1 warning (red symbols)
Symbol flashing or lit; partly combined with audible
warnings.
Stop the vehicle! It is dangerous ››› in Warning
symbols on page 101!
Check the function that is faulty and repair it. If necessa-
ry, request assistance from specialised personnel.
Priority 2 warning (yellow symbols)
Symbol flashing or lit; partly combined with audible
warnings.
A faulty function, or fluids which are below the correct
levels may cause damage to the vehicle! ›››
in Warn-
ing symbols on page 101
Check the faulty function as soon as possible. If neces-
sary, request assistance from specialised personnel.
Informative text
Information relating to different vehicle processes. Assist systems submenu
Assist
systems
menuFunction
Tiredness
detection *Switching the tiredness detection on
or off (pause recommendation)
››› page 175. Journey data
M emor y The MFD (multifunction display) shows differ-
ent
v
alues for the journey and the consump-
tion. Changing between display modes on the
MFD
● In vehicles without multifunction steering
wheel:
Press the rocker switch on the
w ind
s
creen wiper lever ››› Fig. 37.
● Vehicles with a multifunction steering
wheel:
turn the thumbwheel ››› Fig. 38.
Multifunction display memory
The multifunction display is equipped with
three memories that work automatically: MFD
from departure, MFD from refuelling and MFD
total calculation. On the screen display, you
can read which memory is currently dis-
played.
Toggle between memories with the ignition
on and the memory displayed
Press the button on the windscreen
w iper l
ev
er or the button of the multifunc-
tion s t
eerin
g wheel. » 29
Page 38 of 248
The essentials
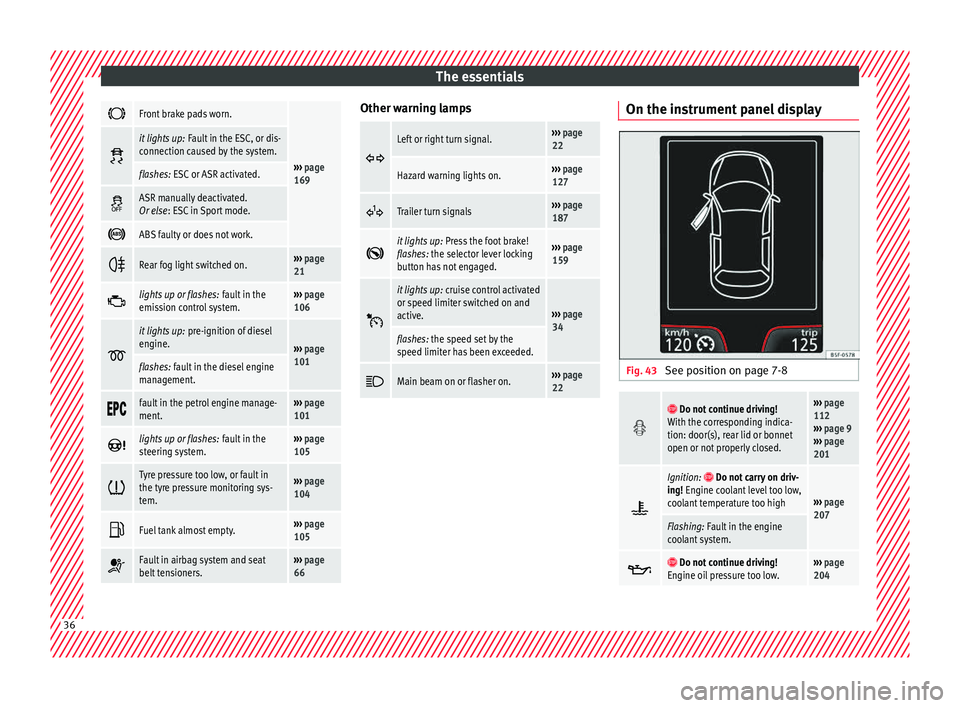
Front brake pads worn.
›››
page
169
it lights up:
Fault in the ESC, or dis-
connection caused by the system.
flashes: ESC or ASR activated.
ASR manually deactivated.
Or else
: ESC in Sport mode.
ABS faulty or does not work.
Rear fog light switched on.›››
page
21
lights up or flashes:
fault in the
emission control system.››› page
106
it lights up:
pre-ignition of diesel
engine.
››› page
101
flashes: fault in the diesel engine
management.
fault in the petrol engine manage-
ment.›››
page
101
lights up or flashes:
fault in the
steering system.››› page
105
Tyre pressure too low, or fault in
the tyre pressure monitoring sys-
tem.›››
page
104
Fuel tank almost empty.›››
page
105
Fault in airbag system and seat
belt tensioners.›››
page
66 Other warning lamps
Left or right turn signal.›››
page
22
Hazard warning lights on.››› page
127
Trailer turn signals›››
page
187
it lights up:
Press the foot brake!
flashes: the selector lever locking
button has not engaged.››› page
159
it lights up:
cruise control activated
or speed limiter switched on and
active.
››› page
34
flashes: the speed set by the
speed limiter has been exceeded.
Main beam on or flasher on.›››
page
22 On the instrument panel display
Fig. 43
See position on page 7-8
Do not continue driving!
With the corresponding indica-
tion: door(s), rear lid or bonnet
open or not properly closed.››› page
112
››› page 9
››› page
201
Ignition: Do not carry on driv-
ing! Engine coolant level too low,
coolant temperature too high
››› page
207
Flashing: Fault in the engine
coolant system.
Do not continue driving!
Engine oil pressure too low.››› page
204 36
Page 46 of 248
The essentials
Emergencies F u
se
s
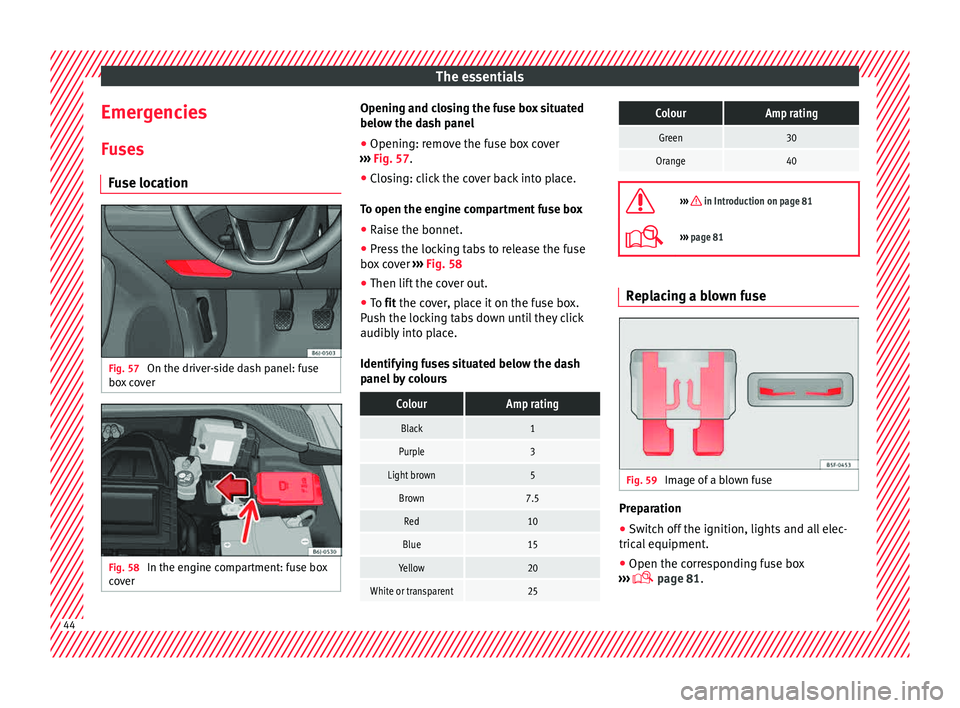
Fuse location Fig. 57
On the driver-side dash panel: fuse
bo x
c
over Fig. 58
In the engine compartment: fuse box
c o
v
er Opening and closing the fuse box situated
belo
w the d a
sh panel
● Opening: remove the fuse box cover
›››
Fig. 57.
● Closing: click the cover back into place.
To open the engine c
ompartment fuse box
● Raise the bonnet.
● Press the locking tabs to release the fuse
box c
over ››› Fig. 58
● Then lift the cover out.
● To fit the cover, place it on the fuse box.
Pu
sh the locking tabs down until they click
audibly into place.
Identifying fuses situated below the dash
panel by colours
ColourAmp rating
Black1
Purple3
Light brown5
Brown7.5
Red10
Blue15
Yellow20
White or transparent25
ColourAmp rating
Green30
Orange40
››› in Introduction on page 81
›››
page 81 Replacing a blown fuse
Fig. 59
Image of a blown fuse Preparation
● Switch off the ignition, lights and all elec-
tric al
equipment
.
● Open the corresponding fuse box
›››
page 81.44
Page 99 of 248
Instruments and warning/control lamps
CAUTION
● To pr ev
ent damage to the engine, the rev
counter needle should only remain in the red
zone for a short period of time.
● When the engine is cold, avoid high revs
and heavy ac
celeration and do not make the
engine work hard. For the sake of the environment
Changing up a gear in time reduces fuel con-
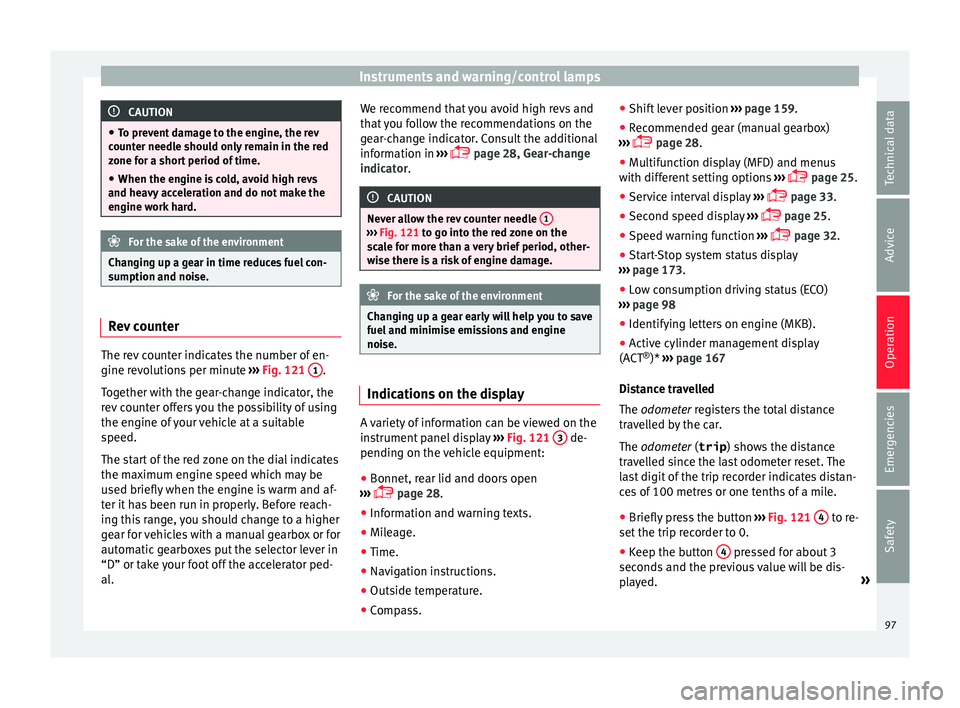
sumption and noi se.Rev counter
The rev counter indicates the number of en-
gine r
ev
o
lutions per minute ›››
Fig. 121 1 .
T og
ether w
ith the gear-change indicator, the
rev counter offers you the possibility of using
the engine of your vehicle at a suitable
speed.
The start of the red zone on the dial indicates
the maximum engine speed which may be
used briefly when the engine is warm and af-
ter it has been run in properly. Before reach-
ing this range, you should change to a higher
gear for vehicles with a manual gearbox or for
automatic gearboxes put the selector lever in
“D” or take your foot off the accelerator ped-
al. We recommend that you avoid high revs and
that
you follow the recommendations on the
gear-change indicator. Consult the additional
information in ›››
page 28, Gear-change
indicator. CAUTION
Never allow the rev counter needle 1 ›››
Fig. 121 to g o int
o the red zone on the
scale for more than a very brief period, other-
wise there is a risk of engine damage. For the sake of the environment
Changing up a gear early will help you to save
fuel and minimi
se emissions and engine
noise. Indications on the display
A variety of information can be viewed on the
in
s
trument
panel display ›››
Fig. 121 3 de-
pendin g on the
v
ehicle equipment:
● Bonnet, rear lid and doors open
›››
page 28.
● Information and warning texts.
● Mileage.
● Time.
● Navigation instructions.
● Outside temperature.
● Compass. ●
Shift l
ever position ››› page 159.
● Recommended gear (manual gearbox)
›››
page 28.
● Multifunction display (MFD) and menus
with differ
ent setting options ›››
page 25.
● Service interval display ›››
page 33.
● Second speed display ›››
page 25.
● Speed warning function ›››
page 32.
● Start-Stop system status display
›››
page 173.
● Low consumption driving status (ECO)
›››
page 98
● Identifying letters on engine (MKB).
● Active cylinder management display
(ACT ®
)* ››
› page 167
Distance travelled
The odometer registers the total distance
travelled by the car.
The odometer (trip ) shows the distance
travelled since the last odometer reset. The
last digit of the trip recorder indicates distan-
ces of 100 metres or one tenths of a mile.
● Briefly press the button ›››
Fig. 121 4 to re-
set the trip r
ec
order to 0.
● Keep the button 4 pressed for about 3
sec ond
s
and the previous value will be dis-
played. »
97
Technical data
Advice
Operation
Emergencies
Safety
Page 103 of 248
Instruments and warning/control lamps
Priority 2 warning messages will not be
sho wn u
ntil all Priority 1 warning messages
have been dealt with!
Examples of priority 2 warning reports (yel-
low):*
● Fuel warning light with the information text
PLEASE REFUEL .WARNING
If the warning lamps and messages are ignor-
ed, the v ehic
le may stall in traffic, or may
cause accidents and severe injuries.
● Never ignore the warning lamps or text
mess
ages.
● Stop the vehicle safely as soon as possible.
● Park the vehicle away from traffic and en-
sure th
at there are no highly flammable ma-
terials under the vehicle that could come into
contact with the exhaust system (e.g. dry
grass, fuel).
● A faulty vehicle represents a risk of acci-
dent for the driv
er and for other road users. If
necessary, switch on the hazard warning
lamps and put out the warning triangle to ad-
vise other drivers.
● Before opening the bonnet, switch off the
engine and al
low it to cool.
● In any vehicle, the engine compartment is a
hazar
dous area and could cause severe inju-
ries ››› page 201. CAUTION
Failure to heed the control lamps and text
mes s
ages when they appear may result in
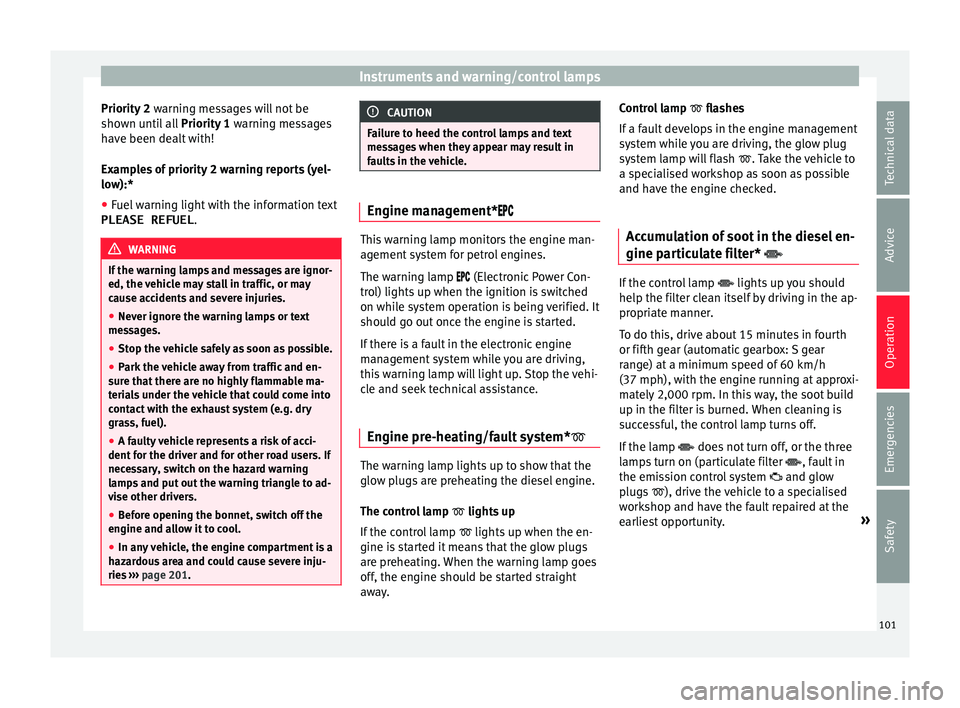
faults in the vehicle. Engine management*
This warning lamp monitors the engine man-
agement
sy
stem for petrol engines.
The warning lamp (Electronic Power Con-
trol) lights up when the ignition is switched
on while system operation is being verified. It
should go out once the engine is started.
If there is a fault in the electronic engine
management system while you are driving,
this warning lamp will light up. Stop the vehi-
cle and seek technical assistance.
Engine pre-heating/fault system* The warning lamp lights up to show that the
glo
w p
lug
s are preheating the diesel engine.
The control lamp lights up
If the control lamp lights up when the en-
gine is started it means that the glow plugs
are preheating. When the warning lamp goes
off, the engine should be started straight
away. Control lamp
flashe
s
If a fault develops in the engine management
system while you are driving, the glow plug
system lamp will flash . Take the vehicle to
a specialised workshop as soon as possible
and have the engine checked.
Accumulation of soot in the diesel en-
gine partic
ulate filter* If the control lamp
lights up
y
ou should
help the filter clean itself by driving in the ap-
propriate manner.
To do this, drive about 15 minutes in fourth
or fifth gear (automatic gearbox: S gear
range) at a minimum speed of 60 km/h
(37 mph), with the engine running at approxi-
mately 2,000 rpm. In this way, the soot build
up in the filter is burned. When cleaning is
successful, the control lamp turns off.
If the lamp does not turn off, or the three
lamps turn on (particulate filter , fault in
the emission control system and glow
plugs ), drive the vehicle to a specialised
workshop and have the fault repaired at the
earliest opportunity. »
101
Technical data
Advice
Operation
Emergencies
Safety
Page 105 of 248
Instruments and warning/control lamps
WARNING
● Bef or
e opening the bonnet, read and ob-
serve the warnings ››› page 201, Working in
the engine compartment.
● If the brake system warning lamp should
light
up together with the ABS warning lamp
, stop the vehicle immediately and check
the brake fluid level in the reservoir
››› page 208, Brake fluid. If the brake fluid
level has dropped below the “MIN” mark you
must not drive on. Risk of accident. Obtain
technical assistance.
● If the brake fluid level is correct, the fault in
the brake sy
stem may have been caused by a
failure of the ABS system. This could cause
the rear wheels to lock quickly when you
brake. This could cause the rear to break
away. Risk of skidding. Stop the vehicle and
seek technical assistance. Differential lock fault (EDS)*
The EDL operates along with the ABS in vehi-
c
l
e
s equipped with Electronic Stability Con-
trol (ESC)*.
A malfunction in the EDL is indicated by the
ABS control lamp . Take the vehicle to a
specialised workshop as soon as possible.
For further information on the EDL see
››› page 170, Electronic differential lock
(EDS)*. Traction control system (ASR)* / The traction control system prevents the driv-
en wheels
fr
om spinning when the vehicle is
accelerating.
There are two control lamps for the traction
control system: and . Both control lamps
light up together when the ignition is switch-
ed on and should turn off after approximately
2 seconds. This is the time taken for the func-
tion check.
The lamp has the following function:
● It flashes when the ASR is working if the ve-
hicl e i
s moving.
If the system is deactivated or if it has any
fault, the warning lamp will remain lit. The
warning lamp will also light up if a fault
should occur in the ABS because the ASR op-
erates in conjunction with the ABS. For fur-
ther information, see ›››
page 172.
The lamp provides information about the
disconnection status of the system:
● It stays lit when the ASR is disconnected
via E
asy Connect.
By means of Easy Connect, the ASR function
is reactivated and the warning lamp switched
off. Electronic Stability Control (ESC)*
/ There are two control lamps for the electronic
st
ab
ility control. The lamp provides infor-
mation concerning function and disconnec-
tion status.
Both control lamps light up together when
the ignition is switched on and should turn
off after approximately 2 seconds. This is the
time taken for the function check.
This programme includes the ABS, EDL and
ASR. It also includes emergency braking as-
sistance (BAS).
The control lamp has the following func-
tions:
● It flashes whilst driving when the ASR/ESC
is activ
ated.
● It will light up if there is a fault in the ESC.
● As the ESC operates in conjunction with the
ABS, the ESC light
will also come on if a fault
should occur in the ABS.
If the ESC control lamp lights up and stays
on after the engine is started, this may mean
that the control system has temporarily
switched off the ESC. In this case the ESC can
be reactivated by switching the ignition off
and then on again. If the control lamp goes
out, this means the system is fully functional. »
103
Technical data
Advice
Operation
Emergencies
Safety
Page 108 of 248
Operation
●
Never ignor e the w
arning lamps or messag-
es.
● Stop the vehicle at the next opportunity
and in a safe p
lace. Note
Failure to heed the control lamps and corre-
s pondin g t
ext messages when they light up
may result in damage to the vehicle. Emission control system*
Control lamp
fla
she
s:
When there is misfiring that can damage the
catalytic converter. Reduce speed and drive
carefully to the nearest specialised workshop
to have the engine checked.
The control lamp lights up:
If a fault has developed during driving which
has reduced the quality of the exhaust gas
(e.g. lambda probe fault). Reduce speed and
drive carefully to the nearest specialised
workshop to have the engine checked.
Coolant Level*/Temperature There is a fault if:
● The warning symbol does not go out again
af t
er a f
ew seconds. ●
The contro
l lamp lights up or flashes while
the vehicle is moving, and three acoustic
warning signals ››› are emitted.
Thi s
me
ans that either the coolant level is too
low or the coolant temperature is too high.
Coolant temperature too high
If the control lamp comes on, stop the vehi-
cle, turn off the engine and wait for it to cool
down. Check the coolant level.
If the coolant level is correct, the overheating
may be caused by a malfunction of the radia-
tor fan. Check the radiator fan fuse and have
it replaced if necessary ››› page 81.
If the control lamp lights up again after driv-
ing on for a short distance, stop the vehicle
and switch the engine off. Contact a Techni-
cal Service or a specialised workshop.
Coolant level too low
If the control lamp comes on , stop the vehi-
cle, turn off the engine and wait for it to cool
down. First check the coolant level. If the lev-
el of the coolant is below the “MIN” mark,
top up with coolant liquid ››› .
WARNING
● If y
our vehicle is immobilised for technical
reasons, move it to a safe distance from traf-
fic. Turn the engine off, turn the hazard lights
on and place the warning triangle. ●
Never open the bonnet if
you can see or
hear steam or coolant escaping from the en-
gine compartment. Risk of scalding. Wait un-
til you can no longer see or hear escaping
steam or coolant.
● The engine compartment is a dangerous
area. B
efore carrying out any work in the en-
gine compartment, switch off the engine and
allow it to cool down. Always note the corre-
sponding warnings ››› page 201. Alternator
This control lamp signals a fault in the alter-
n
at
or
.
The control lamp lights up when the igni-
tion is switched on. It should go out when the
engine has started running.
If the control lamp lights up while driving,
the alternator is no longer charging the bat-
tery. You should immediately drive to the
nearest specialised workshop.
You should avoid using electrical equipment
that is not absolutely necessary because this
will drain the battery.
Turn signals Depending on which turn signal is operating,
either the l
ef
t
or right turn signal lamp
flashes. Both control lamps will flash at the
106