phone Seat Ibiza 5D 2015 Owner's manual
[x] Cancel search | Manufacturer: SEAT, Model Year: 2015, Model line: Ibiza 5D, Model: Seat Ibiza 5D 2015Pages: 248, PDF Size: 4.77 MB
Page 28 of 248
The essentials
A specialised workshop will be able to pro-
gr amme or modif
y
additional functions, ac-
cording to the vehicle equipment. SEAT rec-
ommends visiting a SEAT Official Service.
Some menu options can only be read when
the vehicle is at a standstill.
As long as a priority 1 warning is displayed, it
will not be possible to read the menus. Some
warning messages can be confirmed and
made to disappear with the windscreen wiper
lever button or the multifunction steering
wheel button.
The information system also provides the fol-
lowing information and displays (depending
on the vehicle's equipment):
Driving data ››› page 29
■ Vehicle status
■ MFD from departure
■ MFD from refuelling
■ MFD total calculation
Assist systems ››› table on page 27
■ Reverse (optional)
Navigation ››› Booklet Navigation system
Audio ››› Booklet Radio or ››› Booklet Naviga-
tion system
Telephone ››› Booklet Radio or ››› Book-
let Navigation system
Vehicle ››› table on page 27 WARNING
Any distraction may lead to an accident, with
the risk of
injury.
● Do not operate the instrument panel con-
trol
s when driving. Operating the instrument panel me-
nus
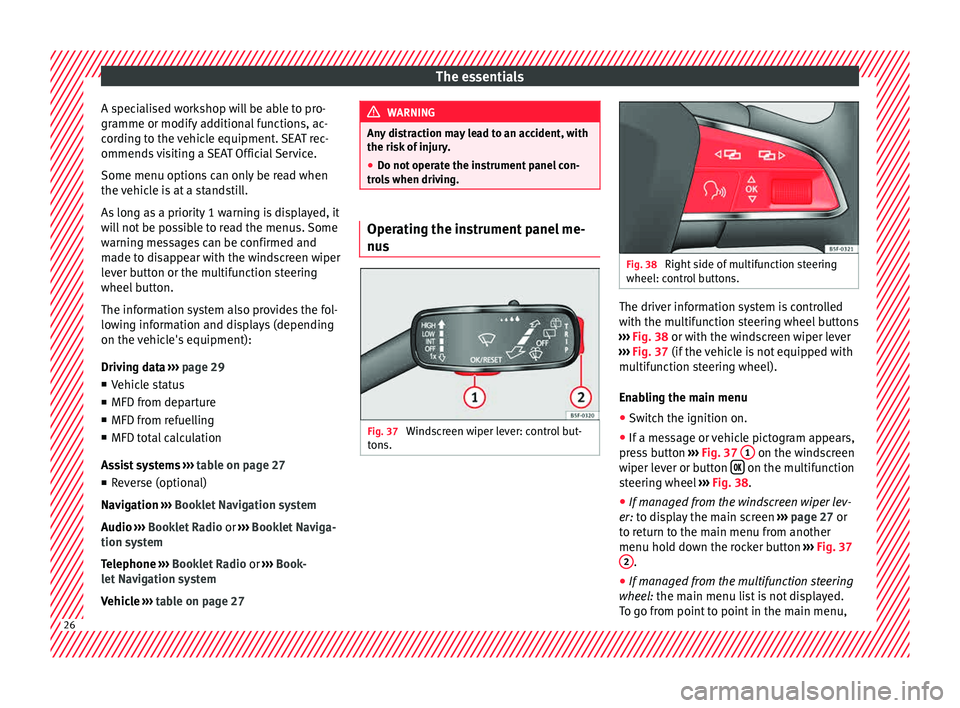
Fig. 37
Windscreen wiper lever: control but-
t on
s. Fig. 38
Right side of multifunction steering
wheel: contr o
l buttons. The driver information system is controlled
w
ith the mu
ltif
unction steering wheel buttons
››› Fig. 38 or with the windscreen wiper lever
››› Fig. 37 (if the vehicle is not equipped with
multifunction steering wheel).
Enabling the main menu
● Switch the ignition on.
● If a message or vehicle pictogram appears,
pres
s button ››› Fig. 37 1 on the windscreen
w iper l
ev
er or button on the multifunction
s t
eerin
g wheel ››› Fig. 38.
● If managed from the windscreen wiper lev-
er: to dis
play the main screen ››› page 27 or
to return to the main menu from another
menu hold down the rocker button ››› Fig. 37
2 .
● If managed from the multifunction steering
whee l:
the main menu list is not displayed.
To go from point to point in the main menu, 26
Page 29 of 248
The essentials
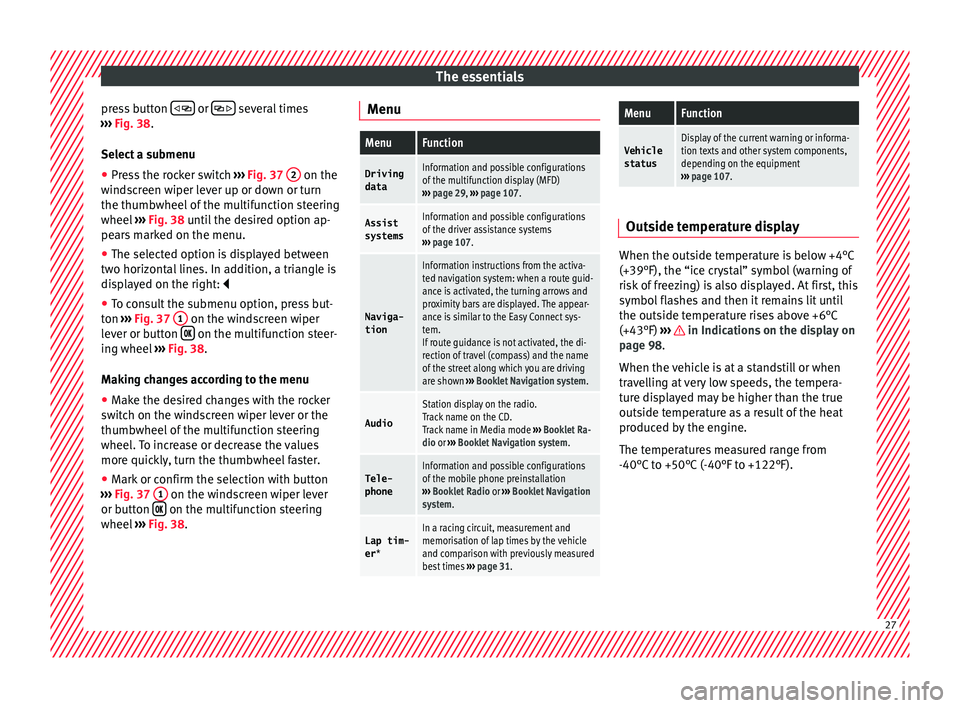
press button
or
several times
› ›
›
Fig. 38.
Select a submenu ● Press the rocker switch ›››
Fig. 37 2 on the
w ind
s
creen wiper lever up or down or turn
the thumbwheel of the multifunction steering
wheel ››› Fig. 38 until the desired option ap-
pears marked on the menu.
● The selected option is displayed between
two horizont
al lines. In addition, a triangle is
displayed on the right:
● To consult the submenu option, press but-
ton ››
› Fig. 37 1 on the windscreen wiper
l ev
er or b
utton on the multifunction steer-
in g wheel
›
›› Fig. 38.
Making changes according to the menu ● Make the desired changes with the rocker
switc
h on the windscreen wiper lever or the
thumbwheel of the multifunction steering
wheel. To increase or decrease the values
more quickly, turn the thumbwheel faster.
● Mark or confirm the selection with button
›››
Fig. 37 1 on the windscreen wiper lever
or b utt
on on the multifunction steering
wheel
›
›
› Fig. 38. Menu
MenuFunction
Driving
dataInformation and possible configurations
of the multifunction display (MFD)
››› page 29, ››› page 107.
Assist
systemsInformation and possible configurations
of the driver assistance systems
››› page 107.
Naviga-
tion
Information instructions from the activa-
ted navigation system: when a route guid-
ance is activated, the turning arrows and
proximity bars are displayed. The appear-
ance is similar to the Easy Connect sys-
tem.
If route guidance is not activated, the di-
rection of travel (compass) and the name
of the street along which you are driving
are shown ››› Booklet Navigation system.
Audio
Station display on the radio.
Track name on the CD.
Track name in Media mode ››› Booklet Ra-
dio or ››› Booklet Navigation system.
Tele-
phoneInformation and possible configurations
of the mobile phone preinstallation
››› Booklet Radio or ››› Booklet Navigation
system.
Lap tim-
er *In a racing circuit, measurement and
memorisation of lap times by the vehicle
and comparison with previously measured
best times ››› page 31.
MenuFunction
Vehicle
statusDisplay of the current warning or informa-
tion texts and other system components,
depending on the equipment
››› page 107. Outside temperature display
When the outside temperature is below +4°C
(+39°F), the “ice c
r
ystal” symbol (warning of
risk of freezing) is also displayed. At first, this
symbol flashes and then it remains lit until
the outside temperature rises above +6°C
(+43°F) ››› in Indications on the display on
p ag
e 98
.
When the vehicle is at a standstill or when
travelling at very low speeds, the tempera-
ture displayed may be higher than the true
outside temperature as a result of the heat
produced by the engine.
The temperatures measured range from
-40°C to +50°C (-40°F to +122°F). 27
Page 39 of 248
The essentials
Fault in the battery.›››
page
209
Driving light totally or partially
faulty.›››
page
83
Fault in the cornering light sys-
tem.››› page
123
Diesel particulate filter blocked›››
page
101
Level of windscreen washer fluid
too low.›››
page
209
Flashing: Fault in the oil level de-
tection. Control manually.›››
page
204
Ignition: Insufficient engine oil.
Fault in the gearbox.›››
page
164
Immobiliser active.›››
page
107
Service interval display›››
page
33
Mobile telephone is connected
via Bluetooth to the original tele-
phone device.›››
Book-
let Radio
or
››› Book-
let Navi-
gation
system
Mobile telephone battery charge
meter. Available only for devices
pre-installed in factory.
Freezing warning. The outside
temperature is lower than +4°C
(+39°F).›››
page
27
Start-Stop system activated.›››
page
173
Start-Stop system unavailable.
Low consumption driving status›››
page
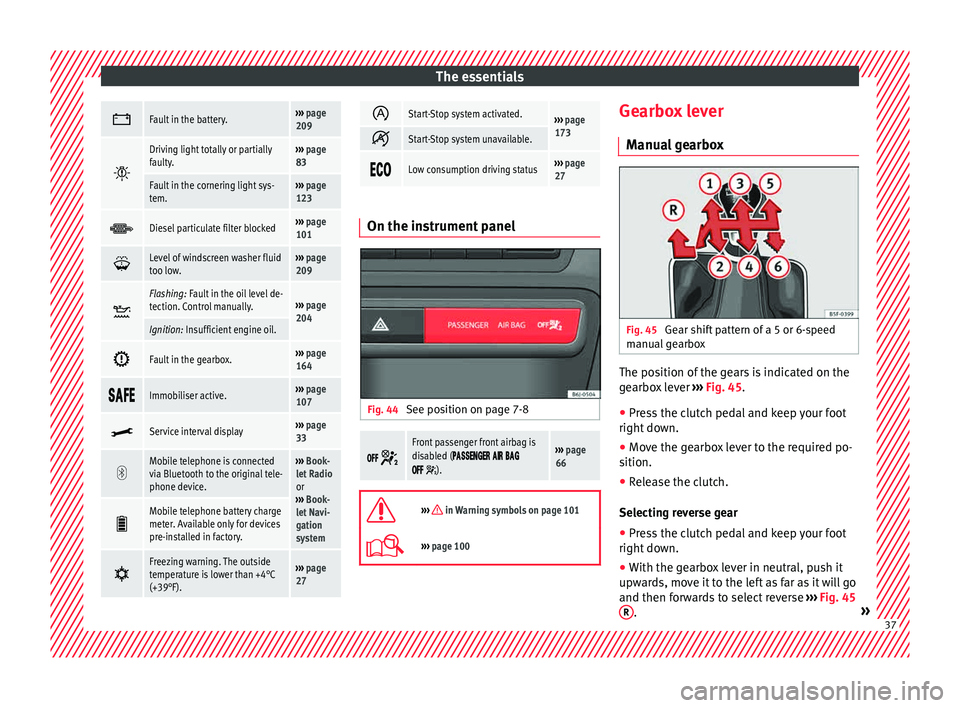
27 On the instrument panel
Fig. 44
See position on page 7-8
Front passenger front airbag is
disabled (
).
››› page
66
››› in Warning symbols on page 101
›››
page 100 Gearbox lever
M anua
l
gearbox Fig. 45
Gear shift pattern of a 5 or 6-speed
m anual
g
earbox The position of the gears is indicated on the
g
e
arbo
x lever ››› Fig. 45.
● Press the clutch pedal and keep your foot
right down.
● Mo
ve the gearbox lever to the required po-
sition.
● Rel
ease the clutch.
Selecting r
everse gear
● Press the clutch pedal and keep your foot
right down.
● W
ith the gearbox lever in neutral, push it
upwar
ds, move it to the left as far as it will go
and then forwards to select reverse ››› Fig. 45
R .
» 37
Page 58 of 248
Safety
Safety
Saf e driv
in
g
Safety first! This chapter contains important information,
tips, s
ug
gestions and warnings that you
should read and consider for both your own
safety and for your passengers' safety. WARNING
● This m
anual contains important informa-
tion about the operation of the vehicle, both
for the driver and the passengers. The other
sections of the on-board documentation also
contain further information that you should
be aware of for your own safety and for the
safety of your passengers.
● Ensure that the on-board documentation is
kept in the
vehicle at all times. This is espe-
cially important when lending or selling the
vehicle to another person. Advice about driving
B ef or
e setting off For your own safety and the safety of your
p
a
s
sengers, always note the following points
before every trip: –
Make s
ure that the vehicle's lights and turn
signals are working properly.
– Check tyre pressure.
– Ensure that all windows provide a clear and
good v
iew of the surroundings.
– Ensure that all luggage is correctly secured
›››
page 139.
– Make sure that no objects can interfere
with the pedal
s.
– Adjust front seat, head restraint and rear vi-
sion mirror
s properly according to your
size.
– Ensure that the passenger in the central
rear se
at always has the head restraint in
the correct position for use.
– Instruct passengers to adjust the head re-
straints
according to their height.
– Protect children with appropriate child
seats and pr
operly applied seat belts
››› page 72.
– Assume the correct sitting position. Instruct
your pa
ssengers also to assume a proper
sitting position. ››› page 57.
– Fasten your seat belt securely. Instruct your
pas
sengers also to fasten their seat belts
properly. ›››
page 61. What affects driving safety? As a driver, you are responsible for yourself
and y
our p
assengers. When your concentra-
tion or driving safety is affected by any cir-
cumstance, you endanger yourself as well as
others on the road ››› , for this reason:
– Always pay attention to traffic and do not
get di
stracted by passengers or telephone
calls.
– Never drive when your driving ability is im-
paired (e.
g. by medication, alcohol, drugs).
– Observe traffic laws and speed limits.
– Always reduce your speed as appropriate
for r o
ad, traffic and weather conditions.
– When travelling long distances, take
break
s regularly - at least every two hours.
– If possible, avoid driving when you are tired
or stre
ssed. WARNING
When driving safety is impaired during a trip,
the risk of
injury and accidents increases. Safety equipment
Never put your safety or the safety of your
p
a
s
sengers in danger. In the event of an acci-
dent, the safety equipment may reduce the
56
Page 71 of 248
Airbag system
If any of the airbags are disabled by a Techni-
c al
Service, the warning lamp flashes for sev-
eral more seconds after verification and will
turn off if there is no fault. WARNING
● If ther e i
s a malfunction, the airbag and
belt tensioner system cannot properly per-
form its protective function.
● If a malfunction occurs, have the system
check
ed immediately by a specialised work-
shop. Otherwise, in the event of an accident,
the airbag system and belt tensioners may
not be triggered, or may not be triggered cor-
rectly. Airbag safety instructions
Fr ont
airb
agsRead the additional information carefully
› ›
›
page 14. WARNING
● The seat belt
s and airbags can only provide
maximum protection if the occupants are
seated correctly ››› page 57, Correct position
for passengers.
● The deployment space between the front
pas
sengers and the airbags must not in any
case be occupied by other passenger, pets
and objects. ●
The airbag s
provide protection for just one
accident; replace them once they have de-
ployed.
● It is also important not to attach any ob-
jects
such as cup holders or telephone
mountings to the surfaces covering the air-
bag units.
● Do not attempt to modify components of
the airbag sys
tem in any way. Side airbags*
Read the additional information carefully
› ›
›
page 15. WARNING
● If y
ou do not wear a seat belt, if you lean
forward, or are not seated correctly while the
vehicle is in motion, you are at a greater risk
of injury if the side airbag system is triggered
in an accident.
● In order for the side airbags to provide their
maximum pr
otection, the prescribed sitting
position must always be maintained with
seat belts fastened while travelling.
● Occupants of the outer seats must never
carry
any objects or pets in the deployment
space between them and the airbags, or al-
low children or other passengers to travel in
this position. It is also important not to at-
tach any accessories (such as cup holders) to the doors. This would impair the protection
offer
ed b
y the side airbags.
● The built-in coat hooks should be used only
for lightweight
clothing. Do not leave any
heavy or sharp-edged objects in the pockets.
● Great forces, such as hard blows or kicks,
must
not be exerted upon the backrest bol-
ster because the system may be damaged. In
this case, the side airbags would not be trig-
gered.
● Under no circumstances should protective
cov
ers be fitted over seats with side airbags
unless the covers have been approved for use
in your vehicle. Because the airbag deploys
from the side of the backrest, the use of con-
ventional seat covers would obstruct the side
airbag, seriously reducing the airbag's effec-
tiveness.
● Any damage to the original seat upholstery
or around the se
ams of the side airbag units
must be repaired immediately by a special-
ised workshop.
● The airbags provide protection for just one
accident; r
eplace them once they have de-
ployed.
● Any work on the side airbag system or re-
mova
l and installation of the airbag compo-
nents for other repairs (such as removal of
the front seat) should only be performed by a
specialised workshop. Otherwise, faults may
occur during the airbag system operation.
● Do not attempt to modify components of
the airbag sys
tem in any way. » 69
Technical data
Advice
Operation
Emergencies
Safety
Page 97 of 248
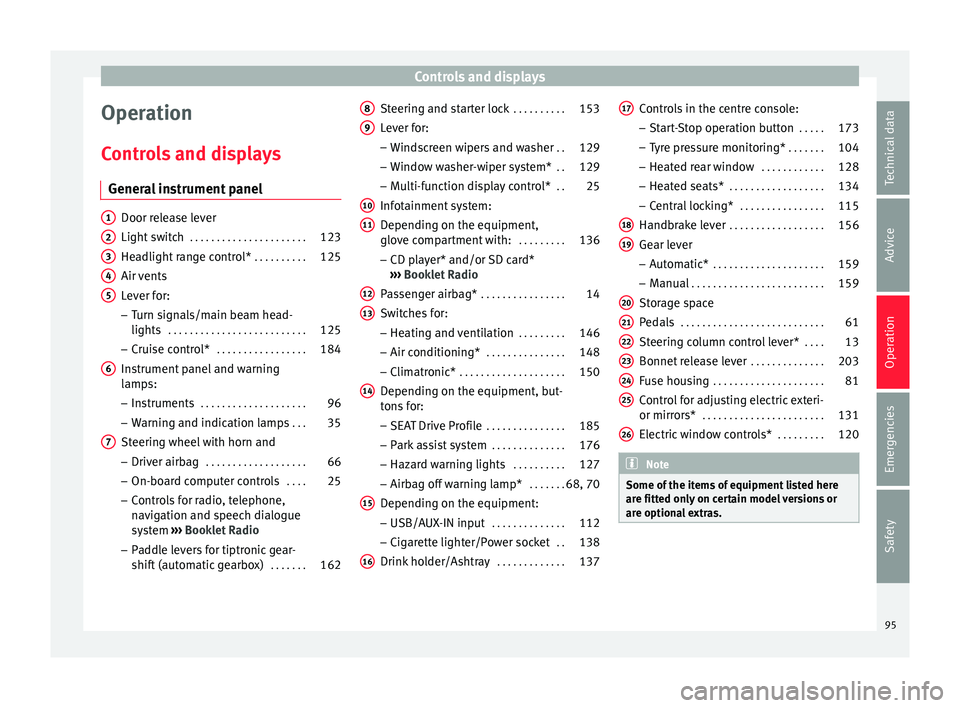
Controls and displays
Operation
C ontr
o
ls and displays
General instrument panel Door release lever
Light sw
it
ch . . . . . . . . . . . . . . . . . . . . . . 123
Headlight range control* . . . . . . . . . .125
Air vents
Lever f
or:
– Turn signals/main beam head-
lights . . . . . . . . . . . . . . . . . . . . . . . . . . 125
– Crui se c
ontrol* . . . . . . . . . . . . . . . . . 184
Instrument panel and warning
lamp s:
– In
struments . . . . . . . . . . . . . . . . . . . . 96
– Warnin g and indic
ation lamps . . .35
Steering wheel with horn and – Driver airb ag . . . . . . . . . . . . . . . . . . . 66
– On-boar d c
omputer controls . . . .25
– Contro
ls for radio, telephone,
navigation and speech dialogue
system ›››
Booklet Radio
– Paddle levers for tiptronic gear-
shift (automatic gearbox) . . . . . . .162
1 2
3
4
5
6
7 Steering and starter lock
. . . . . . . . . .153
Lever for: – Wind
s
creen wipers and washer . .129
– Window w
asher-wiper system* . .129
– Multi-f
unction display control* . .25
Infotainment system:
Depending on the equipment,
glo
ve compartment with: . . . . . . . . .136
– CD pla
yer* and/or SD card*
››› Booklet Radio
Passenger airbag* . . . . . . . . . . . . . . . . 14
Switches for:
– Heating and
ventilation . . . . . . . . . 146
– Air conditionin g* . . . . . . . . . . . . . . . 148
– C
limatr
onic* . . . . . . . . . . . . . . . . . . . . 150
Depending on the equipment, but-
ton s
for:
– SEAT Drive Profile . . . . . . . . . . . . . . . 185
– Park a
ssist system . . . . . . . . . . . . . . 176
– Hazard w
arning lights . . . . . . . . . .127
– Airbag off w
arning lamp* . . . . . . .68, 70
Depending on the equipment:
– USB/AUX -IN inp
ut . . . . . . . . . . . . . . 112
– Cig ar
ette lighter/Power socket . .138
Drink holder/Ashtray . . . . . . . . . . . . .137
8 9
10
11
12
13
14
15
16 Controls in the centre console:
– St ar
t
-Stop operation button . . . . .173
– Tyr
e pressure monitoring* . . . . . . .104
– Heated r
ear window . . . . . . . . . . . . 128
– Heated se
ats* . . . . . . . . . . . . . . . . . . 134
– Central
locking* . . . . . . . . . . . . . . . . 115
Handbrake lever . . . . . . . . . . . . . . . . . . 156
Gear lever – Automatic* . . . . . . . . . . . . . . . . . . . . . 159
– M
anual . . . . . . . . . . . . . . . . . . . . . . . . . 159
Stor
age space
Pedal
s . . . . . . . . . . . . . . . . . . . . . . . . . . . 61
Steering column control lever* . . . .13
Bonnet release lever . . . . . . . . . . . . . .203
Fuse housing . . . . . . . . . . . . . . . . . . . . . 81
Control for adjusting electric exteri-
or mirrors* . . . . . . . . . . . . . . . . . . . . . . . 131
El
ectric window controls* . . . . . . . . .120 Note
Some of the items of equipment listed here
are fitt ed on
ly on certain model versions or
are optional extras. 17
18
19
20
21
22
23
24
25
26
95
Technical data
Advice
Operation
Emergencies
Safety
Page 110 of 248
Operation
Communications and multi-
medi a
St eerin
g wheel controls*
General information The vehicle includes a multifunction module
from wher
e it
is possible to control the audio,
telephone and radio/navigation functions
without needing to distract the driver.
There are two versions of the multifunction
module:
● Audio version, to control the available au-
dio fu nction
s from the steering wheel (Radio,
audio CD, MP3 CD, iPod ®1)
, USB 1)
).
● Audio + telephone versions o control the
avail
able audio functions from the steering
wheel (Radio, audio CD, MP3 CD, iPod ®1)
,
USB 1)
, SD 1)
) and the Bluetooth system. 1)
Depending on the vehicle equipment.
108
Page 112 of 248
Operation
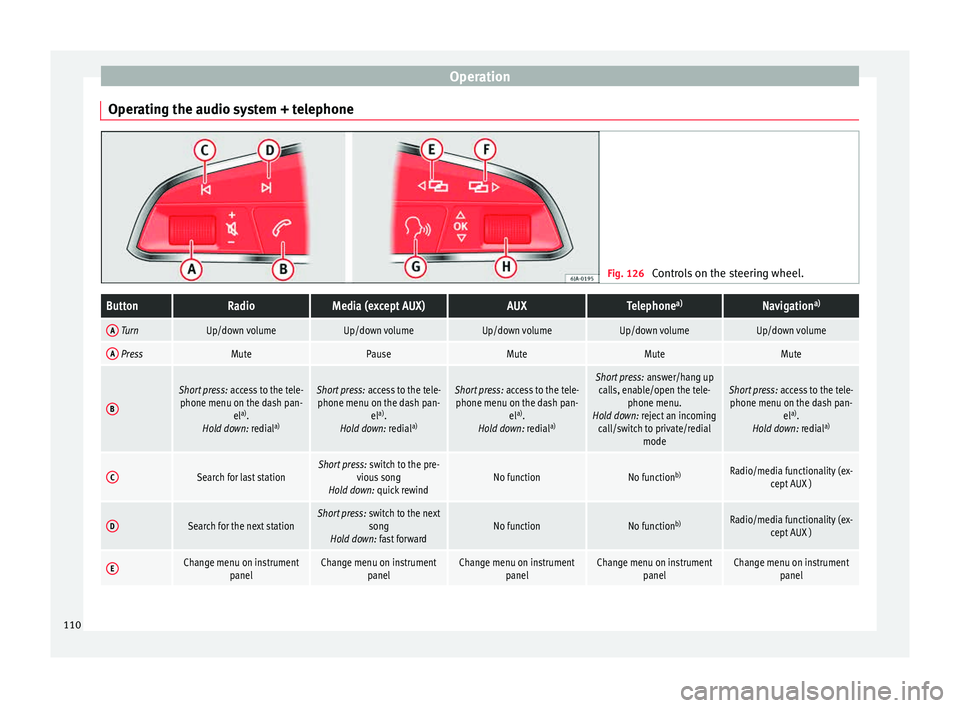
Operating the audio system + telephone Fig. 126
Controls on the steering wheel.ButtonRadioMedia (except AUX)AUXTelephone a)Navigation a)
A TurnUp/down volumeUp/down volumeUp/down volumeUp/down volumeUp/down volume
A PressMutePauseMuteMuteMute
B
Short press:
access to the tele-
phone menu on the dash pan- ela)
.
Hold down: redial a)Short press:
access to the tele-
phone menu on the dash pan- ela)
.
Hold down: redial a)Short press:
access to the tele-
phone menu on the dash pan- ela)
.
Hold down: redial a)Short press:
answer/hang up
calls, enable/open the tele- phone menu.
Hold down: reject an incoming call/switch to private/redial modeShort press: access to the tele-
phone menu on the dash pan- ela)
.
Hold down: redial a)
CSearch for last stationShort press:
switch to the pre-
vious song
Hold down: quick rewindNo functionNo function b)Radio/media functionality (ex-
cept AUX )
DSearch for the next stationShort press: switch to the next
song
Hold down: fast forwardNo functionNo function b)Radio/media functionality (ex-
cept AUX )
EChange menu on instrument panelChange menu on instrumentpanelChange menu on instrumentpanelChange menu on instrumentpanelChange menu on instrumentpanel110
Page 113 of 248
Communications and multimediaButtonRadioMedia (except AUX)AUXTelephone
a)Navigation a)
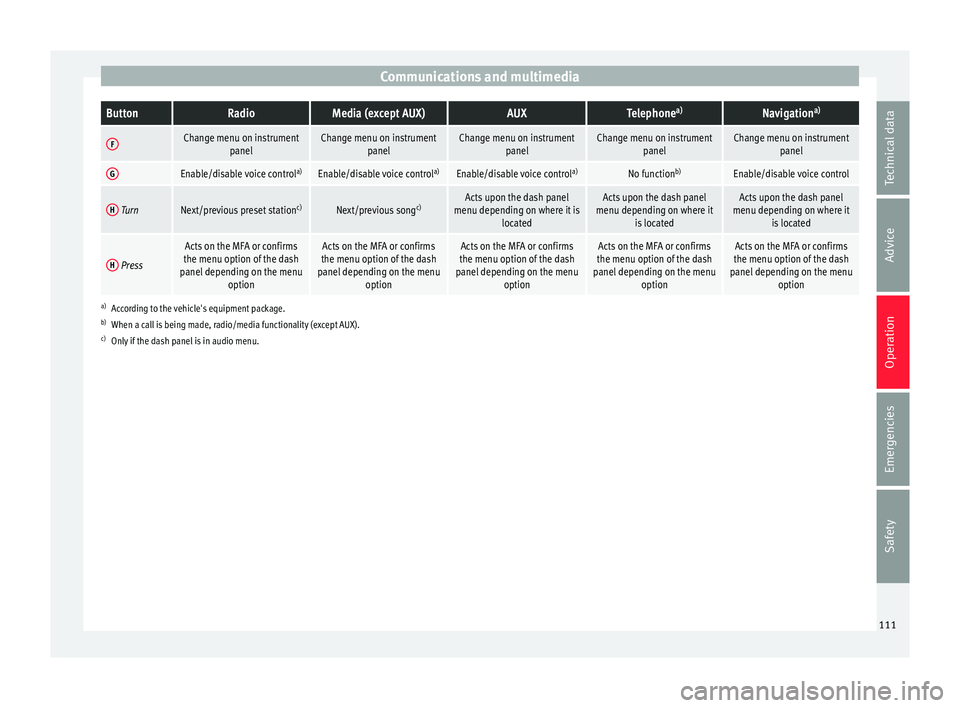
FChange menu on instrument
panelChange menu on instrumentpanelChange menu on instrumentpanelChange menu on instrumentpanelChange menu on instrumentpanel
GEnable/disable voice control a)Enable/disable voice controla)Enable/disable voice controla)No functionb)Enable/disable voice control
H TurnNext/previous preset station c)Next/previous songc)Acts upon the dash panel
menu depending on where it is locatedActs upon the dash panel
menu depending on where it is locatedActs upon the dash panel
menu depending on where it is located
H Press
Acts on the MFA or confirms
the menu option of the dash
panel depending on the menu optionActs on the MFA or confirms
the menu option of the dash
panel depending on the menu optionActs on the MFA or confirms
the menu option of the dash
panel depending on the menu optionActs on the MFA or confirms
the menu option of the dash
panel depending on the menu optionActs on the MFA or confirms
the menu option of the dash
panel depending on the menu option
a)According to the vehicle's equipment package.
b) When a call is being made, radio/media functionality (except AUX).
c) Only if the dash panel is in audio menu.
111
Technical data
Advice
Operation
Emergencies
Safety
Page 122 of 248
Operation
● Tiltin
g p
anoramic sunroof open (partially or
completely),
● Movement of objects inside the vehicle,
such a
s loose papers, items hanging from
the rear vision mirror (air fresheners), etc. Note
● If the v
ehicle is relocked and the alarm is
activated without the volumetric sensor func-
tion, relocking will activate the alarm with all
its functions, except the volumetric sensor.
This function is reactivated when the alarm is
switched on again, unless it is deliberately
switched off.
● If the alarm has been triggered by the volu-
metric sensor
, this will be indicated by a
flashing of the warning lamp on the driver
door when the vehicle is opened. The flash is
different to the flash indicating the alarm is
activated.
● The vibration of a mobile phone left inside
the vehic
le may cause the vehicle interior
monitoring alarm to trigger, as both sensors
react to movements and shakes inside the ve-
hicle.
● If on activating the alarm, any door or the
rear lid i
s open, only the alarm will be activa-
ted. The vehicle interior monitoring and the
anti-tow system will only be activated once
all the doors are closed (including the rear
lid). Boot hatch
Openin g and c
lo
sing Read the additional information carefully
›› ›
page 9 WARNING
● Alw a
ys close the rear lid properly. Risk of
accident or injury.
● The rear lid must not be opened when the
rever
se or rear fog lights are lit. This may
damage the tail lights.
● Do not close the rear lid by pushing it down
with y
our hand on the rear window. The glass
could smash. Risk of injury!
● Ensure the rear lid is locked after closing it.
If not, it m
ay open unexpectedly while driv-
ing.
● Never allow children to play in or around
the vehic
le. A locked vehicle can be subjected
to extremely high and low temperatures, de-
pending on the time of year, thus causing se-
rious injuries/illness. It could even have fatal
consequences. Close and lock both the rear
lid and all the other doors when you are not
using the vehicle.
● Closing the rear lid without observing and
ensurin
g it is clear could cause serious injury
to you and to third parties. Make sure that no
one is in the path of the rear lid. ●
Never driv e w
ith the rear lid open or half-
closed, exhaust gases may enter into the in-
terior of the vehicle. Danger of poisoning!
● If you only open the rear lid, do not leave
the key in
side. The vehicle cannot be opened
if the key is left inside. Electric windows
Opening and c lo
sing of the electric
windows* Fig. 133
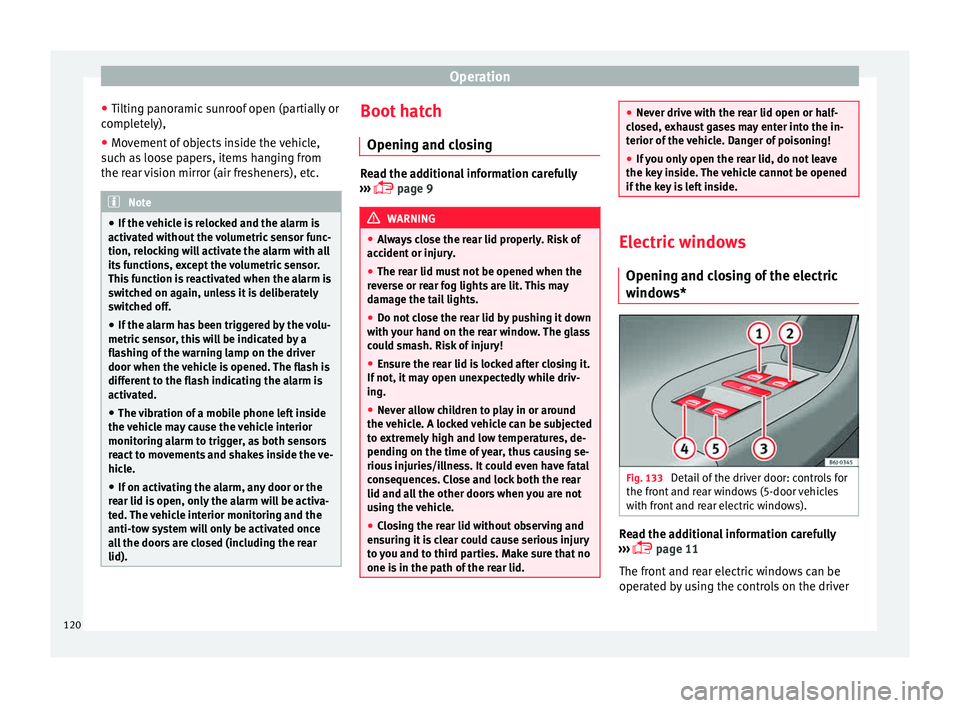
Detail of the driver door: controls for
the fr ont
and r
ear windows (5-door vehicles
with front and rear electric windows). Read the additional information carefully
› ›
›
page 11
The front and rear electric windows can be
operated by using the controls on the driver
120