roof Seat Ibiza 5D 2015 Owner's manual
[x] Cancel search | Manufacturer: SEAT, Model Year: 2015, Model line: Ibiza 5D, Model: Seat Ibiza 5D 2015Pages: 248, PDF Size: 4.77 MB
Page 5 of 248
Table of Contents
Table of Contents
The e s
senti
als . . . . . . . . . . . . . . . . . . . . . . . . 5
Exterior view . . . . . . . . . . . . . . . . . . . . . . . . . . . . 5
Exterior view . . . . . . . . . . . . . . . . . . . . . . . . . . . . 6
Interior view (left guide) . . . . . . . . . . . . . . . . . . 7
Interior view (right-hand drive) . . . . . . . . . . . . . 8
How it works . . . . . . . . . . . . . . . . . . . . . . . . . . . . 9
Opening and closing . . . . . . . . . . . . . . . . . . . . . 9
Before driving . . . . . . . . . . . . . . . . . . . . . . . . . . . 12
Airbags . . . . . . . . . . . . . . . . . . . . . . . . . . . . . . . . 14
Child seats . . . . . . . . . . . . . . . . . . . . . . . . . . . . . 16
Starting the vehicle . . . . . . . . . . . . . . . . . . . . . . 20
Lights and visibility . . . . . . . . . . . . . . . . . . . . . . 21
Easy Connect . . . . . . . . . . . . . . . . . . . . . . . . . . . 24
Driver information system . . . . . . . . . . . . . . . . . 25
Journey data . . . . . . . . . . . . . . . . . . . . . . . . . . . . 29
Cruise control . . . . . . . . . . . . . . . . . . . . . . . . . . . 34
Warning lamps . . . . . . . . . . . . . . . . . . . . . . . . . . 35
Gearbox lever . . . . . . . . . . . . . . . . . . . . . . . . . . . 37
Air conditioning . . . . . . . . . . . . . . . . . . . . . . . . . 39
Level control . . . . . . . . . . . . . . . . . . . . . . . . . . . . 40
Emergencies . . . . . . . . . . . . . . . . . . . . . . . . . . . . 44
Fuses . . . . . . . . . . . . . . . . . . . . . . . . . . . . . . . . . . 44
Bulbs . . . . . . . . . . . . . . . . . . . . . . . . . . . . . . . . . . 45
Action in the event of a puncture . . . . . . . . . . . 45
Changing a wheel . . . . . . . . . . . . . . . . . . . . . . . 47
Snow chains . . . . . . . . . . . . . . . . . . . . . . . . . . . . 50
Emergency towing of the vehicle . . . . . . . . . . . 51
How to jump start . . . . . . . . . . . . . . . . . . . . . . . . 52
Changing the windscreen wiper blades . . . . . . 54
Safety . . . . . . . . . . . . . . . . . . . . . . . . . . . . . . . . 56
Safe driving . . . . . . . . . . . . . . . . . . . . . . . . . . . . 56
Safety first! . . . . . . . . . . . . . . . . . . . . . . . . . . . . . 56
Advice about driving . . . . . . . . . . . . . . . . . . . . . 56 Correct position for passengers . . . . . . . . . . . . 57
Pedal area . . . . . . . . . . . . . . . . . . . . . . . . . . . . . . 61
Seat belts
. . . . . . . . . . . . . . . . . . . . . . . . . . . . . . 61
Why wear a seat belt? . . . . . . . . . . . . . . . . . . . . 61
How to properly adjust your seatbelt . . . . . . . . 64
Belt pretensioners* . . . . . . . . . . . . . . . . . . . . . . 65
Airbag system . . . . . . . . . . . . . . . . . . . . . . . . . . 66
Brief introduction . . . . . . . . . . . . . . . . . . . . . . . . 66
Airbag safety instructions . . . . . . . . . . . . . . . . . 69
Deactivating airbags . . . . . . . . . . . . . . . . . . . . . 70
Transporting children safely . . . . . . . . . . . . . . . 72
Safety for children . . . . . . . . . . . . . . . . . . . . . . . 72
Child seats . . . . . . . . . . . . . . . . . . . . . . . . . . . . . 73
Emergencies . . . . . . . . . . . . . . . . . . . . . . . . . . 75
Self-help . . . . . . . . . . . . . . . . . . . . . . . . . . . . . . . 75
Emergency equipment . . . . . . . . . . . . . . . . . . . . 75
Tyre repair . . . . . . . . . . . . . . . . . . . . . . . . . . . . . . 76
Changing the windscreen wiper blades . . . . . . 78
Towing or tow-starting . . . . . . . . . . . . . . . . . . . . 79
Fuses and bulbs . . . . . . . . . . . . . . . . . . . . . . . . . 81
Fuses . . . . . . . . . . . . . . . . . . . . . . . . . . . . . . . . . . 81
Changing bulbs . . . . . . . . . . . . . . . . . . . . . . . . . 83
Single headlight bulb change . . . . . . . . . . . . . . 84
Double headlight bulb change . . . . . . . . . . . . . 85
Changing the AFS headlight bulbs . . . . . . . . . . 87
Changing the fog light bulbs . . . . . . . . . . . . . . . 88
Changing the tail light bulbs . . . . . . . . . . . . . . . 89
Changing the side and interior bulbs . . . . . . . . 91
Operation . . . . . . . . . . . . . . . . . . . . . . . . . . . . . 95
Controls and displays . . . . . . . . . . . . . . . . . . . . 95
General instrument panel . . . . . . . . . . . . . . . . . 94
Instruments and warning/control lamps . . . . . 96
Instruments . . . . . . . . . . . . . . . . . . . . . . . . . . . . 96
Warning and indication lamps . . . . . . . . . . . . . 100
Introduction to the Easy Connect system* . . . . 107
System settings (CAR)* . . . . . . . . . . . . . . . . . . . 107 Communications and multimedia
. . . . . . . . . . . 108
Steering wheel controls* . . . . . . . . . . . . . . . . . . 108
Multimedia . . . . . . . . . . . . . . . . . . . . . . . . . . . . . 112
Opening and closing . . . . . . . . . . . . . . . . . . . . . 112
Central locking system . . . . . . . . . . . . . . . . . . . . 112
Keys . . . . . . . . . . . . . . . . . . . . . . . . . . . . . . . . . . . 116
Radio frequency remote control* . . . . . . . . . . . 117
Anti-theft alarm* . . . . . . . . . . . . . . . . . . . . . . . . 118
Boot hatch . . . . . . . . . . . . . . . . . . . . . . . . . . . . . 120
Electric windows . . . . . . . . . . . . . . . . . . . . . . . . . 120
Tilting panoramic roof* . . . . . . . . . . . . . . . . . . . 122
Lights and visibility . . . . . . . . . . . . . . . . . . . . . . 123
Lights . . . . . . . . . . . . . . . . . . . . . . . . . . . . . . . . . 123
Interior lights . . . . . . . . . . . . . . . . . . . . . . . . . . . 128
Visibility . . . . . . . . . . . . . . . . . . . . . . . . . . . . . . . 128
Windscreen wiper and rear window wiper sys-
tems . . . . . . . . . . . . . . . . . . . . . . . . . . . . . . . . . . 129
R
ear view mirrors . . . . . . . . . . . . . . . . . . . . . . . . 131
Seats and head restraints . . . . . . . . . . . . . . . . . 132
Adjusting the seat and head restraints . . . . . . 132
Seat functions . . . . . . . . . . . . . . . . . . . . . . . . . . 134
Transport and practical equipment . . . . . . . . . 136
Practical equipment . . . . . . . . . . . . . . . . . . . . . . 136
Luggage compartment . . . . . . . . . . . . . . . . . . . . 139
Roof rack/roof luggage rack* . . . . . . . . . . . . . . 142
Air conditioning . . . . . . . . . . . . . . . . . . . . . . . . . 144
Heating, ventilation and cooling . . . . . . . . . . . . 144
Heating and fresh air . . . . . . . . . . . . . . . . . . . . . 146
Air conditioning* . . . . . . . . . . . . . . . . . . . . . . . . 148
Climatronic* . . . . . . . . . . . . . . . . . . . . . . . . . . . . 150
Driving . . . . . . . . . . . . . . . . . . . . . . . . . . . . . . . . 152
Address . . . . . . . . . . . . . . . . . . . . . . . . . . . . . . . . 152
Starting and stopping the engine . . . . . . . . . . . 153
Braking and parking . . . . . . . . . . . . . . . . . . . . . 156
Manual gearbox . . . . . . . . . . . . . . . . . . . . . . . . . 159
Automatic gearbox* . . . . . . . . . . . . . . . . . . . . . . 159
Run-in and economical driving . . . . . . . . . . . . . 165
Driving abroad . . . . . . . . . . . . . . . . . . . . . . . . . . 168 3
Page 13 of 248
The essentials
● Rel
e
ase the bonnet stay and secure it in
the fixture designed for this in the bonnet.
››› in safety notes for work in the en-
gine compartment on page 202
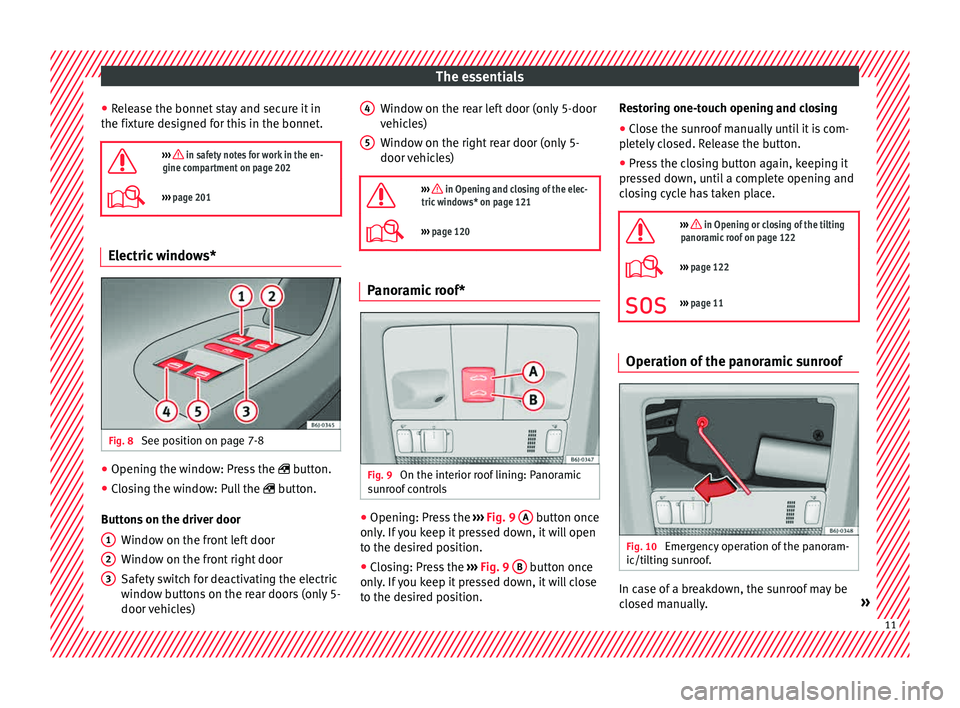
››› page 201 Electric windows*
Fig. 8
See position on page 7-8 ●
Opening the window: Press the butt
on.
● C
losing the window: Pull the button.
B
uttons on the driver door Window on the front left door
Window on the front right door
Safety switch for deactivating the electric
window buttons on the rear doors (only 5-
door vehicles)
1 2
3 Window on the rear left door (only 5-door
v
ehic
l
es)
Window on the right rear door (only 5-
door vehicles)
››› in Opening and closing of the elec-
tric windows* on page 121
››› page 120 Panoramic roof*
Fig. 9
On the interior roof lining: Panoramic
s u
nr
oof controls ●
Opening: Press the ››
›
Fig. 9 A button once
on ly
. If
you keep it pressed down, it will open
to the desired position.
● Closing: Press the ›››
Fig. 9 B button once
on ly
. If
you keep it pressed down, it will close
to the desired position. 4 5 Restoring one-touch opening and closing
●
Close the sunroof manually until it is com-
p l
et
ely closed. Release the button.
● Press the closing button again, keeping it
pres
sed down, until a complete opening and
closing cycle has taken place.
››› in Opening or closing of the tilting
panoramic roof on page 122
››› page 122
››› page 11 Operation of the panoramic sunroof
Fig. 10
Emergency operation of the panoram-
ic/ti ltin
g s
unroof. In case of a breakdown, the sunroof may be
c
lo sed m
anually. » 11
Page 14 of 248
The essentials
● Remo
v
e the plastic cover by inserting a
screwdriver into the rear section.
● Insert an Allen key (4 mm) into the opening
as f
ar as possible and close the sunroof.
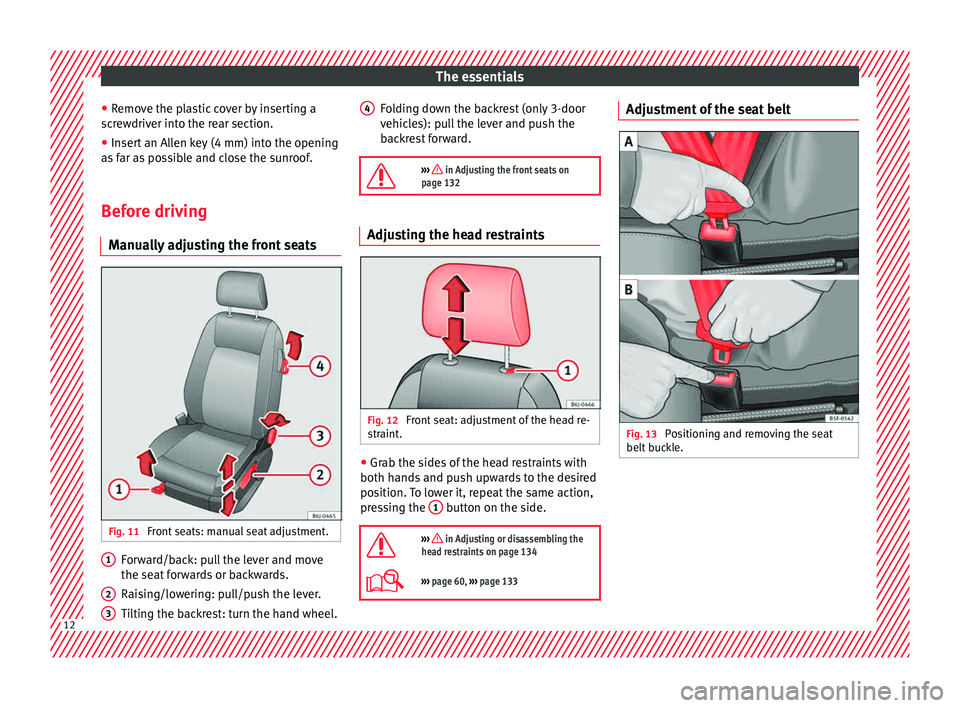
Before driving Manual
ly adjusting the front seats Fig. 11
Front seats: manual seat adjustment. Forward/back: pull the lever and move
the se
at
f
orwards or backwards.
Raising/lowering: pull/push the lever.
Tilting the backrest: turn the hand wheel.
1 2
3 Folding down the backrest (only 3-door
v
ehic
l
es): pull the lever and push the
backrest forward.
››› in Adjusting the front seats on
page 132 Adjusting the head restraints
Fig. 12
Front seat: adjustment of the head re-
s tr aint
. ●
Grab the sides of the head restraints with
both h and
s
and push upwards to the desired
position. To lower it, repeat the same action,
pressing the 1 button on the side.
››› in Adjusting or disassembling the
head restraints on page 134
››› page 60, ››› page 133 4
Adjustment of the seat belt
Fig. 13
Positioning and removing the seat
belt b
uc
kle. 12
Page 74 of 248
Safety
Transporting children safely Saf ety
f
or children
Introduction For safety reasons, as we have learned from
acc
ident
statistics, we recommend that chil-
dren under 12 years of age travel in the rear
seats. Depending on their age, height and
weight, children travelling in rear seats must
use a child seat or a seat belt. For safety rea-
sons, the child seat should be installed in the
rear seat, behind the front passenger seat or
in the centre back seat.
The physical laws involved and the forces
acting in a collision apply also to children
››› page 63. But unlike adults, children do not
have fully developed muscle and bone struc-
tures. This means that children are subject to
a greater risk of injury.
To reduce the risk of injuries, children must
always use special child restraint systems
when travelling in the vehicle.
We recommend the use of child safety prod-
ucts from the SEAT Original Accessories Pro-
gramme, which includes systems for all ages
made by “Peke” (not for all countries).
These systems have been especially de-
signed and approved, complying with the
ECE-R44. regulation. Follow the manufacturer's instructions and
ob
ser
ve any statutory requirements when in-
stalling and using child seats. Always read
and note ››› page 72.
We recommend you always carry the manu-
facturer's Child Seat Instruction Manual to-
gether with the on-board documentation.
Important information regarding the
front p
assenger's airbag Read the additional information carefully
› ›
›
page 16.
Read and always observe the safety informa-
tion included in the following chapters:
● Safety distance with respect to the passen-
ger airbag ›
›› page 66.
● Objects between the passenger and the
pas
senger side airbag ››› in Front airbags
on p ag
e 69
.
The passenger side front airbag, when ena-
bled, is a serious risk for a child that is facing
backward since the airbag can strike the seat
with such force that it can cause serious or
fatal injuries. Children up to 12 years old
should always travel on the rear seat.
Therefore we strongly recommend you to
transport children on the rear seats. This is
the safest location in the vehicle. Alternative-
ly, the front passenger airbag can be disa- bled with a key-operated switch
›››
page 70.
When transporting children, use a child seat
appropriate to the age and size of each child. WARNING
● If a c hi
ld seat is secured to the front pas-
senger seat, the risk to the child of sustain-
ing critical or fatal injuries in the event of an
accident increases.
● An inflating front passenger airbag can
strike the r
ear-facing child seat and project it
with great force against the door, the roof or
the backrest.
● Never install a child seat facing backwards
on the front p
assenger seat unless the front
passenger front airbag has been disabled.
Risk of potentially fatal injuries to the child!
However, if it is necessary, in exceptional ca-
ses, to transport a child in the front passen-
ger seat, the front passenger front airbag
must always be disabled ››› page 70, Deacti-
vation of front passenger front airbag*. If the
front passenger seat has a height adjustment
option, move it to the highest position.
● For those vehicles that do not include a key
lock sw
itch to deactivate the airbag, the vehi-
cle must be taken to a technical service.
● All vehicle occupants, especially children,
must
assume the proper sitting position and
be properly belted in while travelling.
● Never hold children or babies on your lap,
this c
an result in potentially fatal injuries to
the child! 72
Page 75 of 248
Transporting children safely
●
Never a l
low a child to be transported in a
vehicle without being properly secured, or to
stand up or kneel on a seat while travelling.
In an accident, the child could be flung
through the vehicle, causing possibly fatal in-
juries to themselves and to the other vehicle
occupants.
● If children assume an improper sitting posi-
tion when the vehic
le is moving, they expose
themselves to greater risk of injury in the
event of a sudden braking manoeuvre or in an
accident. This is particularly important if the
child is travelling on the front passenger seat
and the airbag system is triggered in an acci-
dent; as this could cause serious injury or
even death.
● A suitable child seat can protect your child!
● Never leave a child alone in the child seat
or inside the
vehicle because depending on
the season, very high temperatures may be
reached inside a parked vehicle, which could
be fatal.
● Children who are less than 1.5 metres tall
must
not wear a normal seat belt without a
child seat, as this could cause injuries to the
abdominal and neck areas during a sudden
braking manoeuvre or in an accident.
● Do not allow the seat belt to become twis-
ted and the seat
belt should be properly in
place ››› page 61.
● Only one child may occupy a child seat
›››
page 73, Child seats. ●
When a chi l
d seat is mounted in the rear
seats, the door child-proof lock should be ac-
tivated ››› page 115. Child seats
Safety in
structions Read the additional information carefully
›› ›
page 16. WARNING
When travelling, children must be secured in
the v ehic
le with a restraint system suitable
for age, weight and size.
● Read and always observe information and
warning
s concerning the use of child seats
››› page 72. WARNING
The retaining rings are designed only for use
with “ISOFIX” and T op
Tether* system child
seats.
● Never secure other child seats that do not
have the “ISOFIX” or T
op Tether* system, or
retaining belts or objects to the fastening
rings - this can result in potentially fatal inju-
ries to the child.
● Ensure that the child seat is secured cor-
rectly u
sing the “ISOFIX” and Top Tether* se-
curing rings. WARNING
An undue installation of the safety seat will
incr e
ase the risk of injury in the event of a
crash.
● Never tie the retainer strap to a hook in the
luggag
e compartment.
● Never secure or tie luggage or other items
to the low
er anchorages (ISOFIX) or the upper
ones (Top Tether). Categorisation of child seats into
gr
oup
s Only use child seats that are officially ap-
pr
o
v
ed and suitable for the child.
Child seats are subject to the regulation ECE-
R 44. ECE-R stands for: Economic Commis-
sion for Europe Regulation.
The child seats are grouped into 5 catego-
ries:
Group 0: Up to 10 kg (up to around 9
months)
Group 0+: Up to 13 kg (up to around 18
months)
Group 1: from 9 to 18 kg (up to approx. 4
years old)
Group 2: from 15 to 25 kg (up to approx. 7
years old) »
73
Technical data
Advice
Operation
Emergencies
Safety
Page 84 of 248
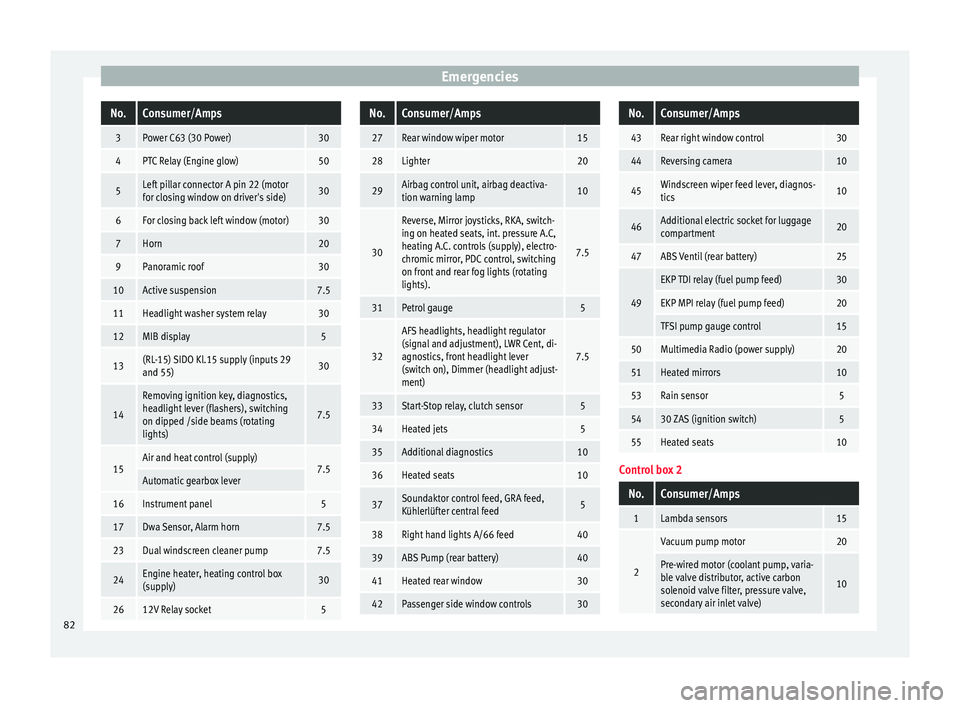
EmergenciesNo.Consumer/Amps
3Power C63 (30 Power)30
4PTC Relay (Engine glow)50
5Left pillar connector A pin 22 (motor
for closing window on driver's side)30
6For closing back left window (motor)30
7Horn20
9Panoramic roof30
10Active suspension7.5
11Headlight washer system relay30
12MIB display5
13(RL-15) SIDO Kl.15 supply (inputs 29
and 55)30
14
Removing ignition key, diagnostics,
headlight lever (flashers), switching
on dipped /side beams (rotating
lights)
7.5
15Air and heat control (supply)7.5Automatic gearbox lever
16Instrument panel5
17Dwa Sensor, Alarm horn7.5
23Dual windscreen cleaner pump7.5
24Engine heater, heating control box
(supply)30
2612V Relay socket5
No.Consumer/Amps
27Rear window wiper motor15
28Lighter20
29Airbag control unit, airbag deactiva-
tion warning lamp10
30
Reverse, Mirror joysticks, RKA, switch-
ing on heated seats, int. pressure A.C,
heating A.C. controls (supply), electro-
chromic mirror, PDC control, switching
on front and rear fog lights (rotating
lights).
7.5
31Petrol gauge5
32
AFS headlights, headlight regulator
(signal and adjustment), LWR Cent, di-
agnostics, front headlight lever
(switch on), Dimmer (headlight adjust-
ment)
7.5
33Start-Stop relay, clutch sensor5
34Heated jets5
35Additional diagnostics10
36Heated seats10
37Soundaktor control feed, GRA feed,
Kühlerlüfter central feed5
38Right hand lights A/66 feed40
39ABS Pump (rear battery)40
41Heated rear window30
42Passenger side window controls30
No.Consumer/Amps
43Rear right window control30
44Reversing camera10
45Windscreen wiper feed lever, diagnos-
tics10
46Additional electric socket for luggage
compartment20
47ABS Ventil (rear battery)25
49
EKP TDI relay (fuel pump feed)30
EKP MPI relay (fuel pump feed)20
TFSI pump gauge control15
50Multimedia Radio (power supply)20
51Heated mirrors10
53Rain sensor5
5430 ZAS (ignition switch)5
55Heated seats10
Control box 2
No.Consumer/Amps
1Lambda sensors15
2
Vacuum pump motor20
Pre-wired motor (coolant pump, varia-
ble valve distributor, active carbon
solenoid valve filter, pressure valve,
secondary air inlet valve)
10
82
Page 117 of 248
Opening and closing
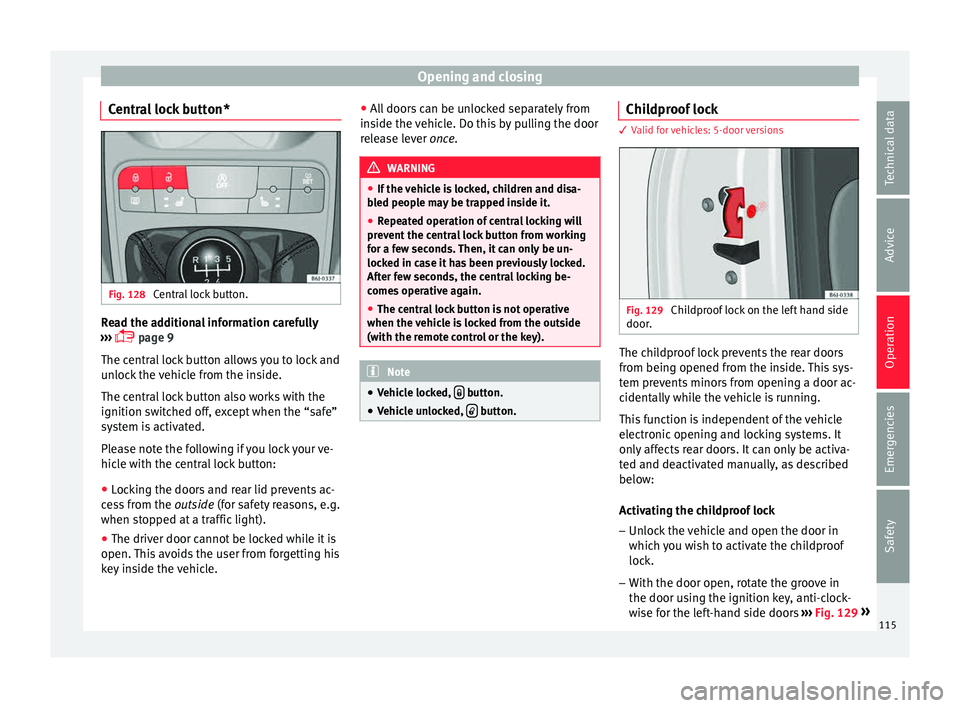
Central lock button* Fig. 128
Central lock button. Read the additional information carefully
› ›
›
page 9
The central lock button allows you to lock and
unlock the vehicle from the inside.
The central lock button also works with the
ignition switched off, except when the “safe”
system is activated.
Please note the following if you lock your ve-
hicle with the central lock button:
● Locking the doors and rear lid prevents ac-
ces
s from the outside (for safety reasons, e.g.
when stopped at a traffic light).
● The driver door cannot be locked while it is
open. This
avoids the user from forgetting his
key inside the vehicle. ●
All
doors can be unlocked separately from
inside the vehicle. Do this by pulling the door
release lever once. WARNING
● If the v
ehicle is locked, children and disa-
bled people may be trapped inside it.
● Repeated operation of central locking will
prevent
the central lock button from working
for a few seconds. Then, it can only be un-
locked in case it has been previously locked.
After few seconds, the central locking be-
comes operative again.
● The central lock button is not operative
when the vehic
le is locked from the outside
(with the remote control or the key). Note
● Vehic l
e locked, button.
● Vehicle unlocked, button. Childproof lock
3 Valid for vehicles: 5-door versions
Fig. 129
Childproof lock on the left hand side
door . The childproof lock prevents the rear doors
fr
om bein
g opened fr
om the inside. This sys-
tem prevents minors from opening a door ac-
cidentally while the vehicle is running.
This function is independent of the vehicle
electronic opening and locking systems. It
only affects rear doors. It can only be activa-
ted and deactivated manually, as described
below:
Activating the childproof lock
– Unlock the vehicle and open the door in
which y
ou wish to activate the childproof
lock.
– With the door open, rotate the groove in
the door usin
g the ignition key, anti-clock-
wise for the left-hand side doors ››› Fig. 129 »
115
Technical data
Advice
Operation
Emergencies
Safety
Page 118 of 248
Operation
and clockwise for the right-hand side
door s.
D e
activating the childproof lock
– Unlock the vehicle and open the door
whose chi
ldproof lock you want to deacti-
vate.
– With the door open, rotate the groove in
the door usin
g the ignition key, anti-clock-
wise for the right-hand side doors, and
clockwise for the left-hand side doors
››› Fig. 129.
Once the childproof lock is activated, the
door can only be opened from the outside.
The childproof lock can be activated or deac-
tivated by inserting the key in the groove
when the door is open, as described above. Keys
Set of k
eys Fig. 130
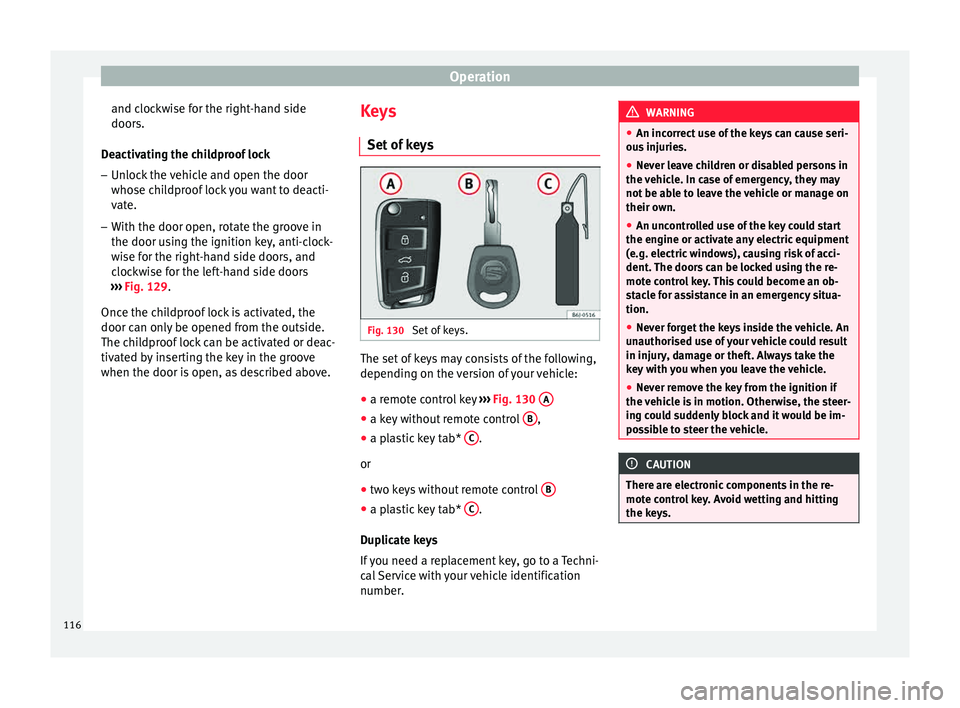
Set of keys. The set of keys may consists of the following,
dependin
g on the
v
ersion of your vehicle:
● a remote control key ›››
Fig. 130 A ●
a key without remote control B ,
● a plastic key tab* C .
or
● two keys without remote control B ●
a plastic key tab* C .
D up
lic
ate keys
If you need a replacement key, go to a Techni-
cal Service with your vehicle identification
number. WARNING
● An incorr ect
use of the keys can cause seri-
ous injuries.
● Never leave children or disabled persons in
the vehic
le. In case of emergency, they may
not be able to leave the vehicle or manage on
their own.
● An uncontrolled use of the key could start
the engine or activat
e any electric equipment
(e.g. electric windows), causing risk of acci-
dent. The doors can be locked using the re-
mote control key. This could become an ob-
stacle for assistance in an emergency situa-
tion.
● Never forget the keys inside the vehicle. An
unauthori
sed use of your vehicle could result
in injury, damage or theft. Always take the
key with you when you leave the vehicle.
● Never remove the key from the ignition if
the vehic
le is in motion. Otherwise, the steer-
ing could suddenly block and it would be im-
possible to steer the vehicle. CAUTION
There are electronic components in the re-
mote c ontr
ol key. Avoid wetting and hitting
the keys. 116
Page 122 of 248
Operation
● Tiltin
g p
anoramic sunroof open (partially or
completely),
● Movement of objects inside the vehicle,
such a
s loose papers, items hanging from
the rear vision mirror (air fresheners), etc. Note
● If the v
ehicle is relocked and the alarm is
activated without the volumetric sensor func-
tion, relocking will activate the alarm with all
its functions, except the volumetric sensor.
This function is reactivated when the alarm is
switched on again, unless it is deliberately
switched off.
● If the alarm has been triggered by the volu-
metric sensor
, this will be indicated by a
flashing of the warning lamp on the driver
door when the vehicle is opened. The flash is
different to the flash indicating the alarm is
activated.
● The vibration of a mobile phone left inside
the vehic
le may cause the vehicle interior
monitoring alarm to trigger, as both sensors
react to movements and shakes inside the ve-
hicle.
● If on activating the alarm, any door or the
rear lid i
s open, only the alarm will be activa-
ted. The vehicle interior monitoring and the
anti-tow system will only be activated once
all the doors are closed (including the rear
lid). Boot hatch
Openin g and c
lo
sing Read the additional information carefully
›› ›
page 9 WARNING
● Alw a
ys close the rear lid properly. Risk of
accident or injury.
● The rear lid must not be opened when the
rever
se or rear fog lights are lit. This may
damage the tail lights.
● Do not close the rear lid by pushing it down
with y
our hand on the rear window. The glass
could smash. Risk of injury!
● Ensure the rear lid is locked after closing it.
If not, it m
ay open unexpectedly while driv-
ing.
● Never allow children to play in or around
the vehic
le. A locked vehicle can be subjected
to extremely high and low temperatures, de-
pending on the time of year, thus causing se-
rious injuries/illness. It could even have fatal
consequences. Close and lock both the rear
lid and all the other doors when you are not
using the vehicle.
● Closing the rear lid without observing and
ensurin
g it is clear could cause serious injury
to you and to third parties. Make sure that no
one is in the path of the rear lid. ●
Never driv e w
ith the rear lid open or half-
closed, exhaust gases may enter into the in-
terior of the vehicle. Danger of poisoning!
● If you only open the rear lid, do not leave
the key in
side. The vehicle cannot be opened
if the key is left inside. Electric windows
Opening and c lo
sing of the electric
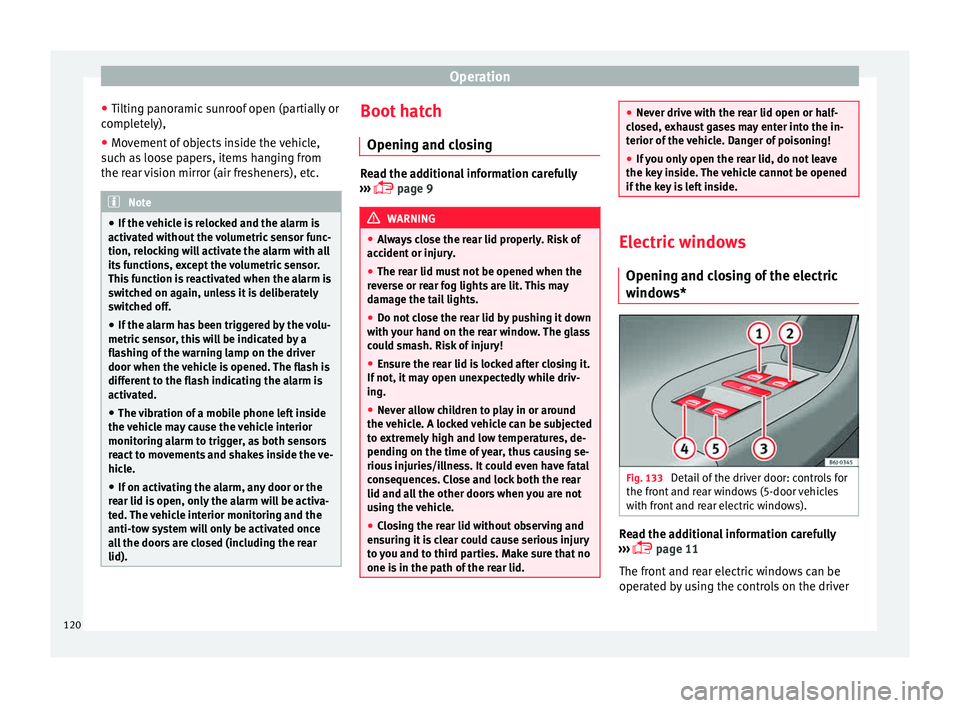
windows* Fig. 133
Detail of the driver door: controls for
the fr ont
and r
ear windows (5-door vehicles
with front and rear electric windows). Read the additional information carefully
› ›
›
page 11
The front and rear electric windows can be
operated by using the controls on the driver
120
Page 124 of 248
Operation
● If a w
indo
w is obstructed when closing au-
tomatically, the window stops at this point
and lowers immediately ››› .
● Next, check why the window does not close
bef or
e att
empting it again.
● If you try within the following 10 seconds
and the window c
loses again with difficulty
or there is an obstruction, the automatic clos-
ing will stop working for 10 seconds.
● If the window is still obstructed, the win-
dow wi
ll stop at this point.
● If there is no obvious reason why the win-
dow cannot
be closed, try to close it again by
pulling the tab within ten seconds. The win-
dow closes with maximum force. The roll-
back function is now deactivated.
If more than 10 seconds pass, the window
will open fully when you operate one of the
buttons. One-touch closing is reactivated. WARNING
● Incorr ect
use of the electric windows can
result in injury.
● Always take the ignition key with you when
leav
ing the vehicle, even if you only intend to
be gone for a short time. Please ensure that
children are never left alone inside the vehi-
cle.
● The electric windows will work until the ig-
nition has
been switched off and one of the
front doors has been opened. ●
Clo s
ing the windows without observing and
ensuring it is clear could cause serious injury
to you and third parties. Make sure that no
one is in the path of a window.
● Never allow people to remain in the vehicle
when you c
lose the vehicle from the outside.
The windows cannot be opened even in an
emergency.
● The roll-back function does not prevent fin-
gers
or other parts of the body getting
pinched against the window frame. Risk of
accident. Convenience opening/closing*
Using the door lock*
– Hold the key in the door lock of the driver
door in either the loc k
in
g or the unlocking
position until all windows are either
opened or closed.
– Release the key to interrupt this function.
Usin
g the remote control
– Keep the locking/unlocking button pressed
for the electric
window risers to
open/close; if you stop pressing the but-
ton, the window raising/lowering function
is stopped.
– If the automatic raising is stopped and im-
mediately
after, the opening button is kept
pressed, the window risers will lower. –
Once the windo
ws are completely closed,
the turn signals will flash.
Tilting panoramic roof* Opening or clo
sing of the tilting pan-
oramic roof Read the additional information carefully
›› ›
page 11
The panoramic/tilting sunroof is opened and
closed by using the switch when the ignition
is switched on.
Always close the panoramic/tilting sunroof
fully if you park the vehicle or leave it unat-
tended ››› .
The ti ltin
g s
unroof can be operated for up to
about ten minutes after the ignition has been
switched off, provided the driver door and
the front passenger door are not opened.
Sun visor
The sun visor is opened and closed manually
(independently of the panoramic/tilting sun-
roof). WARNING
● Incorr ect
use of the tilting sunroof can re-
sult in injury. 122