cam Seat Ibiza 5D 2016 Owner's manual Edition 11.16
[x] Cancel search | Manufacturer: SEAT, Model Year: 2016, Model line: Ibiza 5D, Model: Seat Ibiza 5D 2016Pages: 248, PDF Size: 5.25 MB
Page 6 of 248
Table of Contents
Engine management and exhaust gas purifica-
tion sy s
t
em . . . . . . . . . . . . . . . . . . . . . . . . . . . . . 166
Driving tips . . . . . . . . . . . . . . . . . . . . . . . . . . . . . 169
Driver assistance systems . . . . . . . . . . . . . . . . . 170
Start-Stop System* . . . . . . . . . . . . . . . . . . . . . . . 170
Fatigue detection (break recommendation)* . . 171
Parking aid . . . . . . . . . . . . . . . . . . . . . . . . . . . . . 173
Rear Assist “Rear View Camera”* . . . . . . . . . . . 177
Cruise speed* (cruise control - GRA) . . . . . . . . . 180
“SEAT Drive Profile” system . . . . . . . . . . . . . . . . 182
Towing bracket device and trailer . . . . . . . . . . . 183
Trailer mode . . . . . . . . . . . . . . . . . . . . . . . . . . . . 183
Retrofitting a towing bracket* . . . . . . . . . . . . . . 185
Advice . . . . . . . . . . . . . . . . . . . . . . . . . . . . . . . . 187
Care and maintenance . . . . . . . . . . . . . . . . . . . . 187
Accessories and modifications to the vehi-
cle
. . . . . . . . . . . . . . . . . . . . . . . . . . . . . . . . . . . . 187
Care and cleaning . . . . . . . . . . . . . . . . . . . . . . . 188
Care of the vehicle exterior . . . . . . . . . . . . . . . . 189
Caring for the vehicle interior . . . . . . . . . . . . . . 194
Checking and refilling levels . . . . . . . . . . . . . . . 196
Refuelling . . . . . . . . . . . . . . . . . . . . . . . . . . . . . . 196
Fuel . . . . . . . . . . . . . . . . . . . . . . . . . . . . . . . . . . . 196
Working in the engine compartment . . . . . . . . 198
Engine oil . . . . . . . . . . . . . . . . . . . . . . . . . . . . . . 201
Cooling system . . . . . . . . . . . . . . . . . . . . . . . . . . 204
Brake fluid . . . . . . . . . . . . . . . . . . . . . . . . . . . . . 206
Windscreen washer reservoir . . . . . . . . . . . . . . 207
Vehicle battery . . . . . . . . . . . . . . . . . . . . . . . . . . 207
Wheels . . . . . . . . . . . . . . . . . . . . . . . . . . . . . . . . 210
Wheels and tyres . . . . . . . . . . . . . . . . . . . . . . . . 210
Winter service . . . . . . . . . . . . . . . . . . . . . . . . . . . 214
Technical data . . . . . . . . . . . . . . . . . . . . . . . . 216
Technical specifications . . . . . . . . . . . . . . . . . . 216
Important information . . . . . . . . . . . . . . . . . . . . 216
Information on fuel consumption . . . . . . . . . . . 217 Trailer mode . . . . . . . . . . . . . . . . . . . . . . . . . . . . 217
Wheels . . . . . . . . . . . . . . . . . . . . . . . . . . . . . . . . 218
Engine data . . . . . . . . . . . . . . . . . . . . . . . . . . . . . 219
Dimensions . . . . . . . . . . . . . . . . . . . . . . . . . . . . . 231
Index . . . . . . . . . . . . . . . . . . . . . . . . . . . . . . . . . 233
4
Page 12 of 248
The essentials
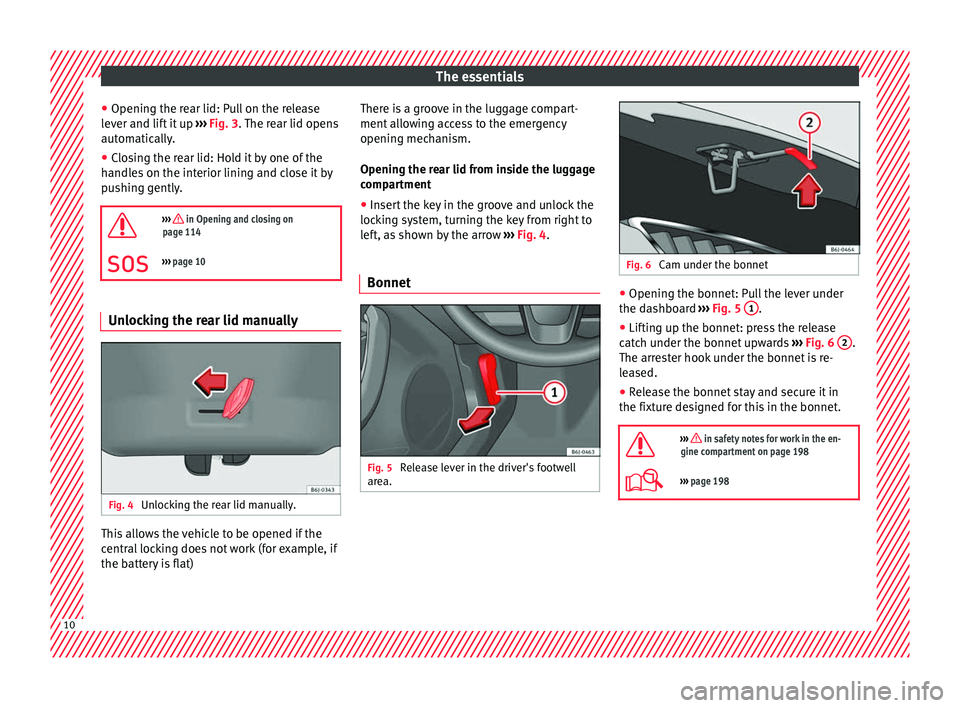
● Openin g the r
e
ar lid: Pull on the release
lever and lift it up ››› Fig. 3. The rear lid opens
automatically.
● Closing the rear lid: Hold it by one of the
handle
s on the interior lining and close it by
pushing gently.
››› in Opening and closing on
page 114
››› page 10 Unlocking the rear lid manually
Fig. 4
Unlocking the rear lid manually. This allows the vehicle to be opened if the
c
entr
al
locking does not work (for example, if
the battery is flat) There is a groove in the luggage compart-
ment allo
wing access to the emergency
opening mechanism.
Opening the rear lid from inside the luggage
compartment
● Insert the key in the groove and unlock the
lockin
g system, turning the key from right to
left, as shown by the arrow ››› Fig. 4.
Bonnet Fig. 5
Release lever in the driver's footwell
ar e
a. Fig. 6
Cam under the bonnet ●
Opening the bonnet: Pull the lever under
the d a
shbo
ard ››› Fig. 5 1 .
● Lifting up the bonnet: press the release
c at
c
h under the bonnet upwards ››› Fig. 6 2 .
The arr e
s
ter hook under the bonnet is re-
leased.
● Release the bonnet stay and secure it in
the fixtur
e designed for this in the bonnet.
››› in safety notes for work in the en-
gine compartment on page 198
››› page 198 10
Page 84 of 248
EmergenciesNo.Consumer/Amps
27Rear window wiper motor15
28Lighter20
29Airbag control unit, airbag deactiva-
tion warning lamp10
30
Reverse, Mirror joysticks, RKA, switch-
ing on heated seats, int. pressure A.C,
heating A.C. controls (supply), electro-
chromic mirror, PDC control, switching
on front and rear fog lights (rotating
lights).
7.5
31Petrol gauge5
32
AFS headlights, headlight regulator
(signal and adjustment), LWR Cent, di-
agnostics, front headlight lever
(switch on), Dimmer (headlight adjust-
ment)
7.5
33Start-Stop relay, clutch sensor5
34Heated jets5
35Soundaktor control feed, GRA feed,
Kühlerlüfter central feed5
36Heated seats10
37Additional diagnostics10
38Right hand lights A/66 feed40
39ABS Pump (rear battery)40
41Heated rear window30
42Passenger side window controls30
No.Consumer/Amps
43Rear right window control30
44Reversing camera10
45Windscreen wiper feed lever, diagnos-
tics10
47ABS Ventil (rear battery)25
49
EKP TDI relay (fuel pump feed)30
EKP MPI relay (fuel pump feed)20
TFSI pump gauge control15
50Multimedia Radio (power supply)20
51Heated mirrors10
53Rain sensor5
5430 ZAS (ignition switch)5
55Heated seats10
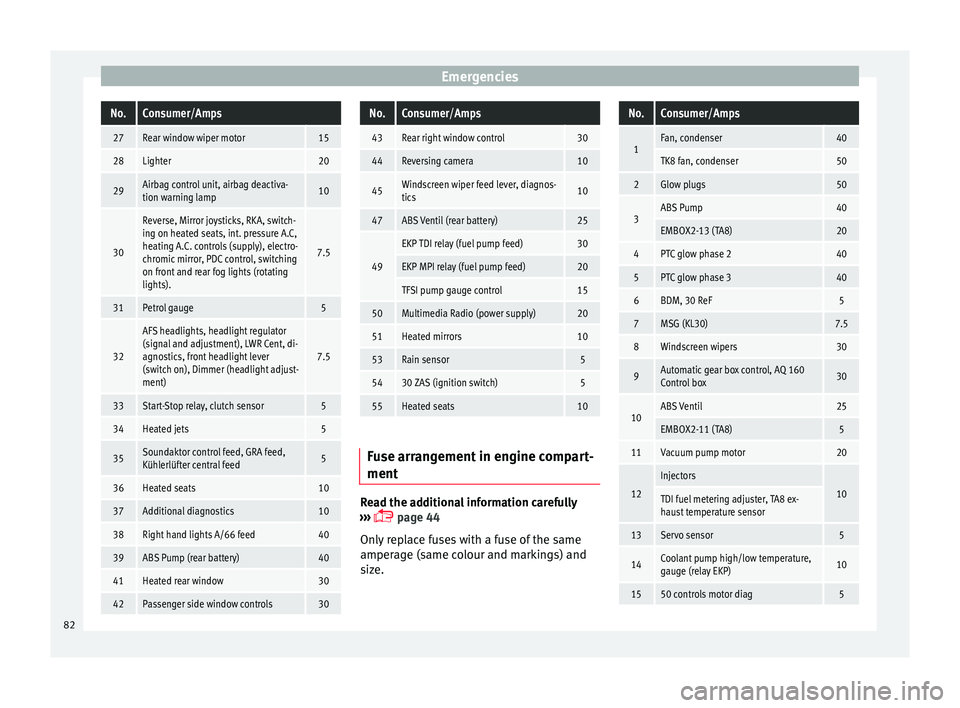
Fuse arrangement in engine compart-
ment
Read the additional information carefully
› ›
›
page 44
Only replace fuses with a fuse of the same
amperage (same colour and markings) and
size.
No.Consumer/Amps
1Fan, condenser40
TK8 fan, condenser50
2Glow plugs50
3ABS Pump40
EMBOX2-13 (TA8)20
4PTC glow phase 240
5PTC glow phase 340
6BDM, 30 ReF5
7MSG (KL30)7.5
8Windscreen wipers30
9Automatic gear box control, AQ 160
Control box30
10ABS Ventil25
EMBOX2-11 (TA8)5
11Vacuum pump motor20
12
Injectors
10TDI fuel metering adjuster, TA8 ex-
haust temperature sensor
13Servo sensor5
14Coolant pump high/low temperature,
gauge (relay EKP)10
1550 controls motor diag5 82
Page 177 of 248
Driver assistance systems
0.60 m
1.60 m
0.60 m
As
y
ou approach the obstacle, the time inter-
val between the audible warnings will be re-
duced. When you reach around 0.30 m the
warning will be constant: do not continue to
move forward (or backward)!
If you maintain separation from the obstacle,
the volume of the warning begins to reduce
after four seconds (does not affect the tone
of the constant warning).
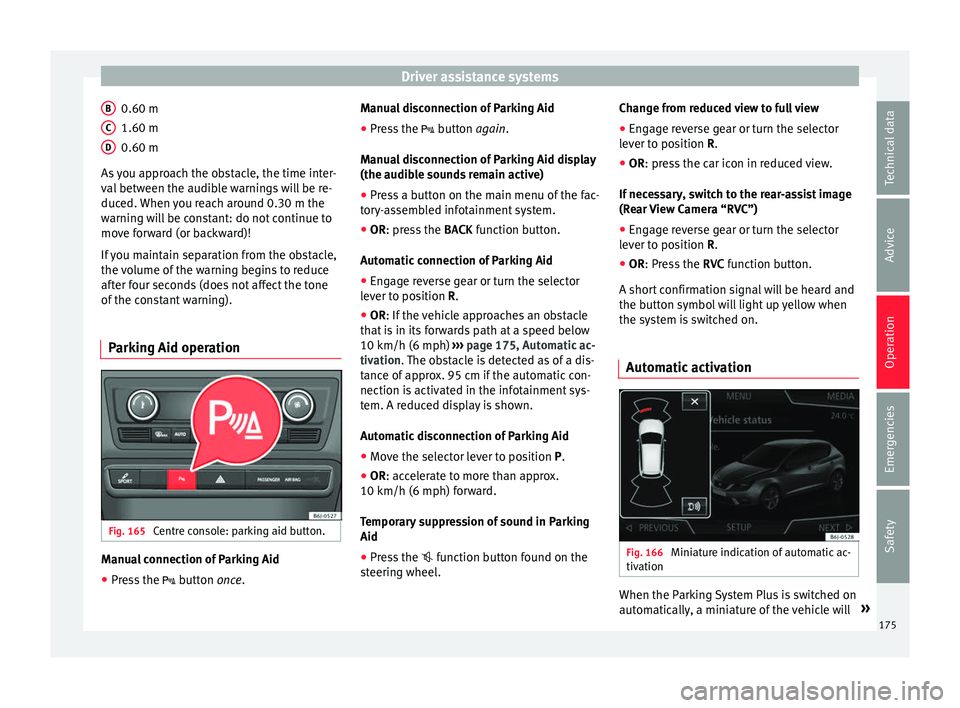
Parking Aid operation Fig. 165
Centre console: parking aid button. Manual connection of Parking Aid
● Press the butt
on
once.
B C
D Manual disconnection of Parking Aid
●
Press the butt
on
again.
Manual disconnection of Parking Aid display
(the audible sounds remain active)
● Press a button on the main menu of the fac-
tory
-assembled infotainment system.
● OR: press the BACK fu
nction button.
Automatic connection of Parking Aid ● Engage reverse gear or turn the selector
lever t
o position R.
● OR: If the vehicle approaches an obstacle
that
is in its forwards path at a speed below
10 km/h (6 mph) ››› page 175, Automatic ac-
tivation. The obstacle is detected as of a dis-
tance of approx. 95 cm if the automatic con-
nection is activated in the infotainment sys-
tem. A reduced display is shown.
Automatic disconnection of Parking Aid
● Move the selector lever to position P.
● OR: accelerate to more than approx.
10 km/h (6 mph) for
ward.
Temporary suppression of sound in Parking
Aid
● Press the function b
utton found on the
steering wheel. Change from reduced view to full view
●
Engage reverse gear or turn the selector
lever t
o position R.
● OR: press the car icon in reduced view.
If nec
essary, switch to the rear-assist image
(Rear View Camera “RVC”)
● Engage reverse gear or turn the selector
lever t
o position R.
● OR: Press the RVC fu
nction button.
A short confirmation signal will be heard and
the button symbol will light up yellow when
the system is switched on.
Automatic activation Fig. 166
Miniature indication of automatic ac-
tiv ation When the Parking System Plus is switched on
aut
om
atic
ally, a miniature of the vehicle will »
175
Technical data
Advice
Operation
Emergencies
Safety
Page 179 of 248

Driver assistance systems
Adjusting the display and audible
w arnin
g
s The settings for the display and audible
warnin
g
s are controlled via the Easy Con-
nect*.
Automatic activation
on – activates the Automatic activa-
tion option ››› page 175.
off – deactivates the Automatic ac-
tivation option ››› page 175.
Front volume*
Volume in the front and rear area.
Front sound settings/sharpness*
Frequency (tone) of the sound in the front
area.
Rear volume*
Volume in the rear area.
Rear sound settings/sharpness*
Frequency (tone) of the sound in the rear
area.
Adjust volume
With the parking aid switched on, the active
audio/video source volume will be reduced
to the intensity of the selected setting. Error messages When the Parking Aid is activated or when it
is
sw
itched on, if a message reporting a Park-
ing aid error is displayed on the instrument
panel, there is a fault in the system.
If the fault doesn't disappear before discon-
necting the ignition, next time that parking
aid is engaged in reverse, it will not be indi-
cated.
Parking System Plus*
If there is a fault in the parking aid system a
message will appear on the instrument panel
indicating the error. In addition the key
LED will blink.
If there is a fault in a sensor, the symbol is
displayed on the Easy Connect display in
front of/behind the vehicle. If a rear sensor is
faulty, only the obstacles in the areas A and
B are displayed
››
›
Fig. 164. If a front sensor
is faulty, only the obstacles in the areas C and
D are displayed.
Hav e the f
au
lt corrected by a specialised
workshop without delay.
Towing bracket In vehicles equipped with a towing bracket
dev
ic
e fr
om the factory, when the trailer is
connected electrically, the Parking Aid rear sensors will not be activated when reverse
gear i
s engaged, when the selector lever is
turned to position R or when the button is
pressed.
Parking System Plus
The distance to possible obstacles at the rear
of the vehicle will not be displayed on the
screen and nor will it be indicated by means
of audible sound signals.
The Easy Connect system screen will only dis-
play objects detected at the front, and the ve-
hicle's trajectory will be hidden.
Rear Assist “Rear View Cam-
era”*
Operatin
g and safety warnings WARNING
● The Re ar As
sist does not make it possible
to precisely calculate the distance from ob-
stacles (people, vehicles, etc.) and nor can it
overcome the system's own limits, hence us-
ing it may cause serious accidents and inju-
ries if used negligently or without due care.
The driver should be aware of his/her sur-
roundings at all times to ensure safe driving.
● The camera lens expands and distorts the
field of
vision and displays the objects on the » 177
Technical data
Advice
Operation
Emergencies
Safety
Page 180 of 248
Operation
screen in a different, vague manner. The
perc
eption of
distances is also distorted by
this effect.
● Some objects may, due to the resolution of
the disp
lay screen - not be displayed in a sat-
isfactory manner or may not be displayed at
all. Take special care with thin posts, fences,
railings or trees that might not be displayed
on screen and could damage the vehicle.
● The rear assist has blind spots where it is
not pos
sible to represent people or objects
(small children, animals and certain objects
cannot be detected in its field of vision). Mon-
itor the vehicle's surrounding area at all
times.
● Keep the camera lens clean, free of ice and
snow
, and do not cover it.
● The system is not a replacement for driver
awar
eness. Supervise the parking operation
at all times, as well as the vehicle's surround-
ing area. Adapt your speed and driving style
at all times to suit visibility, weather, road
and traffic conditions.
● Do not be distracted from the traffic by
looking at
the screen.
● The images on the rear assist screen are
only tw
o-dimensional. Due to a lack of spatial
depth, protruding parts or holes in the road,
for example, are more difficult to detect or
may not be seen at all.
● Vehicle load modifies the representation of
the orientation lines
displayed. The width
represented by the lines diminishes with ve-
hicle load. Pay special attention to the vehi-
cle's surroundings when the inside of the ve- hicle of the luggage compartment is carrying
a heavy
lo
ad.
● In the following situations, the objects or
other vehic
les shown in the navigation sys-
tem display appear to be further away or
closer than they really are: Pay special atten-
tion:
– On moving from a horizontal plane to a
slope.
– On moving from a slope to a horizontal
plane.
– If the vehicle is heavily loaded at the
rear.
– When the vehicle approaches objects
that are not on the ground surface or are
jutting out from it. These objects may al-
so be outside the camera's angle of vi-
sion when reversing. Note
● It i s
important to take great care and pay
special attention if you are not yet familiar
with the system.
● Rear assist will not be available if the vehi-
cle's
rear lid is open. Instructions for use
Fig. 168
On the rear bumper: location of the
r e
ar a
ssist camera
›› ›
table on page 2
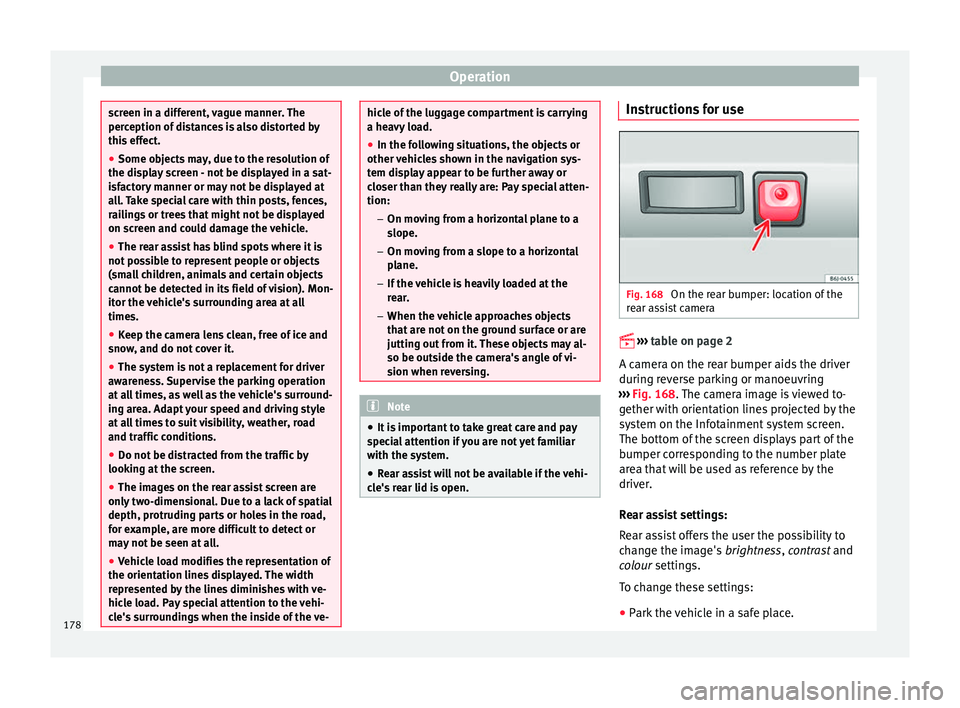
A camera on the rear bumper aids the driver
during reverse parking or manoeuvring
››› Fig. 168. The camera image is viewed to-
gether with orientation lines projected by the
system on the Infotainment system screen.
The bottom of the screen displays part of the
bumper corresponding to the number plate
area that will be used as reference by the
driver.
Rear assist settings:
Rear assist offers the user the possibility to
change the image's brightness, contrast and
colour settings.
To change these settings:
● Park the vehicle in a safe place.
178
Page 181 of 248
Driver assistance systems
● Ap p
ly
the parking brake.
● Switch the ignition on.
● If necessary, switch on the Infotainment
syst
em.
● Engage reverse gear or turn the selector
lever t
o position R.
● Press the function b
utton displayed on
the right of the image.
● Make the desired adjustments on the menu
by pr
essing the –/+ function buttons or by
moving the corresponding scroll button.
Necessary conditions for parking and ma-
noeuvring with the rear assist
The system should not be used in the follow-
ing cases:
● If the image displayed is not very reliable or
is di
storted, for example low visibility or dirty
lens.
● If the area behind the vehicle is not dis-
pla
yed very clearly or is incomplete.
● If the vehicle is heavily loaded at the rear.
● If the position and installation angle of the
camera h
ave been changed, e.g. after a rear-
end collision. Have the system checked by a
specialised workshop.
Familiarising yourself with the system
To familiarise yourself with the system, the
orientation lines and their function, SEAT rec- ommends practising parking and manoeu-
vring with the r
ear assist in a place without
too much traffic or in a car park when there
are good weather and visibility conditions.
Cleaning the camera lens
Keep the camera lens clean and clear of snow
and ice:
● Moisten the lens using a normal alcohol-
based gl
ass cleaning product and clean the
lens with a dry cloth.
● Remove snow using a small brush.
● Use de-icing spray to remove any ice. CAUTION
● Never u se abr
asive cleaning products to
clean the camera lens.
● Do not use hot or warm water to remove ice
or snow fr
om the camera lens. Doing so could
damage the camera. Parking and manoeuvring with the
r
e
ar a
ssist Fig. 169
Display on the Infotainment system
s c
r
een: orientation lines. Switching the system on and off
●
The rear assist will switch on when the igni-
tion i s
on or the en
gine running, on engaging
reverse gear (manual gearbox) or on chang-
ing the selector lever to the R position (auto-
matic gearbox).
● The system switches off 8 seconds after
diseng
aging reverse gear (manual gearbox)
or removing the selector lever from the R po-
sition (automatic gearbox). The system will
also disconnect immediately after the igni-
tion is switched off.
● The camera will stop transmitting images
above the s
peed of 15 km/h (9 mph) with re-
verse engaged. »
179
Technical data
Advice
Operation
Emergencies
Safety
Page 182 of 248
Operation
In combination with the Parking System Plus
› ›
›
page 173, the camera image will cease to
be transmitted immediately when reverse
gear is disengaged or when the selector lever
is moved from the R position, and the optical
information provided by the Parking Aid sys-
tem will be displayed.
Also in combination with the system, the rear
assist image can also be concealed:
● By pressing one of the Infotainment system
button
s on the display.
● OR: By pressing the miniature vehicle that
appe
ars on the left of the screen (which
switches to the full-screen mode of the Park-
ing System Plus's optical system).
If you wish to display the rear assist image
again:
● Disengage reverse, or change the selector
lever's
position, engage reverse again or
move the selector lever to position R.
● OR: Press the RVC fu
nction button1)
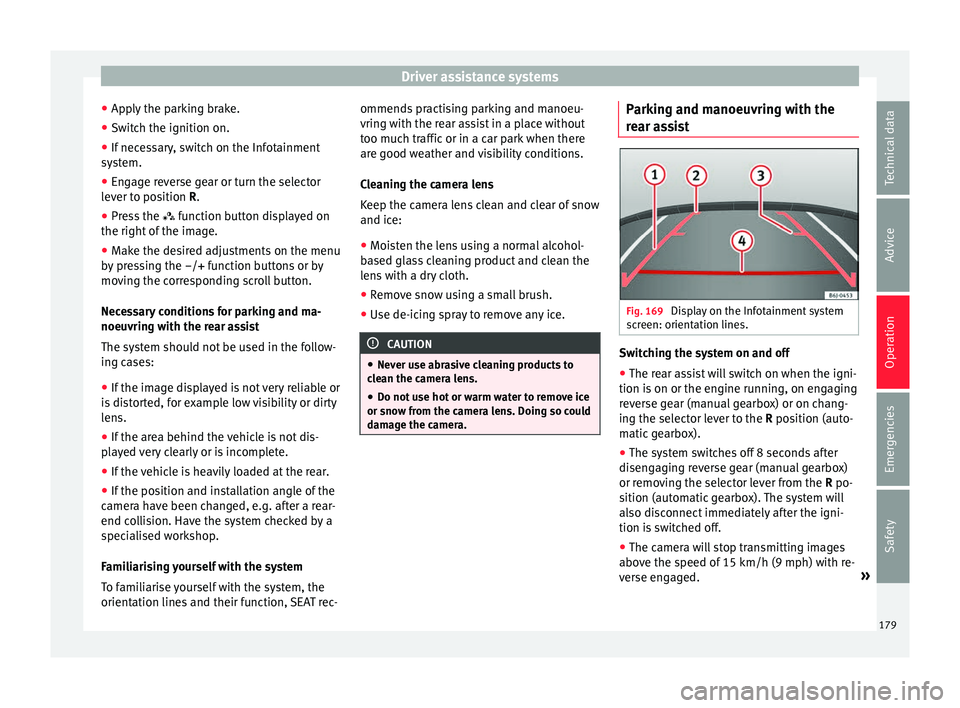
Meaning of the orientation lines
››› Fig. 169 Side lines: exten
sion of the vehicle (the
approximate width of the vehicle plus the
rear view mirrors) on the road surface.
End of the side lines: the area marked in
green ends approximately 2 m behind
the vehicle on the road surface.
Intermediate line: indicates a distance of
approximately 1 m behind the vehicle on
the road surface.
Red horizontal line: indicates a safe dis-
tance of approximately 40 cm at the rear
of the vehicle on the road surface.
Parking manoeuvre
● Place the vehicle in front of the parking
spac
e and engage reverse gear (manual
gearbox) or move the selector to the R posi-
tion (automatic gearbox).
● Reverse slowly, and turn the steering wheel
so that the s
ide orientation lines lead to-
wards the parking space.
● Guide the vehicle into the parking space so
that the s
ide orientation lines run parallel to
it. 1 2
3
4 Cruise speed* (cruise control -
GRA)
Oper ation Fig. 170
Turn signal and main beam head-
light l
ev
er: switch and rocker switch for the
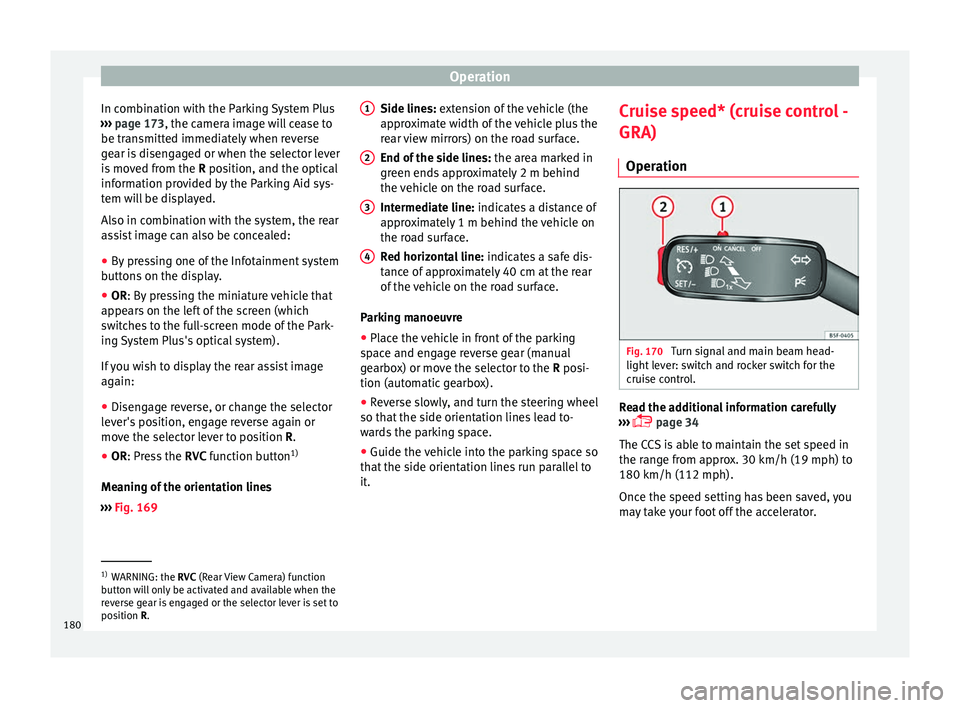
cruise control. Read the additional information carefully
› ›
›
page 34
The CCS is able to maintain the set speed in
the range from approx. 30 km/h (19 mph) to
180 km/h (112 mph).
Once the speed setting has been saved, you
may take your foot off the accelerator. 1)
WARNING: the RVC (Rear
View Camera) function
button will only be activated and available when the
reverse gear is engaged or the selector lever is set to
position R.
180
Page 193 of 248
Care and maintenance
Stickers attached by the factory Follow these directions to avoid damaging
the stic
k
ers:
● Do not use high pressure cleaners.
● To remove ice or snow from the stickers do
not use w
indow scrapers or ice scrapers.
● Do not polish the stickers.
● Do not use dirty cloths or sponges.
● Preferably wash using a soft sponge and
soft neutr
al soap.
Sensors and camera lenses ●
Use a small brush to remove snow and a
de-ic er s
pr
ay to remove ice.
● Clean the sensors with a solvent-free prod-
uct and a soft, dr
y cloth.
● Moisten the camera lens using a standard
alcohol-b
ased glass cleaning agent and
clean the lens with a dry cloth. CAUTION
● When y ou c
lean the vehicle with a pressure
washer:
–Stay a suitable distance from the sensors
on the front and rear bumpers.
– Do not clean the camera lenses or sur-
rounding area with the pressure washer. ●
Never u se w
arm or hot water to remove
snow and ice from the reverse camera lens,
as it could crack the lens.
● Never use abrasive cleaning agents on the
lens. Vehicle paint maintenance
Regular waxing protects the paintwork.
You need t
o ap
ply wax to your vehicle if water
does not form small drops and run off the
paintwork when it is clean.
Good quality hard wax products are available
at your Technical Service.
Regular wax applications help to protect the
paintwork from environmental contaminants
››› page 188. It is also effective in protecting
against minor scratches.
Even if a wax solution is used regularly in the
vehicle washing tunnel, it is advisable to pro-
tect the paint with a hard wax coating at least
twice a year.
Polishing the paintwork Polishing is only necessary if the paint has
lo
s
t
its shine, and the gloss cannot be
brought back by applying wax. Polishing
products can be purchased in your Technical
Service. The vehicle must be waxed after polishing if
the polish u
sed does not contain wax com-
pounds to seal the paint ››› page 191, Vehicle
paint maintenance . CAUTION
To prevent damage to the paintwork:
● Do not use polishes and hard wax on pain-
ted p ar
ts with a matt finish or on plastic
parts.
● Do not polish your vehicle in a sandy or
dusty
environment. Caring for plastic parts
If normal washing fails to clean plastic parts,
c
l
e
an them with approved solvent-free plas-
tic cleaning and care products. CAUTION
● The use of li
quid air freshener directly over
the air vents of the vehicle may damage the
plastic parts if the liquid is accidentally spil-
led.
● Cleaning products which contain solvents
wil
l damage the material. 191
Technical data
Advice
Operation
Emergencies
Safety
Page 241 of 248
Index
Loading the vehicle fa
s
tening rings . . . . . . . . . . . . . . . . . . . . . . . . . 134
luggage compartment . . . . . . . . . . . . . . . . . . . . . 9
roof luggage rack . . . . . . . . . . . . . . . . . . . . . . . 135
Locking and unlocking with the central lock button . . . . . . . . . . . . . . . 108
Luggage . . . . . . . . . . . . . . . . . . . . . . . . . . . . . . . . 133
Luggage compartment . . . . . . . . . . . . . . . . . . . 9, 133 luggage compartment lighting . . . . . . . . . . . . 122
store the rear shelf . . . . . . . . . . . . . . . . . . . . . . 135
unlocking manually . . . . . . . . . . . . . . . . . . . . . . 10
see also Loading the luggage compartment . 133
Luggage compartment lid . . . . . . . . . . . . . . . . . . . 10
M Main beam lever . . . . . . . . . . . . . . . . . . . . . . . . . . 119
Maintenance and cleaning . . . . . . . . . . . . . . . . . 187
maintenance intervals . . . . . . . . . . . . . . . . . . . . . 201
Malfunction catalytic converter . . . . . . . . . . . . . . . . . . . . . . 167
diesel particulate filter . . . . . . . . . . . . . . . . . . . 167
gearbox . . . . . . . . . . . . . . . . . . . . . . . . . . . . . . . 163
Manual gearbox . . . . . . . . . . . . . . . . . . . . . . . . . . 158
Mobile . . . . . . . . . . . . . . . . . . . . . . . . . . . . . . . . . . 188
Mobile phones . . . . . . . . . . . . . . . . . . . . . . . . . . . 188
Modifications . . . . . . . . . . . . . . . . . . . . . . . . . . . . 187
Multimedia . . . . . . . . . . . . . . . . . . . . . . . . . . . . . . 105
N
Noises tyres . . . . . . . . . . . . . . . . . . . . . . . . . . . . . . . . . . . 49
Number of seats . . . . . . . . . . . . . . . . . . . . . . . . . . . 61
O Octane rating (petrol) . . . . . . . . . . . . . . . . . . . . . . 196 Odometer . . . . . . . . . . . . . . . . . . . . . . . . . . . . . . . . 97
reset button . . . . . . . . . . . . . . . . . . . . . . . . . . . . 97
total . . . . . . . . . . . . . . . . . . . . . . . . . . . . . . . . . . . 94
trip recorder . . . . . . . . . . . . . . . . . . . . . . . . . . . . 94
Oil change . . . . . . . . . . . . . . . . . . . . . . . . . . . . . . . 204
Oil properties . . . . . . . . . . . . . . . . . . . . . . . . . . . . . 41
One-touch opening and closing electric windows . . . . . . . . . . . . . . . . . . . . . . . . 115
Open and close . . . . . . . . . . . . . . . . . . . . . . . . . . 106 rear lid . . . . . . . . . . . . . . . . . . . . . . . . . . . . . . . . 113
Opening . . . . . . . . . . . . . . . . . . . . . . . . . . . . . . . . 106 bonnet . . . . . . . . . . . . . . . . . . . . . . . . . . . . . . . . . 10
fuel tank flap . . . . . . . . . . . . . . . . . . . . . . . . . . . 196
tilting panoramic roof . . . . . . . . . . . . . . . . . . . . 116
windows . . . . . . . . . . . . . . . . . . . . . . . . . . . . . . 114
Opening and closing bonnet . . . . . . . . . . . . . . . . . . . . . . . . . . . . . . . . . 10
by remote control . . . . . . . . . . . . . . . . . . . . . . . 110
fuel tank flap . . . . . . . . . . . . . . . . . . . . . . . . . . . 196
in the lock cylinder . . . . . . . . . . . . . . . . . . . . . . . . 9
rear lid . . . . . . . . . . . . . . . . . . . . . . . . . . . . . . . . 113
rear lid of the luggage compartment . . . . . . . . . 9
tilting panoramic roof . . . . . . . . . . . . . . . . . . . . 116
windows . . . . . . . . . . . . . . . . . . . . . . . . . . . . . . 114
with the central lock button . . . . . . . . . . . . . . . 108
Outside temperature . . . . . . . . . . . . . . . . . . . . . . . 27
P
Parking . . . . . . . . . . . . . . . . . . . . . . . . . . . . . . . . . 151
Parking aid . . . . . . . . . . . . . . . . . . . . . . . . . . . . . . 173
Parking Aid adjusting the display and audible warnings . 177
automatic activation . . . . . . . . . . . . . . . . . . . . 175
fault . . . . . . . . . . . . . . . . . . . . . . . . . . . . . . . . . . 177
parking system plus . . . . . . . . . . . . . . . . . . . . . 174
rear parking aid . . . . . . . . . . . . . . . . . . . . . . . . 174
sensors and camera: cleaning . . . . . . . . . . . . . 191 towing bracket . . . . . . . . . . . . . . . . . . . . . . . . . 177
vis
ual indication . . . . . . . . . . . . . . . . . . . . . . . . 176
Parking aid system see Parking aid . . . . . . . . . . . . . . . . . . . . 173, 174
Parking distance warning system see Parking aid . . . . . . . . . . . . . . . . . . . . 173, 174
Parking (automatic gearbox) . . . . . . . . . . . . . . . . 162
ParkPilot see Parking aid . . . . . . . . . . . . . . . . . . . . 173, 174
Particulate filter (diesel) . . . . . . . . . . . . . . . . . . . 166
Parts . . . . . . . . . . . . . . . . . . . . . . . . . . . . . . . . . . . 187
Passenger see Correct sitting position . . . . . . . . . 57, 58, 59
Pedals . . . . . . . . . . . . . . . . . . . . . . . . . . . . . . . . . . . 61
Petrol additives . . . . . . . . . . . . . . . . . . . . . . . . . . . . . . 196
refuelling . . . . . . . . . . . . . . . . . . . . . . . . . . . . . . 196
Plastic parts: cleaning . . . . . . . . . . . . . . . . 191, 194
Pollution filter . . . . . . . . . . . . . . . . . . . . . . . . . . . . 137
Positioning seat belts during pregnancy . . . . . . . . . . . . . . . . . . . . . . . . 65
seat belts . . . . . . . . . . . . . . . . . . . . . . . . . . . . . . 65
Power-assisted steering . . . . . . . . . . . . . . . . . . . . 146
Power steering . . . . . . . . . . . . . . . . . . . . . . . . . . . 145
Pre-heating system control lamp . . . . . . . . . . . . . . . . . . . . . . . . . . . 168
Products for vehicle maintenance . . . . . . . . . . . . 188
Puncture action . . . . . . . . . . . . . . . . . . . . . . . . . . . . . . . . . 45
R Radio frequency remote control. . . . . . . . . . . . . . 110
Raising the vehicle . . . . . . . . . . . . . . . . . . . . . . . . . 48
Rear Assist . . . . . . . . . . . . . . . . . . . . . . . . . . . . . . 177 instructions for use . . . . . . . . . . . . . . . . . . . . . 178
parking . . . . . . . . . . . . . . . . . . . . . . . . . . . . . . . 179
239