buttons SEAT IBIZA 5D 2017 Owners Manual
[x] Cancel search | Manufacturer: SEAT, Model Year: 2017, Model line: IBIZA 5D, Model: SEAT IBIZA 5D 2017Pages: 248, PDF Size: 5.24 MB
Page 11 of 248
The essentials
How it works
Openin g and c
lo
sing
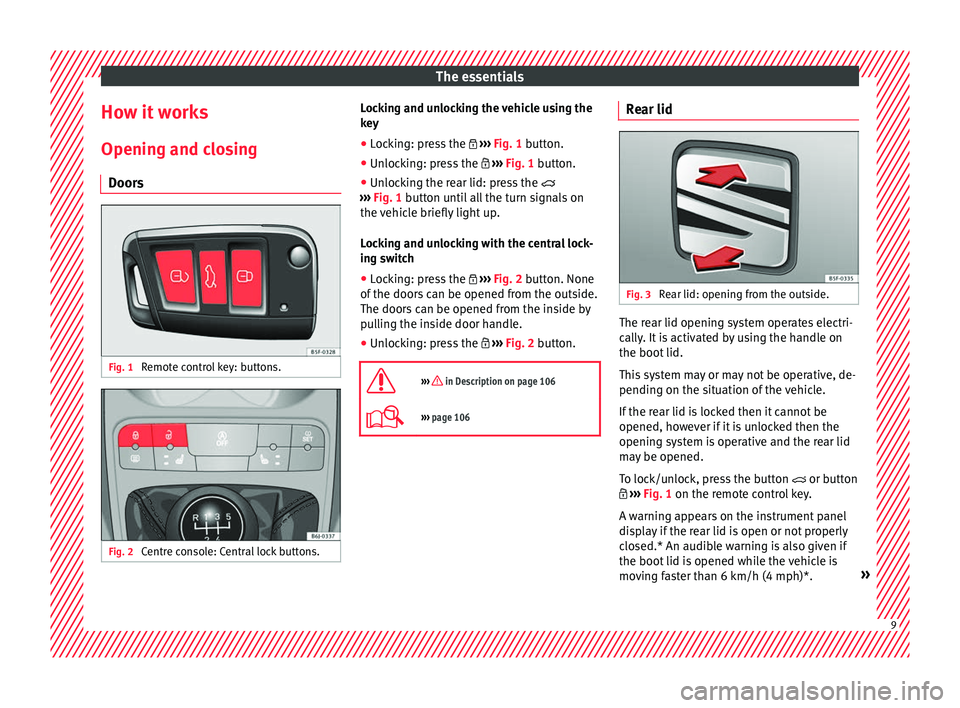
Doors Fig. 1
Remote control key: buttons. Fig. 2
Centre console: Central lock buttons. Locking and unlocking the vehicle using the
k
ey
● Loc
king: press the ›››
Fig. 1 button.
● Unlocking: press the ›››
Fig. 1 button.
● Unlocking the rear lid: press the
›››
Fig. 1 button until all the turn signals on
the vehicle briefly light up.
Locking and unlocking with the central lock-
ing switch
● Locking: press the ›››
Fig. 2 button. None
of the doors can be opened from the outside.
The doors can be opened from the inside by
pulling the inside door handle.
● Unlocking: press the ›››
Fig. 2 button.
››› in Description on page 106
››› page 106 Rear lid
Fig. 3
Rear lid: opening from the outside. The rear lid opening system operates electri-
c
al
ly
. It is activated by using the handle on
the boot lid.
This system may or may not be operative, de-
pending on the situation of the vehicle.
If the rear lid is locked then it cannot be
opened, however if it is unlocked then the
opening system is operative and the rear lid
may be opened.
To lock/unlock, press the button or button
››› Fig. 1 on the remote control key.
A warning appears on the instrument panel
display if the rear lid is open or not properly
closed.* An audible warning is also given if
the boot lid is opened while the vehicle is
moving faster than 6 km/h (4 mph)*. » 9
Page 13 of 248
The essentials
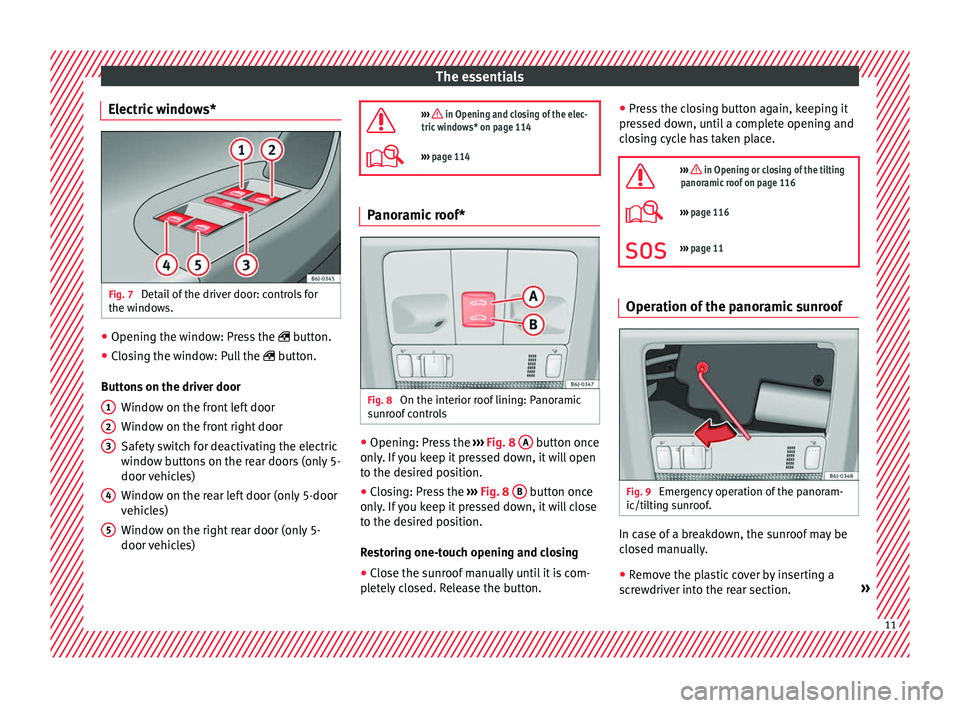
Electric windows* Fig. 7
Detail of the driver door: controls for
the w indo
w
s. ●
Opening the window: Press the butt
on.
● C
losing the window: Pull the button.
B
uttons on the driver door Window on the front left door
Window on the front right door
Safety switch for deactivating the electric
window buttons on the rear doors (only 5-
door vehicles)
Window on the rear left door (only 5-door
vehicles)
Window on the right rear door (only 5-
door vehicles)
1 2
3
4
5
››› in Opening and closing of the elec-
tric windows* on page 114
››› page 114 Panoramic roof*
Fig. 8
On the interior roof lining: Panoramic
s u
nr
oof controls ●
Opening: Press the ››
›
Fig. 8 A button once
on ly
. If
you keep it pressed down, it will open
to the desired position.
● Closing: Press the ›››
Fig. 8 B button once
on ly
. If
you keep it pressed down, it will close
to the desired position.
Restoring one-touch opening and closing
● Close the sunroof manually until it is com-
pl et
ely closed. Release the button. ●
Pre s
s the closing button again, keeping it
pressed down, until a complete opening and
closing cycle has taken place.
››› in Opening or closing of the tilting
panoramic roof on page 116
››› page 116
››› page 11 Operation of the panoramic sunroof
Fig. 9
Emergency operation of the panoram-
ic/ti lting s
unroof. In case of a breakdown, the sunroof may be
c
lo
sed m
anually.
● Remove the plastic cover by inserting a
scr
ewdriver into the rear section. » 11
Page 27 of 248
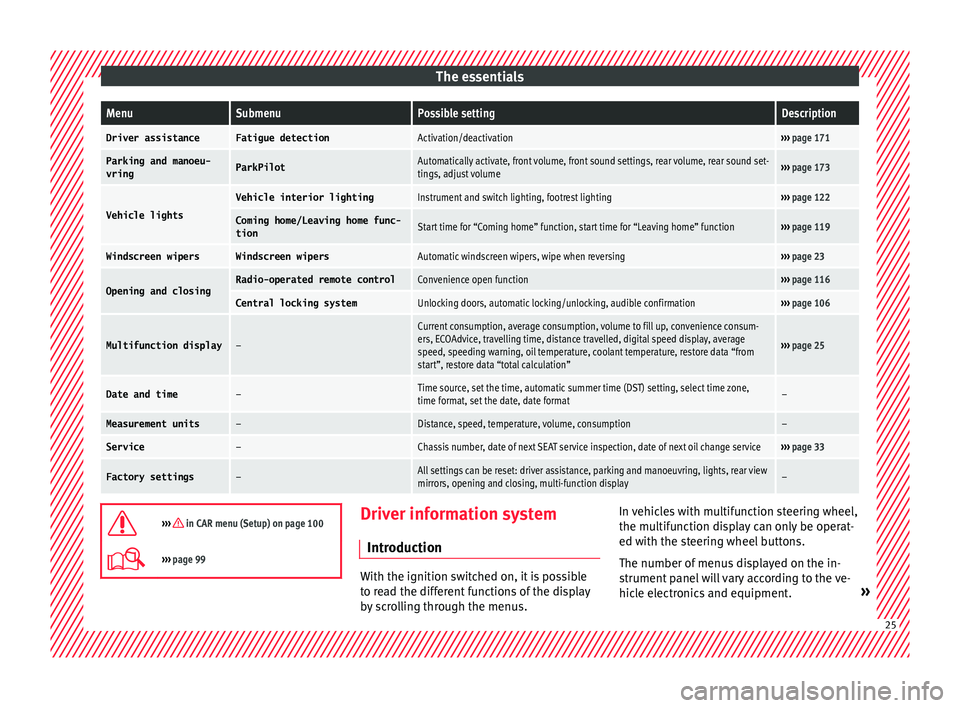
The essentialsMenuSubmenuPossible settingDescription
Driver assistanceFatigue detectionActivation/deactivation›››
page 171
Parking and manoeu-
vringParkPilotAutomatically activate, front volume, front sound settings, rear volume, rear sound set-
tings, adjust volume››› page 173
Vehicle lights
Vehicle interior lightingInstrument and switch lighting, footrest lighting››› page 122
Coming home/Leaving home func‐
tionStart time for “Coming home” function, start time for “Leaving home” function››› page 119
Windscreen wipersWindscreen wipersAutomatic windscreen wipers, wipe when reversing››› page 23
Opening and closingRadio-operated remote controlConvenience open function››› page 116
Central locking systemUnlocking doors, automatic locking/unlocking, audible confirmation››› page 106
Multifunction display–
Current consumption, average consumption, volume to fill up, convenience consum-
ers, ECOAdvice, travelling time, distance travelled, digital speed display, average
speed, speeding warning, oil temperature, coolant temperature, restore data “from
start”, restore data “total calculation”
››› page 25
Date and time–Time source, set the time, automatic summer time (DST) setting, select time zone,
time format, set the date, date format–
Measurement units–Distance, speed, temperature, volume, consumption–
Service–Chassis number, date of next SEAT service inspection, date of next oil change service››› page 33
Factory settings–All settings can be reset: driver assistance, parking and manoeuvring, lights, rear view
mirrors, opening and closing, multi-function display–
››› in CAR menu (Setup) on page 100
›››
page 99 Driver information system
Intr oduction With the ignition switched on, it is possible
to r
e
ad the different functions of the display
by scrolling through the menus. In vehicles with multifunction steering wheel,
the multif
u
nction display can only be operat-
ed with the steering wheel buttons.
The number of menus displayed on the in-
strument panel will vary according to the ve-
hicle electronics and equipment. » 25
Page 28 of 248
The essentials
A specialised workshop will be able to pro-
gr amme or modif
y
additional functions, ac-
cording to the vehicle equipment. SEAT rec-
ommends visiting a SEAT Official Service.
Some menu options can only be read when
the vehicle is at a standstill.
As long as a priority 1 warning is displayed, it
will not be possible to read the menus. Some
warning messages can be confirmed and
made to disappear with the windscreen wiper
lever button or the multifunction steering
wheel button.
The information system also provides the fol-
lowing information and displays (depending
on the vehicle's equipment):
Driving data ››› page 29
■ Vehicle status
■ MFD from departure
■ MFD from refuelling
■ MFD total calculation
Assist systems ››› table on page 27
■ Reverse (optional)
Navigation ››› Booklet Navigation system
Audio ››› Booklet Radio or ››› Booklet Naviga-
tion system
Telephone ››› Booklet Radio or ››› Book-
let Navigation system
Vehicle ››› table on page 27 WARNING
Any distraction may lead to an accident, with
the risk of
injury.
● Do not operate the instrument panel con-
trol
s when driving. Operating the instrument panel me-
nus
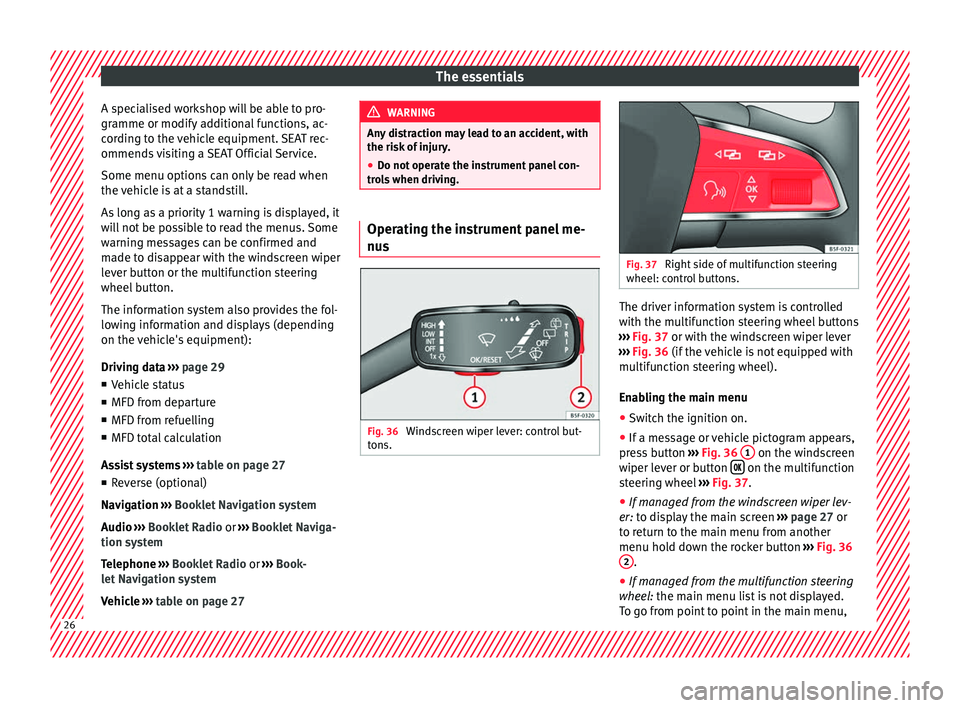
Fig. 36
Windscreen wiper lever: control but-
t on
s. Fig. 37
Right side of multifunction steering
wheel: contr o
l buttons. The driver information system is controlled
w
ith the mu
ltif
unction steering wheel buttons
››› Fig. 37 or with the windscreen wiper lever
››› Fig. 36 (if the vehicle is not equipped with
multifunction steering wheel).
Enabling the main menu
● Switch the ignition on.
● If a message or vehicle pictogram appears,
pres
s button ››› Fig. 36 1 on the windscreen
w iper l
ev
er or button on the multifunction
s t
eerin
g wheel ››› Fig. 37.
● If managed from the windscreen wiper lev-
er: to dis
play the main screen ››› page 27 or
to return to the main menu from another
menu hold down the rocker button ››› Fig. 36
2 .
● If managed from the multifunction steering
whee l:
the main menu list is not displayed.
To go from point to point in the main menu, 26
Page 33 of 248
The essentials
● To sw
it
ch system on: adjust to the desired
speed within 5 seconds using the rocker
switch on the windscreen wiper lever or
b y
t
urning the thumbwheel on the multifunc-
tion steering wheel. Next, press the button or
again or wait several seconds.
The s peed i
s
stored and the warning activa-
ted.
● To switch system off: press the but-
ton or
. The stored speed is de-
l et
ed.
En
gine oil temperature display The engine reaches its operating temperature
when in norm
al
driv
ing conditions, the oil
temperature is between 80°C (178°F) and
120°C (248°F). If the engine is required to
work hard and the outside temperature is
high, the engine oil temperature can in-
crease. This does not present any problem as
long as the warning lamps ›››
table on
page 36 or ›››
table on page 36 do not
appear on the display.
Vehicles without multifunction steering
wheel
● Press the rocker switch ›››
Fig. 36 2 until
the m ain menu ap
pe
ars. Enter into Driving
data . With the button 2 move to the oil
t emper
at
ure gauge. Vehicles with multifunction steering wheel
●
Enter the submenu Driving data and
turn the thumbwheel
until the oil tempera-
ture display appears.
Additional electrical appliances ●
Operation with the windscreen wiper lever*:
Pre s
s the rocker switch ››› Fig. 36 2 until the
main menu ap pe
ars. Enter into the section
Driving data . With the rocker switch,
move to the display Convenience con-
sumers .
● Operation with the multi-function steering
whee l*:
Move with the buttons 1 or
2 to
Driving data and enter w
ith
OK . Turn the
thumbwheel to the right until the Conven-
ience consumers display appears.
In addition, a scale will inform you of the cur-
rent sum of all the additional appliances.
Saving tips Tips on how to save fuel will be displayed in
c
ondition
s
that increase fuel consumption.
Follow them to reduce consumption. The indi-
cations appear automatically only with the ef-
ficiency programme. After a time, the tips will
disappear automatically. If you wish to hide a saving tip immediately
after it
appears, press any button on the
windscreen wiper lever*/multifunction steer-
ing wheel*. Note
● If y
ou hide a saving tip, it will reappear af-
ter you switch the ignition on again.
● The saving tips do not appear in all situa-
tions, but
rather with a large separation of
time. Timer*
You can access the timer via the selection
menu
››
›
page 27.
It allows you to manually time lap times on a
racing circuit, memorise them and compare
them to the vehicle's previous best times.
The following menus can be displayed:
● Stop
● Lap
● Pause
● Partial time
● Statistics » 31
Page 41 of 248
The essentials
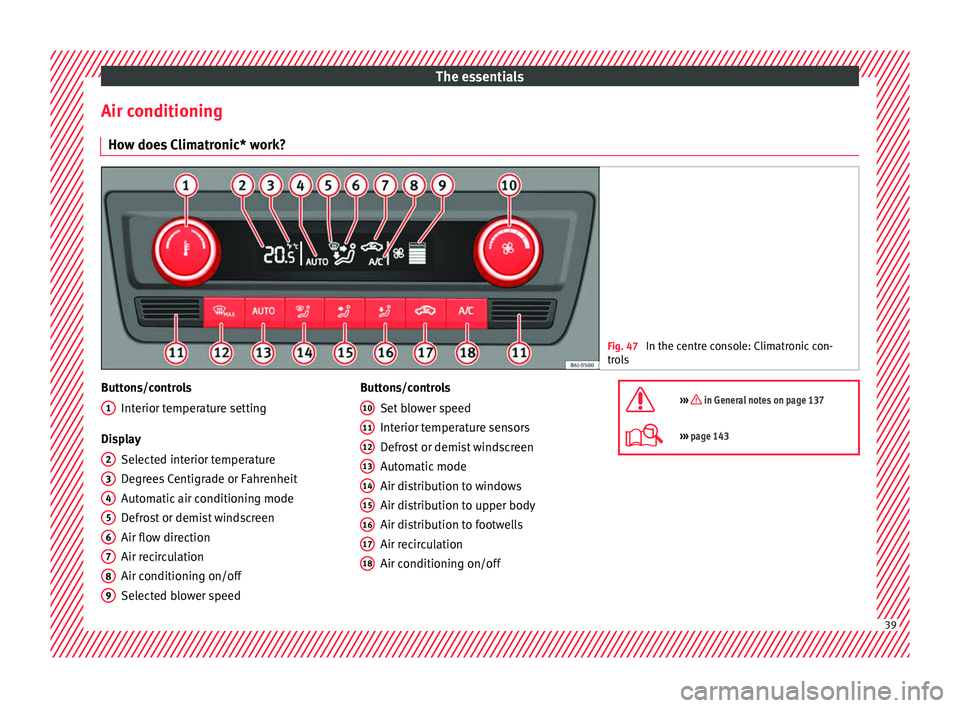
Air conditioning Ho w doe
s
Climatronic* work? Fig. 47
In the centre console: Climatronic con-
tro l
s Buttons/controls
Interior t
emper
ature setting
Display Selected interior temperature
Degrees Centigrade or Fahrenheit
Automatic air conditioning mode
Defrost or demist windscreen
Air flow direction
Air recirculation
Air conditioning on/off
Selected blower speed
1 2
3
4
5
6
7
8
9 Buttons/controls
Set b
lo
wer speed
Interior temperature sensors
Defrost or demist windscreen
Automatic mode
Air distribution to windows
Air distribution to upper body
Air distribution to footwells
Air recirculation
Air conditioning on/off
10 11
12
13
14
15
16
17
18 ››› in General notes on page 137
›››
page 143 39
Page 102 of 248
OperationFunction buttons in the
vehicle settings
menuPage
ESC system››› page 152
Tyres››› page 213
Driver assistance››› table on page 24
Parking and manoeuvring››› page 173
Vehicle lights››› table on page 24
Mirrors and windscreen wipers››› table on page 24
Opening and closing››› table on page 24
Multifunction display››› table on page 24
Date and time››› table on page 24
Units››› table on page 24
Service››› page 95
Factory settings››› table on page 24 WARNING
Any distraction may lead to an accident, with
the risk of
injury. Operating the Easy Connect
system while driving could distract you from
traffic. 100
Page 108 of 248
Operation
Opening and closing C entr
a
l locking system
Description Read the additional information carefully
›› ›
page 9.
The central locking system enables you to
lock and unlock all doors and the rear lid by
just pushing the button.
Central locking can be activated by using any
of the following options:
● the key, by inserting it into the driver door
cylinder and r ot
ating it in the opening direc-
tion. Depending on the vehicle version, ei-
ther all doors will be unlocked or only the
driver door will be unlocked. All doors will be
locked on locking the vehicle using the key.
● the interior central lock button
›››
page 108.
● the radio frequency remote control , usin
g
the buttons on the key ›››
page 110.
Various functions are available to improve
the vehicle safety: Locking system “Safe*”
Selective* unlocking system
Self-locking system to prevent involunta-
ry unlocking
–
–
– Automatic speed dependent locking and
unloc
king system*
Emergency unlocking system
Unlocking the vehicle* Press button
› ››
Fig. 122
on r
emote
control to unlock all the doors and rear
lid.
Locking the vehicle* Press button
› ››
Fig. 122
on the r
e-
mote control to lock all doors and the
rear lid or turn the key in the door to lock
all doors and the rear lid. WARNING
● Loc k
ing from the outside carelessly or with-
out good visibility may lead to bruising, par-
ticularly in the case of children.
● When locking a vehicle, never leave chil-
dren un
accompanied inside, as from the out-
side it will be difficult to provide assistance if
required.
● Having the doors locked prevents intruders
from gettin
g in, for example when stopped at
a traffic light. Note
For anti-theft security, only the driver door is
fitted w ith a loc
k cylinder. –
–
–
–
“Safe” security system** This is an anti-theft device which consists of
a doubl
e loc
k for the door locks and a deacti-
vation function for the boot in order to pre-
vent forced entry.
Activation
The “safe” system is activated when the vehi-
cle is locked using the key or the remote con-
trol.
To activate it with the key, rotate once it is in-
serted in the door lock cylinder in the locking
direction.
To activate the system using the remote con-
trol, press the lock button once on the re-
mot e.
Onc e thi
s system is activated, opening doors
from the outside and the inside is not possi-
ble. The rear lid can not be opened. The cen-
tral lock button does not work.
When the ignition is switched off, the instru-
ment panel display indicates that the “Safe”
system is on.
Deactivation
Rotate the key inserted in the lock cylinder
twice towards the locking direction.
To activate the system using the remote con-
trol, press the lock button on the remote
twice in less than five seconds.
106
Page 112 of 248
Operation
Keys Set of
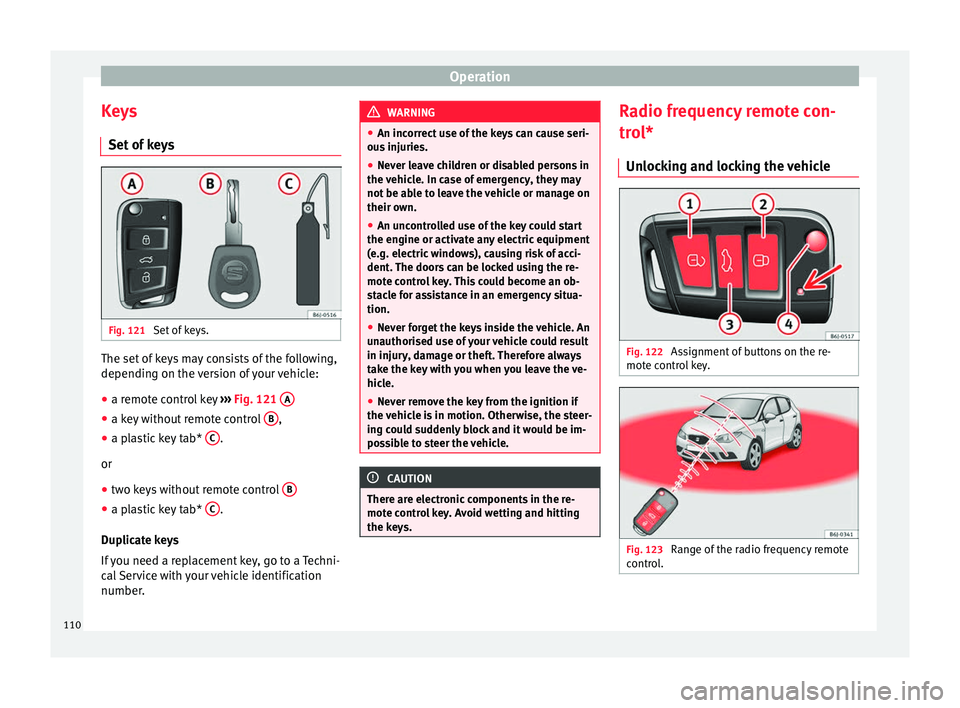
k
eys Fig. 121
Set of keys. The set of keys may consists of the following,
dependin
g on the
v
ersion of your vehicle:
● a remote control key ›››
Fig. 121 A ●
a key without remote control B ,
● a plastic key tab* C .
or
● two keys without remote control B●
a plastic key tab* C .
D up
lic
ate keys
If you need a replacement key, go to a Techni-
cal Service with your vehicle identification
number. WARNING
● An incorr ect
use of the keys can cause seri-
ous injuries.
● Never leave children or disabled persons in
the vehic
le. In case of emergency, they may
not be able to leave the vehicle or manage on
their own.
● An uncontrolled use of the key could start
the engine or activat
e any electric equipment
(e.g. electric windows), causing risk of acci-
dent. The doors can be locked using the re-
mote control key. This could become an ob-
stacle for assistance in an emergency situa-
tion.
● Never forget the keys inside the vehicle. An
unauthori
sed use of your vehicle could result
in injury, damage or theft. Therefore always
take the key with you when you leave the ve-
hicle.
● Never remove the key from the ignition if
the vehic
le is in motion. Otherwise, the steer-
ing could suddenly block and it would be im-
possible to steer the vehicle. CAUTION
There are electronic components in the re-
mote c ontr
ol key. Avoid wetting and hitting
the keys. Radio frequency remote con-
tr
o
l*
Un
locking and locking the vehicle Fig. 122
Assignment of buttons on the re-
mot e c
ontr
ol key. Fig. 123
Range of the radio frequency remote
c ontr
o
l. 110
Page 116 of 248
Operation
WARNING
● Alw a
ys close the rear lid properly. Risk of
accident or injury.
● The rear lid must not be opened when the
rever
se or rear fog lights are lit. This may
damage the tail lights.
● Do not close the rear lid by pushing it down
with y
our hand on the rear window. The glass
could smash. Risk of injury!
● Ensure the rear lid is locked after closing it.
If not, it m
ay open unexpectedly while driv-
ing.
● Never allow children to play in or around
the vehic
le. A locked vehicle can be subjected
to extremely high and low temperatures, de-
pending on the time of year, thus causing se-
rious injuries/illness. It could even have fatal
consequences. Close and lock both the rear
lid and all the other doors when you are not
using the vehicle.
● Closing the rear lid without observing and
ensurin
g it is clear could cause serious injury
to you and to third parties. Make sure that no
one is in the path of the rear lid.
● Never drive with the rear lid open or half-
closed, e
xhaust gases may enter into the in-
terior of the vehicle. Danger of poisoning!
● If you only open the rear lid, do not leave
the key in
side. The vehicle cannot be opened
if the key is left inside. Electric windows
Openin g and c
lo
sing of the electric
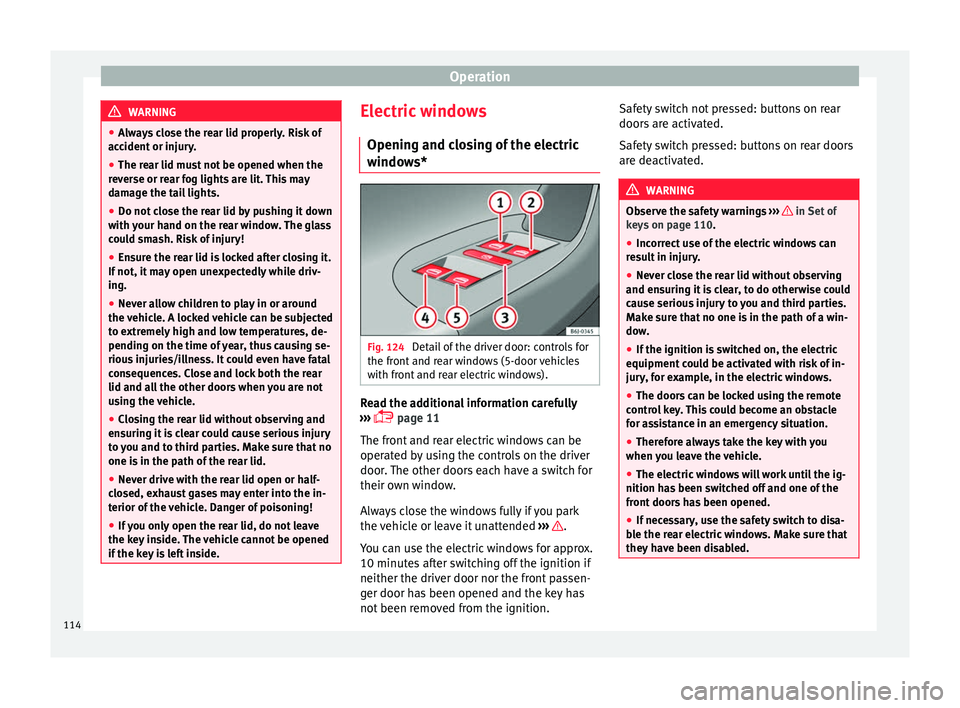
windows* Fig. 124
Detail of the driver door: controls for
the fr ont
and r
ear windows (5-door vehicles
with front and rear electric windows). Read the additional information carefully
› ›
›
page 11
The front and rear electric windows can be
operated by using the controls on the driver
door. The other doors each have a switch for
their own window.
Always close the windows fully if you park
the vehicle or leave it unattended ››› .
Y ou c
an u
se the electric windows for approx.
10 minutes after switching off the ignition if
neither the driver door nor the front passen-
ger door has been opened and the key has
not been removed from the ignition. Safety switch not pressed: buttons on rear
doors ar
e activated.
Safety switch pressed: buttons on rear doors
are deactivated. WARNING
Observe the safety warnings ›››
in Set of
key s on p
age 110.
● Incorrect use of the electric windows can
res
ult in injury.
● Never close the rear lid without observing
and ensurin
g it is clear, to do otherwise could
cause serious injury to you and third parties.
Make sure that no one is in the path of a win-
dow.
● If the ignition is switched on, the electric
equipment cou
ld be activated with risk of in-
jury, for example, in the electric windows.
● The doors can be locked using the remote
contro
l key. This could become an obstacle
for assistance in an emergency situation.
● Therefore always take the key with you
when you l
eave the vehicle.
● The electric windows will work until the ig-
nition has
been switched off and one of the
front doors has been opened.
● If necessary, use the safety switch to disa-
ble the r
ear electric windows. Make sure that
they have been disabled. 114