set clock Seat Ibiza SC 2010 Owner's manual
[x] Cancel search | Manufacturer: SEAT, Model Year: 2010, Model line: Ibiza SC, Model: Seat Ibiza SC 2010Pages: 266, PDF Size: 7.02 MB
Page 54 of 266

Cockpit
52Rev counter
The rev counter displays the engine speed in revolutions per
minute.The start of the red zone ⇒ page 51, fig. 30 indicates the maximum
engine speed operating at service temperature. However, it is advisable to
cha nge u p to a h igh er gear, m ove th e s el e cto r le ve r to D o r li f t your fo ot o f f th e
accelerator before the needle reaches the red zone.
Caution
The rev counter needle must never enter the red zone on the scale. Risk of
engine damage.
For the sake of the environment
Changing up into higher gears early will help you to reduce fuel consumption,
emissions and minimise engine noise.SpeedometerThe speedometer is equipped with a digital odometer and a trip recorder, in
addition to a service intervals display.
During the running-in period, the instructions shown on ⇒page 158 should
be followed.
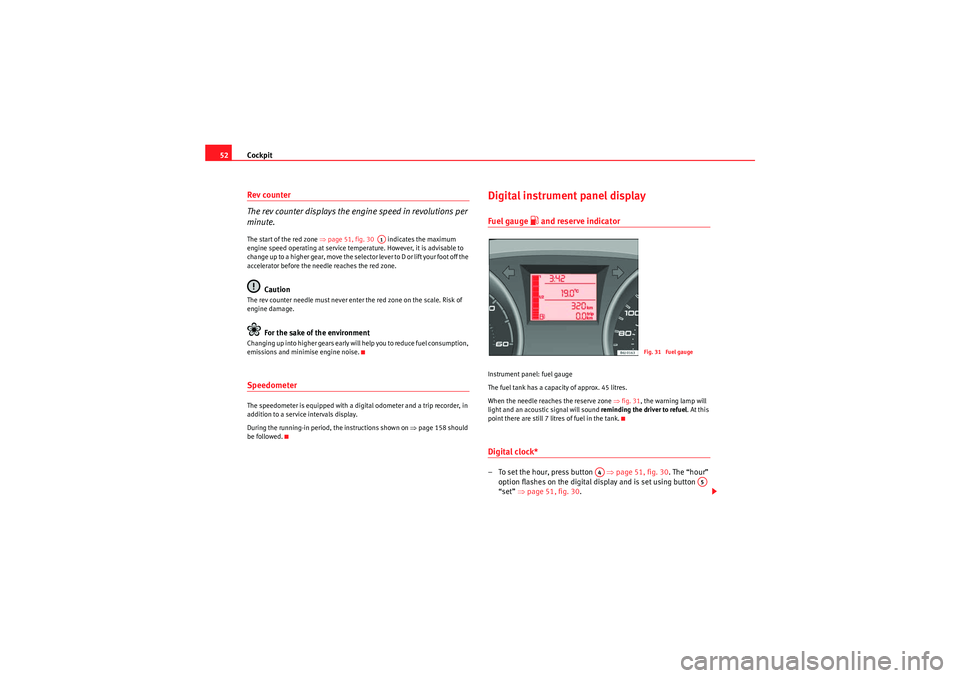
Digital instrument panel displayFuel gauge
�z and reserve indicator
Instrument panel: fuel gauge
The fuel tank has a capacity of approx. 45 litres.
When the needle reaches the reserve zone ⇒fig. 31 , the warning lamp will
light and an acoustic signal will sound reminding the driver to refuel. At this
point there are still 7 litres of fuel in the tank.Digital clock* – To set the hour, press button ⇒ page 51, fig. 30. The “hour”
option flashes on the digital display and is set using button
“set” ⇒page 51, fig. 30 .
A1
Fig. 31 Fuel gauge
A4
A5
IbizaSC_EN.book Seite 52 Donnerstag, 2. September 2010 6:10 18
Page 59 of 266

Cockpit57
Safety First
Operating Instructions
Practical Tips
Technical Specifications
Vehicles with
service intervals dependent on time/distance travelled already
have certain service intervals set.
The intervals are calculated separately in vehicles with LongLife service Te ch-
nical progress has made it possible to considerably reduce servicing require-
ments. With the LongLife System, SEAT ensures that your vehicle only has an
interval service when it is necessary. To calculate this (max. two years), the
conditions under which the vehicle is used and the individual driving style
are also taken into account. The service pre-warning will appear at 20 days or
less prior to the corresponding service. The distance travelled is rounded off
to the nearest 100 km and the time to full days. The current service message
can only be consulted 500 km or more after the last service. Until that time,
only dashes are displayed.
Service warning
A service warning will appear when the ignition is switched on if a service is
due soon.
The instrument panel display will show the “spanner symbol”
and the
“km” indication, along with a clock symbol with the days remaining until the
date of the next service. The figure indicated is the maximum number of kilo-
metres remaining before the date of the next service. The indication changes
after a few seconds. A “clock symbol” appears and the number of days until
the service appointment should be carried out.
Service
If a service is due, a gong signal will sound and the flashing “spanner”
symbol will be shown along with the fixed text SERVICE.
If no service is carried out following the indication on the instrument panel,
the excess distance travelled and the excess time following the SERVICE
warning will be displayed.
Reading the service message
The current service message can be consulted with the ignition on, the
engine switched off and the vehicle at a standstill:
•Press the button on the instrument panel as often as necessary until
the spanner symbol
is displayed.
An overdue service is indicated by a minus sign in front of the mileage or day
information.
Resetting service interval display
If the service was not performed by a SEAT dealer, the display must be reset
as follows:
•Switch the ignition off.•Press and hold the button.•Switch ignition back on.•Release the button and press the button within 20 seconds.
Do not reset the display between service intervals, as the display will other-
wise be incorrect.
If the display is reset manually, the next service interval will be indicated after
15,000 km or one year and will not be calculated individually.Note
In LongLife Service vehicles, if the battery is disconnected for a long period,
the days remaining until the next service cannot be calculated. Therefore, the
service message indications may be incorrect. In this case, bear in mind the
maximum service intervals permitted in the ⇒Booklet “Service Schedule”.
0.0 / SET
0.0 / SET
IbizaSC_EN.book Seite 57 Donnerstag, 2. September 2010 6:10 18
Page 123 of 266

Air conditioning121
Safety First
Operating Instructions
Practical Tips
Technical Specifications
•In air recirculation mode, no cold air from the outside enters the vehicle
interior. The windows can quickly fog over if the heating is switched off.
Therefore, never leave the air recirculation mode switched on for a long
time (risk of accident).Note
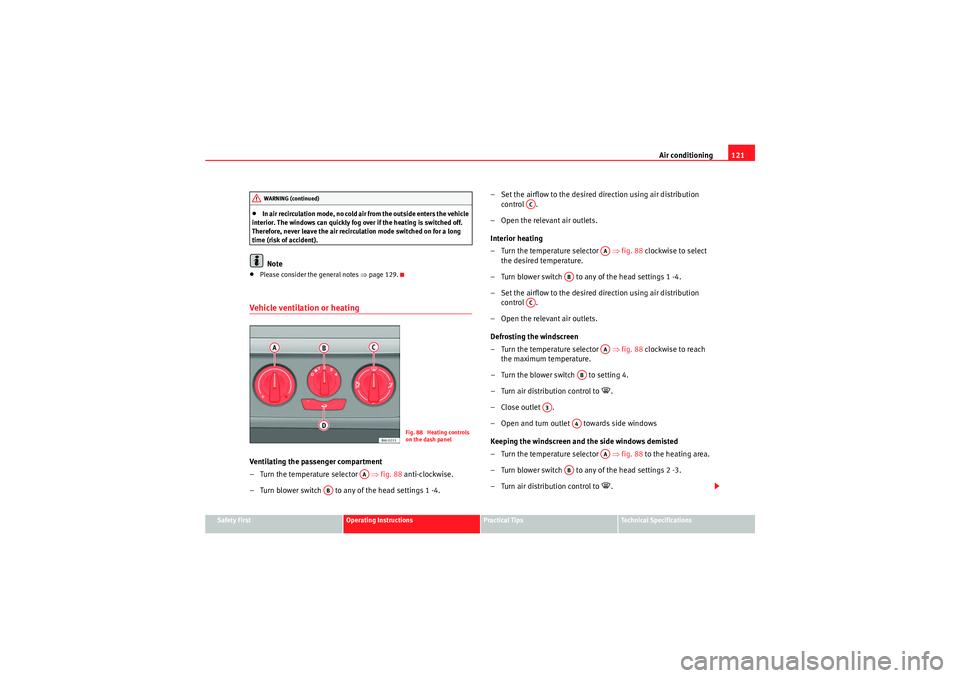
•Please consider the general notes ⇒ page 129.Vehicle ventilation or heatingVentilating the passenger compartment
– Turn the temperature selector ⇒fig. 88 anti-clockwise.
– Turn blower switch to any of the head settings 1 -4. – Set the airflow to the desired
direction using air distribution
control .
– Open the relevant air outlets.
Interior heating
– Turn the temperature selector ⇒fig. 88 clockwise to select
the desired temperature.
– Turn blower switch to any of the head settings 1 -4.
– Set the airflow to the desired direction using air distribution
control .
– Open the relevant air outlets.
Defrosting the windscreen
– Turn the temperature selector ⇒fig. 88 clockwise to reach
the maximum temperature.
– Turn the blower switch to setting 4.
– Turn air distribution control to
�<.
–Close outlet .
– Open and turn outlet towards side windows
Keeping the windscreen and the side windows demisted
– Turn the temperature selector ⇒fig. 88 to the heating area.
– Turn blower switch to any of the head settings 2 -3.
– Turn air distribution control to �<.
WARNING (continued)
Fig. 88 Heating controls
on the dash panel
AA
AB
AC
AA
AB
AC
AA
AB
A3
A4
AA
AB
IbizaSC_EN.book Seite 121 Donnerstag, 2. September 2010 6:10 18
Page 132 of 266

Driving
130DrivingSteeringAdjusting the steering wheel position
The height and reach of the steering wheel can be freely
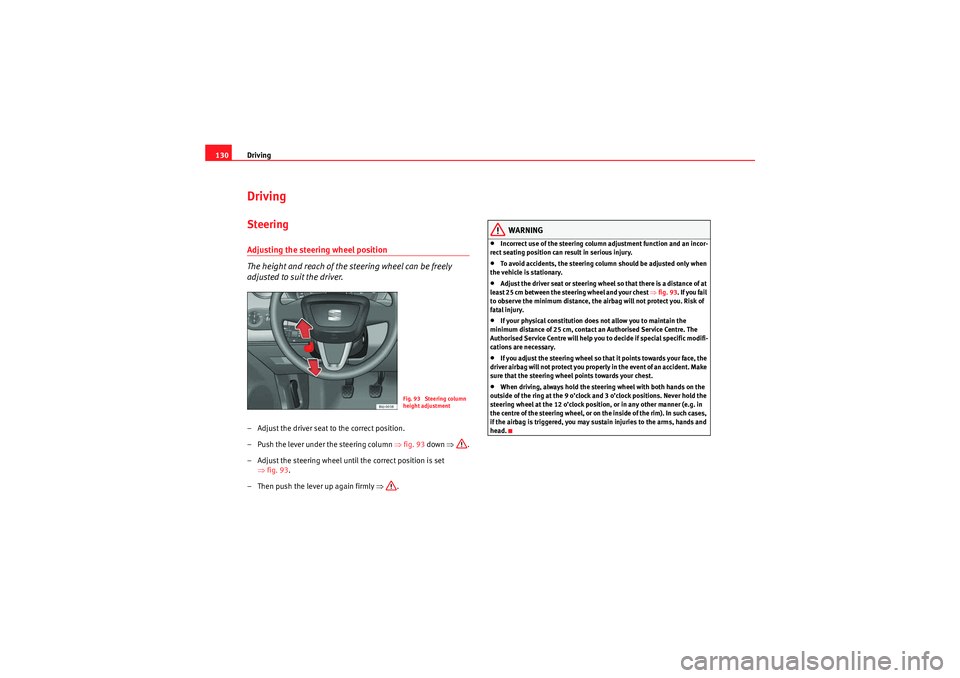
adjusted to suit the driver.– Adjust the driver seat to the correct position.
– Push the lever under the steering column ⇒fig. 93 down ⇒.
– Adjust the steering wheel until the correct position is set ⇒fig. 93 .
– Then push the lever up again firmly ⇒.
WARNING
•Incorrect use of the steering column adjustment function and an incor-
rect seating position can result in serious injury.•To avoid accidents, the steering column should be adjusted only when
the vehicle is stationary.•Adjust the driver seat or steering wheel so that there is a distance of at
least 25 cm between the steering wheel and your chest ⇒fig. 93 . If you fail
to observe the minimum distance, the airbag will not protect you. Risk of
fatal injury.•If your physical constitution does not allow you to maintain the
minimum distance of 25 cm, contact an Authorised Service Centre. The
Authorised Service Centre will help you to decide if special specific modifi-
cations are necessary.•If you adjust the steering wheel so that it points towards your face, the
driver airbag will not protect you properly in the event of an accident. Make
sure that the steering wheel points towards your chest.•When driving, always hold the steering wheel with both hands on the
outside of the ring at the 9 o’clock and 3 o’clock positions. Never hold the
steering wheel at the 12 o’clock position, or in any other manner (e.g. in
the centre of the steering wheel, or on the inside of the rim). In such cases,
if the airbag is triggered, you may sustain injuries to the arms, hands and
head.
Fig. 93 Steering column
height adjustment
IbizaSC_EN.book Seite 130 Donnerstag, 2. September 2010 6:10 18