Seat Ibiza SC 2011 Owner's manual
Manufacturer: SEAT, Model Year: 2011, Model line: Ibiza SC, Model: Seat Ibiza SC 2011Pages: 278, PDF Size: 3.92 MB
Page 151 of 278
149
Driving
Changing gear in tiptronic mode*
The tiptronic system allows the driver to select gears man-
ually
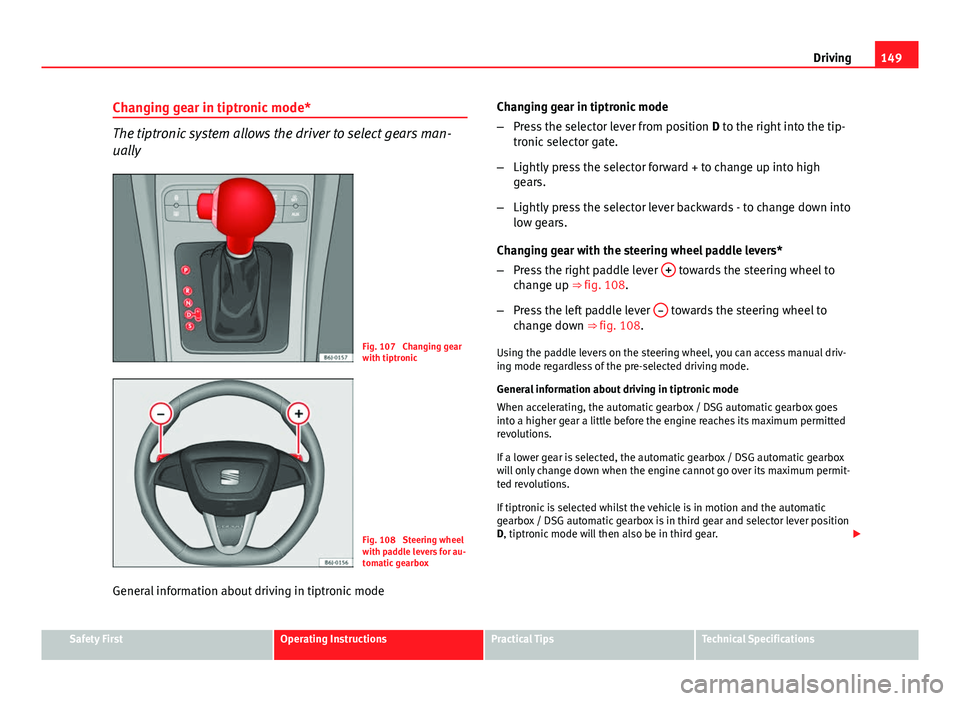
Fig. 107 Changing gear
with tiptronic
Fig. 108 Steering wheel
with paddle levers for au-
tomatic gearbox
General information about driving in tiptronic mode Changing gear in tiptronic mode
–
Press the selector lever from position D to the right into the tip-
tronic selector gate.
– Lightly press the selector forward + to change up into high
gears.
– Lightly press the selector lever backwards - to change down into
low gears.
Changing gear with the steering wheel paddle levers*
– Press the right paddle lever +
towards the steering wheel to
change up ⇒ fig. 108.
– Press the left paddle lever –
towards the steering wheel to
change down ⇒ fig. 108.
Using the paddle levers on the steering wheel, you can access manual driv-
ing mode regardless of the pre-selected driving mode.
General information about driving in tiptronic mode
When accelerating, the automatic gearbox / DSG automatic gearbox goes
into a higher gear a little before the engine reaches its maximum permitted
revolutions.
If a lower gear is selected, the automatic gearbox / DSG automatic gearbox
will only change down when the engine cannot go over its maximum permit-
ted revolutions.
If tiptronic is selected whilst the vehicle is in motion and the automatic
gearbox / DSG automatic gearbox is in third gear and selector lever position
D, tiptronic mode will then also be in third gear.
Safety FirstOperating InstructionsPractical TipsTechnical Specifications
Page 152 of 278
150Driving
Changing gears in the normal or sport programme using the steering wheel
paddle levers
If the paddle levers ⇒ fig. 108 are used in the normal or sport programme,
the system switches temporarily to tiptronic mode. To exit “tiptronic” mode
again, press the right paddle lever +
towards the steering wheel for approx-
imately one second. You will also leave tiptronic mode if the paddle levers
are not moved for a certain time.
Note
● The gear paddle levers on the steering wheel can be operated with the
selector lever in any position and with the vehicle in motion.
Selector lever positions
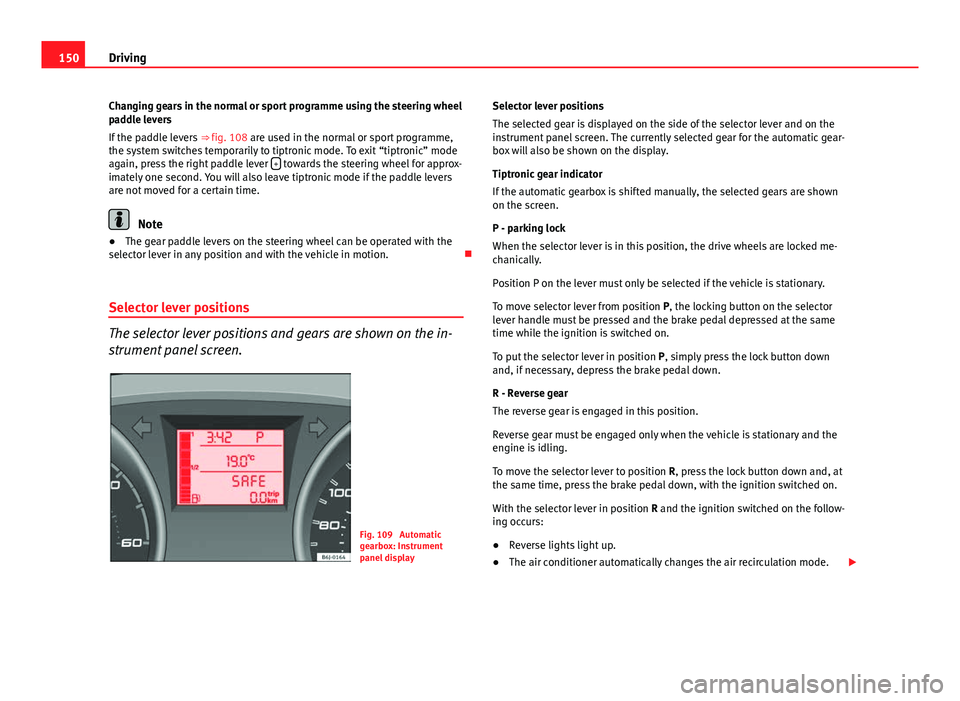
The selector lever positions and gears are shown on the in-
strument panel screen.
Fig. 109 Automatic
gearbox: Instrument
panel display Selector lever positions
The selected gear is displayed on the side of the selector lever and on the
instrument panel screen. The currently selected gear for the automatic gear-
box will also be shown on the display.
Tiptronic gear indicator
If the automatic gearbox is shifted manually, the selected gears are shown
on the screen.
P - parking lock
When the selector lever is in this position, the drive wheels are locked me-
chanically.
Position P on the lever must only be selected if the vehicle is stationary.
To move selector lever from position P, the locking button on the selector
lever handle must be pressed and the brake pedal depressed at the same
time while the ignition is switched on.
To put the selector lever in position
P, simply press the lock button down
and, if necessary, depress the brake pedal down.
R - Reverse gear
The reverse gear is engaged in this position.
Reverse gear must be engaged only when the vehicle is stationary and the
engine is idling.
To move the selector lever to position R, press the lock button down and, at
the same time, press the brake pedal down, with the ignition switched on.
With the selector lever in position R and the ignition switched on the follow-
ing occurs:
● Reverse lights light up.
● The air conditioner automatically changes the air recirculation mode.
Page 153 of 278
151
Driving
● The wiper starts if the windscreen washer is on.
● The parking distance warning system switches on.*
N - Neutral (idling)
If this position is selected, the gearbox is in neutral. Power is not transmit-
ted to the wheels and the engine does not have a braking function.
Never use the N position to drive down a hill. The engine does not function
as a brake and the brakes are subjected to excessive stain.
You could damage the automatic gearbox if you drive down hills with the
gear lever in position N and the engine switched off.
D - Drive (forward)
In this position the gearbox automatically changes to a lower or higher gear,
according to the engine's requirements, the driving style and speed. The
braking effect of the engine when driving downhill is very limited when the
selector is in this position. The instrument panel displays the selected gear
as well as the selector lever in position D.
If position N has been selected and you wish to select D, you must press the
foot brake if the vehicle is stationary, or travelling at under 5 km/h.
S - Standard driving position (Sport programme)
When the selector lever is in position S, it will automatically change up into
a higher gear later, and change down into a low gear, if compared with posi-
tion D. This way, it is possible to take full advantage of the engine reserve
power, depending on the engine demand, driving style and speed. The
braking effect of the engine when driving downhill is very limited. On the
instrument panel display the selected gear is shown as well as the selector
lever to position S.
To select gear range S, press the lock button on the selector lever.
WARNING
If the vehicle moves with no control, an accident and serious injury may
occur.
● As a driver, you should never leave your vehicle if the engine is run-
ning and a gear is engaged. If you have to leave your vehicle while the
engine is running, you must always apply the handbrake and engage
parking lock P.
● If the engine is running and if D or R are engaged, you will need to
hold the vehicle stopped by depressing footbrake down. The car would
creep forward as the power transmission is not fully interrupted even
when the engine is idling.
● Never accelerate when moving the selector gear or you may cause an
accident.
● Never move the selector lever to “R” or “P” when driving. Risk of acci-
dent.
● Before driving down a very steep slope, reduce your speed and shift
to first gear.
● Always hold the vehicle on the foot brake if you stop on hills. Other-
wise, the vehicle could roll back.
● Never allow the brake to rub and do not use the brake pedal too often
or for long periods. Constant braking will cause the brakes to overheat
and will considerably reduce the brake effect. This increases the braking
distance and could cause the brake system to fail.
WARNING
Never switch the engine off until the vehicle is stationary. You could lose
control of your vehicle. This could cause an accident and serious injury.
● The airbags and belt tensioners do not work when the ignition is
switched off.
Safety FirstOperating InstructionsPractical TipsTechnical Specifications
Page 154 of 278
152Driving
WARNING (Continued)
● The brake servo does not work with the engine off. You need more
force to stop the vehicle.
● Power steering does not work when the engine is not running. That is
why it is much more difficult to turn the steering wheel.
● Never remove the key from the ignition if the vehicle is in motion. The
steering lock could suddenly engage, and you would not be able to steer
the vehicle.
● Never allow the car to roll downhill with the selector lever in “N”, re-
gardless of the engine is running or not.
CAUTION
If you allow the vehicle to move when the engine is switched off or with the
selector lever in position “N”, take your foot off the accelerator and wait un-
til the engine starts idling before returning to position “D”.
Kickdown feature
This feature allows maximum acceleration. If you press the accelerator down thoroughly, the gearbox automatically
changes down, depending on speed and engine speed, into a lower gear to
take full advantage of give the vehicle maximum acceleration.
The gearbox does not change gear until the engine reaches the maximum
determined engine speed for the gear.
WARNING
You could lose control of the vehicle if you accelerate on slippery road
surfaces. Risk of serious injury.
● Be particularly careful when using the kickdown features on slippery
road surfaces. With a fast acceleration, the vehicle could lose traction
and skid.
● You should use the kickdown feature only when traffic and weather
conditions allow it to be used safely.
Handbrake Using the handbrake
The handbrake should be applied firmly to prevent the vehi-
cle from accidentally rolling away.
Fig. 110 Handbrake be-
tween the front seats
Page 155 of 278
153
Driving
Always apply the handbrake when you leave your vehicle and when
you park.
Applying the handbrake
– Pull the handbrake lever up firmly ⇒ fig. 110.
Releasing the handbrake
– Pull the lever up slightly and press the release knob in the di-
rection of the arrow ⇒ fig. 110 and guide the handbrake lever
down fully ⇒
.
Always apply the handbrake as far as it will go in order to prevent you from
driving with the handbrake applied by mistake ⇒
.
The handbrake warning lamp lights up when the handbrake is applied
and the ignition switched on. The warning turns off when the handbrake is
released.
WARNING
● Never use the handbrake to stop the vehicle when it is in motion. The
braking distance is considerably longer, because braking is only applied
to the rear wheels. Risk of accident!
● If it is only partially released, this will cause rear brakes overheating,
which can impair the function of the brake system and could lead to an
accident. This also causes premature wear on the rear brake pads.
CAUTION
Always apply the handbrake before you leave the vehicle. The first gear
should also be selected. Parking
The handbrake should always be firmly applied when the
vehicle is parked.
Always note the following points when parking the vehicle:
–
Use the brake pedal to stop the vehicle.
– Apply the handbrake.
– Select first gear.
– Switch the engine off and remove the key from the ignition. Turn
the steering wheel slightly to engage the steering lock.
– Always take you car keys with you when you leave the vehicle
⇒
.
Additional notes on parking the vehicle on gradients:
Turn the steering wheel so that the vehicle rolls against the kerb if it started
to roll.
● If the vehicle is parked facing downhill, turn the front wheels so that
they point towards the kerb .
● If the vehicle is parked facing uphill, turn the front wheels so that they
point away from the kerb .
● Secure the vehicle as normal by applying the handbrake firmly and se-
lecting first gear.
Safety FirstOperating InstructionsPractical TipsTechnical Specifications
Page 156 of 278
154Driving
WARNING
● Take measures to reduce the risk of injury when you leave your vehi-
cle unattended.
● Never park where the hot exhaust system could ignite inflammable
materials, such as dry grass, low bushes, spilt fuel etc.
● Never allow vehicle occupants to remain in the vehicle when it is
locked. They would be unable to open the vehicle from the inside, and
could become trapped in the vehicle in an emergency. In the event of an
emergency, locked doors will delay assistance to occupants.
● Never leave children alone in the vehicle. They could set the vehicle
in motion, for example, by releasing the handbrake or the gear lever.
● Depending on weather conditions, it may become extremely hot or
cold inside the vehicle. This can be fatal.
Hill-start assist*
This function is only included in vehicles with ESP. This device helps when starting uphill.
These are the basic operation conditions: doors closed, brake pedal press-
ed down and vehicle in neutral. The system gets activated on engaging
gear.
After removing your foot from the brake pedal, the braking force is main-
tained for a few seconds to prevent the vehicle from moving backward when
putting into gear. This short space of time is enough to start the vehicle
with ease.
This system also works when reversing uphill.
WARNING
● If you do not start the vehicle immediately after taking your foot off
the brake pedal, the vehicle may start to roll back under certain condi-
tions. Depress the brake pedal or use the hand brake immediately.
● If the engine stalls, depress the brake pedal or use the hand brake
immediately.
● When following a line of traffic uphill, if you want to prevent the vehi-
cle from rolling back accidentally when starting off, hold the brake pedal
down for a few seconds before starting off.
Note
The Official Service or a specialist workshop can tell you if your vehicle is
equipped with this system.
Acoustic parking aid system* Rear parking aid
The parking aid system will use an acoustic signal to warn of
the approach of any object towards the rear of the vehicle.
Description
The acoustic parking aid system will measure the distance between the rear
of the vehicle and any possible obstacle using four ultrasonic sensors loca-
ted on the rear bumper. The measuring range of the sensors starts approxi-
mately and depending on the nature of the obstacle at a distance of:
● side of the rear bumper: 0.6 m
● middle of the rear bumper: 1.6 m
Page 157 of 278
155
Driving
Activation
The system is activated by engagement of the reverse gear. A brief acoustic
signal confirms the activation and correct function of the system.
Reverse gear
The distance warning will begin as soon as an obstacle is detected by the
system. The frequency of the bleeps emitted by the system will increase rap-
idly as the vehicle approaches the obstacle.
Within a short distance of about 30cm, a continuous signal sounds (stop
signal). The driver should not reverse any further.
Models with a factory-fitted towing bracket: When the vehicle is less than
0.35 m away from the obstacle the warning tone will sound continuously.
The driver should then not reverse any further.
The warning tone decreases by 30% after 3 seconds from the start of the
system.
Provided that it is not in continuous mode, the tone on the parking aid sys-
tem stops when it detects a wall parallel to the vehicle.
Trailer towing
For vehicles factory-fitted with a towing bar, the parking aid system will not
be activated by the engagement of the reverse gear when pulling a trailer,
as the trailer's electric connector will be plugged into the vehicle.
Possible faults
If a continuous beep sounds for some seconds when the reverse gear is en-
gaged, this indicates that there is a fault in the parking aid system.
If the fault continues until the ignition is turned off, the acoustic signal
warning of the fault will not be emitted every time the system is reactivated
(by engaging the reverse gear). Thus, the system ready indication will not
sound either. Have the fault repaired by an Authorised Service Centre as
soon as possible. If there is no ready signal or no acoustic warning signal, then the parking
aid loudspeaker is faulty and may not warn of obstacles.
To ensure that the system works properly, the sensors must be kept clean
and free of ice and snow.
WARNING
● The sensors have blind spots in which obstacles may not be detected.
● Always look out for small children and animals because the system
will not always detect them. Always pay attention when reversing to
avoid accidents.
● The parking aid is not a replacement for driver awareness. The driver
must take full responsibility for parking and other manoeuvres.
CAUTION
● Please note that low obstacles detected by the system may no longer be
registered by the sensors as the car moves closer, so the system will not
give any further warning. Certain kinds of obstacles (such as wire fences,
chains, thin posts or trailer draw bars, high kerbs or painted railings etc)
may not always be detected by the system, so there is a risk of damaging
the vehicle in such cases.
● In some cases, obstacles with uniform edges and bumps may not be de-
tected immediately by the system due to their geometry. Take special care
of this type of obstacle (corners, rectangular objects, etc.), as they can
cause damage to the vehicle.
● Be especially careful when manoeuvring into a corner between two per-
pendicular walls. Carefully watch the approach of the wall to the side of the
vehicle (using the mirrors).
● The parking aid system does not replace use of the mirrors for manoeu-
vres.
Safety FirstOperating InstructionsPractical TipsTechnical Specifications
Page 158 of 278
156Driving
● External ultra-sonic sources (pneumatic drills, construction machinery,
other vehicles with PDC) may interfere with the operation of the system.
● Periodic cleaning of the sensors, take care not to damage or scratch
them. When cleaning with high pressure washers or steam cleaners, the
sensors should be sprayed for only a very short period and from a distance
of more than 10 cm.
Page 159 of 278
157
Driving
Cruise speed* (Cruise control system)
Description
The cruise control system is able to maintain the set speed
in the range of 30 km/h to 180 km/h.
Once the speed setting has been saved, you may take your foot off the ac-
celerator.
WARNING
It could be dangerous to use the cruise control system if it is not possible
to drive at constant speed.
● Do not use the cruise control system when driving in dense traffic, on
roads with lots of bends or on roads with poor conditions (with ice, slip-
pery surfaces, loose grit or gravel), as this could cause an accident.
● Always switch the cruise control system off after using it in order to
avoid an involuntary use.
● It is dangerous to use a set speed which is too high for the current
road, traffic or weather conditions. Risk of accident.
Note
The cruise control cannot maintain a constant speed when descending
downhill. The vehicle will accelerate due to its own weight. Use the foot
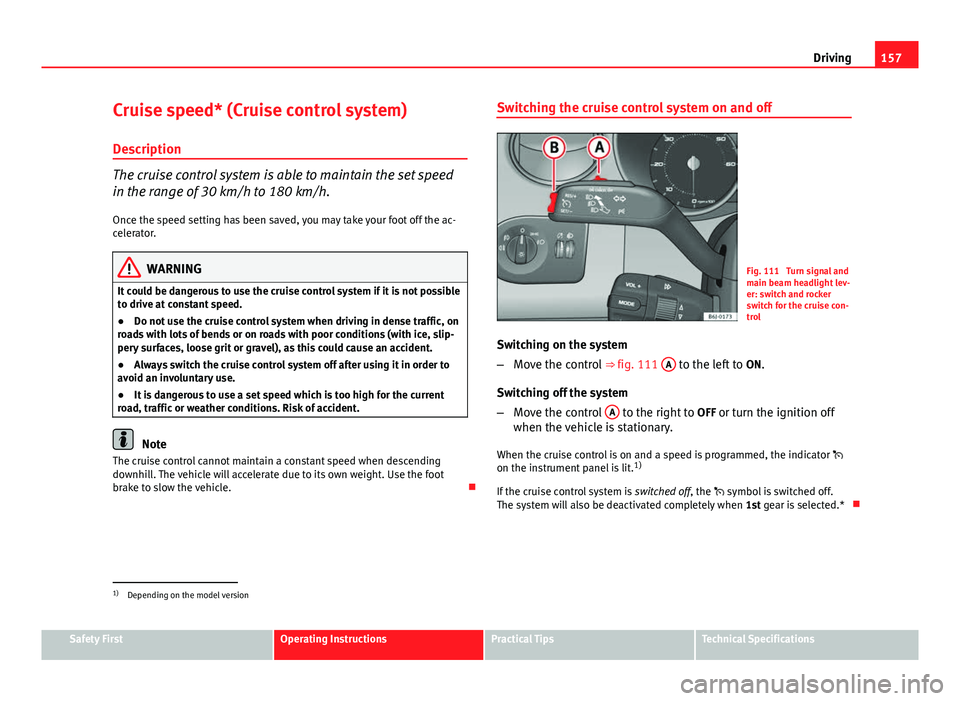
brake to slow the vehicle. Switching the cruise control system on and off
Fig. 111 Turn signal and
main beam headlight lev-
er: switch and rocker
switch for the cruise con-
trol
Switching on the system
– Move the control ⇒ fig. 111 A
to the left to
ON.
Switching off the system
– Move the control A
to the right to
OFF or turn the ignition off
when the vehicle is stationary.
When the cruise control is on and a speed is programmed, the indicator
on the instrument panel is lit. 1)
If the cruise control system is switched off, the symbol is switched off.
The system will also be deactivated completely when 1st gear is selected.*
1)
Depending on the model version
Safety FirstOperating InstructionsPractical TipsTechnical Specifications
Page 160 of 278
158Driving
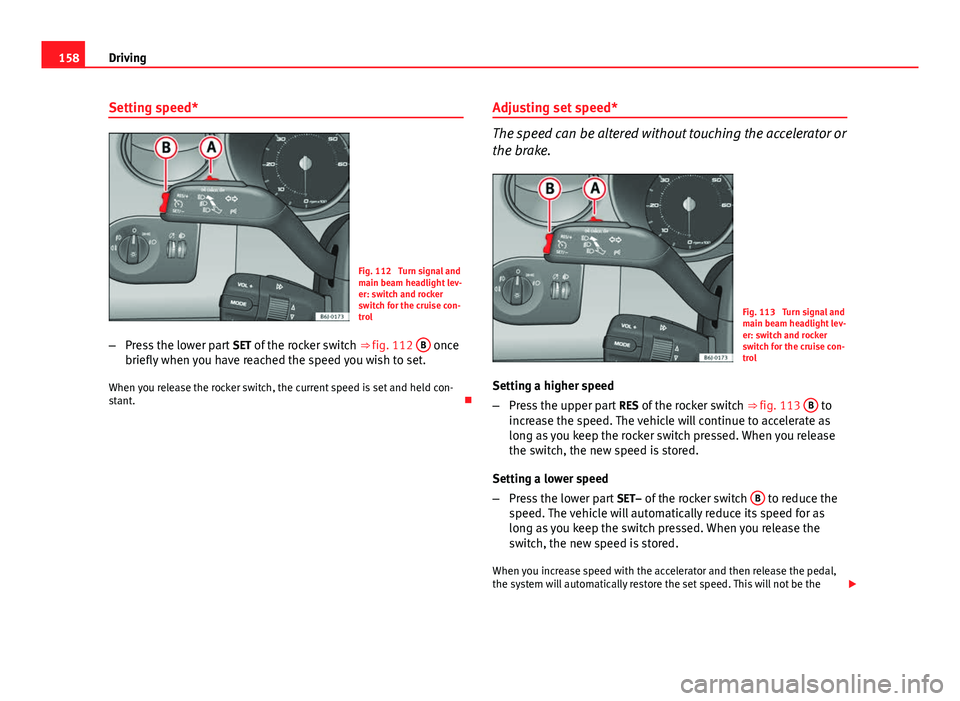
Setting speed*
Fig. 112 Turn signal and
main beam headlight lev-
er: switch and rocker
switch for the cruise con-
trol
– Press the lower part SET of the rocker switch ⇒ fig. 112 B
once
briefly when you have reached the speed you wish to set.
When you release the rocker switch, the current speed is set and held con-
stant. Adjusting set speed*
The speed can be altered without touching the accelerator or
the brake.
Fig. 113 Turn signal and
main beam headlight lev-
er: switch and rocker
switch for the cruise con-
trol
Setting a higher speed
– Press the upper part RES of the rocker switch ⇒ fig. 113 B
to
increase the speed. The vehicle will continue to accelerate as
long as you keep the rocker switch pressed. When you release
the switch, the new speed is stored.
Setting a lower speed
– Press the lower part SET– of the rocker switch B
to reduce the
speed. The vehicle will automatically reduce its speed for as
long as you keep the switch pressed. When you release the
switch, the new speed is stored.
When you increase speed with the accelerator and then release the pedal,
the system will automatically restore the set speed. This will not be the