start stop button Seat Ibiza SC 2011 Owner's manual
[x] Cancel search | Manufacturer: SEAT, Model Year: 2011, Model line: Ibiza SC, Model: Seat Ibiza SC 2011Pages: 278, PDF Size: 3.92 MB
Page 85 of 278
83
Unlocking and locking
WARNING
● An improper use of the key can cause serious injuries.
● Never leave children or disabled persons in the vehicle. In case of
emergency, they may not be able to leave the vehicle or manage on their
own.
● Never forget the keys inside the vehicle. Otherwise, this could result
in serious injuries, accidents or even the theft of your vehicle. Always
take the key with you when you leave the vehicle.
● An uncontrolled use of the key could start the engine or activate any
electric equipment (e.g. electric windows), causing risk of accident. The
vehicle can be locked when using the remote control key. This could com-
plicate the aid in case of emergency.
Note
● The remote control key functions only when you are within range
⇒ fig. 46.
● If the vehicle cannot be unlocked or locked by using the radio-frequency
remote control, the remote control key will have to be re-synchronised. For
this, go to your Technical Service.
Changing the battery
If the battery indicator does not flash when the buttons are pushed, the bat-
tery must be replaced.
CAUTION
The use of inappropriate batteries may damage the radio frequency remote
control. For this reason, always replace the dead battery with another of the
same size and power.
For the sake of the environment
Used batteries must be disposed of at an appropriate waste facility or
through an authorised service, given that their components can affect the
environment.
Synchronising the remote control key
If it is not possible to unlock or lock the door with the remote
control, it should be re-synchronised.
While the vehicle is open:
– Press the
button
2 ⇒
fig. 45 on the remote control.
– Then close the vehicle using the key bit within one minute.
While the vehicle is closed:
– Press the
button
1 ⇒ fig. 45 on the remote control.
– Then close the vehicle using the key bit within one minute.
It is possible that the vehicle could no longer be opened and closed with
the remote control if the button
is repeatedly pressed outside of the ef-
fective range of the radio frequency remote control. The remote control key
will have to be resynchronised.
Spare remote control keys are available in your Authorised Service Centres,
where they must be matched to the locking system.
Up to five remote control keys can be used.
Safety FirstOperating InstructionsPractical TipsTechnical Specifications
Page 91 of 278
89
Unlocking and locking
Windows Opening or closing the windows electrically*
All electric windows can be operated using the controls on
the driver door.
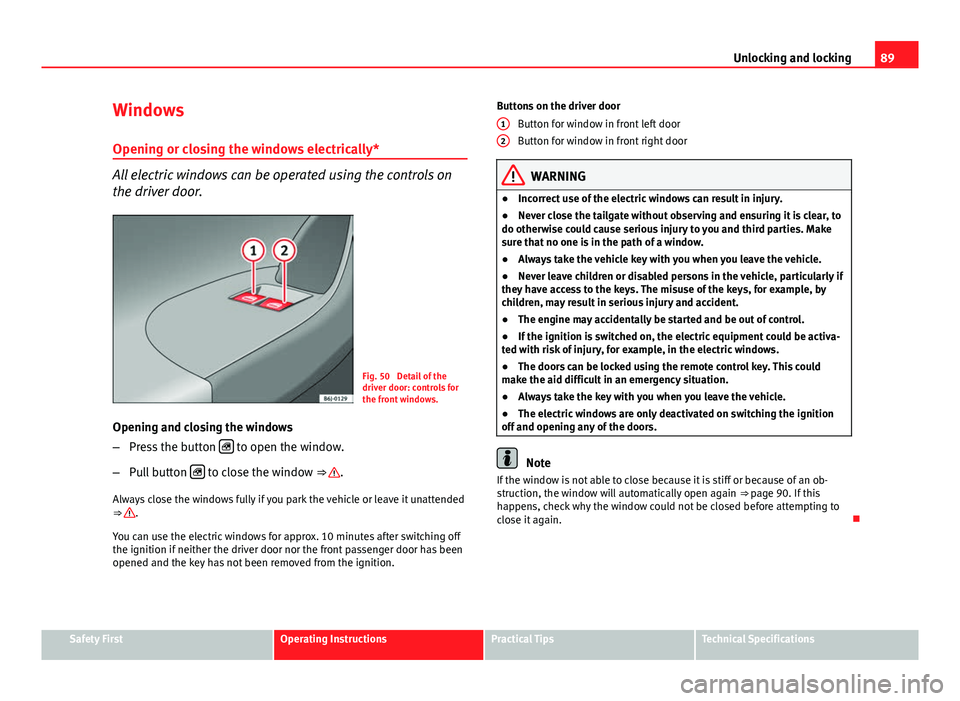
Fig. 50 Detail of the
driver door: controls for
the front windows.
Opening and closing the windows
– Press the button
to open the window.
– Pull button
to close the window ⇒ .
Always close the windows fully if you park the vehicle or leave it unattended
⇒
.
You can use the electric windows for approx. 10 minutes after switching off
the ignition if neither the driver door nor the front passenger door has been
opened and the key has not been removed from the ignition. Buttons on the driver door
Button for window in front left door
Button for window in front right door
WARNING
● Incorrect use of the electric windows can result in injury.
● Never close the tailgate without observing and ensuring it is clear, to
do otherwise could cause serious injury to you and third parties. Make
sure that no one is in the path of a window.
● Always take the vehicle key with you when you leave the vehicle.
● Never leave children or disabled persons in the vehicle, particularly if
they have access to the keys. The misuse of the keys, for example, by
children, may result in serious injury and accident.
● The engine may accidentally be started and be out of control.
● If the ignition is switched on, the electric equipment could be activa-
ted with risk of injury, for example, in the electric windows.
● The doors can be locked using the remote control key. This could
make the aid difficult in an emergency situation.
● Always take the key with you when you leave the vehicle.
● The electric windows are only deactivated on switching the ignition
off and opening any of the doors.
Note
If the window is not able to close because it is stiff or because of an ob-
struction, the window will automatically open again ⇒ page 90. If this
happens, check why the window could not be closed before attempting to
close it again.
1
2
Safety FirstOperating InstructionsPractical TipsTechnical Specifications
Page 93 of 278
91
Unlocking and locking
WARNING
● Incorrect use of the electric windows can result in injury.
● Always take the key with you when leaving the vehicle, even if you
only intend to be gone for a short time. Please ensure that children are
never left alone inside the vehicle.
● The electric windows will work until the ignition has been switched
off and one of the front doors has been opened.
● Closing the windows without observing and ensuring it is clear could
cause serious injury to you and third parties. Make sure that no one is in
the path of a window.
● Never allow people to remain in the vehicle when you close the vehi-
cle from the outside. The windows cannot be opened even in an emergen-
cy.
● The roll-back function does not prevent fingers or other parts of the
body from getting pinched against the window frame, causing injury.
Convenience opening and closing*
Using the door lock*
– Hold the key in the door lock of the driver door in either the
locking or the unlocking position until all windows are either
opened or closed.
– Release the key to interrupt this function.
Using the remote control
– Keep the locking/unlocking button pressed for the electrical
window risers to open/close; if you stop pressing the button,
the window raising/lowering function is stopped. –
If the automatic raising is stopped and immediately after, the
opening button is kept pressed, the window risers will lower.
– Once the windows are completely closed, the turn signals will
flash.
Panorama tilting sunroof* Opening and closing the panorama/tilting sunroof
The panorama/tilting sunroof is opened and closed by using
the switch when the ignition is switched on.
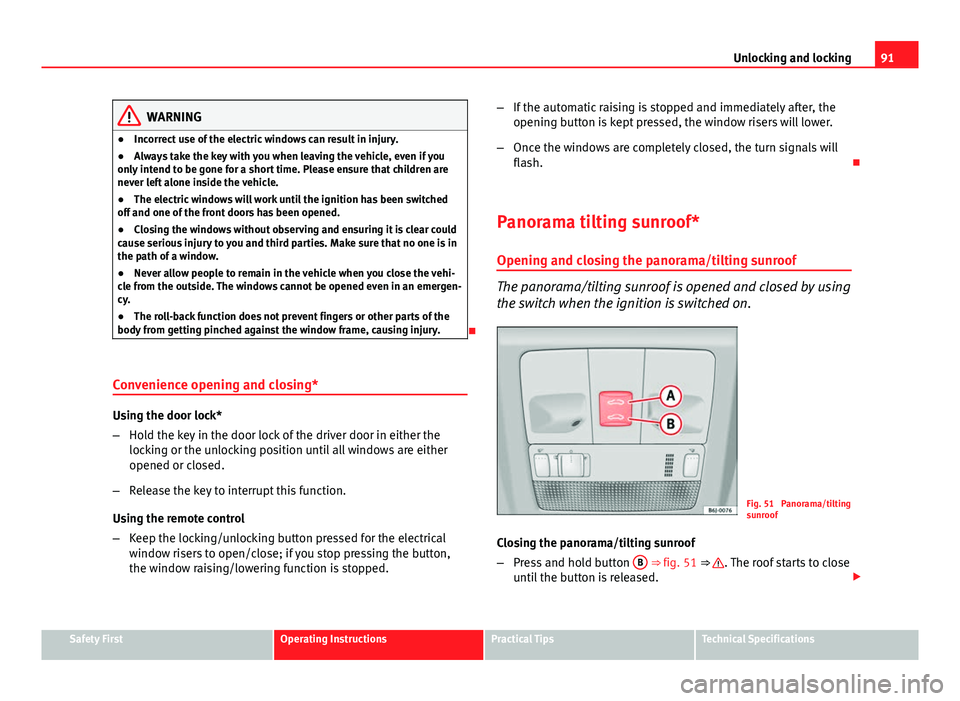
Fig. 51 Panorama/tilting
sunroof
Closing the panorama/tilting sunroof
– Press and hold button B
⇒ fig. 51 ⇒ . The roof starts to close
until the button is released.
Safety FirstOperating InstructionsPractical TipsTechnical Specifications
Page 101 of 278
99
Lights and visibility
For the sake of the environment
The heated rear window should be disconnected as soon as the glass is
demisted. By saving electrical power you can also save fuel.
Note
To avoid possible damage to the battery, an automatic temporary discon-
nection of this function is possible, coming back on when normal operating
conditions are re-established.
Hazard warning lights
The hazard warning lights are used to draw the attention of
other road users to your vehicle in emergencies.
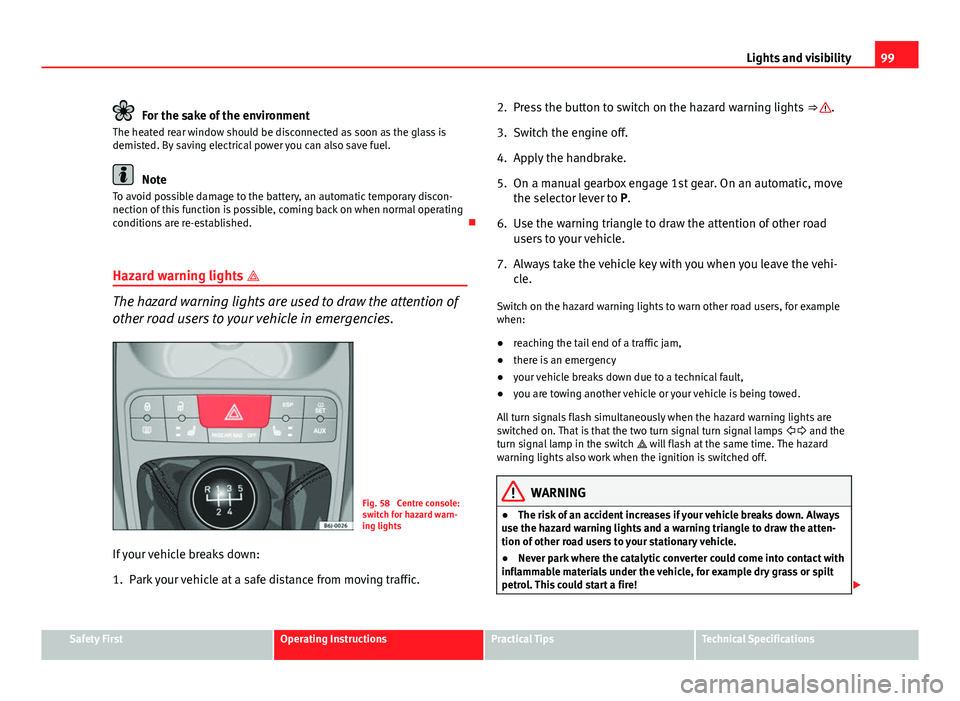
Fig. 58 Centre console:
switch for hazard warn-
ing lights
If your vehicle breaks down:
1. Park your vehicle at a safe distance from moving traffic. 2. Press the button to switch on the hazard warning lights
⇒
.
3. Switch the engine off.
4. Apply the handbrake.
5. On a manual gearbox engage 1st gear. On an automatic, move the selector lever to P.
6. Use the warning triangle to draw the attention of other road users to your vehicle.
7. Always take the vehicle key with you when you leave the vehi- cle.
Switch on the hazard warning lights to warn other road users, for example
when:
● reaching the tail end of a traffic jam,
● there is an emergency
● your vehicle breaks down due to a technical fault,
● you are towing another vehicle or your vehicle is being towed.
All turn signals flash simultaneously when the hazard warning lights are
switched on. That is that the two turn signal turn signal lamps and the
turn signal lamp in the switch will flash at the same time. The hazard
warning lights also work when the ignition is switched off.
WARNING
● The risk of an accident increases if your vehicle breaks down. Always
use the hazard warning lights and a warning triangle to draw the atten-
tion of other road users to your stationary vehicle.
● Never park where the catalytic converter could come into contact with
inflammable materials under the vehicle, for example dry grass or spilt
petrol. This could start a fire!
Safety FirstOperating InstructionsPractical TipsTechnical Specifications
Page 143 of 278
141
Driving
● There is enough LPG in the tank.
● The temperature of the vehicle coolant is above 30 °C.
● Engine speed while driving is above 1200 rpm.
Automatic switch from LPG to petrol
When the vehicle is operating in LPG mode and one of these conditions is
met, the system automatically switches to petrol mode, the notification changed to petrol mode is displayed and the green indicator lamp on the in-
strument panel goes out:
● When the engine is started.
● If the LPG tank is empty.
● If there is a fault in the LPG system.
● At very low temperatures, below 10 °C.
Manual switch from petrol to LPG
Press the GAS
button on the centre console ⇒ fig. 99 to change mode. The
notification changed to GAS mode is displayed. When the following condi-
tions are met, the system switches to LPG mode, the green indicator lamp
on the instrument panel lights up and the notification displayed changes to changed to GAS mode .
● There is enough LPG in the tank.
● The temperature of the vehicle coolant is above 30 °C.
● Engine speed while driving is above 1200 rpm.
Manual switch from LPG to petrol
Press the GAS
button on the centre console ⇒
fig. 99 to change mode. The
green lamp on the instrument panel goes out and the notification changed
to petrol mode is displayed.
Running on petrol
Run the engine with petrol for short journeys at regular intervals to avoid
problems in the petrol system.
WARNING
LPG is a highly explosive and inflammable substance. It may cause se-
vere burns and other injury.
● Due care must be taken to avoid any risk of fire or explosion.
● When parking the vehicle in a closed area (for example in a garage),
make sure that there is adequate ventilation, either natural or mechani-
cal, to neutralise the LPG in the event of a leak.
Note
● If frequent short journeys are made, especially when the outside tem-
perature is low, the vehicle will tend to run on petrol more often than on
LPG. Therefore, the petrol tank may empty before the LPG tank.
● The notification LPG mode not possible may be displayed.
Start-Stop function* Description and operation
The Start-Stop function stops the engine when the vehicle is stop-
ped and starts it automatically when required.
– When the vehicle is stopped, put it in neutral and release the
clutch pedal. The engine will stop.
– When the clutch pedal is pressed, the engine starts again.
– The instrument panel screen displays information about the sta-
tus of the Start-Stop function ⇒
fig. 101.
Safety FirstOperating InstructionsPractical TipsTechnical Specifications
Page 144 of 278
142Driving
Start-Stop function conditions
● The driver seat belt must be buckled.
● The engine hood must be closed.
● The engine must be at operating temperature
● The steering wheel must be straight.
● The vehicle must be on flat ground.
● The vehicle must not be in reverse.
● A trailer must not be connected.
● The temperature of the passenger compartment must be within the con-
venience limits ( AC
button should be selected).
● The windscreen de-mist function must be off.
● If in an increase in airflow is not requested.
● The temperature must not be set to HI or LO.
● The driver door must be closed.
● The diesel particulate filter must not be in regeneration mode, for diesel
engines.
● The battery charge must not be low for the next start.
● The battery temperature must be between -1 °C and 55 °C.
Start-Stop function interruption
In the following situations, the Start-Stop function will be interrupted and
the engine will automatically start:
● The vehicle starts moving.
● The brake pedal is pressed several times in a row.
● The battery has been discharged excessively.
● The Start-Stop System is manually deactivated.
● The windscreen de-mist function is turned on.
● The temperature of the passenger compartment exceeds the conven-
ience limits ( AC
button).
● If the airflow is increased by more than 3 presses. ●
Temperature setting HI or LO is selected.
● The engine coolant temperature is insufficient.
● The alternator is faulty, for example the V-belt has ruptured.
● If any of the conditions described in the previous section are not fulfil-
led.
WARNING
Never allow the vehicle to move with the engine off for any reason. You
could lose control of your vehicle. This could cause an accident and seri-
ous injury.
● The brake servo does not work with the engine off. You need more
force to stop the vehicle.
● Power steering does not work when the engine is not running. That is
why it is much more difficult to turn the steering wheel.
● Disconnect the Start-Stop system when driving through water (ford-
ing streams, etc.).
Note
● For vehicles with the Start-Stop function and a manual gearbox, when
the engine is started, the clutch must be pressed.
● When the conditions for the Start-Stop function are not fulfilled, the in-
strument panel displays the Start-Stop indicator dimmed.
● If the steering wheel is turned more than 270°, it will not be possible to
start the vehicle again. To start the vehicle, straighten the steering wheel so
that it is turned less than 270°.
Page 145 of 278
143
Driving
Activating and deactivating the Start-Stop function
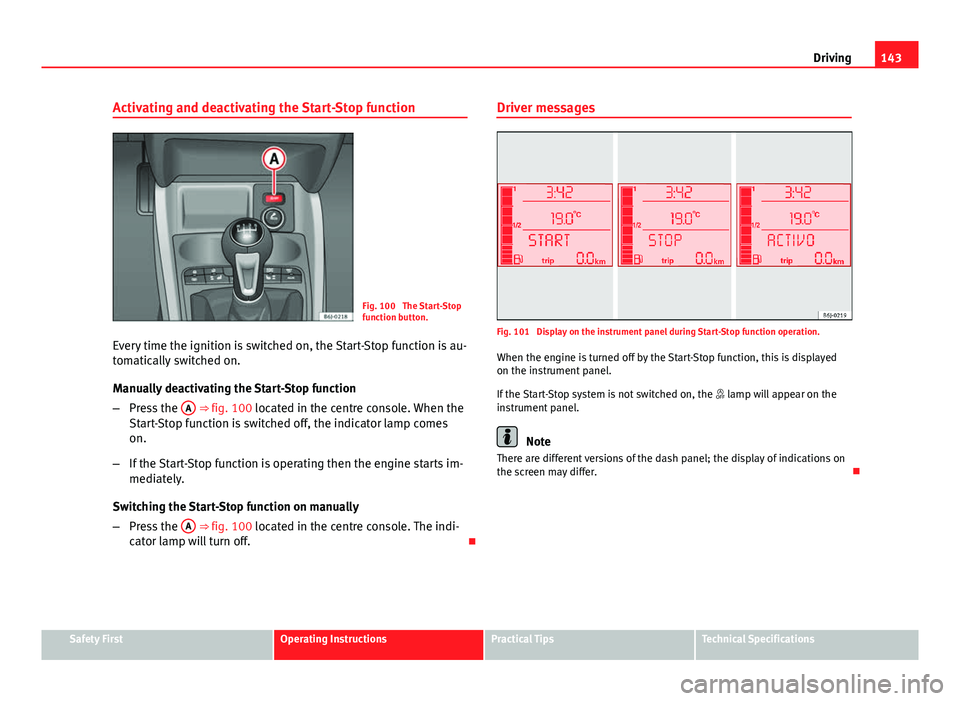
Fig. 100 The Start-Stop
function button.
Every time the ignition is switched on, the Start-Stop function is au-
tomatically switched on.
Manually deactivating the Start-Stop function
– Press the A
⇒ fig. 100 located in the centre console. When the
Start-Stop function is switched off, the indicator lamp comes
on.
– If the Start-Stop function is operating then the engine starts im-
mediately.
Switching the Start-Stop function on manually
– Press the A
⇒ fig. 100 located in the centre console. The indi-
cator lamp will turn off. Driver messages
Fig. 101 Display on the instrument panel during Start-Stop function operation.
When the engine is turned off by the Start-Stop function, this is displayed
on the instrument panel.
If the Start-Stop system is not switched on, the lamp will appear on the
instrument panel.
Note
There are different versions of the dash panel; the display of indications on
the screen may differ.
Safety FirstOperating InstructionsPractical TipsTechnical Specifications
Page 149 of 278
147
Driving
Driving a car with an automatic gearbox
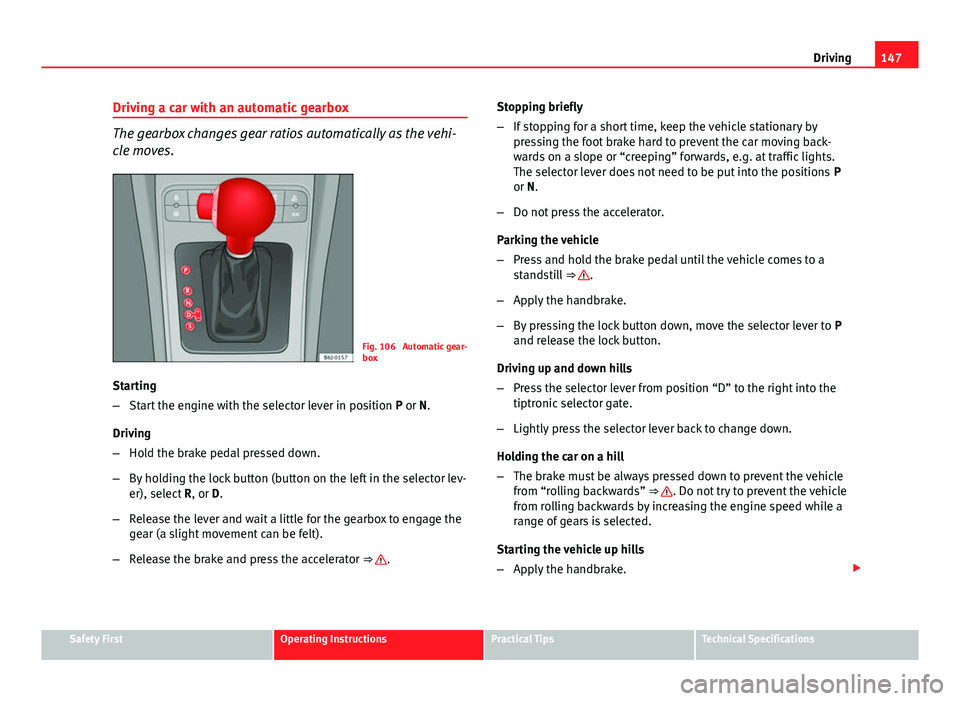
The gearbox changes gear ratios automatically as the vehi-
cle moves.
Fig. 106 Automatic gear-
box
Starting
– Start the engine with the selector lever in position P or N.
Driving
– Hold the brake pedal pressed down.
– By holding the lock button (button on the left in the selector lev-
er), select R, or D.
– Release the lever and wait a little for the gearbox to engage the
gear (a slight movement can be felt).
– Release the brake and press the accelerator ⇒
.Stopping briefly
–
If stopping for a short time, keep the vehicle stationary by
pressing the foot brake hard to prevent the car moving back-
wards on a slope or “creeping” forwards, e.g. at traffic lights.
The selector lever does not need to be put into the positions P
or N.
– Do not press the accelerator.
Parking the vehicle
– Press and hold the brake pedal until the vehicle comes to a
standstill ⇒
.
– Apply the handbrake.
– By pressing the lock button down, move the selector lever to P
and release the lock button.
Driving up and down hills
– Press the selector lever from position “D” to the right into the
tiptronic selector gate.
– Lightly press the selector lever back to change down.
Holding the car on a hill
– The brake must be always pressed down to prevent the vehicle
from “rolling backwards” ⇒
. Do not try to prevent the vehicle
from rolling backwards by increasing the engine speed while a
range of gears is selected.
Starting the vehicle up hills
– Apply the handbrake.
Safety FirstOperating InstructionsPractical TipsTechnical Specifications
Page 153 of 278
151
Driving
● The wiper starts if the windscreen washer is on.
● The parking distance warning system switches on.*
N - Neutral (idling)
If this position is selected, the gearbox is in neutral. Power is not transmit-
ted to the wheels and the engine does not have a braking function.
Never use the N position to drive down a hill. The engine does not function
as a brake and the brakes are subjected to excessive stain.
You could damage the automatic gearbox if you drive down hills with the
gear lever in position N and the engine switched off.
D - Drive (forward)
In this position the gearbox automatically changes to a lower or higher gear,
according to the engine's requirements, the driving style and speed. The
braking effect of the engine when driving downhill is very limited when the
selector is in this position. The instrument panel displays the selected gear
as well as the selector lever in position D.
If position N has been selected and you wish to select D, you must press the
foot brake if the vehicle is stationary, or travelling at under 5 km/h.
S - Standard driving position (Sport programme)
When the selector lever is in position S, it will automatically change up into
a higher gear later, and change down into a low gear, if compared with posi-
tion D. This way, it is possible to take full advantage of the engine reserve
power, depending on the engine demand, driving style and speed. The
braking effect of the engine when driving downhill is very limited. On the
instrument panel display the selected gear is shown as well as the selector
lever to position S.
To select gear range S, press the lock button on the selector lever.
WARNING
If the vehicle moves with no control, an accident and serious injury may
occur.
● As a driver, you should never leave your vehicle if the engine is run-
ning and a gear is engaged. If you have to leave your vehicle while the
engine is running, you must always apply the handbrake and engage
parking lock P.
● If the engine is running and if D or R are engaged, you will need to
hold the vehicle stopped by depressing footbrake down. The car would
creep forward as the power transmission is not fully interrupted even
when the engine is idling.
● Never accelerate when moving the selector gear or you may cause an
accident.
● Never move the selector lever to “R” or “P” when driving. Risk of acci-
dent.
● Before driving down a very steep slope, reduce your speed and shift
to first gear.
● Always hold the vehicle on the foot brake if you stop on hills. Other-
wise, the vehicle could roll back.
● Never allow the brake to rub and do not use the brake pedal too often
or for long periods. Constant braking will cause the brakes to overheat
and will considerably reduce the brake effect. This increases the braking
distance and could cause the brake system to fail.
WARNING
Never switch the engine off until the vehicle is stationary. You could lose
control of your vehicle. This could cause an accident and serious injury.
● The airbags and belt tensioners do not work when the ignition is
switched off.
Safety FirstOperating InstructionsPractical TipsTechnical Specifications
Page 165 of 278
163
Intelligent technology
TCS helps the vehicle to start moving, accelerate and climb a gradient in
slippery conditions where this may otherwise be difficult or even impossi-
ble.
The TCS is switched on automatically when the engine is started. If necessa-
ry, it may be turned on or off by briefly pushing the ESP button on the centre
console.
When the TCS is off, the warning lamp is lit. The TCS should normally be
left on. Only in exceptional circumstances, when the slipping of the wheels
is required, can they be disconnected using the ESP button, for example.
● With compact temporary spare wheel.
● When using the snow chains.
● When driving in deep snow or on loose surfaces
● When the vehicle is bogged-down, to free it by rocking.
The TCS should be switched on again as soon as possible.
WARNING
● It must be remembered that TCS cannot defy the laws of physics. This
should be kept in mind, particularly on slippery and wet roads and when
towing a trailer.
● Always adapt your driving style to suit the condition of the roads and
the traffic situation. Do not let the extra safety afforded by TCS tempt you
into taking any risks when driving, this can cause accidents.
CAUTION
● In order to ensure that TCS function correctly, all four wheels must be fit-
ted with the same tyres. Any differences in the rolling radius of the tyres can
cause the system to reduce engine power when this is not desired.
● Modifications to the vehicle (e.g. to the engine, the brake system, run-
ning gear or any components affecting the wheels and tyres) could affect
the efficiency of the ABS and TCS. XDS*
Driveshaft differential
When taking a bend, the driveshaft differential mechanism allows the outer
wheel to turn at a higher speed than the inner wheel. In this way, the wheel
that is turning faster (outer wheel) receives less drive torque than the inner
wheel. This may mean that in certain situations the torque delivered to the
inner wheel is too high, causing the wheels to spin. On the other hand, the
outer wheel is receiving a lower drive torque than it could transmit. This
causes an overall loss of lateral grip on the front axle, resulting in under-
steer or “lengthening” of the trajectory.
By using the ESP sensors and signals, the XDS system is able to detect and
correct this effect.
Through the ESP, the XDS brakes the inner wheel, thereby counteracting the
excess drive torque in this wheel. This means that the driver's desired tra-
jectory is much more precise,
The XDS system operates in combination with the ESP and is always active,
even when the traction control, TCS, is disconnected.
Electronic Stability Programme (ESP)* General notes
The Electronic Stability Programme increases the vehicle's
stability on the road.
The Electronic Stability Programme helps reduce the danger of skidding.
The Electronic Stability Programme (ESP) consists of ABS, EDL and TCS.
Safety FirstOperating InstructionsPractical TipsTechnical Specifications