buttons Seat Ibiza SC 2013 Owner's manual
[x] Cancel search | Manufacturer: SEAT, Model Year: 2013, Model line: Ibiza SC, Model: Seat Ibiza SC 2013Pages: 294, PDF Size: 4.05 MB
Page 81 of 294

79
Cockpit
Audio Control
Fig. 41 Audio controls
ButtonShort pressRadioCD AudioMP3 CDAUX-INAVolume upBVolume downCCycle through source FM - AM - CD - FM...
D ’āÄStation search.
Increase frequencyNext trackNo function
D ’āÅStation search.
Decrease frequencyPrevious trackNo function
ENext presetNo functionChange folder (forward)No functionFPrevious presetNo functionChange folder (back)No function’āÉ
Safety FirstOperating instructionsPractical TipsTechnical Specifications
Page 84 of 294
82Opening and closing
Opening and closing
Central locking
Description
The central locking system enables you to lock and unlock
all doors and the rear lid by just pushing the button. Central locking can be activated by using any of the following options:
ŌŚÅ the key, by inserting it into the driver door cylinder and rotating it in the
opening direction. Depending on the vehicle version, either all doors will be
unlocked or only the driver door will be unlocked. All doors will be locked on
locking the vehicle using the key.
ŌŚÅ the interior central lock button ŌćÆŌĆŖpage 85.
ŌŚÅ the radio frequency remote control , using the buttons on the key
ŌćÆŌĆŖ page 88.
Various functions are available to improve the vehicle safety: Safe* security system
Selective unlocking system*
Self-locking system to prevent involuntary unlocking
Automatic speed-dependent locking and unlocking system*
Emergency unlocking system
-
-
-
-
-
WARNING
ŌŚÅ Locking from the outside carelessly or without good visibility may
lead to bruising, particularly in the case of children.
ŌŚÅ When locking a vehicle, never leave children unaccompanied inside,
as from the outside it will be difficult to provide assistance if required.
ŌŚÅ Having the doors locked prevents an intrusion from getting in, for ex-
ample when stopped at a traffic light.
Note
For anti-theft security, only the driver door is fitted with a lock cylinder. ’āÉ
Security system ŌĆ£SafeŌĆØ*
This is an anti-theft device that consists of a double lock for
the door locks and a disabling function for the luggage
compartment in order to prevent a forced entry (depending
on country). Activation
The ŌĆ£safeŌĆØ system is activated when the vehicle is locked using the key or
the remote control.
To activate it with the key, rotate once it is inserted in the door lock cylinder
in the locking direction.
To activate the system using the remote control, press the lock button once ’üŚ
on the remote. ’éŻ
Page 90 of 294
88Opening and closing
Radio frequency remote control*
Locking and unlocking the vehicle
The radio frequency remote control key is used to lock and
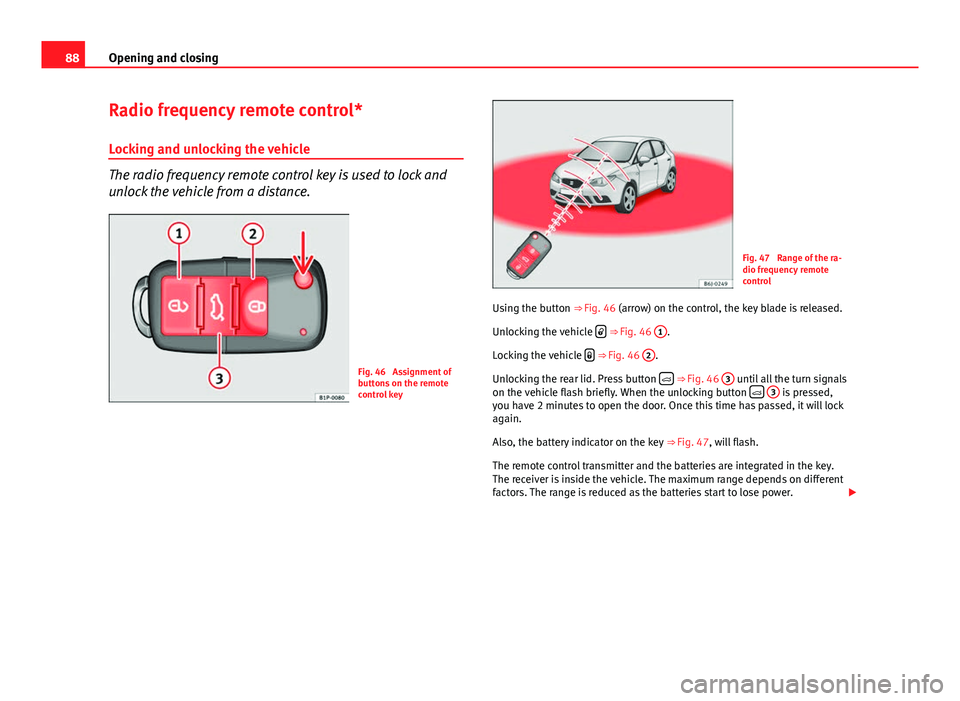
unlock the vehicle from a distance.
Fig. 46 Assignment of
buttons on the remote
control key
Fig. 47 Range of the ra-
dio frequency remote
control
Using the button ŌćÆŌĆŖFig. 46 (arrow) on the control, the key blade is released.
Unlocking the vehicle ’ü¢
ŌćÆŌĆŖ Fig. 46 1.
Locking the vehicle ’üŚ
ŌćÆŌĆŖ Fig. 46 2.
Unlocking the rear lid. Press button ’é½
ŌćÆŌĆŖ Fig. 46 3 until all the turn signals
on the vehicle flash briefly. When the unlocking button ’é½
3 is pressed,
you have 2 minutes to open the door. Once this time has passed, it will lock
again.
Also, the battery indicator on the key ŌćÆŌĆŖFig. 47, will flash.
The remote control transmitter and the batteries are integrated in the key.
The receiver is inside the vehicle. The maximum range depends on different
factors. The range is reduced as the batteries start to lose power. ’éŻ
Page 91 of 294

89
Opening and closing
WARNING
ŌŚÅ An improper use of the key can cause serious injuries.
ŌŚÅ Never leave children or disabled persons in the vehicle. In case of
emergency, they may not be able to leave the vehicle or manage on their
own.
ŌŚÅ Never forget the keys inside the vehicle. Otherwise, this could result
in serious injuries, accidents or even the theft of your vehicle. Always
take the key with you when you leave the vehicle.
ŌŚÅ An uncontrolled use of the key could start the engine or activate any
electric equipment (e.g. electric windows), causing risk of accident. The
vehicle can be locked when using the remote control key. This could com-
plicate the aid in case of emergency.
Note
ŌŚÅ The radio frequency remote control key functions only when you are
within range ŌćÆŌĆŖFig. 47.
ŌŚÅ If the vehicle cannot be unlocked or locked by using the radio frequency
remote control, the remote control key will have to be re-synchronised. For
this, go to your Technical Service. ’āÉ
Changing the battery
If the battery indicator does not flash when the buttons are pushed, the bat-
tery must be replaced.
CAUTION
The use of inappropriate batteries may damage the radio frequency remote
control. For this reason, always replace the dead battery with another of the
same size and power.
For the sake of the environment
Used batteries must be disposed of at an appropriate waste facility or
through an authorised service, given that their components can affect the
environment. ’āÉ
Synchronising the remote control key
If it is not possible to unlock or lock the door with the remote
control, it should be re-synchronised.
While the vehicle is open:
ŌĆō Press the ’üŚ
button
2 ŌćÆŌĆŖ
Fig. 46 on the remote control.
ŌĆō Then close the vehicle using the key bit within one minute.
While the vehicle is closed:
ŌĆō Press the ’ü¢
button
1 ŌćÆŌĆŖFig. 46 on the remote control.
ŌĆō Then close the vehicle using the key bit within one minute.
It is possible that the vehicle could no longer be opened and closed with
the remote control if the button ’ü¢
is repeatedly pressed outside of the ef-
fective range of the radio frequency remote control. The remote control key
will have to be resynchronised.
Spare remote control keys are available in your Technical Service, where
they must be matched to the locking system.
Up to five remote control keys can be used. ’āÉ
Safety FirstOperating instructionsPractical TipsTechnical Specifications
Page 98 of 294

96Opening and closing
Windows
Opening or closing the windows electrically*
The front and rear electric windows can be operated by us-
ing the controls on the driver door. The other doors each
have a switch for their own window.
Fig. 52 Detail of the
driver door: controls for
the front and rear win-
dows (5-door vehicles)
Fig. 53 Detail of the
driver door: controls for
the front windows (3-
door vehicles)
Opening and closing the windows
ŌĆō Press the button ’éĄ
to open the window.
ŌĆō Pull button ’éĄ
to close the window ŌćÆŌĆŖ.
Always close the windows fully if you park the vehicle or leave it unattended
ŌćÆŌĆŖ
.
You can use the electric windows for approx. 10 minutes after switching off
the ignition if neither the driver door nor the front passenger door has been
opened and the key has not been removed from the ignition.
Buttons on the driver door Button for window in front left door
Button for window in front right door
Safety switch for deactivating the electric window buttons in the rear
doors
Button for window in rear left door
Button for window in rear right door ’éŻ
1
23
45
Page 99 of 294
97
Opening and closing
Safety switch ’é”* (only in 5-door vehicles)
Safety switch 3
on the driver door can be used to disable the electric win-
dow buttons in the rear doors.
Safety switch not pressed: buttons on rear doors are activated.
Safety switch pressed: buttons on rear doors are deactivated.
WARNING
ŌŚÅ Incorrect use of the electric windows can result in injury.
ŌŚÅ Never close the rear lid without observing and ensuring it is clear, to
do otherwise could cause serious injury to you and third parties. Make
sure that no one is in the path of a window.
ŌŚÅ Always take the vehicle key with you when you leave the vehicle.
ŌŚÅ Never leave children or disabled persons in the vehicle, particularly if
they have access to the keys. The misuse of the keys, for example, by
children, may result in serious injury and accident.
ŌŚÅ The engine may accidentally be started and be out of control.
ŌŚÅ If the ignition is switched on, the electric equipment could be activa-
ted with risk of injury, for example, in the electric windows.
ŌŚÅ The doors can be locked using the remote control key. This could be-
come an obstacle for assistance in an emergency situation.
ŌŚÅ Always take the key with you when you leave the vehicle.
ŌŚÅ The electric windows will work until the ignition has been switched
off and one of the front doors has been opened.
ŌŚÅ If necessary, use the safety switch to disable the rear electric win-
dows. Make sure that they have been disabled.
Note
If the window is not able to close because it is stiff or because of an ob-
struction, the window will automatically open again ŌćÆŌĆŖpage 98. If this
happens, check why the window could not be closed before attempting to
close it again. ’āÉOne-touch opening and closing*
One-touch opening and closing means you do not have to
hold down the button.
Buttons ŌćÆŌĆŖFig. 52 1
, 2, 4 and 5 have two positions for open-
ing windows and two for closing them. This makes it easier to open
and close windows to the desired position.
One-touch closing
ŌĆō Pull up the window button briefly up to the second position. The
window closes fully.
One-touch opening
ŌĆō Push down the window button briefly up to the second position.
The window opens fully.
Restoring one-touch opening and closing
ŌĆō The automatic open and close function will not work if the bat-
tery has been temporarily disconnected. The function can be re-
stored as follows:
ŌĆō Close the window as far as it will go by lifting and holding the
electric window switch.
ŌĆō Release the switch and then lift it again for one second. This
will re-enable the automatic function.
If you push (or pull) a button to the first stage, the window will open (or
close) until you release the button. If you push or lift the button briefly to
the second stage, the window will open (one-touch opening) or close (one-
touch closing) automatically. If you operate the button while the window is
opening or closing, it stops at this position. ’éŻ
Safety FirstOperating instructionsPractical TipsTechnical Specifications
Page 100 of 294

98Opening and closing
The one-touch opening and closing function will not function once the igni-
tion has been switched off.
The one-touch function and roll-back function will not work if there is a mal-
function in the electric windows. Contact a specialised workshop. ’āÉ
Roll-back function
The roll-back function reduces the risk of injury when the
electric windows close.
ŌŚÅ If a window is obstructed when closing automatically, the window stops
at this point and lowers immediately ŌćÆŌĆŖ
.
ŌŚÅ Next, check why the window does not close before attempting it again.
ŌŚÅ If you try within the following 10 seconds and the window closes again
with difficulty or there is an obstruction, the automatic closing will stop
working for 10 seconds.
ŌŚÅ If the window is still obstructed, the window will stop at this point.
ŌŚÅ If there is no obvious reason why the window cannot be closed, try to
close it again by pulling the tab within ten seconds. The window closes with
maximum force. The roll-back function is now deactivated.
If more than 10 seconds pass, the window will open fully when you operate
one of the buttons. One-touch closing is reactivated.
The one-touch function and roll-back function will not work if there is a mal-
function in the electric windows. Contact a specialised workshop.
WARNING
ŌŚÅ Incorrect use of the electric windows can result in injury.
ŌŚÅ Always take the ignition key with you when leaving the vehicle, even
if you only intend to be gone for a short time. Please ensure that children
are never left alone inside the vehicle.
ŌŚÅ The electric windows will work until the ignition has been switched
off and one of the front doors has been opened.
ŌŚÅ Closing the windows without observing and ensuring it is clear could
cause serious injury to you and third parties. Make sure that no one is in
the path of a window.
ŌŚÅ Never allow people to remain in the vehicle when you close the vehi-
cle from the outside. The windows cannot be opened even in an emergen-
cy.
ŌŚÅ The roll-back function does not prevent fingers or other parts of the
body getting pinched against the window frame. Risk of accident.
’āÉ
Convenience opening and closing*
Using the door lock*
ŌĆō Hold the key in the door lock of the driver door in either the
locking or the unlocking position until all windows are either
opened or closed.
ŌĆō Release the key to interrupt this function.
Using the remote control
ŌĆō Keep the locking/unlocking button pressed for the electric win-
dow risers to open/close; if you stop pressing the button, the
window raising/lowering function is stopped. ’éŻ
Page 145 of 294
143
Air conditioning
Climatronic Controls
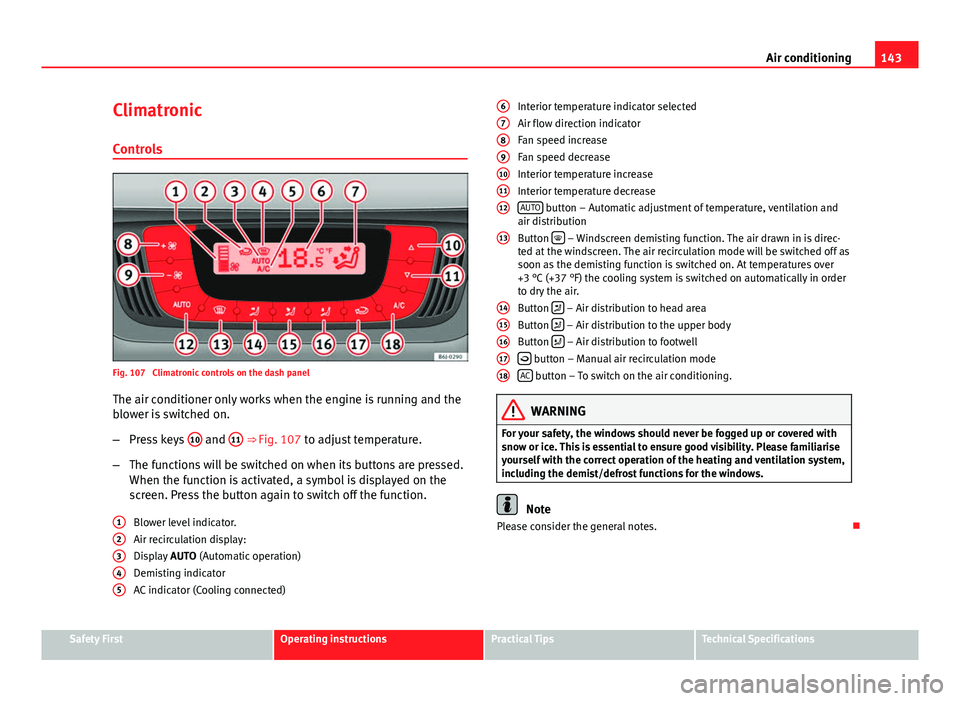
Fig. 107 Climatronic controls on the dash panelThe air conditioner only works when the engine is running and the
blower is switched on.
ŌĆō Press keys 10
and 11 ŌćÆŌĆŖFig. 107 to adjust temperature.
ŌĆō The functions will be switched on when its buttons are pressed.
When the function is activated, a symbol is displayed on the
screen. Press the button again to switch off the function.
Blower level indicator.
Air recirculation display:
Display AUTO (Automatic operation)
Demisting indicator
AC indicator (Cooling connected)
1
2345
Interior temperature indicator selected
Air flow direction indicator
Fan speed increase
Fan speed decrease
Interior temperature increase
Interior temperature decrease
AUTO
button ŌĆō Automatic adjustment of temperature, ventilation and
air distribution
Button ’ü£
ŌĆō Windscreen demisting function. The air drawn in is direc-
ted at the windscreen. The air recirculation mode will be switched off as
soon as the demisting function is switched on. At temperatures over
+3 ┬░C (+37 ┬░F) the cooling system is switched on automatically in order
to dry the air.
Button ’ü▒
ŌĆō Air distribution to head area
Button ’ü░ ŌĆō Air distribution to the upper body
Button ’ü▓ ŌĆō Air distribution to footwell
’ĆŁ button ŌĆō Manual air recirculation mode
AC button ŌĆō To switch on the air conditioning.
WARNING
For your safety, the windows should never be fogged up or covered with
snow or ice. This is essential to ensure good visibility. Please familiarise
yourself with the correct operation of the heating and ventilation system,
including the demist/defrost functions for the windows.
Note
Please consider the general notes. ’āÉ
6
789101112
13
1415161718
Safety FirstOperating instructionsPractical TipsTechnical Specifications
Page 146 of 294
144Air conditioning
Automatic mode
In automatic mode air temperature, air flow and distribution
are automatically regulated so that a specified temperature
is attained as quickly as possible, and then maintained.
Switching on automatic mode
ŌĆō Press the AUTO
button. The indication
ŌćÆŌĆŖFig. 107 3 is dis-
played.
ŌĆō Press keys 10
and 11 ŌćÆŌĆŖFig. 107 to adjust the desired tempera-
ture inside the vehicle. We recommend +22 ┬░C (+72 ┬░F).
A comfortable interior climate is quickly reached when a temperature of
+22 ┬░C (+72 ┬░F) is set in automatic mode. Therefore, we recommend you not
to change this adjustment, except as necessary to suit individual preferen-
ces or particular circumstances. It is possible to select interior temperatures
from +18 ┬░C (+64 ┬░F) to +29 ┬░C (+86 ┬░F). If a lower or higher temperature is
selected, LO or HI are respectively displayed on the screen. These are ap-
proximate temperatures which may slightly vary depending on the outside
conditions.
Climatronic maintains a constant temperature. To do so, it automatically
regulates the supplied air temperature, the blower speed and the air distri-
bution. The system also considers the sunlight radiation, so there is no
need for manual readjustment. Therefore, automatic mode almost always
provides the best comfort for the vehicle occupants throughout the year.
Automatic mode is switched off whenever an adjustment is made using the
buttons for air distribution or blower. The temperature continues to self-reg-
ulate. ’āÉManual mode
In manual mode the air temperature, flow, and the desired
air distribution can be adjusted.
Switching on manual mode
ŌĆō Press one of the buttons ŌćÆŌĆŖFig. 107 14
to 16 or press the blow-
er control 8 and 9 down. The indicator is switched off 3.
Temperature
It is possible to select interior temperatures from +18 ┬░C (+64 ┬░F) to +29 ┬░C
(+86 ┬░F). These are approximate temperatures which may slightly vary de-
pending on the outside conditions.
If you select temperatures below +18 ┬░C (+64 ┬░F), the indication LO will ap-
pear on the screen. In this setting the system runs at maximum cooling out-
put and the temperature is not regulated.
If a temperature above +29 ┬░C (+86 ┬░F) is selected, the screen will show HI.
In this setting the system runs at maximum heating output and the temper-
ature is not controlled.
Blower
The blower can be adjusted with buttons 8
and 9 ŌćÆŌĆŖFig. 107. If the blow-
er is off (level 1 is not shown on the screen) and button 9 is pressed after
1 second, the Climatronic switches off.
Air distribution
The air distribution is adjusted using the buttons ’ü▒
, ’éČ and ’Ƭ. It is also
possible to open and close some of the air outlets separately.
Switching the air conditioning on and off
Pressing the button AC
the air cooling system can be switched off in order
to save fuel. The temperature continues to self-regulate. The set tempera-
ture can then only be reached if it is higher than the outside temperature. ’āÉ
Page 290 of 294
Overviewcontrol lamps . . . . . . . . . . . . . . . . . . . . . . . . 67
Control lamps . . . . . . . . . . . . . . . . . . . . . . . . 65
Dash panel . . . . . . . . . . . . . . . . . . . . . . . . . . 55
Instruments . . . . . . . . . . . . . . . . . . . . . . . . . 57
warning lamps . . . . . . . . . . . . . . . . . . . . . . . 67
Warning lamps . . . . . . . . . . . . . . . . . . . . . . . 65
P Paintwork Polishing . . . . . . . . . . . . . . . . . . . . . . . . . . . 190
Panoramic sunroof . . . . . . . . . . . . . . . . . . . . . . . 99
Parking . . . . . . . . . . . . . . . . . . . . . . . . . . . . . . . 165
Parking aid . . . . . . . . . . . . . . . . . . . . . . . . . . . . 166
Parking lights . . . . . . . . . . . . . . . . . . . . . . . . . . 108
Passenger see Correct sitting position . . . . . . . 10, 11, 12
Pedals . . . . . . . . . . . . . . . . . . . . . . . . . . . . . . . . . 16
Petrol . . . . . . . . . . . . . . . . . . . . . . . . . . . . . . . . . 205 Driving abroad . . . . . . . . . . . . . . . . . . . . . . 184
Petrol additives . . . . . . . . . . . . . . . . . . . . . . . . 205
Physical principles of a frontal collision . . . . . . 21
Plastic parts . . . . . . . . . . . . . . . . . . . . . . . . . . . 190
Plastic parts cleaning . . . . . . . . . . . . . . . . . . . . 193
Pollen filter . . . . . . . . . . . . . . . . . . . . . . . . . . . . 145
Pollution filter . . . . . . . . . . . . . . . . . . . . . . . . . . 145
Power socket in the luggage compartment . . . . . . . . . . . 130
Power sockets . . . . . . . . . . . . . . . . . . . . . . . . . . 129
Products for vehicle maintenance . . . . . . . . . . 187 R
Radio frequency remote control . . . . . . . . . . . . 88 Changing the battery . . . . . . . . . . . . . . . . . . 89
Rain sensor . . . . . . . . . . . . . . . . . . . . . . . . . . . . 112
Rear drink holder . . . . . . . . . . . . . . . . . . . . . . . 128
Rear fog light control lamp . . . . . . . . . . . . . . . . . . . . . . . . . 71
Control lamp . . . . . . . . . . . . . . . . . . . . . . . . 101
Rear head restraints . . . . . . . . . . . . . . . . . . . . . . 14
Rear lid . . . . . . . . . . . . . . . . . . . . . . . . . . . . . . . . 93 Control lamp . . . . . . . . . . . . . . . . . . . . . . . . . 74
Emergency opening . . . . . . . . . . . . . . . . . . . 94
Rear parking aid . . . . . . . . . . . . . . . . . . . . . . . . . . . . . . . . 167
Rear seat folding down . . . . . . . . . . . . . . . . . . . . . . . . 123
Rear seats . . . . . . . . . . . . . . . . . . . . . . . . . . . . . 123
Rear shelf . . . . . . . . . . . . . . . . . . . . . . . . . . . . . 134
Rear shelf with storage compartment Storage compartment . . . . . . . . . . . . . . . . 135
Rear view mirrors . . . . . . . . . . . . . . . . . . . . . . . 114
Rear window automatic wiper/washer . . . . . . 113
Rear window wiper . . . . . . . . . . . . . . . . . . . . . . 113
Recommended gear display . . . . . . . . . . . . . . . 60
Refuelling . . . . . . . . . . . . . . . . . . . . . . . . . . . . . 200
Remote control key Buttons . . . . . . . . . . . . . . . . . . . . . . . . . . . . . 88
Synchronising . . . . . . . . . . . . . . . . . . . . . . . . 89
Removing and fitting the wheel . . . . . . . . . . . 234
Repairs Airbags . . . . . . . . . . . . . . . . . . . . . . . . . . . . . 32 Replacement keys . . . . . . . . . . . . . . . . . . . . . . . 87
Replacement of parts . . . . . . . . . . . . . . . . . . . . 196
Rev counter . . . . . . . . . . . . . . . . . . . . . . . . . . . . . 58
Reverse gear
Manual gearbox . . . . . . . . . . . . . . . . . . . . . 156
Roll-back function panoramic/tilting sunroof . . . . . . . . . . . . . 100
Windows . . . . . . . . . . . . . . . . . . . . . . . . . . . . 98
Roof aerial . . . . . . . . . . . . . . . . . . . . . . . . . . . . . 197
Roof rack . . . . . . . . . . . . . . . . . . . . . . . . . . . . . . 136
Rubber seals . . . . . . . . . . . . . . . . . . . . . . . . . . . 191
Running in Brake pads . . . . . . . . . . . . . . . . . . . . . . . . . 179
Engine . . . . . . . . . . . . . . . . . . . . . . . . . . . . . 179
Tyres . . . . . . . . . . . . . . . . . . . . . . . . . . . . . . 179
Running in tyres . . . . . . . . . . . . . . . . . . . . . . . . 179
S Safe . . . . . . . . . . . . . . . . . . . . . . . . . . . . . . . . . . . 82
Safe driving . . . . . . . . . . . . . . . . . . . . . . . . . . . . . 7
Safety . . . . . . . . . . . . . . . . . . . . . . . . . . . . . . . . . . 8
Safety equipment . . . . . . . . . . . . . . . . . . . . . . . . . 7
Safety instructions Coolant temperature . . . . . . . . . . . . . . . . . . 76
Safety notes Airbags . . . . . . . . . . . . . . . . . . . . . . . . . . . . . 32
Deactivating front passenger airbag . . . . . . 42
Front airbags . . . . . . . . . . . . . . . . . . . . . . . . 37
Seat belt tensioners . . . . . . . . . . . . . . . . . . . 28
Side airbags . . . . . . . . . . . . . . . . . . . . . . . . . 39
288 Index