door lock Seat Ibiza SC 2014 Owner's Guide
[x] Cancel search | Manufacturer: SEAT, Model Year: 2014, Model line: Ibiza SC, Model: Seat Ibiza SC 2014Pages: 240, PDF Size: 4.89 MB
Page 93 of 240
Lights and visibility
and to ensure that other road users are able
to see you. Always use your dipped beam
headlights if it is dark or if visibility is poor.
Note
● The dipped beam headlights will only work
with the ignition on. The side lights come on
automatically when the ignition is turned off.
● If the lights are left on after the key has
been taken out of the ignition lock, an audi-
ble warning sounds while the driver door re-
mains open. This is a reminder to switch the
lights off.
● The rear fog light is so bright that it can
dazzle drivers behind you. You should use
the rear fog light only when visibility is very
poor.
● The use of the lighting described here is
subject to the relevant statutory require-
ments. Automatic lighting*
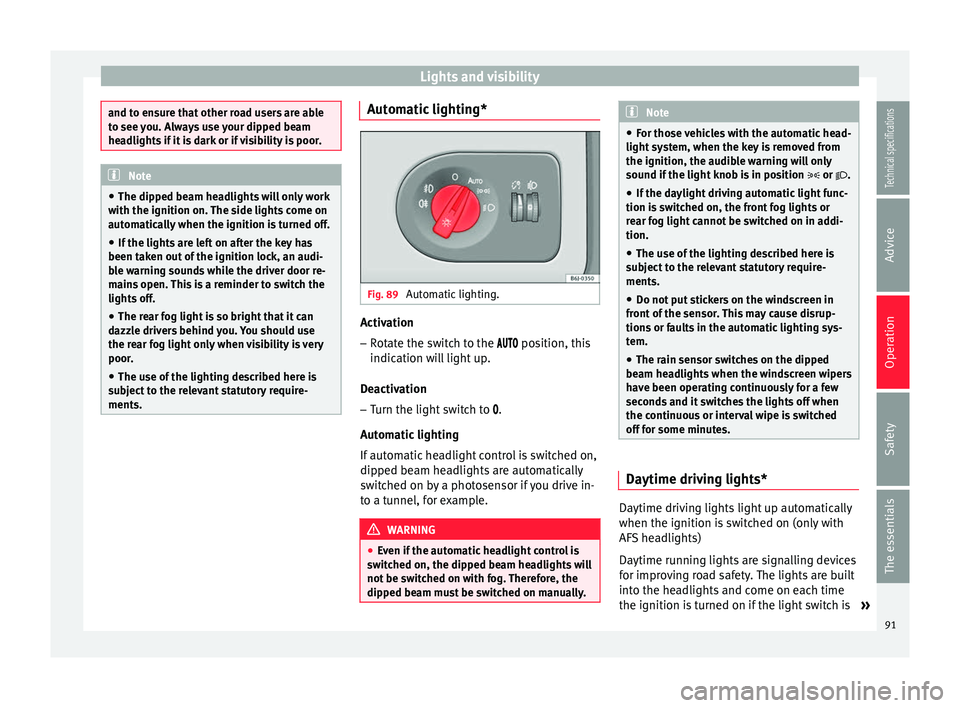
Fig. 89
Automatic lighting. Activation
– Rotate the switch to the position, this
indication will light up.
Deactivation – Turn the light switch to .
Automatic lighting
If automatic headlight control is switched on,
dipped beam headlights are automatically
switched on by a photosensor if you drive in-
to a tunnel, for example. WARNING
● Even if the automatic headlight control is
switched on, the dipped beam headlights will
not be switched on with fog. Therefore, the
dipped beam must be switched on manually. Note
● For those vehicles with the automatic head-
light system, when the key is removed from
the ignition, the audible warning will only
sound if the light knob is in position or .
● If the daylight driving automatic light func-
tion is switched on, the front fog lights or
rear fog light cannot be switched on in addi-
tion.
● The use of the lighting described here is
subject to the relevant statutory require-
ments.
● Do not put stickers on the windscreen in
front of the sensor. This may cause disrup-
tions or faults in the automatic lighting sys-
tem.
● The rain sensor switches on the dipped
beam headlights when the windscreen wipers
have been operating continuously for a few
seconds and it switches the lights off when
the continuous or interval wipe is switched
off for some minutes. Daytime driving lights*
Daytime driving lights light up automatically
when the ignition is switched on (only with
AFS headlights)
Daytime running lights are signalling devices
for improving road safety. The lights are built
into the headlights and come on each time
the ignition is turned on if the light switch is
»
91Technical specifications
Advice
Operation
Safety
The essentials
Page 95 of 240
Lights and visibility
off . The instrument lighting is dimmed auto-
m atic
ally as the daylight starts to fade. It
goes out completely when ambient light is
very low. This function is intended to remind
the driver to switch on the dipped beam
headlights in good time when light condi-
tions become poor.
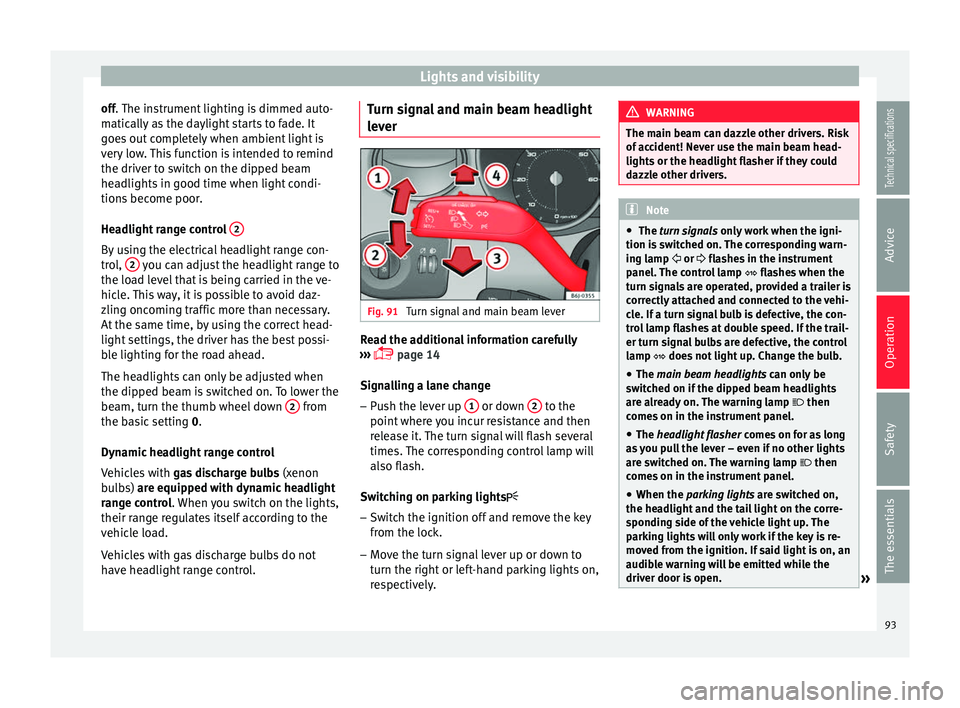
Headlight range control 2By using the electrical headlight range con-
trol,
2 you can adjust the headlight range to
the load level that is being carried in the ve-
hicle. This way, it is possible to avoid daz-
zling oncoming traffic more than necessary.
At the same time, by using the correct head-
light settings, the driver has the best possi-
ble lighting for the road ahead.
The headlights can only be adjusted when
the dipped beam is switched on. To lower the
beam, turn the thumb wheel down 2 from
the basic setting 0.
D y
namic headlight range control
Vehicles with gas discharge bulbs (xenon
bulbs)
are equipped with dynamic headlight
range control. When you switch on the lights,
their range regulates itself according to the
vehicle load.
Vehicles with gas discharge bulbs do not
have headlight range control. Turn signal and main beam headlight
lever
Fig. 91
Turn signal and main beam lever Read the additional information carefully
››› page 14
Signalling a lane change
– Push the lever up 1 or down
2 to the
point where you incur resistance and then
release it. The turn signal will flash several
times. The corresponding control lamp will
also flash.
Switching on parking lights – Switch the ignition off and remove the key
from the lock.
– Move the turn signal lever up or down to
turn the right or left-hand parking lights on,
respectively. WARNING
The main beam can dazzle other drivers. Risk
of accident! Never use the main beam head-
lights or the headlight flasher if they could
dazzle other drivers. Note
● The turn signals only
work when the igni-
tion is switched on. The corresponding warn-
ing lamp or flashes in the instrument
panel
. The control lamp flashes when the
turn signals are operated, provided a trailer is
correctly attached and connected to the vehi-
cle. If a turn signal bulb is defective, the con-
trol lamp flashes at double speed. If the trail-
er turn signal bulbs are defective, the control
lamp does not light up. Change the bulb.
● The main beam headlights
can only be
switched on if the dipped beam headlights
are already on. The warning lamp then
comes on in the instrument panel.
● The headlight flasher come
s on for as long
as you pull the lever – even if no other lights
are switched on. The warning lamp then
comes on in the instrument panel.
● When the parking lights are switched on,
the he
adlight and the tail light on the corre-
sponding side of the vehicle light up. The
parking lights will only work if the key is re-
moved from the ignition. If said light is on, an
audible warning will be emitted while the
driver door is open. » 93
Technical specifications
Advice
Operation
Safety
The essentials
Page 96 of 240
Operation
●
If the turn signal lever is left on after the
key has been taken out of the ignition lock,
an acoustic signal sounds when the driver
door is opened. This is intended as a remind-
er to switch off the turn signal, unless you
wish to leave the parking light on. Coming Home/Leaving Home
Function*
The Coming Home function is controlled man-
ually. The Leaving Home function is control-
led with a photosensor.
If the Coming Home or Leaving Home func-
tion is connected, the front side and dipped
lights, the tail lights and the number plate
light will light up to provide assistance.
Coming home function
The Coming Home function is activated by
switching off the ignition and briefly flashing
the lights. When the driver door is opened,
the Coming Home lighting comes on. If the
driver door is already open when the lights
are flashed briefly, the Coming Home lighting
comes on
immediately.
When the last door of the vehicle or the rear
lid is closed, the Coming Home function
starts and the switching off the headlights is
delayed. The Coming Home lighting switches off in the
following cases:
● On completion of the time period establish-
ed for the delay in switching off the lights af-
ter all the vehicle doors and the rear lid have
been closed.
● If, 30 seconds after being connected, any
doors or the rear lid remain open.
● If the light switch is turned to position .
● If the ignition i
s switched on.
Automatic Leaving Home function
The Leaving Home function is activated when
the vehicle is unlocked if:
● the light control is in position and
● the photosensor detects “darkness”.
The Leaving Home lighting switches off in the
following cases:
● If the time period for the delay in switching
off the headlights has ended
● If the vehicle is locked again.
● If the light switch is turned to position .
● If the ignition is switched on.
Manual Leaving Home function
In vehicles without an automatic headlight
system (light sensor), if the manual Coming
Home function is activated when leaving the car, upon returning to the car and unlocking
it the manual Leaving Home function will be
activated automatically.
Note
● To activate the Coming/Leaving home func-
tion, the rotary light switch must be in posi-
tion and the light sensor must detect
d arkne
ss.
● If the ignition key is removed while the
lights are on, the lights flash briefly and the
driver door opens, no audible warning is
heard, since with the Coming Home function
on, the lights are automatically switched off
after a period of time (except when the light
switch is in position or . Adaptive headlights* (for driving
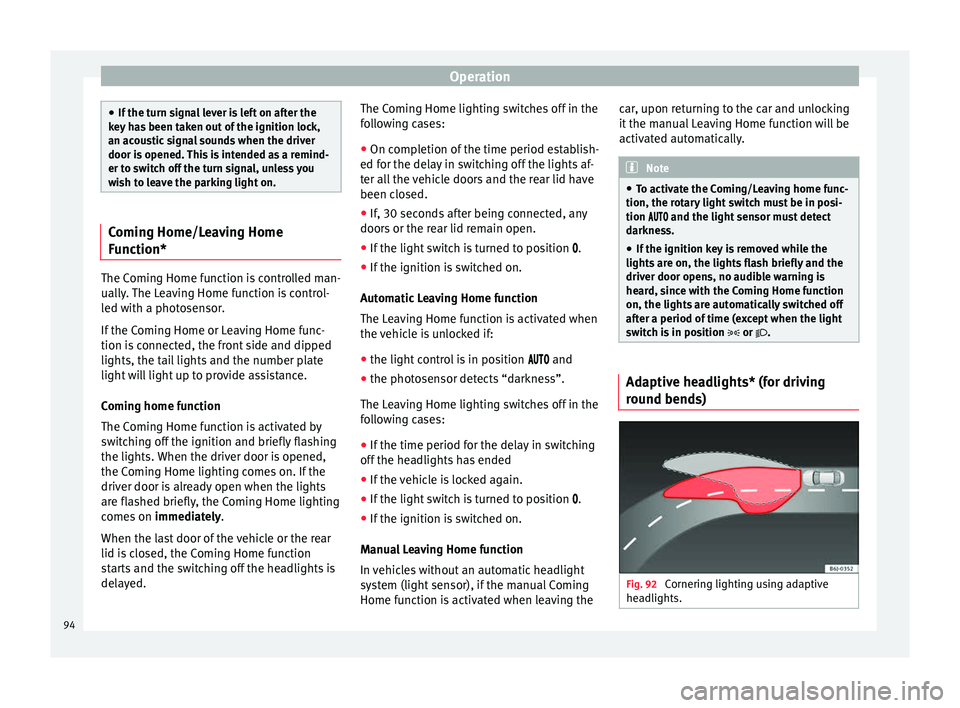
round bends)
Fig. 92
Cornering lighting using adaptive
headlights. 94
Page 111 of 240
Transport and practical equipment
●
Never leave your vehicle unattended, espe-
cially when the rear lid is open. Children
could climb into the luggage compartment,
closing the door behind them; they will be
trapped and run the risk of death.
● Never allow children to play in or around
the vehicle. Close and lock all the doors and
rear lid when you leave the vehicle. Before
you lock the vehicle, make sure that there are
no adults or children in the vehicle.
● Please observe the notes on the ››› page 29. CAUTION
Hard objects on the rear shelf could chafe
against the wires of the heating element in
the heated rear window and cause damage. Note
● The tyre pressure must be adjusted accord-
ing to the load. When necessary check the
tyre pressures on the label located on the in-
side fuel tank flap ››› page 177.
● Air c ir
culation in the vehicle helps reduce
fogging of the windows. Used air escapes
through ventilation slits in the side trim of
the luggage compartment. Ensure that the
ventilation slots are never covered.
● Straps for securing the load to the fasten-
ing rings* are commercially available from ac-
cessory shops. Fastening rings*
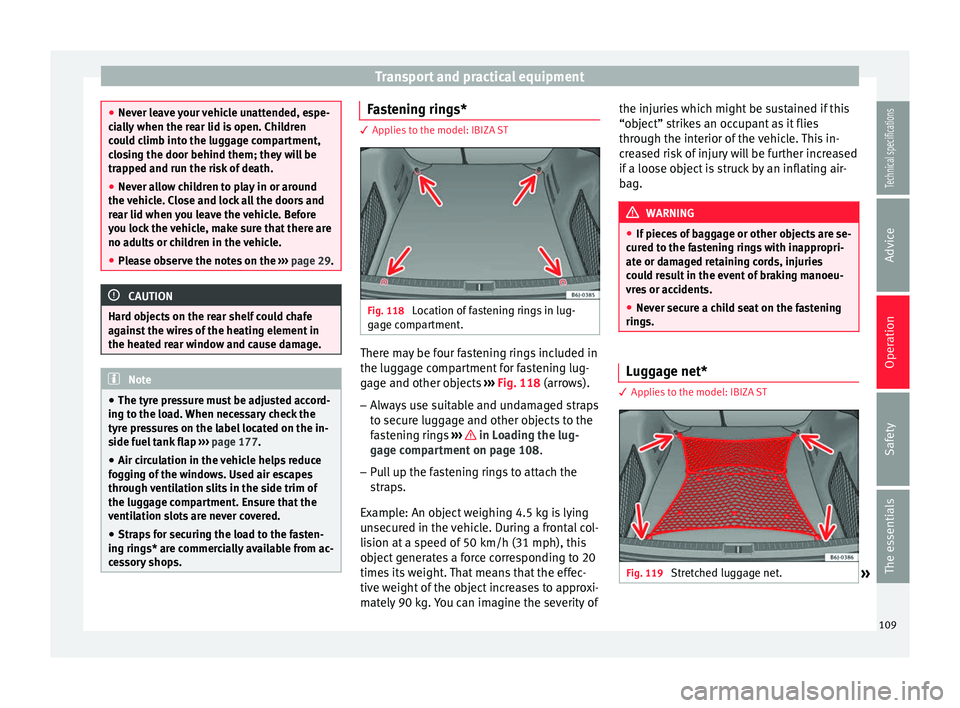
3 Applies to the model: IBIZA ST
Fig. 118
Location of fastening rings in lug-
gage compartment. There may be four fastening rings included in
the luggage compartment for fastening lug-
gage and other objects
››› Fig. 118 (arrows).
– Alw
ays use suitable and undamaged straps
to secure luggage and other objects to the
fastening rings ››› in Loading the lug-
gage compartment on page 108.
– Pull up the fastening rings to attach the
straps.
Example: An object weighing 4.5 kg is lying
unsecured in the vehicle. During a frontal col-
lision at a speed of 50 km/h (31 mph), this
object generates a force corresponding to 20
times its weight. That means that the effec-
tive weight of the object increases to approxi-
mately 90 kg. You can imagine the severity of the injuries which might be sustained if this
“object” strikes an occupant as it flies
through the interior of the vehicle. This in-
creased risk of injury will be further increased
if a loose object is struck by an inflating air-
bag.
WARNING
● If pieces of baggage or other objects are se-
cured to the fastening rings with inappropri-
ate or damaged retaining cords, injuries
could result in the event of braking manoeu-
vres or accidents.
● Never secure a child seat on the fastening
rings. Luggage net*
3 Applies to the model: IBIZA ST
Fig. 119
Stretched luggage net.
» 109
Technical specifications
Advice
Operation
Safety
The essentials
Page 129 of 240
Driving
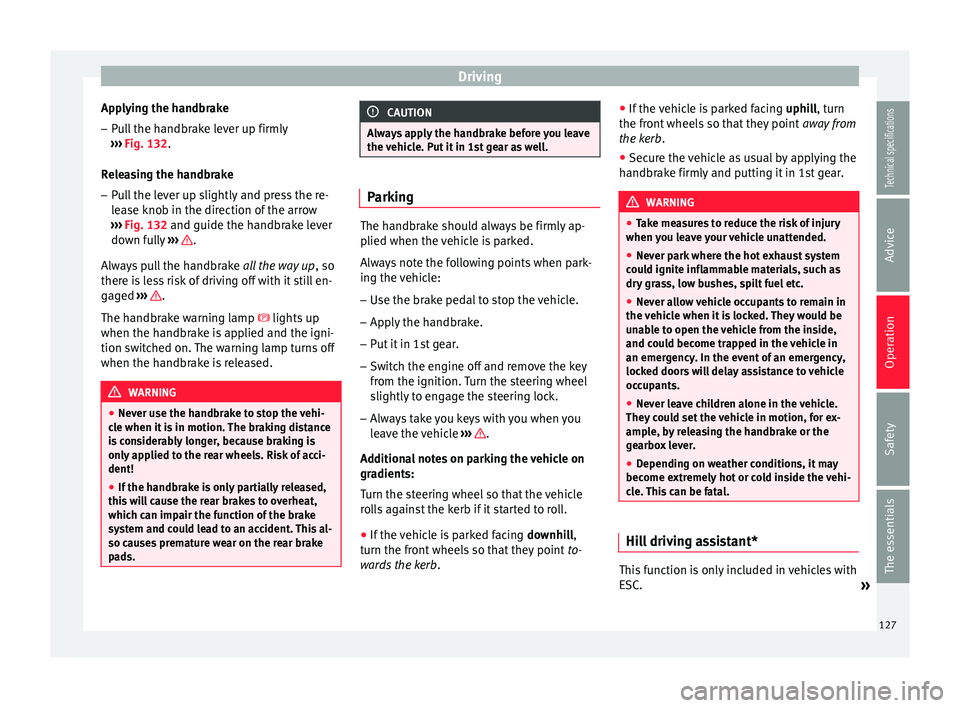
Applying the handbrake
– Pull the handbrake lever up firmly
››› Fig. 132 .
R el
easing the handbrake
– Pull the lever up slightly and press the re-
lease knob in the direction of the arrow
››› Fig. 132 and guide the handbrake lever
down f
ully ››› .
Always pull the handbrake all the way up, so
there is less risk of driving off with it still en-
gaged ››› .
The handbrake warning lamp lights up
when the handbrake is applied and the igni-
tion switched on. The warning lamp turns off
when the handbrake is released. WARNING
● Never use the handbrake to stop the vehi-
cle when it is in motion. The braking distance
is considerably longer, because braking is
only applied to the rear wheels. Risk of acci-
dent!
● If the handbrake is only partially released,
this will cause the rear brakes to overheat,
which can impair the function of the brake
system and could lead to an accident. This al-
so causes premature wear on the rear brake
pads. CAUTION
Always apply the handbrake before you leave
the vehicle. Put it in 1st gear as well. Parking
The handbrake should always be firmly ap-
plied when the vehicle is parked.
Always note the following points when park-
ing the vehicle:
– Use the brake pedal to stop the vehicle.
– Apply the handbrake.
– Put it in 1st gear.
– Switch the engine off and remove the key
from the ignition. Turn the steering wheel
slightly to engage the steering lock.
– Always take you keys with you when you
leave the vehicle ››› .
Additional notes on parking the vehicle on
gradients:
Turn the steering wheel so that the vehicle
rolls against the kerb if it started to roll.
● If the vehicle is parked facing downhill,
turn the front wheels so that they point to-
wards the kerb . ●
If the vehicle is parked facing uphill, turn
the fr ont
wheels so that they point away from
the kerb
.
● Secure the vehicle as usual by applying the
handbrake firmly and putting it in 1st gear. WARNING
● Take measures to reduce the risk of injury
when you leave your vehicle unattended.
● Never park where the hot exhaust system
could ignite inflammable materials, such as
dry grass, low bushes, spilt fuel etc.
● Never allow vehicle occupants to remain in
the vehicle when it is locked. They would be
unable to open the vehicle from the inside,
and could become trapped in the vehicle in
an emergency. In the event of an emergency,
locked doors will delay assistance to vehicle
occupants.
● Never leave children alone in the vehicle.
They could set the vehicle in motion, for ex-
ample, by releasing the handbrake or the
gearbox lever.
● Depending on weather conditions, it may
become extremely hot or cold inside the vehi-
cle. This can be fatal. Hill driving assistant*
This function is only included in vehicles with
ESC.
»
127
Technical specifications
Advice
Operation
Safety
The essentials
Page 160 of 240
Advice
– Rinse the vehicle thoroughly with water.
– Dry the vehicle surface gently with a cha-
mois leather.
– In cold temperature
, dry the rubber seals
and their s
urfaces to prevent them from
freezing. Apply silicone spray to the rubber
seals.
After washing the vehicle – After washing, avoid sudden and sharp
braking. “Dry” the brakes by braking sever-
al times. WARNING
● Wash your vehicle with the ignition switch-
ed off.
● Protect your hands and arms from cuts on
sharp metal edges when cleaning the under-
body, the inside of the wheel housings etc.
Risk of injury.
● Water, ice and salt on the brake system can
reduce braking effectiveness. Risk of acci-
dent. CAUTION
● Never remove dirt, mud or dust if the vehi-
cle surface is dry. Never use a dry cloth or
sponge for cleaning purposes. This could
scratch the paintwork or glass on your vehi-
cle. ●
Washing the vehicle in low temperatures:
when washing the vehicle with a hose, do not
direct water into the lock cylinders or the
gaps around the doors, rear lid, or sunroof.
Risk of freezing. For the sake of the environment
To protect the environment, the vehicle
should be washed only in specially provided
wash bays, to prevent toxic, oil-laden waste
water from entering the sewer system. In
some places, washing vehicles outside wash
bays is prohibited. Note
Do not wash the vehicle in direct sunlight. Washing the vehicle with a high
pressure cleaner
Be particularly careful when using a high
pressure cleaner!
– Always observe the instructions for the
high-pressure cleaner, particularly those
concerning the pressure and the spraying
di s
tance.
– Increase the spraying distance for soft ma-
terials and painted bumpers. –
Do not use a high pressure cleaner to re-
move ice or snow from windows
››› page 159.
– Never u
se concentrated jet nozzles (“rotat-
ing jets”) ››› .
– After washing, avoid sudden and sharp
braking. “Dry” the brakes by braking sever-
al times ››› page 126 . WARNING
● Never wash tyres with a concentrated jet
(“rotating nozzle”). Even at large spraying
distances and short cleaning times, damage
can occur to the tyres. This may cause an ac-
cident.
● Water, ice and salt on the brake system can
reduce braking effectiveness. Risk of acci-
dent. CAUTION
● Do not use water hotter than +60 °C
(+140 °F). This could damage the vehicle.
● To avoid damage to the vehicle, keep a suf-
ficient distance from sensitive materials such
as flexible hoses, plastic, soundproofing ma-
terial, etc. This also applies to bumpers pain-
ted in the colour of the bodywork. The closer
the nozzle is to the surface, the greater the
wear on the material. 158
Page 162 of 240
Advice
●
The heating element for the rear window is
located on the inner side of the window. To
prevent damage, do not put stickers over the
heating elements on the inside of the win-
dow. Cleaning windscreen wiper blades
Clean wiper blades improve visibility.
1. Use a soft cloth to remove dust and dirt
from the windscreen wiper blades.
2. Use window cleaner to clean the wind- screen wiper blades. Use a sponge or a
cloth to remove stubborn dirt.
Rubber seals maintenance If rubber seals are well looked after, they will
not freeze so quickly.
1. Use a soft cloth to remove dust and dirt
from the rubber seals.
2. Apply a specialist care product to the rub- ber seals.
The rubber strips on the doors, windows, etc.
will remain pliable and last longer if they are
treated with a suitable rubber care product
from time to time (for example silicone
spray). Caring for rubber seals will also prevent pre-
mature ageing and leaks. The doors will be
easier to open. If rubber seals are well looked
after, they will not freeze so quickly in winter.
Door lock cylinders The door lock cylinders can freeze up in win-
ter.
To de-ice the lock cylinders you should only
use spray with lubricating and anti-corrosive
properties.
Cleaning chrome parts 1. Clean chrome parts with a damp cloth.
2. Polish chrome parts with a soft, dry cloth.
If this does not provide satisfying results, use
a specialist
chrome cleaning product.
Chrome cleaning products will remove stains
from the surface. CAUTION
To prevent scratching chrome surfaces:
● Never use an abrasive cleaning product on
chrome.
● Do not clean or polish chrome parts in a
sandy or dusty environment. Steel wheel rims
–
Clean steel wheel rims regularly using a
separate sponge.
Use an industrial cleaner to remove brake
dust. Any damage to the paint on steel wheel
rims should be repaired before starting to
rust. WARNING
● Never wash tyres with a cylindrical jet. Even
at large spraying distances and short clean-
ing times, damage can occur to the tyres.
This may cause an accident.
● Water, ice and salt on the brake system can
reduce braking effectiveness. Risk of acci-
dent. Directly after washing, avoid sudden
and sharp braking. “Dry” the brakes by brak-
ing several times ››› page 126, Braking ca-
pacity and braking distance . Alloy wheel rims
Every two weeks
– Wash salt and brake dust from alloy
wheels.
– Use an acid free detergent to clean the
wheel rims.
Every 3 months
– Apply a hard wax compound to the wheels.
160
Page 233 of 240
Index
Differential lock fault (EDL) control lamp . . . . . . . . . . . . . . . . . . . . . . . . . . . . 60
Digital clock . . . . . . . . . . . . . . . . . . . . . . . . . . . . . . 64
Dimensions . . . . . . . . . . . . . . . . . . . . . . . . . . . . . . 226
Disposal Seat belt tensioners . . . . . . . . . . . . . . . . . . . . . . 39
Door handle . . . . . . . . . . . . . . . . . . . . . . . . . . . . . 160
Door lock . . . . . . . . . . . . . . . . . . . . . . . . . . . . . . . . 160
Door lock cylinders . . . . . . . . . . . . . . . . . . . . . . . . 160
Door release lever . . . . . . . . . . . . . . . . . . . . . . . . . 55
Doors . . . . . . . . . . . . . . . . . . . . . . . . . . . . . . . . . . . . . 9 Childproof locks . . . . . . . . . . . . . . . . . . . . . . . . . 82
control lamp . . . . . . . . . . . . . . . . . . . . . . . . . . . . 62
Double headlight bulbs . . . . . . . . . . . . . . . . . . . . 199
Driver see Correct sitting position . . . . . . . . . 30, 31, 32
Driv e
shaft differential
XDS . . . . . . . . . . . . . . . . . . . . . . . . . . . . . . . . . . 142
Driving driving abroad . . . . . . . . . . . . . . . . . . . . . . . . . 138
Economically/with Respect for the Environ-ment . . . . . . . . . . . . . . . . . . . . . . . . . . . . . . . 136
With a trailer . . . . . . . . . . . . . . . . . . . . . . . . . . . 153
Driving abroad . . . . . . . . . . . . . . . . . . . . . . . . . . . 138 Headlights . . . . . . . . . . . . . . . . . . . . . . . . . . . . 138
Driving Economically . . . . . . . . . . . . . . . . . . . . . . 136
Driving safety . . . . . . . . . . . . . . . . . . . . . . . . . . . . . 29
Driving with Respect for the Environment . . . . . 136
Duplicate keys . . . . . . . . . . . . . . . . . . . . . . . . . . . . 82
Dust filter . . . . . . . . . . . . . . . . . . . . . . . . . . . . . . . 113
Dynamic headlight range control . . . . . . . . . . . . . 92
E EDL . . . . . . . . . . . . . . . . . . . . . . . . . . . . . . . . . . . . 139 control lamp . . . . . . . . . . . . . . . . . . . . . . . . . . . . 59
Electric windows . . . . . . . . . . . . . . . . . . . . . . . . 10, 87 Electro-hydraulic steering
control lamp . . . . . . . . . . . . . . . . . . . . . . . . . . . . 62
Electronic differential lock . . . . . . . . . . . . . . . . . . 139 control lamp . . . . . . . . . . . . . . . . . . . . . . . . . . . . 59
Electronic immobiliser . . . . . . . . . . . . . . . . . . . . . 124
Electronic Stability Control . . . . . . . . . . . . . 60, 139
Electronic Stability Control (ESC) control lamp . . . . . . . . . . . . . . . . . . . . . . . . . . . . 60
Emission control system control lamp . . . . . . . . . . . . . . . . . . . . . . . . . . . . 63
Engine Running in . . . . . . . . . . . . . . . . . . . . . . . . . . . . . 134
Engine compartment . . . . . . . . . . . . . . . . . . 10, 167 Working in the engine compartment . . . . . . . . 166
Engine coolant G 12 plus-plus . . . . . . . . . . . . . . . . . . . . . . . . . 171
G 13 . . . . . . . . . . . . . . . . . . . . . . . . . . . . . . . . . . 171
Specifications . . . . . . . . . . . . . . . . . . . . . . . . . . 171
Engine coolant fluid . . . . . . . . . . . . . . . . . . . . . . . 171
Engine fault control lamp . . . . . . . . . . . . . . . . . . . . . . . . . . . . 58
Engine management control lamp . . . . . . . . . . . . . . . . . . . . . . . . . . . . 58
Engine oil Changing . . . . . . . . . . . . . . . . . . . . . . . . . . . . . . 171
Checking engine oil level . . . . . . . . . . . . . . . . . 170
Oil properties . . . . . . . . . . . . . . . . . . . . . . . . . . 169
Specifications . . . . . . . . . . . . . . . . . . . . . . . . . . 168
Topping up . . . . . . . . . . . . . . . . . . . . . . . . . . . . 170
Engine oil dipstick . . . . . . . . . . . . . . . . . . . . . . . . 170
Engine oil pressure control lamp . . . . . . . . . . . . . . . . . . . . . . . . . . . . 59
Environment . . . . . . . . . . . . . . . . . . . . . . . . . . . . . 136 Environmental friendliness . . . . . . . . . . . . . . . 135
Environmental tip Avoiding pollution . . . . . . . . . . . . . . . . . . . . . . 164
Equipment . . . . . . . . . . . . . . . . . . . . . . . . . . . . . . 155 ESC . . . . . . . . . . . . . . . . . . . . . . . . . . . . . . . . 60, 139
see also Electronic Stability Control . . . . . . . . 139
Exhau
st gas emission control system . . . . . . . . . 135
Exterior mirror Adjustment . . . . . . . . . . . . . . . . . . . . . . . . . . . . . 12
Exterior mirrors . . . . . . . . . . . . . . . . . . . . . . . . . . . 159
Exterior view . . . . . . . . . . . . . . . . . . . . . . . . . . . . . . . 5
External aerial . . . . . . . . . . . . . . . . . . . . . . . . . . . . 156
F Fabric trim cleaning . . . . . . . . . . . . . . . . . . . . . . . 162
Fastening rings . . . . . . . . . . . . . . . . . . . . . . . . . . . 109
Filling the fuel tank . . . . . . . . . . . . . . . . . . . . . . . 163
Fire extinguisher . . . . . . . . . . . . . . . . . . . . . . . . . . 181
First-aid kit . . . . . . . . . . . . . . . . . . . . . . . . . . . . . . 181
Floor mats . . . . . . . . . . . . . . . . . . . . . . . . . . . . . . . . 34
Fog light bulb . . . . . . . . . . . . . . . . . . . . . . . . . . . . 202
Fog lights . . . . . . . . . . . . . . . . . . . . . . . . . . . . . . . . 90
Fog lights with cornering function . . . . . . . . . . . . 95
Footwell lights . . . . . . . . . . . . . . . . . . . . . . . . . . . . 96
Front head restraints . . . . . . . . . . . . . . . . . . . . . . . . . . 32
headrests . . . . . . . . . . . . . . . . . . . . . . . . . . . . . . 32
Front airbags . . . . . . . . . . . . . . . . . . . . . . . . . . . . . 42 operation . . . . . . . . . . . . . . . . . . . . . . . . . . . . . . . 40
safety instructions . . . . . . . . . . . . . . . . . . . . . . . 43
Front ashtray . . . . . . . . . . . . . . . . . . . . . . . . . . . . . 106
Front drink holder . . . . . . . . . . . . . . . . . . . . . . . . . 106
Front interior light . . . . . . . . . . . . . . . . . . . . . . . . . 96
Front parking aid . . . . . . . . . . . . . . . . . . . . . . . . . . . . . . . . . . . 148
Front passenger airbag deactivation . . . . . . . . . . 45 safety information . . . . . . . . . . . . . . . . . . . . . . . 46
Front passenger front airbag Deactivation . . . . . . . . . . . . . . . . . . . . . . . . . . . . 11
Front reading light . . . . . . . . . . . . . . . . . . . . . . . . . 96
231