window SEAT IBIZA SC 2017 User Guide
[x] Cancel search | Manufacturer: SEAT, Model Year: 2017, Model line: IBIZA SC, Model: SEAT IBIZA SC 2017Pages: 248, PDF Size: 5.24 MB
Page 81 of 248
Self-help
●
Cle
an the windscreen wiper blades and all
windows regularly.
● The wiper blades should be changed once
or twice a
year. CAUTION
● Dam aged or dir
ty windscreen wipers could
scratch the glass.
● Never use fuel, nail varnish remover, paint
thinner or simil
ar products to clean the win-
dows. This could damage the windscreen
wiper blades.
● Never move any windscreen wiper by hand.
This c
ould cause damage.
● To prevent damage to the bonnet and the
winds
creen wiper arms, the latter should only
be lifted off the windscreen when in service
position. Note
● The wind s
creen wiper arms can be moved
to the service position only when the bonnet
is properly closed.
● You can also use the service position, for
examp
le, if you want to fix a cover over the
windscreen in the winter to keep it clear of
ice. Towing or tow-starting
Not e
s Read the additional information carefully
›› ›
page 51
Please observe the following points if you
use a tow rope:
Notes for the driver of the towing vehicle
– Move the vehicle slowly until the cable is
taut.
Then accelerate gradually.
– Begin and change gears cautiously. If you
are driv in
g an automatic vehicle, accelerate
gently.
– Remember that the brake servo and power
steerin
g are not working in the vehicle you
are towing. Brake sooner than normal and
pressing the pedal gently.
Notes for the driver of the towed vehicle
– Ensure that the tow rope remains taut at all
times when t
owing.
Towing vehicles with an automatic gearbox
● Put the selector lever into position “N”.
● Do not drive faster than 50 km/h (31 mph).
● Do not tow further than 50 km.
● If a breakdown vehicle is used, the vehicle
must
be towed with the front wheels raised. WARNING
If the vehicle has no electrical power, the
brak e light
s, turn signals and all other lights
will no longer function. Do not have the vehi-
cle towed away. Failure to follow this instruc-
tion could result in an accident. WARNING
Vehicle handling and braking capacity
ch an
ge considerably during towing. Please
observe the following instructions to mini-
mise the risk of serious accidents and injury:
● As the driver of the vehicle being towed:
– You shoul
d depress the brake much hard-
er as the brake servo does not operate.
Pay the utmost attention to avoid crash-
ing into the towing vehicle.
– More strength is required at the steering
wheel as the power steering does not op-
erate when the engine is switched off.
● As the driver of the towing vehicle:
– Acc
elerate with particular care and cau-
tion.
– Avoid sudden braking and manoeuvres.
– Brake earlier than usual and more
smoothly. CAUTION
When tow-starting, fuel could enter the cata-
lytic c on
verter and damage it. » 79
Technical data
Advice
Operation
Emergencies
Safety
Page 83 of 248
Fuses and bulbs
●
Tak e c
are not to cause short circuits in the
electrical system. WARNING
Using unsuitable fuses, repairing fuses or
bridgin g a curr
ent circuit without fuses can
cause a fire and serious injury.
● Never use a fuse with a higher value. Only
repl
ace fuses with a fuse of the same amper-
age (same colour and markings) and size.
● Never repair a fuse.
● Never replace a fuse by a metal strip, staple
or simil
ar. CAUTION
● To pr ev
ent damage to the vehicle's electric
system, before replacing a fuse always turn
off the ignition, the lights and all electrical
elements and remove the key from the igni-
tion.
● If you replace a fuse with higher-rating
fuse,
you could cause damage to another part
of the electrical system.
● Protect the fuse boxes when open to pre-
vent the entr
y of dust or humidity as they can
damage the electrical system.
● Always carefully remove the fuse box cov-
ers and r
efit them correctly to avoid problems
with your vehicle. Note
● One component m
ay have more than one
fuse.
● Several components may run on a single
fuse.
● In the
vehicle, there are more fuses than
those indicat
ed in this chapter. These should
only be changed by a specialised workshop.
● Positions not containing a fuse do not ap-
pear in the fo
llowing tables.
● Some of the equipment listed in the tables
below pert
ain only to certain versions of the
model or are optional extras.
● Please note that the above lists, while cor-
rect at
the time of printing, are subject to
change. Fuses to the left of the instrument
p
anel Read the additional information carefully
› ›
›
page 44
Only replace fuses with a fuse of the same
amperage (same colour and markings) and
size.
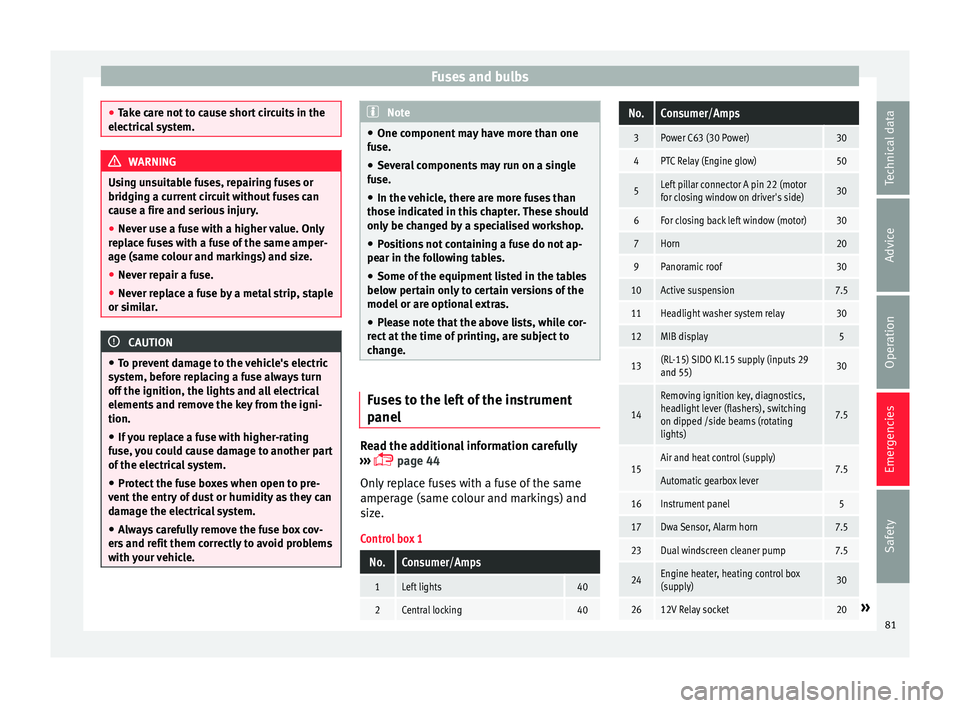
Control box 1
No.Consumer/Amps
1Left lights40
2Central locking40
No.Consumer/Amps
3Power C63 (30 Power)30
4PTC Relay (Engine glow)50
5Left pillar connector A pin 22 (motor
for closing window on driver's side)30
6For closing back left window (motor)30
7Horn20
9Panoramic roof30
10Active suspension7.5
11Headlight washer system relay30
12MIB display5
13(RL-15) SIDO Kl.15 supply (inputs 29
and 55)30
14
Removing ignition key, diagnostics,
headlight lever (flashers), switching
on dipped /side beams (rotating
lights)
7.5
15Air and heat control (supply)7.5Automatic gearbox lever
16Instrument panel5
17Dwa Sensor, Alarm horn7.5
23Dual windscreen cleaner pump7.5
24Engine heater, heating control box
(supply)30
2612V Relay socket20» 81
Technical data
Advice
Operation
Emergencies
Safety
Page 84 of 248
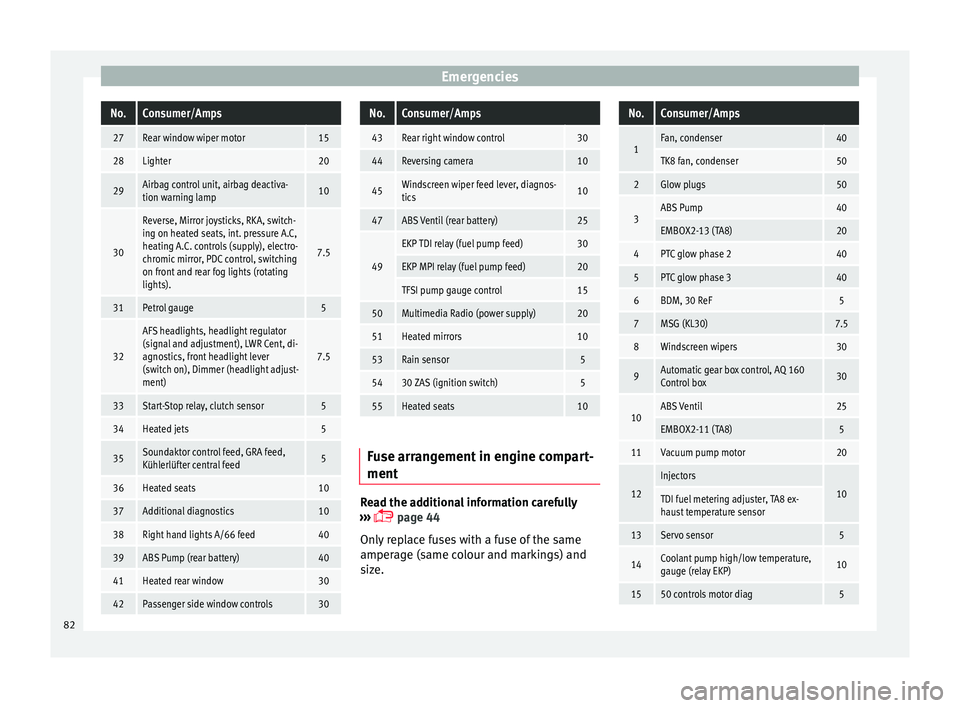
EmergenciesNo.Consumer/Amps
27Rear window wiper motor15
28Lighter20
29Airbag control unit, airbag deactiva-
tion warning lamp10
30
Reverse, Mirror joysticks, RKA, switch-
ing on heated seats, int. pressure A.C,
heating A.C. controls (supply), electro-
chromic mirror, PDC control, switching
on front and rear fog lights (rotating
lights).
7.5
31Petrol gauge5
32
AFS headlights, headlight regulator
(signal and adjustment), LWR Cent, di-
agnostics, front headlight lever
(switch on), Dimmer (headlight adjust-
ment)
7.5
33Start-Stop relay, clutch sensor5
34Heated jets5
35Soundaktor control feed, GRA feed,
Kühlerlüfter central feed5
36Heated seats10
37Additional diagnostics10
38Right hand lights A/66 feed40
39ABS Pump (rear battery)40
41Heated rear window30
42Passenger side window controls30
No.Consumer/Amps
43Rear right window control30
44Reversing camera10
45Windscreen wiper feed lever, diagnos-
tics10
47ABS Ventil (rear battery)25
49
EKP TDI relay (fuel pump feed)30
EKP MPI relay (fuel pump feed)20
TFSI pump gauge control15
50Multimedia Radio (power supply)20
51Heated mirrors10
53Rain sensor5
5430 ZAS (ignition switch)5
55Heated seats10
Fuse arrangement in engine compart-
ment
Read the additional information carefully
› ›
›
page 44
Only replace fuses with a fuse of the same
amperage (same colour and markings) and
size.
No.Consumer/Amps
1Fan, condenser40
TK8 fan, condenser50
2Glow plugs50
3ABS Pump40
EMBOX2-13 (TA8)20
4PTC glow phase 240
5PTC glow phase 340
6BDM, 30 ReF5
7MSG (KL30)7.5
8Windscreen wipers30
9Automatic gear box control, AQ 160
Control box30
10ABS Ventil25
EMBOX2-11 (TA8)5
11Vacuum pump motor20
12
Injectors
10TDI fuel metering adjuster, TA8 ex-
haust temperature sensor
13Servo sensor5
14Coolant pump high/low temperature,
gauge (relay EKP)10
1550 controls motor diag5 82
Page 95 of 248
Controls and displays
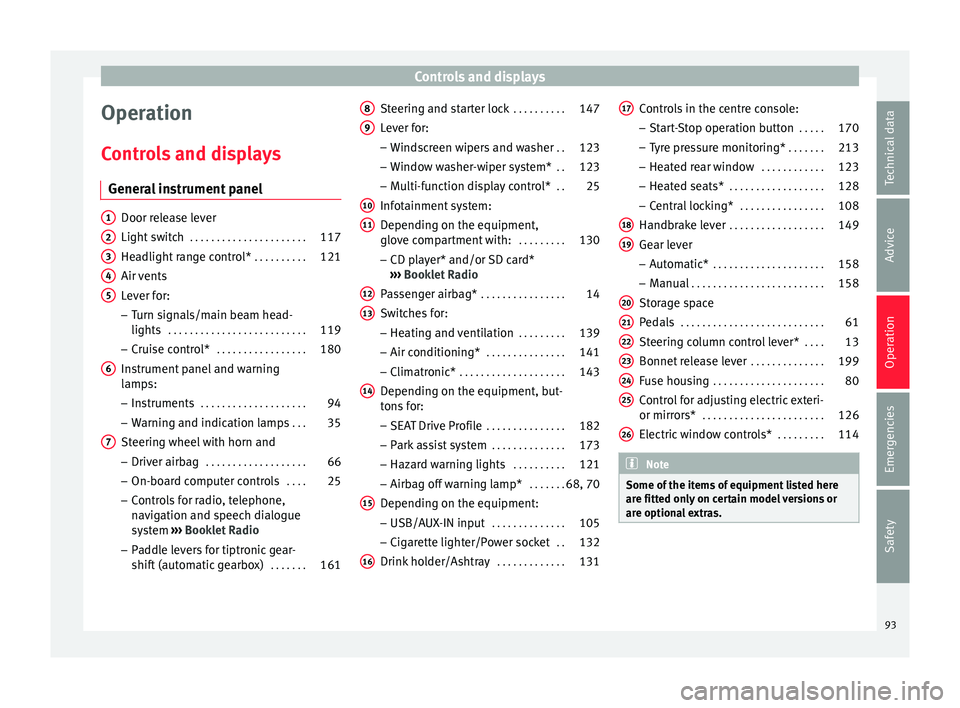
Operation
C ontr
o
ls and displays
General instrument panel Door release lever
Light sw
it
ch . . . . . . . . . . . . . . . . . . . . . . 117
Headlight range control* . . . . . . . . . .121
Air vents
Lever f
or:
– Turn signals/main beam head-
lights . . . . . . . . . . . . . . . . . . . . . . . . . . 119
– Crui se c
ontrol* . . . . . . . . . . . . . . . . . 180
Instrument panel and warning
lamp s:
– In
struments . . . . . . . . . . . . . . . . . . . . 94
– Warnin g and indic
ation lamps . . .35
Steering wheel with horn and – Driver airb ag . . . . . . . . . . . . . . . . . . . 66
– On-boar d c
omputer controls . . . .25
– Contro
ls for radio, telephone,
navigation and speech dialogue
system ›››
Booklet Radio
– Paddle levers for tiptronic gear-
shift (automatic gearbox) . . . . . . .161
1 2
3
4
5
6
7 Steering and starter lock
. . . . . . . . . .147
Lever for: – Wind
s
creen wipers and washer . .123
– Window w
asher-wiper system* . .123
– Multi-f
unction display control* . .25
Infotainment system:
Depending on the equipment,
glo
ve compartment with: . . . . . . . . .130
– CD pla
yer* and/or SD card*
››› Booklet Radio
Passenger airbag* . . . . . . . . . . . . . . . . 14
Switches for:
– Heating and
ventilation . . . . . . . . . 139
– Air conditionin g* . . . . . . . . . . . . . . . 141
– C
limatr
onic* . . . . . . . . . . . . . . . . . . . . 143
Depending on the equipment, but-
ton s
for:
– SEAT Drive Profile . . . . . . . . . . . . . . . 182
– Park a
ssist system . . . . . . . . . . . . . . 173
– Hazard w
arning lights . . . . . . . . . .121
– Airbag off w
arning lamp* . . . . . . .68, 70
Depending on the equipment:
– USB/AUX -IN inp
ut . . . . . . . . . . . . . . 105
– Cig ar
ette lighter/Power socket . .132
Drink holder/Ashtray . . . . . . . . . . . . .131
8 9
10
11
12
13
14
15
16 Controls in the centre console:
– St ar
t
-Stop operation button . . . . .170
– Tyr
e pressure monitoring* . . . . . . .213
– Heated r
ear window . . . . . . . . . . . . 123
– Heated se
ats* . . . . . . . . . . . . . . . . . . 128
– Central
locking* . . . . . . . . . . . . . . . . 108
Handbrake lever . . . . . . . . . . . . . . . . . . 149
Gear lever – Automatic* . . . . . . . . . . . . . . . . . . . . . 158
– M
anual . . . . . . . . . . . . . . . . . . . . . . . . . 158
Stor
age space
Pedal
s . . . . . . . . . . . . . . . . . . . . . . . . . . . 61
Steering column control lever* . . . .13
Bonnet release lever . . . . . . . . . . . . . .199
Fuse housing . . . . . . . . . . . . . . . . . . . . . 80
Control for adjusting electric exteri-
or mirrors* . . . . . . . . . . . . . . . . . . . . . . . 126
El
ectric window controls* . . . . . . . . .114 Note
Some of the items of equipment listed here
are fitt ed on
ly on certain model versions or
are optional extras. 17
18
19
20
21
22
23
24
25
26
93
Technical data
Advice
Operation
Emergencies
Safety
Page 112 of 248
Operation
Keys Set of
k
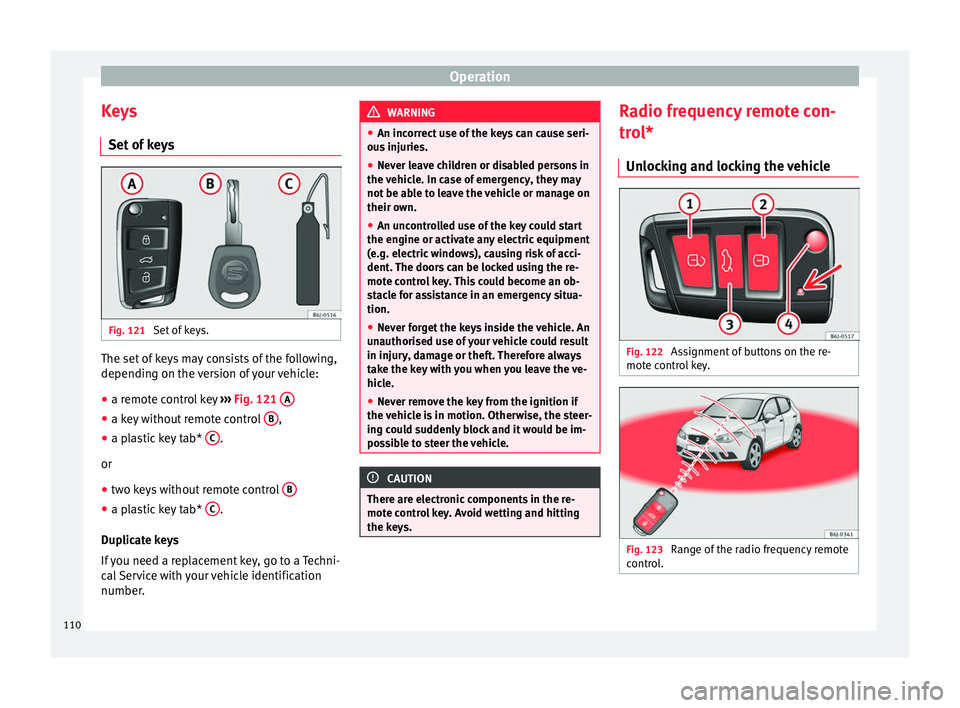
eys Fig. 121
Set of keys. The set of keys may consists of the following,
dependin
g on the
v
ersion of your vehicle:
● a remote control key ›››
Fig. 121 A ●
a key without remote control B ,
● a plastic key tab* C .
or
● two keys without remote control B●
a plastic key tab* C .
D up
lic
ate keys
If you need a replacement key, go to a Techni-
cal Service with your vehicle identification
number. WARNING
● An incorr ect
use of the keys can cause seri-
ous injuries.
● Never leave children or disabled persons in
the vehic
le. In case of emergency, they may
not be able to leave the vehicle or manage on
their own.
● An uncontrolled use of the key could start
the engine or activat
e any electric equipment
(e.g. electric windows), causing risk of acci-
dent. The doors can be locked using the re-
mote control key. This could become an ob-
stacle for assistance in an emergency situa-
tion.
● Never forget the keys inside the vehicle. An
unauthori
sed use of your vehicle could result
in injury, damage or theft. Therefore always
take the key with you when you leave the ve-
hicle.
● Never remove the key from the ignition if
the vehic
le is in motion. Otherwise, the steer-
ing could suddenly block and it would be im-
possible to steer the vehicle. CAUTION
There are electronic components in the re-
mote c ontr
ol key. Avoid wetting and hitting
the keys. Radio frequency remote con-
tr
o
l*
Un
locking and locking the vehicle Fig. 122
Assignment of buttons on the re-
mot e c
ontr
ol key. Fig. 123
Range of the radio frequency remote
c ontr
o
l. 110
Page 115 of 248
Opening and closing
●
The al arm i
s triggered immediately if one of
the battery cables is disconnected while the
alarm system is active. Vehicle interior monitoring and anti-
to
w sy
stem* Monitoring or control function incorporated
in the anti-theft
al
arm* which detects unau-
thorised vehicle entry by means of ultra-
sound.
Activation
– It is automatically switched on when the
anti-theft al
arm is activated.
Deactivation – Open the vehicle with the key, either me-
chanic
ally or by pressing the button on
the r emot
e c
ontrol. The time period from
when the door is opened until the key is in-
serted into the contact should not exceed
15 seconds, otherwise the alarm will be
triggered.
– Press the button on the remote control
tw ic
e.
The volumetric sensor and tilt sen-
sors will be deactivated. The alarm system
remains activated.
The vehicle interior monitoring and the anti-
tow system are automatically switched on
again next time the vehicle is locked. The vehicle interior monitoring and anti-tow
sensor (tilt
sensor) are automatically switch-
ed on when the anti-theft alarm is switched
on. In order to activate it, all the doors and
the rear lid must be closed.
If you wish to switch off the vehicle interior
monitoring and the anti-tow system, it must
be done each time that the vehicle is locked;
if not, they will be automatically switched on.
The vehicle interior monitoring and the anti-
tow system should be switched off if animals
are left inside the locked vehicle (otherwise,
their movements will trigger the alarm) or
when, for example, the vehicle is transported
or has to be towed with only one axle on the
ground.
False alarms
Interior monitoring will only operate correctly
if the vehicle is completely closed. Please ob-
serve related legal requirements.
The following cases may cause a false alarm:
● Open windows (partially or fully),
● Tilting panoramic sunroof open (partially or
compl
etely),
● Movement of objects inside the vehicle,
such a
s loose papers, items hanging from
the rear vision mirror (air fresheners), etc. Note
● If the v
ehicle is relocked and the alarm is
activated without the volumetric sensor func-
tion, relocking will activate the alarm with all
its functions, except the volumetric sensor.
This function is reactivated when the alarm is
switched on again, unless it is deliberately
switched off.
● If the alarm has been triggered by the volu-
metric sensor
, this will be indicated by a
flashing of the warning lamp on the driver
door when the vehicle is opened. The flash is
different to the flash indicating the alarm is
activated.
● The vibration of a mobile phone left inside
the vehic
le may cause the vehicle interior
monitoring alarm to trigger, as both sensors
react to movements and shakes inside the ve-
hicle.
● If on activating the alarm, any door or the
rear lid i
s open, only the alarm will be activa-
ted. The vehicle interior monitoring and the
anti-tow system will only be activated once
all the doors are closed (including the rear
lid). Boot hatch
Openin g and c
lo
sing Read the additional information carefully
› ›
›
page 9 »
113
Technical data
Advice
Operation
Emergencies
Safety
Page 116 of 248
Operation
WARNING
● Alw a
ys close the rear lid properly. Risk of
accident or injury.
● The rear lid must not be opened when the
rever
se or rear fog lights are lit. This may
damage the tail lights.
● Do not close the rear lid by pushing it down
with y
our hand on the rear window. The glass
could smash. Risk of injury!
● Ensure the rear lid is locked after closing it.
If not, it m
ay open unexpectedly while driv-
ing.
● Never allow children to play in or around
the vehic
le. A locked vehicle can be subjected
to extremely high and low temperatures, de-
pending on the time of year, thus causing se-
rious injuries/illness. It could even have fatal
consequences. Close and lock both the rear
lid and all the other doors when you are not
using the vehicle.
● Closing the rear lid without observing and
ensurin
g it is clear could cause serious injury
to you and to third parties. Make sure that no
one is in the path of the rear lid.
● Never drive with the rear lid open or half-
closed, e
xhaust gases may enter into the in-
terior of the vehicle. Danger of poisoning!
● If you only open the rear lid, do not leave
the key in
side. The vehicle cannot be opened
if the key is left inside. Electric windows
Openin g and c
lo
sing of the electric
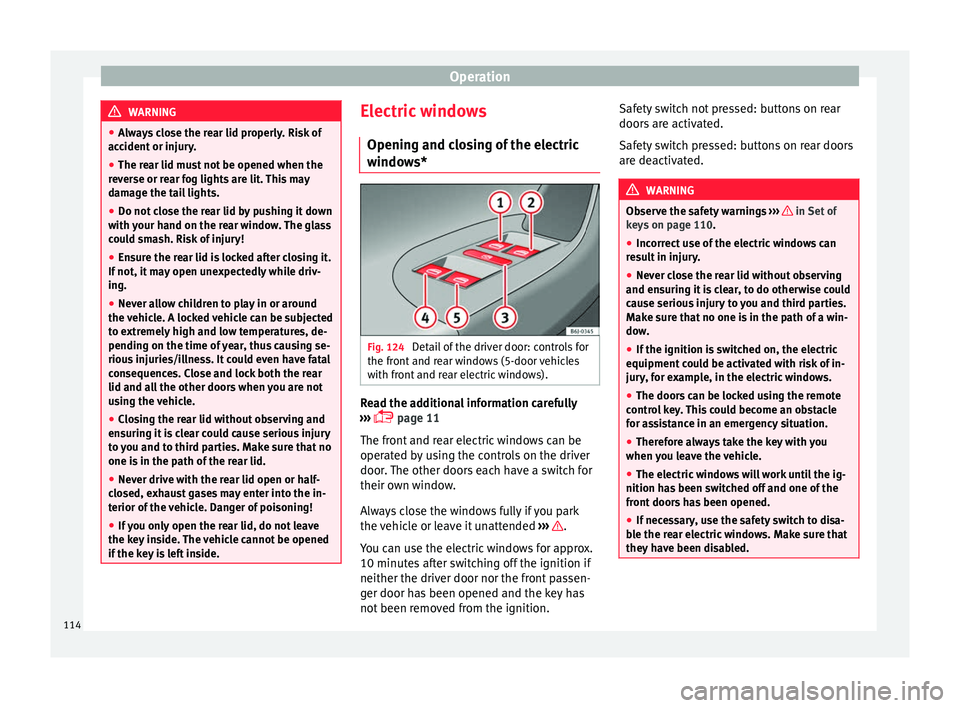
windows* Fig. 124
Detail of the driver door: controls for
the fr ont
and r
ear windows (5-door vehicles
with front and rear electric windows). Read the additional information carefully
› ›
›
page 11
The front and rear electric windows can be
operated by using the controls on the driver
door. The other doors each have a switch for
their own window.
Always close the windows fully if you park
the vehicle or leave it unattended ››› .
Y ou c
an u
se the electric windows for approx.
10 minutes after switching off the ignition if
neither the driver door nor the front passen-
ger door has been opened and the key has
not been removed from the ignition. Safety switch not pressed: buttons on rear
doors ar
e activated.
Safety switch pressed: buttons on rear doors
are deactivated. WARNING
Observe the safety warnings ›››
in Set of
key s on p
age 110.
● Incorrect use of the electric windows can
res
ult in injury.
● Never close the rear lid without observing
and ensurin
g it is clear, to do otherwise could
cause serious injury to you and third parties.
Make sure that no one is in the path of a win-
dow.
● If the ignition is switched on, the electric
equipment cou
ld be activated with risk of in-
jury, for example, in the electric windows.
● The doors can be locked using the remote
contro
l key. This could become an obstacle
for assistance in an emergency situation.
● Therefore always take the key with you
when you l
eave the vehicle.
● The electric windows will work until the ig-
nition has
been switched off and one of the
front doors has been opened.
● If necessary, use the safety switch to disa-
ble the r
ear electric windows. Make sure that
they have been disabled. 114
Page 117 of 248
Opening and closing
Note
If the window is not able to close because it
is s
tiff or because of an obstruction, the win-
dow will automatically open again
››› page 115. If this happens, check why the
window could not be closed before attempt-
ing to close it again. One-touch opening and closing*
One-touch opening and closing means you
do not h
av
e to hold down the button.
Buttons ›››
Fig. 124 1 ,
2 ,
4 and
5 have
tw o po
s
itions for opening windows and two
for closing them. This makes it easier to open
and close windows to the desired position.
One-touch closing
– Pull up the window button briefly up to the
second pos
ition. The window closes fully.
One-touch opening
– Push down the window button briefly up to
the second pos
ition. The window opens
fully.
Resetting one-touch opening and closing
– The automatic open and close function will
not work
if the battery has been temporari-
ly disconnected. The function can be re-
stored as follows: –
Close the w
indow as far as it will go by lift-
ing and holding the electric window switch.
– Release the switch and then lift it again for
1 second. Thi
s will re-enable the automatic
function.
If you push (or pull) a button to the first
stage, the window will open (or close) until
you release the button. If you push or lift the
button briefly to the second stage, the win-
dow will open (one-touch opening) or close
(one-touch closing) automatically. If you op-
erate the button while the window is opening
or closing, it stops at this position.
Roll-back function The roll-back function reduces the risk of in-
jur
y
when the el
ectric windows close.
● If a window is obstructed when closing au-
tomatic
ally, the window stops at this point
and lowers immediately ››› .
● Next, check why the window does not close
bef or
e att
empting it again.
● If you try within the following 10 seconds
and the window c
loses again with difficulty
or there is an obstruction, the automatic clos-
ing will stop working for 10 seconds.
● If the window is still obstructed, the win-
dow w i
ll stop at this point. ●
If ther e i
s no obvious reason why the win-
dow cannot be closed, try to close it again by
pulling the tab within ten seconds. The win-
dow closes with maximum force. The roll-
back function is now deactivated.
If more than 10 seconds pass, the window
will open fully when you operate one of the
buttons. One-touch closing is reactivated. WARNING
● Incorr ect
use of the electric windows can
result in injury.
● Always take the ignition key with you when
leav
ing the vehicle, even if you only intend to
be gone for a short time. Please ensure that
children are never left alone inside the vehi-
cle.
● The electric windows will work until the ig-
nition has
been switched off and one of the
front doors has been opened.
● Closing the windows without observing and
ensurin
g it is clear could cause serious injury
to you and third parties. Make sure that no
one is in the path of a window.
● Never allow people to remain in the vehicle
when you c
lose the vehicle from the outside.
The windows cannot be opened even in an
emergency.
● The roll-back function does not prevent fin-
gers
or other parts of the body getting
pinched against the window frame. Risk of
accident. 115
Technical data
Advice
Operation
Emergencies
Safety
Page 118 of 248
Operation
Convenience opening/closing* Using the door lock*
– Hold the key in the door lock of the driver
door in either the lock in
g or the unlocking
position until all windows are either
opened or closed.
– Release the key to interrupt this function.
Usin
g the remote control
– Keep the locking/unlocking button pressed
for the electric
window risers to
open/close; if you stop pressing the but-
ton, the window raising/lowering function
is stopped.
– If the automatic raising is stopped and im-
mediat ely
after, the opening button is kept
pressed, the window risers will lower.
– Once the windows are completely closed,
the turn sign
als will flash.
Tilting panoramic roof* Opening or clo
sing of the tilting pan-
oramic roof Read the additional information carefully
› ›
›
page 11 The panoramic/tilting sunroof is opened and
closed b
y using the switch when the ignition
is switched on.
Always close the panoramic/tilting sunroof
fully if you park the vehicle or leave it unat-
tended ››› .
The ti ltin
g s
unroof can be operated for up to
about ten minutes after the ignition has been
switched off, provided the driver door and
the front passenger door are not opened.
Sun visor
The sun visor is opened and closed manually
(independently of the panoramic/tilting sun-
roof). WARNING
● Incorr ect
use of the tilting sunroof can re-
sult in injury.
● Never close the tilting sunroof without first
check
ing that there are no obstructions. Risk
of serious injury to you or others. Make sure
that no one is in the path of the tilting sun-
roof.
● Always take the vehicle key with you when
you le
ave the vehicle.
● Never leave children or disabled persons in
the vehic
le, particularly if they have access to
the keys. Unsupervised use of a key could
mean that the engine is started or that elec-
trical equipment is used (e.g. electric tilting
sunroof) with a risk of accident. The doors can be locked using the remote control key.
This
c
ould become an obstacle for assistance
in an emergency situation.
● The tilting sunroof continues to function
until
one of the front doors is opened and the
key removed from the ignition.
● Ensure that no object and/or end is be-
tween the gla
ss and the sunroof when the
one-touch opening/closing function is reset. Convenience closing*
Using the door lock
– Hold the key in the door lock of the driver
door in the loc k
in
g position until the tilting
sunroof is closed.
– Release the key to interrupt this function.
Usin
g the remote control
– Push the lock button on the remote control
for appr
oximately 3 seconds. The tilting
sunroof closes.
– Press the unlock button to interrupt the
function.
116
Page 125 of 248
Lights and visibility
Visibility He at
ed r
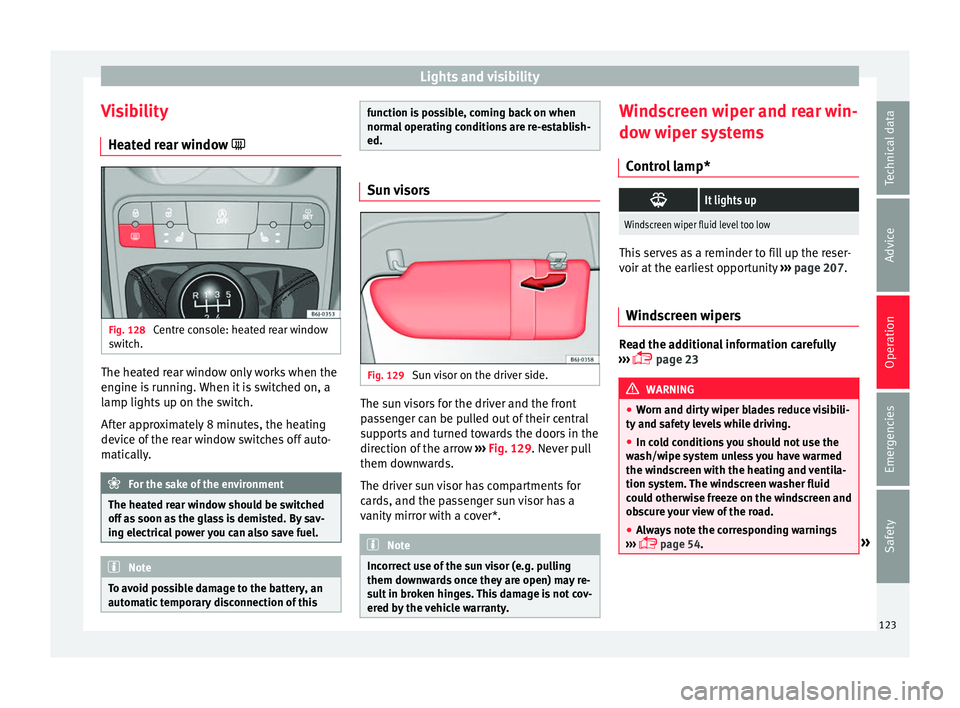
ear window Fig. 128
Centre console: heated rear window
sw it
c
h. The heated rear window only works when the
en
gine i
s
running. When it is switched on, a
lamp lights up on the switch.
After approximately 8 minutes, the heating
device of the rear window switches off auto-
matically. For the sake of the environment
The heated rear window should be switched
off a s
soon as the glass is demisted. By sav-
ing electrical power you can also save fuel. Note
To avoid possible damage to the battery, an
autom atic
temporary disconnection of this function is possible, coming back on when
norma
l
operating conditions are re-establish-
ed. Sun visors
Fig. 129
Sun visor on the driver side. The sun visors for the driver and the front
p
a
s
senger can be pulled out of their central
supports and turned towards the doors in the
direction of the arrow ››› Fig. 129. Never pull
them downwards.
The driver sun visor has compartments for
cards, and the passenger sun visor has a
vanity mirror with a cover*. Note
Incorrect use of the sun visor (e.g. pulling
them down w
ards once they are open) may re-
sult in broken hinges. This damage is not cov-
ered by the vehicle warranty. Windscreen wiper and rear win-
do
w w
iper sy
stems
Control lamp*
It lights up
Windscreen wiper fluid level too low
This serves as a reminder to fill up the reser-
voir at
the e
arliest opportunity ››› page 207.
Windscreen wipers Read the additional information carefully
› ›
›
page 23 WARNING
● Worn and dir ty
wiper blades reduce visibili-
ty and safety levels while driving.
● In cold conditions you should not use the
wash/w
ipe system unless you have warmed
the windscreen with the heating and ventila-
tion system. The windscreen washer fluid
could otherwise freeze on the windscreen and
obscure your view of the road.
● Always note the corresponding warnings
›››
page 54. » 123
Technical data
Advice
Operation
Emergencies
Safety