fuel Seat Ibiza ST 2010 Owner's Guide
[x] Cancel search | Manufacturer: SEAT, Model Year: 2010, Model line: Ibiza ST, Model: Seat Ibiza ST 2010Pages: 264, PDF Size: 7.11 MB
Page 191 of 264
Checking and refilling levels189
Safety First
Operating Instructions
Practical Tips
Technical Specifications
•If any work has to be performed when the engine is started or with the
engine running, there is an additional, potentially fatal, safety risk from the
rotating parts, such as the drive belts, alternator, radiator fan, etc., and
from the high-voltage ignition system. You should also observe the
following points:
−Never touch the electrical wiring of the ignition system.
− Ensure that jewellery, loose clothing and long hair do not get
trapped in rotating engine parts. Danger of death. Before starting any
work remove jewellery, tie back and cover hair, and wear tight-fitting
clothes.
− Never accelerate with a gear engaged without taking the necessary
precautions. The vehicle could move, even if the handbrake is applied.
Danger of death.•If work has to be carried out on the fuel system or on electrical compo-
nents, you must observe the following safety notes in addition to the above
warnings:
−Always disconnect the battery. The vehicle must be unlocked when
this is done, otherwise the alarm will be triggered.
− Do not smoke.
− Never work near naked flames.
− Always have a fire extinguisher on hand.Caution
When topping up service fluids, make sure not to mistake them. Using the
wrong fluids could cause serious malfunctions and engine damage!
For the sake of the environment
Service fluids leaks are harmful to the environment. For this reason you
should make regular checks on the ground underneath your vehicle. If you find spots of oil or other fluids, have your vehicle inspected at a specialised
workshop.
WARNING (continued)
IbizaST_EN.book Seite 189 Dienstag, 14. September 2010 1:31 13
Page 200 of 264
Checking and refilling levels
198Changing windscreen wiper blades
If the windscreen wiper blades are in perfect condition, you
will benefit from an improved visibility. Damaged wiper
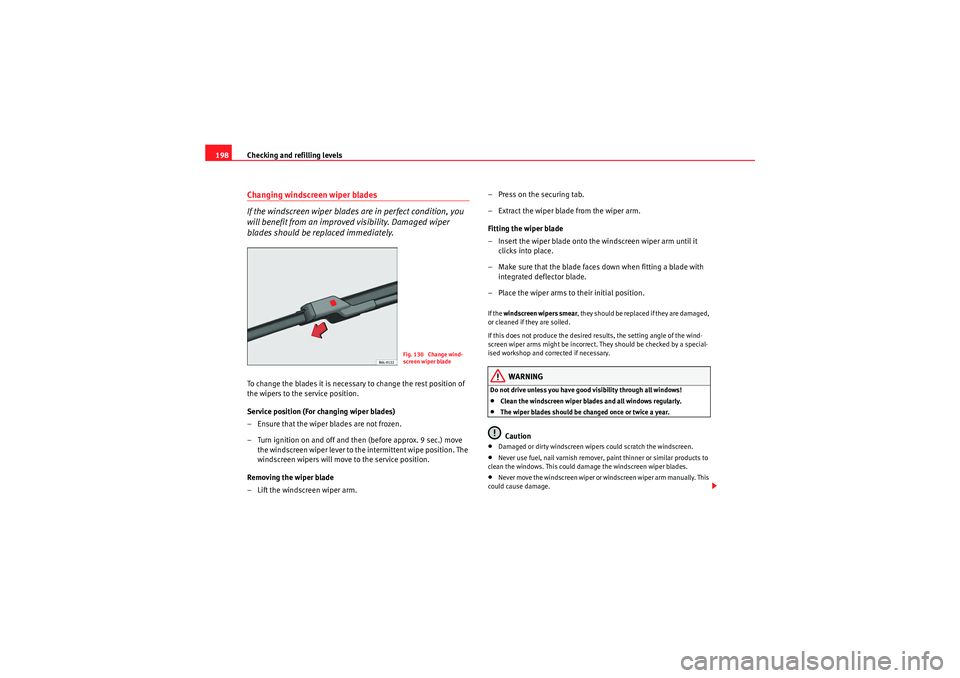
blades should be replaced immediately.To change the blades it is necessary to change the rest position of
the wipers to the service position.
Service position (For changing wiper blades)
– Ensure that the wiper blades are not frozen.
– Turn ignition on and off and then (before approx. 9 sec.) move
the windscreen wiper lever to the intermittent wipe position. The
windscreen wipers will move to the service position.
Removing the wiper blade
– Lift the windscreen wiper arm. – Press on the securing tab.
– Extract the wiper blade from the wiper arm.
Fitting the wiper blade
– Insert the wiper blade onto the windscreen wiper arm until it
clicks into place.
– Make sure that the blade faces down when fitting a blade with integrated deflector blade.
– Place the wiper arms to their initial position.
If the windscreen wipers smear , t h e y s h o u l d b e r e p l a ce d i f t h e y a r e d a m a g e d ,
or cleaned if they are soiled.
If this does not produce the desired results, the setting angle of the wind-
screen wiper arms might be incorrect. They should be checked by a special-
ised workshop and corrected if necessary.
WARNING
Do not drive unless you have good visibility through all windows!•Clean the windscreen wiper blades and all windows regularly.•The wiper blades should be changed once or twice a year.Caution
•Damaged or dirty windscreen wipers could scratch the windscreen.•Never use fuel, nail varnish remover, paint thinner or similar products to
clean the windows. This could damage the windscreen wiper blades.•Never move the windscreen wiper or windscreen wiper arm manually. This
could cause damage.
Fig. 130 Change wind-
screen wiper blade
IbizaST_EN.book Seite 198 Dienstag, 14. September 2010 1:31 13
Page 201 of 264

Checking and refilling levels199
Safety First
Operating Instructions
Practical Tips
Technical Specifications
Note
•The wiper arms can be moved to the service position only when the
bonnet is properly closed.Changing the rear wiper blade
A good rear wiper blade is e ssential for clear rear vision.
Damaged wiper blades should be replaced immediately.Removing the wiper blade
– Lift the rear wiper arm.
– Release the blade by pulling it in the direction of the arrow . Fitting the wiper blade
– Insert the wiper blade onto the windscreen wiper arm until it
clicks into place.
Check the condition of the wiper blade regularly. Change as required.
If the windscreen wiper scrapes , i t s h o u l d b e r e p la ce d i f d a m a ge d , o r c l ea n e d
if soiled.
If this is not sufficient, refer to a specialised workshop.
WARNING
Do not drive unless you have good visibility through all windows!•Clean the windscreen wiper blades and all windows regularly.•The wiper blades should be changed once or twice a year.Caution
•A damaged or dirty window wiper could scratch the rear window.•Never use fuel, nail varnish remover, paint thinner or similar products to
clean the window.•Never move the windscreen wiper by hand. This could cause damage.
Fig. 131 Changing the
rear window wiper blade
A2
IbizaST_EN.book Seite 199 Dienstag, 14. September 2010 1:31 13
Page 205 of 264
Checking and refilling levels203
Safety First
Operating Instructions
Practical Tips
Technical Specifications
Charging and changing the vehicle battery
The battery is maintenance-free and is checked during the
inspection service. All work on the vehicle battery requires
specialist knowledge.If you often drive short distances or if the vehicle is not driven for long
periods, the battery should be checked by a specialised workshop between
the scheduled services.
If the battery has discharged and you have problems starting the vehicle, the
battery might be damaged. If this happens, we recommend you have the
vehicle battery checked by an Authorised Service Centre where it will be re-
charged or replaced.
Charging the battery
The vehicle battery should be charged by a specialised workshop only, as
batteries using special technology have been installed and they must be
charged in a controlled environment.
Replacing a vehicle battery
The battery has been developed to suit the conditions of its location and has
special safety features.
Genuine SEAT batteries fulfil the maintenance, performance and safety spec-
ifications of your vehicle.
WARNING
•We recommend you use only maintenance-free or cycle free leak-proof
batteries which comply with standards T 825 06 and VW 7 50 73. This
standard applies as of 2001.•Before starting any work on the batteries, you must read and observe
the warnings ⇒ in “Warnings on handling the battery” on page 201.
For the sake of the environment
Batteries contain toxic substances such as sulphuric acid and lead. They
m ust b e d isp os ed o f a ppro p ria tely and m ust not be d isp ose d of wi th o rd ina r y
household waste.WheelsGeneral notesAvoiding damage
– If you have to drive over a kerb or similar obstacle, drive very
slowly and at a right angle.
– Keep grease, oil and fuel off the tyres.
– Inspect the tyres regularly for da mage (cuts, cracks or blisters,
etc.). Remove any foreign objects embedded in the treads.
Storing tyres
– When you remove the tyres, mark them in order to maintain the same direction of rotation when they are installed again.
– When removed, the wheels and/or tyres should be stored in a cool, dry and preferably dark location.
– Store tyres in a vertical position if they are not fitted on wheel
rims.New tyres
New tyres must be run in ⇒ page 164.
IbizaST_EN.book Seite 203 Dienstag, 14. September 2010 1:31 13
Page 206 of 264
Checking and refilling levels
204The tread depth of new tyres may vary, according to the type and make of tyre
and the tread pattern.
Concealed damage
Damage to tyres and rims is often not readily visible. If you notice unusual
vibrations or the vehicle pulling to one side, this may indicate that one of the
tyres is damaged. The tyres should be checked immediately by an Authorised
Service Centre.
Tyres with directional tread pattern
An arrow on the tyre sidewall indicates the direction of rotation on tyres with
directional tread. Always observe the direction of rotation indicated when
fitting the wheel. This guarantees optimum grip and helps to avoid aqua-
planing, excessive noise and wear.
WARNING
•New tyres do not have maximum grip during the first 500 km. Drive
particularly carefully to avoid possible accidents.•Never drive with damaged tyres. This may cause an accident.•If you notice unusual vibrations or if the vehicle pulls to one side when
driving, stop the vehicle immediately and check the tyres for damage.
Checking tyre pressure
The correct tyre pressure can be seen on the sticker on the
inside of the tank flap.1. Read the required tyre inflation pressure from the sticker. The values refer to Summer tyres. 2. The tyre pressures should only be checked when the tyres are
cold. The slightly raised pressu res of warm tyres must not be
reduced.
3. Adjust the tyre pressure to the load you are carrying.
Tyre pressure
The correct tyre pressure is especially important at high speeds. The pressure
should therefore be checked at least once a month and before starting a
journey.
WARNING
A tyre can easily burst if the pressure is too low, causing an accident!•At continuously high speeds, a tyre with insufficient pressure flexes
more. In this way it becomes too hot, and this can cause tread separation
and tyre blow-out. Always observe the recommended tyre pressures.•If the tyre pressure is too low or too high, the tyres will wear prema-
turely and the vehicle will not handle well. Risk of accident!For the sake of the environment
Under-inflated tyres will increase fuel consumption.
IbizaST_EN.book Seite 204 Dienstag, 14. September 2010 1:31 13
Page 208 of 264

Checking and refilling levels
206
WARNING
There is a serious danger of accidents if a tyre bursts during driving!•The tyres must be replaced at the latest when the tread is worn down to
the tread wear indicators. Failure to do so could result in an accident. Worn
tyres do not grip well at high speeds on wet roads. There is also a greater
risk of aquaplaning.•At continuously high speeds, a tyre with insufficient pressure flexes
more. This causes it to overheat. This can cause tread separation and tyre
blow-out. Risk of accident. Always observe the recommended tyre pres-
sures.•If tyres show excessive wear, you should have the running gear checked
by an Authorised Service Centre.•Keep chemicals such as oil, fuel and brake fluid away from tyres.•Damaged wheels and tyres must be replaced immediately!For the sake of the environment
Under-inflated tyres will increase fuel consumption.New tyres and wheels
New tyres and wheels have to be run in.The tyres and wheel rims are an essential part of the vehicle's design. The
tyres and rims approved by SEAT are specially matched to the characteristics
of the vehicle and make a major contribution to good road holding and safe
handling ⇒.
Tyres should be replaced at least in pairs and not individually (i.e. both front
tyres or both rear tyres together). A knowledge of tyre designations makes it easier to choose the correct tyres. Radial tyres have the tyre designations
marked on the sidewall, for example:
195/65 R15 91T
This contains the following information:
195 Tyre width in mm
65 Height/width ratio in %
RTyre construction: Radial
15 Rim diameter in inches
91 Load rating code
TSpeed rating
The tyres could also have the following information:
•A direction of rotation symbol•“Reinforced” denotes heavy-duty tyres.
The manufacturing date is also indicated on the tyre sidewall (possibly only
on the inner side of the wheel).
“DOT ... 1103 ...” means, for example, that the tyre was produced in the 11th
week of 2003.
We recommend that work on tyres and wheels be carried out by an Authorised
Service Centre. They are familiar with the procedure and have the necessary
special tools and spare parts as well as the proper facilities for disposing of
the old tyres.
Any Authorised Service Centre has full information on the technical require-
ments when installing or changing tyres, wheels or wheel trims.WARNING
•We recommend that you use only wheels and tyres which have been
approved by SEAT for your model. Failure to do so could impair vehicle
handling. Risk of accident.
IbizaST_EN.book Seite 206 Dienstag, 14. September 2010 1:31 13
Page 210 of 264

Checking and refilling levels
208Winter tyres must be fitted on all four wheels.
Information on permitted winter tyre sizes can be found in the vehicle's regis-
tration documents. Use only radial winter tyres. All tyre sizes listed in the
vehicle documentation also apply to winter tyres.
Winter tyres lose their effectiveness when the tread is worn down to a depth
of 4 mm.
The speed rating code ⇒page 206, “New tyres and wheels” determines the
following speed limits for winter tyres: ⇒
In some countries, vehicles which can exceed the speed rating of the fitted
tyre must have an appropriate sticker in the driver's field of view. These
stickers are available from your Authorised Service Centre. The legal require-
ments of each country must be followed.
Do not have winter tyres fitted for unnecessarily long periods. Vehicles with
summer tyres handle better when the roads are free of snow and ice.
If you have a flat tyre, please refer to the notes on the spare wheel
⇒ page 206, “New tyres and wheels”.
WARNING
The maximum speed for the winter tyres must not be exceeded. Otherwise,
this could lead to tyre damage and risk of accident.
For the sake of the environment
Fit your summer tyres again as soon as possible. They are quieter, do not wear
so quickly and reduce fuel consumption.Snow chainsSnow chains may be fitted only to the front wheels, and only for the following
tyres:
Remove wheel hub covers and trim rings before fitting snow chains. For safety
reasons cover caps, available in any Authorised Service Centre, must then be
fitted over the wheel bolts.
WARNING
Snow chains should be correctly tightened in accordance with the manu-
facturer's instructions. This will prevent the chains coming into contact
with the wheel housing.
Q
max. 160 km/h
S
max. 180 km/h
T
max. 190 km/h
H
max. 210 km/h
175/70R14
185/60R15
Chains with links not exceeding 15 mm (including the
chain closure)
215/45R16
Chains with links not exceeding 9 mm (including the
chain closure)
215/40R17
Chains with links not exceeding 7 mm (including the
chain closure)
IbizaST_EN.book Seite 208 Dienstag, 14. September 2010 1:31 13
Page 221 of 264
If and when219
Safety First
Operating Instructions
Practical Tips
Technical Specifications
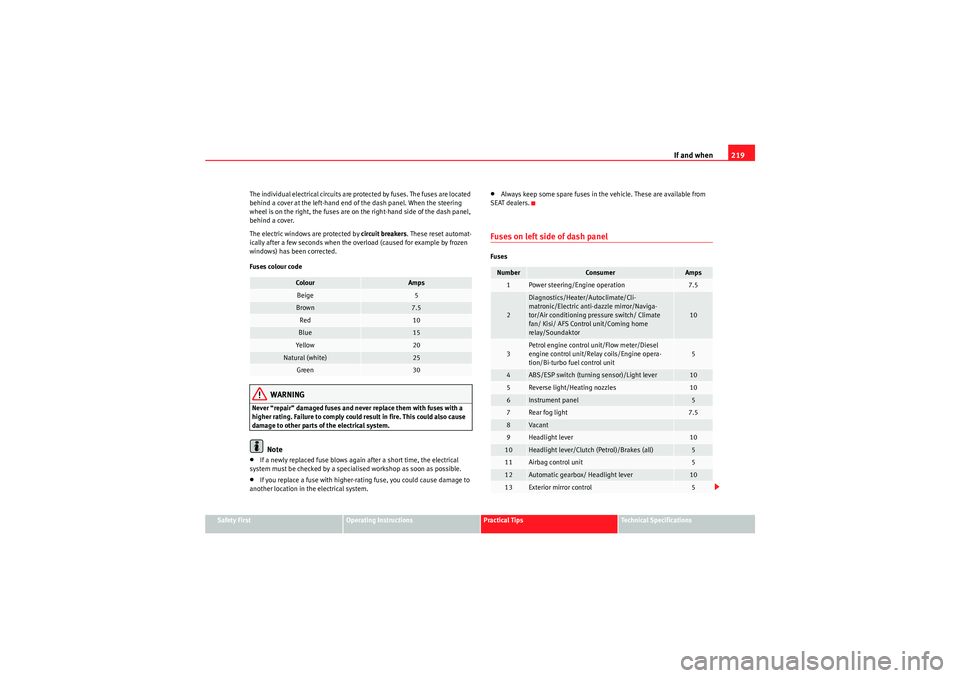
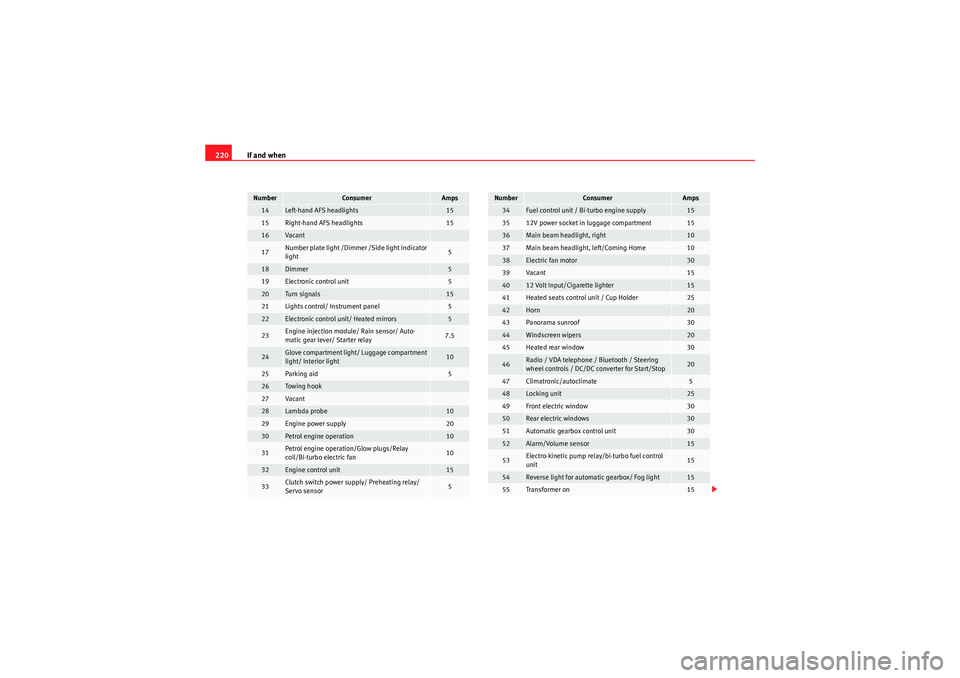
The individual electrical circuits are protected by fuses. The fuses are located
behind a cover at the left-hand end of the dash panel. When the steering
wheel is on the right, the fuses are on the right-hand side of the dash panel,
behind a cover.
The electric windows are protected by
circuit breakers. These reset automat-
ically after a few seconds when the overload (caused for example by frozen
windows) has been corrected.
Fuses colour code
WARNING
Never “repair” damaged fuses and never replace them with fuses with a
higher rating. Failure to comply could result in fire. This could also cause
damage to other parts of the electrical system.
Note
•If a newly replaced fuse blows again after a short time, the electrical
system must be checked by a specialised workshop as soon as possible.•If you replace a fuse with higher-rating fuse, you could cause damage to
another location in the electrical system.
•Always keep some spare fuses in the vehicle. These are available from
SEAT dealers.Fuses on left side of dash panelFuses
Colour
Amps
Beige
5
Brown
7.5
Red
10
Blue
15
Ye l l o w
20
Natural (white)
25
Green
30
Number
Consumer
Amps
1
Power steering/Engine operation
7.5
2
Diagnostics/Heater/Autoclimate/Cli-
matronic/Electric anti-dazzle mirror/Naviga-
tor/Air conditioning pressure switch/ Climate
fan/ Kisi/ AFS Control unit/Coming home
relay/Soundaktor
10
3
Petrol engine control unit/Flow meter/Diesel
engine control unit/Relay coils/Engine opera-
tion/Bi-turbo fuel control unit
5
4
ABS/ESP switch (turning sensor)/Light lever
10
5
Reverse light/Heating nozzles
10
6
Instrument panel
5
7
Rear fog light
7.5
8
Va can t
9
Headlight lever
10
10
Headlight lever/Clutch (Petrol)/Brakes (all)
5
11
Airbag control unit
5
12
Automatic gearbox/ Headlight lever
10
13
Exterior mirror control
5
IbizaST_EN.book Seite 219 Dienstag, 14. September 2010 1:31 13
Page 222 of 264
If and when
220
14
Left-hand AFS headlights
15
15
Right-hand AFS headlights
15
16
Vaca n t
17
Number plate light /Dimmer /Side light indicator
light
5
18
Dimmer
5
19
Electronic control unit
5
20
Turn signals
15
21
Lights control/ Instrument panel
5
22
Electronic control unit/ Heated mirrors
5
23
Engine injection module/ Rain sensor/ Auto-
matic gear lever/ Starter relay
7.5
24
Glove compartment light/ Luggage compartment
light/ Interior light
10
25
Parking aid
5
26
Towing hook
27
Vaca n t
28
Lambda probe
10
29
Engine power supply
20
30
Petrol engine operation
10
31
Petrol engine operation/Glow plugs/Relay
coil/Bi-turbo electric fan
10
32
Engine control unit
15
33
Clutch switch power supply/ Preheating relay/
Servo sensor
5
Number
Consumer
Amps
34
Fuel control unit / Bi-turbo engine supply
15
35
12V power socket in luggage compartment
15
36
Main beam headlight, right
10
37
Main beam headlight, left/Coming Home
10
38
Electric fan motor
30
39
Vaca n t
15
40
12 Volt Input/Cigarette lighter
15
41
Heated seats control unit / Cup Holder
25
42
Horn
20
43
Panorama sunroof
30
44
Windscreen wipers
20
45
Heated rear window
30
46
Radio / VDA telephone / Bluetooth / Steering
wheel controls / DC/DC converter for Start/Stop
20
47
Climatronic/autoclimate
5
48
Locking unit
25
49
Front electric window
30
50
Rear electric windows
30
51
Automatic gearbox control unit
30
52
Alarm/Volume sensor
15
53
Electro-kinetic pump relay/bi-turbo fuel control
unit
15
54
Reverse light for automatic gearbox/ Fog light
15
55
Transformer on
15
Number
Consumer
Amps
IbizaST_EN.book Seite 220 Dienstag, 14. September 2010 1:31 13
Page 235 of 264
If and when233
Safety First
Operating Instructions
Practical Tips
Technical Specifications
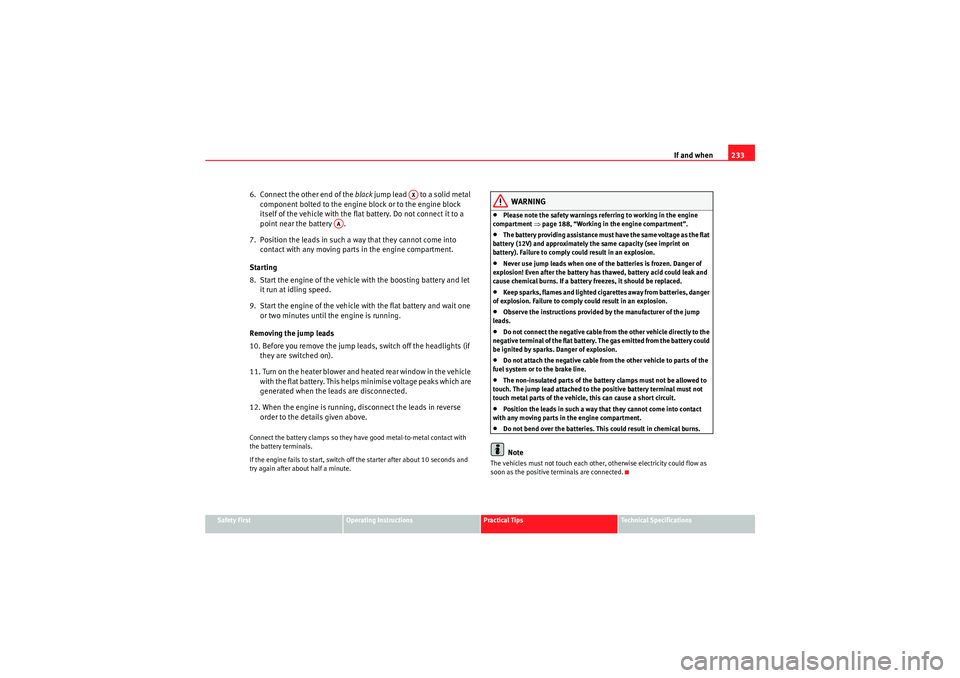
6. Connect the other end of the black jump lead to a solid metal
component bolted to the engine block or to the engine block
itself of the vehicle with the flat battery. Do not connect it to a
point near the battery .
7. Position the leads in such a way that they cannot come into contact with any moving parts in the engine compartment.
Starting
8. Start the engine of the vehicle with the boosting battery and let it run at idling speed.
9. Start the engine of the vehicle with the flat battery and wait one or two minutes until the engine is running.
Removing the jump leads
10. Before you remove the jump leads, switch off the headlights (if they are switched on).
11. Turn on the heater blower and heated rear window in the vehicle with the flat battery. This helps minimise voltage peaks which are
generated when the leads are disconnected.
12. When the engine is running, disconnect the leads in reverse order to the details given above.Connect the battery clamps so they have good metal-to-metal contact with
the battery terminals.
If the engine fails to start, switch off the starter after about 10 seconds and
try again after about half a minute.
WARNING
•Please note the safety warnings referring to working in the engine
compartment ⇒page 188, “Working in the engine compartment”.•The battery providing assistance must have the same voltage as the flat
battery (12V) and approximately the same capacity (see imprint on
battery). Failure to comply could result in an explosion.•Never use jump leads when one of the batteries is frozen. Danger of
explosion! Even after the battery has thawed, battery acid could leak and
cause chemical burns. If a battery freezes, it should be replaced.•Keep sparks, flames and lighted cigarettes away from batteries, danger
of explosion. Failure to comply could result in an explosion.•Observe the instructions provided by the manufacturer of the jump
leads.•Do not connect the negative cable from the other vehicle directly to the
negative terminal of the flat battery. The gas emitted from the battery could
be ignited by sparks. Danger of explosion.•Do not attach the negative cable from the other vehicle to parts of the
fuel system or to the brake line.•The non-insulated parts of the battery clamps must not be allowed to
touch. The jump lead attached to the positive battery terminal must not
touch metal parts of the vehicle, this can cause a short circuit.•Position the leads in such a way that they cannot come into contact
with any moving parts in the engine compartment.•Do not bend over the batteries. This could result in chemical burns.Note
The vehicles must not touch each other, otherwise electricity could flow as
soon as the positive terminals are connected.
AX
AA
IbizaST_EN.book Seite 233 Dienstag, 14. September 2010 1:31 13