brake Seat Ibiza ST 2012 Owner's manual
[x] Cancel search | Manufacturer: SEAT, Model Year: 2012, Model line: Ibiza ST, Model: Seat Ibiza ST 2012Pages: 282, PDF Size: 3.77 MB
Page 5 of 282
Table of Contents
Manual structure . . . . . . . . . . . . . . . . . . . . 5
Content . . . . . . . . . . . . . . . . . . . . . . . . . . . . . . . . 6
Safety First . . . . . . . . . . . . . . . . . . . . . . . . . . . . 7
Safe driving . . . . . . . . . . . . . . . . . . . . . . . . . . . . . . . 7
Brief introduction . . . . . . . . . . . . . . . . . . . . . . . . . 7
Proper sitting position for occupants . . . . . . . . . 10
Pedal area . . . . . . . . . . . . . . . . . . . . . . . . . . . . . . . 16
Storing objects . . . . . . . . . . . . . . . . . . . . . . . . . . . 16
Seat belts . . . . . . . . . . . . . . . . . . . . . . . . . . . . . . . . . 19
Brief introduction . . . . . . . . . . . . . . . . . . . . . . . . . 19
Why wear seat belts? . . . . . . . . . . . . . . . . . . . . . . 21
Seat belts . . . . . . . . . . . . . . . . . . . . . . . . . . . . . . . 25
Belt tensioners* . . . . . . . . . . . . . . . . . . . . . . . . . . 28
Airbag system . . . . . . . . . . . . . . . . . . . . . . . . . . . . . 30
Brief introduction . . . . . . . . . . . . . . . . . . . . . . . . . 30
Front airbags . . . . . . . . . . . . . . . . . . . . . . . . . . . . . 34
Side airbags . . . . . . . . . . . . . . . . . . . . . . . . . . . . . 38
Deactivating airbags* . . . . . . . . . . . . . . . . . . . . . . 41
Child safety . . . . . . . . . . . . . . . . . . . . . . . . . . . . . . . 43
Brief introduction . . . . . . . . . . . . . . . . . . . . . . . . . 43
Child seats . . . . . . . . . . . . . . . . . . . . . . . . . . . . . . . 45
Securing child seats . . . . . . . . . . . . . . . . . . . . . . . 48
Operating Instructions . . . . . . . . . . . . . 55
Cockpit . . . . . . . . . . . . . . . . . . . . . . . . . . . . . . . . . . . 55
Overview . . . . . . . . . . . . . . . . . . . . . . . . . . . . . . . . 55
Instruments . . . . . . . . . . . . . . . . . . . . . . . . . . . . . . 57 LPG system* . . . . . . . . . . . . . . . . . . . . . . . . . . . . . 58
Digital instrument panel display . . . . . . . . . . . . . 59
Warning lamps . . . . . . . . . . . . . . . . . . . . . . . . . . . 65
Steering column controls* . . . . . . . . . . . . . . . . . 78
General information . . . . . . . . . . . . . . . . . . . . . . . 78
Audio Control . . . . . . . . . . . . . . . . . . . . . . . . . . . . . 79
Audio + Telephone Control . . . . . . . . . . . . . . . . . . 80
Opening and closing . . . . . . . . . . . . . . . . . . . . . . 82
Central locking . . . . . . . . . . . . . . . . . . . . . . . . . . . 82
Keys . . . . . . . . . . . . . . . . . . . . . . . . . . . . . . . . . . . . 87
Radio frequency remote control* . . . . . . . . . . . . . 88
Anti-theft alarm system* . . . . . . . . . . . . . . . . . . . 90
Rear lid . . . . . . . . . . . . . . . . . . . . . . . . . . . . . . . . . . 93
Windows . . . . . . . . . . . . . . . . . . . . . . . . . . . . . . . . 95
Panoramic tilting sunroof* . . . . . . . . . . . . . . . . . . 98
Lights and visibility . . . . . . . . . . . . . . . . . . . . . . . . 100
Lights . . . . . . . . . . . . . . . . . . . . . . . . . . . . . . . . . . . 100
Interior lights . . . . . . . . . . . . . . . . . . . . . . . . . . . . . 107
Visibility . . . . . . . . . . . . . . . . . . . . . . . . . . . . . . . . . 108
Windscreen wipers . . . . . . . . . . . . . . . . . . . . . . . . 109
Rear view mirrors . . . . . . . . . . . . . . . . . . . . . . . . . . 112
Seats and storage compartments . . . . . . . . . . 115
The importance of correct seat adjustment . . . . . 115
Head restraints . . . . . . . . . . . . . . . . . . . . . . . . . . . 116
Front seats . . . . . . . . . . . . . . . . . . . . . . . . . . . . . . . 118
Rear seats . . . . . . . . . . . . . . . . . . . . . . . . . . . . . . . 120
Storage compartment . . . . . . . . . . . . . . . . . . . . . . 122
Ashtrays, cigarette lighter and power socket . . . 125
First-aid kit, warning triangle, fire extinguisher . 128
Luggage compartment . . . . . . . . . . . . . . . . . . . . . 129
Roof rack* . . . . . . . . . . . . . . . . . . . . . . . . . . . . . . . 132
Air conditioning . . . . . . . . . . . . . . . . . . . . . . . . . . . 134
Heating . . . . . . . . . . . . . . . . . . . . . . . . . . . . . . . . . 134
Air conditioning* . . . . . . . . . . . . . . . . . . . . . . . . . . 137 Climatronic . . . . . . . . . . . . . . . . . . . . . . . . . . . . . . 140
General notes . . . . . . . . . . . . . . . . . . . . . . . . . . . . 142
Driving . . . . . . . . . . . . . . . . . . . . . . . . . . . . . . . . . . . . 144
Steering . . . . . . . . . . . . . . . . . . . . . . . . . . . . . . . . . 144
Safety . . . . . . . . . . . . . . . . . . . . . . . . . . . . . . . . . . . 145
Ignition lock . . . . . . . . . . . . . . . . . . . . . . . . . . . . . . 145
Starting and stopping the engine . . . . . . . . . . . . 147
Start-Stop function* . . . . . . . . . . . . . . . . . . . . . . . 150
Manual gearbox . . . . . . . . . . . . . . . . . . . . . . . . . . 153
Automatic gearbox* . . . . . . . . . . . . . . . . . . . . . . . 154
Handbrake . . . . . . . . . . . . . . . . . . . . . . . . . . . . . . . 161
Acoustic parking aid system* . . . . . . . . . . . . . . . 163
Cruise speed* (Cruise control system) . . . . . . . . 164
Practical Tips . . . . . . . . . . . . . . . . . . . . . . . . . 168
Intelligent technology . . . . . . . . . . . . . . . . . . . . . 168
Brakes . . . . . . . . . . . . . . . . . . . . . . . . . . . . . . . . . . 168
Anti-lock brake system and traction control ABS 169
Electronic Stability Control (ESC)* . . . . . . . . . . . . 170
Driving and the environment . . . . . . . . . . . . . . . 173
Running-in . . . . . . . . . . . . . . . . . . . . . . . . . . . . . . . 173
Exhaust gas purification system . . . . . . . . . . . . . 174
Economical and environmentally friendly driving 176
Driving abroad . . . . . . . . . . . . . . . . . . . . . . . . . . . . 178
Trailer towing . . . . . . . . . . . . . . . . . . . . . . . . . . . . . 178
Vehicle maintenance and cleaning . . . . . . . . . 181
General notes . . . . . . . . . . . . . . . . . . . . . . . . . . . . 181
Care of the vehicle exterior . . . . . . . . . . . . . . . . . . 182
Vehicle interior maintenance . . . . . . . . . . . . . . . . 187
3
Table of Contents
Page 6 of 282
Accessories, replacement of parts and
modifications . . . . . . . . . . . . . . . . . . . . . . . . . . . . . 190
Accessories and spare parts . . . . . . . . . . . . . . . . 190
Technical modifications . . . . . . . . . . . . . . . . . . . . 190
Roof aerial* . . . . . . . . . . . . . . . . . . . . . . . . . . . . . . 191
Mobile telephones and two-way radios . . . . . . . . 191
Fitting a towing bracket* . . . . . . . . . . . . . . . . . . . 192
Checking and refilling levels . . . . . . . . . . . . . . . 194
Refuelling . . . . . . . . . . . . . . . . . . . . . . . . . . . . . . . 194
LPG system* . . . . . . . . . . . . . . . . . . . . . . . . . . . . . 196
Petrol . . . . . . . . . . . . . . . . . . . . . . . . . . . . . . . . . . . 199
Diesel . . . . . . . . . . . . . . . . . . . . . . . . . . . . . . . . . . . 199
Working in the engine compartment . . . . . . . . . . 200
Engine oil . . . . . . . . . . . . . . . . . . . . . . . . . . . . . . . . 203
Coolant . . . . . . . . . . . . . . . . . . . . . . . . . . . . . . . . . 207
Washer fluid and windscreen wiper blades . . . . 209
Brake fluid . . . . . . . . . . . . . . . . . . . . . . . . . . . . . . . 213
Vehicle battery . . . . . . . . . . . . . . . . . . . . . . . . . . . 214
Wheels . . . . . . . . . . . . . . . . . . . . . . . . . . . . . . . . . . 216
If and when . . . . . . . . . . . . . . . . . . . . . . . . . . . . . . . 223
Vehicle tools, spare wheel . . . . . . . . . . . . . . . . . . 223
Wheel change . . . . . . . . . . . . . . . . . . . . . . . . . . . . 224
Tyre repair kit (Tyre-Mobility-System)* . . . . . . . . . 229
Fuses . . . . . . . . . . . . . . . . . . . . . . . . . . . . . . . . . . . 231
Bulb change . . . . . . . . . . . . . . . . . . . . . . . . . . . . . 234
Single headlight bulb change . . . . . . . . . . . . . . . 236
Double headlight bulb change . . . . . . . . . . . . . . . 238
Changing the bulbs of AFS headlights . . . . . . . . 242
Changing the fog light bulbs . . . . . . . . . . . . . . . . 243
Changing the rear lights (on the wing) . . . . . . . . 244
Changing the rear lights (on the rear lid) . . . . . . 245
Side turn signal bulbs . . . . . . . . . . . . . . . . . . . . . . 246
Number plate light . . . . . . . . . . . . . . . . . . . . . . . . 247
Interior light and front reading lights . . . . . . . . . 247
Additional brake lights* . . . . . . . . . . . . . . . . . . . . 248
Luggage compartment light . . . . . . . . . . . . . . . . . 248 Jump-starting . . . . . . . . . . . . . . . . . . . . . . . . . . . . . 248
Towing and tow-starting . . . . . . . . . . . . . . . . . . . . 252
Technical Specifications . . . . . . . . . . . 255
Description of specifications . . . . . . . . . . . . . . . 255
Important information . . . . . . . . . . . . . . . . . . . . . 255
Information on fuel consumption . . . . . . . . . . . . 257
Towing a trailer . . . . . . . . . . . . . . . . . . . . . . . . . . . 257
Wheels . . . . . . . . . . . . . . . . . . . . . . . . . . . . . . . . . . 258
Technical specifications . . . . . . . . . . . . . . . . . . . . 259
Checking fluid levels . . . . . . . . . . . . . . . . . . . . . . . 259
Petrol engine 1.2 51 kW (70 PS) . . . . . . . . . . . . . 260
Petrol engine 1.2 TSI 63 kW (85 PS) . . . . . . . . . . 261
Petrol engine 1.4 63 kW (85 PS) . . . . . . . . . . . . . 262
Petrol engine 1.2 TSI 77 kW (105 PS) . . . . . . . . . 263
Petrol engine 1.2 TSI 77 kW (105 PS) Start-Stop 264
Petrol engine 1.4 TSI 110 kW (150 PS) automatic . .265
Diesel engine 1.2 TDI CR 55 kW (75 PS) DPF
Start-Stop Ecomotive . . . . . . . . . . . . . . . . . . . . . . 266
Diesel engine 1.2 TDI CR 55 kW (75 PS) DPF . . . . 267
Diesel engine 1.6 TDI CR 66 kW (90 PS) DPF . . . . 268
Diesel engine 1.6 TDI CR 77 kW (105 PS) with/
without DPF . . . . . . . . . . . . . . . . . . . . . . . . . . . . . . 269
Dimensions and capacities . . . . . . . . . . . . . . . . . 270
Index . . . . . . . . . . . . . . . . . . . . . . . . . . . . . . . . . . . 271
4Table of Contents
Page 12 of 282
10Safe driving
Proper sitting position for occupants
Correct sitting position for driver
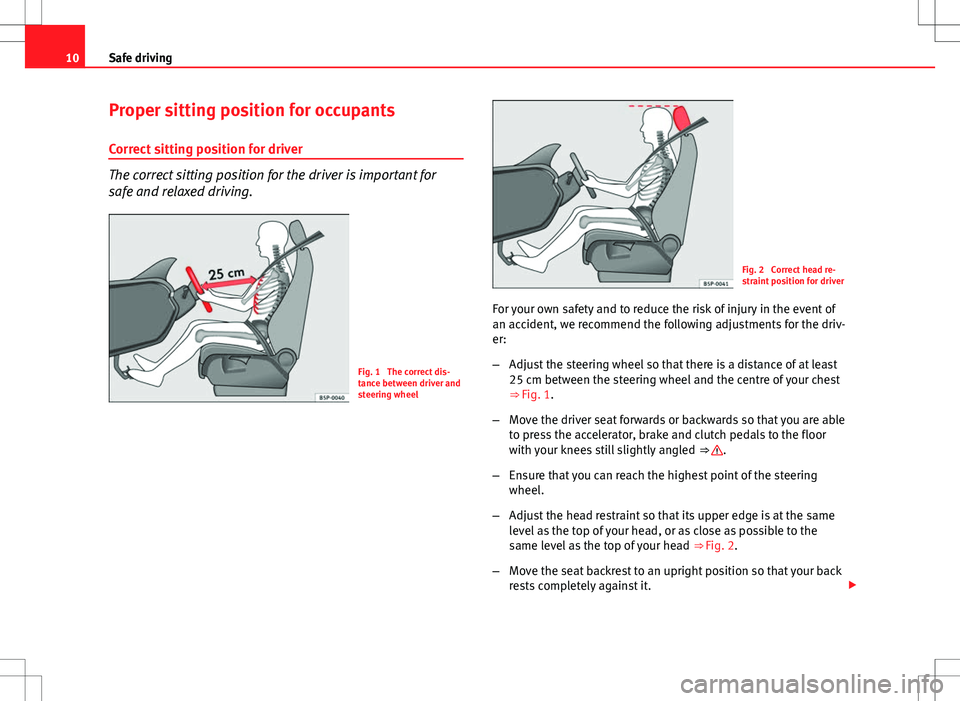
The correct sitting position for the driver is important for
safe and relaxed driving.
Fig. 1 The correct dis-
tance between driver and
steering wheel
Fig. 2 Correct head re-
straint position for driver
For your own safety and to reduce the risk of injury in the event of
an accident, we recommend the following adjustments for the driv-
er:
– Adjust the steering wheel so that there is a distance of at least
25 cm between the steering wheel and the centre of your chest
⇒ Fig. 1.
– Move the driver seat forwards or backwards so that you are able
to press the accelerator, brake and clutch pedals to the floor
with your knees still slightly angled ⇒
.
– Ensure that you can reach the highest point of the steering
wheel.
– Adjust the head restraint so that its upper edge is at the same
level as the top of your head, or as close as possible to the
same level as the top of your head ⇒ Fig. 2.
– Move the seat backrest to an upright position so that your back
rests completely against it.
Page 18 of 282
16Safe driving
Pedal area
Pedals
The operation of all pedals must never be impaired by ob-
jects or floor mats. – Ensure that you can always press the accelerator, brake and
clutch pedals unimpaired to the floor.
– Ensure that the pedals can return unimpaired to their initial po-
sitions.
Use only floor mats which leave the pedal area free and can be securely fas-
tened on the footwell.
If a brake circuit fails, the brake pedal must be pressed down thoroughly in
order to stop the vehicle.
Wearing suitable shoes
Always wear shoes which support your feet properly and give you a good
feeling for the pedals.
WARNING
● Restricting pedal operation can lead to critical situations while driv-
ing.
● Never place objects on the driver footwell. An object could move into
the pedal area and impair pedal operation. In the event of a sudden driv-
ing or braking manoeuvre, you will not be able to operate the brake,
clutch or accelerator pedal. Risk of accident!
Floor mats on the driver side
Only floor mats may be used which can be securely fastened
in the footwell and do not impair operation of the pedals.
– Ensure that the floor mats are securely fastened during the trip
and do not obstruct the pedals ⇒
.
Only use floor mats which leave the pedals clear and which are secured to
prevent them from slipping. You can obtain suitable floor mats from a speci-
alised dealership.
WARNING
● If the pedals are obstructed, an accident may occur. Risk of serious
injuries.
● Ensure that the floor mats are always securely attached.
● Never lay or fit floor mats or other floor coverings over the original
floor mats. This would reduce the pedal area and could obstruct the ped-
als. Risk of accident.
Storing objects Loading the luggage compartment
All luggage and other loose objects must be safely secured
in the luggage compartment.
Unsecured objects which shift back and forth could affect safety or
driving characteristics of the vehicle by shifting the centre of gravi-
ty.
Page 57 of 282
55
Cockpit
Operating Instructions Cockpit
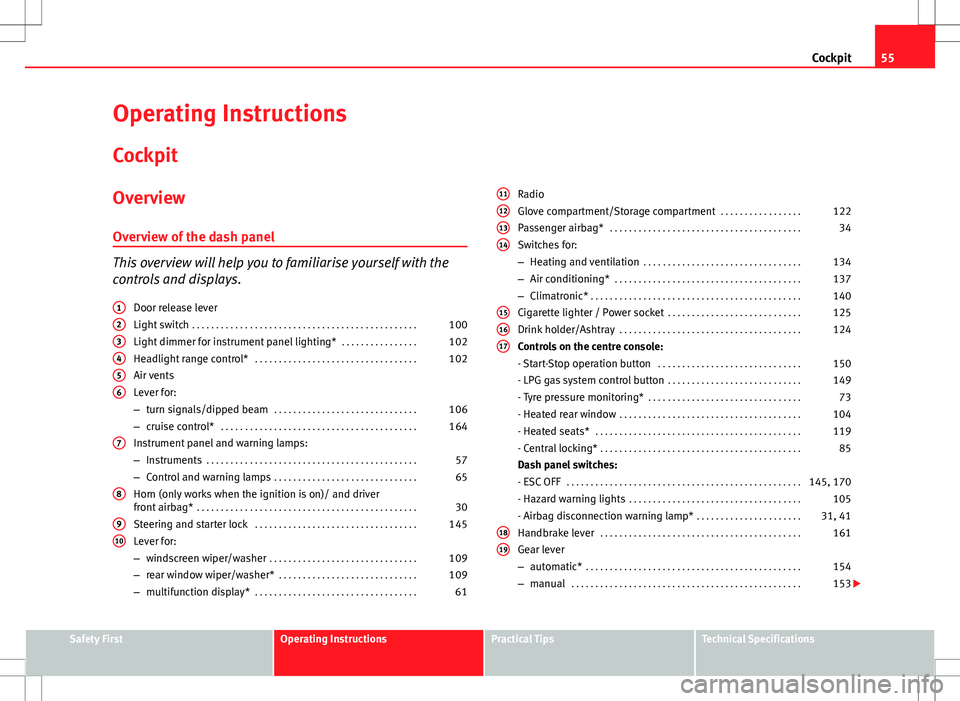
Overview Overview of the dash panel
This overview will help you to familiarise yourself with the
controls and displays. Door release lever
Light switch . . . . . . . . . . . . . . . . . . . . . . . . . . . . . . . . . . . . . . . . . . . . . . . 100
Light dimmer for instrument panel lighting* . . . . . . . . . . . . . . . .102
Headlight range control* . . . . . . . . . . . . . . . . . . . . . . . . . . . . . . . . . . 102
Air vents
Lever for:
– turn signals/dipped beam . . . . . . . . . . . . . . . . . . . . . . . . . . . . . . 106
– cruise control* . . . . . . . . . . . . . . . . . . . . . . . . . . . . . . . . . . . . . . . . . 164
Instrument panel and warning lamps:
– Instruments . . . . . . . . . . . . . . . . . . . . . . . . . . . . . . . . . . . . . . . . . . . . 57
– Control and warning lamps . . . . . . . . . . . . . . . . . . . . . . . . . . . . . . 65
Horn (only works when the ignition is on)/ and driver
front airbag* . . . . . . . . . . . . . . . . . . . . . . . . . . . . . . . . . . . . . . . . . . . . . . 30
Steering and starter lock . . . . . . . . . . . . . . . . . . . . . . . . . . . . . . . . . . 145
Lever for:
– windscreen wiper/washer . . . . . . . . . . . . . . . . . . . . . . . . . . . . . . . 109
– rear window wiper/washer* . . . . . . . . . . . . . . . . . . . . . . . . . . . . . 109
– multifunction display* . . . . . . . . . . . . . . . . . . . . . . . . . . . . . . . . . . 61
1
23456
7
8
910
Radio
Glove compartment/Storage compartment
. . . . . . . . . . . . . . . . .122
Passenger airbag* . . . . . . . . . . . . . . . . . . . . . . . . . . . . . . . . . . . . . . . . 34
Switches for:
– Heating and ventilation . . . . . . . . . . . . . . . . . . . . . . . . . . . . . . . . . 134
– Air conditioning* . . . . . . . . . . . . . . . . . . . . . . . . . . . . . . . . . . . . . . . 137
– Climatronic* . . . . . . . . . . . . . . . . . . . . . . . . . . . . . . . . . . . . . . . . . . . . 140
Cigarette lighter / Power socket . . . . . . . . . . . . . . . . . . . . . . . . . . . . 125
Drink holder/Ashtray . . . . . . . . . . . . . . . . . . . . . . . . . . . . . . . . . . . . . . 124
Controls on the centre console:
- Start-Stop operation button . . . . . . . . . . . . . . . . . . . . . . . . . . . . . . 150
- LPG gas system control button . . . . . . . . . . . . . . . . . . . . . . . . . . . . 149
- Tyre pressure monitoring* . . . . . . . . . . . . . . . . . . . . . . . . . . . . . . . . 73
- Heated rear window . . . . . . . . . . . . . . . . . . . . . . . . . . . . . . . . . . . . . . 104
- Heated seats* . . . . . . . . . . . . . . . . . . . . . . . . . . . . . . . . . . . . . . . . . . . 119
- Central locking* . . . . . . . . . . . . . . . . . . . . . . . . . . . . . . . . . . . . . . . . . . 85
Dash panel switches:
- ESC OFF . . . . . . . . . . . . . . . . . . . . . . . . . . . . . . . . . . . . . . . . . . . . . . . . . 145, 170
- Hazard warning lights . . . . . . . . . . . . . . . . . . . . . . . . . . . . . . . . . . . . 105
- Airbag disconnection warning lamp* . . . . . . . . . . . . . . . . . . . . . .31, 41
Handbrake lever . . . . . . . . . . . . . . . . . . . . . . . . . . . . . . . . . . . . . . . . . . 161
Gear lever
– automatic* . . . . . . . . . . . . . . . . . . . . . . . . . . . . . . . . . . . . . . . . . . . . . 154
– manual . . . . . . . . . . . . . . . . . . . . . . . . . . . . . . . . . . . . . . . . . . . . . . . . 153
11121314
151617
1819
Safety FirstOperating InstructionsPractical TipsTechnical Specifications
Page 66 of 282
64Cockpit
The service interval display only indicates the dates of services that include
engine oil change. The dates of all other services, such as Inspection Serv-
ice or brake fluid change, appear in the sticker on the door pillar or in the
Maintenance Programme.
Vehicles with service intervals dependent on time/distance travelled al-
ready have certain service intervals set.
The intervals are calculated separately in vehicles with LongLife service.
Technical progress has made it possible to considerably reduce servicing re-
quirements. With the LongLife System, SEAT ensures that your vehicle only
has an interval service when it is necessary. To calculate this (max. two
years), the conditions under which the vehicle is used and the individual
driving style are also taken into account. The service pre-warning will ap-
pear at 20 days or less prior to the corresponding service. The distance trav-
elled is rounded off to the nearest 100 km (miles) and the time to full days.
The current service message can only be consulted 500 km (miles) or more
after the last service. Until that time, only dashes are displayed.
Service warning
A service warning will appear when the ignition is switched on if a service is
due soon.
The instrument panel display will show the “spanner symbol” and the
“km (miles)” indication, along with a clock symbol with the days remaining
until the date of the next service. The figure indicated is the maximum num-
ber of kilometres (miles) remaining before the date of the next service. The
indication changes after a few seconds. A “clock symbol” appears and the
number of days until the service appointment should be carried out.
Service
If a service is due, an audible warning will sound and the flashing “span-
ner” symbol will be shown along with the fixed text SERVICE.
If no service is carried out following the indication on the instrument panel,
the excess distance travelled and the excess time following the SERVICE
warning will be displayed. Reading the service message
The current service message
can be consulted with the ignition on, the en-
gine switched off and the vehicle at a standstill:
● Press the
button on the instrument panel as often as necessary until
the spanner symbol is displayed.
An overdue service is indicated by a minus sign in front of the mileage or
day information.
Resetting service interval display
If the service was not performed by a SEAT dealership, the display must be
reset as follows:
● Switch the ignition off.
● Press and hold the 0.0 / SET
button.
● Switch ignition back on.
● Release the 0.0 / SET
button and press the button within 20 seconds.
Do not reset the display between service intervals, as the display will other-
wise be incorrect.
If the display is reset manually, the next service interval will be indicated af-
ter 15 000 km (10 000 miles) or one year and will not be calculated individ-
ually.
Note
In LongLife Service vehicles, if the battery is disconnected for a long period,
the days remaining until the next service cannot be calculated. Therefore,
the service message indications may be incorrect. In this case, bear in mind
the maximum service intervals permitted in the ⇒ Booklet Maintenance Pro-
gramme.
Page 68 of 282
66Cockpit
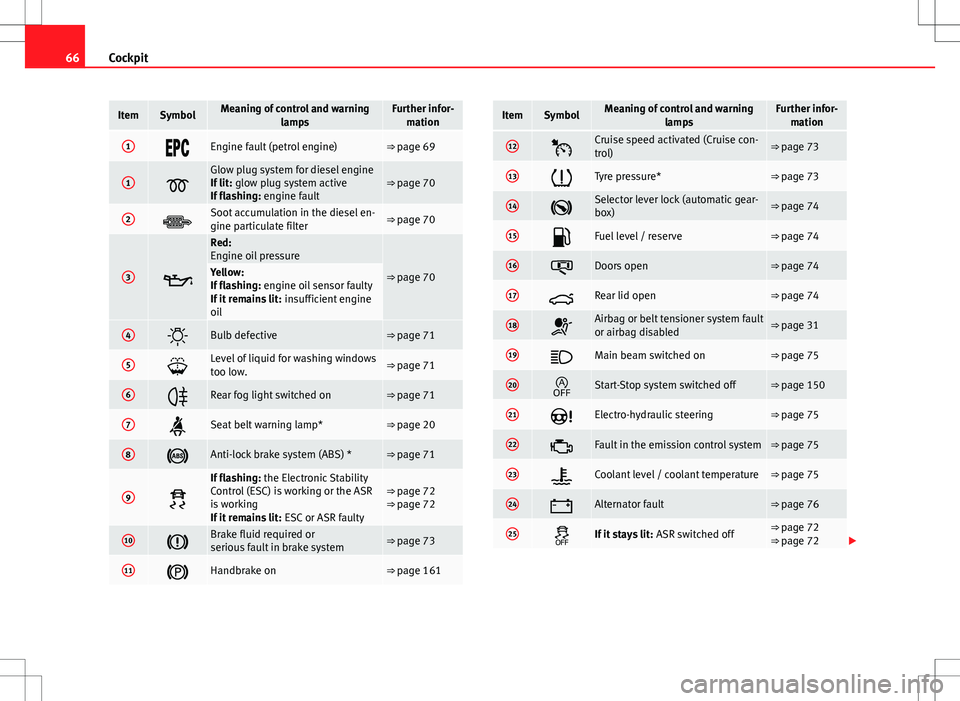
ItemSymbolMeaning of control and warning
lampsFurther infor-mation
1Engine fault (petrol engine)⇒ page 69
1
Glow plug system for diesel engine
If lit: glow plug system active
If flashing: engine fault⇒ page 70
2Soot accumulation in the diesel en-
gine particulate filter⇒ page 70
3
Red:
Engine oil pressure
⇒ page 70Yellow:
If flashing: engine oil sensor faulty
If it remains lit: insufficient engine
oil
4Bulb defective⇒ page 71
5Level of liquid for washing windows
too low.⇒ page 71
6Rear fog light switched on⇒ page 71
7Seat belt warning lamp*⇒ page 20
8Anti-lock brake system (ABS) *⇒ page 71
9
If flashing: the Electronic Stability
Control (ESC) is working or the ASR
is working
If it remains lit: ESC or ASR faulty⇒ page 72
⇒ page 72
10Brake fluid required or
serious fault in brake system⇒ page 73
11Handbrake on⇒ page 161
ItemSymbolMeaning of control and warning
lampsFurther infor-mation
12Cruise speed activated (Cruise con-
trol)⇒ page 73
13Tyre pressure*⇒ page 73
14Selector lever lock (automatic gear-
box)⇒ page 74
15Fuel level / reserve⇒ page 74
16Doors open⇒ page 74
17Rear lid open⇒ page 74
18Airbag or belt tensioner system fault
or airbag disabled⇒ page 31
19Main beam switched on⇒ page 75
20Start-Stop system switched off⇒ page 150
21Electro-hydraulic steering⇒ page 75
22Fault in the emission control system⇒ page 75
23Coolant level / coolant temperature⇒ page 75
24Alternator fault⇒ page 76
25If it stays lit: ASR switched off⇒ page 72
⇒ page 72
Page 70 of 282
68Cockpit
WARNING
● Failure to observe control lamps and warning messages can result in
serious personal injury or damage to your vehicle.
● The risk of an accident increases if your vehicle breaks down. Use a
warning triangle to draw the attention of other road users in order to pre-
vent danger to third parties.
● The engine compartment is a dangerous area! Before you open the
bonnet to work on the engine or in the engine compartment, you must
switch the engine off and allow it to cool to reduce the risk of scalding or
other injuries. Read and observe the relevant warnings ⇒ page 200.
Note
● The appropriate control lamp for a fault will light up in vehicles without
warning or information messages in the display.
● In vehicles with warning or information texts on the screen, the appro-
priate control lamp for a fault will light up and a warning or information
message will also appear on the screen.
Warning symbols
There are red warning symbols (priority 1) and yellow warning sym-
bols (priority 2) Warning messages, Priority 1 (red)
If one of these faults occurs, the warning lamp will flash or light up and will
be accompanied by three audible warnings. This is a danger warning. Stop
the vehicle and switch off the engine. Check the fault and correct it. Obtain
professional assistance if necessary. If several priority 1 faults are detected at the same time, the symbols will be
displayed one after the other for about 2 seconds at a time and will contin-
ue until the fault is corrected.
No menus will be shown in the display for the duration of a priority 1 warn-
ing message.
Examples of priority 1 warning messages (red)
●
Brake system symbol with the warning message STOP BRAKE FLUID
INSTRUCTION MANUAL or STOP BRAKE FAULT INSTRUCTION MANUAL .
● Coolant symbol with the warning message STOP SEE COOLANT IN-
STRUCTION MANUAL.
● Engine oil pressure symbol with the warning message STOP ENGINE
OIL PRESSURE LOW! INSTRUCTION MANUAL .
Warning messages, Priority 2 (yellow)
If one of these faults occurs, the warning lamp lights up, and is accompa-
nied by one audible warning. Check the corresponding function as soon as
possible although the vehicle may be used without risk.
If several priority 2 warning messages are detected at the same time, the
symbols are displayed one after the other for about 2 seconds at a time. Af-
ter a set time, the information text will disappear and the symbol will be
shown as a reminder at the side of the display.
Priority 2 warning messages will not be shown until all Priority 1 warning
messages have been dealt with!
Examples of priority 2 warning messages (yellow): 1)
● Fuel warning light with the information text PLEASE REFUEL.
1)
Depending on the version of the model.
Page 71 of 282
69
Cockpit
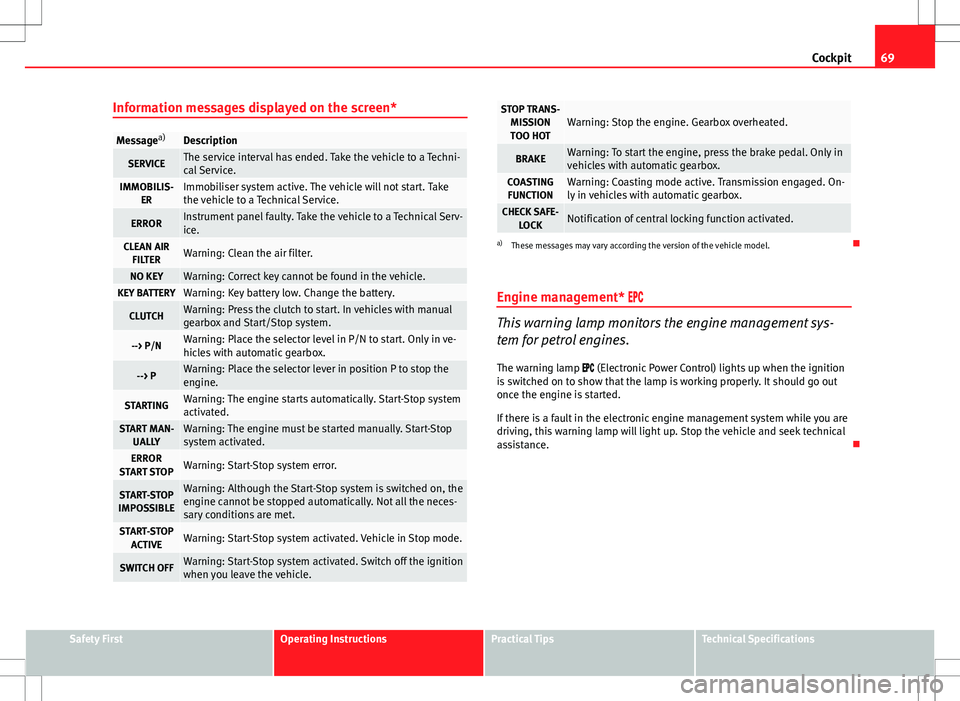
Information messages displayed on the screen*
Message a)Description
SERVICEThe service interval has ended. Take the vehicle to a Techni-
cal Service.
IMMOBILIS-
ERImmobiliser system active. The vehicle will not start. Take
the vehicle to a Technical Service.
ERRORInstrument panel faulty. Take the vehicle to a Technical Serv-
ice.
CLEAN AIRFILTERWarning: Clean the air filter.
NO KEYWarning: Correct key cannot be found in the vehicle.KEY BATTERYWarning: Key battery low. Change the battery.
CLUTCHWarning: Press the clutch to start. In vehicles with manual
gearbox and Start/Stop system.
--> P/NWarning: Place the selector level in P/N to start. Only in ve-
hicles with automatic gearbox.
--> PWarning: Place the selector lever in position P to stop the
engine.
STARTINGWarning: The engine starts automatically. Start-Stop system
activated.
START MAN- UALLYWarning: The engine must be started manually. Start-Stop
system activated.
ERROR
START STOPWarning: Start-Stop system error.
START-STOP
IMPOSSIBLEWarning: Although the Start-Stop system is switched on, the
engine cannot be stopped automatically. Not all the neces-
sary conditions are met.
START-STOP ACTIVEWarning: Start-Stop system activated. Vehicle in Stop mode.
SWITCH OFFWarning: Start-Stop system activated. Switch off the ignition
when you leave the vehicle.
STOP TRANS-MISSIONTOO HOTWarning: Stop the engine. Gearbox overheated.
BRAKEWarning: To start the engine, press the brake pedal. Only in
vehicles with automatic gearbox.
COASTING FUNCTIONWarning: Coasting mode active. Transmission engaged. On-
ly in vehicles with automatic gearbox.
CHECK SAFE- LOCKNotification of central locking function activated.
a)These messages may vary according the version of the vehicle model.
Engine management*
This warning lamp monitors the engine management sys-
tem for petrol engines.
The warning lamp (Electronic Power Control) lights up when the ignition
is switched on to show that the lamp is working properly. It should go out
once the engine is started.
If there is a fault in the electronic engine management system while you are
driving, this warning lamp will light up. Stop the vehicle and seek technical
assistance.
Safety FirstOperating InstructionsPractical TipsTechnical Specifications
Page 73 of 282
71
Cockpit
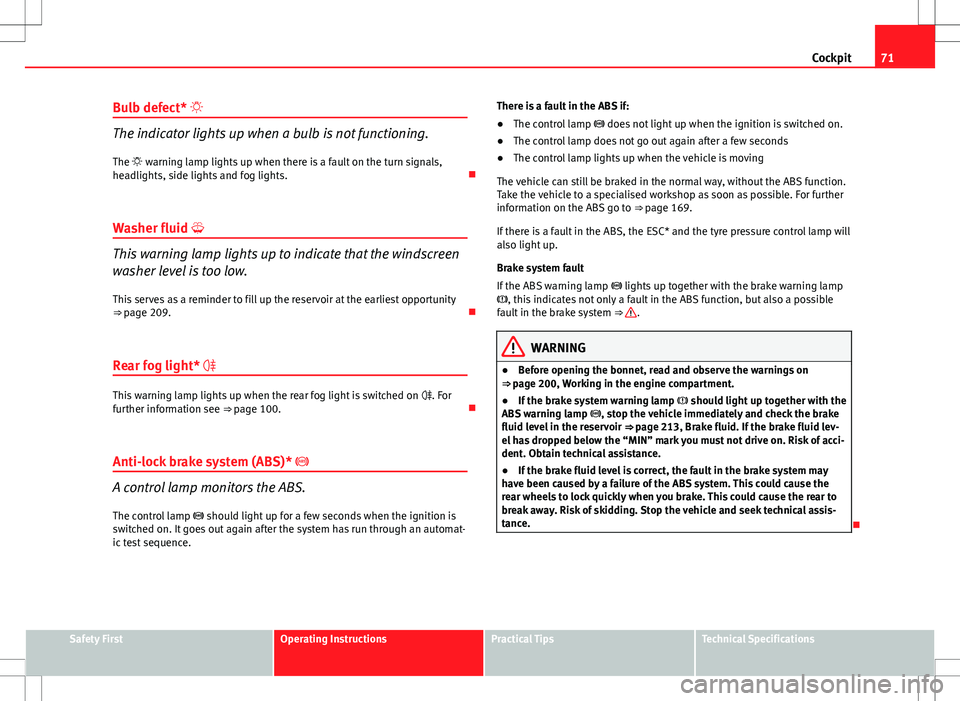
Bulb defect*
The indicator lights up when a bulb is not functioning. The warning lamp lights up when there is a fault on the turn signals,
headlights, side lights and fog lights.
Washer fluid
This warning lamp lights up to indicate that the windscreen
washer level is too low. This serves as a reminder to fill up the reservoir at the earliest opportunity
⇒ page 209.
Rear fog light*
This warning lamp lights up when the rear fog light is switched on . For
further information see ⇒ page 100.
Anti-lock brake system (ABS)*
A control lamp monitors the ABS.
The control lamp should light up for a few seconds when the ignition is
switched on. It goes out again after the system has run through an automat-
ic test sequence. There is a fault in the ABS if:
●
The control lamp does not light up when the ignition is switched on.
● The control lamp does not go out again after a few seconds
● The control lamp lights up when the vehicle is moving
The vehicle can still be braked in the normal way, without the ABS function.
Take the vehicle to a specialised workshop as soon as possible. For further
information on the ABS go to ⇒ page 169.
If there is a fault in the ABS, the ESC* and the tyre pressure control lamp will
also light up.
Brake system fault
If the ABS warning lamp lights up together with the brake warning lamp
, this indicates not only a fault in the ABS function, but also a possible
fault in the brake system ⇒
.
WARNING
● Before opening the bonnet, read and observe the warnings on
⇒ page 200, Working in the engine compartment.
● If the brake system warning lamp should light up together with the
ABS warning lamp , stop the vehicle immediately and check the brake
fluid level in the reservoir ⇒ page 213, Brake fluid. If the brake fluid lev-
el has dropped below the “MIN” mark you must not drive on. Risk of acci-
dent. Obtain technical assistance.
● If the brake fluid level is correct, the fault in the brake system may
have been caused by a failure of the ABS system. This could cause the
rear wheels to lock quickly when you brake. This could cause the rear to
break away. Risk of skidding. Stop the vehicle and seek technical assis-
tance.
Safety FirstOperating InstructionsPractical TipsTechnical Specifications