check engine light Seat Ibiza ST 2012 User Guide
[x] Cancel search | Manufacturer: SEAT, Model Year: 2012, Model line: Ibiza ST, Model: Seat Ibiza ST 2012Pages: 282, PDF Size: 3.77 MB
Page 149 of 282
147
Driving
Starting and stopping the engine Starting petrol engines
The engine can only be started using a genuine SEAT key
with its correct code.
– Move the gearbox lever to the neutral position and depress the
clutch pedal thoroughly and hold it in this position for the start-
er to turn the engine on.
– Turn the ignition key to the starting ⇒ page 145 position.
– Let go of the ignition key as soon as the engine starts; the start-
er motor must not run on with the engine.
After starting a very hot engine, you may need to slightly press down the ac-
celerator.
When starting a very cold engine, it may be a little noisy for the first few sec-
onds until oil pressure has built up in the hydraulic valve compensators.
This is quite normal, and no cause for concern.
If the engine does not start immediately, switch the starter off after 10 sec-
onds and try again after half a minute. If the engine still does not start, the
fuel pump fuse should be checked ⇒ page 231, Fuses.
WARNING
● Never start or run the engine in unventilated or closed rooms. The ex-
haust gases contain carbon monoxide, an odourless and colourless poi-
sonous gas. Risk of fatal accidents. Carbon monoxide can cause loss of
consciousness. It can also result in death.
● Never leave the vehicle unattended if the engine is running.
● Never use “cold start sprays”, they could explode or cause the engine
to run at high revs. Risk of injury.
CAUTION
● When the engine is cold, you should avoid high engine speeds, driving
at full throttle and over-loading the engine. Risk of engine damage.
● The vehicle should not be pushed or towed more than 50 metres to start
the engine. Unburnt fuel could enter the catalytic converter and damage it.
● Before attempting to push-start or tow a vehicle in order to start it, you
should first try to start it using the battery of another vehicle. Note and fol-
low the instructions in ⇒ page 248, Jump-starting.
For the sake of the environment
Do not warm-up the engine by running the engine with the vehicle station-
ary. Start off immediately, driving gently. This helps the engine reach oper-
ating temperature faster and reduces emissions.
Safety FirstOperating InstructionsPractical TipsTechnical Specifications
Page 176 of 282
174Driving and the environment
recommend that you have the thickness of your brake pads checked by a
Technical Service more frequently than recommended in the Maintenance
Programme.
If you drive with wet brakes, for example, after crossing areas of water, in
heavy rainfall or even after washing the vehicle, the effect of the brakes is
lessened as the brake discs are wet or even frozen (in winter). In this case
the brakes should be dried by pressing the brake pedal several times.
WARNING
Longer braking distances and faults in the brake system increase the risk
of accidents.
● New brake pads must be run in and do not have the correct friction
during the first 200 km (120 miles). However, the reduced braking ca-
pacity may be compensated by pressing on the brake pedal a little hard-
er. This also applies when the brake pads have to be changed further on.
● If brakes are wet or frozen, or if you are driving on roads which have
been salted, braking power may be lower than normal.
● On steep slopes, if brakes are excessively used, they will overheat.
Before driving down a long steep slope, it is advisable to reduce speed
and change down into a lower gear or range (depending on the type of
transmission). This makes use of engine braking and relieves the brakes.
● Never let the brakes “drag” by applying light pressure. Continuous
braking will cause the brakes to overheat and the braking distance will
increase. Apply and then release the brakes alternately.
● Never let the vehicle run with the engine switched off. The braking
distance is increased considerably when the brake servo is not active.
● If the brake fluid loses its viscosity and is subjected to heavy use, va-
pour bubbles can form in the brake system. This reduces the efficiency of
the brakes.
WARNING (Continued)
● Non-standard or damaged front spoilers could restrict the airflow to
the brakes and cause them to overheat. Before purchasing accessories
please observe the relevant instructions ⇒ page 190, Technical modifi-
cations.
● If a brake system circuit fails, the braking distance will be increased
considerably. Contact a specialised workshop immediately and avoid un-
necessary journeys.
Exhaust gas purification system Catalytic converter*
To maintain the useful life of the catalytic converter
– Use only unleaded petrol with petrol engines, as lead damages
the catalytic converter.
– Do not let the fuel get too low in the tank.
– For engine oil changes, do not replenish with too much engine
oil ⇒ page 206, Topping up engine oil .
– Never tow the vehicle to start it, use jump leads if necessary
⇒ page 248.
If you notice misfiring, uneven running or loss of power when the vehicle is
moving, reduce speed immediately and have the vehicle inspected at the
nearest specialised workshop. In general, the exhaust gas warning lamp
will light up when any of the described symptoms occur ⇒ page 65. If this
happens, unburnt fuel can enter the exhaust system and escape into the en-
vironment. The catalytic converter can also be damaged by overheating.
Page 205 of 282
203
Checking and refilling levels
WARNING (Continued)
● Wait until no more steam, smoke or coolant is emitted from the bon-
net, then carefully open the bonnet.
● When working in the engine compartment, always observe the safety
warnings ⇒ page 200.
Closing the bonnet
– Slightly raise the bonnet
– Release the bonnet stay and replace it in its support.
– At a height of about 30 cm let it fall so it is locked.
If the bonnet does not close, do not press downwards. Open it once more
and let it fall as before.
WARNING
If the bonnet is not closed properly, it could open while you are driving
and completely obscure your view of the road. Risk of accident.
● After closing the bonnet, always check that it is properly secured. The
bonnet must be flush with the surrounding body panels.
● If you notice that the bonnet latch is not secured when the vehicle is
moving, stop the vehicle immediately and close the bonnet properly.
Risk of accident.
Engine oil
General notes
The engine comes with a special, multi-grade oil that can be used all year
round.
Because the use of high-quality oil is essential for the correct operation of
the engine and its long useful life, when topping up or changing oil, use on-
ly those oils that comply with VW standards.
The specifications (VW standards) set out in the following page should ap-
pear on the container of the service oil; when the container displays the
specific standards for petrol and diesel engines together, it means that the
oil can be used for both types of engines.
We recommend that the oil change, indicated in the Maintenance Pro-
gramme, be performed by a Technical Service or a specialised workshop.
The correct oil specifications for your engine are listed in ⇒ page 204, Oil
properties.
Service intervals
Service intervals can be flexible (LongLife service) or fixed (dependent on
time/distance travelled).
If the PR code that appears on the back of the “Maintenance Programme”
booklet is QG1, this means that your vehicle has the LongLife service pro-
grammed. If it has the codes QG0 or QG2 the interval service is dependent
on time/distance travelled.
Flexible service intervals (LongLife service intervals*)
Special oils and processes have been developed which, depending on the
characteristics and individual driving profiles, enable the extension of the
oil change service (LongLife service intervals).
Safety FirstOperating InstructionsPractical TipsTechnical Specifications
Page 209 of 282
207
Checking and refilling levels
WARNING
Only change the engine oil yourself if you have the specialist knowledge
required!
● Before opening the bonnet, read and observe the warnings
⇒ page 200, Safety instructions on working in the engine compartment.
● Wait for the engine to cool down. Hot oil may cause burn injuries.
● Wear eye protection to avoid injuries, such as acid burns, caused by
splashes of oil.
● When removing the oil drain plug with your fingers, keep your arm
horizontal to help prevent oil from running down your arm.
● Wash your skin thoroughly if it comes into contact with engine oil.
● Engine oil is poisonous! Used oil must be stored in a safe place out of
the reach of children.
CAUTION
No additives should be used with engine oil. This could result in engine
damage. Any damage caused by the use of such additives would not be
covered by the factory warranty.
For the sake of the environment
● Because of the disposal problems, the necessary special tools and spe-
cialist knowledge required, we recommend that you have the engine oil and
filter changed by a Technical Service.
● Never pour oil down drains or into the ground.
● Use a suitable container when draining the used oil. It must be large
enough to hold all the engine oil. Coolant
Engine coolant specifications
The engine cooling system is supplied from the factory with a specially trea-
ted mixture of water and, at least, 40 % of the additive G 13 (TL-VW 774 J).
The engine coolant additive is recognisable by its purple colour. This mix-
ture of water and additive gives the necessary frost protection down to
-25°C (-13°F) and protects the light alloy parts of the cooling system against
corrosion. It also prevents scaling and considerably raises the boiling point
of the coolant.
To protect the engine cooling system, the percentage of additive must al-
ways be at least 40 %, even in warm climates where anti-freeze protection is
not required.
If greater frost protection is required in very cold climates, the proportion of
additive can be increased. However, the percentage of additive should not
exceed 60 %, as this would reduce the frost protection and, in turn, de-
crease the cooling capacity.
When the coolant is topped up, use a mixture of distilled water and, at
least, 40 % of the G 13 or G 12 plus-plus (TL-VW 774 G) additive (both are
purple) to obtain an optimum anticorrosion protection ⇒
. The mixture of
G 13 with G 12 plus (TL-VW 774 F), G 12 (red) or G 11 (green-blue) engine
coolants will significantly reduce the anticorrosion protection and should,
therefore be avoided ⇒
.
Safety FirstOperating InstructionsPractical TipsTechnical Specifications
Page 212 of 282
210Checking and refilling levels
The windscreen washer and the headlight washers are supplied with fluid
from the windscreen washer fluid container in the engine compartment. The
container holds approx. 2 litres; in vehicles with headlight washers* it holds
approx. 4.5 litres.
The tank is in the engine compartment.
Plain water is not enough to clean the windscreen and headlights. We rec-
ommend that you always add a product to the windscreen washer fluid. Ap-
proved windscreen cleaning products exist on the market with high deter-
gent and anti-freeze properties, these may be added all-year-round. Please
follow the dilution instructions on the packaging.
WARNING
Any work carried out in the engine compartment or on the engine must
be carried out cautiously.
● When working in the engine compartment, always observe the safety
warnings ⇒ page 200.
CAUTION
● Never put radiator anti-freeze or other additives into the windscreen
washer fluid.
● Always use approved windscreen cleansing products diluted as per in-
structions. If you use other washer fluids or soap solutions, the tiny holes in
the fan-shaped nozzles could become blocked. Changing windscreen wiper blades
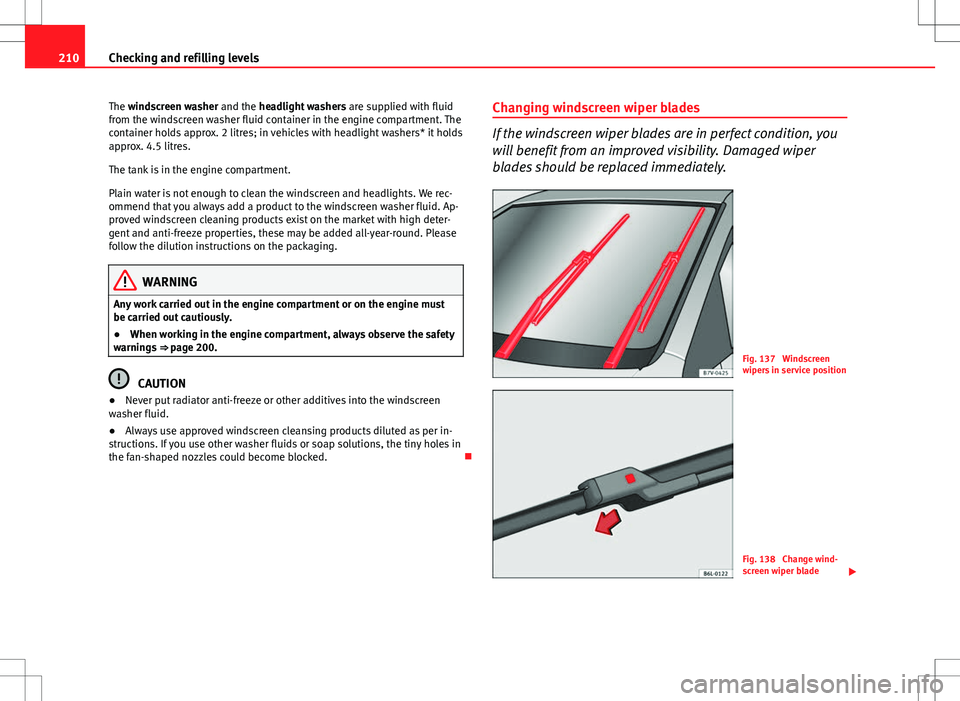
If the windscreen wiper blades are in perfect condition, you
will benefit from an improved visibility. Damaged wiper
blades should be replaced immediately.
Fig. 137 Windscreen
wipers in service position
Fig. 138 Change wind-
screen wiper blade
Page 215 of 282
213
Checking and refilling levels
Brake fluid Checking the brake fluid level
The brake fluid is checked at the intervals given in the serv-
ice schedule.
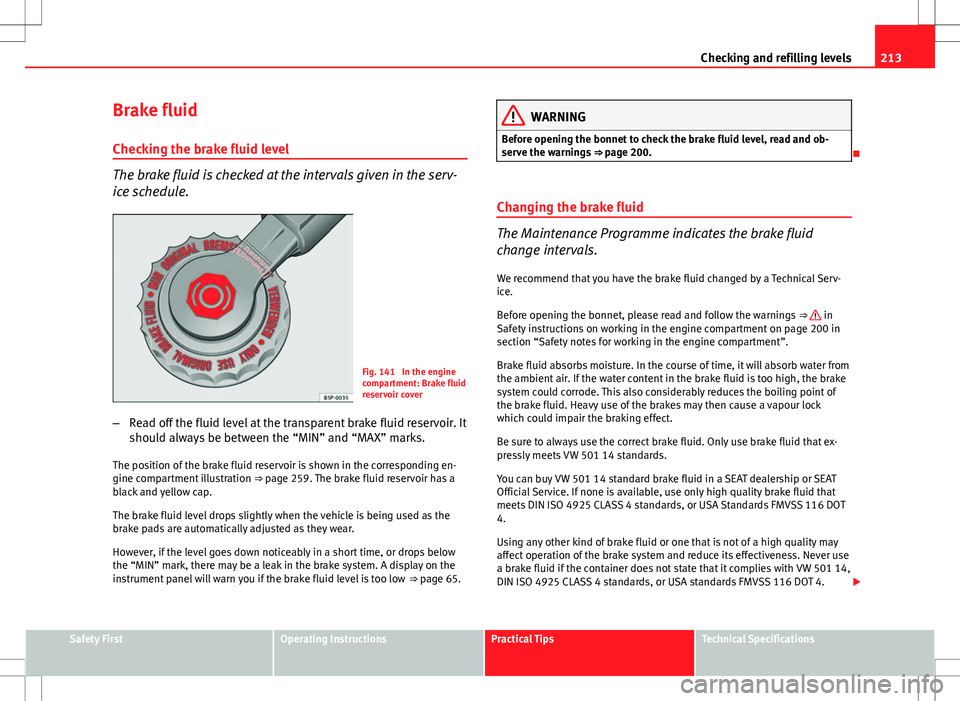
Fig. 141 In the engine
compartment: Brake fluid
reservoir cover
– Read off the fluid level at the transparent brake fluid reservoir. It
should always be between the “MIN” and “MAX” marks.
The position of the brake fluid reservoir is shown in the corresponding en-
gine compartment illustration ⇒ page 259. The brake fluid reservoir has a
black and yellow cap.
The brake fluid level drops slightly when the vehicle is being used as the
brake pads are automatically adjusted as they wear.
However, if the level goes down noticeably in a short time, or drops below
the “MIN” mark, there may be a leak in the brake system. A display on the
instrument panel will warn you if the brake fluid level is too low ⇒ page 65.
WARNING
Before opening the bonnet to check the brake fluid level, read and ob-
serve the warnings ⇒ page 200.
Changing the brake fluid
The Maintenance Programme indicates the brake fluid
change intervals. We recommend that you have the brake fluid changed by a Technical Serv-
ice.
Before opening the bonnet, please read and follow the warnings ⇒
in
Safety instructions on working in the engine compartment on page 200 in
section “Safety notes for working in the engine compartment”.
Brake fluid absorbs moisture. In the course of time, it will absorb water from
the ambient air. If the water content in the brake fluid is too high, the brake
system could corrode. This also considerably reduces the boiling point of
the brake fluid. Heavy use of the brakes may then cause a vapour lock
which could impair the braking effect.
Be sure to always use the correct brake fluid. Only use brake fluid that ex-
pressly meets VW 501 14 standards.
You can buy VW 501 14 standard brake fluid in a SEAT dealership or SEAT
Official Service. If none is available, use only high quality brake fluid that
meets DIN ISO 4925 CLASS 4 standards, or USA Standards FMVSS 116 DOT
4.
Using any other kind of brake fluid or one that is not of a high quality may
affect operation of the brake system and reduce its effectiveness. Never use
a brake fluid if the container does not state that it complies with VW 501 14,
DIN ISO 4925 CLASS 4 standards, or USA standards FMVSS 116 DOT 4.
Safety FirstOperating InstructionsPractical TipsTechnical Specifications
Page 217 of 282
215
Checking and refilling levels
WARNING (Continued)
● Fires, sparks, open flames and smoking are prohibited. When han-
dling cables and electrical equipment, avoid causing sparks and electro-
static charge. Never short the battery terminals. High-energy sparks can
cause injury.
● A highly explosive mixture of gases is released when the battery is
under charge. The batteries should be charged in a well-ventilated room
only.
● Keep children away from acid and batteries.
● Before working on the electrical system, you must switch off the en-
gine, the ignition and all consumers. The negative cable on the battery
must be disconnected. When a light bulb is changed, you need only
switch off the light.
● Deactivate the anti-theft alarm by unlocking the vehicle before you
disconnect the battery! The alarm will otherwise be triggered.
● When disconnecting the battery from the vehicle on-board network,
disconnect first the negative cable and then the positive cable.
● Switch off all electrical consumers before reconnecting the battery.
Reconnect first the positive cable and then the negative cable. Never re-
verse the polarity of the connections. This could cause an electrical fire.
● Never charge a frozen battery, or one which has thawed. This could
result in explosions and chemical burns. Always replace a battery which
has frozen. A flat battery can freeze at temperatures around 0°C.
● Ensure that the vent hose is always connected to the battery.
● Never use a defective battery. This could cause an explosion. Replace
a damaged battery immediately.
● For vehicles with the battery in the luggage compartment: Check that
the battery gas ventilation hose is securely attached.CAUTION
● Never disconnect the battery if the ignition is switched on or if the en-
gine is running. This could damage the electrical system or electronic com-
ponents.
● Do not expose the battery to direct sunlight over a long period of time,
as the intense ultraviolet radiation can damage the battery housing.
● If the vehicle is left standing in cold conditions for a long period, protect
the battery from freezing. If it freezes it will be damaged.
Checking the electrolyte level
The electrolyte level should be checked regularly in high-
mileage vehicles, in hot countries and in older batteries. – Open the engine bonnet and the battery cover ⇒
in Safety in-
structions on working in the engine compartment on page 201
⇒
in Warnings on handling the battery on page 214.
– Check the colour display in the "magic eye" on the top of the
battery.
– If there are air bubbles in the window, tap the window gently
until they disperse.
The position of the battery is shown in the corresponding engine compart-
ment diagram ⇒ page 259.
The “magic eye” indicator, located on the top of the battery changes colour,
depending on the charge state and electrolyte level of the battery.
There are two different colours:
Safety FirstOperating InstructionsPractical TipsTechnical Specifications
Page 226 of 282
224If and when
If you have a puncture on one of the front wheels when using snow chains,
fit the compact temporary spare wheel in place of one of the rear wheels.
You can then attach the snow chains to the wheel taken from the rear and
use this wheel to replace the punctured front wheel.
WARNING
● The tyre pressures must be checked and corrected as soon as possi-
ble after fitting the temporary spare wheel.
● Do not drive faster than 80 km/h (50 mph). Higher speeds can cause
an accident.
● Avoid heavy acceleration, hard braking and fast cornering. Risk of ac-
cident.
● Never use more than one temporary spare wheel at the same time,
risk of accident.
● No other type of tyre (normal summer or winter tyre) may be fitted on
the compact temporary spare wheel rim.
Tyre repair kit*
The tyre repair kit (for vehicles not including a temporary
spare wheel) is stored under the floor panel in the luggage
compartment. Your vehicle is equipped with the Tyre Mobility System “Tyre repair kit”.
The tyre repair kit consists of a container with sealing product to repair the
puncture and a compressor to generate the required tyre pressure. The kit
will reliably seal punctures up to a size of about 4 mm caused by the pene-
tration of a foreign body into the tyre.
Note
● Seek professional assistance if the repair of a tyre puncture is not possi-
ble with the sealing product.
Wheel change Preparation work
What you must do before changing a wheel.
– If you have a flat tyre or puncture, park the vehicle as far away
from the flow of traffic as possible. Choose a location that is as
level as possible.
– All vehicle occupants should leave the vehicle. They should
wait in a safe area (for instance behind the roadside crash barri-
er).
– Switch the engine off. Switch the hazard warning lights on and
place the warning triangles in position.
– Apply the handbrake firmly.
– Engage the first gear , or put the selector lever to position P for
those vehicles with an automatic gearbox.
– If you are towing a trailer, unhitch it from your vehicle.
– Take the vehicle tools and the spare wheel out of the luggage
compartment.
Page 237 of 282
235
If and when
Xenon 1)
//adaptive headlights*
- D1S2)
- LED 3)
- LED3)
- PY 21W
Fog light - H11
WARNING
● Take particular care when working on components in the engine com-
partment if the engine is warm. Risk of burns.
● Bulbs are highly sensitive to pressure. The glass can break when you
touch the bulb, causing injury.
● The high voltage element of gas discharge bulbs* (xenon light) must
be handled correctly. Otherwise, there is a risk of death.
● When changing bulbs, please take care not to injure yourself on sharp
parts in the headlight housing.
CAUTION
● Remove the ignition key before working on the electric system. Other-
wise, a short circuit could occur.
● Switch off the lights or parking lights before you change a bulb.
Dipped and full beam
Side
DRL (day light)
Turn signals
Fog light/cornering
For the sake of the environment
Please ask your specialist retailer how to dispose of used bulbs in the prop-
er manner.
Note
● Depending on weather conditions (cold or wet), the front lights, the fog
lights, the tail lights and the turn signals may be temporarily misted. This
has no influence on the useful life of the lighting system. By switching on
the lights, the area through which the beam of light is projected will quickly
be demisted. However, the edges may continue to be misted.
● Please check at regular intervals that all lighting (especially the exterior
lighting) on your vehicle is functioning properly. This is not only in the inter-
est of your own safety, but also that of all other road users.
● Before changing a bulb, make sure you have the correct new bulb.
● Do not touch the glass part of the bulb with your bare hands, use a cloth
or paper towel instead. Otherwise, the fingerprints left on the glass will va-
porise as a result of the heat generated by the bulb, they will be deposited
on the reflector and will impair its surface.
1)
With this type of headlight, the user can replace the turn signal bulb. Replacement of the
dipped/main beam bulb must be done by a Technical Service, given that complex elements
must be removed from the vehicle and the automatic control system that incorporates it
must be reset.
2) The Xenon bulbs discharge 2.5 times the light flux and have an average lifespan of 5 times
more than that of halogen bulbs, this means that, except due to unusual circumstances,
there is no need to change the bulbs for the whole life of the vehicle.
3) In the event that there is a fault in the LEDs, the complete headlight must be replaced.
Safety FirstOperating InstructionsPractical TipsTechnical Specifications
Page 274 of 282
C
Car care Exterior . . . . . . . . . . . . . . . . . . . . . . . . . . . . 182
Car phone . . . . . . . . . . . . . . . . . . . . . . . . . . . . . 191
Catalytic converter . . . . . . . . . . . . . . . . . . . . . . 174
CCS . . . . . . . . . . . . . . . . . . . . . . . . . . . . . . . . . . 164
Central lock button Locking . . . . . . . . . . . . . . . . . . . . . . . . . . . . . 85
Unlocking . . . . . . . . . . . . . . . . . . . . . . . . . . . 85
Central locking . . . . . . . . . . . . . . . . . . . . . . . . . . 82 Automatic speed dependent locking andunlocking system* . . . . . . . . . . . . . . . . . . 84
Emergency unlocking system . . . . . . . . . . . 85
Locking system for involuntary unlocking . 84
Selective unlocking system* . . . . . . . . . . . . 83
Unlocking system* . . . . . . . . . . . . . . . . . . . . 84
Cetane number . . . . . . . . . . . . . . . . . . . . . . . . . 199
Changing bulbs interior light and front reading lights . . . . 247
Changing gear see Manual gearbox . . . . . . . . . . . . . . . . . . 153
Changing gear in tiptronic mode . . . . . . . . . . 157
Changing rear lights on the rear lid . . . . . . . . . . . . . . . . . . . . . . . 245
on the wing . . . . . . . . . . . . . . . . . . . . . . . . . 244
Changing single headlight bulbs Turn signal bulb . . . . . . . . . . . . . . . . . . . . . 236
Changing the AFS headlight bulbs Xenon lights . . . . . . . . . . . . . . . . . . . . . . . . 242
Changing the bulbs AFS headlight bulbs . . . . . . . . . . . . . . . . . . 242
fog light bulbs . . . . . . . . . . . . . . . . . . . . . . 243 Luggage compartment light . . . . . . . . . . . 248
number plate light . . . . . . . . . . . . . . . . . . . 247
Side turn signal lights . . . . . . . . . . . . . . . . 246
Changing the main headlight bulb turn signal lights . . . . . . . . . . . . . . . . . . . . 240
Changing the main headlight bulbs turn signal lights . . . . . . . . . . . . . . . . . . . . 242
Changing the single headlight bulbs Dipped/main beam . . . . . . . . . . . . . . . . . . 237
Side light . . . . . . . . . . . . . . . . . . . . . . . . . . 237
Changing windscreen wiper blades . . . . . . . . 210
Chassis number . . . . . . . . . . . . . . . . . . . . . . . . 256
Checking . . . . . . . . . . . . . . . . . . . . . . . . . . . . . . 215
Checking battery electrolyte level . . . . . . . . . . 215
Checking engine oil level . . . . . . . . . . . . . . . . . 205
Child safety . . . . . . . . . . . . . . . . . . . . . . . . . . . . . 43
Child seat Categorisation in groups . . . . . . . . . . . . . . . 45
Group 1 . . . . . . . . . . . . . . . . . . . . . . . . . . . . . 46
Group 2 . . . . . . . . . . . . . . . . . . . . . . . . . . . . . 46
Group 3 . . . . . . . . . . . . . . . . . . . . . . . . . . . . . 46
Groups 0 and 0+ . . . . . . . . . . . . . . . . . . . . . . 45
Safety notes . . . . . . . . . . . . . . . . . . . . . . . . . 43
Securing . . . . . . . . . . . . . . . . . . . . . . . . . . . . 48
Child seats . . . . . . . . . . . . . . . . . . . . . . . . . . . . . 45 ISOFIX system . . . . . . . . . . . . . . . . . . . . . . . . 49
on the front passenger seat . . . . . . . . . . . . . 31
Top Tether system . . . . . . . . . . . . . . . . . . . . 50
Cigarette lighter . . . . . . . . . . . . . . . . . . . . . . . . 126
Cleaning alloy wheel rims . . . . . . . . . . . . . . . . 186
Cleaning chrome . . . . . . . . . . . . . . . . . . . . . . . 185
Cleaning engine compartment . . . . . . . . . . . . 187 Cleaning steel wheel rims . . . . . . . . . . . . . . . . 186
Cleaning windows . . . . . . . . . . . . . . . . . . . . . . 184
Climatronic
automatic mode . . . . . . . . . . . . . . . . . . . . . 141
controls . . . . . . . . . . . . . . . . . . . . . . . . . . . . 140
General notes . . . . . . . . . . . . . . . . . . . . . . . 142
manual mode . . . . . . . . . . . . . . . . . . . . . . . 141
Clock . . . . . . . . . . . . . . . . . . . . . . . . . . . . . . . . . . 60
Cloth seat covers cleaning . . . . . . . . . . . . . . . . 188
Cockpit . . . . . . . . . . . . . . . . . . . . . . . . . . . . . . . . 55
Coming Home function . . . . . . . . . . . . . . . . . . 104
Compartment for on-board documentation . . 122
Control Exterior mirrors . . . . . . . . . . . . . . . . . . . . . . 113
control lamp . . . . . . . . . . . . . . . . . . . . . . . . . . . . 31
Control lamps . . . . . . . . . . . . . . . . . . . . . . . . . . . 65
Control lighting . . . . . . . . . . . . . . . . . . . . . . . . . . 55
Controls Electric windows . . . . . . . . . . . . . . . . . . . . . . 95
Convenience closing Sliding/tilting sunroof . . . . . . . . . . . . . . . . . 99
Windows . . . . . . . . . . . . . . . . . . . . . . . . . . . . 97
Convenience opening Windows . . . . . . . . . . . . . . . . . . . . . . . . . . . . 97
Coolant . . . . . . . . . . . . . . . . . . . . . . . . . . . 207, 208
Coolant level . . . . . . . . . . . . . . . . . . . . . . . . . . . 208 control lamp . . . . . . . . . . . . . . . . . . . . . . . . . 75
Coolant loss . . . . . . . . . . . . . . . . . . . . . . . . . . . 208
Coolant temperature control lamp . . . . . . . . . . . . . . . . . . . . . . . . . 75
Safety instructions . . . . . . . . . . . . . . . . . . . . 76
Correct adjustment of front head restraints . . . 13
272 Index