lock Seat Ibiza ST 2012 User Guide
[x] Cancel search | Manufacturer: SEAT, Model Year: 2012, Model line: Ibiza ST, Model: Seat Ibiza ST 2012Pages: 282, PDF Size: 3.77 MB
Page 62 of 282
60Cockpit
Digital clock*
–To set the hour, press button 4 ⇒ Fig. 30. The “hour” option
flashes on the digital display and is set using button 5 “set”
⇒ Fig. 30.
– To set the minutes, press button 4
again and select the mi-
nute option. Set from button 5 “set”.
Once the operation has been carried out, the system memorises the time.
Outside temperature indicator
The outside temperature is displayed when the ignition is
switched on. In addition to the outside temperature display, an ice crystal is displayed
and, if vehicle speed is over 10 km/h (6 mph), a warning tone is heard at
temperatures dropping from between +4°C and -7°C and at temperatures
rising from -5°C up to +6°C.
The lighting of the crystal symbol aims to warn the driver of the risk of ice,
so that he/she proceeds with due care.
When the vehicle is stationary or travelling at very low speeds, the tempera-
ture displayed may be slightly higher than the actual outside temperature
as a result of heat coming from the engine. Recommended gear display*
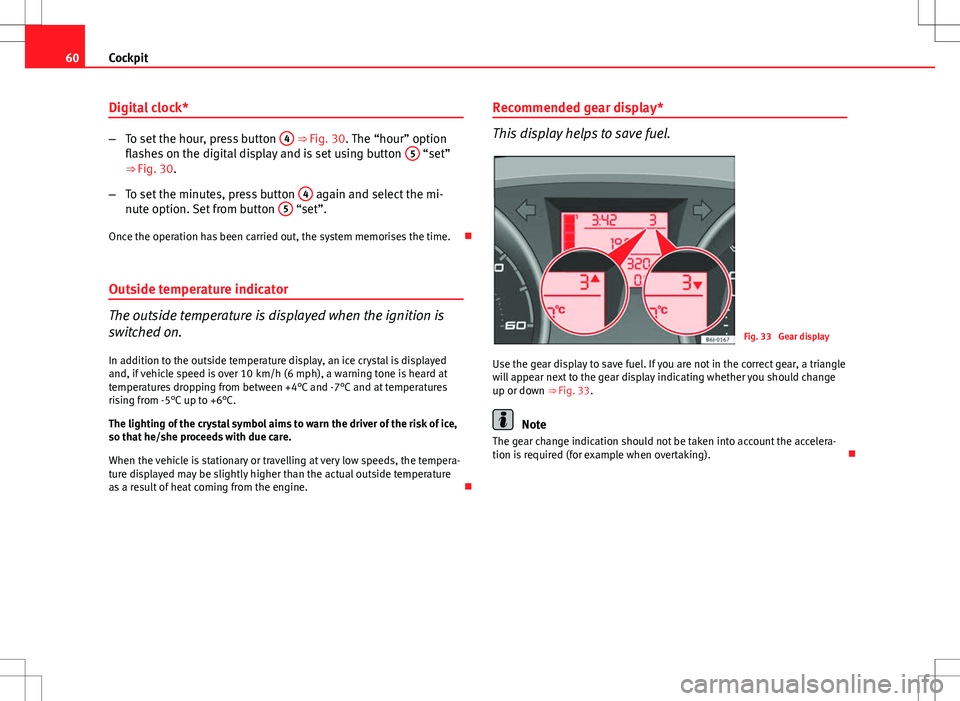
This display helps to save fuel.
Fig. 33 Gear display
Use the gear display to save fuel. If you are not in the correct gear, a triangle
will appear next to the gear display indicating whether you should change
up or down ⇒ Fig. 33.
Note
The gear change indication should not be taken into account the accelera-
tion is required (for example when overtaking).
Page 66 of 282
64Cockpit
The service interval display only indicates the dates of services that include
engine oil change. The dates of all other services, such as Inspection Serv-
ice or brake fluid change, appear in the sticker on the door pillar or in the
Maintenance Programme.
Vehicles with service intervals dependent on time/distance travelled al-
ready have certain service intervals set.
The intervals are calculated separately in vehicles with LongLife service.
Technical progress has made it possible to considerably reduce servicing re-
quirements. With the LongLife System, SEAT ensures that your vehicle only
has an interval service when it is necessary. To calculate this (max. two
years), the conditions under which the vehicle is used and the individual
driving style are also taken into account. The service pre-warning will ap-
pear at 20 days or less prior to the corresponding service. The distance trav-
elled is rounded off to the nearest 100 km (miles) and the time to full days.
The current service message can only be consulted 500 km (miles) or more
after the last service. Until that time, only dashes are displayed.
Service warning
A service warning will appear when the ignition is switched on if a service is
due soon.
The instrument panel display will show the “spanner symbol” and the
“km (miles)” indication, along with a clock symbol with the days remaining
until the date of the next service. The figure indicated is the maximum num-
ber of kilometres (miles) remaining before the date of the next service. The
indication changes after a few seconds. A “clock symbol” appears and the
number of days until the service appointment should be carried out.
Service
If a service is due, an audible warning will sound and the flashing “span-
ner” symbol will be shown along with the fixed text SERVICE.
If no service is carried out following the indication on the instrument panel,
the excess distance travelled and the excess time following the SERVICE
warning will be displayed. Reading the service message
The current service message
can be consulted with the ignition on, the en-
gine switched off and the vehicle at a standstill:
● Press the
button on the instrument panel as often as necessary until
the spanner symbol is displayed.
An overdue service is indicated by a minus sign in front of the mileage or
day information.
Resetting service interval display
If the service was not performed by a SEAT dealership, the display must be
reset as follows:
● Switch the ignition off.
● Press and hold the 0.0 / SET
button.
● Switch ignition back on.
● Release the 0.0 / SET
button and press the button within 20 seconds.
Do not reset the display between service intervals, as the display will other-
wise be incorrect.
If the display is reset manually, the next service interval will be indicated af-
ter 15 000 km (10 000 miles) or one year and will not be calculated individ-
ually.
Note
In LongLife Service vehicles, if the battery is disconnected for a long period,
the days remaining until the next service cannot be calculated. Therefore,
the service message indications may be incorrect. In this case, bear in mind
the maximum service intervals permitted in the ⇒ Booklet Maintenance Pro-
gramme.
Page 68 of 282
66Cockpit
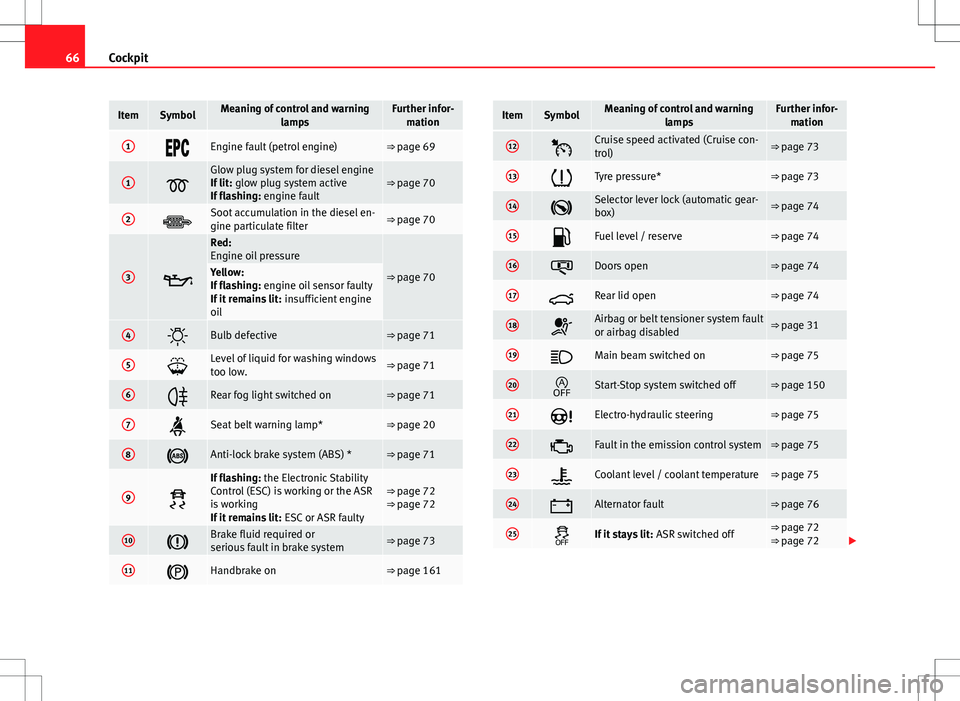
ItemSymbolMeaning of control and warning
lampsFurther infor-mation
1Engine fault (petrol engine)⇒ page 69
1
Glow plug system for diesel engine
If lit: glow plug system active
If flashing: engine fault⇒ page 70
2Soot accumulation in the diesel en-
gine particulate filter⇒ page 70
3
Red:
Engine oil pressure
⇒ page 70Yellow:
If flashing: engine oil sensor faulty
If it remains lit: insufficient engine
oil
4Bulb defective⇒ page 71
5Level of liquid for washing windows
too low.⇒ page 71
6Rear fog light switched on⇒ page 71
7Seat belt warning lamp*⇒ page 20
8Anti-lock brake system (ABS) *⇒ page 71
9
If flashing: the Electronic Stability
Control (ESC) is working or the ASR
is working
If it remains lit: ESC or ASR faulty⇒ page 72
⇒ page 72
10Brake fluid required or
serious fault in brake system⇒ page 73
11Handbrake on⇒ page 161
ItemSymbolMeaning of control and warning
lampsFurther infor-mation
12Cruise speed activated (Cruise con-
trol)⇒ page 73
13Tyre pressure*⇒ page 73
14Selector lever lock (automatic gear-
box)⇒ page 74
15Fuel level / reserve⇒ page 74
16Doors open⇒ page 74
17Rear lid open⇒ page 74
18Airbag or belt tensioner system fault
or airbag disabled⇒ page 31
19Main beam switched on⇒ page 75
20Start-Stop system switched off⇒ page 150
21Electro-hydraulic steering⇒ page 75
22Fault in the emission control system⇒ page 75
23Coolant level / coolant temperature⇒ page 75
24Alternator fault⇒ page 76
25If it stays lit: ASR switched off⇒ page 72
⇒ page 72
Page 71 of 282
69
Cockpit
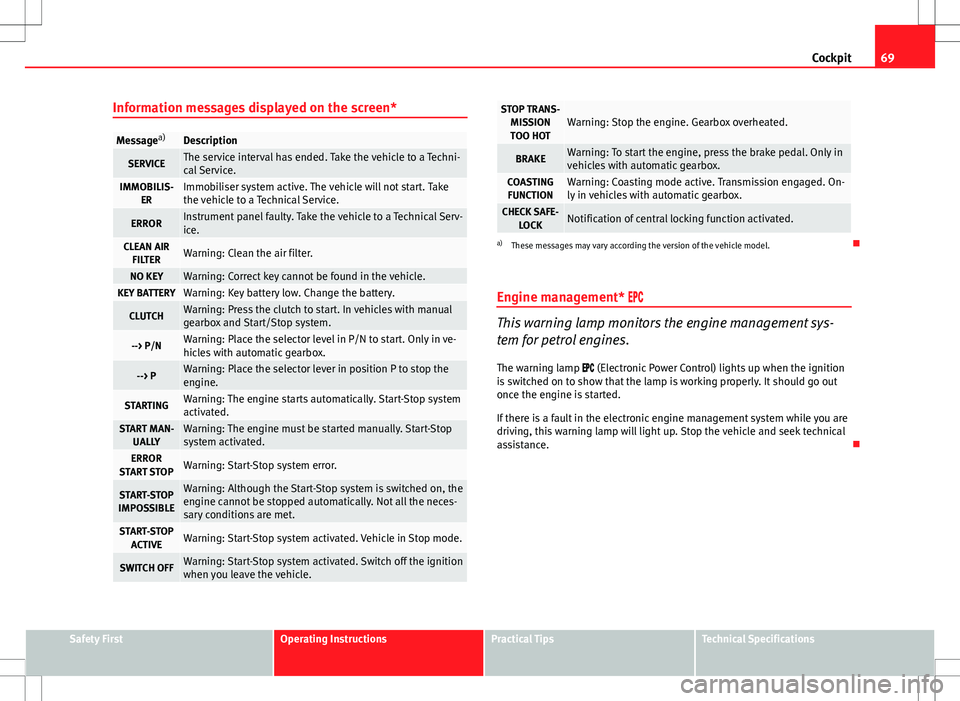
Information messages displayed on the screen*
Message a)Description
SERVICEThe service interval has ended. Take the vehicle to a Techni-
cal Service.
IMMOBILIS-
ERImmobiliser system active. The vehicle will not start. Take
the vehicle to a Technical Service.
ERRORInstrument panel faulty. Take the vehicle to a Technical Serv-
ice.
CLEAN AIRFILTERWarning: Clean the air filter.
NO KEYWarning: Correct key cannot be found in the vehicle.KEY BATTERYWarning: Key battery low. Change the battery.
CLUTCHWarning: Press the clutch to start. In vehicles with manual
gearbox and Start/Stop system.
--> P/NWarning: Place the selector level in P/N to start. Only in ve-
hicles with automatic gearbox.
--> PWarning: Place the selector lever in position P to stop the
engine.
STARTINGWarning: The engine starts automatically. Start-Stop system
activated.
START MAN- UALLYWarning: The engine must be started manually. Start-Stop
system activated.
ERROR
START STOPWarning: Start-Stop system error.
START-STOP
IMPOSSIBLEWarning: Although the Start-Stop system is switched on, the
engine cannot be stopped automatically. Not all the neces-
sary conditions are met.
START-STOP ACTIVEWarning: Start-Stop system activated. Vehicle in Stop mode.
SWITCH OFFWarning: Start-Stop system activated. Switch off the ignition
when you leave the vehicle.
STOP TRANS-MISSIONTOO HOTWarning: Stop the engine. Gearbox overheated.
BRAKEWarning: To start the engine, press the brake pedal. Only in
vehicles with automatic gearbox.
COASTING FUNCTIONWarning: Coasting mode active. Transmission engaged. On-
ly in vehicles with automatic gearbox.
CHECK SAFE- LOCKNotification of central locking function activated.
a)These messages may vary according the version of the vehicle model.
Engine management*
This warning lamp monitors the engine management sys-
tem for petrol engines.
The warning lamp (Electronic Power Control) lights up when the ignition
is switched on to show that the lamp is working properly. It should go out
once the engine is started.
If there is a fault in the electronic engine management system while you are
driving, this warning lamp will light up. Stop the vehicle and seek technical
assistance.
Safety FirstOperating InstructionsPractical TipsTechnical Specifications
Page 73 of 282
71
Cockpit
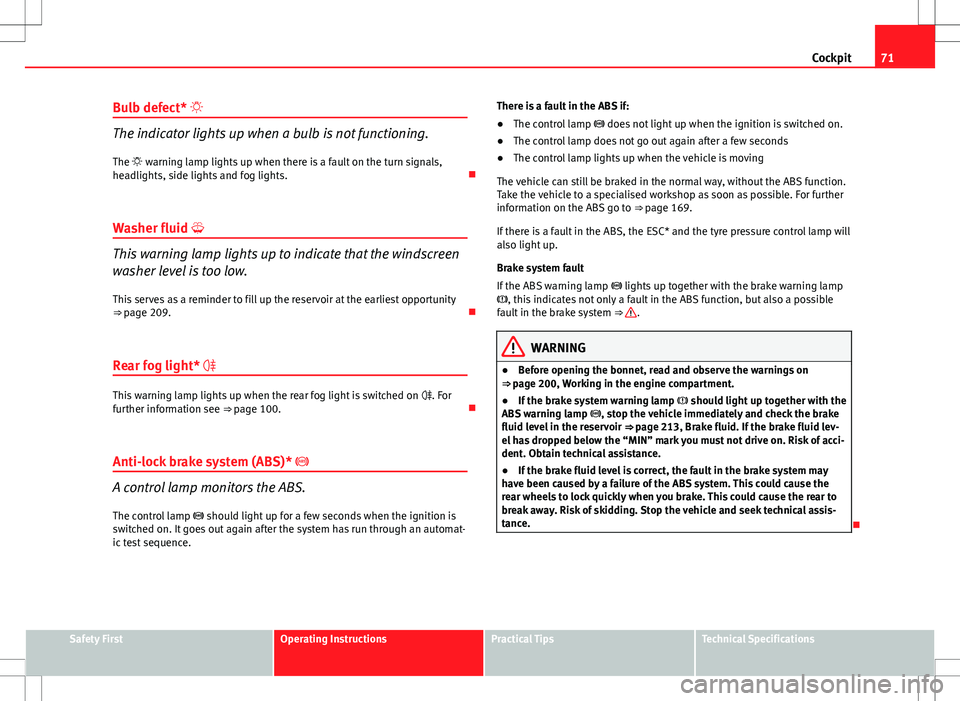
Bulb defect*
The indicator lights up when a bulb is not functioning. The warning lamp lights up when there is a fault on the turn signals,
headlights, side lights and fog lights.
Washer fluid
This warning lamp lights up to indicate that the windscreen
washer level is too low. This serves as a reminder to fill up the reservoir at the earliest opportunity
⇒ page 209.
Rear fog light*
This warning lamp lights up when the rear fog light is switched on . For
further information see ⇒ page 100.
Anti-lock brake system (ABS)*
A control lamp monitors the ABS.
The control lamp should light up for a few seconds when the ignition is
switched on. It goes out again after the system has run through an automat-
ic test sequence. There is a fault in the ABS if:
●
The control lamp does not light up when the ignition is switched on.
● The control lamp does not go out again after a few seconds
● The control lamp lights up when the vehicle is moving
The vehicle can still be braked in the normal way, without the ABS function.
Take the vehicle to a specialised workshop as soon as possible. For further
information on the ABS go to ⇒ page 169.
If there is a fault in the ABS, the ESC* and the tyre pressure control lamp will
also light up.
Brake system fault
If the ABS warning lamp lights up together with the brake warning lamp
, this indicates not only a fault in the ABS function, but also a possible
fault in the brake system ⇒
.
WARNING
● Before opening the bonnet, read and observe the warnings on
⇒ page 200, Working in the engine compartment.
● If the brake system warning lamp should light up together with the
ABS warning lamp , stop the vehicle immediately and check the brake
fluid level in the reservoir ⇒ page 213, Brake fluid. If the brake fluid lev-
el has dropped below the “MIN” mark you must not drive on. Risk of acci-
dent. Obtain technical assistance.
● If the brake fluid level is correct, the fault in the brake system may
have been caused by a failure of the ABS system. This could cause the
rear wheels to lock quickly when you brake. This could cause the rear to
break away. Risk of skidding. Stop the vehicle and seek technical assis-
tance.
Safety FirstOperating InstructionsPractical TipsTechnical Specifications
Page 74 of 282
72Cockpit
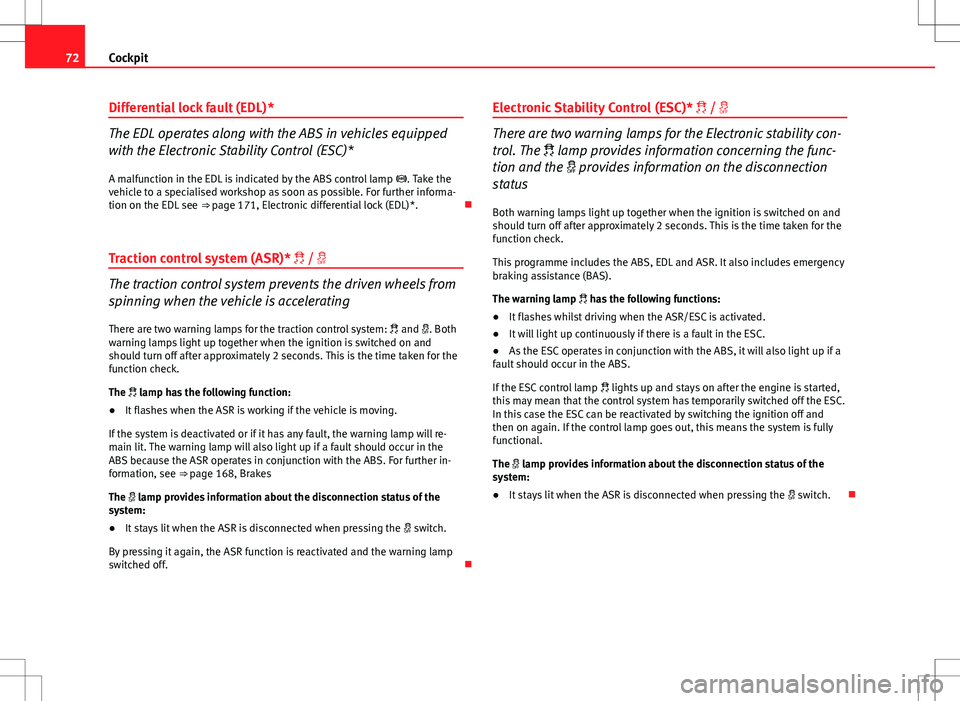
Differential lock fault (EDL)*
The EDL operates along with the ABS in vehicles equipped
with the Electronic Stability Control (ESC)*
A malfunction in the EDL is indicated by the ABS control lamp . Take the
vehicle to a specialised workshop as soon as possible. For further informa-
tion on the EDL see ⇒ page 171, Electronic differential lock (EDL)*.
Traction control system (ASR)* /
The traction control system prevents the driven wheels from
spinning when the vehicle is accelerating
There are two warning lamps for the traction control system: and . Both
warning lamps light up together when the ignition is switched on and
should turn off after approximately 2 seconds. This is the time taken for the
function check.
The lamp has the following function:
● It flashes when the ASR is working if the vehicle is moving.
If the system is deactivated or if it has any fault, the warning lamp will re-
main lit. The warning lamp will also light up if a fault should occur in the
ABS because the ASR operates in conjunction with the ABS. For further in-
formation, see ⇒ page 168, Brakes
The lamp provides information about the disconnection status of the
system:
● It stays lit when the ASR is disconnected when pressing the switch.
By pressing it again, the ASR function is reactivated and the warning lamp
switched off. Electronic Stability Control (ESC)* /
There are two warning lamps for the Electronic stability con-
trol. The lamp provides information concerning the func-
tion and the
provides information on the disconnection
status
Both warning lamps light up together when the ignition is switched on and
should turn off after approximately 2 seconds. This is the time taken for the
function check.
This programme includes the ABS, EDL and ASR. It also includes emergency
braking assistance (BAS).
The warning lamp has the following functions:
● It flashes whilst driving when the ASR/ESC is activated.
● It will light up continuously if there is a fault in the ESC.
● As the ESC operates in conjunction with the ABS, it will also light up if a
fault should occur in the ABS.
If the ESC control lamp lights up and stays on after the engine is started,
this may mean that the control system has temporarily switched off the ESC.
In this case the ESC can be reactivated by switching the ignition off and
then on again. If the control lamp goes out, this means the system is fully
functional.
The lamp provides information about the disconnection status of the
system:
● It stays lit when the ASR is disconnected when pressing the switch.
Page 75 of 282
73
Cockpit
Brake system*
This warning lamp lights up if the brake fluid level is too low
or if there is a fault in the system.
This warning lamp lights up if
● the brake fluid level is too low ⇒ page 213.
● there is a fault in the brake system.
This warning lamp can light up together with the ABS system warning lamp.
WARNING
● If the brake warning lamp does not go out, or if it lights up when driv-
ing, the brake fluid level ⇒ page 213, Brake fluid in the reservoir is too
low. Risk of accident. Stop the vehicle and do not drive on. Obtain techni-
cal assistance.
● If the brake warning lamp lights up together with the ABS warning
lamp , the control function of the ABS could be out of action. This could
cause the rear wheels to lock quickly when you brake. This could cause
the rear to break away. Risk of skidding. Stop the vehicle and seek tech-
nical assistance.
Cruise speed (Cruise control)*
The warning lamp comes on when the cruise control system
is switched on.
The warning lamp lights up when the cruise control system is switched
on. For further information on the cruise control system, see ⇒ page 164.Tyre pressure*
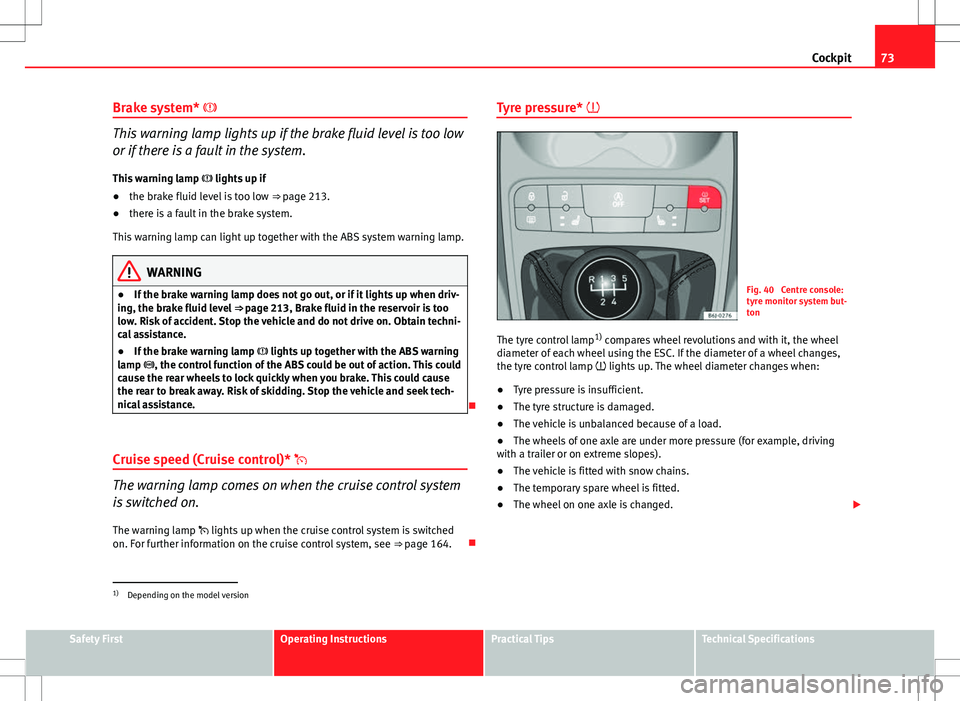
Fig. 40 Centre console:
tyre monitor system but-
ton
The tyre control lamp 1)
compares wheel revolutions and with it, the wheel
diameter of each wheel using the ESC. If the diameter of a wheel changes,
the tyre control lamp lights up. The wheel diameter changes when:
● Tyre pressure is insufficient.
● The tyre structure is damaged.
● The vehicle is unbalanced because of a load.
● The wheels of one axle are under more pressure (for example, driving
with a trailer or on extreme slopes).
● The vehicle is fitted with snow chains.
● The temporary spare wheel is fitted.
● The wheel on one axle is changed.
1)
Depending on the model version
Safety FirstOperating InstructionsPractical TipsTechnical Specifications
Page 76 of 282
74Cockpit
Tyre pressure adjustment
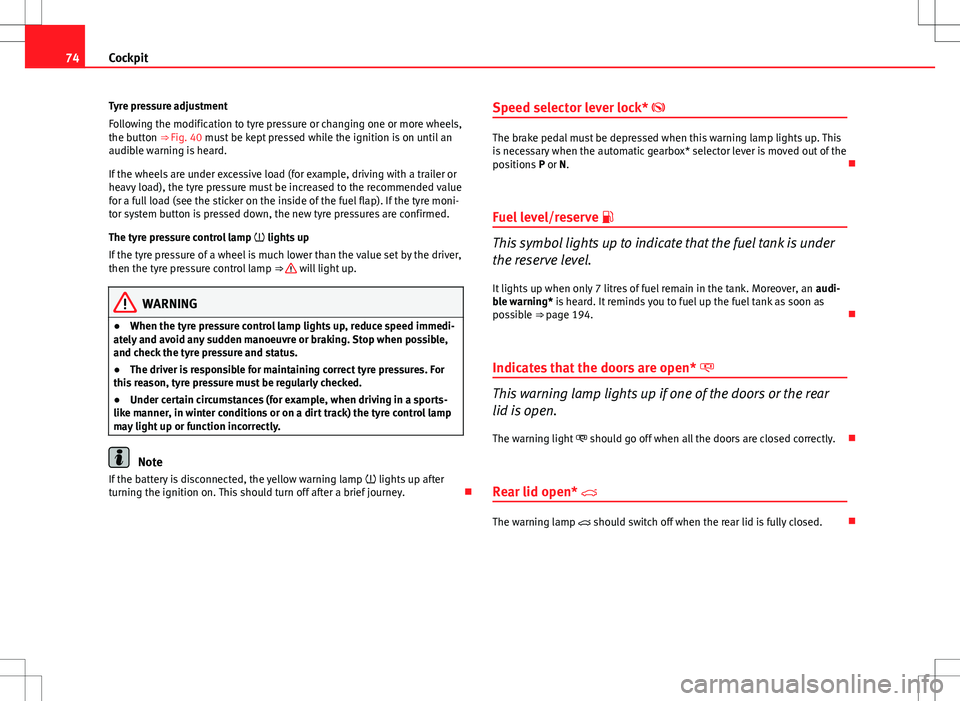
Following the modification to tyre pressure or changing one or more wheels,
the button ⇒ Fig. 40 must be kept pressed while the ignition is on until an
audible warning is heard.
If the wheels are under excessive load (for example, driving with a trailer or
heavy load), the tyre pressure must be increased to the recommended value
for a full load (see the sticker on the inside of the fuel flap). If the tyre moni-
tor system button is pressed down, the new tyre pressures are confirmed.
The tyre pressure control lamp lights up
If the tyre pressure of a wheel is much lower than the value set by the driver,
then the tyre pressure control lamp ⇒
will light up.
WARNING
● When the tyre pressure control lamp lights up, reduce speed immedi-
ately and avoid any sudden manoeuvre or braking. Stop when possible,
and check the tyre pressure and status.
● The driver is responsible for maintaining correct tyre pressures. For
this reason, tyre pressure must be regularly checked.
● Under certain circumstances (for example, when driving in a sports-
like manner, in winter conditions or on a dirt track) the tyre control lamp
may light up or function incorrectly.
Note
If the battery is disconnected, the yellow warning lamp lights up after
turning the ignition on. This should turn off after a brief journey. Speed selector lever lock*
The brake pedal must be depressed when this warning lamp lights up. This
is necessary when the automatic gearbox* selector lever is moved out of the
positions
P or N.
Fuel level/reserve
This symbol lights up to indicate that the fuel tank is under
the reserve level.
It lights up when only 7 litres of fuel remain in the tank. Moreover, an audi-
ble warning* is heard. It reminds you to fuel up the fuel tank as soon as
possible ⇒ page 194.
Indicates that the doors are open*
This warning lamp lights up if one of the doors or the rear
lid is open. The warning light should go off when all the doors are closed correctly.
Rear lid open*
The warning lamp should switch off when the rear lid is fully closed.
Page 78 of 282
76Cockpit
If the control lamp lights up again after driving on for a short distance, stop
the vehicle and switch the engine off . Contact a Technical Service or a spe-
cialised workshop.
Coolant level too low
If the warning light comes on, stop the vehicle, switch off the engine and
wait for it to cool down First check the coolant level. If the level of the cool-
ant is below the “MIN” mark, top up with coolant liquid ⇒
.
WARNING
● If your vehicle is immobilised for technical reasons, move it to a safe
distance from traffic. Turn the engine off, turn the hazard lights on and
place the warning triangle.
● Never open the bonnet if you can see or hear steam or coolant escap-
ing from the engine compartment. Risk of scalding. Wait until you can no
longer see or hear escaping steam or coolant.
● The engine compartment is a dangerous area! Before carrying out any
work in the engine compartment, switch off the engine and allow it to
cool down. Always note the corresponding warnings ⇒ page 200.
Alternator
This warning lamp signals a fault in the alternator.
The warning lamp lights up when the ignition is switched on. It should
go out when the engine has started running.
If the warning lamp lights up while driving, the alternator is no longer
charging the battery. You should immediately drive to the nearest special-
ised workshop. You should avoid using electrical equipment that is not absolutely necessa-
ry because this will drain the battery.
If the indicator flashes the voltage is insufficient for normal vehicle opera-
tion.
Turn signals
The control lamp flashes when the turn signals are in opera-
tion.
Depending on which turn signal is operated, either the left or right turn
signal warning lamp flashes. Both control lamps will flash at the same time
when the hazard warning lights are switched on.
If any of both turn signals fails, the warning lamp will start flashing twice
faster than normal.
For further information on the turn signals, please see ⇒ page 106.
Electronic immobiliser “Safe”*
This warning lamp flashes if an unauthorised key is used.
Inside the key there is a chip that deactivates the electronic immobiliser au-
tomatically when the key is inserted into the ignition. The electronic immo-
biliser will be activated again automatically as soon as you pull the key out
of the ignition lock.
The instrument panel displays the following message 1)
: SAFE. The vehicle
cannot be started in this case
1)
Depending on the version of the model.
Page 84 of 282
82Opening and closing
Opening and closing
Central locking
Description
The central locking system enables you to lock and unlock
all doors by just pushing the button. Central locking can be activated by using any of the following options:
● the key, by inserting it into the driver door cylinder and rotating it in the
opening direction. Depending on the vehicle version, either all doors will be
unlocked or only the driver door will be unlocked. All doors will be locked on
locking the vehicle using the key.
● the interior central lock button ⇒ page 85.
● the remote control, using the buttons on the key ⇒ page 88.
Various functions are available to improve the vehicle safety: Safe* security system
Selective unlocking system*
Self-locking system to prevent involuntary unlocking
Automatic speed-dependent locking and unlocking system*
Emergency unlocking system
-
-
-
-
-
WARNING
● Locking from the outside carelessly or without good visibility may
lead to bruising, particularly in the case of children.
● When locking a vehicle, never leave children unaccompanied inside,
as from the outside it will be difficult to provide assistance if required.
● Having the doors locked prevents an intrusion from getting in, for ex-
ample when stopped at a traffic light.
Note
For anti-theft security, only the driver door is fitted with a lock cylinder.
Safe security system*
This is an anti-theft device that consists of a double lock for
the door locks and a disabling function for the luggage
compartment in order to prevent a forced entry (depending
on country). Activation
The “safe” system is activated when the vehicle is locked using the key or
the remote control.
To activate it with the key, rotate once it is inserted in the door lock cylinder
in the locking direction.
To activate the system using the remote control, press the lock button once
on the remote.