stop start Seat Ibiza ST 2012 Owner's Guide
[x] Cancel search | Manufacturer: SEAT, Model Year: 2012, Model line: Ibiza ST, Model: Seat Ibiza ST 2012Pages: 282, PDF Size: 3.77 MB
Page 173 of 282
171
Intelligent technology
Electronic Stability Control (ESC)*
The ESC reduces the risk of skidding by braking the wheels individually.
The system uses the steering wheel angle and road speed to calculate the
changes of direction desired by the driver, and constantly compares them
with the actual behaviour of the vehicle. When irregularities occur, for exam-
ple, if the vehicle begins to skid, the ESC brakes the appropriate wheel au-
tomatically.
The forces acting on the braked wheel bring the vehicle back to a stable
condition. If the vehicle tends to oversteer, the system will act on the front
wheel on the outside of the turn.
WARNING
● Remember that not even the ESC can defy the laws of physics. This
should be kept in mind, particularly on slippery and wet roads and when
towing a trailer.
● Always adapt your driving style to suit the condition of the roads and
the traffic situation. The greater safety provided by the ESC should not
encourage you to run any risks.
CAUTION
● To ensure that the ESC works correctly, all four wheels must be fitted
with the same tyres. Any differences in the rolling radius of the tyres can
cause the system to reduce engine power when this is not desired.
● Any modifications made to the vehicle (for example, to the engine,
brake system, running gear or to the combination of wheels and tyres) may
affect the operation of the ABS, EDL, ESC and ASR. Anti-lock brake system (ABS)
The anti-lock brake system prevents the wheels locking during braking
⇒ page 169.
Electronic differential lock (EDL)*
The electronic differential lock helps prevent the loss of trac-
tion caused if one of the driven wheels starts spinning.
EDL helps the vehicle to start moving, accelerate and climb a gradient in
slippery conditions where this may otherwise be difficult or even impossi-
ble.
The system will control the revolutions of the driven wheels using the ABS
sensors (in case of an EDL fault the warning lamp for ABS lights up)
⇒ page 71.
At speeds of up to approximately 80 km/h (50 mph), it is able to balance
out differences in the speed of the driven wheels of approximately 100 rpm
caused by a slippery road surface on one side of the vehicle. It does this by
braking the wheel which has lost traction and distributing more driving
force to the other driven wheel via the differential.
To prevent the disc brake of the braking wheel from overheating, the EDL
cuts out automatically if subjected to excessive loads. The vehicle will con-
tinue to function normally without EDL. For this reason, the driver is not in-
formed that the EDL has been switched off.
The EDL will switch on again automatically when the brake has cooled
down.
Safety FirstOperating InstructionsPractical TipsTechnical Specifications
Page 179 of 282
177
Driving and the environment
Avoid short journeys
To reduce the consumption and emission of polluting exhaust gases, the
engine and the exhaust gas filtration systems should reach the optimum
service temperature.
With the engine cold, fuel consumption is proportionally higher. The engine
does not warm up and fuel consumption does not normalise until having
driven approximately four kilometres (2.5 miles). This is why we recommend
avoiding short trips whenever possible.
Maintain the correct tyre pressures
Bear in mind that keeping the tyres at an adequate pressure saves fuel. If
the tyre pressure is just one bar too low, fuel consumption can increase by
as much as 5%. Due to the greater rolling resistance, under-inflation also
increases tyre wear and impairs handling.
The tyre pressures should always be checked when the tyres are cold.
Do not use winter tyres all year round as they increase fuel consumption by
up to 10%.
Avoid unnecessary weight
Given that every kilo of extra weight will increase the fuel consumption, it is
advisable to always check the luggage compartment to make sure that no
unnecessary loads are being transported.
A roof rack is often left in place for the sake of convenience, even when it is
no longer needed. At a speed of 100-120 km/h (60-75 mph) your vehicle
will use about 12% more fuel as a result of the extra wind resistance caused
by the roof rack even when it is not in use.
Save electricity
The engine activates the alternator, which produces electricity. With the
need for electricity, fuel consumption is also increased. Because of this, al-
ways turn off electrical components when you do not need them. Examples
of components that use a lot of electricity are: the fan at high speeds, the
rear window heating or the seat heaters*.
Note
● If you vehicle has Start-Stop, it is not recommended to switch this func-
tion off.
● It is recommended to close the windows when driving at more than
60 km/h (40 mph)
● Do not drive with your foot resting on the clutch pedal, as the pressure
can make the plate spin, more fuel will be used and it can burn the clutch
plate lining, causing a serious fault.
● Do not hold the vehicle on a hill with the clutch, use the foot brake or
hand brake, using the latter to start. The fuel consumption will be lower and
you will prevent the clutch plate from being damaged.
● On descents, use the engine brake, changing to the gear that is more
suitable for the slope. The fuel consumption will be lower and the brakes
will not suffer.
Environmental friendliness
Environmental protection is a top priority in the design, choice of materials
and production of your new Seat.
Design measures for economical recycling
● Joints and connections designed for easy dismantling
● Modular construction to facilitate dismantling
● Increased use of single-grade materials
● Plastic parts and elastomers are marked in accordance with ISO 1043,
ISO 11469 and ISO 1629
Choice of materials
● Nearly all materials used can be recycled
● Similar types of plastics grouped together for easy recycling
● Recycled materials used in manufacture
Safety FirstOperating InstructionsPractical TipsTechnical Specifications
Page 189 of 282
187
Vehicle maintenance and cleaning
WARNING
Do not apply underseal or anti-corrosion coatings to the exhaust pipes,
catalytic converter or the heat shields on the exhaust system. The heat of
the exhaust system or the engine could cause them to ignite. Risk of fire.
Cleaning the engine compartment
Take special care when cleaning the engine compartment.
Anti-corrosion treatment
The engine compartment and the surface of the power unit are given anti-
corrosion treatment at the factory.
Good corrosion protection is particularly important in winter when the vehi-
cle is frequently driven on salted roads. To prevent the salt corroding the ve-
hicle, the entire engine compartment should be thoroughly cleaned before
and after winter.
Your Technical Services have got the necessary workshop equipment to pro-
vide the correct cleaning and preserving products. For this reason, we rec-
ommend having this work performed by them.
The anti-corrosion protection is usually removed if the engine compartment
is cleaned with grease removing solutions, or if you have the engine
cleaned. On commissioning this work, ensure that all surfaces, seams,
joints and components in the engine compartment are given anti-corrosion
treatment.
WARNING
● When working in the engine compartment, always observe the safety
warnings ⇒ page 200.
● Before opening the bonnet, switch the engine off, apply the hand-
brake firmly and always remove the key from the ignition.
● Allow the engine to cool before you clean the engine compartment.
● Do not clean the vehicle underbody, wheel arches or wheel trims
without protecting your hands and arms. You may cut yourself on sharp-
edged metal parts. Failure to comply could result in injury.
● Moisture, ice and salt on the brake system may affect braking effec-
tiveness. Risk of accident. Directly after washing, avoid sudden and
sharp braking.
● Never touch the radiator fan. It is temperature-controlled and could
start automatically, even when the key is removed from the ignition!
For the sake of the environment
Fuel, grease and oil deposits could be removed when the engine is washed.
The polluted water must be cleaned in an oil separator. For this reason, en-
gine washing should be carried out only by a specialised workshop or a pet-
rol station.
Vehicle interior maintenance Plastic parts and dash panel cleaning
– Use a clean, damp cloth to clean plastic parts and the dash
panel.
– If this does not provide satisfactory results, use a special sol-
vent-free plastic cleaning product.
Safety FirstOperating InstructionsPractical TipsTechnical Specifications
Page 197 of 282
195
Checking and refilling levels
WARNING
● Fuel is highly flammable and can cause serious burns and other inju-
ries.
–Never smoke or use an open flame when filling the fuel tank of the
vehicle, or a spare fuel canister, with fuel. This is an explosion haz-
ard.
– Follow legal requirements for the use of spare fuel canisters.
– For safety reasons we do not recommend carrying a spare fuel can-
ister in the vehicle. The canister could be damaged in an accident and
leak.
● If, in exceptional circumstances, you have to carry a spare fuel canis-
ter, please observe the following points:
–Never fill the spare fuel canister inside the vehicle or on it. An elec-
trostatic charge could build up during filling, causing the fuel fumes
to ignite. This could cause an explosion. Always place the canister on
the ground to fill it.
– Insert the fuel nozzle into the mouth of the canister as far as possi-
ble.
– If the spare fuel canister is made of metal, the filling nozzle must
be in contact with the canister during filling. This helps prevent an
electrostatic charge building up.
– Never spill fuel in the vehicle or in the luggage compartment. Fuel
vapours are explosive. Danger of death.
CAUTION
● Fuel spills should be removed from the paintwork immediately.
● Never run the tank completely dry. An irregular fuel supply could cause
misfiring. As a result, unburnt fuel could enter the catalytic converter and
cause damage.
● When filling the fuel tank after having run it completely dry on a vehicle
with a diesel engine the ignition must be switched on for at least 30 sec-
onds without starting the engine. When you then start the engine it may take longer than normal (up to one minute) for the engine to start firing.
This is due to the fact that the fuel system has to purge itself of air before
starting.
For the sake of the environment
Do not try to put in more fuel after the automatic filler nozzle has switched
off; this may cause the fuel to overflow if it becomes warm.
Safety FirstOperating InstructionsPractical TipsTechnical Specifications
Page 201 of 282
199
Checking and refilling levels
Petrol Petrol types
The correct petrol types are listed on a sticker inside the fuel
tank flap.Only unleaded petrol conforming to standard DIN EN 228 may be used for
vehicles with catalytic converters (EN = “European Standard”).
Fuel types are differentiated by the octane rating, e.g: 91, 95, 98 RON (RON
= “Research Octane Number”, unit for determining the knock resistance of
petrol). You may use petrol with a higher octane number than the one rec-
ommended for your engine. However, this has no advantage in terms of fuel
consumption and engine power.
CAUTION
● Even one tankful of leaded fuel would permanently impair the efficiency
of the catalytic converter.
● High engine speed and full throttle can damage the engine when using
petrol with an octane rating lower than the correct grade for the engine.
For the sake of the environment
Just one full tank of leaded fuel would seriously impair the efficiency of the
catalytic converter.
Petrol additives
Petrol additives improve the quality of the petrol.
The quality of the petrol influences the performance, power and life of the
engine. For this reason, you should use good quality petrol containing addi- tives. These additives will help to prevent corrosion, keep the fuel system
clean and prevent deposits from building up in the engine.
If good quality petrol with additives is not available or engine problems oc-
cur, the required additives must be added during refuelling.
Diesel Diesel*
Diesel fuel must conform to DIN EN 590 (EN = “European Standard”). It
must have a cetane number (CN) of at least 51. The cetane number indi-
cates the ignition quality of the diesel fuel.
Notes on refuelling ⇒ page 194.
Biodiesel*
CAUTION
● Your vehicle is not designed to use biodiesel fuel. Never, under any cir-
cumstances refuel with biodiesel. The use of biodiesel fuel could damage
the engine and the fuel system. The addition of biodiesel to diesel fuel by
the diesel manufacturer in accordance with standard EN 590 or DIN 51628
is authorised and will not cause damage to the engine or the fuel system.
● The diesel engine has been designed to be used exclusively with diesel
fuel conforming to standard EN 590. Never refuel or use petrol, kerosene,
fuel oil or any other type of fuel. If you accidentally fill up the vehicle with
the wrong type of fuel, do not start the engine. Seek assistance from speci-
alised personnel. The composition of these fuels may severely damage the
fuel system and the engine.
Safety FirstOperating InstructionsPractical TipsTechnical Specifications
Page 203 of 282
201
Checking and refilling levels
WARNING
All work on the engine or in the engine compartment, e.g. checking and
refilling fluids, involves the danger of injury and scalding as well as the
risk of accident or fire.
● Never open the bonnet if you see steam, smoke or coolant escaping
from the engine compartment. Otherwise, there is a risk of sustaining
burns. Wait until no more steam or coolant is emitted, then allow the en-
gine to cool before carefully opening the bonnet.
● Switch off the engine and remove the key from the ignition.
● Apply the handbrake and move the gear lever to neutral or selector
lever to position P.
● Keep children away from the vehicle.
● Never touch hot engine parts. There is a risk of burns.
● Never spill liquids on a hot engine or on a hot exhaust gas system.
This is a fire hazard.
● Avoid causing short-circuits in the electrical system, particularly at
the points where the jump leads are attached ⇒ page 249. The battery
could explode.
● Never touch the radiator fan. It is temperature controlled and could
start automatically, even when the engine has been switched off and the
key removed from the ignition!
● Do not unscrew the cap on the coolant expansion tank when the en-
gine is hot. If the coolant is hot, the cooling system will be pressurised!
● Protect face, hands and arms by covering the cap with a large, thick
cloth to protect against escaping coolant and steam.
● Always make sure you have not left any objects, such as cleaning
cloths and tools, in the engine compartment.
● If you have to work underneath the vehicle, you must use suitable
stands additionally to support the vehicle, there is a risk of accident!. A
hydraulic jack is insufficient for securing the vehicle and there is a risk of
injury.WARNING (Continued)
● If any work has to be performed when the engine is started or with
the engine running, there is an additional, potentially fatal, safety risk
from the rotating parts, such as the drive belts, alternator, radiator fan,
etc., and from the high-voltage ignition system. You should also observe
the following points:
–Never touch the electrical wiring of the ignition system.
– Ensure that jewellery, loose clothing and long hair do not get trap-
ped in rotating engine parts. Danger of death. Before starting any
work remove jewellery, tie back and cover hair, and wear tight-fitting
clothes.
– Never accelerate with a gear engaged without taking the necessary
precautions. The vehicle could move, even if the handbrake is ap-
plied. Danger of death.
● If work has to be carried out on the fuel system or on electrical com-
ponents, you must observe the following safety notes in addition to the
above warnings:
–Always disconnect the battery from the on-board network. The ve-
hicle must be unlocked when this is done, otherwise the alarm will be
triggered.
– Do not smoke.
– Never work near naked flames.
– Always have a fire extinguisher on hand.
CAUTION
When topping up service fluids, make sure not to mistake them. Using the
wrong fluids could cause serious malfunctions and engine damage!
Safety FirstOperating InstructionsPractical TipsTechnical Specifications
Page 207 of 282
205
Checking and refilling levels
Checking the engine oil level
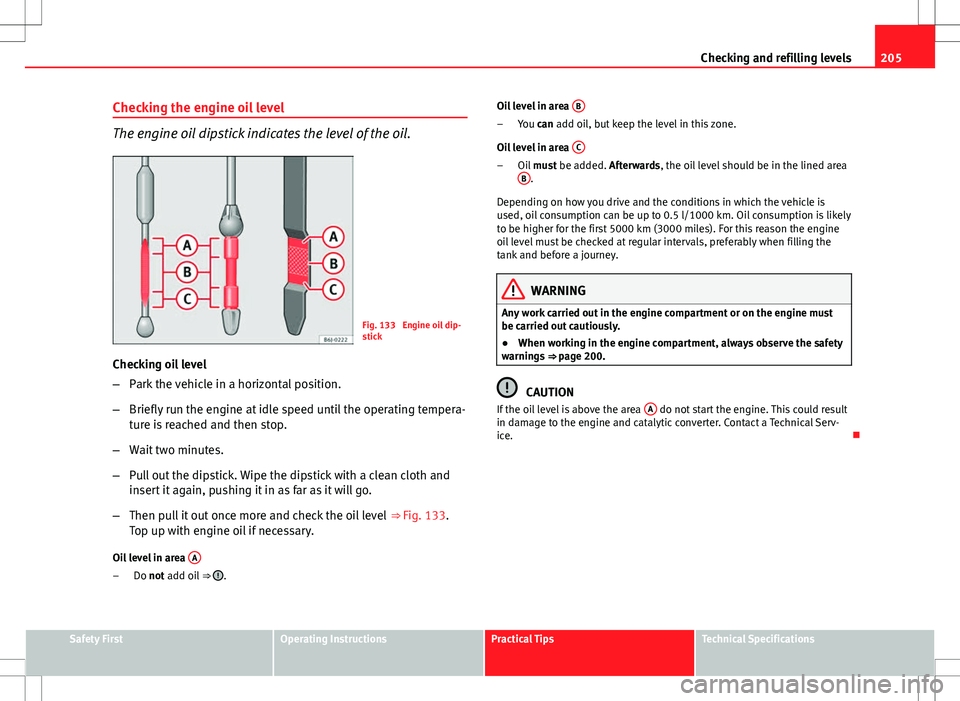
The engine oil dipstick indicates the level of the oil.
Fig. 133 Engine oil dip-
stick
Checking oil level
– Park the vehicle in a horizontal position.
– Briefly run the engine at idle speed until the operating tempera-
ture is reached and then stop.
– Wait two minutes.
– Pull out the dipstick. Wipe the dipstick with a clean cloth and
insert it again, pushing it in as far as it will go.
– Then pull it out once more and check the oil level ⇒ Fig. 133.
Top up with engine oil if necessary.
Oil level in area A
Do not add oil
⇒ .
– Oil level in area
B
You can add oil, but keep the level in this zone.
Oil level in area C
Oil
must be added. Afterwards, the oil level should be in the lined area
B.
Depending on how you drive and the conditions in which the vehicle is
used, oil consumption can be up to 0.5 l/1000 km. Oil consumption is likely
to be higher for the first 5000 km (3000 miles). For this reason the engine
oil level must be checked at regular intervals, preferably when filling the
tank and before a journey.
WARNING
Any work carried out in the engine compartment or on the engine must
be carried out cautiously.
● When working in the engine compartment, always observe the safety
warnings ⇒ page 200.
CAUTION
If the oil level is above the area A do not start the engine. This could result
in damage to the engine and catalytic converter. Contact a Technical Serv-
ice.
–
–
Safety FirstOperating InstructionsPractical TipsTechnical Specifications
Page 219 of 282
217
Checking and refilling levels
– When removed, the wheels and/or tyres should be stored in a
cool, dry and preferably dark location.
– Store tyres in a vertical position if they are not fitted on wheel
rims.
New tyres
New tyres must be run in ⇒ page 173.
The tread depth of new tyres may vary, according to the type and make of
tyre and the tread pattern.
Concealed damage
Damage to tyres and rims is often not readily visible. If you notice unusual
vibrations or the vehicle pulling to one side, this may indicate that one of
the tyres is damaged. The tyres should be checked immediately by a Techni-
cal Service.
Tyres with directional tread pattern
An arrow on the tyre sidewall indicates the direction of rotation on tyres with
directional tread. Always observe the direction of rotation indicated when
fitting the wheel. This guarantees optimum grip and helps to avoid aqua-
planing, excessive noise and wear.
WARNING
● New tyres do not have maximum grip during the first 500 km
(300 miles). Drive particularly carefully to avoid possible accidents.
● Never drive with damaged tyres. This may cause an accident.
● If you notice unusual vibrations or if the vehicle pulls to one side
when driving, stop the vehicle immediately and check the tyres for dam-
age.
Checking tyre pressure
The correct tyre pressure can be seen on the sticker on the
inside of the fuel tank flap.
1. Read the required tyre inflation pressure from the sticker. The values refer to Summer tyres.
2. The tyre pressures should only be checked when the tyres are cold. The slightly raised pressures of warm tyres must not be re-
duced.
3. Adjust the tyre pressure to the load you are carrying.
Tyre pressure
The correct tyre pressure is especially important at high speeds. The pres-
sure should therefore be checked at least once a month and before starting
a journey.
WARNING
A tyre can easily burst if the pressure is too low, causing an accident!
● At continuously high speeds, a tyre with insufficient pressure flexes
more. In this way it becomes too hot, and this can cause tread separation
and tyre blow-out. Always observe the recommended tyre pressures.
● If the tyre pressure is too low or too high, the tyres will wear prema-
turely and the vehicle will not handle well. Risk of accident!
For the sake of the environment
Under-inflated tyres will increase fuel consumption.
Safety FirstOperating InstructionsPractical TipsTechnical Specifications
Page 225 of 282
223
If and when
If and when
Vehicle tools, spare wheel
Vehicle Tools
The vehicle tools are located under the floor panel in the
luggage compartment. – Lift luggage compartment floor panel.
– Take the vehicle tools out of the vehicle.
The vehicle tool kit includes:
● Jack*
● Hook to remove integral* trim and screw caps.
● Box spanner for wheel bolts*
● Towline anchorage*
● Adapter for the anti-theft wheel bolts*
Some of the items listed are only provided in certain model versions, or are
optional extras.
WARNING
● The factory-supplied jack is only designed for changing wheels on
this model. On no account attempt to use it for lifting heavier vehicles or
other loads. Risk of injury.
● Use the jack only on a firm, level ground.
WARNING (Continued)
● Never start the engine when the vehicle is on the jack. Risk of acci-
dent.
● If work is to be carried out underneath the vehicle, this must be se-
cured by suitable means. Otherwise, there is a risk of injury.
Spare wheel (temporary spare wheel)*
The spare wheel (temporary spare wheel) must only be used
for the minimum necessary time.
The temporary spare wheel is stored under the floor panel in the luggage
compartment and is attached by a thumbnut.
How to use the temporary spare wheel
If you ever have a punctured tyre or loss of pressure, the temporary spare
wheel is only intended for temporary use until you reach a workshop.
Change it for a duty wheel as soon as possible.
Please note the following restrictions when using the temporary spare
wheel. This temporary spare wheel has been specially designed for your ve-
hicle, thus, it cannot be changed with the temporary spare wheel from an-
other vehicle.
No other type of tyre (normal summer or winter tyre) may be fitted on the
compact temporary spare wheel rim.
Snow chains
For technical reasons, snow chains must not be used on the compact tem-
porary spare wheel.
Safety FirstOperating InstructionsPractical TipsTechnical Specifications
Page 234 of 282
232If and when
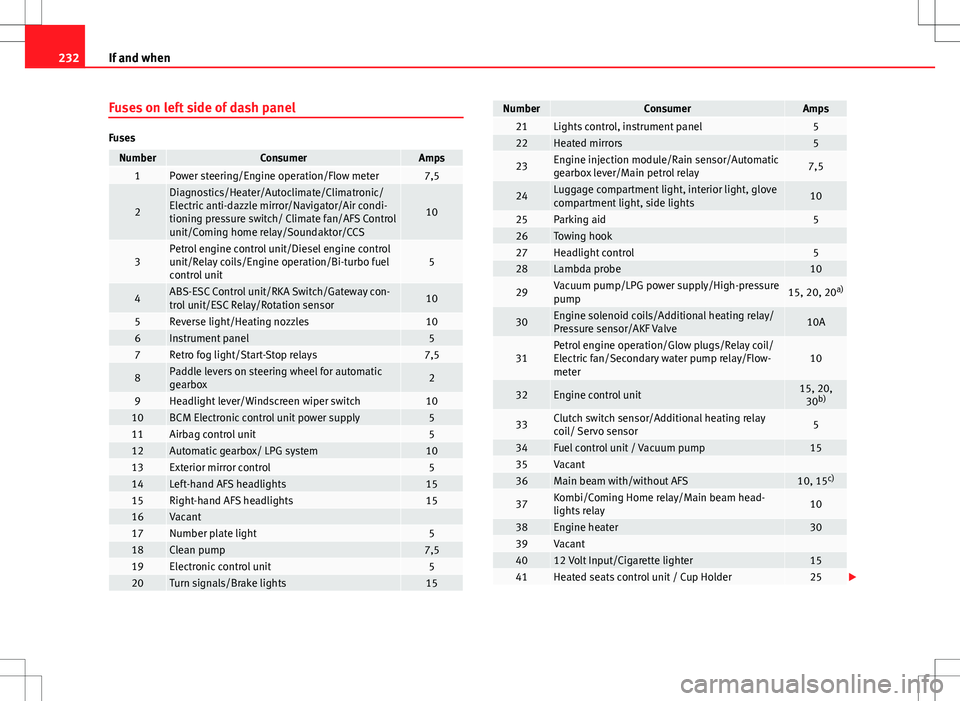
Fuses on left side of dash panel
Fuses
NumberConsumerAmps1Power steering/Engine operation/Flow meter7,5
2
Diagnostics/Heater/Autoclimate/Climatronic/
Electric anti-dazzle mirror/Navigator/Air condi-
tioning pressure switch/ Climate fan/AFS Control
unit/Coming home relay/Soundaktor/CCS
10
3Petrol engine control unit/Diesel engine control
unit/Relay coils/Engine operation/Bi-turbo fuel
control unit5
4ABS-ESC Control unit/RKA Switch/Gateway con-
trol unit/ESC Relay/Rotation sensor10
5Reverse light/Heating nozzles106Instrument panel57Retro fog light/Start-Stop relays7,5
8Paddle levers on steering wheel for automatic
gearbox2
9Headlight lever/Windscreen wiper switch1010BCM Electronic control unit power supply511Airbag control unit512Automatic gearbox/ LPG system1013Exterior mirror control514Left-hand AFS headlights1515Right-hand AFS headlights1516Vacant 17Number plate light518Clean pump7,519Electronic control unit520Turn signals/Brake lights15
NumberConsumerAmps21Lights control, instrument panel522Heated mirrors5
23Engine injection module/Rain sensor/Automatic
gearbox lever/Main petrol relay7,5
24Luggage compartment light, interior light, glove
compartment light, side lights10
25Parking aid526Towing hook 27Headlight control528Lambda probe10
29Vacuum pump/LPG power supply/High-pressure
pump15, 20, 20a)
30Engine solenoid coils/Additional heating relay/
Pressure sensor/AKF Valve10A
31Petrol engine operation/Glow plugs/Relay coil/
Electric fan/Secondary water pump relay/Flow-
meter10
32Engine control unit15, 20,
30 b)
33Clutch switch sensor/Additional heating relay
coil/ Servo sensor5
34Fuel control unit / Vacuum pump1535Vacant 36Main beam with/without AFS10, 15 c)
37Kombi/Coming Home relay/Main beam head-
lights relay10
38Engine heater3039Vacant 4012 Volt Input/Cigarette lighter1541Heated seats control unit / Cup Holder25