Seat Ibiza ST 2013 Owner's manual
Manufacturer: SEAT, Model Year: 2013, Model line: Ibiza ST, Model: Seat Ibiza ST 2013Pages: 294, PDF Size: 4.05 MB
Page 121 of 294
119
Seats and storage
Removing or adjusting head restraints
The head restraints can be adjusted by moving them up and
down.
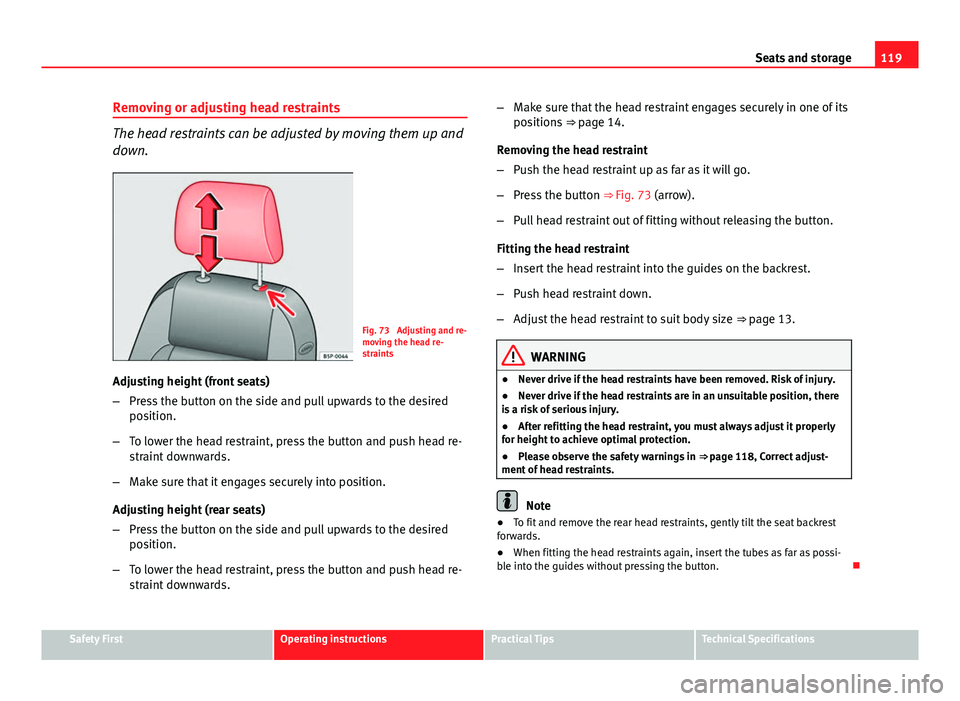
Fig. 73 Adjusting and re-
moving the head re-
straints
Adjusting height (front seats)
– Press the button on the side and pull upwards to the desired
position.
– To lower the head restraint, press the button and push head re-
straint downwards.
– Make sure that it engages securely into position.
Adjusting height (rear seats)
– Press the button on the side and pull upwards to the desired
position.
– To lower the head restraint, press the button and push head re-
straint downwards. –
Make sure that the head restraint engages securely in one of its
positions ⇒ page 14.
Removing the head restraint
– Push the head restraint up as far as it will go.
– Press the button ⇒ Fig. 73 (arrow).
– Pull head restraint out of fitting without releasing the button.
Fitting the head restraint
– Insert the head restraint into the guides on the backrest.
– Push head restraint down.
– Adjust the head restraint to suit body size ⇒ page 13.
WARNING
● Never drive if the head restraints have been removed. Risk of injury.
● Never drive if the head restraints are in an unsuitable position, there
is a risk of serious injury.
● After refitting the head restraint, you must always adjust it properly
for height to achieve optimal protection.
● Please observe the safety warnings in ⇒ page 118, Correct adjust-
ment of head restraints.
Note
● To fit and remove the rear head restraints, gently tilt the seat backrest
forwards.
● When fitting the head restraints again, insert the tubes as far as possi-
ble into the guides without pressing the button.
Safety FirstOperating instructionsPractical TipsTechnical Specifications
Page 122 of 294
120Seats and storage
Front seats
Adjustment of the front seats
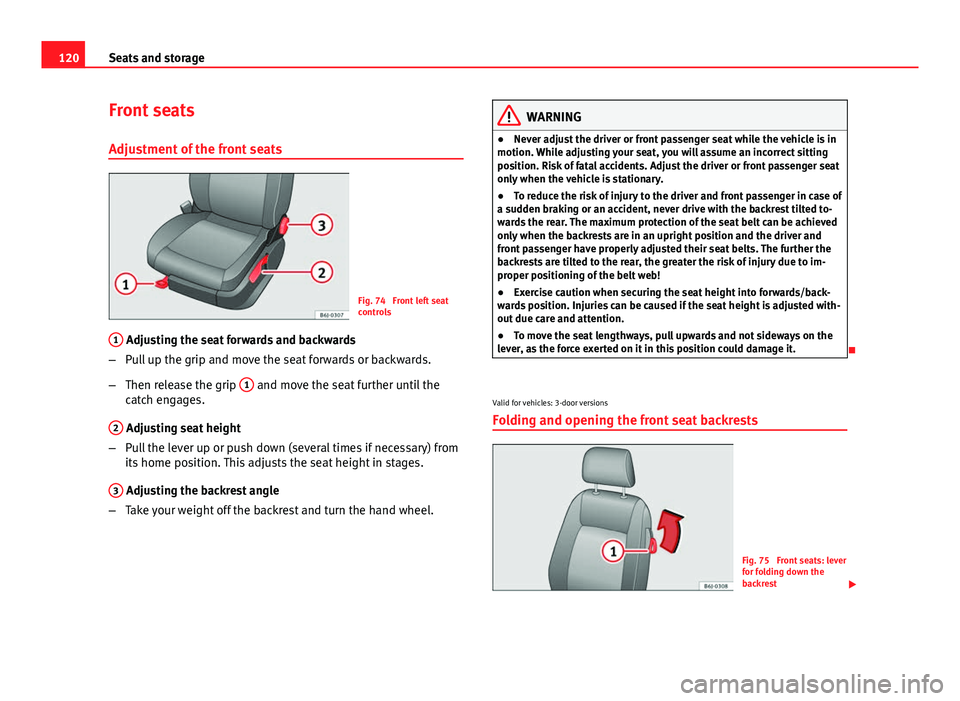
Fig. 74 Front left seat
controls
1
Adjusting the seat forwards and backwards
– Pull up the grip and move the seat forwards or backwards.
– Then release the grip 1
and move the seat further until the
catch engages.
2
Adjusting seat height
– Pull the lever up or push down (several times if necessary) from
its home position. This adjusts the seat height in stages.
3
Adjusting the backrest angle
– Take your weight off the backrest and turn the hand wheel.
WARNING
● Never adjust the driver or front passenger seat while the vehicle is in
motion. While adjusting your seat, you will assume an incorrect sitting
position. Risk of fatal accidents. Adjust the driver or front passenger seat
only when the vehicle is stationary.
● To reduce the risk of injury to the driver and front passenger in case of
a sudden braking or an accident, never drive with the backrest tilted to-
wards the rear. The maximum protection of the seat belt can be achieved
only when the backrests are in an upright position and the driver and
front passenger have properly adjusted their seat belts. The further the
backrests are tilted to the rear, the greater the risk of injury due to im-
proper positioning of the belt web!
● Exercise caution when securing the seat height into forwards/back-
wards position. Injuries can be caused if the seat height is adjusted with-
out due care and attention.
● To move the seat lengthways, pull upwards and not sideways on the
lever, as the force exerted on it in this position could damage it.
Valid for vehicles: 3-door versions
Folding and opening the front seat backrests
Fig. 75 Front seats: lever
for folding down the
backrest
Page 123 of 294
121
Seats and storage
Vehicles without Easy-Entry function
– To fold the backrest, pull the lever 1
upwards and push the
backrest forwards.
– To unfold the backrest, push it back.
Vehicles with Easy-Entry function
– To fold the backrest, pull the lever 1
upwards and push the
backrest forwards. You can push the seat forwards at the same
time to make entry to the rear seats easier.
– To unfold the backrest, first move the seat completely back.
The Easy-Entry function facilitates the access to the vehicle rear seats. Be-
fore lifting the backrest, return the seat to the original position. The seat in-
serts when the backrest is lifted. Heated seats*
The front seat cushions and backrests can be heated electri-
cally.
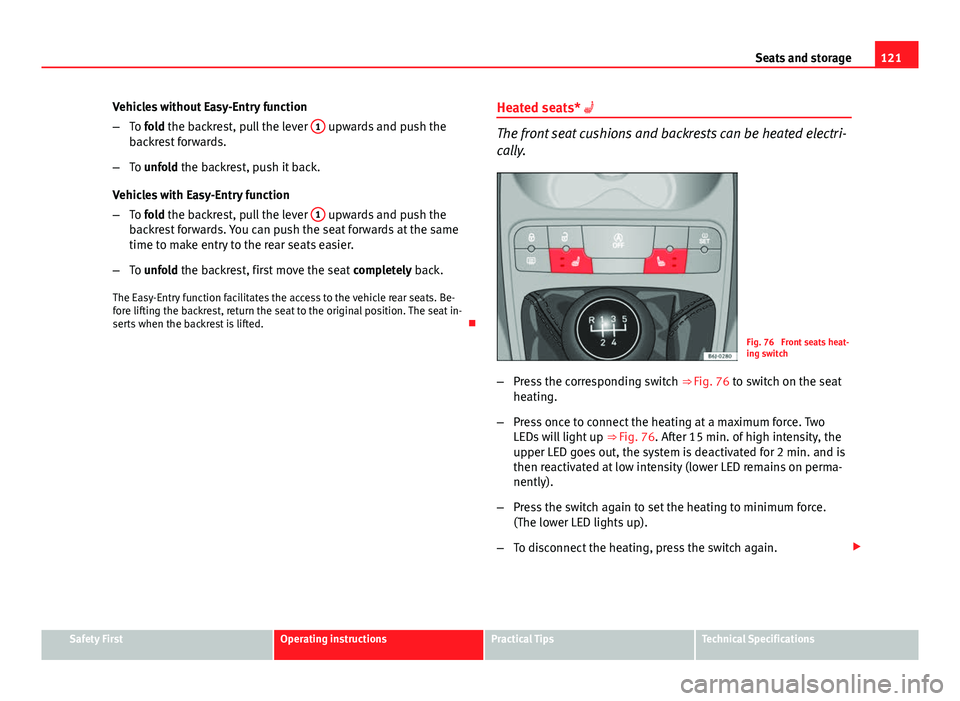
Fig. 76 Front seats heat-
ing switch
– Press the corresponding switch ⇒ Fig. 76 to switch on the seat
heating.
– Press once to connect the heating at a maximum force. Two
LEDs will light up ⇒ Fig. 76. After 15 min. of high intensity, the
upper LED goes out, the system is deactivated for 2 min. and is
then reactivated at low intensity (lower LED remains on perma-
nently).
– Press the switch again to set the heating to minimum force.
(The lower LED lights up).
– To disconnect the heating, press the switch again.
Safety FirstOperating instructionsPractical TipsTechnical Specifications
Page 124 of 294
122Seats and storage
CAUTION
To avoid damaging the heating elements, please do not kneel on the seat or
apply sharp pressure at a single point to the seat cushion and backrest.
Note
The seats are only heated electrically when the engine is running.
Page 125 of 294
123
Seats and storage
Rear seats
Folding down rear seats
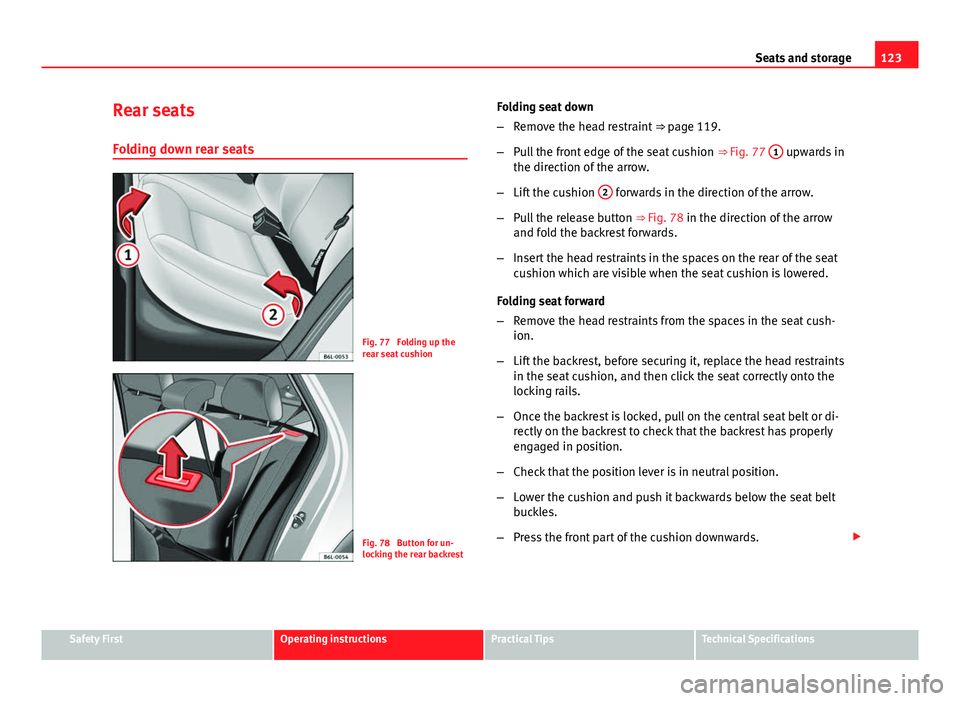
Fig. 77 Folding up the
rear seat cushion
Fig. 78 Button for un-
locking the rear backrest Folding seat down
–
Remove the head restraint ⇒ page 119.
– Pull the front edge of the seat cushion ⇒ Fig. 77 1
upwards in
the direction of the arrow.
– Lift the cushion 2
forwards in the direction of the arrow.
– Pull the release button ⇒ Fig. 78 in the direction of the arrow
and fold the backrest forwards.
– Insert the head restraints in the spaces on the rear of the seat
cushion which are visible when the seat cushion is lowered.
Folding seat forward
– Remove the head restraints from the spaces in the seat cush-
ion.
– Lift the backrest, before securing it, replace the head restraints
in the seat cushion, and then click the seat correctly onto the
locking rails.
– Once the backrest is locked, pull on the central seat belt or di-
rectly on the backrest to check that the backrest has properly
engaged in position.
– Check that the position lever is in neutral position.
– Lower the cushion and push it backwards below the seat belt
buckles.
– Press the front part of the cushion downwards.
Safety FirstOperating instructionsPractical TipsTechnical Specifications
Page 126 of 294
124Seats and storage
On split rear seats 1)
the backrest and cushion can be lowered and raised re-
spectively in two sections.
WARNING
● Please be careful when folding back the backrest! Injuries can be
caused if the seat height is adjusted without due care and attention.
● Do no trap or damage seat belts when raising the backrest.
● After raising the backrest, check it has engaged properly in position.
Do this by pulling on the central seat belt or directly on the backrest and
check that the position lever is in the neutral position.
● The three point automatic seat belt only works correctly when the
backrest of the central seat is correctly engaged.
1) Optional equipment
Page 127 of 294

125
Seats and storage
Storage compartment
Storage compartment on the front passenger side
Fig. 79 Passenger side:
storage compartment
Fig. 80 Storage com-
partment for instruction
manual
The compartment can be opened by pulling the lever ⇒ Fig. 79.This compartment can hold documents in A4 format, a water bottle of 1.5
L,...
WARNING
Always keep the storage compartment cover closed while the vehicle is
in motion in order to reduce the risk of injury caused by a sudden braking
or by an accident.
Storage compartment on the driver side
There is a storage compartment on the driver side
Fig. 81 Driver side com-
partment
Safety FirstOperating instructionsPractical TipsTechnical Specifications
Page 128 of 294
126Seats and storage
Navigator mount on dash panel*
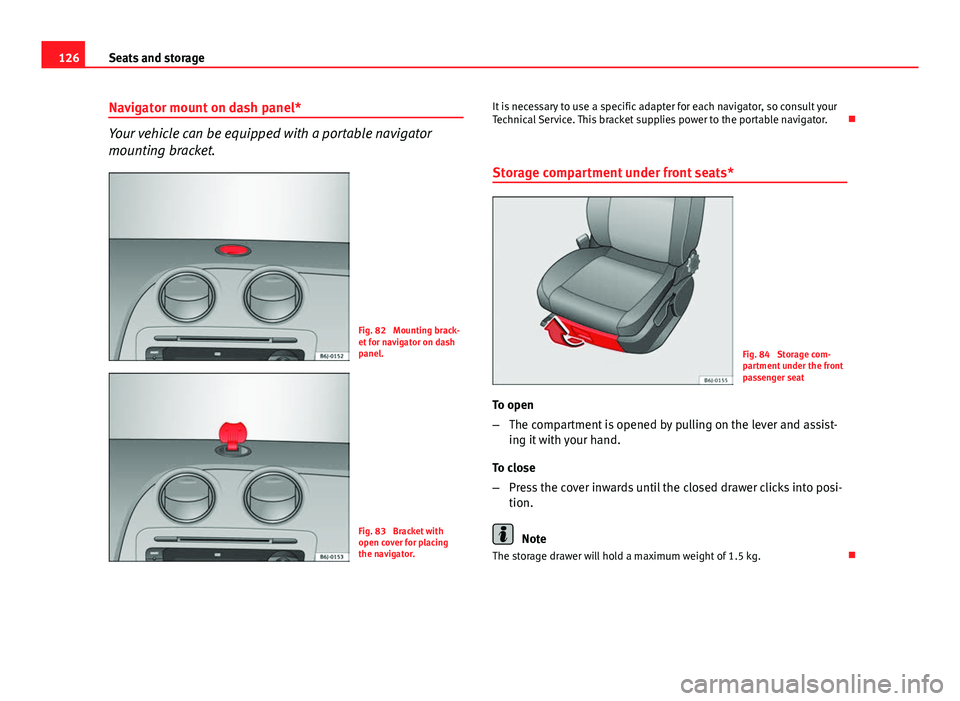
Your vehicle can be equipped with a portable navigator
mounting bracket.
Fig. 82 Mounting brack-
et for navigator on dash
panel.
Fig. 83 Bracket with
open cover for placing
the navigator. It is necessary to use a specific adapter for each navigator, so consult your
Technical Service. This bracket supplies power to the portable navigator.
Storage compartment under front seats*
Fig. 84 Storage com-
partment under the front
passenger seat
To open
– The compartment is opened by pulling on the lever and assist-
ing it with your hand.
To close
– Press the cover inwards until the closed drawer clicks into posi-
tion.
Note
The storage drawer will hold a maximum weight of 1.5 kg.
Page 129 of 294

127
Seats and storage
Seat storage pocket*
Fig. 85 Seat storage
pocket
There is a storage pocket on the rear of the front seats.
Storage compartment in the front door panel*
In this storage compartment a 1.5l water bottle can be stored,... Front drink holder*
Fig. 86 Front drink hold-
ers in the centre console
There are two cup holders in the centre console in front of the gearbox lever
⇒ Fig. 86.
WARNING
● Do not put hot drinks in the drink holders. During normal or sudden
driving manoeuvres, sudden braking or an accident, the hot drink could
be spilled. Danger of scalding.
● Never use rigid materials (for example, glass or ceramic), these could
cause injury in the case of an accident.
● When travelling the drink holder should always be closed to prevent
risk in the event of sudden breaking or accident.
Safety FirstOperating instructionsPractical TipsTechnical Specifications
Page 130 of 294
128Seats and storage
Rear drink holder*
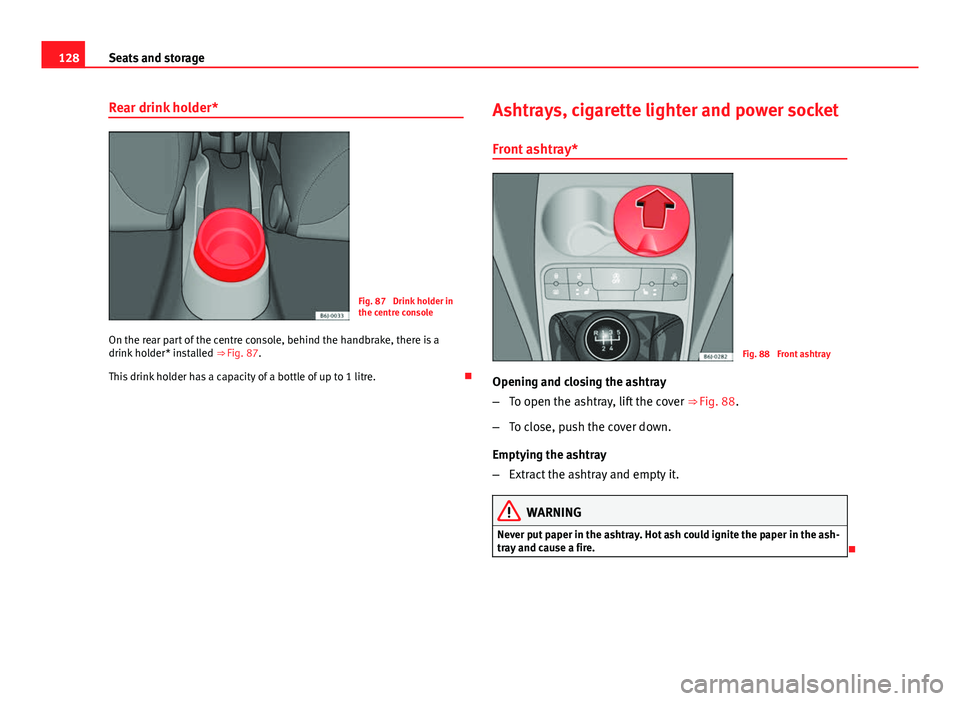
Fig. 87 Drink holder in
the centre console
On the rear part of the centre console, behind the handbrake, there is a
drink holder* installed ⇒ Fig. 87.
This drink holder has a capacity of a bottle of up to 1 litre. Ashtrays, cigarette lighter and power socket
Front ashtray*
Fig. 88 Front ashtray
Opening and closing the ashtray
– To open the ashtray, lift the cover ⇒ Fig. 88.
– To close, push the cover down.
Emptying the ashtray
– Extract the ashtray and empty it.
WARNING
Never put paper in the ashtray. Hot ash could ignite the paper in the ash-
tray and cause a fire.