alarm Seat Ibiza ST 2013 Owner's manual
[x] Cancel search | Manufacturer: SEAT, Model Year: 2013, Model line: Ibiza ST, Model: Seat Ibiza ST 2013Pages: 294, PDF Size: 4.05 MB
Page 5 of 294
Table of Contents
About this manual . . . . . . . . . . . . . . . . . . . 5
Content . . . . . . . . . . . . . . . . . . . . . . . . . . . . . . . . 6
Safety First . . . . . . . . . . . . . . . . . . . . . . . . . . . . 7
Safe driving . . . . . . . . . . . . . . . . . . . . . . . . . . . . . . . 7
Brief introduction . . . . . . . . . . . . . . . . . . . . . . . . . 7
Proper sitting position for occupants . . . . . . . . . 10
Pedal area . . . . . . . . . . . . . . . . . . . . . . . . . . . . . . . 16
Storing objects . . . . . . . . . . . . . . . . . . . . . . . . . . . 16
Seat belts . . . . . . . . . . . . . . . . . . . . . . . . . . . . . . . . . 19
Brief introduction . . . . . . . . . . . . . . . . . . . . . . . . . 19
Why wear seat belts? . . . . . . . . . . . . . . . . . . . . . . 21
Seat belts . . . . . . . . . . . . . . . . . . . . . . . . . . . . . . . 25
Seat belt tensioners* . . . . . . . . . . . . . . . . . . . . . . 28
Airbag system . . . . . . . . . . . . . . . . . . . . . . . . . . . . . 30
Brief introduction . . . . . . . . . . . . . . . . . . . . . . . . . 30
Front airbags . . . . . . . . . . . . . . . . . . . . . . . . . . . . . 34
Side airbags . . . . . . . . . . . . . . . . . . . . . . . . . . . . . 38
Deactivating airbags* . . . . . . . . . . . . . . . . . . . . . . 41
Child safety . . . . . . . . . . . . . . . . . . . . . . . . . . . . . . . 43
Brief introduction . . . . . . . . . . . . . . . . . . . . . . . . . 43
Child seats . . . . . . . . . . . . . . . . . . . . . . . . . . . . . . . 45
Securing child seats . . . . . . . . . . . . . . . . . . . . . . . 48
Operating instructions . . . . . . . . . . . . . 55
Cockpit . . . . . . . . . . . . . . . . . . . . . . . . . . . . . . . . . . . 55
Overview . . . . . . . . . . . . . . . . . . . . . . . . . . . . . . . . 55
Instruments . . . . . . . . . . . . . . . . . . . . . . . . . . . . . . 57 LPG system* . . . . . . . . . . . . . . . . . . . . . . . . . . . . . 58
Digital instrument panel display . . . . . . . . . . . . . 59
Warning lamps . . . . . . . . . . . . . . . . . . . . . . . . . . . 65
Steering column controls* . . . . . . . . . . . . . . . . . . 78
Opening and closing . . . . . . . . . . . . . . . . . . . . . . 82
Central locking . . . . . . . . . . . . . . . . . . . . . . . . . . . 82
Keys . . . . . . . . . . . . . . . . . . . . . . . . . . . . . . . . . . . . 87
Radio frequency remote control* . . . . . . . . . . . . . 88
Anti-theft alarm system* . . . . . . . . . . . . . . . . . . . 90
Rear lid . . . . . . . . . . . . . . . . . . . . . . . . . . . . . . . . . . 93
Windows . . . . . . . . . . . . . . . . . . . . . . . . . . . . . . . . 96
Panoramic tilting sunroof* . . . . . . . . . . . . . . . . . . 99
Lights and visibility . . . . . . . . . . . . . . . . . . . . . . . . 101
Lights . . . . . . . . . . . . . . . . . . . . . . . . . . . . . . . . . . . 101
Interior lights . . . . . . . . . . . . . . . . . . . . . . . . . . . . . 109
Visibility . . . . . . . . . . . . . . . . . . . . . . . . . . . . . . . . . 110
Windscreen wipers . . . . . . . . . . . . . . . . . . . . . . . . 111
Rear view mirrors . . . . . . . . . . . . . . . . . . . . . . . . . . 114
Seats and storage . . . . . . . . . . . . . . . . . . . . . . . . . 117
The importance of correct seat adjustment . . . . . 117
Head restraints . . . . . . . . . . . . . . . . . . . . . . . . . . . 118
Front seats . . . . . . . . . . . . . . . . . . . . . . . . . . . . . . . 120
Rear seats . . . . . . . . . . . . . . . . . . . . . . . . . . . . . . . 123
Storage compartment . . . . . . . . . . . . . . . . . . . . . . 125
Ashtrays, cigarette lighter and power socket . . . 128
First-aid kit, warning triangle, fire extinguisher* 131
Luggage compartment . . . . . . . . . . . . . . . . . . . . . 132
Air conditioning . . . . . . . . . . . . . . . . . . . . . . . . . . . 137
Heating . . . . . . . . . . . . . . . . . . . . . . . . . . . . . . . . . 137
Air conditioning* . . . . . . . . . . . . . . . . . . . . . . . . . . 140 Climatronic . . . . . . . . . . . . . . . . . . . . . . . . . . . . . . 143
General notes . . . . . . . . . . . . . . . . . . . . . . . . . . . . 145
Driving . . . . . . . . . . . . . . . . . . . . . . . . . . . . . . . . . . . . 147
Steering . . . . . . . . . . . . . . . . . . . . . . . . . . . . . . . . . 147
Safety . . . . . . . . . . . . . . . . . . . . . . . . . . . . . . . . . . . 148
Ignition lock . . . . . . . . . . . . . . . . . . . . . . . . . . . . . . 148
Starting and stopping the engine . . . . . . . . . . . . 150
Start-Stop function* . . . . . . . . . . . . . . . . . . . . . . . 153
Manual gearbox . . . . . . . . . . . . . . . . . . . . . . . . . . 156
Automatic gearbox* . . . . . . . . . . . . . . . . . . . . . . . 157
Handbrake . . . . . . . . . . . . . . . . . . . . . . . . . . . . . . . 164
Parking aid* . . . . . . . . . . . . . . . . . . . . . . . . . . . . . . 166
Cruise speed* (Cruise control system) . . . . . . . . 171
Practical Tips . . . . . . . . . . . . . . . . . . . . . . . . . 174
Intelligent technology . . . . . . . . . . . . . . . . . . . . . 174
Brakes . . . . . . . . . . . . . . . . . . . . . . . . . . . . . . . . . . 174
Anti-lock brake system and traction control ABS 175
Electronic Stability Control (ESC)* . . . . . . . . . . . . 176
Driving and the environment . . . . . . . . . . . . . . . 179
Running-in . . . . . . . . . . . . . . . . . . . . . . . . . . . . . . . 179
Exhaust gas purification system . . . . . . . . . . . . . 180
Economical and environmentally friendly driving 182
Driving abroad . . . . . . . . . . . . . . . . . . . . . . . . . . . . 184
Trailer towing . . . . . . . . . . . . . . . . . . . . . . . . . . . . . 184
Vehicle maintenance and cleaning . . . . . . . . . 187
General notes . . . . . . . . . . . . . . . . . . . . . . . . . . . . 187
Care of the vehicle exterior . . . . . . . . . . . . . . . . . . 188
Vehicle interior maintenance . . . . . . . . . . . . . . . . 193
3
Table of Contents
Page 85 of 294
83
Opening and closing
Once this system is activated, opening doors from the outside and the in-
side is not possible. The rear lid can not be opened. The central lock button
does not work.
When the ignition is switched off, the instrument panel display indicates
that the Safe system is on.
Deactivation
Rotate the key inserted in the lock cylinder twice towards the locking direc-
tion.
To activate the system using the remote control, press the lock button on
the remote twice
in less than five seconds.
On deactivating the “Safe” system, the alarm volumetric sensor is also de-
activated.
With the “Safe” switched off, doors can be opened from the interior but not
from the exterior.
See “Selective unlocking system*”
“Safe” status
On the driver door, there is a visible warning lamp which shows the “Safe”
system status.
We will know that “Safe” system is activated by the flashing warning lamp.
The indicator will flash on all vehicles, fitted and nor fitted with an alarm,
until they unlock.
Remember:
Safe activated with or without an alarm: Warning lamp flashes continuous-
ly.
Safe deactivated without an alarm: The indicator remains off.
Safe deactivated with an alarm: The indicator remains off.
WARNING
No one should remain inside the vehicle if the “Safe” mechanism is acti-
vated because opening the doors will not be possible in case of emergen-
cy neither from the inside nor the outside. Danger of death. Passengers
could become trapped inside in case of emergency.
Selective unlocking system*
This system allows to unlock either just the driver door or all
the vehicle.
Driver door unlock button
Unlock once. Use either the key or the remote control.
Once the key is inserted in the lock cylinder, rotate once in the unlock direc-
tion. The driver door will remain without “Safe” and unlocked. See Anti-theft
Alarm chapter for vehicles fitted with an alarm ⇒ page 90.
Using the remote control, press the unlock button on the remote
once.
The Safe system for all the vehicle is deactivated, only the driver door is un-
locked and both the alarm and the warning lamp are also turned off.
Unlocking all doors and the luggage compartment
The unlock button on the remote control must be pressed twice
so that
all doors and the luggage compartment can be opened.
Press twice within 5 seconds to deactivate the Safe system for all vehicle, to
unlock all doors and to use the luggage compartment. The warning lamp
and the alarm (only vehicles fitted with one) are turned off.
Unlocking the luggage compartment
See ⇒ page 93.
Safety FirstOperating instructionsPractical TipsTechnical Specifications
Page 92 of 294
90Opening and closing
Anti-theft alarm system*
Description of anti-theft alarm system*
The anti-theft alarm triggers if unauthorised movements are
detected around the vehicle.
The anti-theft alarm makes it more difficult to break into the vehicle or steal
it. The system will initiate acoustic and optical warning signals when your
vehicle is tried to be forced.
The anti-theft alarm system is automatically switched on when locking the
vehicle. For this, either rotate the key in the locking position or press button
2 on the radio frequency remote control*. The system is immediately ac-
tivated and the turn signal light located on the driver door will flash along
with the turn signals, indicating that the alarm and the locking security sys-
tem (double lock) have been turned on.
If any of the doors or the bonnet are open, they will not be included in the
protection zones of the vehicle when the alarm is connected. If the door or
the bonnet are subsequently closed, they will be automatically included in
the protection areas of the vehicle and the turn signals will flash according-
ly when the doors close.
● The turn signal light will flash twice on opening and deactivating the
alarm.
● The turn signal light will flash once on closing and activating the alarm.
When does the system trigger an alarm?
The system triggers an alarm if the following unauthorised actions are car-
ried out when the vehicle is locked: ●
Opening of vehicle with mechanical key without switching ignition on
within the next 15 seconds
● Opening a door
● Opening the bonnet
● Opening the rear lid
● Ignition switched on with a non-validated key.
● Movements in the driving compartment (vehicles with a volume sensor)
● Towing of the vehicle 1)
● Tilt angle (tow-away protection) 1)
● Undue manipulation of the alarm
● Battery handling
The acoustic signals sound and the turn signals flash for approx. 30 sec-
onds. This may be repeated up to 10 times depending on the country.
Opening all the doors in manual mode
In vehicles without alarm, when opening the driver door manually all the
doors are opened.
How to switch the alarm off
To deactivate the anti-theft alarm, turn the key in the opening direction,
open the door and switch the ignition on, or press the unlock button
on
the remote control.
In vehicles equipped with an anti-theft alarm system, you have 15 seconds
to insert the key in the ignition lock and activate the ignition if the vehicle is
opened using the driver door key.
Otherwise, the alarm will trigger for 30 sec. and the ignition will be blocked.
1)
With vehicles fitted with a tow-away protection
Page 93 of 294
91
Opening and closing
Note
● After 28 days, the indicator light will be switched off to prevent the bat-
tery from exhausting if the vehicle has been left parked for a long period of
time. The alarm system remains activated.
● The alarm will trigger again if attempts are made to open another protec-
tion zone.
● The alarm system can be activated or deactivated using the radio fre-
quency remote control ⇒ page 88.
Vehicle interior monitoring and anti-tow system*
Monitoring or control function incorporated in the anti-theft
alarm* which detects unauthorized vehicle entry by means
of ultrasound.
Activation
– It is automatically switched on when the anti-theft alarm is acti-
vated.
Deactivation
– Open the vehicle with the key, either mechanically 1)
or by press-
ing the
button on the remote control.
– Press the button
on the remote control twice. The volumetric
sensor and tilt sensors will be deactivated. The alarm system re-
mains activated. The vehicle interior monitoring and the anti-tow system are automatically
switched on again next time the vehicle is locked.
The vehicle interior monitoring and anti-tow sensor (tilt sensor) are auto-
matically switched on when the anti-theft alarm is switched on. In order to
activate it, all the doors and the rear lid must be closed.
If you wish to switch off the vehicle interior monitoring and the anti-tow sys-
tem, it must be done each time that the vehicle is locked; if not, they will be
automatically switched on.
The vehicle interior monitoring and the anti-tow system should be switched
off if animals are left inside the locked vehicle (otherwise, their movements
will trigger the alarm) or when, for example, the vehicle is transported or
has to be towed with only one axle on the ground.
False alarms
The interior monitoring only operates correctly if the vehicle is completely
closed. Please observe legal requirements when doing so.
The following cases may cause a false alarm:
●
opened windows (partially or fully)
● panoramic/tilting sunroof open (partially or completely).
● movement of objects inside the vehicle, such as loose papers, items
hanging from the rear vision mirror (air fresheners), etc.
1)
The time period from when the door is opened until the key is inserted in the contact
should not exceed 15 sec., otherwise the alarm will be triggered.
Safety FirstOperating instructionsPractical TipsTechnical Specifications
Page 94 of 294
92Opening and closing
Note
● If the vehicle is relocked and the alarm is activated without the volumet-
ric sensor function, relocking will activate the alarm with all its functions,
except the volumetric sensor. This function is reactivated when the alarm is
switched on again, unless it is deliberately switched off.
● If the alarm has been triggered by the volumetric sensor, this will be in-
dicated by a flashing of the warning lamp on the driver door when the vehi-
cle is opened. The flash is different to the flash indicating the alarm is acti-
vated.
● The vibration of a mobile phone left inside the vehicle may cause the ve-
hicle interior monitoring alarm to trigger, as both sensors react to move-
ments and shakes inside the vehicle.
● If on activating the alarm, any door or the rear lid is open, only the alarm
will be activated. The vehicle interior monitoring and the anti-tow system
will only be activated once all the doors are closed (including the rear lid).
Page 114 of 294
112Lights and visibility
Note
● The windscreen wipers will only work when the ignition is switched on.
● The heat output of the heated jets* is controlled automatically when the
ignition is switched on, depending upon the outside temperature.
● In certain versions of vehicles with alarms, the windscreen wiper will on-
ly work in interval/rain sensor mode when the ignition is on and the bonnet
closed.
● When the interval wipe function is on, the intervals are directly propor-
tional to the speed. This way, the higher the vehicle speed the shorter the
intervals.
● If you stop the vehicle with the windscreen wiper in position 1 or 2, it
will automatically change to a lower speed. The set speed will be resumed
when the vehicle pulls away.
● The windscreen will be wiped again after approximately five seconds
once the “automatic wipe/wash system” has been operated, provided the
vehicle is in transit (drip function). If you activate the wipers less than three
seconds after the drip function, a new wash sequence will begin without the
last wipe. For the “drip” function to work again, you have to turn the ignition
off and then on again. Rain sensor*
The rain sensor controls the frequency of the windscreen
wiper intervals, depending on the amount of rain.
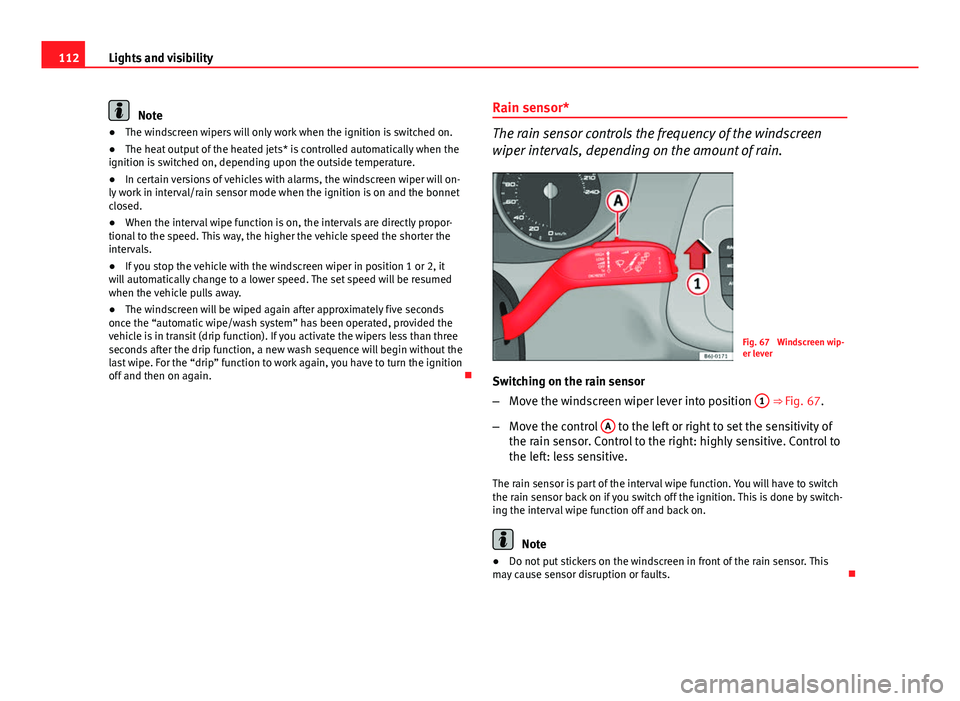
Fig. 67 Windscreen wip-
er lever
Switching on the rain sensor
– Move the windscreen wiper lever into position 1
⇒ Fig. 67.
– Move the control A
to the left or right to set the sensitivity of
the rain sensor. Control to the right: highly sensitive. Control to
the left: less sensitive.
The rain sensor is part of the interval wipe function. You will have to switch
the rain sensor back on if you switch off the ignition. This is done by switch-
ing the interval wipe function off and back on.
Note
● Do not put stickers on the windscreen in front of the rain sensor. This
may cause sensor disruption or faults.
Page 170 of 294
168Driving
CAUTION
● Please note that low obstacles detected by the system may no longer be
registered by the sensors as the car moves closer, so the system will not
give any further warning. Certain kinds of obstacles (such as wire fences,
chains, thin posts or trailer draw bars, high kerbs or painted railings etc)
may not always be detected by the system, so there is a risk of damaging
the vehicle in such cases.
● In some cases, obstacles with uniform edges and bumps may not be de-
tected immediately by the system due to their geometry. Take special care
of this type of obstacle (corners, rectangular objects, etc.), as they can
cause damage to the vehicle.
● Be especially careful when manoeuvring into a corner between two per-
pendicular walls. Pay special attention to the side distance from the wall us-
ing the mirrors.
● The parking aid system does not replace use of the mirrors for manoeu-
vres.
● External ultra-sonic sources (pneumatic drills, construction machinery,
other vehicles with PDC) may interfere with the operation of the system.
● Periodic cleaning of the sensors, take care not to damage or scratch
them. When cleaning with high pressure washers or steam cleaners, the
sensors should be sprayed for only a very short period and from a distance
of more than 10 cm.
● If the licence plate (especially the front one) is bent in such a way that it
noticeably juts out from the bumper, false alarms may sound for the front of
the vehicle. Rear parking aid with navigator view
Fig. 123 Parking aid
view on the navigation
screen.
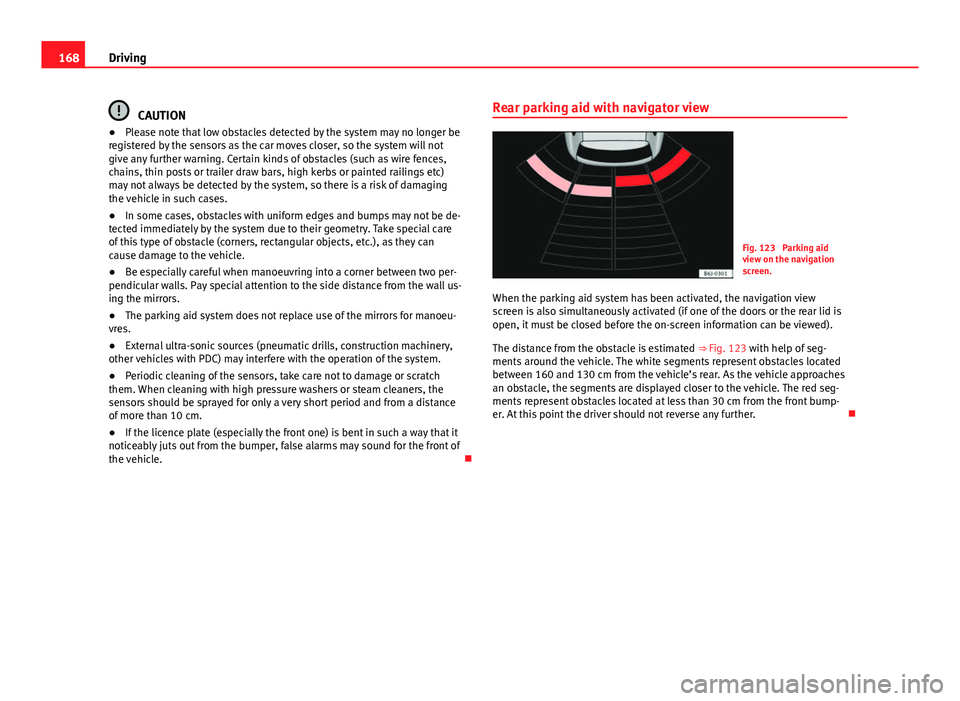
When the parking aid system has been activated, the navigation view
screen is also simultaneously activated (if one of the doors or the rear lid is
open, it must be closed before the on-screen information can be viewed).
The distance from the obstacle is estimated ⇒ Fig. 123 with help of seg-
ments around the vehicle. The white segments represent obstacles located
between 160 and 130 cm from the vehicle’s rear. As the vehicle approaches
an obstacle, the segments are displayed closer to the vehicle. The red seg-
ments represent obstacles located at less than 30 cm from the front bump-
er. At this point the driver should not reverse any further.
Page 172 of 294
170Driving
system works properly, the sensors must be kept clean and free of ice and
snow.
WARNING
● The sensors have blind spots in which obstacles may not be detected.
● Always look out for small children and animals because the system
will not always detect them. Always pay attention when reversing to
avoid accidents.
● The parking aid is not a replacement for driver awareness. The driver
must take full responsibility for parking and other manoeuvres.
CAUTION
● Please note that low obstacles detected by the system may no longer be
registered by the sensors as the car moves closer, so the system will not
give any further warning. Certain kinds of obstacles (such as wire fences,
chains, thin posts or trailer draw bars, high kerbs or painted railings etc)
may not always be detected by the system, so there is a risk of damaging
the vehicle in such cases.
● In some cases, obstacles with uniform edges and bumps may not be de-
tected immediately by the system due to their geometry. Take special care
of this type of obstacle (corners, rectangular objects, etc.), as they can
cause damage to the vehicle.
● Be especially careful when manoeuvring into a corner between two per-
pendicular walls. Pay special attention to the side distance from the wall us-
ing the mirrors.
● The parking aid system does not replace use of the mirrors for manoeu-
vres.
● External ultra-sonic sources (e.g. pneumatic drills, construction machi-
nery or other vehicles equipped with PND) may interfere with the operation
of the system. ●
Periodic cleaning of the sensors, take care not to damage or scratch
them. When cleaning with high pressure washers or steam cleaners, the
sensors should be sprayed for only a very short period and from a distance
of more than 10 cm.
● If the licence plate (especially the front one) is bent in such a way that it
noticeably juts out from the bumper, false alarms may sound for the front of
the vehicle.
Front parking aid with navigator view
Fig. 124 Parking aid
view on the navigation
screen.
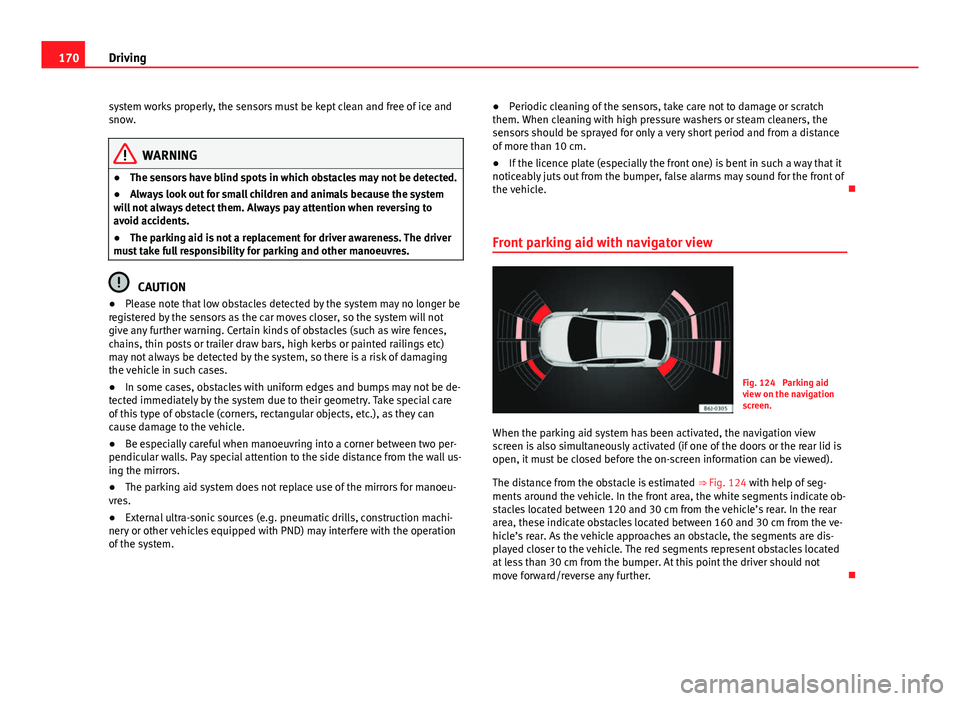
When the parking aid system has been activated, the navigation view
screen is also simultaneously activated (if one of the doors or the rear lid is
open, it must be closed before the on-screen information can be viewed).
The distance from the obstacle is estimated ⇒ Fig. 124 with help of seg-
ments around the vehicle. In the front area, the white segments indicate ob-
stacles located between 120 and 30 cm from the vehicle’s rear. In the rear
area, these indicate obstacles located between 160 and 30 cm from the ve-
hicle’s rear. As the vehicle approaches an obstacle, the segments are dis-
played closer to the vehicle. The red segments represent obstacles located
at less than 30 cm from the bumper. At this point the driver should not
move forward/reverse any further.
Page 209 of 294
207
Checking and refilling levels
6. Raise the bonnet ⇒ page 208.
You should not do any work in the engine compartment unless you know ex-
actly how to carry out the jobs and have the correct tools! Have the work car-
ried out by a specialised workshop if you are uncertain.
All service fluids and consumables, e.g. coolant, engine oil, spark plugs
and batteries, are under constant development. SEAT provides a constant
flow of information to the Technical Services concerning modifications. For
this reason, we recommend you to have service fluids and consumables re-
placed by a Technical Service. Please observe the relevant instructions
⇒ page 196. The engine compartment of the vehicle is a hazardous area
⇒
.
WARNING
All work on the engine or in the engine compartment, e.g. checking and
refilling fluids, involves the danger of injury and scalding as well as the
risk of accident or fire.
● Never open the bonnet if you see steam, smoke or coolant escaping
from the engine compartment. Otherwise, there is a risk of sustaining
burns. Wait until no more steam or coolant is emitted, then allow the en-
gine to cool before carefully opening the bonnet.
● Switch off the engine and remove the key from the ignition.
● Apply the handbrake and move the gear lever to neutral or selector
lever to position P.
● Keep children away from the vehicle.
● Never touch hot engine parts. There is a risk of burns.
● Never spill liquids on a hot engine or on a hot exhaust gas system.
This is a fire hazard.
● Avoid causing short-circuits in the electrical system, particularly at
the points where the jump leads are attached ⇒ page 257. The battery
could explode.
WARNING (Continued)
● Never touch the radiator fan. It is temperature controlled and could
start automatically, even when the engine has been switched off and the
key removed from the ignition!
● Do not unscrew the cap on the coolant expansion tank when the en-
gine is hot. If the coolant is hot, the cooling system will be pressurised!
● Protect face, hands and arms by covering the cap with a large, thick
cloth to protect against escaping coolant and steam.
● Always make sure you have not left any objects, such as cleaning
cloths and tools, in the engine compartment.
● If you have to work underneath the vehicle, you must use suitable
stands additionally to support the vehicle, there is a risk of accident!. A
hydraulic jack is insufficient for securing the vehicle and there is a risk of
injury.
● If any work has to be performed when the engine is started or with
the engine running, there is an additional, potentially fatal, safety risk
from the rotating parts, such as the drive belts, alternator, radiator fan,
etc., and from the high-voltage ignition system. You should also observe
the following points:
–Never touch the electrical wiring of the ignition system.
– Ensure that jewellery, loose clothing and long hair do not get trap-
ped in rotating engine parts. Danger of death. Before starting any
work remove jewellery, tie back and cover hair, and wear tight-fitting
clothes.
– Never accelerate with a gear engaged without taking the necessary
precautions. The vehicle could move, even if the handbrake is ap-
plied. Danger of death.
● If work has to be carried out on the fuel system or on electrical com-
ponents, you must observe the following safety notes in addition to the
above warnings:
–Always disconnect the battery from the on-board network. The ve-
hicle must be unlocked when this is done, otherwise the alarm will be
triggered.
– Do not smoke.
Safety FirstOperating instructionsPractical TipsTechnical Specifications
Page 223 of 294

221
Checking and refilling levels
WARNING (Continued)
● Fires, sparks, open flames and smoking are prohibited. When han-
dling cables and electrical equipment, avoid causing sparks and electro-
static charge. Never short the battery terminals. High-energy sparks can
cause injury.
● A highly explosive mixture of gases is released when the battery is
under charge. The batteries should be charged in a well-ventilated room
only.
● Keep children away from acid and batteries.
● Before working on the electrical system, you must switch off the en-
gine, the ignition and all consumers. The negative cable on the battery
must be disconnected. When a light bulb is changed, you need only
switch off the light.
● Deactivate the anti-theft alarm by unlocking the vehicle before you
disconnect the battery! The alarm will otherwise be triggered.
● When disconnecting the battery from the vehicle on-board network,
disconnect first the negative cable and then the positive cable.
● Switch off all electrical consumers before reconnecting the battery.
Reconnect first the positive cable and then the negative cable. Never re-
verse the polarity of the connections. This could cause an electrical fire.
● Never charge a frozen battery, or one which has thawed. This could
result in explosions and chemical burns. Always replace a battery which
has frozen. A flat battery can also freeze at temperatures close to 0 °C
(+32 °F).
● Ensure that the vent hose is always connected to the battery.
● Never use a defective battery. This could cause an explosion. Replace
a damaged battery immediately.
● For vehicles with the battery in the luggage compartment: Check that
the battery gas ventilation hose is securely attached.CAUTION
● Never disconnect the battery if the ignition is switched on or if the en-
gine is running. This could damage the electrical system or electronic com-
ponents.
● Do not expose the battery to direct sunlight over a long period of time,
as the intense ultraviolet radiation can damage the battery housing.
● If the vehicle is left standing in cold conditions for a long period, protect
the battery from freezing. If it freezes it will be damaged.
Checking the electrolyte level
The electrolyte level should be checked regularly in high-
mileage vehicles, in hot countries and in older batteries. – Open the engine bonnet and the battery cover ⇒
in Safety in-
structions on working in the engine compartment on page 207
⇒
in Warnings on handling the battery on page 220. For vehi-
cles with the battery under the spare wheel, open the rear lid
and lift the floor covering. The battery is located next to the
spare wheel.
– Check the colour display in the "magic eye" on the top of the
battery.
– If there are air bubbles in the window, tap the window gently
until they disperse.
The position of the battery is shown in the corresponding engine compart-
ment diagram ⇒ page 267. The location of the battery in the luggage com-
partment can be seen in ⇒ Fig. 195.
The “magic eye” indicator, located on the top of the battery changes colour,
depending on the charge state and electrolyte level of the battery.
Safety FirstOperating instructionsPractical TipsTechnical Specifications