fuel pressure Seat Ibiza ST 2014 User Guide
[x] Cancel search | Manufacturer: SEAT, Model Year: 2014, Model line: Ibiza ST, Model: Seat Ibiza ST 2014Pages: 240, PDF Size: 4.89 MB
Page 179 of 240
Wheels
Concealed damage
Damage to tyres and rims is often not readily
visible. If you notice unusual vibrations or the
vehicle pulling to one side, this may indicate
that one of the tyres is damaged. They
should be checked immediately by a Techni-
cal Service.
Tyres with directional tread pattern
An arrow on the tyre sidewall indicates the di-
rection of rotation on tyres with directional
tread. Always observe the direction of rota-
tion indicated when fitting the wheel. This
guarantees optimum grip and helps to avoid
aquaplaning, excessive noise and wear. WARNING
● New tyres do not have maximum grip dur-
ing the first 500 km. Drive particularly care-
fully to avoid possible accidents.
● Never drive with damaged tyres. This may
cause an accident.
● If you notice unusual vibrations or if the ve-
hicle pulls to one side when driving, stop the
vehicle immediately and check the tyres for
damage. Checking tyre pressure
The correct tyre pressure can be seen on the
sticker on the inside of the fuel tank flap. 1. Read the required tyre inflation pressure
from the sticker. The values refer to Sum-
mer tyres.
2. The tyre pressures should only be checked when the tyres are cold. The slightly raised
pressures of warm tyres must not be re-
duced.
3. Adjust the tyre pressure to the load you are carrying.
Tyre pressure
The correct tyre pressure is especially impor-
tant at high speeds. The pressure should
therefore be checked at least once a month
and before starting a journey. WARNING
A tyre can easily burst if the pressure is too
low, causing an accident!
● At continuously high speeds, a tyre with in-
sufficient pressure flexes more. In this way it
becomes too hot, and this can cause tread
separation and tyre blow-out. Always observe
the recommended tyre pressures.
● If the tyre pressure is too low or too high,
the tyres will wear prematurely and the vehi-
cle will not handle well. Risk of accident! For the sake of the environment
Under-inflated tyres will increase fuel con-
sumption. Tyre useful life
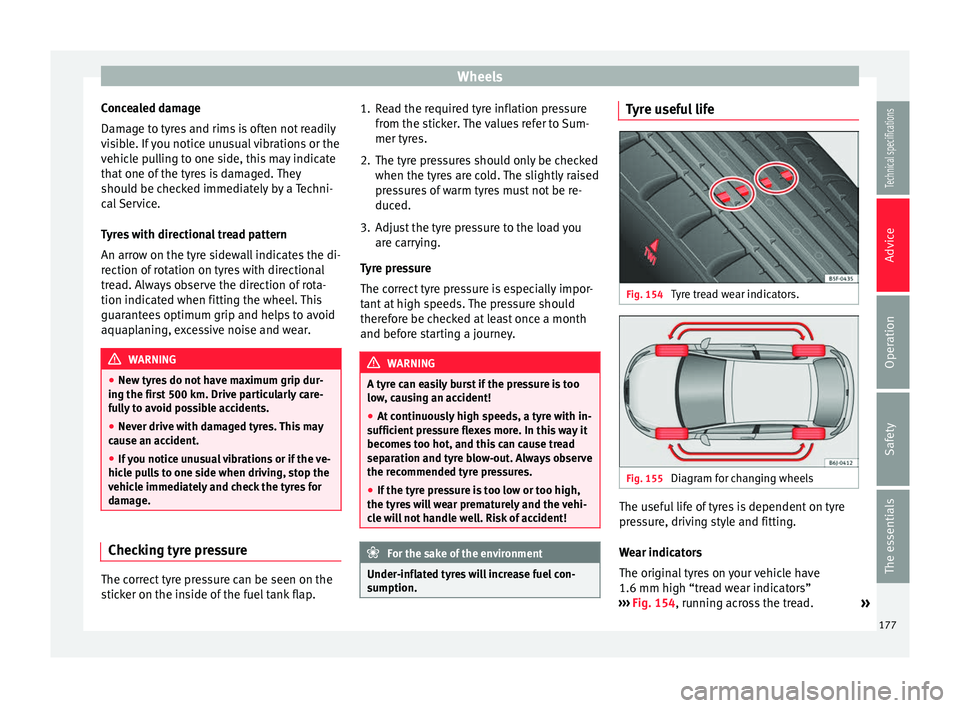
Fig. 154
Tyre tread wear indicators. Fig. 155
Diagram for changing wheels The useful life of tyres is dependent on tyre
pressure, driving style and fitting.
Wear indicators
The original tyres on your vehicle have
1.6 mm high “tread wear indicators”
››› Fig. 154 , running across the tread.
»
177Technical specifications
Advice
Operation
Safety
The essentials
Page 180 of 240
Advice
Depending on the make, there will be 6 to 8
of them evenly spaced around the tyre. Mark-
ings on the tyre sidewall (for instance the let-
ters “TWI” or other symbols) indicate the po-
sitions of the tread wear indicators. The mini-
mum tread depth required by law is 1.6 mm
(measured in the tread grooves next to the
tread wear indicators). Worn tyres must be re-
placed. Different figures may apply in export
countries ››› .
Tyre pressure
Incorrect tyre pressure causes premature
wear and could cause tyre blow-out. For this
reason, the tyre pressure should be checked
at least once per month ››› page 177.
Driving style
Fast cornering, heavy acceleration and hard
braking all increase tyre wear.
Changing wheels around
If the front tyres are worn considerably more
than the rear ones it is advisable to change
them around as shown ››› Fig. 155 . The use-
f u
l life of all the tyres will then be about the
same time.
Wheel balance
The wheels on new vehicles are balanced.
However, various factors encountered in nor-
mal driving can cause them to become unbal-
anced, which results in steering vibration. Unbalanced wheels should be rebalanced, as
they otherwise cause excessive wear on
steering, suspension and tyres. A wheel must
also be rebalanced when a new tyre is fitted.
Incorrect wheel alignment
Incorrect wheel alignment causes excessive
tyre wear, impairing the safety of the vehicle.
If tyres show excessive wear, you should
have the wheel alignment checked by a Tech-
nical Service.
WARNING
There is a serious danger of accidents if a tyre
bursts during driving!
● The tyres must be replaced at the latest
when the tread wear indicators are worn
››› page 177. Failure to follow this instruction
could result in an accident. Worn tyres do not
grip well at high speeds on wet roads. There
is also a greater risk of “aquaplaning”.
● At continuously high speeds, a tyre with in-
sufficient pressure flexes more. This causes it
to overheat. This can cause tread separation
and tyre blow-out. Risk of accident. Always
observe the recommended tyre pressures.
● If tyres show excessive wear, you should
have the running gear checked by a Technical
Service.
● Keep chemicals such as oil, fuel and brake
fluid away from tyres.
● Damaged wheels and tyres must be re-
placed immediately! For the sake of the environment
Under-inflated tyres will increase fuel con-
sumption. New tyres and wheels
New tyres and wheels have to be run in.
The tyres and wheel rims are an essential
part of the vehicle's design. Those approved
by SEAT are specially matched to the charac-
teristics of the vehicle and make a major con-
tribution to good road-holding and safe han-
dling
››› .
Tyres should be replaced at least in pairs and
not individually (i.e. both front tyres or both
rear tyres together). A knowledge of tyre des-
ignations makes it easier to choose the cor-
rect tyres. Radial tyres have the tyre designa-
tions marked on the sidewall, for example: 195/65 R15 91T
This contains the following information:
Tyre width in mm
Height/width ratio in %
Tyre construction: R
adial
Rim di
ameter in inches
Load rating code
Speed rating
195
65
R
15
91
T
178
Page 182 of 240
Advice
CAUTION
The prescribed tightening torque for wheel
bolts for steel and alloy wheels is 120 Nm. Winter service
Winter tyres In winter conditions winter tyres will consid-
erably improve the vehicle's handling. The
design of summer tyres (width, rubber com-
pound, tread pattern) gives less grip on ice
and snow.
Winter tyres must be inflated to a
pressure of
0.2 bar (2.9 psi/20 kPa) higher than the pres-
sures specified for summer tyres (see sticker
on fuel tank flap).
Winter tyres must be fitted on all four wheels.
Information on permitted winter tyre sizes
can be found in the vehicle's registration
documentation. Use only radial winter tyres.
All tyre sizes listed in the vehicle documenta-
tion also apply to winter tyres.
Winter tyres lose their effectiveness when the
tread is worn down to a depth of 4 mm.
The speed rating code ›››
page 178, New
tyres and wheels determines the following
speed limits for winter tyres: ›› › max. 160 km/h (99 mph)
Q max. 180 km/h (112 mph)
max. 190 km/h (118 mph)
max. 210 km/h (130 mph)
In some countries, vehicles which can exceed
the speed rating of the fitted tyre must have
an appropriate sticker in the driver's field of
view. These stickers are available from your
technical service. The legal requirements of
each country must be followed.
Do not have winter tyres fitted for unnecessa-
rily long periods. Vehicles with summer tyres
handle better when the roads are free of
snow and ice.
If you have a flat tyre, please refer to the
notes on the spare wheel ››› page 178, New
tyres and wheels . WARNING
The maximum speed for the winter tyres must
not be exceeded. Otherwise, this could lead
to damage and risk of accident. For the sake of the environment
Fit your summer tyres again as soon as possi-
ble. They are quieter, do not wear so quickly
and reduce fuel consumption. S
T
H
Snow chains Snow chains may be fitted only to the front
wheels, and only for the following tyres:
175/70R14
185/60R15Chains with links not exceeding 15 mm
(including the chain closure)
215/45R16Chains with links not exceeding 9 mm (in-
cluding the chain closure)
215/40R17Chains with links not exceeding 7 mm (in-
cluding the chain closure)
Remove wheel hub covers and trim rings be-
fore fitting snow chains. For safety reasons,
cover caps, available in any Technical Serv-
ices, must then be fitted over the wheel
bolts.
WARNING
Snow chains should be correctly tightened in
accordance with the manufacturer's instruc-
tions. This will prevent the chains coming in-
to contact with the wheel housing. CAUTION
Remove the snow chains to drive on roads
without snow. Otherwise they will impair
handling, damage the tyres and wear out very
quickly. 180
Page 184 of 240
Advice
●
Observe the expiry date of the contents of
the first aid kit. After it has expired you
should purchase a new one.
● The fire extinguisher must comply with le-
gal requirements.
● Ensure that the fire extinguisher is fully
functional. The fire extinguisher should,
therefore, be checked regularly. The sticker
on the fire extinguisher will inform you of the
next date for checking.
● Before acquiring accessories and emergen-
cy equipment see the instructions in “Acces- sories and spares” ››› page 155. Vehicle Tools
Read the additional information carefully
››› page 27
Some of the items listed are only provided in
certain model versions, or are optional ex-
tras. WARNING
● The factory-supplied jack is only designed
for changing wheels on this model. On no ac-
count attempt to use it for lifting heavier ve-
hicles or other loads. Risk of injury.
● Use the jack only on a firm, level ground.
● Never start the engine when the vehicle is
on the jack. Risk of accident. ●
If work is to be carried out underneath the
vehicle, this must be secured by suitable
means. Otherwise, there is a risk of injury. Note
The jack does not generally require any main-
tenance. If required, it should be greased us-
ing universal type grease. Spare wheel (temporary spare
wheel)*
The temporary spare wheel is stored under
the floor panel in the luggage compartment
and is attached by a thumbnut.
How to use the temporary spare wheel
If you ever have a punctured tyre or loss of
pressure, the temporary spare wheel is only
intended for temporary use until you reach a
workshop. Change it for a duty wheel as soon
as possible.
Please note the following restrictions when
using the temporary spare wheel. This tem-
porary spare wheel has been specially de-
signed for your vehicle, thus, it cannot be
changed with the temporary spare wheel
from another vehicle.
No other type of tyre (normal summer or win-
ter tyre) may be fitted on the compact tempo-
rary spare wheel rim.Snow chains
For technical reasons, snow chains must not
be used on the temporary spare wheel.
If you have a puncture on one of the front
wheels when using snow chains, fit the tem-
porary spare wheel in place of one of the rear
wheels. Fit the snow chains on the rear wheel
that you have removed and replace the punc-
tured front wheel with this wheel.
WARNING
● After fitting the temporary spare wheel,
check the tyre pressures as soon as possible.
Failure to do so may cause an accident. The
tyre pressures are listed on the inside of the
fuel tank flap.
● Do not drive at over 80 km/h (50 mph)
when the temporary spare wheel is fitted on
the vehicle: risk of accident!
● Avoid heavy acceleration, hard braking and
fast cornering: risk of accident!
● Never use more than one temporary spare
wheel at the same time, risk of accident.
● No other type of tyre (normal summer or
winter tyre) may be fitted on the compact
temporary spare wheel rim. 182
Page 192 of 240
Advice
Note
The vehicles must not touch each other, oth-
erwise electricity could flow as soon as the
positive terminals are connected. Towing or tow starting
Tow-starting* We recommend that you do
not tow-start your
v ehic
le. Jump-starting is preferable
››› page 188.
Ho w
ever, if your vehicle has to be tow-
started:
– Engage 2 nd
or 3 rd
gear.
– Keep the clutch pressed down.
– Switch the ignition on.
– Once both vehicles are moving, release the
clutch.
– As soon as the engine starts, press the
clutch and move the gear lever into neutral.
This helps to prevent driving into the tow-
ing vehicle. WARNING
The risk of accidents is high when tow-start-
ing. The vehicle being towed can easily col-
lide with the towing vehicle. CAUTION
When tow-starting, fuel could enter the cata-
lytic converter and damage it. Comments
Please observe the following points if you
use a tow rope:
Notes for the driver of the towing vehicle
– Drive slowly at first until the tow rope is
taut. Then accelerate gradually.
– Begin and change gears cautiously. If you
are driving an automatic vehicle, accelerate
gently.
– Remember that the brake servo and power
steering are not working in the vehicle you
are towing. Brake sooner than normal and
pressing the pedal gently.
Notes for the driver of the towed vehicle
– Ensure that the tow rope remains taut at all
times when towing.
Tow rope or tow bar
It is easier and safer for the vehicle to be tow-
ed using a tow bar. You should only use a
tow-rope if you do not have a tow-bar.
A tow rope should be slightly elastic to re-
duce the loading on both vehicles. It is advis- able to use a tow rope made of synthetic fi-
bre or similarly elastic material.
Attach the tow rope or the tow bar only to the
towline anchorages provided or a towing
bracket.
Driving style
Towing requires some experience, especially
when using a tow rope. Both drivers should
be familiar with the technique required for
towing. Inexperienced drivers should not at-
tempt to tow.
Do not pull too hard with the towing vehicle
and take care to avoid jerking the tow rope.
When towing on an unpaved road, there is al-
ways a risk of overloading and damaging the
anchorage points.
The ignition of the vehicle being towed must
be switched on to prevent the steering wheel
from locking and also to allow the use of the
turn signals, horn, windscreen wipers and
washers.
The brake servo only works when the engine
is running. When not running, you must ap-
ply considerably more pressure to the brake
pedal.
As the power assisted steering does not work
if the engine is not running, you will need
more strength to steer than you normally
would.
190
Page 212 of 240
Technical specifications
Special versions, optional equipment fittings
or retro-fitting accessories will increase the
weight of the vehicle ››› .
WARNING
● Please note that the centre of gravity may
shift when transporting heavy objects; this
may affect vehicle handling and lead to an ac-
cident. Always adjust your speed and driving
style to suit road conditions and require-
ments.
● Never exceed the gross axle weight rating
or the gross vehicle weight rating. If the per-
missible axle load or the permissible total
weight is exceeded, the driving characteris-
tics of the vehicle may change, leading to ac-
cidents, injuries and damage to the vehicle. Towing a trailer
Trailer weights Trailer weight
The trailer weights and drawbar loads ap-
proved are selected in intensive trials accord-
ing to precisely defined criteria. The ap-
proved trailer weights are valid for vehicles in
the
EU
for maximum speeds of 80 km/h (50
mph) (in c ertain circumstances up to 100
km/h (62 mph)). The figures may be different
in other countries. All data in the official vehi- cle documentation takes precedence over
these data at all times
››› .
Drawbar loads
The maximum
permitted drawbar load on the
b
all joint of the towing bracket must not ex-
ceed
75 kg.
In the interest of road safety, we recommend
that you always tow approaching the maxi-
mum drawbar load. The response of the trail-
er on the road will be poor, if the drawbar
load is too small.
If the maximum permissible drawbar load
cannot be met (e.g. with small, empty and
light-weight single axle trailers or tandem
axle trailers with a wheelbase of less than 1
metre), a minimum of 4% of the actual trailer
weight is legally required for the drawbar
load. WARNING
● For safety reasons, you should not drive at
speeds above 80 km/h (50 mph) when towing
a trailer. This also applies in countries where
higher speeds are permitted.
● Never exceed the maximum trailer weights
or the drawbar load. If the permissible axle
load or the permissible total weight is excee-
ded, the driving characteristics of the vehicle
may change, leading to accidents, injuries
and damage to the vehicle. Wheels
Tyre pressure, snow chains, wheel
bolts Tyre pressures
The sticker with the tyre pressure values can
be found on the inside of the fuel tank flap.
The tyre pressure values given there are for
cold tyres. Do not reduce the slightly raised
pr
e
ssures of warm tyres ››› .
Snow chains
Snow chains may be fitted only to the front
wheels, and only for the following tyres:
175/70R14
185/60R15Chains with links not exceeding 15 mm
(including the chain closure)
215/45R16Chains with links not exceeding 9 mm
(including the chain closure)
215/40R17Chains with links not exceeding 7 mm
(including the chain closure) Wheel bolts
After the wheels have been changed, the
tightening torque
of the wheel bolts should
be c hec
ked as soon as possible with a torque
wrench ››› . The tightening torque for steel
and alloy wheels is 120 Nm.
210
Page 229 of 240
Technical features
CapacitiesCapacities
Fuel tank 45 litres. Reserve 7 li-
tres.
Windscreen washer fluid
container with headlight
washer 2 l/ 4.5 l
Tyre pressure
Summer tyres:
Correct tyre pressure can be seen on the sticker on the
inside of the fuel tank flap.
Winter tyres:
The pressure of these tyres is 0.2 bar higher than that of
summer tyres (2.9 psi / 20 kPa). 227
Technical specifications
Advice
Operation
Safety
The essentials
Page 233 of 240
Index
Differential lock fault (EDL) control lamp . . . . . . . . . . . . . . . . . . . . . . . . . . . . 60
Digital clock . . . . . . . . . . . . . . . . . . . . . . . . . . . . . . 64
Dimensions . . . . . . . . . . . . . . . . . . . . . . . . . . . . . . 226
Disposal Seat belt tensioners . . . . . . . . . . . . . . . . . . . . . . 39
Door handle . . . . . . . . . . . . . . . . . . . . . . . . . . . . . 160
Door lock . . . . . . . . . . . . . . . . . . . . . . . . . . . . . . . . 160
Door lock cylinders . . . . . . . . . . . . . . . . . . . . . . . . 160
Door release lever . . . . . . . . . . . . . . . . . . . . . . . . . 55
Doors . . . . . . . . . . . . . . . . . . . . . . . . . . . . . . . . . . . . . 9 Childproof locks . . . . . . . . . . . . . . . . . . . . . . . . . 82
control lamp . . . . . . . . . . . . . . . . . . . . . . . . . . . . 62
Double headlight bulbs . . . . . . . . . . . . . . . . . . . . 199
Driver see Correct sitting position . . . . . . . . . 30, 31, 32
Driv e
shaft differential
XDS . . . . . . . . . . . . . . . . . . . . . . . . . . . . . . . . . . 142
Driving driving abroad . . . . . . . . . . . . . . . . . . . . . . . . . 138
Economically/with Respect for the Environ-ment . . . . . . . . . . . . . . . . . . . . . . . . . . . . . . . 136
With a trailer . . . . . . . . . . . . . . . . . . . . . . . . . . . 153
Driving abroad . . . . . . . . . . . . . . . . . . . . . . . . . . . 138 Headlights . . . . . . . . . . . . . . . . . . . . . . . . . . . . 138
Driving Economically . . . . . . . . . . . . . . . . . . . . . . 136
Driving safety . . . . . . . . . . . . . . . . . . . . . . . . . . . . . 29
Driving with Respect for the Environment . . . . . 136
Duplicate keys . . . . . . . . . . . . . . . . . . . . . . . . . . . . 82
Dust filter . . . . . . . . . . . . . . . . . . . . . . . . . . . . . . . 113
Dynamic headlight range control . . . . . . . . . . . . . 92
E EDL . . . . . . . . . . . . . . . . . . . . . . . . . . . . . . . . . . . . 139 control lamp . . . . . . . . . . . . . . . . . . . . . . . . . . . . 59
Electric windows . . . . . . . . . . . . . . . . . . . . . . . . 10, 87 Electro-hydraulic steering
control lamp . . . . . . . . . . . . . . . . . . . . . . . . . . . . 62
Electronic differential lock . . . . . . . . . . . . . . . . . . 139 control lamp . . . . . . . . . . . . . . . . . . . . . . . . . . . . 59
Electronic immobiliser . . . . . . . . . . . . . . . . . . . . . 124
Electronic Stability Control . . . . . . . . . . . . . 60, 139
Electronic Stability Control (ESC) control lamp . . . . . . . . . . . . . . . . . . . . . . . . . . . . 60
Emission control system control lamp . . . . . . . . . . . . . . . . . . . . . . . . . . . . 63
Engine Running in . . . . . . . . . . . . . . . . . . . . . . . . . . . . . 134
Engine compartment . . . . . . . . . . . . . . . . . . 10, 167 Working in the engine compartment . . . . . . . . 166
Engine coolant G 12 plus-plus . . . . . . . . . . . . . . . . . . . . . . . . . 171
G 13 . . . . . . . . . . . . . . . . . . . . . . . . . . . . . . . . . . 171
Specifications . . . . . . . . . . . . . . . . . . . . . . . . . . 171
Engine coolant fluid . . . . . . . . . . . . . . . . . . . . . . . 171
Engine fault control lamp . . . . . . . . . . . . . . . . . . . . . . . . . . . . 58
Engine management control lamp . . . . . . . . . . . . . . . . . . . . . . . . . . . . 58
Engine oil Changing . . . . . . . . . . . . . . . . . . . . . . . . . . . . . . 171
Checking engine oil level . . . . . . . . . . . . . . . . . 170
Oil properties . . . . . . . . . . . . . . . . . . . . . . . . . . 169
Specifications . . . . . . . . . . . . . . . . . . . . . . . . . . 168
Topping up . . . . . . . . . . . . . . . . . . . . . . . . . . . . 170
Engine oil dipstick . . . . . . . . . . . . . . . . . . . . . . . . 170
Engine oil pressure control lamp . . . . . . . . . . . . . . . . . . . . . . . . . . . . 59
Environment . . . . . . . . . . . . . . . . . . . . . . . . . . . . . 136 Environmental friendliness . . . . . . . . . . . . . . . 135
Environmental tip Avoiding pollution . . . . . . . . . . . . . . . . . . . . . . 164
Equipment . . . . . . . . . . . . . . . . . . . . . . . . . . . . . . 155 ESC . . . . . . . . . . . . . . . . . . . . . . . . . . . . . . . . 60, 139
see also Electronic Stability Control . . . . . . . . 139
Exhau
st gas emission control system . . . . . . . . . 135
Exterior mirror Adjustment . . . . . . . . . . . . . . . . . . . . . . . . . . . . . 12
Exterior mirrors . . . . . . . . . . . . . . . . . . . . . . . . . . . 159
Exterior view . . . . . . . . . . . . . . . . . . . . . . . . . . . . . . . 5
External aerial . . . . . . . . . . . . . . . . . . . . . . . . . . . . 156
F Fabric trim cleaning . . . . . . . . . . . . . . . . . . . . . . . 162
Fastening rings . . . . . . . . . . . . . . . . . . . . . . . . . . . 109
Filling the fuel tank . . . . . . . . . . . . . . . . . . . . . . . 163
Fire extinguisher . . . . . . . . . . . . . . . . . . . . . . . . . . 181
First-aid kit . . . . . . . . . . . . . . . . . . . . . . . . . . . . . . 181
Floor mats . . . . . . . . . . . . . . . . . . . . . . . . . . . . . . . . 34
Fog light bulb . . . . . . . . . . . . . . . . . . . . . . . . . . . . 202
Fog lights . . . . . . . . . . . . . . . . . . . . . . . . . . . . . . . . 90
Fog lights with cornering function . . . . . . . . . . . . 95
Footwell lights . . . . . . . . . . . . . . . . . . . . . . . . . . . . 96
Front head restraints . . . . . . . . . . . . . . . . . . . . . . . . . . 32
headrests . . . . . . . . . . . . . . . . . . . . . . . . . . . . . . 32
Front airbags . . . . . . . . . . . . . . . . . . . . . . . . . . . . . 42 operation . . . . . . . . . . . . . . . . . . . . . . . . . . . . . . . 40
safety instructions . . . . . . . . . . . . . . . . . . . . . . . 43
Front ashtray . . . . . . . . . . . . . . . . . . . . . . . . . . . . . 106
Front drink holder . . . . . . . . . . . . . . . . . . . . . . . . . 106
Front interior light . . . . . . . . . . . . . . . . . . . . . . . . . 96
Front parking aid . . . . . . . . . . . . . . . . . . . . . . . . . . . . . . . . . . . 148
Front passenger airbag deactivation . . . . . . . . . . 45 safety information . . . . . . . . . . . . . . . . . . . . . . . 46
Front passenger front airbag Deactivation . . . . . . . . . . . . . . . . . . . . . . . . . . . . 11
Front reading light . . . . . . . . . . . . . . . . . . . . . . . . . 96
231
Page 234 of 240
Index
Front seat Adjustment . . . . . . . . . . . . . . . . . . . . . . . . . . . . . 11
Front towline anchorage . . . . . . . . . . . . . . . . . . . 191
Fuel . . . . . . . . . . . . . . . . . . . . . . . . . . . . . . . . . . . . . 23 Diesel . . . . . . . . . . . . . . . . . . . . . . . . . . . . . . . . 165
Petrol . . . . . . . . . . . . . . . . . . . . . . . . . . . . . . . . . 164
Fuel consumption . . . . . . . . . . . . . . . . . . . . 136, 209
Fuel level Indicator . . . . . . . . . . . . . . . . . . . . . . . . . . . . . . . 64
Fuel reserve . . . . . . . . . . . . . . . . . . . . . . . . . . . . . . 62
Fuel tank Opening the fuel tank flap . . . . . . . . . . . . . . . . 163
see also Fuel reserve . . . . . . . . . . . . . . . . . . . . . 62
F uel
tank flap . . . . . . . . . . . . . . . . . . . . . . . . . . . . 163
Fuel: saving . . . . . . . . . . . . . . . . . . . . . . . . . . . . . . 136
Fuses . . . . . . . . . . . . . . . . . . . . . . . . . . . . . . . 25, 195 Fuse box . . . . . . . . . . . . . . . . . . . . . . . . . . . . . . 195
Identifying blown fuses . . . . . . . . . . . . . . . . . . 196
Identifying by colours . . . . . . . . . . . . . . . . . . . . 196
Preparation before replacing . . . . . . . . . . . . . . 196
Replacement . . . . . . . . . . . . . . . . . . . . . . . . . . . 196
G Gear-change indicator . . . . . . . . . . . . . . . . . . . . . 134
Gear lever . . . . . . . . . . . . . . . . . . . . . . . . . . . . . . . . 19
Gear shift pattern . . . . . . . . . . . . . . . . . . . . . . . . . 128
General overview of the engine compartment . . 168
Glove compartment . . . . . . . . . . . . . . . . . . . . . . . 104
Glove compartment light . . . . . . . . . . . . . . . . . . . . 96
Glow plug system . . . . . . . . . . . . . . . . . . . . . . . . . 125 control lamp . . . . . . . . . . . . . . . . . . . . . . . . . . . . 58
H
Handbrake . . . . . . . . . . . . . . . . . . . . . . . . . . . . . . 126 warning lamp . . . . . . . . . . . . . . . . . . . . . . . . . . 127
Hazard warning lights . . . . . . . . . . . . . . . . . . . 15, 95
HBA . . . . . . . . . . . . . . . . . . . . . . . . . . . . . . . . . . . . 140 Head-on collisions and the laws of physics . . . . . 36
Headlight range control . . . . . . . . . . . . . . . . . . . . . 92
Headlights
Driving abroad . . . . . . . . . . . . . . . . . . . . . . . . . 138
fog lights . . . . . . . . . . . . . . . . . . . . . . . . . . . . . . . 90
Headlight washer . . . . . . . . . . . . . . . . . . . . . . . . 98
Head restraints . . . . . . . . . . . . . . . . . . . . . . . . . . . . 12 adjusting . . . . . . . . . . . . . . . . . . . . . . . . . . . . . . 101
angle adjustment . . . . . . . . . . . . . . . . . . . . . . . 101
removing . . . . . . . . . . . . . . . . . . . . . . . . . . . . . . 101
Headrests . . . . . . . . . . . . . . . . . . . . . . . . . . . . . . . . 12
Head rests adjusting . . . . . . . . . . . . . . . . . . . . . . . . . . . . . . 101
angle adjustment . . . . . . . . . . . . . . . . . . . . . . . 101
removing . . . . . . . . . . . . . . . . . . . . . . . . . . . . . . 101
Heated exterior mirrors . . . . . . . . . . . . . . . . . . . . . 99
Heated front seats . . . . . . . . . . . . . . . . . . . . . . . . 102
Heated rear window heating element wires . . . . . . . . . . . . . . . . . . . 160
Heating . . . . . . . . . . . . . . . . . . . . . . . . . . . . . 23, 114
Heating system . . . . . . . . . . . . . . . . . . . . . . . . . . . 116
High pressure cleaners . . . . . . . . . . . . . . . . . . . . 158
Hill driving assistant . . . . . . . . . . . . . . . . . . . . . . 127
Horn . . . . . . . . . . . . . . . . . . . . . . . . . . . . . . . . . . . . 55
How to jump start description . . . . . . . . . . . . . . . 188
Hydraulic Brake Assist Automatic hazard warning lights activation . . 140
I
Identification plate . . . . . . . . . . . . . . . . . . . . . . . . 209
Ignition . . . . . . . . . . . . . . . . . . . . . . . . . . . . . 13, 123
Ignition key . . . . . . . . . . . . . . . . . . . . . . . . . . . . . . 123
Ignition lock . . . . . . . . . . . . . . . . . . . . . . . . . 13, 123
Importance of the correct adjustment of head re- straints . . . . . . . . . . . . . . . . . . . . . . . . . . . . . . . . 32
Instrument and switch lighting . . . . . . . . . . . . . . . 92
Instrument lighting . . . . . . . . . . . . . . . . . . . . . . . . 55 Instrument panel . . . . . . . . . . . . . . . . . . . . . . . . . . 55
Service interval display . . . . . . . . . . . . . . . . . . . 67
Instruments . . . . . . . . . . . . . . . . . . . . . . . . . . . . . . 56
Interior lights . . . . . . . . . . . . . . . . . . . . . . . . . . . . . 15
Interior rear vision mirror . . . . . . . . . . . . . . . . . . . . 99
Interior view . . . . . . . . . . . . . . . . . . . . . . . . . . . . . . . 7
ISOFIX system . . . . . . . . . . . . . . . . . . . . . . . . . . . . . 50
J Jack Mounting points . . . . . . . . . . . . . . . . . . . . . . . . 184
Jump-starting . . . . . . . . . . . . . . . . . . . . . . . . . . . . 188
Jump leads . . . . . . . . . . . . . . . . . . . . . . . . . . . . . . 188
K Keys . . . . . . . . . . . . . . . . . . . . . . . . . . . . . . . . . . . . . 82
L Leather cleaning . . . . . . . . . . . . . . . . . . . . . . . . . . 162
Leaving Home Function . . . . . . . . . . . . . . . . . . . . . 94
Level control . . . . . . . . . . . . . . . . . . . . . . . . . . . . . . 23
Lifting the vehicle . . . . . . . . . . . . . . . . . . . . . . . . . 184
Light Switch . . . . . . . . . . . . . . . . . . . . . . . . . . . . . . . . . 14
Lights . . . . . . . . . . . . . . . . . . . . . . . . . . . . . . . . 14, 90 Automatic lighting . . . . . . . . . . . . . . . . . . . . . . . 91
Load compartment in the luggage compartment see Loading the luggage compartment . . . . . 108
Lo
ading the luggage compartment . . . . . . . . . . . 108
Loading the vehicle luggage compartment . . . . . . . . . . . . . . . . . . . . . 9
Luggage compartment . . . . . . . . . . . . . . . . . . . 9, 108 Fastening rings . . . . . . . . . . . . . . . . . . . . . . . . . 109
Loading . . . . . . . . . . . . . . . . . . . . . . . . . . . . . . . 108
Luggage net . . . . . . . . . . . . . . . . . . . . . . . . . . . 109
see also Loading the luggage compartment . 108
L ug
gage compartment light . . . . . . . . . . . . 96, 207
232