sport mode Seat Ibiza ST 2014 Owner's manual
[x] Cancel search | Manufacturer: SEAT, Model Year: 2014, Model line: Ibiza ST, Model: Seat Ibiza ST 2014Pages: 240, PDF Size: 4.89 MB
Page 22 of 240
The essentials
● Release the clutch.
››› in Driving with a manual gearbox on
page 128
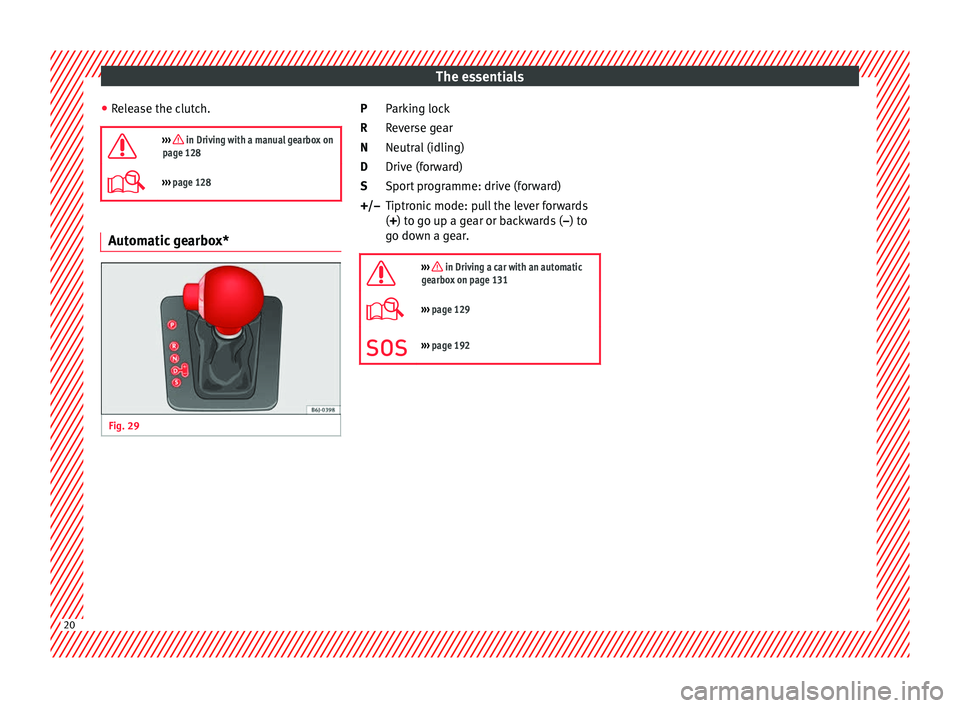
››› page 128 Automatic gearbox*
Fig. 29
Parking lock
Reverse gear
Neutral (idling)
Drive (forward)
Sport programme: drive (forward)
Tiptronic mode: pull the lever forwards
(
+
) to go up a gear or backwards ( –
) to
go do
wn a gear.
››› in Driving a car with an automatic
gearbox on page 131
››› page 129
››› page 192 P
R
N
D
S
+/–
20
Page 50 of 240
Safety
●
Never hold children or babies on your lap,
this can result in potentially fatal injuries to
the child!
● Never allow a child to be transported in a
vehicle without being properly secured, or to
stand up or kneel on a seat while travelling.
In an accident, the child could be flung
through the vehicle, causing possibly fatal in-
juries to themselves and to the other vehicle
occupants.
● If children assume an improper sitting posi-
tion when the vehicle is moving, they expose
themselves to greater risk of injury in the
event of a sudden braking manoeuvre or in an
accident. This is particularly important if the
child is travelling on the front passenger seat
and the airbag system is triggered in an acci-
dent; as this could cause serious injury or
even death.
● A suitable child seat can protect your child!
● Never leave a child alone in the child seat
or inside the vehicle because depending on
the season, very high temperatures may be
reached inside a parked vehicle, which could
be fatal.
● Children who are less than 1.5 metres tall
must not wear a normal seat belt without a
child seat, as this could cause injuries to the
abdominal and neck areas during a sudden
braking manoeuvre or in an accident.
● Do not allow the seat belt to become twis-
ted and the seat belt should be properly in
place ››› page 34. ●
Only one child may occupy a child seat
››› page 48, Child seats.
● When a c hi
ld seat is mounted in the rear
seats, the door child-proof lock should be ac-
tivated ››› page 82. Child seats
Categorisation of child seats into
groups Only use child seats that are officially ap-
proved and suitable for the child.
Child seats are subject to the regulation ECE-
R 44. ECE-R stands for: Economic Commis-
sion for Europe Regulation.
The child seats are grouped into 5 catego-
ries:
Group 0 : Up to 10 kg (up to around 9
months)
Gr oup 0+
: Up to 13 kg (up to around 18
months)
Group 1
: from 9 to 18 kg (up to approx. 4
years old)
Group 2
: from 15 to 25 kg (up to approx. 7
years old) Group 3: From 22 to 36 kg (over around 7
years old)
Child seats that have been tested and ap-
proved under the ECE R44 standard bear the
test mark on the seat (the letter E in a circle
with the test number below it).
Follow the manufacturer's instructions and
observe any statutory requirements when in-
stalling and using child seats.
We recommend you to always include the
manufacturer's Child Seat Instruction Manual
together with the on-board documentation.
SEAT recommends you use child seats from
the Original Accessories Catalogue . The
se
child seats have been designed and tested
for use in SEAT vehicles. You can find the
right child seat for your model and age group
at SEAT dealers. WARNING
Read and always observe information and
warnings concerning the use of child seats
››› page 47.48
Page 51 of 240
Transporting children safety
Ways to secure a child seat Fig. 65
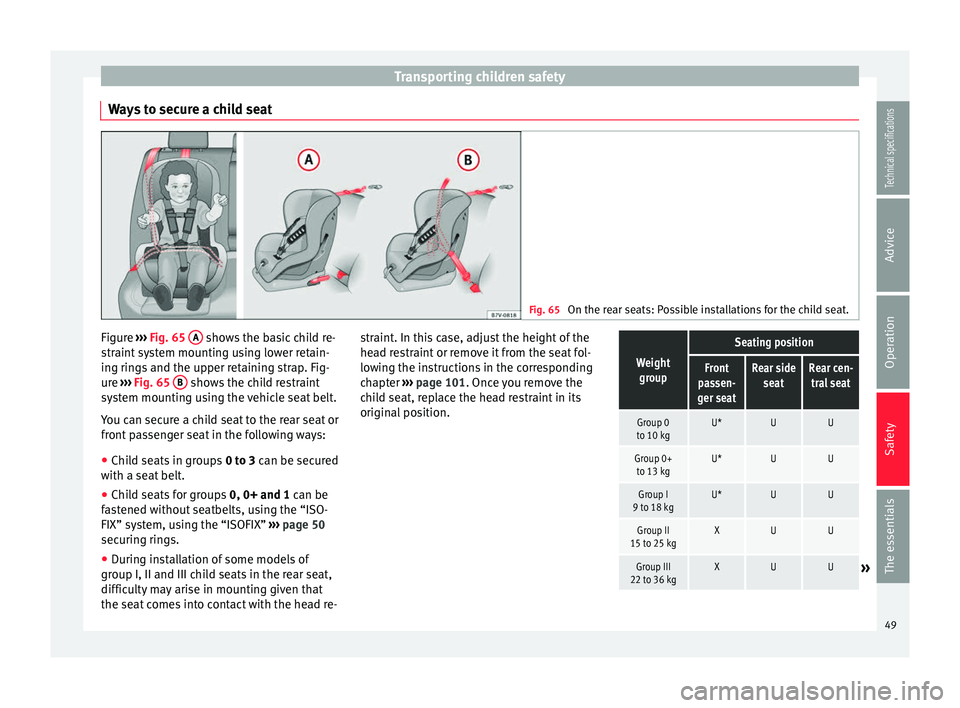
On the rear seats: Possible installations for the child seat. Figure
››› Fig. 65 A shows the basic child re-
straint system mounting using lower retain-
ing rings and the upper retaining strap. Fig-
ure ››› Fig. 65 B shows the child restraint
system mounting using the vehicle seat belt.
You can secure a child seat to the rear seat or
front passenger seat in the following ways:
● Child seats in groups 0 to 3 can be secured
w ith a se
at belt.
● Child seats for groups 0, 0+ and 1
can be
fastened without seatbelts, using the “ISO-
FIX” system, using the “ISOFIX” ››› page 50
securing rings.
● During installation of some models of
group I, II and III child seats in the rear seat,
difficulty may arise in mounting given that
the seat comes into contact with the head re- straint. In this case, adjust the height of the
head restraint or remove it from the seat fol-
lowing the instructions in the corresponding
chapter
››› page 101. Once you remove the
child seat, replace the head restraint in its
original position.
Weight group
Seating position
Front
passen-
ger seatRear side seatRear cen-tral seat
Group 0
to 10 kgU*UU
Group 0+ to 13 kgU*UU
Group I
9 to 18 kgU*UU
Group II
15 to 25 kgXUU
Group III
22 to 36 kgXUU» 49
Technical specifications
Advice
Operation
Safety
The essentials
Page 109 of 240
Transport and practical equipment
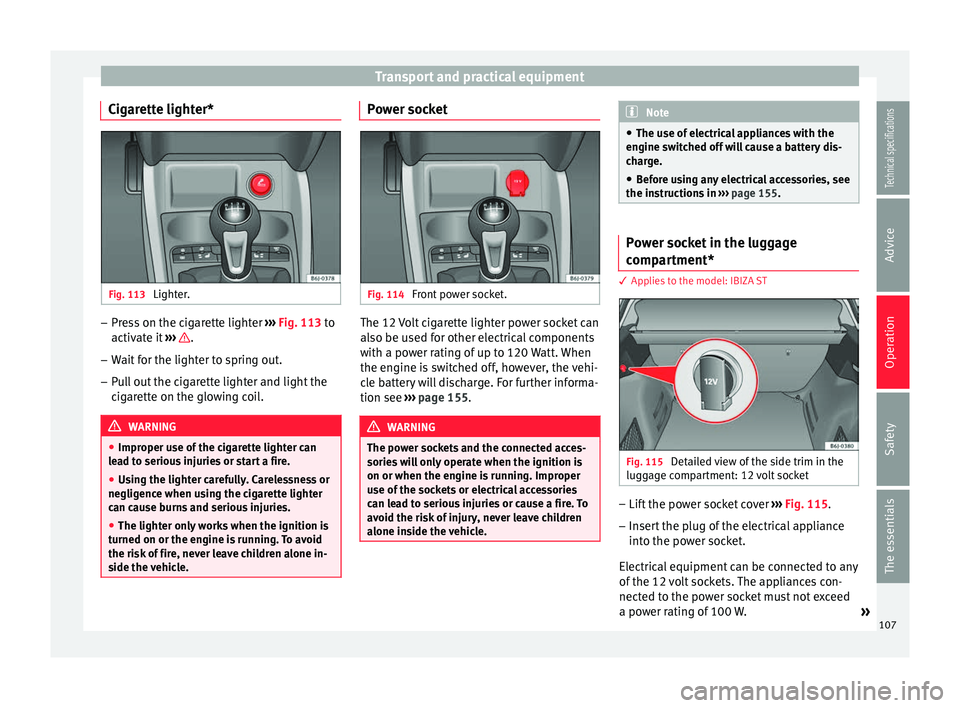
Cigarette lighter* Fig. 113
Lighter. –
Press on the cigarette lighter ››› Fig. 113 to
activ at
e it ››› .
– Wait for the lighter to spring out.
– Pull out the cigarette lighter and light the
cigarette on the glowing coil. WARNING
● Improper use of the cigarette lighter can
lead to serious injuries or start a fire.
● Using the lighter carefully. Carelessness or
negligence when using the cigarette lighter
can cause burns and serious injuries.
● The lighter only works when the ignition is
turned on or the engine is running. To avoid
the risk of fire, never leave children alone in-
side the vehicle. Power socket
Fig. 114
Front power socket. The 12 Volt cigarette lighter power socket can
also be used for other electrical components
with a power rating of up to 120 Watt. When
the engine is switched off, however, the vehi-
cle battery will discharge. For further informa-
tion see
››› page 155 . WARNING
The power sockets and the connected acces-
sories will only operate when the ignition is
on or when the engine is running. Improper
use of the sockets or electrical accessories
can lead to serious injuries or cause a fire. To
avoid the risk of injury, never leave children
alone inside the vehicle. Note
● The use of electrical appliances with the
engine switched off will cause a battery dis-
charge.
● Before using any electrical accessories, see
the instructions in ››› page 155. Power socket in the luggage
compartment*
3 Applies to the model: IBIZA ST
Fig. 115
Detailed view of the side trim in the
luggage compartment: 12 volt socket –
Lift the power socket cover ››› Fig. 115 .
– Inser
t the plug of the electrical appliance
into the power socket.
Electrical equipment can be connected to any
of the 12 volt sockets. The appliances con-
nected to the power socket must not exceed
a power rating of 100 W. »
107
Technical specifications
Advice
Operation
Safety
The essentials
Page 111 of 240
Transport and practical equipment
●
Never leave your vehicle unattended, espe-
cially when the rear lid is open. Children
could climb into the luggage compartment,
closing the door behind them; they will be
trapped and run the risk of death.
● Never allow children to play in or around
the vehicle. Close and lock all the doors and
rear lid when you leave the vehicle. Before
you lock the vehicle, make sure that there are
no adults or children in the vehicle.
● Please observe the notes on the ››› page 29. CAUTION
Hard objects on the rear shelf could chafe
against the wires of the heating element in
the heated rear window and cause damage. Note
● The tyre pressure must be adjusted accord-
ing to the load. When necessary check the
tyre pressures on the label located on the in-
side fuel tank flap ››› page 177.
● Air c ir
culation in the vehicle helps reduce
fogging of the windows. Used air escapes
through ventilation slits in the side trim of
the luggage compartment. Ensure that the
ventilation slots are never covered.
● Straps for securing the load to the fasten-
ing rings* are commercially available from ac-
cessory shops. Fastening rings*
3 Applies to the model: IBIZA ST
Fig. 118
Location of fastening rings in lug-
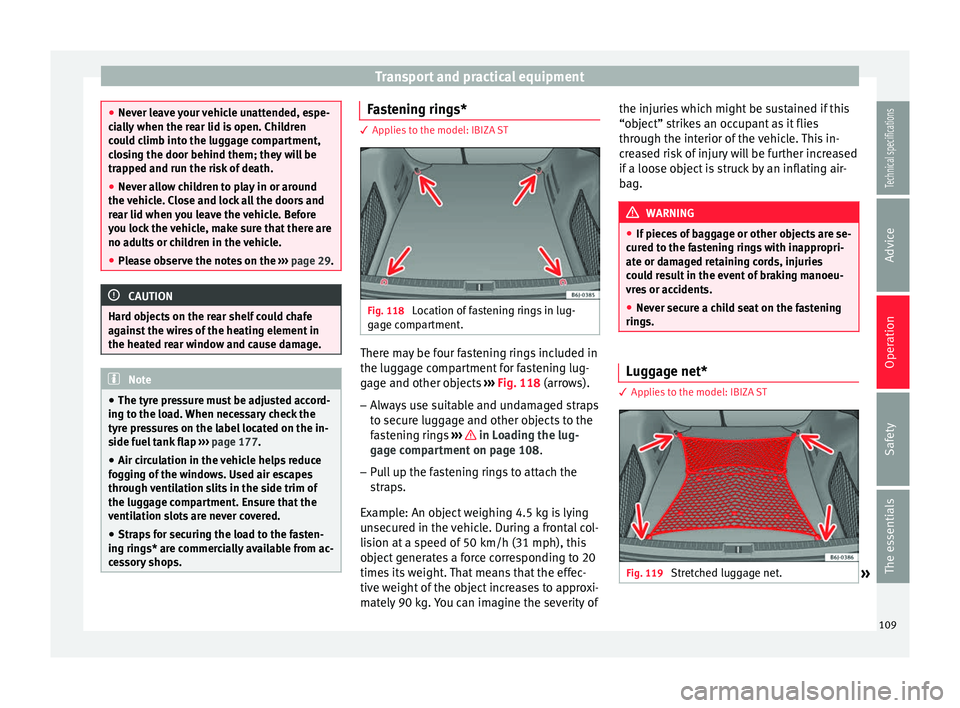
gage compartment. There may be four fastening rings included in
the luggage compartment for fastening lug-
gage and other objects
››› Fig. 118 (arrows).
– Alw
ays use suitable and undamaged straps
to secure luggage and other objects to the
fastening rings ››› in Loading the lug-
gage compartment on page 108.
– Pull up the fastening rings to attach the
straps.
Example: An object weighing 4.5 kg is lying
unsecured in the vehicle. During a frontal col-
lision at a speed of 50 km/h (31 mph), this
object generates a force corresponding to 20
times its weight. That means that the effec-
tive weight of the object increases to approxi-
mately 90 kg. You can imagine the severity of the injuries which might be sustained if this
“object” strikes an occupant as it flies
through the interior of the vehicle. This in-
creased risk of injury will be further increased
if a loose object is struck by an inflating air-
bag.
WARNING
● If pieces of baggage or other objects are se-
cured to the fastening rings with inappropri-
ate or damaged retaining cords, injuries
could result in the event of braking manoeu-
vres or accidents.
● Never secure a child seat on the fastening
rings. Luggage net*
3 Applies to the model: IBIZA ST
Fig. 119
Stretched luggage net.
» 109
Technical specifications
Advice
Operation
Safety
The essentials
Page 131 of 240
Driving
Automatic gearbox* Gearbox programmes Read the additional information carefully
››› page 20
The automatic gearbox has got two gearbox
programmes.
Selecting the normal programme
– Put the selector lever into position D.
Selecting the sport programme – Put the selector lever into position S.
If you select the normal programme, D
, you
w i
ll drive in the economy mode, i.e. the pro-
gramme is designed to reduce fuel consump-
tion. The gearbox changes up into a higher
gear as soon as possible and down into a
lower gear as late as possible.
If you select the sport programme, S, you will
drive in a s
porty mode, i.e. a programme in
which shifts into high gears are postponed in
order to use the full power of the engine. Selector lever lock
Fig. 133
Automatic gearbox Fig. 134
Automatic gearbox: instrument pan-
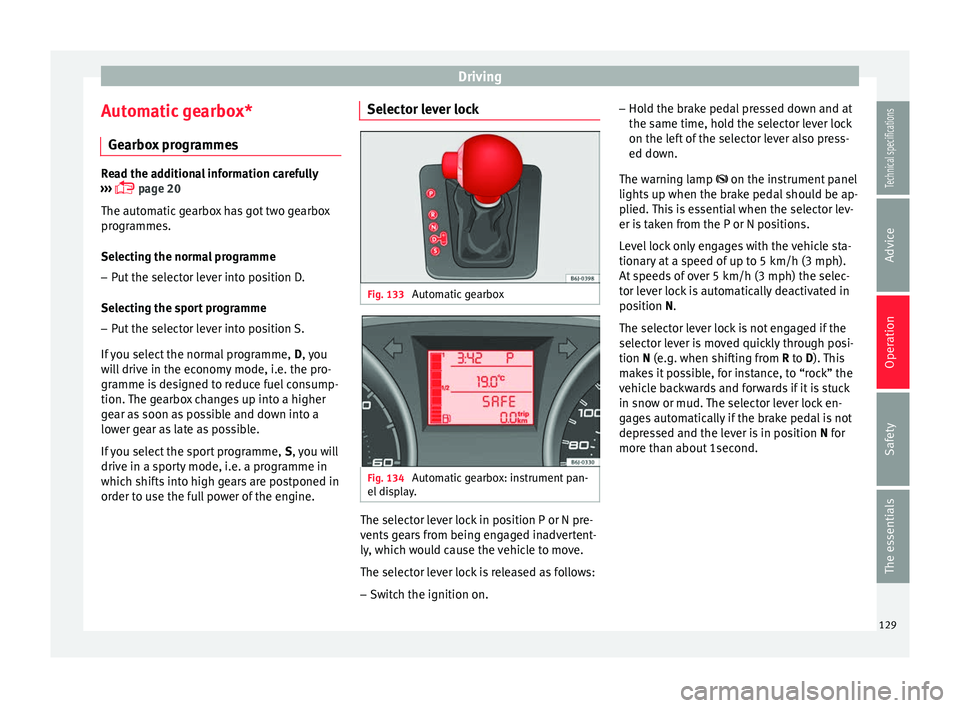
el display. The selector lever lock in position P or N pre-
vents gears from being engaged inadvertent-
ly, which would cause the vehicle to move.
The selector lever lock is released as follows:
– Switch the ignition on. –
Hold the brake pedal pressed down and at
the same time, hold the selector lever lock
on the left of the selector lever also press-
ed down.
The warning lamp
on the instrument panel
lights
up when the brake pedal should be ap-
plied. This is essential when the selector lev-
er is taken from the P or N positions.
Level lock only engages with the vehicle sta-
tionary at a speed of up to 5 km/h (3 mph).
At speeds of over 5 km/h (3 mph) the selec-
tor lever lock is automatically deactivated in
position
N.
The selector lever lock is not engaged if the
selector lever is moved quickly through posi-
tion
N (e.g. when shifting from R to D). This
makes it possible, for instance, to “rock” the
vehicle backwards and forwards if it is stuck
in snow or mud. The selector lever lock en-
gages automatically if the brake pedal is not
depressed and the lever is in position N for
more th
an about 1second.
129
Technical specifications
Advice
Operation
Safety
The essentials
Page 134 of 240
Operation
– Press the left paddle lever - towards the
steering wheel to change down ››› Fig. 137.
Using the paddle levers on the steering
wheel, you can access manual driving mode
regardless of the pre-selected driving mode.
General information about driving in
tiptronic mode
When accelerating, the automatic gearbox /
DSG automatic gearbox goes into a higher
gear a little before the engine reaches its
maximum permitted revolutions.
If a lower gear is selected, the automatic
gearbox / DSG automatic gearbox will only
change down when the engine cannot go
over its maximum permitted revolutions.
If “tiptronic” is selected whilst the vehicle is
in motion and the automatic gearbox / DSG
automatic gearbox is in third gear and selec-
tor lever position D
, “tiptronic” mode will
then al
so be in third gear.
Changing gears in the normal or sport
programme using the steering wheel paddle
levers
If the paddle levers ››› Fig. 137 are used in
the normal
or sport programme, the system
switches temporarily to “tiptronic” mode. To
exit “Tiptronic” mode again, press the right
paddle lever + towards the steering wheel
for approximately one second. You will also leave “tiptronic” mode if the paddle levers
are not moved for a certain time. Note
● The gear paddle levers on the steering
wheel can be operated with the selector lever
in any position and with the vehicle in mo-
tion. Selector lever positions
Fig. 138
Automatic gearbox: instrument pan-
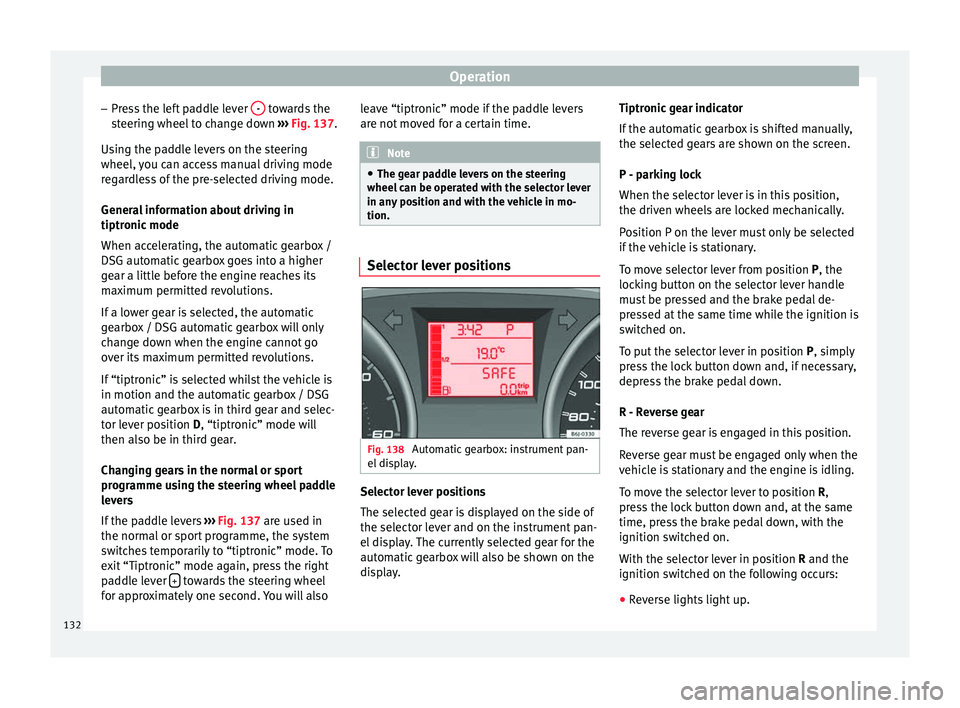
el display. Selector lever positions
The selected gear is displayed on the side of
the selector lever and on the instrument pan-
el display. The currently selected gear for the
automatic gearbox will also be shown on the
display.Tiptronic gear indicator
If the automatic gearbox is shifted manually,
the selected gears are shown on the screen.
P - parking lock
When the selector lever is in this position,
the driven wheels are locked mechanically.
Position P on the lever must only be selected
if the vehicle is stationary.
To move selector lever from position P, the
locking button on the selector lever handle
must be pressed and the brake pedal de-
pressed at the same time while the ignition is
switched on.
To put the selector lever in position
P, simply
pr e
ss the lock button down and, if necessary,
depress the brake pedal down.
R - Reverse gear
The reverse gear is engaged in this position.
Reverse gear must be engaged only when the
vehicle is stationary and the engine is idling.
To move the selector lever to position R,
press the lock button down and, at the same
time, press the brake pedal down, with the
ignition switched on.
With the selector lever in position R and the
ignition sw
itched on the following occurs:
● Reverse lights light up.
132
Page 135 of 240
Driving
● The air conditioner automatically changes
the air recirculation mode.
● The wiper starts if the windscreen washer is
on.
● The parking distance warning system*
switches on.
N - Neutral (idling)
If this position is selected, the gearbox is in
neutral. Power is not transmitted to the
wheels and the engine does not have a brak-
ing function.
Never use the N
position to drive down a long
hi
ll. There is no engine braking and the
brakes are subjected to excessive stain.
You could damage the automatic gearbox if
you drive down hills with the gearbox lever in
position
N and the engine switched off.
D - Drive (forward)
In this position the gearbox automatically
changes to a lower or higher gear, according
to the engine's requirements, the driving
style and speed. The braking effect of the en-
gine when driving downhill is very limited
when the selector is in this position. The in-
strument panel display shows the selected
gear as well as the selector lever in position
D.
When trav
elling at speeds lower than 5 km/h
(3 mph) or when the vehicle is stationary, press the brake pedal to change the selector
lever from position N to position D.
S
- Standard driving position (Sport
programme)
When the selector lever is in position S
, it will
automatically change up into a higher gear
later, and change down into a low gear, if
compared with position D. This way, it is pos-
sible to take full advantage of the engine re-
serve power, depending on the engine de-
mand, driving style and speed. The braking
effect of the engine when driving downhill is
very limited. On the instrument panel display
the selected gear is shown as well as the se-
lector lever to position
S.
To select gear range S
, press the lock button
on the selector lever. WARNING
Observe the safety warnings ››› in Driving a
car with an automatic gearbox on page 131.
● If the
vehicle moves with no control, an ac-
cident and serious injury may occur. WARNING
Never switch the engine off until the vehicle
is stationary. You could lose control of your
vehicle. This could cause an accident and se-
rious injury.
● The airbags and belt tensioners do not
work when the ignition is switched off. ●
The brake servo does not work with the en-
gine off. You need more force to stop the vehi-
cle.
● Power steering does not work when the en-
gine is not running. That is why it is much
more difficult to turn the steering wheel.
● Never remove the key from the ignition if
the vehicle is in motion. The steering lock
could suddenly engage, and you would not be
able to steer the vehicle. CAUTION
If you allow the vehicle to move when the en-
gine is switched off or with the selector lever
in position “N”, take your foot off the acceler-
ator and wait until the engine starts idling
before returning to position “D”. Kick-down feature
This feature allows maximum acceleration.
If you press the accelerator down thoroughly,
the gearbox automatically changes down, de-
pending on speed and engine speed, into a
lower gear to take full advantage of give the
vehicle maximum acceleration.
The gearbox does not change gear until the
engine reaches the maximum determined en-
gine speed for the gear.
»
133
Technical specifications
Advice
Operation
Safety
The essentials
Page 140 of 240
Operation
Do not use winter tyres all year round as they
increase fuel consumption by up to 10%.
Avoid unnecessary weight
Given that every kilo of extra weight will in-
c r
ease the fuel consumption, it is advisable
to always check the luggage compartment to
make sure that no unnecessary loads are be-
ing transported.
A roof rack is often left in place for the sake
of convenience, even when it is no longer
needed. At a speed of 100 km/h (62 mph)
and 120 km/h (75 mph) your vehicle will use
about 12% more fuel as a result of the extra
wind resistance caused by the roof rack even
when it is not in use.
Save electricity
The engine activates the alternator, which
produces electricity. With the need for elec-
tricity, fuel consumption also increases. Be-
cause of this, always turn off electrical devi-
ces when you do not need them. Examples of
devices that use a lot of electricity are: the
blower at high speeds, the rear window heat-
ing or the seat heaters*. Note
● If your vehicle has Start-Stop, it is not rec-
ommended th at
you switch this function off. ●
It is recommended that you close the win-
dows when driving at more than 60 km/h
(37 mph)
● Do not driv
e with your foot resting on the
clutch pedal
, as the pressure can make the
plate spin, more fuel will be used and it can
burn the clutch plate lining, causing a serious
fault.
● Do not hold the car on a hill with the clutch,
use the foot brake or hand brake, using the
latter to start. The fuel consumption will be
lower and you will prevent the clutch plate
from being damaged.
● On descents, use the engine brake, chang-
ing to the gear that is more suitable for the
slope. Fuel consumption will be “zero” and
the brakes will not suffer. Driving abroad
To drive abroad, the following must be taken
into consideration:
●
For vehicles fitted with a catalytic converter
ensure that unleaded petrol is available for
the journey. See the chapter “Refuelling”. Au-
tomobile organisations will have information
about service station networks selling unlea-
ded fuel.
● In some countries, it is possible that your
car model is not sold, and therefore some
spare parts are not available or the technical services may only be able to carry out limited
repairs.
SEAT importers and distributors will gladly
provide information about the technical prep-
aration that your vehicle requires and also
about necessary maintenance and repair
possibilities.
Adhesive strips for headlights
In countries where vehicles drive on the other
side of the road to your home country, the
asymmetric dipped beam may dazzle drivers
of oncoming vehicles.
To prevent dazzling, you must apply stickers
to certain parts of the headlight lenses. Fur-
ther information is available at any Technical
Service.
In vehicles with adaptive headlights, the ro-
tation system must previously be disconnec-
ted. To do this, please go to a specialised
workshop.
138
Page 154 of 240
Operation
Towing bracket device
Trailer towing What do you need to bear in mind
when towing a trailer? Your vehicle may be used to tow a trailer
when fitted with the correct equipment.
If the car is supplied with a
factory-fitted tow-
in g br
acket it will already have the necessary
technical modifications and meet the statuto-
ry requirements for towing a trailer. If you
wish to retrofit a towing bracket, consult
›
›› page 153.
Connect
ors
Your vehicle is fitted with a 12-pin connector
for the electrical connection between the
trailer and the vehicle.
If the trailer has a 7-pin plug you will need to
use an a
dapter cable. It is available at any
Technical Service.
Trailer weight/drawbar load
Never exceed the authorised trailer weight. If
you do not load the trailer up to the maxi-
mum permitted trailer weight, you can then
climb correspondingly steeper slopes.
The maximum trailer weights listed are only applicable for
altitudes up to 1000 m above sea level. With increasing altitude the engine
power and therefore the vehicle climbing
ability are impaired because of the reduced
air density. The maximum trailer weight has
to be reduced accordingly. The weight of the
vehicle and trailer combination must be re-
duced by 10% for every further 1000 m (or
part thereof). The gross combination weight
is the actual weight of the laden vehicle plus
the actual weight of the laden trailer. When
possible, operate the trailer with the maxi-
mum permitted drawbar load on the ball joint
of the t
owing bracket, but do not exceed the
specified limit.
The figures for trailer weights
and drawbar
loads that are given on the data plate of the
towing bracket are for certification purposes
only. The correct figures for your specific
model, which may be lower than these fig-
ures for the towing bracket, are given in the
vehicle documentation or in ››› chapter Tech-
nical Data .
Distributing the load
Distribute loads in the trailer so that heavy
objects are as near to the axle as possible.
Loads carried in the trailer must be secured
to prevent them moving.
Tyre pressure
Set tyre pressure to the maximum permissi-
ble pressure shown on the sticker on the in-
side of the fuel tank flap. Set the tyre pres- sure of the trailer tyres in accordance with the
trailer manufacturer's recommendations.
Exterior mirrors
Check whether you can see enough of the
road behind the trailer with the standard rear
vision mirrors. If this is not the case, you
should have additional exterior mirrors fitted.
Both exterior mirrors should be mounted on
hinged extension brackets. Adjust the mirrors
to give sufficient vision to the rear.
WARNING
Never transport people in a trailer. This could
result in fatal accidents. Note
● Towing a trailer places additional demands
on the vehicle. We recommend additional
services between the normal inspection inter-
vals if the vehicle is used frequently for tow-
ing a trailer.
● Find out whether special regulations apply
to towing a trailer in your country. Ball coupling of towing bracket*
The ball coupling is provided with instruc-
tions on fitting and removing the ball cou-
pling of the towing bracket.
152