brake fluid Seat Ibiza ST 2015 Owner's manual
[x] Cancel search | Manufacturer: SEAT, Model Year: 2015, Model line: Ibiza ST, Model: Seat Ibiza ST 2015Pages: 248, PDF Size: 4.77 MB
Page 6 of 248
Table of Contents
Driver assistance systems . . . . . . . . . . . . . . . . . 169
Braking and stability systems . . . . . . . . . . . . . . 169
Start-Stop System* . . . . . . . . . . . . . . . . . . . . . . . 173
Tiredness detection (break recommenda-
tion)* . . . . . . . . . . . . . . . . . . . . . . . . . . . . . . . . . .
175
P ark
ing aid . . . . . . . . . . . . . . . . . . . . . . . . . . . . . 176
Rear Assist “Rear View Camera”* . . . . . . . . . . . 181
Cruise speed* (cruise control - GRA) . . . . . . . . . 184
“SEAT Drive Profile” system . . . . . . . . . . . . . . . . 185
Towing bracket device and trailer . . . . . . . . . . . 187
Driving with a trailer . . . . . . . . . . . . . . . . . . . . . . 187
Retrofitting a towing bracket* . . . . . . . . . . . . . . 188
Advice . . . . . . . . . . . . . . . . . . . . . . . . . . . . . . . . 190
Care and maintenance . . . . . . . . . . . . . . . . . . . . 190
Accessories and modifications to the vehi-
cle
. . . . . . . . . . . . . . . . . . . . . . . . . . . . . . . . . . . . 190
Care and cleaning . . . . . . . . . . . . . . . . . . . . . . . 191
Care of the vehicle exterior . . . . . . . . . . . . . . . . 192
Caring for the vehicle interior . . . . . . . . . . . . . . 197
Checking and refilling levels . . . . . . . . . . . . . . . 199
Fuel . . . . . . . . . . . . . . . . . . . . . . . . . . . . . . . . . . . 199
Petrol . . . . . . . . . . . . . . . . . . . . . . . . . . . . . . . . . . 200
Diesel . . . . . . . . . . . . . . . . . . . . . . . . . . . . . . . . . 200
Working in the engine compartment . . . . . . . . 201
Engine oil . . . . . . . . . . . . . . . . . . . . . . . . . . . . . . 204
Cooling system . . . . . . . . . . . . . . . . . . . . . . . . . . 207
Brake fluid . . . . . . . . . . . . . . . . . . . . . . . . . . . . . 208
Windscreen washer reservoir . . . . . . . . . . . . . . 209
Vehicle battery . . . . . . . . . . . . . . . . . . . . . . . . . . 209
Wheels . . . . . . . . . . . . . . . . . . . . . . . . . . . . . . . . 212
Wheels and tyres . . . . . . . . . . . . . . . . . . . . . . . . 212
Winter service . . . . . . . . . . . . . . . . . . . . . . . . . . . 215
Technical data . . . . . . . . . . . . . . . . . . . . . . . . 217
Technical specifications . . . . . . . . . . . . . . . . . . 217
Important information . . . . . . . . . . . . . . . . . . . . 217
Information on fuel consumption . . . . . . . . . . . 218 Driving with a trailer . . . . . . . . . . . . . . . . . . . . . . 219
Wheels . . . . . . . . . . . . . . . . . . . . . . . . . . . . . . . . 219
Engine data . . . . . . . . . . . . . . . . . . . . . . . . . . . . . 221
Dimensions . . . . . . . . . . . . . . . . . . . . . . . . . . . . . 233
Index . . . . . . . . . . . . . . . . . . . . . . . . . . . . . . . . . 235
4
Page 37 of 248
The essentials
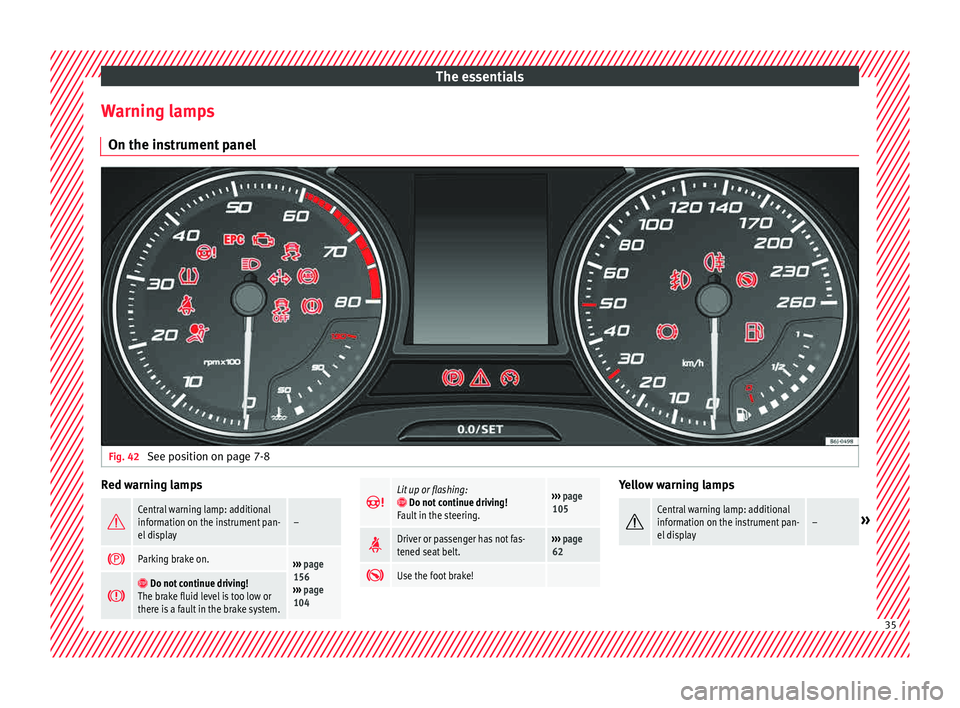
Warning lamps On the in s
trument
panelFig. 42
See position on page 7-8 Red warning lamps
Central warning lamp: additional
information on the instrument pan-
el display–
Parking brake on.›››
page
156
››› page
104
Do not continue driving!
The brake fluid level is too low or
there is a fault in the brake system.
Lit up or flashing: Do not continue driving!
Fault in the steering.››› page
105
Driver or passenger has not fas-
tened seat belt.›››
page
62
Use the foot brake! Yellow warning lamps
Central warning lamp: additional
information on the instrument pan-
el display–»
35
Page 45 of 248
The essentials
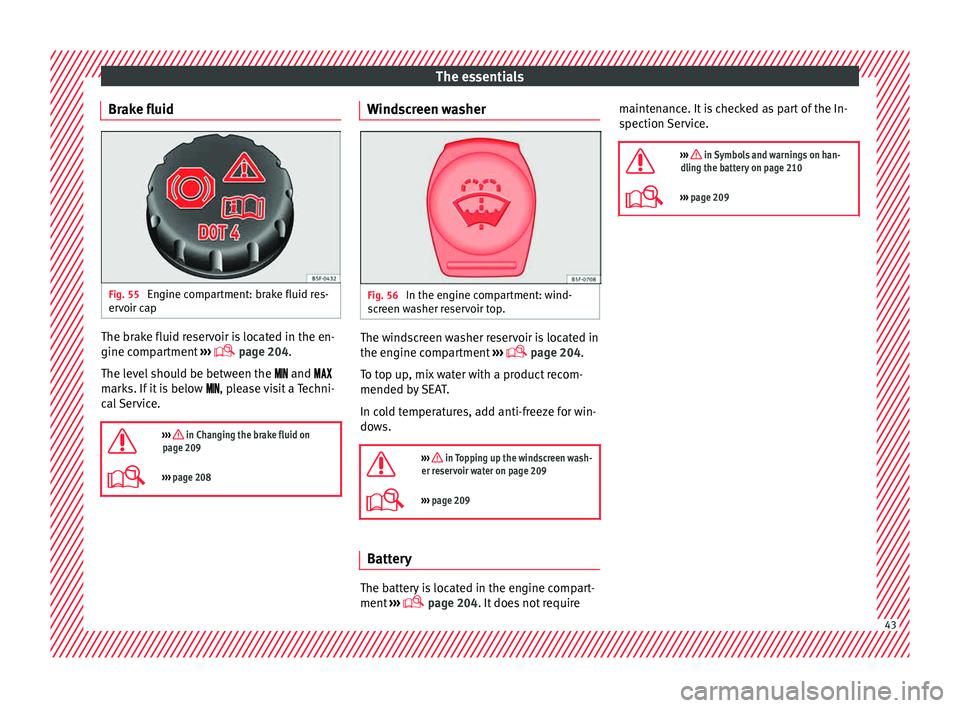
Brake fluid Fig. 55
Engine compartment: brake fluid res-
er v
oir c
ap The brake fluid reservoir is located in the en-
gine c
omp
ar
tment ›››
page 204.
The level should be between the and
marks. If it is below , please visit a Techni-
cal Service.
››› in Changing the brake fluid on
page 209
››› page 208 Windscreen washer
Fig. 56
In the engine compartment: wind-
s c
r
een washer reservoir top. The windscreen washer reservoir is located in
the en
gine c
omp
artment ›››
page 204.
To top up, mix water with a product recom-
mended by SEAT.
In cold temperatures, add anti-freeze for win-
dows.
››› in Topping up the windscreen wash-
er reservoir water on page 209
››› page 209 Battery
The battery is located in the engine compart-
ment
›
›
› page 204. It does not require maintenance. It is checked as part of the In-
spection Ser
vice.
››› in Symbols and warnings on han-
dling the battery on page 210
››› page 209 43
Page 102 of 248
Operation
●
Addition a
l lights and other accessories in
front of the air inlet reduce the cooling effect
of the coolant. At high outside temperatures
and high engine loads, there is a risk of the
engine overheating.
● The front spoiler also ensures proper distri-
bution of the c
ooling air when the vehicle is
moving. If the spoiler is damaged this can re-
duce the cooling effect, which could cause
the engine to overheat. Seek specialist assis-
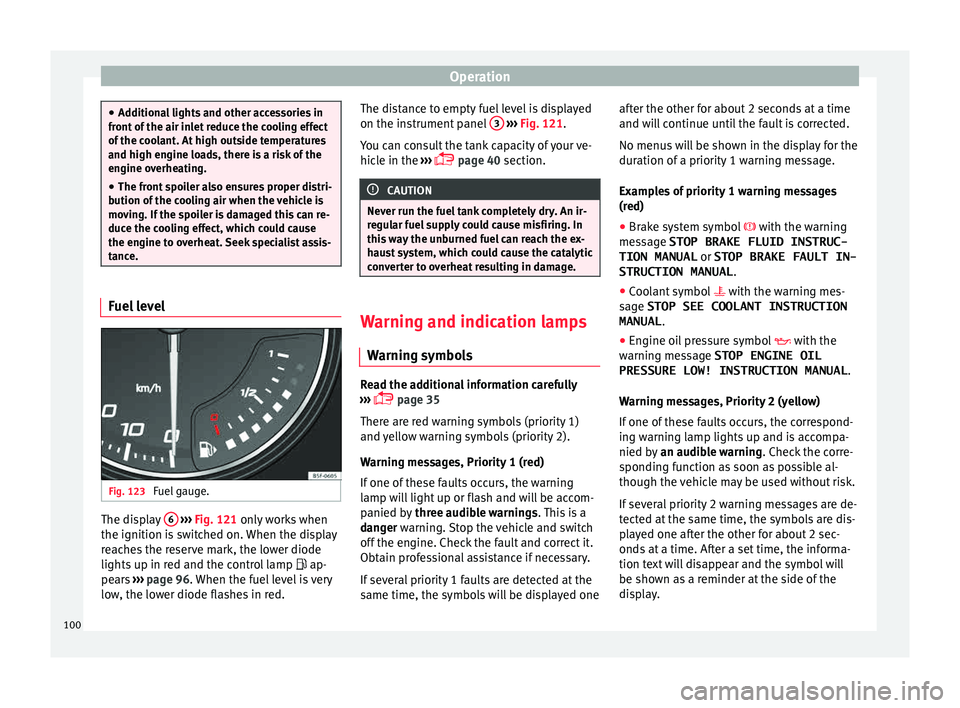
tance. Fuel level
Fig. 123
Fuel gauge. The display
6
› ›
› Fig. 121
only works when
the ignition is switched on. When the display
reaches the reserve mark, the lower diode
lights up in red and the control lamp ap-
pears ››› page 96. When the fuel level is very
low, the lower diode flashes in red. The distance to empty fuel level is displayed
on the instrument
panel 3
› ››
Fig. 121
.
Y
ou can consult the tank capacity of your ve-
hicle in the ›››
page 40 section. CAUTION
Never run the fuel tank completely dry. An ir-
re gu
lar fuel supply could cause misfiring. In
this way the unburned fuel can reach the ex-
haust system, which could cause the catalytic
converter to overheat resulting in damage. Warning and indication lamps
W arnin
g symbo
ls Read the additional information carefully
› ›
›
page 35
There are red warning symbols (priority 1)
and yellow warning symbols (priority 2).
Warning messages, Priority 1 (red)
If one of these faults occurs, the warning
lamp will light up or flash and will be accom-
panied by three audible warnings. This is a
danger warning. Stop the vehicle and switch
off the engine. Check the fault and correct it.
Obtain professional assistance if necessary.
If several priority 1 faults are detected at the
same time, the symbols will be displayed one after the other for about 2 seconds at a time
and wil
l continue until the fault is corrected.
No menus will be shown in the display for the
duration of a priority 1 warning message.
Examples of priority 1 warning messages
(red)
● Brake system symbol with the warnin
g
message STOP BRAKE FLUID INSTRUC-
TION MANUAL or STOP BRAKE FAULT IN-
STRUCTION MANUAL .
● Coolant symbol with the warnin
g mes-
sage STOP SEE COOLANT INSTRUCTION
MANUAL .
● Engine oil pressure symbol with the
warnin
g message STOP ENGINE OIL
PRESSURE LOW! INSTRUCTION MANUAL .
Warning messages, Priority 2 (yellow)
If one of these faults occurs, the correspond-
ing warning lamp lights up and is accompa-
nied by an audible warning. Check the corre-
sponding function as soon as possible al-
though the vehicle may be used without risk.
If several priority 2 warning messages are de-
tected at the same time, the symbols are dis-
played one after the other for about 2 sec-
onds at a time. After a set time, the informa-
tion text will disappear and the symbol will
be shown as a reminder at the side of the
display.
100
Page 104 of 248
Operation
WARNING
● Alw a
ys drive according to the road weather
conditions, the terrain and traffic. Driving rec-
ommendations should never lead to illegal
manoeuvres in surrounding traffic.
● The diesel engine particulate filter may
reac
h extremely high temperatures; in this
case the vehicle should be parked so that it
does not enter into contact with highly flam-
mable materials underneath the vehicle. Oth-
erwise there is a risk of fire. Engine oil pressure
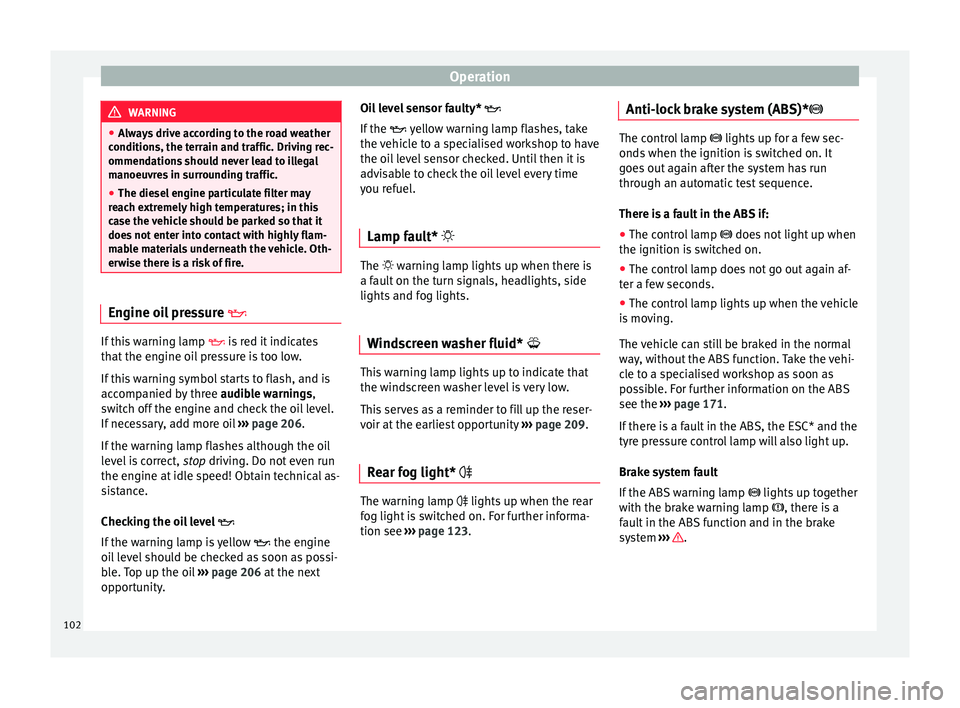
If this warning lamp
is
r
ed it indicates
that the engine oil pressure is too low.
If this warning symbol starts to flash, and is
accompanied by three audible warnings,
switch off the engine and check the oil level.
If necessary, add more oil ›››
page 206.
If the warning lamp flashes although the oil
level is correct, stop driving. Do not even run
the engine at idle speed! Obtain technical as-
sistance.
Checking the oil level
If the warning lamp is yellow the engine
oil level should be checked as soon as possi-
ble. Top up the oil ›››
page 206 at the next
opportunity. Oil level sensor faulty*
If the
y
ellow warning lamp flashes, take
the vehicle to a specialised workshop to have
the oil level sensor checked. Until then it is
advisable to check the oil level every time
you refuel.
Lamp fault* The warning lamp lights up when there is
a f
au
lt on the turn signals, headlights, side
lights and fog lights.
Windscreen washer fluid* This warning lamp lights up to indicate that
the w
ind
s
creen washer level is very low.
This serves as a reminder to fill up the reser-
voir at the earliest opportunity ›››
page 209.
Rear fog light* The warning lamp lights
up when the r
e
ar
fog light is switched on. For further informa-
tion see ›››
page 123. Anti-lock brake system (ABS)* The control lamp
lights up for a f
ew sec-
onds when the ignition is switched on. It
goes out again after the system has run
through an automatic test sequence.
There is a fault in the ABS if:
● The control lamp does not
light up when
the ignition is switched on.
● The control lamp does not go out again af-
ter a few sec
onds.
● The control lamp lights up when the vehicle
is mo
ving.
The vehicle can still be braked in the normal
way, without the ABS function. Take the vehi-
cle to a specialised workshop as soon as
possible. For further information on the ABS
see the ›››
page 171.
If there is a fault in the ABS, the ESC* and the
tyre pressure control lamp will also light up.
Brake system fault
If the ABS warning lamp lights up together
with the brake warning lamp , there is a
fault in the ABS function and in the brake
system ››› .
102
Page 105 of 248
Instruments and warning/control lamps
WARNING
● Bef or
e opening the bonnet, read and ob-
serve the warnings ››› page 201, Working in
the engine compartment.
● If the brake system warning lamp should
light
up together with the ABS warning lamp
, stop the vehicle immediately and check
the brake fluid level in the reservoir
››› page 208, Brake fluid. If the brake fluid
level has dropped below the “MIN” mark you
must not drive on. Risk of accident. Obtain
technical assistance.
● If the brake fluid level is correct, the fault in
the brake sy
stem may have been caused by a
failure of the ABS system. This could cause
the rear wheels to lock quickly when you
brake. This could cause the rear to break
away. Risk of skidding. Stop the vehicle and
seek technical assistance. Differential lock fault (EDS)*
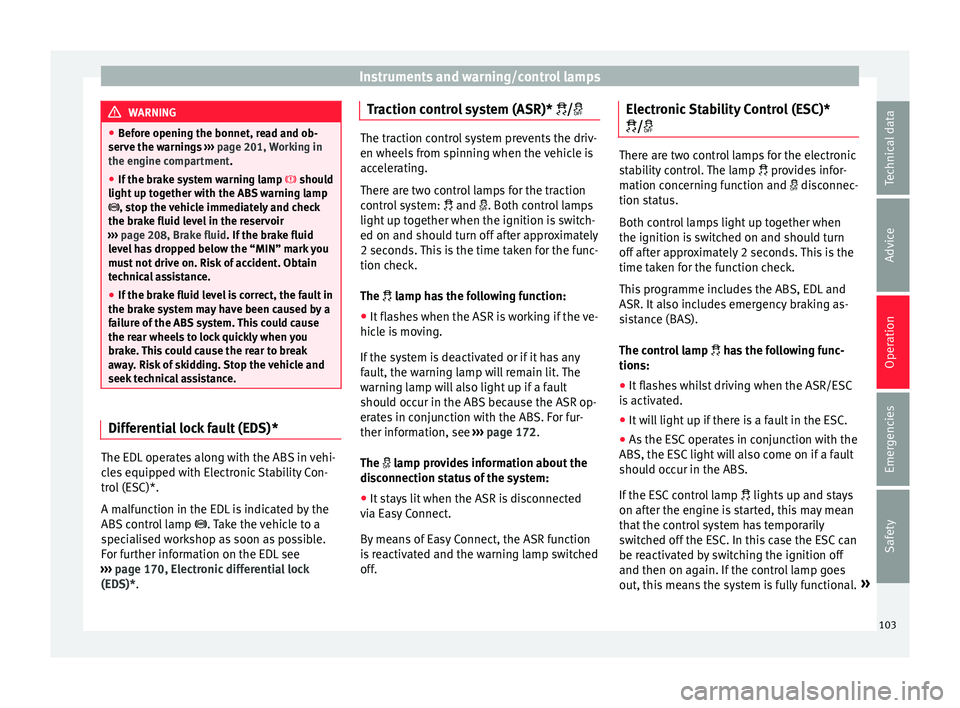
The EDL operates along with the ABS in vehi-
c
l
e
s equipped with Electronic Stability Con-
trol (ESC)*.
A malfunction in the EDL is indicated by the
ABS control lamp . Take the vehicle to a
specialised workshop as soon as possible.
For further information on the EDL see
››› page 170, Electronic differential lock
(EDS)*. Traction control system (ASR)* / The traction control system prevents the driv-
en wheels
fr
om spinning when the vehicle is
accelerating.
There are two control lamps for the traction
control system: and . Both control lamps
light up together when the ignition is switch-
ed on and should turn off after approximately
2 seconds. This is the time taken for the func-
tion check.
The lamp has the following function:
● It flashes when the ASR is working if the ve-
hicl e i
s moving.
If the system is deactivated or if it has any
fault, the warning lamp will remain lit. The
warning lamp will also light up if a fault
should occur in the ABS because the ASR op-
erates in conjunction with the ABS. For fur-
ther information, see ›››
page 172.
The lamp provides information about the
disconnection status of the system:
● It stays lit when the ASR is disconnected
via E
asy Connect.
By means of Easy Connect, the ASR function
is reactivated and the warning lamp switched
off. Electronic Stability Control (ESC)*
/ There are two control lamps for the electronic
st
ab
ility control. The lamp provides infor-
mation concerning function and disconnec-
tion status.
Both control lamps light up together when
the ignition is switched on and should turn
off after approximately 2 seconds. This is the
time taken for the function check.
This programme includes the ABS, EDL and
ASR. It also includes emergency braking as-
sistance (BAS).
The control lamp has the following func-
tions:
● It flashes whilst driving when the ASR/ESC
is activ
ated.
● It will light up if there is a fault in the ESC.
● As the ESC operates in conjunction with the
ABS, the ESC light
will also come on if a fault
should occur in the ABS.
If the ESC control lamp lights up and stays
on after the engine is started, this may mean
that the control system has temporarily
switched off the ESC. In this case the ESC can
be reactivated by switching the ignition off
and then on again. If the control lamp goes
out, this means the system is fully functional. »
103
Technical data
Advice
Operation
Emergencies
Safety
Page 106 of 248
Operation
The l amp provides information about the
di s
connection status of the system:
● It stays lit when the ASR is disconnected on
pres
sing the switch or if we select ESC
Sport mode, only by means of Easy Connect.
Brake system* Situations in which the warning lamp lights
up
●
the brake fluid level is too low
› ››
page 208.
● there is a fault in the brake system.
This w
arning lamp can light up together with
the ABS system warning lamp. WARNING
● If the br ak
e warning lamp does not go out
or if it lights up when driving, the brake fluid
level in the reservoir is too low so there is a
risk of an accident ››› page 208, Brake fluid.
Stop the vehicle and do not drive on. Obtain
technical assistance.
● If the brake warning lamp lights up to-
gether w
ith the ABS lamp this could be
due to an ABS fault. This could cause the rear
wheels to lock quickly when you brake. This
could cause the rear to break away. Risk of
skidding. Stop the vehicle and seek technical
assistance. Cruise speed (cruise control system)*
The warning lamp
comes
on when the
cruise control system is switched on. For fur-
ther information on the cruise control system
please see ›››
page 34.
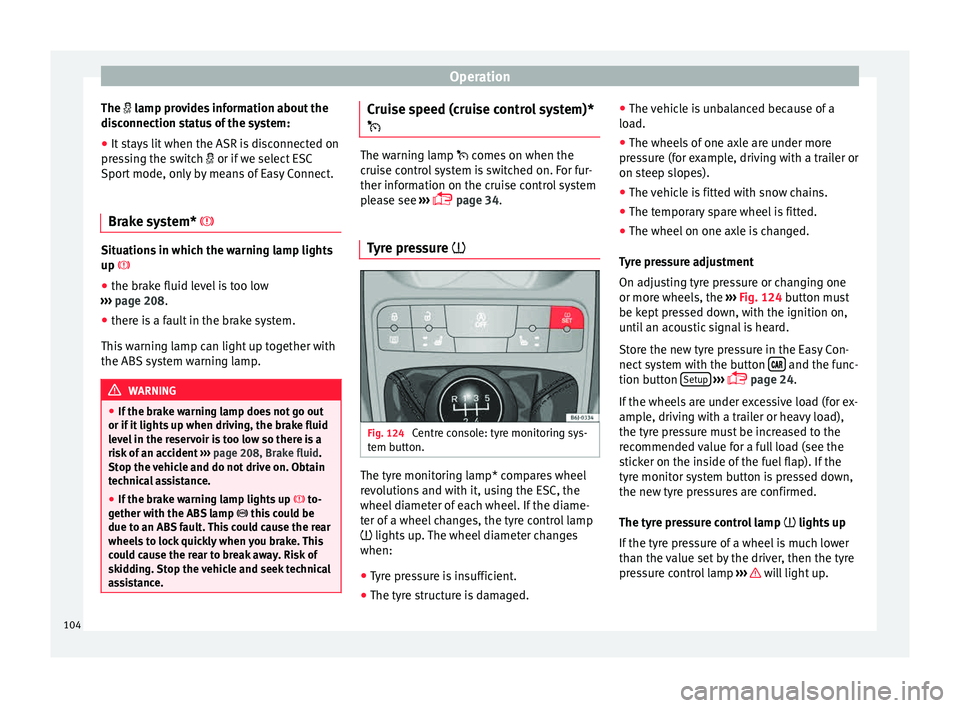
Tyre pressure Fig. 124
Centre console: tyre monitoring sys-
t em b
utt
on. The tyre monitoring lamp* compares wheel
r
ev
o
lutions and with it, using the ESC, the
wheel diameter of each wheel. If the diame-
ter of a wheel changes, the tyre control lamp
lights up. The wheel diameter changes
when:
● Tyre pressure is insufficient.
● The tyre structure is damaged. ●
The vehic
le is unbalanced because of a
load.
● The wheels of one axle are under more
pres
sure (for example, driving with a trailer or
on steep slopes).
● The vehicle is fitted with snow chains.
● The temporary spare wheel is fitted.
● The wheel on one axle is changed.
Tyr
e pressure adjustment
On adjusting tyre pressure or changing one
or more wheels, the ››› Fig. 124 button must
be kept pressed down, with the ignition on,
until an acoustic signal is heard.
Store the new tyre pressure in the Easy Con-
nect system with the button and the func-
tion b utt
on Set
up
› ›
›
page 24.
If the wheels are under excessive load (for ex-
ample, driving with a trailer or heavy load),
the tyre pressure must be increased to the
recommended value for a full load (see the
sticker on the inside of the fuel flap). If the
tyre monitor system button is pressed down,
the new tyre pressures are confirmed.
The tyre pressure control lamp lights up
If the tyre pressure of a wheel is much lower
than the value set by the driver, then the tyre
pressure control lamp ››› will light up.
104
Page 159 of 248
Driving
the brakes to overheat and the braking
dis
t
ance will increase. Apply and then release
the brakes alternately.
● Never let the vehicle run with the engine
switc
hed off. The braking distance is in-
creased considerably when the brake servo is
not active.
● If the brake fluid loses its viscosity and is
subj
ected to heavy use, vapour bubbles can
form in the brake system. This reduces the ef-
ficiency of the brakes.
● Non-standard or damaged front spoilers
coul
d restrict the airflow to the brakes and
cause them to overheat. Before purchasing
accessories please observe the relevant in-
structions ››› page 190, Modifications.
● If a brake system circuit fails, the braking
dist
ance will be increased considerably. Con-
tact a specialised workshop immediately and
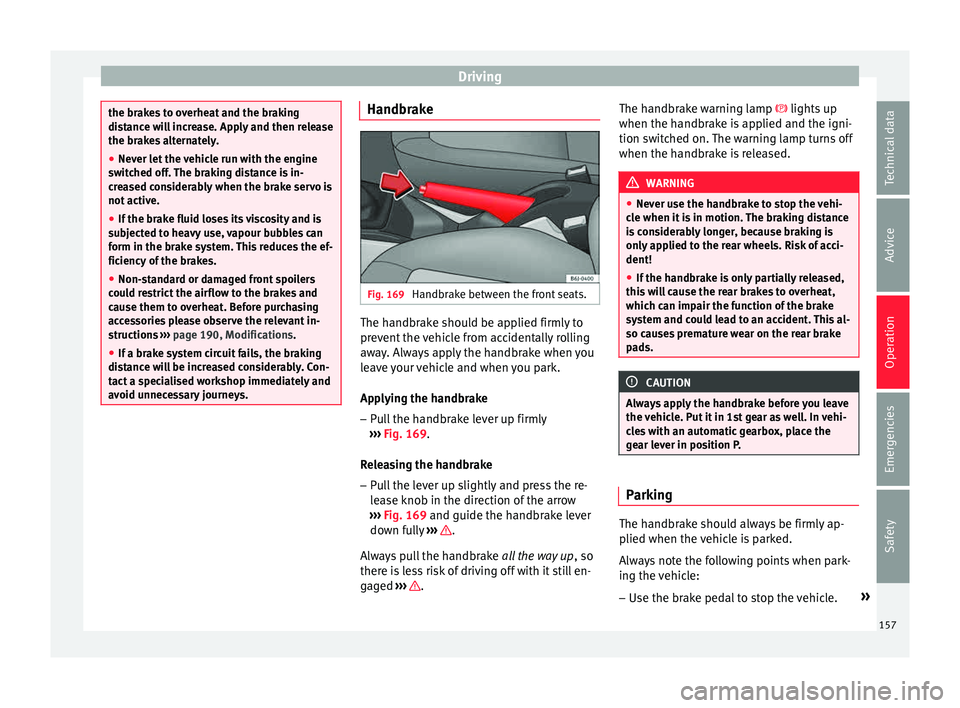
avoid unnecessary journeys. Handbrake
Fig. 169
Handbrake between the front seats. The handbrake should be applied firmly to
pr
ev
ent
the vehicle from accidentally rolling
away. Always apply the handbrake when you
leave your vehicle and when you park.
Applying the handbrake
– Pull the handbrake lever up firmly
›››
Fig. 169.
Releasing the handbrake
– Pull the lever up slightly and press the re-
lea
se knob in the direction of the arrow
››› Fig. 169 and guide the handbrake lever
down fully ››› .
A lw
a
ys pull the handbrake all the way up, so
there is less risk of driving off with it still en-
gaged ››› .The handbrake warning lamp lights
up
when the h andbr
ake is applied and the igni-
tion switched on. The warning lamp turns off
when the handbrake is released. WARNING
● Never u se the h
andbrake to stop the vehi-
cle when it is in motion. The braking distance
is considerably longer, because braking is
only applied to the rear wheels. Risk of acci-
dent!
● If the handbrake is only partially released,
this w
ill cause the rear brakes to overheat,
which can impair the function of the brake
system and could lead to an accident. This al-
so causes premature wear on the rear brake
pads. CAUTION
Always apply the handbrake before you leave
the v ehic
le. Put it in 1st gear as well. In vehi-
cles with an automatic gearbox, place the
gear lever in position P. Parking
The handbrake should always be firmly ap-
p
lied when the
v
ehicle is parked.
Always note the following points when park-
ing the vehicle: – Use the brake pedal to stop the vehicle. »
157
Technical data
Advice
Operation
Emergencies
Safety
Page 194 of 248
Advice
Products for vehicle maintenance
C ar
-c
are products are available in your Tech-
nical Services. Keep the product instructions
until you have used them up. WARNING
● Car -c
are products can be toxic. Because of
this, they must always be kept closed in their
original container. Keep them out of the reach
of children. Failure to comply could result in
poisoning.
● Always read and observe the instructions
and warning
s on the package before using
car-care products. Improper use could cause
health problems or damage the vehicle. The
use of certain products may produce noxious
vapours; they should be used in well ventila-
ted areas.
● Never use fuel, turpentine, engine oil, nail
varnish r
emover or other volatile fluids.
These are toxic and highly flammable. Risk of
fire and explosion.
● Before washing your vehicle, or carrying
out any
maintenance, switch the engine off,
apply the handbrake firmly and remove the
key from the ignition. CAUTION
Never attempt to remove dirt, mud or dust if
the sur f
ace of the vehicle is dry. Never use a
dry cloth or sponge for cleaning purposes.
This could damage the paintwork or the win-
dows of your vehicle. Soak dirt, mud or dust
with plenty of water. For the sake of the environment
● When pur c
hasing car care products, try to
select ones that are not harmful to the envi-
ronment.
● The waste from car-care products should
not be dis
posed of with ordinary household
waste. Observe the disposal information on
the package. Care of the vehicle exterior
Autom atic
car wash tunnel The vehicle paintwork is so durable that the
v
ehic
l
e can normally be washed without
problems in an automatic car wash tunnel.
However, the paintwork wear depends to a
large extent on the kind of the car wash tun-
nel, the brushes used, its water filtering and
the type of cleaning and preservative prod-
ucts.
Before going through a car wash, be sure to
take the usual precautions such as closing
the windows and sunroof. There is nothing to
note apart from that.
If the vehicle has special accessories such as
spoilers or a roof rack or two-way radio aerial,
etc., it is advisable to consult the car wash
tunnel operator first. After washing, the brake
s could take some
time to respond as the brake discs and pads
could be wet, or even frozen in winter. “Dry”
the brakes by braking several times. WARNING
Water, ice and salt on the brake system can
reduc e br
aking effectiveness. Risk of acci-
dent. CAUTION
Before putting the vehicle through the car
wa sh, do not
tighten the aerial if it is folded
because it can be damaged. Hand-washing
Vehicle washing
– First soften the dirt and rinse it off with wa-
ter
.
– C
lean your vehicle from top to bottom with
a soft s
ponge, a glove or a brush. Use very
light pressure.
– Rinse the sponge or glove often with clean
water
.
– Special car shampoo should only be used
for v
ery stubborn dirt.
– Leave the wheels, sill panels etc. until last,
usin
g a different sponge or glove.
192
Page 197 of 248
Care and maintenance
painted surfaces are not suitable to clean
w indo
w
s because they are soiled with wax
deposits which could smear the windows.
If possible, use a de-icing spray to remove
ice. If you use an ice scraper, push it in one
direction only without swinging it.
Use window cleaner or a silicone remover to
clean rubber, oil, grease and silicone depos-
its off.
Wax deposits can only be removed with a
special cleaner available at your Technical
Service. Wax deposits on the windscreen
could cause the wiper blades to judder. Add-
ing a window cleaner that dissolves wax to
the windscreen washer fluid prevents wiper
blades from juddering, but wax deposits are
not removed. CAUTION
● Never u se w
arm or hot water to remove
snow and ice from windows and mirrors. This
could cause the glass to crack!
● The heating element for the rear window is
located on the inner s
ide of the window. To
prevent damage, do not put stickers over the
heating elements on the inside of the win-
dow. Cleaning windscreen wiper blades
Clean wiper blades improve visibility. 1. Use a soft cloth to remove dust and dirt
from the w
ind
screen wiper blades.
2. Use window cleaner to clean the wind- scr
een wiper blades. Use a sponge or a
cloth to remove stubborn dirt.
Care of rubber seals If rubber seals are well looked after, they will
not fr
eez
e so quickly.
1. Use a soft cloth to remove dust and dirt from the rubber se al
s.
2. Apply a specialist care product to the rub- ber seals.
The rubber s
trips on the doors, windows, etc.
will remain pliable and last longer if they are
treated with a suitable rubber care product
from time to time (for example silicone
spray).
Caring for rubber seals will also prevent pre-
mature ageing and leaks. The doors will be
easier to open. If rubber seals are well looked
after, they will not freeze so quickly in winter.
Door lock cylinder The door lock cylinders can freeze up in win-
t
er
. T
o de-ice the lock cylinders you should only
use spr
ay with lubricating and anti-corrosive
properties.
Cleaning chrome parts 1. Clean chrome parts with a damp cloth.
2. Polish chrome parts with a soft, dry cloth.
If thi
s
does not provide satisfying results, use
a specialist chrome cleaning product.
Chrome cleaning products will remove stains
from the surface. CAUTION
To prevent scratching chrome surfaces:
● Never use an abrasive cleaning product on
chr ome.
● Do not
clean or polish chrome parts in a
sandy or du
sty environment. Steel wheel rims
–
Clean steel wheel rims regularly using a
sep ar
at
e sponge.
Use an industrial cleaner to remove brake
dust. Any damage to the paint on steel wheel
rims should be repaired before starting to
rust. »
195
Technical data
Advice
Operation
Emergencies
Safety